Reichert TONO-PEN XL User manual

User’s Guide
TONO-PEN®XL Tonometer

268E3441 Rev.F
©2012 Reichert, Inc.
The information contained in this document was accurate at time of publication.
Reichert, Inc. reserves the right to make changes in the product described in this
manual without notice and without incorporating those changes in any products
already sold.
ISO 9001/13485 Certied – Reichert products are designed and manufactured under
quality processes meeting ISO 9001/13485 requirements.
Caution: Federal law restricts this device to sale by or on the
order of a licensed physician. Rx Only.
The following are registered trademarks of
Reichert, Inc.
Reichert®
Tono-Pen XL®
Tono-Pen AVIA POWERCEL®
Ocu-Film®

3
68E3441 Rev.F
Table of Contents
Introduction 4
Warnings and Cautions 6
Setup 8
Calibration 11
Taking a Measurement 13
Interpreting the LCD 16
Maintenance & Storage 17
Specications 20
Symbols 21
Troubleshooting 22
GuidanceandManufacturer’sDeclaration 23
Accessories 26
Warranty 27

468E3441 Rev.F
Overview
The Reichert Tono-Pen XL is a precision electronic tonometer which
measures intraocular pressure (IOP). The body of the instrument is
specially designed to t comfortably in the user’s hand, facilitating fast
and accurate measurements. The stainless steel probe on the Tono-
Pen XL contains a solid state strain gauge which converts intraocular
pressure (IOP) to an electrical signal. The probe tip must be covered
by a protective membrane. Reichert Ocu-Film®Tip Covers are
recommended.
Utilizing a sophisticated “single chip” microprocessor and electronics
housed in the body of the instrument, the waveform produced by each
touch to the anesthetized corneal surface is analyzed and stored for a
statistical comparison process. Each single valid IOP reading is digitally
displayed on the liquid crystal display (LCD). When four valid readings
are obtained, the mean IOP and the standard deviation for those
readings (an indication of reliability) are shown on the LCD.
Intended Use
The Tono-Pen XL tonometer is a prescription only device intended for
measuring intraocular pressure (IOP) during routine eye examinations
or when increased intraocular pressure is suspected by properly trained
eyecare professionals such as ophthalmologists, optometrists, opticians,
and eye care technicians.
Indications for Use
The indications for use include measuring intraocular pressure
(IOP) for suspected glaucoma, or when increased intraocular
pressure is suspected.
Contraindications
None:
Components
The Tono-Pen XL unit (see Figure 1) is provided in a storage case,
complete with:
OCU-CEL™ XL Batteries (P/N 230570)
•
Stylus Blade for battery replacement (P/N 23050140)•
Instruction Manual (P/N 68E3441)•
Instructional DVD (not shown in Figure 1) (P/N 980079)•
Introduction

5
68E3441 Rev.F
Figure 1 Tono-Pen XL Components (in Storage Case)
Introduction (Continued)
Tono-Pen XL
Tonometer
Stylus Blade
OCU-CEL XL
Batteries
Instruction Manual

668E3441 Rev.F
WARNING: An instruction that draws attention to risk of injury or
death.
WARNING: Any repair or service to this instrument must be performed
by experienced personnel or dealers who are trained by Reichert so that
correct operation of this instrument is maintained.
WARNING: Modications to this instrument is not allowed. Any
modication to this unit must be authorized by Reichert so that correct
operation is maintained.
WARNING: If this instrument is modied, appropriate inspection
and testing must be conducted to ensure continued safe use of this
instrument.
WARNING: Do not use the TONO-PEN XL tonometer on a patient without
an OCU-FILM®tip cover or inaccurate readings may be obtained.
WARNING: Do not use the TONO-PEN XL tonometer on a patient without
an OCU-FILM tip cover or abrasions of the cornea may occur.
WARNING: Do not use an OCU-FILM tip cover for more than one
patient to help prevent cross contamination.
WARNING: Do not use the TONO-PEN XL tonometer if the sensor is
cracked, chipped or shows any irregularity of the surface, to prevent
patient injury, and/or inaccurate readings.
WARNING: Do not use excessive pressure during applanation or eye
injury may occur.
WARNING: The corneal surface needs only to be momentarily contacted,
indentation or additional pressure after the audio “chirp” tone is heard is
not required and may lead to damage to the eye.
WARNING: OCU-FILM tip covers contain natural latex which may cause
allergic reactions. Question patients about allergies to latex before
measuring them with the TONO-PEN XL tonometer.
CAUTION: An instruction that draws attention to the risk of damage
to the product.
CAUTION: Do not use the TONO-PEN XL tonometer without an
OCU-FILM tip cover to prevent damage to the sensor.
Warnings and Cautions

7
68E3441 Rev.F
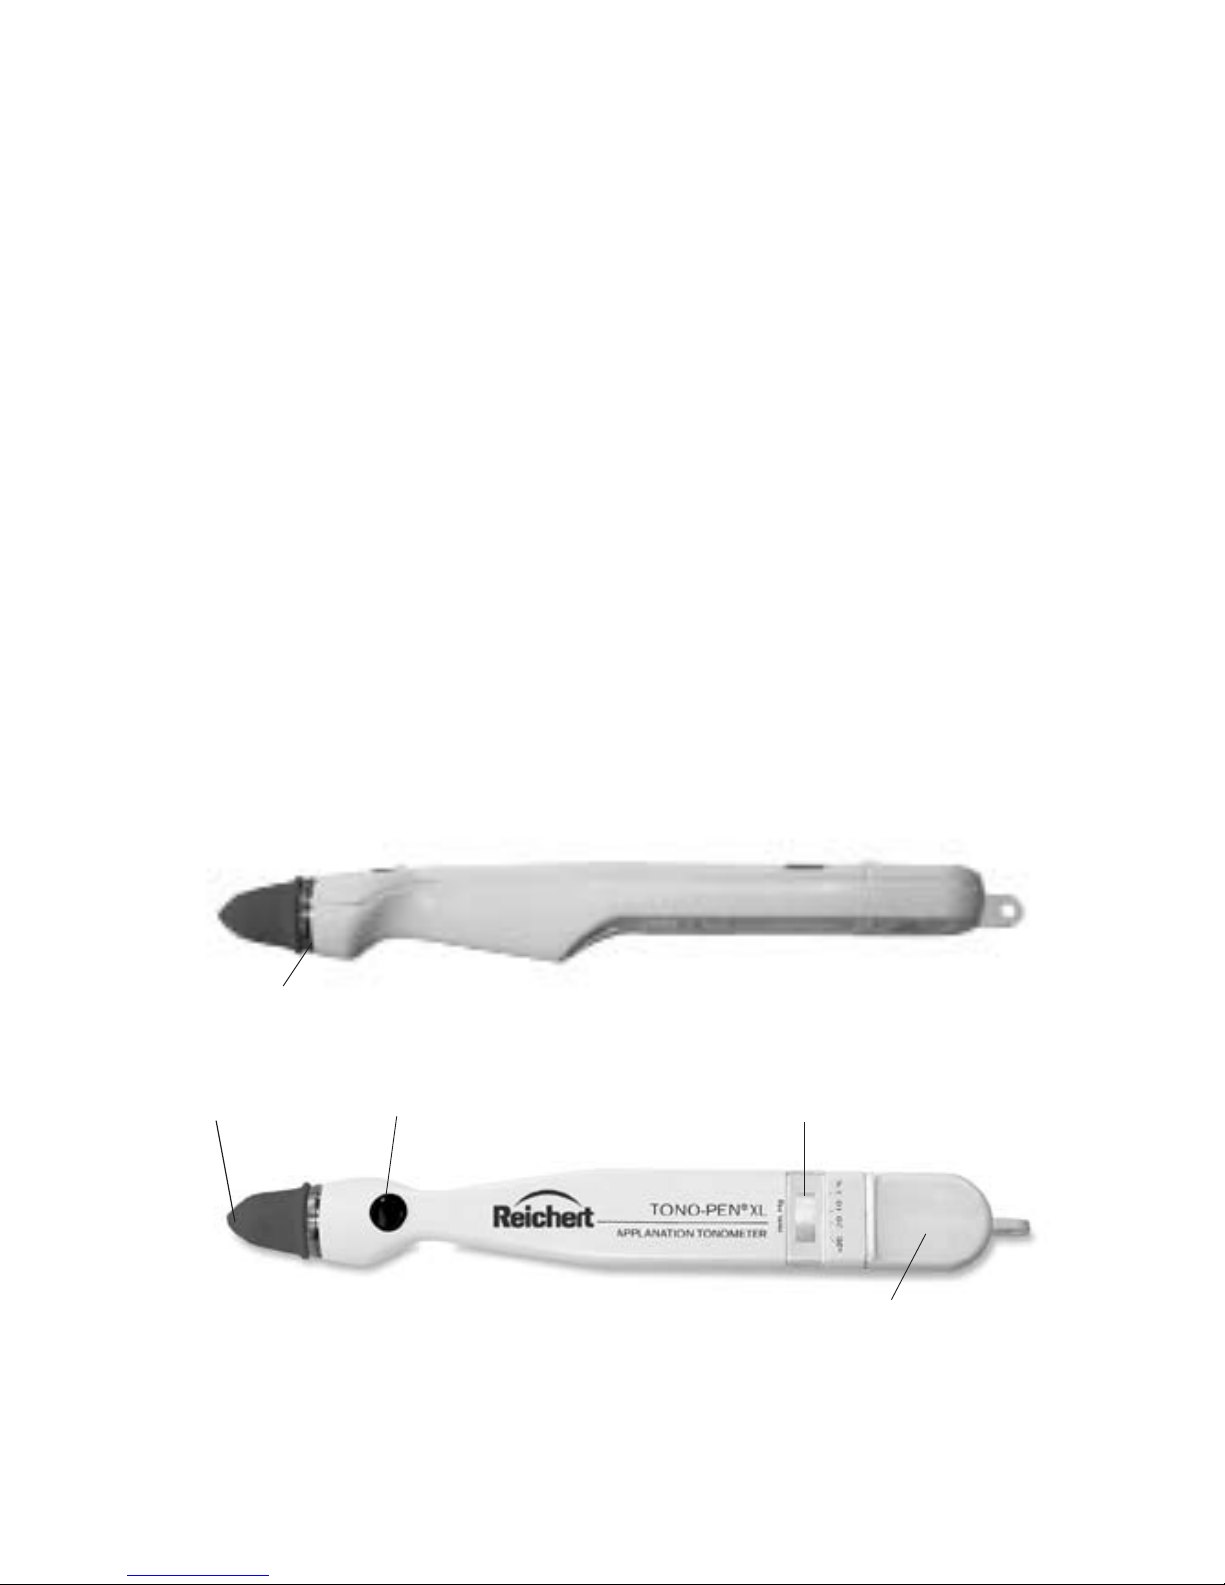
CAUTION: Do not touch the sensor without an OCU-FILM tip cover
applied or damage to the sensor and transducer assembly may result.
CAUTION: Do not bump, jar or drop the device, or damage to the
electronics may occur.
CAUTION: Do not immerse the TONO-PEN XL tonometer in uids
or damage to the electronics may occur.
CAUTION:
Do not attempt to sterilize the TONO-PEN XL tonometer
or damage to the electronics may occur.
CAUTION:
Do not attempt to modify the TONO-PEN XL tonometer or
the TONO-PEN
XL
POWERCEL battery pack or damage to the device may
occur.
CAUTION: Do not store the TONO-PEN XL tonometer without an
OCU-FILM tip cover or debris may enter the sensor and transducer
assembly and cause malfunctions.
CAUTION: The TONO-PEN XL tonometer should not be used adjacent to
or stacked with other equipment. If adjacent or stacked use is necessary,
the TONO-PEN XL tonometer
should be observed to verify normal
operation in the conguration in which it will be used.
CAUTION:
Medical Electrical Equipment needs special precautions
regarding EMC and needs to be installed and put into service according
to the EMC information provided in this guide.
Portable and Mobile RF
communications equipment can affect Medical Electrical Equipment.
CAUTION: Electromagnetic interference from other devices may affect
this instrument. If interference is present, turn off other electronic devices,
or remove them from the immediate area while operating this instrument.
TONO-PEN XL POWERCEL BATTERY PACK
WARNING: Do not carry the TONO-PEN XL POWERCEL battery pack
in a pocket, or close to your person, as a burn injury may result.
CAUTION: Do not expose to high temperatures (>70°C / >158°F).
CAUTION: Do not attempt to recharge.
CAUTION: Do not disassemble.
Warnings and Cautions (Continued)

868E3441 Rev.F
Set Up Instructions
To set up the Tono-Pen XL for operation, follow the instructions listed
below:
Remove all protective packaging materials.1.
Carefully remove the tonometer and accessories from the case.2.
Check for missing items.3.
Visually check the instrument and accessories for damage.4.
Remove the Ocu-Film Tip Cover shipped with the Tono-Pen.5.
Notify Reichert Customer Service immediately if any components6.
are missing or damaged.
Install the batteries in the battery compartment (see page 9).7.
Perform the Calibration Procedure (see page 11).8.
Slide a new Ocu-Film Tip Cover over the Tono-Pen XL unit’s 9.
stainless steel probe tip until the Ocu-Film ridge is seated in the
groove (see Figure 2). The Ocu-Film Tip Cover should t over the
probe tip (see Figure 3), without being too tight. Proper t makes
contact with the probe tip, but still has pleats along the side of the
transducer head assembly.
Setup
Groove
Probe Tip Operator’s Button LCD
Battery Compartment
Figure 2 Tono-Pen XL Top and Side Views

9
68E3441 Rev.F
Battery Installation
The Tono-Pen XL is supplied with four OCU-CEL XL 3.0 volt lithium
manganese dioxide batteries that need to be installed in the Tono-Pen
XL. It is recommended that Reichert OCU-CEL XL Batteries be used
when the batteries need replacement.
Note: The Tono-Pen XL unit will not function properly with mercury
batteries.
Battery Installation
Locate the battery compartment (see Figure 4). Open the battery1.
compartment by gently inserting the stylus blade (see Figure 4) in
the end slot. After insertion, slowly push the stylus forward and pry
the cover up to remove.
Using the other end of the stylus, insert the tip into the holes on the2.
underside of the body mold. Insert the tip perpendicular into the
battery removal holes on the bottom of the base housing to push
the batteries out (see Figure 4).
Insert two batteries as shown in Figure 4 (also diagrammed on the3.
oor of the battery compartment).
Replace the battery cover.4.
CAUTION: CheCk TO be sUre ThAT The bATTerIes Are
INsTAlled COrreCTly. INCOrreCT INsTAllATION COUld
CAUse severe dAmAge TO The eleCTrONICs ANd vOId The
WArrANTy.
Setup (Continued)
Figure 3 Ocu-Film Tip Cover Placement
OCU-FILM Tip Cover -
CORRECT
OCU-FILM Tip Cover -
Too Loose
OCU-FILM Tip Cover -
Too Tight

10 68E3441 Rev.F
Setup (Continued)
Figure 4 Replacing Batteries
+
+-
-

11
68E3441 Rev.F
Calibration Procedure
The TONO PEN XL unit is internally calibrated, thus the instrument
calibration should be checked only before the rst use each day or in
the event of unanticipated readings. Calibration must be routinely and
successfully performed once daily prior to instrument use. Calibration
should also be performed whenever it is indicated by the LCD display,
when batteries are replaced, or after an unsuccessful calibration. It is
not necessary to check calibration prior to each use.
Point the transducer end of the Tono-Pen straight down towards1.
the oor (see Figure 5a).
Depress the Operator’s Button two times rapidly. The time be-2.
tween the rst and second button press must be between 0.5 and
1.5 seconds. The Tono-Pen will “beep” and display [CAL].
Wait approximately 15 seconds for the Tono-Pen to “beep”. The3.
display will change from [CAL] to [UP].
Immediately (within 1 second) invert the Tono-Pen smoothly, point-4.
ing the transducer end straight up (see Figure 5b).
A properly functioning Tono-Pen will display [Good] followed by a5.
“beep”.
Repeat this Calibration Procedure if [bAd] is displayed.6.
After Good is displayed, depress the Operator’s Button one time 7.
and the Tono-Pen will display [8.8.8.8], followed by a single row
of dashes, [- - - -], and then by a double row of dashes [====]
followed by a “beep” tone, indicating the instrument is ready to
measure IOP (Depressing the activation button a second time will
interrupt this process and send the unit to calibration mode).
Calibration
Figure 5a Figure 5b

12 68E3441 Rev.F
Calibration (Continued)
Unsuccessful Calibration
If several consecutive attempts at checking the calibration are
unsuccessful:
Loosen or remove the Ocu-Film Tip Cover from the Tono-Pen XL•
probe tip and repeat the calibration check.
If still unsuccessful:
Spray the probe tip with compressed gas, and repeat the•
calibration check.
If still unsuccessful:
Replace the batteries and repeat the calibration check.•
Note: If [CAL] appears followed by a row of four dashes [- - - -], the
unit did not go into calibration mode. To correct this, depress the
buttonquickertwotimesorslowertwotimes(seestep2ofcalibration
procedure).
Note: Do not take measurements with the instrument if two consecutive
[good] calibration checks cannot be obtained. The instrument will not
take a measurement when the prior calibration check was [bAd].
Note: If the Tono-Pen XL fails to yield a [Good] calibration, call Reichert
Technical Service.

13
68E3441 Rev.F
Instrument Preparation
Prior to using the Tono-Pen XL for IOP measurement prepare the
instrument according to the instructions below:
Allow the instrument to thermally stabilize at room temperature1.
(72-82° F, 22 - 28° C) for approximately 30 minutes prior to use.
Remove the Ocu-Film Tip Cover from the probe. Visually inspect2.
the tonometer’s probe tip for cracks, chips or other irregularities.
If irregularities are present, contact Reichert. Do not use the
instrument.
If the probe tip passes a visual inspection, proceed.3.
To help prevent build-up of debris around the probe tip, spray the4.
probe tip with compressed gas before the rst use of the day.
Cover the Tono-Pen XL probe tip with a new Ocu-Film Tip Cover.5.
Reichert Ocu-Film Tip Covers are:
• Individually wrapped and non-sterile sanitized
• For Single Use only
Perform daily routine calibration (See page 11).6.
Note: Calibration should only be performed on the Tono-Pen once daily,
unless otherwise indicated by the instrument. The Tono-Pen does not
require calibration after every patient examination.
CAUTION: dO NOT Use The INsTrUmeNT WIThOUT AN OCU-FIlm
TIp COver. Use WIThOUT AN OCU-FIlm TIp COver WIll dAmAge
The INsTrUmeNT ANd vOId The WArrANTy.
Performing IOP Measurements
After the Tono-Pen XL has been prepared for operation, the patient
must be prepared and then IOP measurements can be performed.
CAUTION: OCU-FIlm CONTAINs NATUrAl rUbber lATeX WhICh
mAy CAUse AllergIC reACTIONs. QUesTION pATIeNTs AbOUT
AllergIes TO lATeX beFOre eXAmININg Them WITh The TONO-
peN Xl.
To prepare a patient for an IOP measurement:
Instill a drop of topical anesthetic onto the eye to be examined.1.
Position the patient, seated or supine, in front of a xation target; 2.
or have the patient xate on a point of reference (i.e. ear, nose,
distant object) to minimize eye movement.
Note: The Tono-Pen XL unit will function in any stable position.
Taking a Measurement

14 68E3441 Rev.F
To perform an IOP measurement:
Instruct the patient to look straight ahead at the xation target with 1.
his/her eyes fully open.
Hold the Tono-Pen XL unit as you would a pencil.2.
Position yourself to facilitate viewing of the probe tip and patient’s 3.
cornea where contact will be made. For normal corneas, central
corneal contact is recommended.
Brace the heel of your hand on the patient’s cheek for stability 4.
while holding the Tono-Pen XL unit perpendicular to and within 1/2
inch of the patient’s cornea. (See Figure 6 for correct positioning.)
To initiate an IOP measurement, depress the Operator’s Button 5.
once, and only once.
Initially you will see a brief display of [8.8.8.8]. This is a self-test of6.
the LCD (Liquid Crystal Display). If any of the LCD segments are
not displayed, the Tono-Pen requires service.
If a momentary display of [CAL] is seen, followed immediately by a7.
single row of dashes [- - - -], it indicates that the Tono-Pen requires
calibration before it will measure.
If a double row of dashes [====] is seen and a “beep” tone is8.
heard, it indicates that the Tono-Pen is ready to measure IOP.
Proceed with applanation within 15 seconds.
Note: After acquiring the double row of dashes [====], if more
than 15 seconds elapses prior to applanation, the Tono-Pen will
not measure. The software will have initiated a battery-saving
function, indicated initially by the display of a single row of
dashes [- - - -], then followed in sequence by a blank display
[ ]. A new IOP measurement can be initiated by depressing the
operator’s button once.
CORRECT INCORRECT
Figure 6 Corneal Applanation
Taking a Measurement (Continued)

15
68E3441 Rev.F
Note: Anytime the operator’s button is depressed twice within
1.5 seconds, (which may be caused by operator’s inadvertent
pressure on the button) the software will interpret this as a
demand for calibration. Then a sustained display of [CAL] will
be seen which initiates the calibration sequence. The calibration
sequence must be successfully completed before further
measurements can be accomplished.
Once activated, after [====] is displayed and a “beep” tone is9.
heard, touch the Tono-Pen XL unit to the cornea lightly and briey,
then withdraw. Repeat several times. The corneal surface needs
only to be momentarily contacted; indentation is not required and
may lead to inaccurate readings.
A chirp will sound and a digital IOP measurement will be displayed10.
each time a valid reading is obtained. The single horizontal bar at
the bottom of the LCD, indicating statistical reliability, will not be
displayed with each single IOP measurement.
After four (4) valid readings are obtained, a nal beep will sound 11.
and the averaged measurement will appear on the LCD along with
the single bar denoting statistical reliability.
Note: If a single row of dashes [- - - -] appears on the LCD after the
nalbeep,aninsufcientnumberofvalidreadingswascollected.
If this occurs, repeat the patient examination procedure, starting
at step 1.
To take another measurement, reactivate the Tono-Pen XL unit by12.
pressing and releasing the activation switch as described in step 5.
Note:Ifnotreactivatedwithin25seconds,theTono-PenXLunit
will automatically turn off and the LCD will clear, placing the
device in sleep mode, to conserve battery life. If this occurs,
activate the TONO PEN XL by pressing the Operator’s Button
once.
Replace the Ocu-Film Tip Cover before using the Tono-Pen XL13.
unit on another patient and before storage.
Note: Failure to replace the Ocu-Film Tip Cover between patients
may result in unreliable readings of IOP by allowing debris to
enter the transducer assembly.
Note: A reused Ocu-Film Tip Cover may leak. This may cause
damage to the strain gauge and void the Warranty.
Taking a Measurement (Continued)

16 68E3441 Rev.F
The number display represents IOP in millimeters of mercury (mmHg.) A
number with a single horizontal bar displayed at the bottom of the LCD is
an average of the valid measurements. A number without the single bar
is a single measurement of IOP. (See Figure 7).
The display of one of four horizontal bars
located along the lower border of the LCD
block indicates the statistical reliability of the
averaged measurement. For example, if the
5% bar is displayed, the standard deviation
of the valid measurements is 5% or less of
the number shown.
If the reliability measure is 20% or > 20%, a
repeat measurement is recommended.
A single row of dashes [- - - -] indicates that
the instrument is activated.
Two rows of dashes [====] followed by a
“beep” indicates that the instrument is ready
to take measurements.
“CAL” indicates that the instrument
•
is in the process of calibration check
or the instrument needs to undergo
calibration check procedure. If “CAL”
is displayed following a long beep
and “- - - -”, the latter is the case. A
“Good” calibration check must be
obtained.
“Lob” indicates the need to replace both batteries prior to using the
•
instrument.
“UP” indicates that the instrument is being calibrated and the
•
probe tip should be turned from pointing down to pointing up.
“Good” indicates the calibration check procedure was successful.
•
After two “Good” calibration checks, the Tono-Pen XL unit is ready
for use in patient examinations.
“bAd” indicates the calibration check procedure was unsuccessful
•
and must be repeated.
Interpreting the LCD
Figure 7 LCD
(Single Measurement)

17
68E3441 Rev.F
Instrument Storage
Cover the probe tip with an Ocu-Film Tip Cover for protection.1.
If the Tono-Pen XL unit is not to be used until a subsequent day,2.
the instrument and accessories should be replaced in the storage
case provided.
If the Tono-Pen XL unit is not to be used for an extended period of3.
time, remove the batteries from the instrument.
Tono-Pen XL Body
Avoid any shock or excessive vibration which will damage the unit.
Clean with a non-abrasive, dry cloth.
CAUTION: dO NOT Immerse TONO-peN Xl bOdy IN FlUIds. ThIs WIll
CAUse dAmAge TO The eleCTrONICs ANd vOId The WArrANTy
.
Battery Replacement
The batteries need replacing when multiple beeps sound and “Lob”
appears on the LCD upon depressing the activation switch. Occasion-
ally, a noticeable slowing in the calibration check process or in activating
the instrument for taking measurements may suggest that the batteries
need replacing. Always replace both batteries. Do not mix used and new
batteries in the instrument. Reichert OCU-CEL XL batteries are recom-
mended.
Note: The instrument will not function properly when mercury batteries
are used.
Replace the batteries using the procedure described on page 9. If the
instrument is not to be operated for an extended period of time, remove
both batteries. This will avoid possible damage to the instrument due to
battery leakage.
Attachment Screw
The attachment screw, located on the underside of the instrument, is
used to protect the sensitive electronics against intrusion and should be
removed only by the manufacturer.
Note: Removal of the Attachment Screw will void the warranty.
Maintenance Procedures
Maintenance that should be performed on the Tono-Pen XL consists of
activities such as protecting the probe tip, keeping surfaces free of dust
and dirt and storing in a dry and cool place so as not to adversely affect
electronic parts, and replacing the batteries. Keep the probe tip protected
with an Ocu-Film Tip Cover when in use or in storage. Avoid any contact
with the probe tip when not protected by an Ocu-Film Tip Cover.
Maintenance & Storage

18 68E3441 Rev.F
Maintenance & Storage (Continued)
Cleaning Instructions
The Tono-Pen XL tonometer
may have difculty taking
measurements or display “bad”
after a calibration when its tip
is dirty and requires cleaning.
When the tip of the tonometer
has dirt and contaminants in the
airspace between the sensor and
the housing, cleaning of the tip
is necessary. When the airspace
contains contaminants, the
sensor cannot move freely
and the tonometer may have
erratic readings and then show
a “bad” calibration.
To clean the tonometer, perform the following steps:
Remove Ocu-Film tip cover from the tonometer, if one is installed.1.
Using canned air, place the sensor end of the tonometer against2.
the outlet of the canned air as shown in Figure 8.
Blow the canned air into the tip of the tonometer for approximately3.
3 seconds.
Note: It is necessary to blow canned air directly into the tip, so that the
contaminants are pushed out of the airspace between the sensor and
the housing.
After cleaning the tip of the tonometer with compressed air, the4.
tip will be cold. Allow the tip of the tonometer to warm to room
temperature.
Perform the tonometer calibration as indicated in the Instruction5.
Manual.
Note: If the tonometer does not calibrate “good”, then repeat the above
cleaning instructions. Do not clean more than 3 times in a row. If the
tonometer still will not calibrate, contact Reichert.
Note: Always store the Tono-Pen XL tonometer with an Ocu-Film tip
cover installed to protect the tonometer tip from dirt and contaminants.
Note: Never use the Tono-Pen XL tonometer without an Ocu-Film tip
cover installed.
Figure 8
Cleaning Procedure

19
68E3441 Rev.F
Number of Patients per Week Number of Days Between Cleaning
10 30
100 15
300 7
600 1
Suggested Cleaning Schedule
Maintenance & Storage (Continued)
Battery
Replace the Tono-Pen XL batteries when:
The Tono-Pen XL fails calibration and cleaning did not correct•
a “bad” calibration.
Battery Replacement P/N 230570•
There are no beeps, the LCD remains blank after pressing the activation
button, or a noticeable slowing occurs when activating the device.
Storage
Cover the tip with an Ocu-Film tip cover for protection.•
If the Tono-Pen XL tonometer is not to be used until a•
subsequent day, the instrument and accessories should be
placed in the storage case provided.
If the instrument is to be stored for an extended period, remove•
the Tono-Pen XL batteries to avoid possible damage to the
instrument due to battery leakage.
Disposal
At the end of their service life, dispose of the Tono-Pen XL, Ocu-Film,
and batteries according to your local laws and ordinances regarding the
proper disposal of any of the above items.

20 68E3441 Rev.F
Specications
PHYSICAL DIMENSIONS
Size: 7 1/4” x 1” x 7/8”
(18.42 x 2.54 x 2.22 cm)
Weight: 2.1 oz. (59.4 g)
ENVIRONMENTAL
REQUIREMENTS
Operational Environment
Ambient Temperature range: 15° to
35°C (59° to 95°F)
Relative Humidity range: 30 to 75%
RH
Atmospheric Pressure range: 80 kPa
to 106 kPa (23.6 to 31.3 in.Hg)
Transport and Storage Environment
Ambient Temperature range: -10° to
60°C (14° to 140°F)
Relative Humidity range: 50 to 95%
RH (non-condensing)
Atmospheric Pressure range: 50 kPa
to 106 kPa (14.8 to 31.3 in.Hg)
RANGE OF IOP
MEASUREMENTS
5 - 80 mmHg
ELECTRICAL
Power Source
2 x 3V Lithium Manganese Dioxide
batteries
OCU-FILM TIP COVER Contains natural rubber latex.
SOFTWARE REVISION The software revision can be obtained
by contacting Reichert, Inc. The serial
number identies the manufacture date
and will provide access to the software
version
15°C
35°C
30%
75%
106 kPa
80 kPa
Other manuals for TONO-PEN XL
2
Table of contents
Other Reichert Pet Care Product manuals