Renaware Aqua Nano UCU LX-200 CAL Owner's manual

Water Filter
UCU LX-200 CAL
USE & CARE
USO Y MANTENIMIENTO

Congratulations on your purchase
of the Aqua ✓ Nano! I know you will
enjoy using it to provide economical,
fresh tasting water for yourself and
your family.
Our goal at Rena Ware is always
to oer the best quality products
backed by excellent customer
service. That is why we are sure you
can count on the quality of your
Aqua ✓ Nano water lter now and in
the future.
You can also count on Rena Ware
to be there for you if you have any
questions about installing or using
your Aqua ✓ Nano and for any of
your future service needs. Please feel
free to contact us if you have any
questions about your Aqua ✓ Nano
water lter or about any of our other
ne Rena Ware products.
Russ Zylstra
Chairman of the Board
Benjamin Zylstra
Chief Executive Officer
¡Felicitaciones por su compra del
Aqua ✓ Nano! Estoy seguro de que lo
disfrutará para obtener agua fresca de
agradable sabor a bajo costo para usted
y su familia.
Nuestra meta en Rena Ware es ofrecer
productos de la más alta calidad
respaldados por un excelente servicio al
cliente. Por eso estamos seguros de que
puede contar con la calidad de su ltro
de agua Aqua ✓ Nano en el presente y
en el futuro.
También puede tener la seguridad
de que Rena Ware lo ayudará con las
preguntas que usted pueda tener sobre
la instalación o el uso de su Aqua ✓
Nano y con los servicios que pueda
requerir en el futuro. No dude en
comunicarse con nosotros en caso de
tener alguna pregunta sobre su ltro de
agua Aqua ✓ Nano o cualquiera de los
otros excelentes productos Rena Ware.
Benjamin Zylstra
Chief Executive Officer/Jefe Ejecutivo
Contents
3-24
Contenido
25-47
CONTENTS
ENGLISH ESPAÑOL
Introduction 4
Features 5
Safety Precautions 5
Packing/Product Diagrams 6
Installation 8
Accessories 16
Operation 16
Care/Maintenance 16
Replacement Indicator Lights 17
Back-Flushing the Pre-Filter Cartridge 18
Replacing the NanoCeram® Cartridge 21
Troubleshooting 22
Replacement Parts 23
Specications 23
Warranty Information 24
Visit Our YouTube Channel
3
EN

Introduction
You now own one of the most advanced home water ltration systems available
anywhere.
The AquaNano utilizes electropositive technology as part of a multi-stage, high ow
ltering system with limited pressure drop.
The AquaNano is equipped with an electronic ow meter to advise you when to
reorder and to replace the NanoCeram® Cartridge.
CC Cartridge
• Stage 1: Pre-Filtration - The Pre-
Filter removes larger suspended
solids dramatically extending
the life of your NanoCeram®
cartridge.
• Stage 2: Electropositive
Filtration - The second stage
utilizes NanoCeram® patented
electropositive ltration media
with dirt holding capacity and
ltration eciency for particles
as small as a nanometer or .001
micron.
• Stage 3: Advanced Carbon
Block Technology - The third
stage utilizes carbon block
technology and a special
leadsorbent media to absorb
and reduce chlorine, lead, tastes
and odors.
LP Cartridge (limited availability)
• Stage 1: Pre-Filtration - The Pre-Filter
removes larger suspended solids
dramatically extending the life of your
NanoCeram® cartridge.
• Stage 2: Electropositive Filtration -
The second stage utilizes NanoCeram®
patented electropositive ltration
media with dirt holding capacity and
ltration eciency for particles as
small as a nanometer, or .001 micron.
The LP cartridge has twice as much
NanoCeram® for greater particulate
holding capacity.
NOTE: The LP cartridge contains
granulated carbon to help reduce
chlorine and improve the taste.
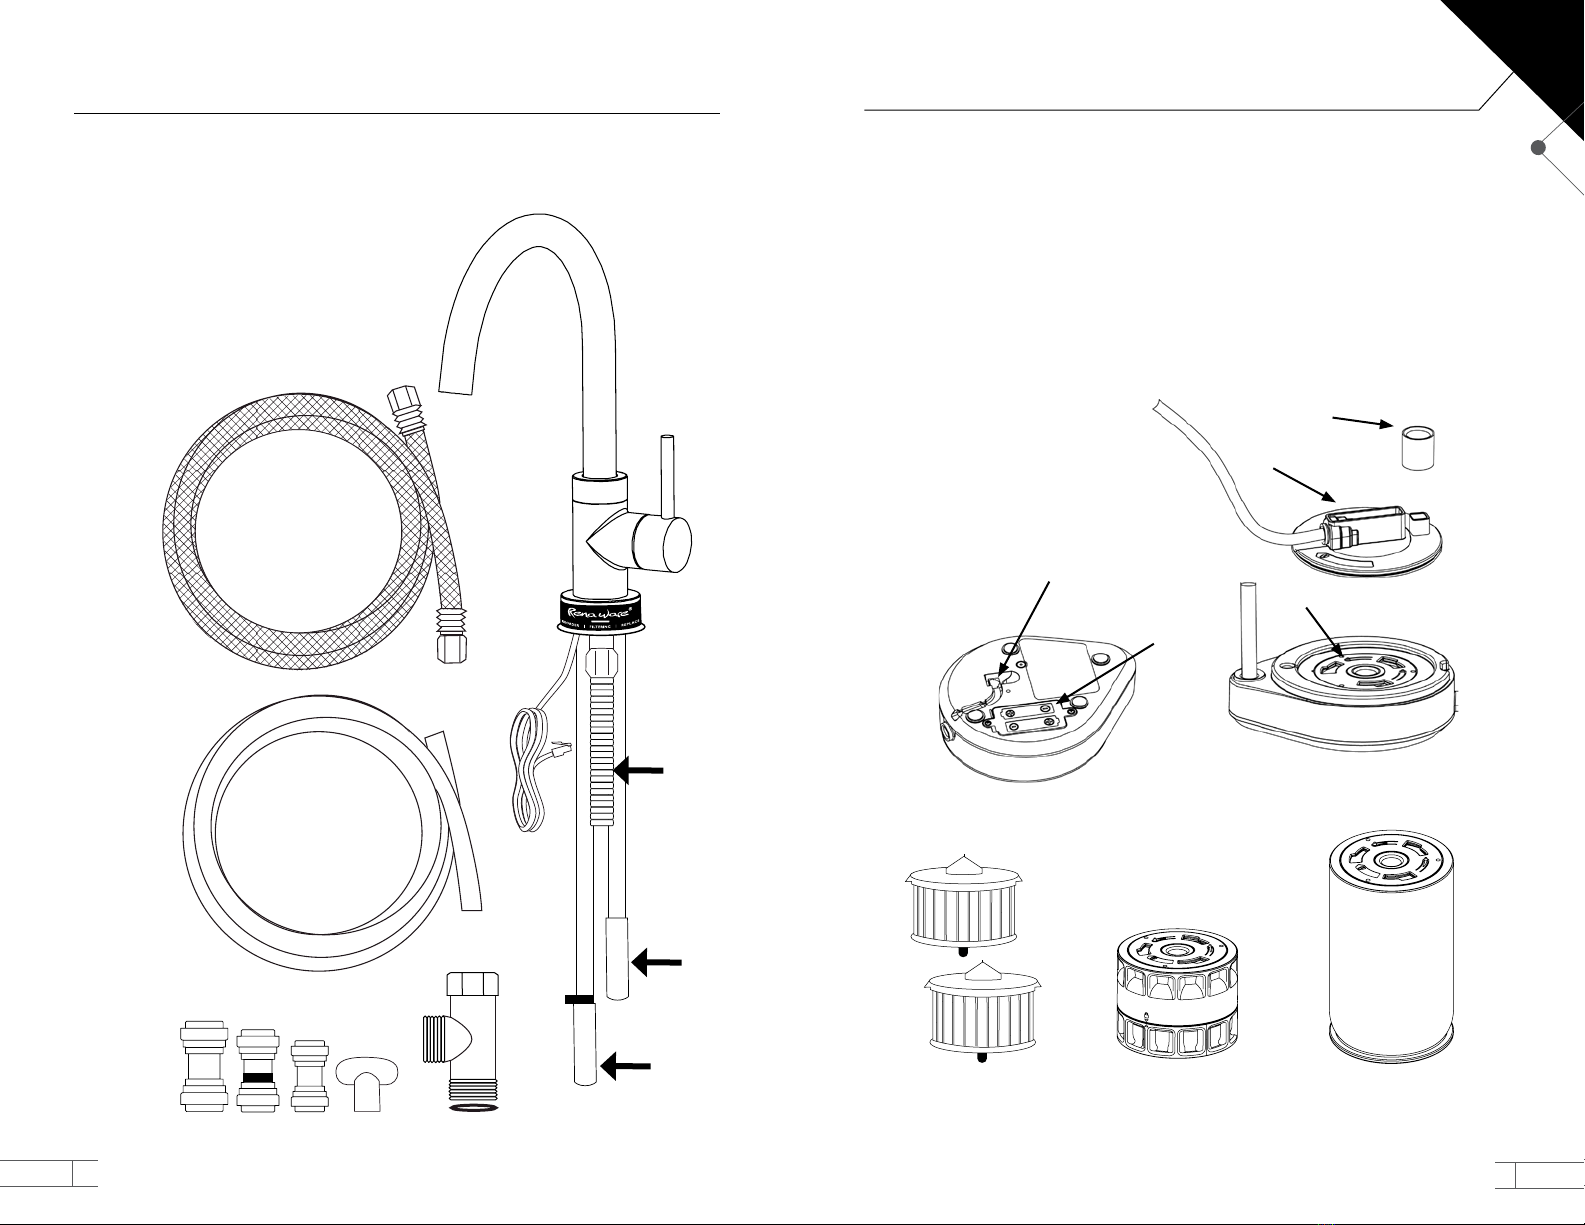
Features
• The AquaNano UCU LX-200 CAL is designed to t under your counter,
great for those with limited counter space.
• A visual ow meter indicates when it is time to replace the NanoCeram®
Cartridge to ensure your supply of ltered water is uninterrupted.
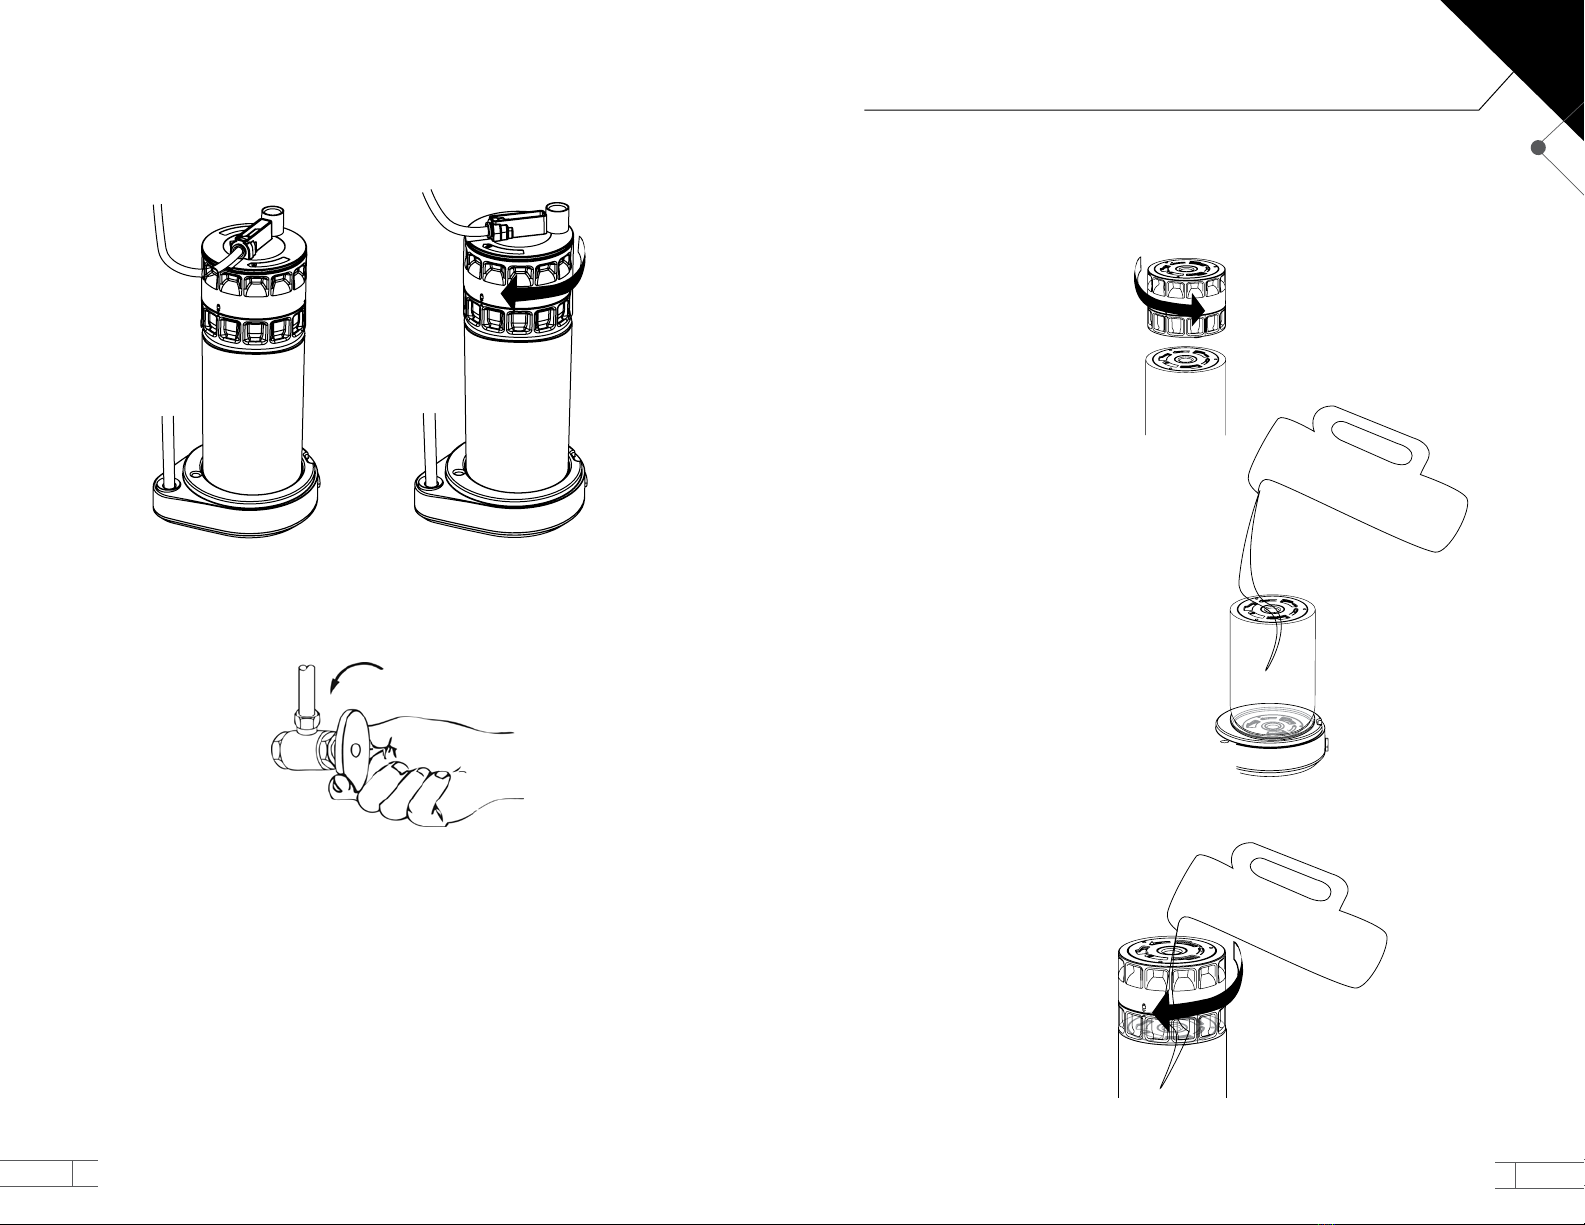
• Both the NanoCeram® Cartridge and Pre-Filter Media Cartridge are
designed to be replaced cleanly & easily.
• The AquaNano UCU LX-200 CAL will eectively lter water for up to one
year or 11,355 liters (3,000 gallons), depending on your families water usage
habits.
Safety Precautions
• This lter is engineered to lter municipally treated water in the home.
• ∆ WARNING: Do not use with water that is microbiologically unsafe or of
unknown quality without adequate disinfection. Always replace the
NanoCeram® lter cartridge when the indicator light turns red.
• The AquaNano’s NanoCeram® Cartridge has a rated capacity of one year
or 11,355 liters (3,000 gallons) whichever occurs first. The NanoCeram®
Cartridge must be replaced when the indicator light flashes red. The actual
capacity will depend on the amount of suspended solids and particles
in your local water system. In certain water supplies, tastes or odors may
return or the flow may decrease prior to the rated capacity. In these cases
the NanoCeram® Cartridge should be replaced more often.
• It is essential that you follow the operation and maintenance instructions
enclosed for proper performance. Failure to follow the Use and Care
instructions will void the warranty.
NOTE: Contaminants or other substances removed or reduced by this water
treatment device are not necessarily in your water.
Proper maintenance in accordance with the Use and Care must be followed.
5
4
EN

Packing/Product Diagrams
4 5 6 7 8
3
2
1
SWAN NECK SPOUT ASSEMBLY BOX
1. Spout body
2. Braided Source Water Tube
3. Outlet Extension Tube
4. Outlet Extension Tube Connector
5. Outlet Tube-to-Faucet Connector
6. Inlet Tube-to-Faucet Outlet Connector
7. Aerator Wrench
8. 3-way-diverter valve
Source
water inlet
Spout
outlet tube
Spout inlet
tube
INSTALLATION ASSEMBLY BOX
9. Inlet Assembly (including Inlet Tube and Outlet Tube)
10. Back-Flush Adapter (for use on the Pre-Filter Cartridge only)
11. Filter Base
12. Locking Plate
13. Battery Door (Batteries not included)
14. Data Cable Port
15. NanoCeram® Cartridge
16. Pre-Filter Cartridge (Reusable Housing and one EM Media Insert)
17. 2 disposable EM Media Inserts
FILTER CARTRIDGES
10
9
11
13
12
14
If any of these items are missing, please contact Rena Ware Customer Service
17
16
15
7
6
EN

Installation
INSTALLING SWAN NECK SPOUT
IMPORTANT: Read all the instructions completely before proceeding. If you
are uncertain about installing this product, we recommend you consult a
professional. This product should be installed in accordance with all local and
state plumbing and building codes.
1. Locate hot water line: If you don’t know which one is your hot water line, open
the hot water tap. Wait 30 seconds and feel the two water feed lines under the
sink. The one that is warm is your hot water feed line, the other is your cold water
feed line. Make a note of which is Hot and which is Cold. Also make note which
side each connects to the underside of the existing faucet because the cold water
line will be disconnected later in the installation.
2. Shut o water supply: After locating the water supply inlets, shut o the water
supply valves. These are usually found under the sink or near the water meter. If
you are replacing an existing side faucet, remove the faucet from the sink and
clean the sink surface thoroughly.
3. Tools recommended: PTFE plumber’s tape or thread sealant, slotted screwdriver,
pliers, adjustable wrench, ashlight, and cloth. Your installation may require new
supply lines and/or shut-o valves or other additional tools.
4. Installing the Side Faucet: NOTE: If there is not already a hole to accommodate
the side faucet, drill one 22 mm (.87”) in diameter through the sink deck.
a. Unscrew the nut at the base of the spout. Remove the nut and both the steel and
the rubber washers.
b. Insert the base of the spout through the hole in the sink deck, holding it centered
in the hole with the lights on the Data Collar facing the front of the sink, replace
the Rubber Washer (top) and the Steel Washer and tightening the Brass Retaining
Nut from underneath the sink.
5. Water Supply Connections:
NOTE: The orientation of the valve is only for reference. It may vary according to your
plumbing installation.
a. Disconnect the cold water supply line from the bottom of the existing faucet.
And thread the collar of the 3-way-diverter onto the faucet’s Cold Water Inlet.
Line to your exisiting faucet
(Cold Water Inlet)
9
8
EN

c. Thread the Braided Source Water Tube (supplied with the side faucet) onto the
bottom of the 3-way-diverter.
b. Thread your existing cold water supply line that comes from the valve on the wall
into the side inlet of the 3-way-diverter
d. Remove the washer that is attached to the
smaller end of the Braided Source Water Tube
and place it in the small end of the tube, then
thread the small end of the tube onto the
Source Water Inlet of the Side Faucet
Line to your wall outlet
To the Side
Faucet
Braided water source tube
Braided water
source tube
6. Attaching installation assembly:
a. Install two new, high quality, AA batteries (not included) in the Filter Base. Insert
the Data Cable into the Data Cable Port on the underside of the base.
data
cable
port
data
cable
IMPORTANT: When the batteries are installed, the replacement lights
will re a test sequence. If all lights do not light, you may have a broken
wire on installation.
b. Insert the Inlet Tube-to-Faucet Outlet
Connector (6) into the end of the Spout Outlet
Tube (the shorter tube without red tape).
11
10
EN

c. Insert the Inlet Assembly tube (9) into the other end of
the Inlet Tube-to-Faucet Outlet Connector (6).
d. Insert the Spout Inlet Tube (marked with the
Red tape) into the narrower end of the Outlet
Tube-to-Faucet Connector (5).
e. Insert one end of the Outlet Extension Tube (3) into the open
end of the Outlet Tube-to-Faucet Connector (5). Make sure the
Outlet Extension Tube is inserted all the way into the connector.
f. Insert the
other end of
the Outlet
Extension
Tube (3) into
one end of
the Outlet
Extension Tube
Connector (4).
g. Insert the
Outlet Line
of the Filter
Base (11) into
the other end
of the Outlet
Extension
Tube
Connector (4).
7. Install the lter cartridges: Hold the NanoCeram® Cartridge with the label end
up and place it into the locking plate on the base. Once inserted into the base
(11), rotate the NanoCeram® Cartridge clockwise slightly to lock. The Pre-Filter
Cartridge inserts into the locking plate at the top of the NanoCeram® Cartridge
the same way.
NOTE: Failure to install appropriate Pre-Filters will greatly reduce the life of the
NanoCeram® Cartridge.
12
EN

8. Attach the inlet assembly: The Inlet Assembly (9) attaches to the top of the Pre-
Filter Cartridge. It is inserted the same way the cartridges connect. Rotate the
Inlet Assembly approximately 1 /8 turn clockwise and make sure that there are no
kinks in the tubes.
9. Unit start up: Turn on the water supplies, and check for leaks above and below
the sink.
10. Flushing: To ush any residual carbon dust from the lter’s manufacturing
process, and to expel air trapped in the lter, turn the new Side Faucet on. Allow
the water to run for 10 Minutes. Check for leaks.
11. Check installation: Turn the hot and cold taps of the existing faucet on. Both
should work the same way they did before. Check for leaks. Also turn the Side
Faucet on and o, both with the main faucet on, or o. The Side Faucet should
work independently from the main faucet.
12. Charge the system. To improve the ow rate and to reduce the“run on” of water
after the Side Faucet is turned o the system needs to be“charged”. Charging
purges trapped air from the system.
Remove the Pre-Filter cartridge carefully to minimize the water that spills onto
the base unit.
Pour water into the top hole to ll
the Nano Ceram® cartridge.
Re-install the Pre-Filter cartridge and again pour in water into the top hole of the
Pre-Filter cartridge until it is full and reattach the inlet assembly.
Your Rena Ware Aqua Nano water lter is now ready for you to enjoy!
15
14
EN

Care & Maintenance
Cleaning the AquaNano UCU LX-200 CAL
To clean the exterior of your faucet, lter cartridges, and base unit, use a clean, damp
cloth and mild, non-abrasive liquid soap. Do not use dishwashing soap. Wipe down
with cloth.
Use of polish, detergents, abrasives, cleaners, organic solvents, or acid may cause
damage. USE OF OTHER THAN A DAMP SOFT CLOTH AND MILD LIQUID SOAP WILL VOID YOUR
WARRANTY.
NOTE: never submerge the unit or let stand in water. Excessive moisture inside the
unit will damage it and void the warranty.
Stage Zero Filter
In areas where the amount of sediments in the water is very high,
the Pre-Filter cartridge can clog quicker than expected. The Stage
Zero external lter removes the larger particles to prevent this from
happening.
It can be easily back-ushed and replaced to allow your Aqua Nano
system to lter the very small things it was designed to remove and
let you go longer between Pre-Filter back-ushes and NanoCeram®
cartridge replacements.
Accessories
Operation
Enjoy freshly ltered water right at your kitchen sink with your Aqua Nano UCU LX-
200 CAL. To turn on, simply move the on/o lever on the Side Faucet down. To turn
o, lift up.
Since the Side Faucet is controlled separately from the main faucet, you may use both
faucets at the same time
Mounting Bracket
You may place the entire under-the-counter assembled lter
on a bracket mounted to the wall to raise if o the oor of your
sink cabinet.
Replacement Indicator Lights
Your Aqua Nano UCU LX-200 CAL features a visual ow meter integrated into the
base of the spout. When water is owing through your lter, LED (light emitting
diode) lights will ash to indicate the following:
• FILTERING The blue light indicates that the unit is functioning normally.
• REORDER The yellow warning light lets you know approximately 1,893 liters
(500 gallons) of life is left in the NanoCeram® Cartridge. Contact your Rena Ware
Independent Representative or Rena Ware Customer Service Center to order
a replacement. The blue FILTERING light also indicates that your lter is still
working.
• REPLACE The red warning light indicates the NanoCeram® Cartridge’s eective
life has ended. The blue FILTERING light will not illuminate. Replace the
NanoCeram® Cartridge before continuing to use your lter.
UCU LX-200 CAL
Non-Functioning Flow Meter
If the electronic ow meter stops functioning, reset the meter by using the following
procedures:
1. Remove the battery compartment door in the bottom of the base by unscrewing
the two screws and by gently prying the door open using a at screwdriver at the
point shown in the diagram.
2. Remove the old batteries, wait 20 seconds, and then replace with two new high
quality AA batteries.
3. Replace the NanoCeram® lter cartridge.
4. The unit will reset to its default settings.
17
16
EN

Back-Flushing, cleaning & replacing the Pre-Filter EM Media
Cartridge
To properly maintain the Pre-Filter, it should be regularly back-ushed and cleaned (up
to 3 times) whenever an important reduction in the ow occurs. The disposable EM
Media Insert (17) shouldbe replaced when these procedures fail to restore acceptable
ow.
NOTE: The back-ushing process will require two people.
NEVER BACK-FLUSH THE NANOCERAM® CARTRIDGE!
BACK-FLUSHING THE NANOCERAM® CARTRIDGE WILL DAMAGE THE INTERNAL STRUCTURE
CAUSING THE FILTER TO BE INEFFECTIVE. BACK-FLUSHING THE NANOCERAM® CARTRIDGE
CAN ALSO CONTAMINATE THE MEDIA DOWNSTREAM OF NANOCERAM® MEDIA IF
DAMAGED, IT WILL NO LONGER FILTER THE WATER.
1. Make sure the water is turned o.
2. Remove the Back-Flush adapter (10) from the Inlet Assembly (9).
3. Remove the Inlet Assembly by turning it counterclockwise until it releases.
4. Remove the Pre-Filter Cartridge from the NanoCeram® Cartridge by turning it
counterclockwise until it releases.
5. Invert the Pre-Filter cartridge and place the Back-Flush Adaptor on the outlet
nipple of the Pre-Filter.
6. Insert the outlet nipple of the Inlet Assembly into the other end of the Back-Flush
Adapter and keep pressure on it. Hold the inverted Pre-Filter over the sink, a
bucket or some other receptacle that can hold at least 2 gallons (7.5 liters).
7. Have a second person turn on the water. When the water is turned on, there will
be a small amount of back pressure forcing the Inlet Assembly out of the Back-
Flush Adapter so you must hold the Inlet Assembly, Back-Flush Adapter, and Pre-
Filter together to keep pressure on it and keep them from coming apart.
8. Allow the water to run for 5 minutes, shake the cartridge and tap it against the
sink until the ow rate has increased
9. Open the housing by turning the top counterclockwise
➟
19
18
EN

10. To remove the media insert from the housing, grab the base of the housing with
both hands and push the end cap of the media insert forward using your thumbs.
Once loose discard or rinse o.
Temporarily reconnect the inlet assembly to the lter base. Wash the reusable
housing and rinse o the media insert with water and dry. When washing the
media mild rubbing is acceptable. If the exterior of the media is scrubbed too
hard it can be damaged permanently.
DO NOT USE SOAP.
11. Insert the Media with the outlet nipple pointing down and the punt up.
12. Close the housing by turning the top clockwise until the arrows
marked on the housing are almost aligned and reinstall.
NOTE: Note that back-ushing and rinsing will improve ow but will not restore the
Pre-Filter cartridge to “like new”condition. The improvement will be less each time you
back-ush and rinse, until it is necessary to replace the Pre-Filter cartridge to restore
the ow rate to an acceptable level.
1. For the NanoCeram® remove the cartridge by turning it counterclockwise until it
releases and discard used cartridge.
2. Remove the battery compartment door in the bottom of the base by unscrewing
the two screws and by gently prying the door open using a at screwdriver.
3. Remove the old batteries, wait 20 seconds, and then replace with two new high
quality AA batteries. This will reset the ow meter to“0”and the LED lights will
start ashing again when water is owing through the lter.
4. Unpack the new NanoCeram® Cartridge and install, run water for 2 minutes,
charge both cartridges as detailed in step 12 of the installation instructions.
NOTE: The Pre-Filter and the NanoCeram®are not necessarily replaced at the same
time and the LED indicator lights refer only to the NanoCeram®cartridge, therefore,
replace it when the ow meter’s red warning light ashes. It will also be time to
replace your batteries.
Replacing the NanoCeram® Cartridge
21
20
EN

Specications
AquaNano
Maximum Operating Pressure 690 kPa (100 psi)
Minimum Operating Pressure 207 kPa (30 psi)
Maximum Water Temperature 38°C (100°F)
Minimum Water Temperature 4°C (40°F)
Filtered Water Flow Rate @ 60 psi 5.7 LPM (1.5 GPM)
NanoCeram® Cartridge Capacity
22
Troubleshooting
1. Water is not coming out of the spout…
• Make sure the source water valves are turned on.
• Make sure the tubing is smooth and straight, without kinks.
• Remove the areator and make sure it is not blocked by any residue.
2. Water leaks out from between the lter cartridges or at the lter inlet
assembly or lter base…
• Separate the cartridges at the point of the leak. Each of the cartridges, and the
lter inlet, should have two o-rings on the raised outlet found between the three
feet. Check to ensure that the o-rings are in place and properly seated in the
grooves provided for them.
3. Water leaks from the tubing…
• Check the tubing for cuts or nicks. Check to ensure that the o-rings in the 3-way-
valve and in the Braided Source Water Tube are in place and properly seated.
4. Water continues to ow out of the Spout after water is turned o…
• Water may continue to ow from the Spout for a short time due to a build-up of
pressure within the lter but will typically stop by itself.
• Trapped air in the lter may force water out after the tap has been turned o. To
eliminate the trapped air, ll the Cartridges with water until you see water leaking
through the top hole of the Cartridges. This is known as “charging”the cartridge
and is done manually with the inlet assembly removed from the top of the lter
cartridge. See “Charging the system”.
5. Lights on the Faucet Collar do not work . . .
• Make sure that the Data Cable is properly plugged into the Data Port.
• Check batteries.
23
Replacement Parts
NOTE: Always use genuine Rena Ware replacement parts.
Contact your Rena Ware Independent Representative or the Rena Ware Customer Ser-
vice Center near you to order replacement parts for your AquaNano Water Filter. You
may also visit Rena Ware on the worldwide web at www.renaware.com for information
on our Service Centers and products.
NanoCeram® Cartridge
Pre-Filter Housing
EM Media
Insert
1 year or 11,355 L (3,000 GAL)
23
22
EN

Warranty
The AquaNano Limited Warranty
Rena Ware warrants its AquaNano water ltration systems to be free from defects in
materials and workmanship for one year from the date of purchase.
This Product is for home use on municipally treated water only. The Warranty does
not cover damage resulting from use of the Product on water having high chemical
interference, suspended materials or visual solids. The Warranty does not cover
normal wear and tear of valving connections, o-rings, rubber and plastic parts, or lter
cartridges.
The Warranty does not cover defects resulting from misuse, abuse, negligence,
accident, use of the Product in a manner other than as described in the instructions
and on the specications label, repairs or alteration outside a Rena Ware facility, or lack
of maintenance. Use of replacement parts other than genuine Rena Ware replacement
parts or removal of the specications label will void this Warranty. The Warranty does
not cover incidental or consequential damages resulting from the use of this Product.
Remedy in the Event of Warranty Claim
At its option, Rena Ware will repair or replace a Product, or any part thereof, which
is determined to be defective. If a replacement is made, the Product for which the
replacement is made becomes the property of Rena Ware. This remedy shall be
the exclusive remedy available.
To Obtain Warranty Service
To obtain warranty service, send a detailed written description of the claimed defect
to the closest Rena Ware Service Center. You may be required to return the Product,
at your expense, to the nearest Rena Ware Service Center in order to obtain warranty
service. You may also be required to provide proof of purchase. If, after inspection, Rena
Ware determines that a covered defect exists, Rena Ware will bear the cost of return
delivery.
Other Warranty Limitations
This Warranty is in lieu of all other express warranties. Any implied warranty shall
be equal in duration to the above express Warranty.
Some jurisdictions do not allow the exclusion or limitation of incidental or consequential
damages, or do not allow limitations on how long an implied warranty lasts, so the
above limitations or exclusions may not apply to you. This Warranty gives you specic
legal rights. You may also have other rights which vary from jurisdiction to jurisdiction.
This Warranty applies to AquaNano water ltration systems only. Separate warranties
apply to other Rena Ware products.
Contents
3-24
Contenido
25-46
CONTENIDO
ENGLISH ESPAÑOL
Introducción 26
Características 27
Medidas de seguridad 27
Empaque/diagramas del producto 28
Instalación 30
Accesorios 38
Funcionamiento 38
Cuidado y mantenimiento 38
Luces indicadoras de reemplazo 39
Lavado con ujo invertido a presión del cartucho del preltro 40
Reemplazo del cartucho NanoCeram® 43
Resolución de problemas 44
Repuestos 45
Especicaciones 45
Garantía 46
Visite nuestro canal en YouTube
25
ES
24

Cartucho CC
• Etapa 1: Preltración La
preltración elimina los
sólidos suspendidos de mayor
tamaño, lo que extiende
considerablemente la vida de su
cartucho NanoCeram®.
• Etapa 2: Filtración
electropositiva La segunda
etapa utiliza medios de ltración
electropositiva NanoCeram®
patentados con capacidad
de absorción de impurezas
y eciencia en ltración de
partículas pequeñas de hasta un
nanómetro o 0,001 micrones.
• Etapa 3: Tecnología avanzada
de bloque de carbón La tercera
etapa utiliza tecnología de
bloque de carbón y un medio
absorbente especial para
absorber y reducir cloro, plomo,
sabores y olores.
Cartucho LP (disponibilidad limitada)
• Etapa 1: Preltración La preltración
elimina los sólidos suspendidos
de mayor tamaño, lo que extiende
considerablemente la vida de su
cartucho NanoCeram®.
• Etapa 2: Filtración electropositiva
La segunda etapa utiliza medios de
ltración electropositiva NanoCeram®
patentados con capacidad de absorción
de impurezas y eciencia en ltración
de partículas pequeñas de hasta
un nanómetro o 0,001 micrones. El
cartucho LP tiene el doble de medios
NanoCeram®, por lo que retiene muchas
más partículas.
NOTA: El cartucho LP contiene carbón
granulado para reducir el contenido de cloro
y mejorar el sabor del agua
El AquaNano incluye un medidor de ujo electrónico que le indicará cuándo debe
ordenar y reemplazar el cartucho NanoCeram®.
Introducción
Ya posee uno de los sistemas de ltración de agua más avanzados disponibles en el
mundo.
El AquaNano utiliza tecnología electropositiva como parte de un sistema de
ltración en etapas múltiples de alto ujo con caída de presión limitada.
Características
• El AquaNanoUCU LX-200 CAL está diseñado para instalarse debajo del
mueble del fregadero de la cocina, ideal para cocinas pequeñas.
• Un medidor de ujo indica cuándo debe reemplazar el cartucho
NanoCeram® para garantizar que tenga agua ltrada ininterrumpidamente.
• El cartucho NanoCeram® y el cartucho del preltro del elemento
desechable EM están diseñados para reemplazarlos limpia y fácilmente.
• El AquaNano UCU LX-200 CAL ltrará agua efectivamente hasta 1 año
o 11.355 litros (3.000 galones), dependiendo del consumo de agua de su
familia.
Medidas de Seguridad
• Este ltro es de uso doméstico y está diseñado para ltrar el agua tratada
por la municipalidad.
• ∆ ADVERTENCIA: No se utilice con agua que no sea segura desde el
punto de vista microbiológico o cuya calidad se desconozca sin la debida
desinfección. Reemplace siempre el cartucho del ltro NanoCeram® cuando
la luz indicadora roja se encienda.
• El cartucho NanoCeram® del AquaNano tiene una capacidad nominal
de 1 año u 11.355 litros (3.000 galones), lo que ocurra primero. El cartucho
NanoCeram® se debe reemplazar cuando la luz indicadora roja se encienda.
La capacidad real dependerá de la cantidad de sólidos y partículas
suspendidos en el sistema de agua de su localidad. En algunos suministros
de agua, los olores y sabores pueden regresar o el ujo puede reducirse
antes de alcanzar la capacidad nominal. En estos casos, el cartucho
NanoCeram® se debe reemplazar con mayor frecuencia.
• Es muy importante cumplir con las instrucciones de uso y mantenimiento
aquí contenidas para lograr un óptimo desempeño. El incumplimiento de
las instrucciones de uso y mantenimiento anulará la garantía.
NOTA: Contaminantes u otras sustancias que este dispositivo para el
tratamiento del agua elimine o reduzca no se encuentran necesariamente en su
agua.
Se debe cumplir con las normas de uso y mantenimiento.
27
26
ES

Empaque/diagramas del producto
4 5 6 7 8
3
2
1
CAJA CON GRIFO CUELLO DE CISNE
1. Grifo
2. Manguera trenzada para agua
3. Manguera de extensión de salida del ltro
4. Conector de manguera de extensión de salida
del ltro
5. Conector de manguera de salida del ltro
al grifo
6. Conector de manguera de entrada a salida
de grifo
7. Llave del Aireador
8. Válvula desviadora de tres salidas
Entrada de
agua
Tubo de salida
del grifo
Tubo de entrada
del grifo
CAJA CON PIEZAS PARA INSTALAR
9. Caja de entrada (incluye manguera de entrada y manguera de salida)
10. Adaptador de ujo invertido (solo para usar con el cartucho del preltro)
11. Base del ltro
12. Placa de seguridad
13. Tapa del compartimiento de las baterías (baterías no incluidas)
14. Puerto del cable de datos
15. Cartucho NanoCeram®
16. Cartucho del preltro (Alojamiento reusable y un elemento desechable EM)
17. Dos elementos desechables EM
CARTUCHOS DEL FILTRO
10
9
11
13
12
14
Comuníquese con el Servicio al Cliente de Rena Ware si no recibe alguno de
estos artículos.
17
16
15
29
28
ES

Instalación
INSTALACIÓN DEL GRIFO CUELLO DE CISNE
IMPORTANTE: Lea todas las instrucciones antes de comenzar. ¡Rena Ware
recomienda llamar a un profesional si no está seguro de cómo instalar este
producto! El ltro se debe instalar de conformidad con las normas de plomería y
construcción locales y estatales.
1. Ubique la línea de agua caliente: Si no sabe cuál es la línea de agua caliente,
abra la llave de agua caliente. Espere 30 segundos y toque ambas líneas de agua
debajo del fregadero; la que esté caliente es la línea de agua caliente, la otra es
la línea de agua fría. Identique cada una. Anote cuál lado se conecta a cada
tubo del grifo existente, ya que la línea de agua fría se desconectará durante la
instalación.
2. Cierre el paso de agua: Ubique las entradas de suministro de agua y cierre las
llaves de paso. Por lo general se encuentran debajo del fregadero o cerca del
medidor de agua. Si va a reemplazar un grifo, retírelo y limpie bien la supercie
del fregadero.
3. Herramientas recomendadas: Cinta de teón o cinta selladora de roscas, masilla
de plomero, destornillador punta plana, alicates, llave ajustable, linterna y paño.
Es posible que la instalación requiera nuevas líneas de suministro y/o llaves de
cierre o herramientas adicionales.
4. Instalación del grifo lateral: NOTA: Si no hay un oricio para instalar el grifo
lateral, taladre uno de 22 mm (0,87 pulgadas) de diámetro en la supercie del
fregadero.
a. Desatornille la tuerca que está en la base del grifo, retírela y saque las
arandelas de acero y goma.
b. Introduzca la base del grifo en el oricio del fregadero, mantenga el grifo
centrado en el oricio con las luces del collarín de datos viendo hacia el
frente del fregadero, reemplace la arandela de goma (arriba) y la arandela de
metal y apriete bien la tuerca por debajo del fregadero.
5. Conexiones de suministro de agua:
NOTA: La orientación de la válvula es solo para su referencia. Puede variar de acuerdo
con la distribución de su plomería.
a. Desconecte la línea de agua fría del grifo existente y enrósquela a la parte
superior de la válvula desviadora de tres salidas.
b. Conecte la línea de agua fría de la válvula que está en la pared en el extremo
lateral de la válvula desviadora de tres salidas.
Línea al grifo existente
(entrada de agua fría)
31
30
ES

d. Retire la arandela del extremo más pequeño de la manguera trenzada
para agua y colóquela en el extremo más pequeño del tubo, enrosque el
extremo más pequeño del tubo a la entrada de agua del grifo lateral.
c. Conecte la manguera trenzada para agua (incluida con el grifo lateral)
en el otro extremo de la válvula desviadora de tres salidas.
Línea a la salida de su
pared
Al grifo lateral
Manguera trenzada
para agua
Manguera
trenzada
para agua
6. Instalación del utillaje:
a. Instale dos baterías AA nuevas de buena calidad (no incluidas) en la base del
ltro. Conecte el cable de datos al puerto del cable de datos que se encuentra en
la parte inferior de la base.
puerto del
cable de datos
cable de
datos
IMPORTANTE: Cuando instale las baterías, las luces indicadoras de reemplazo
activarán una secuencia de prueba. Si no se encienden todas las luces, se puede
haber roto un cable durante la instalación.
b. Introduzca el conector de manguera de entrada
a salida de grifo (6) al extremo del tubo de
salida del grifo (el más corto sin la cinta roja).
33
32
ES

c. Introduzca la manguera de entrada (9) en el otro
extremo del conector de manguera de entrada a salida
de grifo (6).
d. Introduzca el tubo de entrada del grifo
(identicada con la cinta roja) en el extremo
más angosto del conector de manguera de
salida del ltro al grifo (5).
e. Introduzca un extremo de la manguera de extensión de salida
del ltro (3) en el extremo libre del conector de manguera de
salida del ltro al grifo (5). Asegúrese de que la manguera se
haya introducido hasta el fondo del conector.
f. Introduzca el
otro extremo de
la manguera de
extensión de salida
del ltro (3) en uno
de los extremos
del conector de
manguera de
extensión de salida
del ltroa (4).
g. Introduzca la línea
de salida de la
base del tro (11)
en el otro extremo
del Conector de
manguera de
extensión de salida
del ltro (4).
7. Instalación de los cartuchos del ltro: Sujete el cartucho NanoCeram® con la
etiqueta hacia arriba y colóquelo en la placa de seguridad de la base (11). Luego
de insertarlo, gírelo un poco en sentido de las manecillas del reloj. El cartucho del
preltro se inserta en la placa de seguridad, encima del cartucho NanoCeram®, de
la misma forma.
NOTA: Si los preltros no se instalan correctamente, se reducirá
considerablemente la vida del cartucho NanoCeram®.
34
ES

36
8. Instalación de la caja de entrada: La caja de entrada (9) se coloca sobre el
cartucho del preltro. Se introduce de la misma forma que los cartuchos. Gire
la caja de entrada 1/8 aproximadamente en sentido de las manecillas del reloj y
asegúrese de que las mangueras no tengan dobleces.
9. Puesta en funcionamiento de la unidad: Abra las llaves de paso de agua y
asegúrese de que no haya fuga de agua por encima ni por debajo del fregadero.
10. Descarga del grifo: Para eliminar todo residuo de carbón en el ltro, producto del
proceso de fabricación, y eliminar aire atrapado en el ltro, deje correr agua por el
grifo por 10 minutos y asegúrese de que no haya fuga de agua.
11. Revisión de la instalación: Abra las llaves de agua caliente y fría del grifo
existente. Ambas debería funcionar de igual que antes de la instalación, y
asegúrese de que no haya fuga de agua. Abra y cierre la llave de agua del grifo
lateral, con el grifo principal abierto y cerrado. El grifo lateral debe funcionar
independientemente del grifo principal.
37
12. Carga del sistema: Para mejorar el caudal y reducir la “fuga”de agua luego
de cerrar la llave de agua, se debe“cargar”el sistema, ya que esto purga el aire
atrapado en él.
Retire el cartucho del preltro con cuidado de no derramar el agua contenida en
este.
Vierta agua por el oricio superior
para llenar el cartucho NanoCeram®.
Vuelva a instalar el cartucho del preltro y vierta agua nuevamente por el oricio
superior del cartucho del preltro hasta llenarlo y reconecte la caja de entrada.
¡Ya puede usar su ltro de agua Aqua Nano de Rena Ware!
37
36
ES

38
Cuidado y Mantenimiento
Limpieza del AquaNano UCU LX-200 CAL
Use un trapo húmedo y jabón neutro no abrasivo para limpiar la parte externa del
grifo, los cartuchos del grifo y la base. No use jabón lavaplatos.
Usar pulitura, detergentes, sustancias abrasivas, limpiadores, solventes orgánicos
o ácido puede dañar la unidad. SI LA LIMPIA CON OTRO TIPO DE JABÓN O PAÑO
ANULARÁ LA GARANTÍA.
NOTA: No sumerja la unidad en agua ni la deje en remojo. El exceso de humedad en el
interior de la unidad la dañará y anulará la garantía.
Filtro Etapa Cero
En áreas en las que la acumulación de sedimentos en el agua es
muy alta, el cartucho del preltro puede obstruirse más rápido
de lo esperado. El ltro externo Etapa Cero ayuda a prevenir esto,
ya que atrapa las partículas más grandes.
Se puede lavar con ujo invertido a presión y reemplazar
fácilmente para que su sistema Aqua
Nano ltre las partículas
muy pequeñas, para lo que fue diseñado, y espaciar más los
lavados con ujo invertido a presión del preltro y reemplazos
del cartucho NanoCeram®.
Accesorios
Funcionamiento
Tenga agua fresca y ltrada en su cocina con su AquaNano UCU LX-200 CAL. Baje la
palanca del grifo lateral para que salga agua, y súbala para cerrar el paso de agua.
Como el grifo lateral y el grifo principal funcionan independientemente, puede usar
ambos grifos al mismo tiempo.
Soporte
Puede colocar todo el ltro debajo del fregadero sobre un
soporte instalado en la pared para separarlo del piso del
gabinete del fregadero.
39
Luces Indicadoras de reemplazo
Su AquaNano incluye un medidor de ujo en la base del grifo lateral. Cuando el
agua uye por el ltro, luces LED (diodo emisor de luz) titilarán para indicar:
• FILTERING (FILTRAR): La luz azul indica que la unidad funciona correctamente.
• REORDER (ORDENAR): La luz amarilla indica que le quedan aproximadamente
1,893 litros (500 galones) de vida útil al cartucho NanoCeram®. Comuníquese
con su Asesor Rena Ware o con el Centro de Servicio Rena Ware para ordenar
repuestos. La luz azul FILTERING también indica que su ltro sigue funcionando
• REPLACE (REEMPLAZAR): La luz roja indica que la vida útil del cartucho
NanoCeram® ha expirado. La luz azul FILTERING no se encenderá. Reemplace el
cartucho NanoCeram® antes de volver a usar su ltro.
UCU LX-200 CAL
El medidor de ujo no funciona
Si el medidor de ujo electrónico no funciona, reinícielo con el siguiente
procedimiento:
1. Retire la tapa del compartimiento de las baterías que se encuentra en la parte
inferior de la base, desatornillando los dos tornillos y levantando la tapa con cuidado
con la ayuda de un destornillador punta plana en el lugar indicado en el dibujo.
2. Retire las baterías usadas, espere 20 segundos, y reemplácelas por dos baterías AA
nuevas de buena calidad.
3. Reemplace el cartucho del ltro NanoCeram®.
4. La unidad volverá a tener la conguración de fábrica.
39
38
ES
Table of contents
Languages:
Other Renaware Water Dispenser manuals
Popular Water Dispenser manuals by other brands

Lancaster
Lancaster PLATINUM LINE LES X Factor Series Installation, operating and service manual

AquaSure
AquaSure AS-HS32D owner's manual

Elkay
Elkay EMASM Installation and use manual

Elkay
Elkay LZS8WS 2GQ Series Installation & use manual

Elkay
Elkay EMABF8 1B Series Installation, care & use manual

Fleck
Fleck 5600 Econominder Service manual