Rescue Alert RA400 User manual

2
Welcome to Rescue Alert
Congratulations! You have chosen the most advanced and reliable Personal Emergency Response System available to
provide you comfort, reassurance, and peace of mind. Help is just one touch away!
Pressing your waterproof Personal Help Button will immediately activate the Rescue Alert unit. Within seconds, the
Rescue Alert Response Center will be notified of your need for assistance. When a call for help is received, the
Response Center’s computers instantly provide an attendant with all of your emergency information. The caring and
professionally trained attendant will talk to you through the Rescue Alert unit’s speakerphone. The friendly attendant
will personally telephone your family, friends, or emergency services based on the type of assistance you need. If you
cannot hear the attendant, do not worry, help will be summoned.
Rescue Alert is fast and simple to connect to your telephone. A Service Provider may connect the Rescue Alert unit,
or you may elect to do it yourself.
In either case, the signed Subscriber Agreement form must be completed, and
returned with your name, address, responder information, and any important information that would be helpful
to the Rescue Alert attendant.
Rescue Alert operates a dependable, state-of-the-art monitoring center that prides itself in offering fast, friendly, and
flexible response. The Rescue Alert Response Center has been designed for maximum flexibility, allowing you to tailor
usage to your particular needs.
To ensure that you always receive the fastest response time possible, it is very important that you do the following:
•Notify Rescue Alert of any information changes made to your account. You can update your account, at
any time, by calling a Response Center attendant at 1-800-688-9576 or 1-801-571-4121, or by pressing your
PERSONAL HELP BUTTON and relaying the information to the attendant over the speakerphone. The
Response Center needs to be aware of changes to your address, telephone number, responder
information, allergies, doctor’s name and telephone number, hidden key locations, etc.
•Test your Rescue Alert unit at least once a month.
•Always wear your Personal Help Button!
This User’s Manual has been designed to help you make the most of your Rescue Alert system. If you have any
questions or concerns after reading this manual, please contact Customer Service at 1-800-688-9576 or 1-801-571-
4121.

3
*Metal objects, mirrors, aluminum siding, and other construction techniques can prevent the signal from reaching the
antenna inside your Rescue Alert unit. In such cases, there may be a small area in which your Rescue Alert unit may
not respond to your Personal Help Button. It may be helpful to relocate your Rescue Alert unit, or move the object
that is preventing the signal from being received. Also, electronic devices such as clock radios, televisions, microwaves,
and motors in some appliances can cause radio frequency interference.
Setup Guide
Your Rescue Alert unit should be setup in an area that is free from sources of loud noise. The Rescue Alert unit should be
located centrally, in a part of your home that is used frequently, and near a telephone jack and AC electrical outlet.
The figure below is a general representation of the setup of a Rescue Alert RA400.
1.
Locate a telephone jack with an electrical outlet nearby. The Rescue Alert unit should be placed on a flat,
horizontal surface. The Rescue Alert unit should be located away from the immediate vicinity of mechanical
noise sources, i.e. oxygen generators, electrical equipment, and all appliances such as televisions or stereos.
2.
Unplug the telephone cord from the wall jack and plug it into the jack on the back of the Rescue Alert unit
marked “PHONE”.
If your home is equipped with DSL service, see configurations on page 4
.
3.
Find the Rescue Alert supplied telephone cord with a larger modular plug on one end and a smaller modular
plug on the other end. Plug the smaller end into the wall jack, and the larger end into the jack on the back of
the Rescue Alert unit marked “WALL”.
NOTE: When your Rescue Alert unit calls the Response Center, the telephone and any other device
connected to the PHONE jack on the rear of your Rescue Alert unit will be disconnected during the call.
This means if this telephone is off hook, your Rescue Alert unit can still contact the Response Center.
If
there are other extensions of the same telephone number in your home that are off-hook when your Rescue
Alert unit needs to place a call, it will not be able to unless the local telephone company has installed an
RJ31X jack. This jack allows the Rescue Alert unit to disconnect any telephone in the house that may be in
use. IF you elect to have an RJ31X installed, contact your Rescue Alert Service Provider and ask for an
RJ31X telephone cord, part number RA400-RJ31X.
4.
Plug the Power transformer into an AC outlet. Verify that the outlet is not controlled by a light switch.
5.
Turn the Power Switch, located on the rear of Rescue Alert unit, to the “ON” position.
6.
Test the range of the Personal Help Button to make sure it works throughout your home and yard as needed. To do
this:
•
Press and release the small black button marked “TEST/LEARN,” located on the rear of the Rescue
Alert unit.
•
Immediately press and hold down the Personal Help Button.
•
Walk around the home and yard. A continuous tone will be emitted by the Rescue Alert unit while
pressing the Personal Help Button, indicating the Rescue Alert unit works from that location.*
•
To end the Range Test, press the red “CANCEL” button on the right side of the Rescue Alert unit.
7.
Test your Rescue Alert by simply pressing your Personal Help Button, and speaking with an attendant.
(See Manual Test on pg. 5)

4
Setup Guide using DSL
In order to have functional Rescue Alert service, homes with DSL telephone/computer service require additional installation
steps. Below we have listed the three configurations for a successful Rescue Alert/DSL installation, in order of commonality.
Even with these configurations, it is possible that you will need to call Customer Service for more extensive troubleshooting.
1.
A self-installed DSL filter, supplied by the DSL provider, is installed on the telephone cord, between the RA400 Rescue
Alert and the wall jack. Illustrated below. NOTE: We have found that some DSL filters supplied by the DSL Provider do not
work with the Rescue Alert unit.
Rescue Alert recommends using the ADSL Broadband Filter part #279-101, sold at
Radio Shack.
2.
The DSL filter is hard wired by the DSL provider. In this instance the home does not have self-installed filters on the
telephone jacks, and the Rescue Alert will be a standard hook up. Illustrated below.
3.
If neither of the above configurations works, you may be able to connect the Rescue Alert into the DSL Modem, by the
computer. Illustrated below.

5
Frequently Asked Questions
Does the decision to use Rescue Alert services mean giving up my independence?
Rescue Alert works very hard to make sure you get to exercise your independence, and be safe by staying in your own home
and living without unnecessary intrusions by strangers.
How is Rescue Alert different from other Medical Alarm Companies?
Rescue Alert is flexible and offers many types of services which can be found with no other medical alarm company. RA
Minders, Check-In alarms, and EMD certified attendants are a few examples exclusive to Rescue Alert.
Does Rescue Alert care only for the frail and elderly?
Rescue Alert does provide help for the frail and elderly. Many younger and more physically mobile subscribers, who are
alone for any portion of the day, such as latch-key kids, potential domestic violence victims, and rape victims, use Rescue
Alert as well.
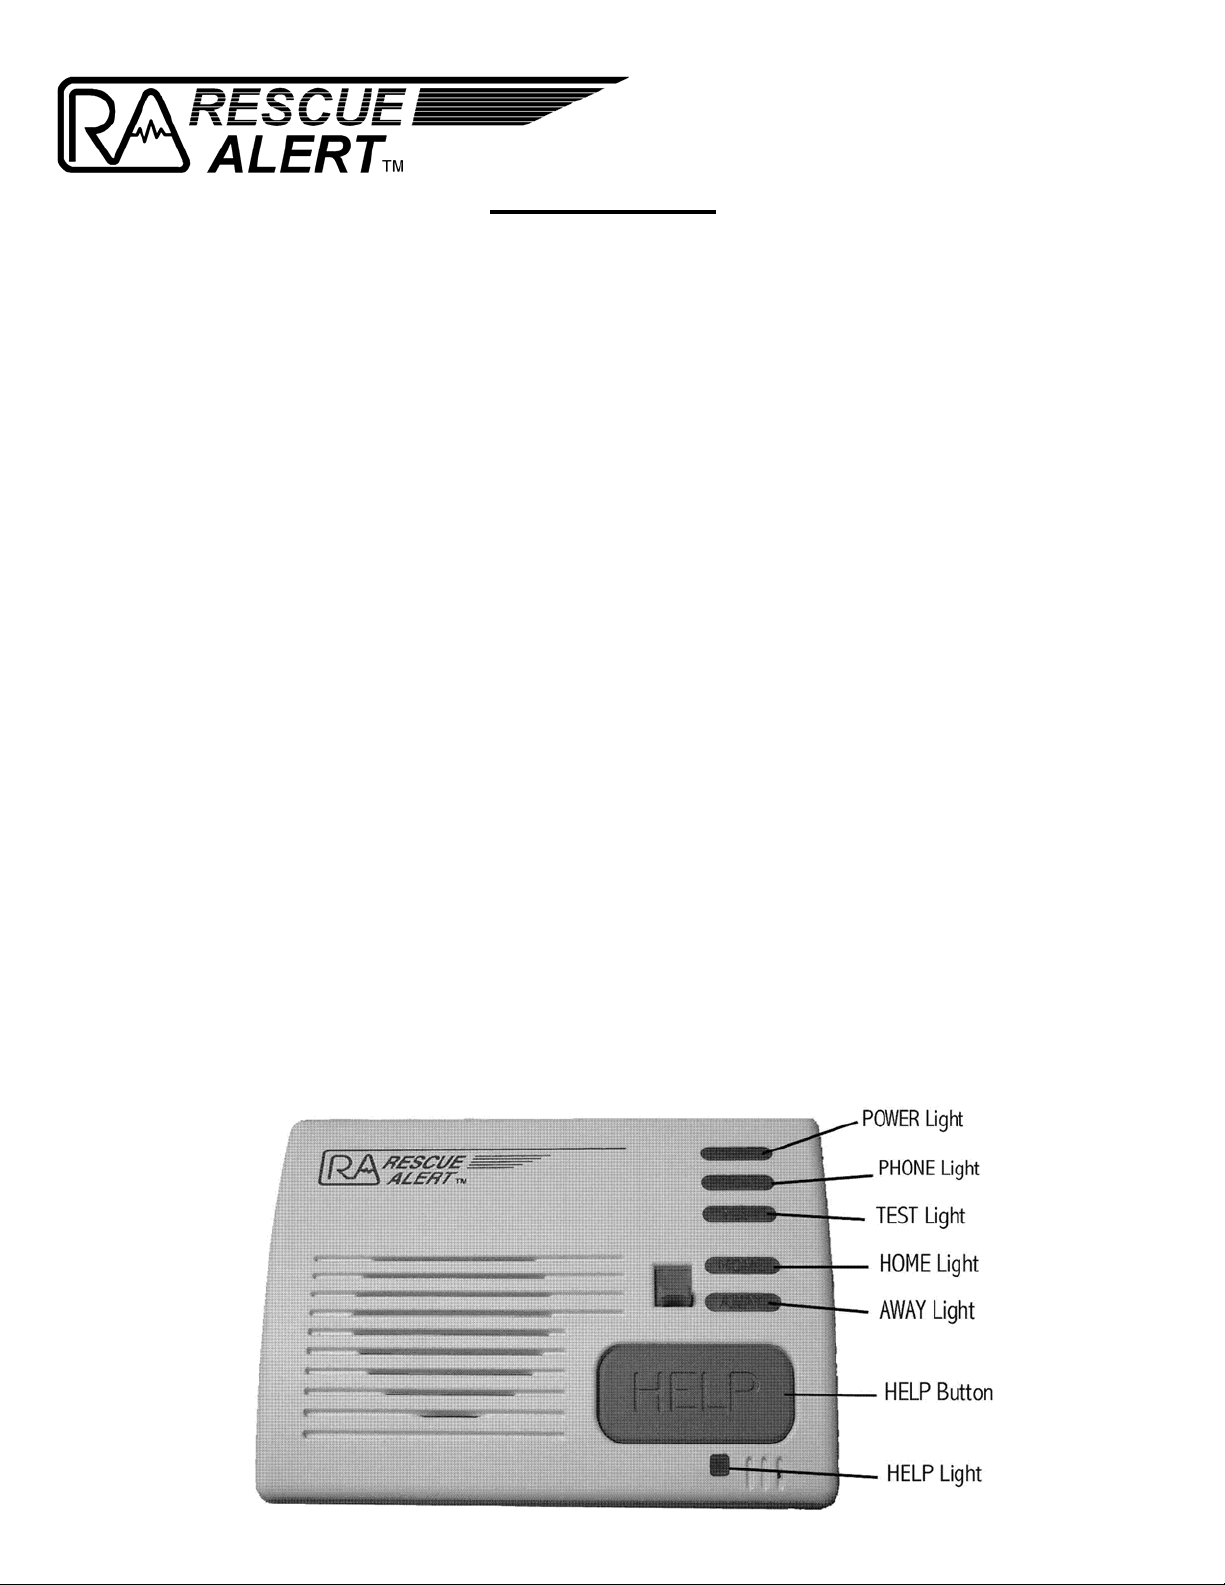
How can Rescue Alert help me to stay at my home and be safe?
Rescue Alert provides for you to be alone and still be able to receive help. Typically, you may be 600 feet or more from
your unit, and still get help - even if you cannot speak to the Emergency Response Center. Simply press your Personal
Help Button to activate your Rescue Alert unit.
Does Rescue Alert provide 24 hour monitoring?
Yes. The Rescue Alert Emergency Response Center is staffed around the clock, 365 days a year.
Where is the Rescue Alert Response center?
Rescue Alert Headquarters and Response Center is located in South Jordan, Utah - in the middle of the Salt Lake Valley.
Must I have a medical emergency to use my Rescue Alert?
No. Only about 6% of all calls received by Rescue Alert are medical emergencies. Rescue Alert can still get you help for
almost any type of need you may have, emergency or otherwise. You may test your Rescue Alert system at any time.
Who do you call? Can Rescue Alert notify my own doctor and hospital if I need care?
Rescue Alert can contact any persons you want on your list of Responders; family, friends, neighbors, police, fire, and
ambulance may all be listed if desired. You are not restricted to a limited number of Responders or telephone numbers to
contact them.
How will my Responders get into my home to help me?
Rescue Alert can keep track of who has keys to your home, but recommends that a key lock box be utilized. Rescue Alert
can be informed of the key lock box access code and give the code to emergency personnel for access. These codes can be
changed at will. Your home will be secure.
Is my Rescue Alert button waterproof?
Yes. Your Rescue Alert button is waterproof, and should be worn in the bathtub or shower - both areas where individuals
have a high number of slips and falls.
Will my Rescue Alert affect my telephone?
Your Rescue Alert will not affect your telephone unless the Personal Help Button is pressed and the system is activated.
DSL service does require use of a model Rescue Alert RA400, and a Radio Shack filter, part number 279-101.
What happens to my Rescue Alert service if I go away for a period of time or move?
Your Rescue Alert is designed for flexible use. It may be taken with you on extended visits or to a new residence. Please
contact Rescue Alert prior to moving or reinstalling your Rescue Alert.
Will my Rescue Alert work when I am at the market, or when I leave my house?
Your Rescue Alert unit will only work in and around your home. The base unit can receive signals from the Personal Help
Button from more that 600 feet away. Instructions for testing the range of your Personal Help Button may be found on
page 3, in step 6, of this User Manual.
Will Medicaid pay for my Rescue Alert service?
Unfortunately, Medicaid will not pay for your Rescue Alert service; neither will most Insurance carriers, even with a
doctor’s written prescription. There are state programs, like Medicaid Waivers, which are usually administered by your
County Aging Services which will pay for the service based on their specific criteria.
Do I need to sign a long-term contract?
No. Rescue Alert requires a short term, month-to-month contract which may be cancelled after any 30-day period.

6
During routine monthly tests, the Rescue Alert attendant may verify your name, address, and telephone
number. This is to ensure that you will receive the fastest response time possible during an emergency. It is very
important that you notify the Response Center of any information changes made on your account.
You can
do this by calling 1-800-688-9576 or 801-571-4121 and asking for a Response Center attendant, or by
pressing your Personal Help Button and relaying the information to the attendant. The Response Center needs
to be aware of changes to your address, telephone number, responder information, allergies to medications,
doctor’s name and telephone number, hidden key locations, etc.
Testing Your Rescue Alert
Our goal at Rescue Alert is to test each Rescue Alert unit every 30 days. Testing can usually be done in less than 3 minutes,
and will not disturb any of your responders. The purpose of testing is to provide security and peace of mind. This is
accomplished through regular usage, which promotes confidence and familiarity with the Rescue Alert system.
Manual Test
Manually testing your Rescue Alert unit is easy. Simply press your Personal Help Button and wait for a Response Center
attendant to speak to you. The following occurs during a Manual Test:
•
The attendant will ask if you need help. Tell them you are doing a monthly test.
•
During each test, the attendant will verify your name, address, and telephone number.
•
Attendants are available 24-hours a day, allowing you to test at your convenience, without disturbing your responders.
•
If it is difficult for you to hear clearly over your telephone or Rescue Alert unit, you may want to have a friend or relative
with you when you test.
Automatic Voice Test
Your Rescue Alert RA400 unit comes standard with the Automatic Voice Test feature enabled. The following occurs during an
Automatic Voice Test:
•
The Rescue Alert unit automatically sends a test signal to the Response Center, during daytime hours.*
•
If your telephone is being used, the Rescue Alert unit waits until the line is available.
•
A friendly attendant greets you over the Rescue Alert unit’s speaker to verify your test.
•
The circuitry of the Rescue Alert unit, including the microphone, speaker and personal help button is tested.
•
The Rescue Alert attendant will verify your name, address, and telephone number.
•
If a test is not performed according to schedule, the Response Center will contact you to help determine the cause.
Automatic Dial Test
If you prefer a silent test that requires no interaction, your Rescue Alert unit may be programmed to perform the Automatic
Dial Test instead. The following occurs during an Automatic Dial Test:
•
The Rescue Alert unit automatically sends a silent test signal during night time hours.*
•
If your telephone is being used, the Rescue Alert unit waits until the line is available.
•
The Response Center computer acknowledges the test signal.
•
The operation of the medical alert base unit is tested.
•
If the Response Center does not receive the expected test, a friendly attendant will contact you the next day to help
determine the cause.
*NOTE: Automatic testing, by default, will occur every 30 days from the last activation of the Rescue Alert unit, and can be
scheduled for any regular interval. If you choose to use the Automatic Dial Test, we encourage you to manually test your
Rescue Alert unit at least once a month.

7
Controls
Your Rescue Alert unit uses various switches and buttons to operate, or control, its function. Each is described below. For
additional information, contact your Rescue Alert Service Provider.
Power Switch
Your Rescue Alert unit’s power switch is located on the rear of your Rescue Alert unit. To turn your Rescue Alert unit” ON,” the
power cube must be connected to an active AC outlet. Even though your Rescue Alert unit has an internal battery, your Rescue
Alert unit will not turn on without having AC power applied first.
Home/Away Slide Switch
The Home/Away Switch is located on the front of your Rescue Alert unit. If neither the Check-In nor Inactivity Timer feature is
enabled, the Home/Away Switch can be ignored and neither the Home nor the Away light will be on. When one of those
features is enabled, the Home/Away Switch suspends the feature when the switch is in the Away position.
Large Console Help Button
You may press the blue Help Button on the front of your Rescue Alert unit to send a “Help Needed” message to the Response
Center. Within seconds, a professionally trained attendant will speak to you through your Rescue Alert unit’s speaker. If help is
needed, the attendant will call responders from your Responder List, as if the main Personal Help Button was pressed, unless
instructed otherwise.
Cancel Button
The red Cancel Button is located on the right side of your Rescue Alert unit. It is used to help your Rescue Alert unit learn
additional Personal Help Buttons, and to exit various test modes. Whenever the Cancel Button is pressed, your Rescue Alert unit
will sound a series of beeps.
The Cancel Button may also be used to cancel your call for help if your Rescue Alert is inadvertently activated. To cancel a call
for help, the red Cancel Button must be pressed within 10-15 seconds of activation; otherwise, the Response Center will already
be on the line with you. The Response Center is ready 24 hours a day, therefore, it is best to allow your Rescue Alert unit to
complete the call and tell the attendant that you accidentally activated your Rescue Alert unit.
Test/Learn Button
The Test/Learn Button is located on the rear of your Rescue Alert unit. It is used to place your Rescue Alert into various modes.

8
Status Lights
The Status lights located on the front of your Rescue Alert unit continually show its operational status. For additional
information, contact your Rescue Alert Service Provider.
Power
The POWER light is normally green. If your Rescue Alert unit becomes unplugged from the AC power outlet, the POWER
light will be red. It is important not to connect your Rescue Alert unit to an AC outlet that is controlled by a light switch. If the
wall switch is turned off, the POWER light will be red even if the Power Cube is plugged into a power outlet.
In the event your Rescue Alert unit loses AC power, the internal back up battery will continue to provide power. The battery
voltage is continuously measured by your Rescue Alert unit. If the voltage drops to a warning level, a “Low Battery” message is
sent to the Response Center, and the POWER light begins to flash red. (See Battery Monitoring on pg 8)
Phone
Normally, the PHONE light is off. Your Rescue Alert unit checks the connections to the telephone line to make certain that the
telephone wires are connected properly. If your Rescue Alert unit becomes unplugged from the telephone line, or the telephone
connections are improper, the PHONE light will be red, and your Rescue Alert unit will not be able to make an emergency call
to the Response Center.
Test
The TEST light is normally off. When your Rescue Alert unit is in Range Test Mode, the TEST Light is green. (See pg 3, step 6)
Home
When either the Check-In or Inactivity feature is enabled, the HOME Light is green if the HOME/AWAY Switch is in the
HOME position. If neither the Check-In nor the Inactivity Timer feature is enabled, the HOME Light will be off, independent
of the position of the HOME/AWAY Switch.
Away
When either the Check-In or Inactivity feature is enabled, the AWAY Light is green if the HOME/AWAY Switch is in the
AWAY position. If neither the Check-In nor the Inactivity Timer feature is enabled, the AWAY Light will be off, independent of
the position of the HOME/AWAY Switch.
Help
The HELP Light is normally off. When your Rescue Alert unit is calling the Response Center, the HELP Light is red. The
HELP Light will turn off automatically when the Response Center disconnects the call.

9
* Your Rescue Alert is designed to provide for your peace of mind and comfort within the privacy of your home and
yard. The signal from the Personal Help Button is limited by various factors, and may vary from home to home. It is
your responsibility to know the effective operating limits of your Personal Help Button, and to use it within these
limits. (See pg 3, step 6)
Microphone and Speaker
RA400 Features
The microphone in your Rescue Alert unit is sensitive enough to hear voice communication around corners and in other rooms
of your home. You do not need to be in the same room with the Rescue Alert unit for the response center to hear you! If you
can not reply, do not worry, help will automatically be summoned. Your Rescue Alert unit’s audio system is engineered to
provide for an increase of up to 83 times the normal volume.
Simplex Two-Way Voice Communication
During an emergency, your Rescue Alert unit uses its simplex communication mode. This greatly increases the coverage and
range of clear communication. The voice range of your Rescue Alert unit is up to twice the range of other systems using duplex
mode!
Waterproof Personal Help Button
Your Personal Help Button may be worn as a necklace, or a bracelet. Both styles are waterproof, and should be worn in the
bathtub and/or shower. Your Personal Help Button uses an indicator light to show the status of its internal battery. While your
Personal Help Button is being pushed, the light on your Personal Help Button flashes green to indicate the internal batteries are
good; a red light indicates the internal batteries may be weak. Every time the Response Center receives a signal from your
Personal Help Button, its battery status is reported. Soft Touch Personal Help Buttons, which require about half the pressure
to activate, are available. For more information contact your Rescue Alert provider.
RA3R Receiver/RA3T Transmitter
Your Rescue Alert unit is equipped with the RA3R Receiver and RA3T Transmitter. The RA3R is a new super-heterodyne
receiver with high sensitivity, and interference rejection.
The RA3T is a waterproof transmitter/Personal Help Button
designed especially for emergency alerts.
Together
this
pair
consistently
exhibits
performance
of
more
than
600
feet
of
open
range.*
Automatic Voice Test
Many Rescue Alert subscribers prefer to use the Automatic Voice Test feature offered by the Rescue Alert because of the added
safety and peace of mind that it provides. All critical functions of your Rescue Alert unit are tested, including the microphone,
speaker and Personal Help Button, to ensure it is working properly. When the Automatic Voice Test feature is enabled, the
Rescue Alert will automatically send an “Automatic Voice Test” message to the Response Center. The attendant will greet you,
and may ask you to press your Personal Help Button, verify your address and phone number, and ask if any assistance is needed.
Battery Monitoring
Your Rescue Alert is equipped with an internal rechargeable battery; the battery provides uninterrupted power to your Rescue
Alert unit for up to 90 hours if AC power is lost. While the battery powers your Rescue Alert unit, the battery condition is
constantly monitored by the Rescue Alert unit.
ETL Listed
The RA400 has been certified by ETL to UL Standard 1637 for Home Health Care Signaling Equipment. The ETL Listed
Mark is proof that your Rescue Alert unit has passed rigorous product safety testing, and has achieved certification.
Remote Programming
Any operational function or parameter can be reprogrammed to customize your Rescue Alert unit to your specific needs, i.e.
dialing “9”.

10
Check-In Alarm
Optional Features
Your Rescue Alert unit can be set to provide for your assistance even when you are unable to get to a telephone or push your
Personal Help Button. Using the Check-In Alarm allows the Response Center to automatically check on you if you fail to
respond to your Rescue Alert Check-In request. Your Rescue Alert unit can be programmed to Check-In with you up to five
specific times each day. At programmed times the Rescue Alert unit sounds an audible alert. If you don’t respond to the audible
alert, a Check-In signal is sent to the Response Center.
Inactivity Timer
Like the Check-In alarm, the Inactivity Timer feature allows the Response Center to automatically check on you if you fail to
reset your Rescue Alert Inactivity Timer. The Inactivity Timer can be set for any interval, up to 48 hours, in increments of 30
minutes. Most users prefer a 12 or 24-hour interval. Pressing your Personal Help Button, the red Cancel Button, using your
telephone, sliding the Home/Away Switch, or pressing the Test/Learn button is considered activity. Each time any activity is
detected, the Inactivity Timer is reset for the programmed interval. When the programmed time expires your Rescue Alert unit
sounds an audible alert. If you don’t respond to the audible alert, an Inactivity signal is sent to the Response Center.
Automatic Dial Test
If the Automatic Voice Test is not used, it is strongly recommended that the Automatic Dial Test feature of your Rescue Alert
unit be used. This test verifies the ability of your Rescue Alert unit to deliver a message to the Response Center. When the
Automatic Dial Test feature is enabled, your Rescue Alert unit will automatically send an “Automatic Dial Test” message to the
Response Center. If the Response Center does not receive an expected test call from your Rescue Alert unit, the attendant will
contact you or your service provider to help determine the cause.
AC Power Monitoring
Your Rescue Alert unit can detect AC Power loss and AC restore, and may be programmed to send automatic “AC Fail” and/or
“AC Restore” messages to the response center.
Smoke Detectors
RA400 compatible Smoke Detectors can be installed and programmed, in up to 8 unique zones, to activate your Rescue Alert
unit. Each individual Smoke Detector will cause a signal to be sent to the Rescue Alert Response Center. Upon account
activation, the location of each Smoke Detector will be logged into the Response Center’s database corresponding to the signal of
each Smoke detector. This allows the Response Center to report to fire officials the exact location smoke is detected. Your Rescue
Alert unit is also able to report Low Smoke Detector Battery signals to the Response Center.
Additional Personal Help Buttons
Your Rescue Alert unit will work with up to eight (8) unique Personal Help Buttons simultaneously. Your Rescue Alert unit is
easily reprogrammed, in your home, to receive the additional Personal Help Buttons.
Audible Alarm
Your Rescue Alert unit has an audible alarm that can be silenced for use in applications such as domestic violence, rape crisis, etc.
*For
more
information
on
Optional
Features,
please
contact
your
Rescue
Alert
service
provider.

11
RA400 Troubleshooting Guide
1
Power Light ON Yes
No
Plug the unit into a working outlet, not controlled by a light switch.
Set the Power Switch to ON, and test.
2
All Indicator lights are
Flashing
No
Yes
The unit needs to be reprogrammed. Call Rescue Alert Response
Center.
3
Power Light Color Green
Solid/Flashing
Red
The unit is running on battery. Plug the unit into a working outlet,
not controlled by a light switch, and test.
4
When connecting a
telephone directly to the
phone jack on the wall,
can you hear dial tone?
Yes
No
Move the Rescue Alert to a location with a working telephone jack.
If necessary, contact telephone company to resolve the problem.
5
Phone Light
Off
Red
Make sure the proper Rescue Alert telephone cord (part# RJ11-
31-7) connects the jack marked "Wall" on the RA400 to a working
telephone jack. Replace telephone cord if necessary.
Flickering Red
This is usually accompanied by a clicking sound on the telephone
line, and can often be solved by reprogramming the unit. Call the
Rescue Alert Response Center for reprogramming.
6
When pressed, does the
Personal Help Button's
indicator light flash?
Yes
No
The Personal Help Button needs to be replaced. See below for
instructions on programming a new Personal Help Button.
7
What color is the
Personal Help Button's
indicator light?
Green
Red
Press the button several times to exercise it. If the light changes to
green, and stays green for at least 10 seconds, the button is fine.
If not, replace the Personal Help Button.
8
Does the Personal Help
Button activate the unit?
Yes
No
Program the Personal Help Button to the unit. See below.
9
Does the Subscriber
have Standard
Telephone Service?
Yes
DSL
Requires a properly installed DSL Filter. (Radio Shack #279-101)
Cable Telephone
Service
Cable Telephone Services may not support medical alarms.
PBX
The unit must use an analog line, such as a fax line.
VoIP
VoIP telephone services may not support medical alarms.
10
Does the telephone
service require a dialing
prefix? (i.e. dial 9)
No
Yes
The Unit needs to be programmed to dial a prefix. Call the Rescue
Alert Response Center for programming.
Use monitor mode as described in advance troubleshooting techniques, or call Rescue Alert customer service.
Monitor Mode
Advanced Troubleshooting Techniques
The RA400 can be placed in monitor mode. This will allow the troubleshooter to hear what the unit is doing during each step of the call-in
process. By placing the unit into monitor mode you may be able to discover what the problem is. Put the unit in monitor mode by pressing
the Test/Learn button on the back of the unit twice. Send a test signal and listen for each of the following:
•
Dial tone
•
Dialing (make sure that dial tone is broken)
•
Ringing
•
A series of tones that represent the following data sequences
oReceiver answer tones
oData Transfer
oKissoff
oDate/Time Stamp
•
A Rescue Alert Attendant asking if you need help.
Programming Personal Help Button
•
Press and hold the Test/Learn button on the rear of your Rescue Alert unit while you press and release the red CANCEL button;
you will hear a series of beeps.
•
Release the Test/Learn button immediately after the beeps; your Rescue Alert will sound 2 more beeps to indicate it is now in Learn
Mode.
•
Press the Personal Help Button. A steady tone will sound from your Rescue Alert unit until you release the button.
•
Press the red CANCEL button on the side of your Rescue Alert unit to exit Learn mode. The Personal Help Button is now
programmed and should activate your Rescue Alert unit.
•
Press the Personal Help Button to test your Rescue Alert unit with the Response Center.
If the trouble shooting guide has not solved the problem, the unit may need to be replaced.
Please call Rescue Alert Customer Service at 1-800-688-9576.

12
Warranty and Replacement Policy
Your Rescue Alert and Personal Help Buttons are manufactured to high and exacting specifications and are designed
to provide you security and peace of mind for many years.
Rentals/Lease
Rented products monitored by the Rescue Alert Response Center shall be covered with a limited lifetime warranty for the
period they are so monitored. Rescue Alert will replace any product which proves to be defective in a timely manner.
Equipment which has been subject to abuse, misuse, alteration, unauthorized repair, or damage as a result of Acts of God
beyond the control of Rescue Alert, is not covered by the warranty. Rescue Alert shall have the right of final determination
of the existence and cause of defect.
Purchases
Rescue Alert warrants, for a period of one year from the date of shipment to the original customer, that the products it sells
are free from defects in material and workmanship. During the warranty period, Rescue Alert will, at its option, either
repair or replace products which prove to be defective. The repaired or replaced equipment is then warranted for 90 days
or the balance of the initial warranty period, whichever is greater. One year warranty excludes all batteries which are
warranted for a period of 90 days only. Equipment which has been subject to abuse, misuse, alteration, unauthorized
repair, or damage as a result of Acts of God beyond the control of Rescue Alert, is not covered by the warranty. Rescue
Alert shall have the right of final determination of the existence and cause of defect.
Products monitored by the Rescue Alert Response Center shall be covered with a limited lifetime warranty for the
period they are so monitored. Limited lifetime warranty excludes all batteries which are warranted for a period of 90
days only. Limited lifetime warranty excludes all Personal Help Buttons which are warranted for a period of one year
only. Warranty does not cover service or repair due to accident, abuse, neglect, vandalism, theft, loss, lightning damage,
use contrary to specifications or instructions, acts of God, or repair or modification by anyone other than Seller. Rescue
Alert shall have the right of final determination of the existence and cause of defect.
Personal Help Buttons
Rescue Alert warrants the RA3T Personal Help Button for a period of one year. Product warranty can be determined by
the serial number located on the label, on the back of the Personal Help Button. Personal Help Buttons with missing
labels will not be replaced under the warranty.
Operations\RA400\Users Manual RA400 08-31-2022.doc
Other manuals for RA400
1
Table of contents