RevAir Reverse-Air Dryer User manual

ALL YOU NEED TO KNOW
operating manual
Visitez support.myrevair.com pour consulter ce manuel en français.
Visite support.myrevair.com para revisar este manual en español.
RevAir Serial Number:
RevAir Education: support.myrevair.com
Contact Support: support@myrevair.com
SAVE THESE INSTRUCTIONS
REV 3.0

20200825 | RA80006 | REV 3.0

myrevair.com // 3
Thank You
Contacting RevAir Customer Support 5
Important Safety Instructions & Warnings
Before Using RevAir 6-8
RevAir Is Here
What’s in the Box? 9
Using Your RevAir Device
Before You Get Started 10
Powering RevAir 10
Reverse-Air Speed 11
Temperature Control 11
How to Rev Your Hair
New Technology Means New Techniques 12-13
Storing Your RevAir
Best Practices 13
Parts & Functions
What Does This Do? 14-15
Looking After Your RevAir Device
A Little TLC 21
Device Care
Keep it Clean 16-21
Disposal Information
It’s Hard To Say Goodbye 21
Never Be Without •One Year Warranty
Registering Your RevAir Device 22
What the Warranty Does and Does Not Cover 22-23
Acquiring Warranty Service 23
Table of Contents

Distributed by
RevAir, LLC
Macedonia, Ohio 44056 | United States | myrevair.com
support@myrevair.com or (440) 462-6100
Model#: RA90001, RA90003

myrevair.com // 5
Thank you for purchasing RevAir, the
World’s First and Only Reverse-Air Dryer.
If you have any questions about your RevAir products, contact
Customer Support through any of the above methods.
Most questions can be answered over the phone by our trained RevAir Customer Support team.
To expedite your request please have your serial number and details of where/when you purchased
your device available when contacting Customer Support.
The serial number can be found on the rating plate located on the back of the Base Unit.
Write your serial number on the front page of this manual for future reference.
800280
AUG-20
S/N:
XXXXXXXXXXX
Model # RAXXXXX
REVX
120V/60Hz/13.5A
Net Wt:10lb/4.5kg
Made In Mexico for RevAir, LLC. Designed in USA
RevAir Serial Number
(S/N:)
Visit our self-service support portal online at
support.myrevair.com
to view how-to videos, general tips, tricks, and other useful information about
your new RevAir i Dryer.

6 // myrevair.com
Important Safety Instructions
BEFORE USING THIS DEVICE, READ ALL INSTRUCTIONS AND CAUTIONARY
MARKINGS IN THIS MANUAL AND ON THE DEVICE.
When using an electrical device, basic precautions should always be followed, including the following:
THESE WARNINGS APPLY TO THE DEVICE, AND WHERE APPLICABLE, TO ALL TOOLS,
ACCESSORIES, OR MAIN ADAPTORS.
REVAIR IS DESIGNED TO DRY, STRAIGHTEN, AND STRETCH - CLEAN, DAMP HAIR.
PRIOR TO USING REVAIR DO NOT USE OILS, DO NOT SATURATE HAIR WITH HAIR CARE
PRODUCTS OR WATER TO THE POINT OF DRIPPING. ANY EXCESS SUBSTANCE ON OR IN THE
DEVICE CAN CAUSE DAMAGE AND VOID YOUR WARRANTY.
01. This device is for household use only and not commercial processes.
02. Never use while sleeping.
03. When this device is used by children, or individuals with limited physical, sensory or
reasoning capabilities, close supervision is necessary.
04. Do not allow to be used as a toy. Close attention is necessary when used by or near
children. Children should be supervised to ensure that they do not play with the device.
05. Do not use RevAir as a vacuum cleaner or for any vacuuming purposes such as picking
up and/or collecting small items or debris.
06. Do not insert anything other than hair into the wand.
07. CAUTION: Prior to using RevAir do not use oils, do not saturate hair with hair care
products or water to the point of dripping. Any excess substance on or in the device can
cause damage and void your warranty.
Contact RevAir Customer Support at support@myrevair.com or (440) 462-6100 for
questions regarding the use of leave-in products.
08. Do not operate this device outside or where oxygen is being administered.
09. CAUTION: At Reverse-Air Speed Level 1, use Low ( I ) or No Heat ( O ) only. High Heat
p;7( II ) should only be used when the Reverse-Air Speed Dial is set at Level 2 - Level 7.
10. Do not place the wand on any surface during use.

myrevair.com // 7
11. If the device is used in a bathroom, unplug after use. The proximity of water presents a
hazard even when this device is switched off.
12. WARNING: Do not use this device near bathtubs,
showers, basins, or other vessels containing water.
13. Do not handle any part of the plug or device with wet hands.
14. Do not put any liquids on or into the RevAir Base, Hose, or Wand.
15. Do not operate this device with an extension cord.
16. Only plug this device into a 120V/60hz 15amp outlet.
17. Do not operate this device with a voltage converter.
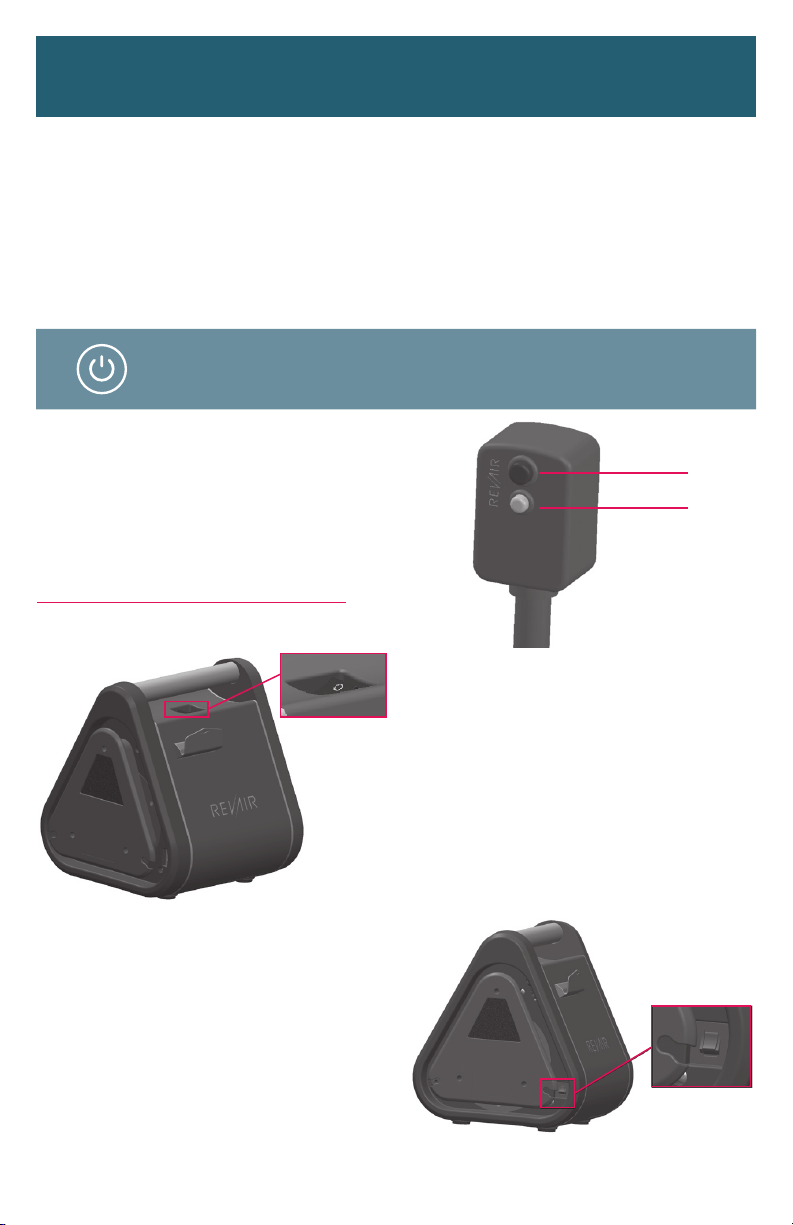
18. This device has a manual, resettable ALCI safety feature to prevent electric shock. If your
device turns off, unplug it from the power outlet, and press the RESET button. Plug it into
the power outlet once again, and power on.
If it still does not work, check to see if the power outlet has a resettable safety device that
needs to be reset. Alternatively, try another outlet to determine whether it is an electrical
issue rather than a device issue.
Should these methods fail, contact RevAir Customer Support at support@myrevair.com
or (440) 462-6100.
19. To ensure the ALCI safety feature is working properly, perform the following steps each
time you use this device.
•With the unit unplugged, press the Reset button on the ALCI plug.
•Plug the device into an AC outlet, press the Test button.
•The Reset button will pop out.
This veries that the safety feature is operating properly. If the Reset button does not pop
out, do not use the device. Contact RevAir Customer Support at support@myrevair.com
or (440) 462-6100 for repair.
20. For additional protection, the installation of a residual current device (RCD) having a
rated residual operating current not exceeding 30 mA is advisable in the electrical circuit
supplying the bathroom. Ask your installer for advice.
21. Do not force the plug’s polarized pin into power outlet/socket if it does not t.
22. Do not unplug by pulling on the cable. To unplug, grasp the plug housing, not the cable.
23. Do not stretch the cord or place the cord under strain. Keep the cord away from heated
surfaces. Do not wrap the cord around the device. The cord should only be wrapped
around the intended Cord Wrap Plate.
24. If the supply cord is damaged, it must be replaced or repaired by RevAir, its service agent
or similarly qualied persons in order to avoid a hazard.
RESET
TEST

8 // myrevair.com
25. This device includes over-temperature sensors. If the unit becomes overheated during
use, the heater will stop and the Lighted Handle will blink quickly.
If the unit continues to overheat due to a dirty or clogged lter, the heat and the Reverse-
Air motor will shut down until the unit has cooled sufciently.
26. Hair sections too large can limit airow and result in the heater turning off by triggering
the over-temperature sensor. If the heater turns off, the unit will continue to operate,
however, the heat shut-off will be indicated by a change in vacuum sound during use.
Reduce the hair section size to increase the airow around the hair and through the
Wand. This should eliminate the activation of the over-temperature sensor shut-off.
Contact Customer Support if any problems persist.
27. CAUTION: The Air Outlet (Base) and Heat Chamber Air Inlet (Wand) surfaces may be
hot. Keep the Air Outlet at least two feet away from walls, fabrics, or any surface.
28. Do not allow anything to block airow to the Air Outlet on the device Base or the Heat
Chamber Air Inlet on Wand.
29. Inspect your device before each use. If you notice any damage such as cracks or
separation of the housings, stop using immediately, and contact Customer Support.
30. Refer to the Device Care section of this manual for routine maintenance instructions.
31. Do not disassemble this device as incorrect reassembly may result in an electric shock
or re. Contact RevAir Customer Support at support@myrevair.com or (440) 462-6100
when service or repair is required.
32. If this device is not working properly, has been dropped, damaged, left outdoors, or
has come into contact with water, do not use it. Contact RevAir Customer Support at
support@myrevair.com or (440) 462-6100.
33. This device complies with part 15 of the FCC Rules. Operation is subject to the following
two conditions: (1) This device may not cause harmful interference, and (2) this device
must accept any interference received, including interference that may cause undesired
operation.
SURFACES
MAY BE HOT!
SURFACES
MAY BE HOT!
CAUTION
CAUTION

myrevair.com // 9
Patented Reverse-Air technology gives the power and exibility to style hair in a healthy, natural way,
without high heat or chemicals in a fraction of the time needed with traditional methods.
Please visit support.myrevair.com to discover more about your unique hair type and to connect
directly with our RevAir Advisor Team.
RevAir changes the way you dry,
stretch, and straighten your hair.
IN THE BOX RevAir Reverse-Air Dryer
Heat Producing Wand
(detachable from hose)
Hose
(attached to lter cover panel)
Reverse-Air Base Unit
(includes the RevAir Keep Safe drawstring bag)
Removable Filter Basket
(resides inside the base unit)
NOTE: Hose shown shortened for illustration purposes
only.
Your RevAir Reverse-Air Dryer arrives assembled and ready for use. The following is included:

10 // myrevair.com
Using Your RevAir Device
Before you get started
Designed to work on all hair types, RevAir’s patented technology is customizable so you can achieve
the best results for your unique hair. When considering your hair type; wavy, curly, coily, or straight,
also consider its length, width, and density.
Think too about the hair’s porosity - is it damaged by chemical treatments such as coloring, bleaching,
or relaxing? These are all important factors in determining the Reverse-Air speed and heat levels
needed to produce the best results for your unique hair. Be prepared to experiment a bit to get it
perfect for your hair type.
Unwind the electric cord from the Cord Wrap
Plate. The plug is equipped with an ALCI safety
feature.
Press the TEST button - you will hear a click, and
the RESET button will pop out. Press RESET
and you are ready to insert the plug into a wall
outlet.
Only insert into a 120V/60hz 15amp outlet.
On the back of the device, there is a Circuit
Breaker.
Should there be a power surge or short, the
breaker will trip, turning off the power to the unit.
The face will be white when it is tripped. If this
happens, unplug the unit from the wall and push
to reset the breaker.
If the issue continues, contact
support@myrevair.com or (440) 462-6100.
RESET
TEST
Powering RevAir
Once the Base Unit is plugged in, the device is
now ready to be powered on.
Locate the Main Power On/Off Switch at the
top of the Base Unit directly below the Handle.
Once switched to the On position, the Handle
will illuminate.

myrevair.com // 11
The effectiveness of Reverse-Air means less
heat is needed than blow-drying. So, even on
high ( II ), RevAir heat is relatively low.
Still, your hair may require even less, so
we recommend you experiment with both
high ( II ) and low ( I ) settings.
As a nishing step, turning heat to the no heat
setting ( O ) duplicates the cold shot found on
most blow dryers.
Note: The Wand includes an internal sensor to
monitor heat levels minimizing heat exposure.
The heat will not turn on unless the Base Unit is
powered on.
II = High Temperature (800 watts)
O= No Heat | Cold Shot
I = Low Temperature (400 watts)
Temperature Control (heat level settings)
Using Your RevAir Device
Reverse-Air provides the tension needed to stretch
and straighten hair. Different hair types require
different levels of Reverse-Air speed/tension. If
the speed is too high for your hair, it could slightly
tangle therefore it is important to experiment to nd
personalized settings that work best for you.
In general, healthy and thicker hair (thick strands)
tend to work well on higher levels. Those same levels
may not suit damaged or ne hair (thin strands). Also,
shorter hair may manage better than longer hair at
higher levels. There are no rules to Rev, so start low
and slow and test your way up.
Testing the Tensions Settings:
We recommend you begin with clean, towel-dried
hair. Before feeding hair into the powered-on
device, be sure the Reverse-Air Speed is set no higher than Level 2.
After 10 seconds, pull the hair out of the wand to check the level of dryness and to and to see if any
tangles are beginning to form at the end of the section.
If you do not see any tangles forming, and think you need additional tension, move up to the next
speed setting for an additional 10 seconds. Repeat until you nd your ideal tension level.
Level 2
Setting
Reverse-Air Speed (tension level settings)

12 // myrevair.com
How you Rev is likely to be as unique as your hair. So, take your time exploring different techniques
to see what works best for you.
First, determine your best heat and speed level settings*. Next, follow these steps to Rev
your hair: *See “Before You Get Started” section on page 11 to determine your best Rev settings.
• Detangle & comb through freshly washed and conditioned hair.
• Section your hair. Think through your section pattern and either
pre-clip or manage your sections as you progress.
• RevAir works best on clean, damp hair in conjunction with any
Tribology hair primer.
• CAUTION: Prior to using RevAir, any leave-in product should be
applied sparingly. Do not saturate the hair with leave-in hair care
products or water to the point of dripping. Do not apply oils or
sticky xatives to the hair prior to Reving. Any excess substance
on or in the device can cause damage and void your warranty.
• Power on the Base Unit. Set the Temperature Control (Wand) and
Reverse-Air Speed Dial (Base Unit) to the level ideal to your hair
How to Rev Your Hair
The Wand includes a sensor to
monitor heat levels. Should a
section of hair be too large in
volume, the Heat Chamber will shut
down indicating the section size
should be reduced.
Removing the section of hair from
the Wand will allow cooling. Simply
remove the section and retry with
less hair. The Heat Chamber will
resume automatically.
Note: The shut-o will be indicated
by a noticeable change in sound
from the Heat Chamber Blower
during use.
TROUBLESHOOTING TIP
NO HEAT? With the Wand set to ( I) or ( II ), and the Base powered on, if you
do not feel any heat at the Wand Mouth, double-check your Wand to Hose
connections are secure. See pages 19-20 for Wand connection troubleshooting.
If you continue to experience issues, please email support@myrevair.com
or visit support.myrevair.com.
New Technology Means New Techniques

myrevair.com // 13
Another option for storage is to leave the Base
Unit where it is used and place the Wand into the
RevAir Get a Grip Wand Holder (sold separately).
Learn more at myrevair.com.
Storing Your RevAir
To store your RevAir once nished, wrap the Hose
twice around the Base Unit going clockwise. The
Wand should reach the Wand Docking Hook
on the left side of the Base Unit.
Secure the Wand to the Wand Docking Hook
via the Wand Docking Groove on the right side
of the Wand.
How to Rev Your Hair
type and condition. CAUTION: When using Reverse-Air speed Level 1, use Low ( l) or No
Heat ( O) only. High Heat ( II ) should only be used when Reverse-Air Speed Dial is set at
Level 2 or higher.
• Take your rst section – gathered from about a 3-inch by 3-inch area of scalp, slightly more
or less depending on how dense/thick your hair is. Too much hair will limit the airow while
too little hair will compromise the Reverse-Air velocity and smooth ow. Those with average
hair density are likely to be able to complete their head in 7-10 sections.
• Feed the section of hair into the Wand until the Wand Mouth reaches your scalp. Slowly
move the Wand mouth across the scalp, or lightly dab, as to reach all the roots of that
section. The heat generated from the Wand kept rm or close to your scalp, will dry the
section’s full length.
• Do not pump the Wand, repeatedly moving the Wand up and down the length of the hair is
not necessary, and may compromise smooth airow along with your nal results.
• Drying time varies by hair type and texture, but the common range is from 30 to 90 seconds
per section.
• After about 30 seconds, pull the Wand about 2 inches from the scalp to feel if the root is still
damp. When dry pull the Wand away allowing the section to fall free. Repeat this process
section by section until complete.
• Note: Hair should not be left in the Wand for more than 120 seconds continuously. Check
hair periodically throughout the drying process.
• Pro Tip: For added volume, we recommend Reving one section at the crown by pulling the
section slightly forward and straight up.

14 // myrevair.com
Hose
Connector
4. Filter Panel
Filter Panel
Latch
Strain Relief Filter Basket
Tab
Filter Basket
Groove
3. Reverse-Air
Speed Dial
2. Main Power
On/Off Switch
6. Lighted Handle
(Warning Notication)
5. Stainless Mesh
Filter Basket
Heat Chamber Cover
Heat Chamber Screen
(interior)
1. Temperature Control
Wand
Connector
Reverse-Air Base Unit Fig. 2.0
Heat Producing Wand Fig. 1.0
Parts & Functions RevAir Reverse-Air Dryer
NOTE: Hose shown shortened for illustration purposes only.
1. Temperature Control Fig. 1.0
•High ( II ), Low ( I ), and No Heat ( O ) settings
•No Heat ( O ) setting allows cool air to seal in
shine
2. Main Power On/Off Switch Fig. 2.0
3. Reverse-Air Speed Dial Fig. 2.0
•In addition to the Off setting, 7 additional
speed settings on the dial allow adjustment of
Reverse-Air tension
4. Filter Panel Fig. 2.0
•Panel remains connected to Hose
•Rotate Filter Panel Latch counter-clockwise to
remove Filter Panel
5. Stainless Mesh Filter Basket Fig. 2.0
•Filter Notch must align for proper insertion
•Filter Basket must be installed for Base Unit to
function
6. Lighted Handle (Warning Notication) Fig. 2.0
•Glows steady when power is on
•Lights a slow flash sequence to notify that the
Filter and/or Filter Panel is not correctly locked in
place (Base Unit will not operate)
•Lights a fast flash sequence if the Base Unit
overheats (Base Unit will still operate, but heat will
shut off until cooled down)
Wand
Mouth
Filter Panel
Tab
Filter Panel
Groove

myrevair.com // 15
Heat Producing Wand Fig. 3.0
Reverse-Air Base Unit Fig. 4.0
Circuit Breaker
12. Cord Wrap
Plate
10. Air Outlet
9. Wand Docking
Hook
Lighted Handle
(Warning Notication)
8. Wand Docking
Groove
Wand
Connector
Heat Chamber Screen
Air Inlet
Heat Chamber
7. Heat Chamber Cover
7. Heat Chamber Cover Fig. 3.0
• Filters incoming air into the Heater
8. Wand Docking Groove Fig. 3.0
• Line up with Wand Docking Hook (Fig. 4.0.9)
located on the Base Unit for secure storage
9. Wand Docking Hook Fig. 4.0
•For easy storage of Wand on Base Unit
10. Air Outlet Fig. 4.0
•Never block the Air Outlet or place close to a
wall or surface, doing so may cause the unit to
overheat
•Do not touch the Air Outlet area, as it may be
hot
11. Exhaust Filter Fig. 4.0
•For noise suppression and additional air ltration
12. Cord Wrap Plate Fig. 4.0
•For manual cord storage
Parts & Functions RevAir Reverse-Air Dryer
11. Exhaust Filter

16 // myrevair.com
Device Care
•Remove the Hose and Filter Panel.
•Slide out the Filter Basket.
•First unplug the Base Unit.
•Next, Unlock the Filter Panel at the base of the
Hose by rotating the Filter Panel Latch counter-
clockwise.
• Do not perform any maintenance or repair work other than what is described in this RevAir
Operating Manual or advised by the RevAir Customer Support team.
• Always disconnect the ALCI plug from the wall outlet before inspecting for issues.
• If the device will not operate, rst conrm the wall outlet has power and that the ALCI plug is
properly inserted into the outlet.
Looking After Your RevAir Device
We recommend emptying your filter every 2-3 uses, and washing your filter after
every 5 uses. Check the Mesh Filter Screen for residual product build-up. Hold the filter up to a
light, when your filter is clean, light will be clearly visible through the filter screen.
Removing hair and dust from your Stainless Mesh Filter Basket
is not enough. Cleaning the Filter Screen is key.
Accessing your Filter.
Washing your Filter.
Manual Method Supplies Needed:
•Toothbrush or small soft scrubbing brush
•Mild Dish Soap
•Warm Water
Dishwasher Supplies Needed:
•Mild Dish Detergent
•Dishwasher

myrevair.com // 17
Washable Foam Liner Insert (sold separately)
• Scrubbing the Mesh Filter Basket can be time-consuming, now you can save time by adding
a Washable Foam Liner to a squeaky clean stainless Filter Basket, making cleaning a breeze.
• The Foam Liner acts as a barrier to protect the stainless steel Filter Basket and minimize build
up on the mesh.
• RevAir recommends cleaning the Foam Liner every 5 uses by removing any loose hair, rinsing
with warm soapy water, and air drying. Foam liners are sold in packs of 2, providing a spare while
the other is drying.
• Note: Before inserting the Foam Liner into the Stainless Mesh Filter Basket, be certain to start
with a freshly scrubbed Filter Basket.
• Washable Foam Liners are available for purchase at myrevair.com.
Easy to Wash & Air Dry
Washable Foam Liner
for additional accessories and replacement parts, visit: myrevair.com
Device Care
• Remove any hair or dust that has accumulated
within the Filter.
• With the Mesh Filter Basket out of the
device, try lling with the Filter with water. If
the water does not drain quickly, your Filter
Basket needs a thorough cleaning. You can
also hold the Filter up to the light, if the light
is not visible through the Filter Screen this is
also an indication that scrubbing is needed.
• Manual method: Using mild dish soap,
warm water, and a small brush, such as
a toothbrush, clean both the inside and
outside of the Filter Screen.
• Dishwasher method: with the open side up,
run the Filter Basket through a wash cycle in
the top rack of your dishwasher.
• Let the Filter Basket completely air dry
before reinstalling into the Base Unit.
Washing your Filter.

18 // myrevair.com
Device Care
•Attach the Hose to the Base Unit by sliding bottom Filter Panel Tab into the Groove located at the
bottom of the Filter opening of the Base Unit.
•Gently push Filter Panel forward so it is ush with Base Unit and securely covers Filter opening.
•Once the Filter Panel is rmly in place, turn Filter Panel Latch clockwise to lock the Filter Panel
into Base Unit.
•The exterior of the Base Unit, Hose and Wand may be cleaned with a soft damp cloth. Never use
any harsh chemicals or abrasive cleansers on any portion of your RevAir.
Reconnecting the Filter Panel after Filter cleaning.
Reinstalling your Filter into the Base Unit.
•Slide the Stainless Mesh Filter Basket into Base Unit, aligning the Filter Tab with the Filter Basket
Groove.
IMPORTANT: The Filter Tab must line up with the intended groove to t in properly. Without Filter
Basket installed, and the alignment of the Filter Tab in its groove, the Base Unit will not power on.
The Filter Tab on the Filter Basket
should t ush within the Filter
Groove that is located at the
bottom of the Base Unit.

myrevair.com // 19
Unlocking the Wand from the Hose.
Cleaning the Exhaust Filter.
•To remove the Exhaust Filter simply pinch the sides together and gently pull to remove the lter
from its housing within the Base.
•After removing the Exhaust Filter, shake
off any dust and rinse well with warm (not
hot) water. Do not wring or twist.
•Gently shake out any excess water, place
on a cloth or paper towel, and allow to air
dry.
•When completely dry, insert the Exhaust
Filter back into the Base, in the original
orientation.
•While gently pinching the sides, press the
lter back into the Base.
•While holding the Strain Relief in one hand, and the neck of the Wand in your other hand, complete
a sharp counter-clockwise turn to unlock the wand from the hose.
•Carefully pull the Wand from the Hose.
We recommend you clean the Exhaust Filter once per month.
Wand
Neck
Device Care
for additional accessories and replacement parts, visit: myrevair.com
Strain
Relief Strain
Relief
Wand
Neck

20 // myrevair.com
• Align the Key on the Hose with the Groove on the Wand.
• While holding the Strain Relief on the Hose in one hand, and the Wand Neck in your other hand,
push together rmly.
• Complete a sharp clockwise turn to lock the Wand into place.
Groove
Key
Reattaching the Wand to the Hose.
Strain
Relief
Cleaning the Wand and/or Hose interior.
TROUBLESHOOTING TIP
NO HEAT? With the Wand set to ( I) or ( II ), and the Base powered on, if
you do not feel heat at the Wand Mouth after reassembly, double-check your
Wand to Hose for secure connections.
If you continue to experience issues, please email support@myrevair.com or
visit support.myrevair.com.
Wand
Neck
Device Care
• If you nd it necessary to clean the interior of your Wand
or Hose, we recommend using a damp microber towel or
sponge brush.
• After removing the Wand from the Hose, gently swab the
interior of the Wand and/or Hose.
• Do not run water or cleaner through the Wand or Hose.
• Do not force anything through the Wand or Hose to avoid
internal damage to the components.
• Allow all components to air dry completely before
reassembly.
Other manuals for Reverse-Air Dryer
2
Table of contents
Other RevAir Hair Dryer manuals