WATER RESISTANCE
Note that the water resistance chart serves only as a
guide (please refer to the water resistance chart on the
next page). Actual water resistance may vary depending
on a number of factors including water temperature,
water salinity, and use under water.
The water resistance of your timepiece may eventually
be compromised over time with general wear and tear
and use of your timepiece under adverse conditions.
Always remember to employ the screw down crown if
available to maintain the water resistance of your
timepiece. Warranty may be voided if the screw down
crown has not been properly employed.
Note that you should never wear your watch in a jacuzzi
or steam room where steam may enter the case despite
the water tight seals used to protect your watch. This
may cause condensation inside your watch which may
effect and damage the inner workings of your watch.
CHRONOGRAPH
WATCH
30M/
3ATM 50M/
5ATM 100M/
10ATM 150M/
15ATM 200M/
20ATM
WATER RESISTANCE
CHART
SPLASH/
SHOWERING
SWIMMING/
BATHING
BRIEF SWIMMING/
WATER SPORTS
PROLONGED
SWIMMING/
FREE DIVING
SCUBA
DIVING
PROFESSIONAL
DEEP SEA DIVING
ALTIMETER
INSTRUCTION MANUAL
BEDIENUNGSANLEITUNG
Remarks :
The measurement time indicated by the stopwatch
hands move independently of the center hands.
60
30
1050
2040
24
12
420
816
60
30
15
45
MINUTE HAND
DATE
SECOND HAND
HOUR HAND 24 HOUR
HAND
PUSH
BUTTON A
PUSH
BUTTON B
CROWN
CHRONOGRAPH
60 MINUTE
HAND
CHRONOGRAPH
SECOND HAND
28
(MOV’T VD52)
IM.RGMT.CO
For more details on operating this timepiece
please refer to the enclosed booklet or visit :
1 2 3 4
5
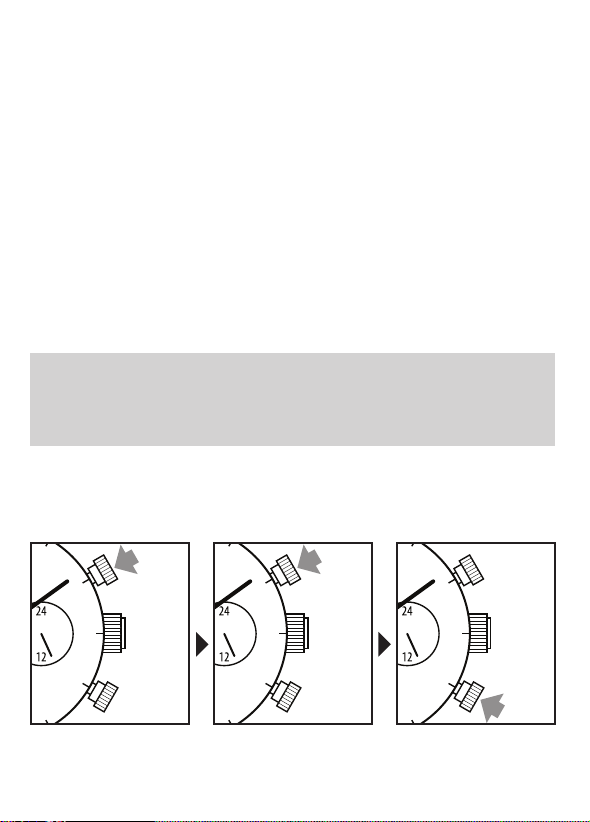
STOPWATCH FUNCTION
• The measurement of time is indicated by the
stopwatch hands that move independently of the
center hands and 24-hour hand.
• The stopwatch can measure up to 60 minutes.
STANDARD MEASUREMENT
START STOP RESET
Restart and stop of the stopwatch can be repeated
by pressing the button A.
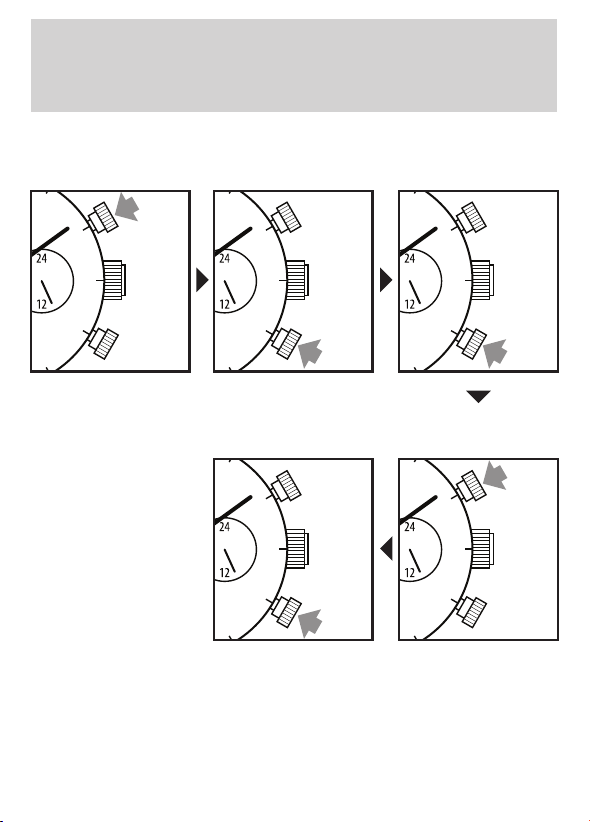
ACCUMULATED ELAPSED TIME
MEASUREMENT
STOPRESET
START STOP RESTART
Vol. 1.03 EN DE
HOW TO SET THE DATE AND TIME
*Before setting the time, check that the chronograph
measurement is stopped.
1. Pull out the crown to the position [2]-(1st click).
2. Turn the crown clockwise until the preview day's
date appears.
3. Pull out the crown to the position [3]-(2nd
click).when the second hand is at the 12 o'clock
position. It will stop on the spot. Set the hands to
the desired time of the day (make sure AM/PM is
set correctly) by turning the crown.
* When the crown is at the position [3]-(2nd click),
do not press any pusher. Otherwise the
chronograph hands will move.
4. Push the crown back in the position [1] in
accordance with a time signal.
* Do not set the date between 9:00 P.M. and 3:00
A.M. , otherwise the day may not change properly.
If it is necessary to set the date during the time
period, first change the time to any time outside
it, set the date and then reset the correct time.
Measurement and release of split time can be
repeated as many times as necessary by pressing
the button B.
SPLIT TIME
MEASUREMENT
STOPRESET
START SPLIT SPLIT
RELEASE
6 7
3
PLEASE READ THE FOLLOWING
BEFORE UNSCREWING THE CROWN:
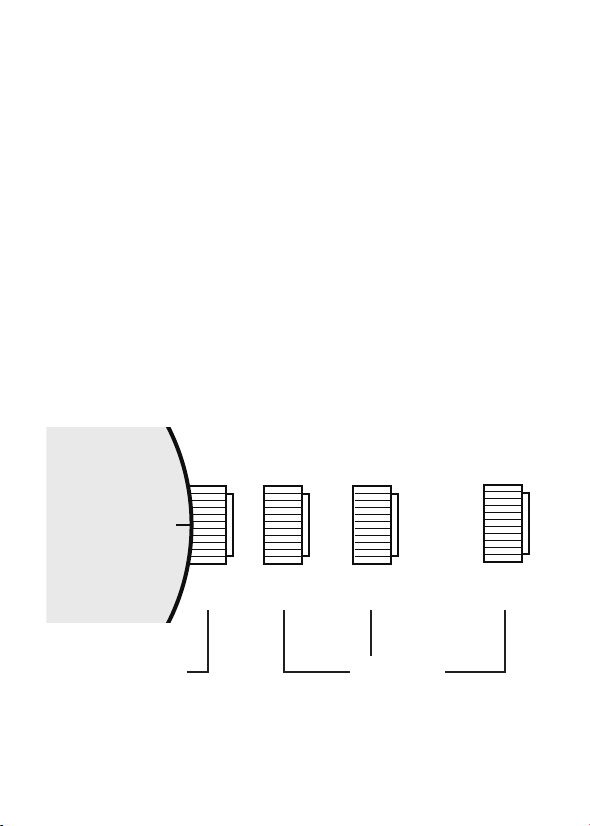
SCREW-DOWN CROWN
Screw-down crowns are used to ensure water
resistance. ALWAYS be certain that your crown is
securely screwed down ( Position [0] is secured.
Positions [1], [2] and [3] are not secured for water
resistance ).
Do NOT unscrew your crown while you are in any
environment where moisture is present.
0 1 2
(1st click) (2nd click)
CLOSED
Securely screwed
+ Water Resistance
OPENED
Not secured
For Water Resistance
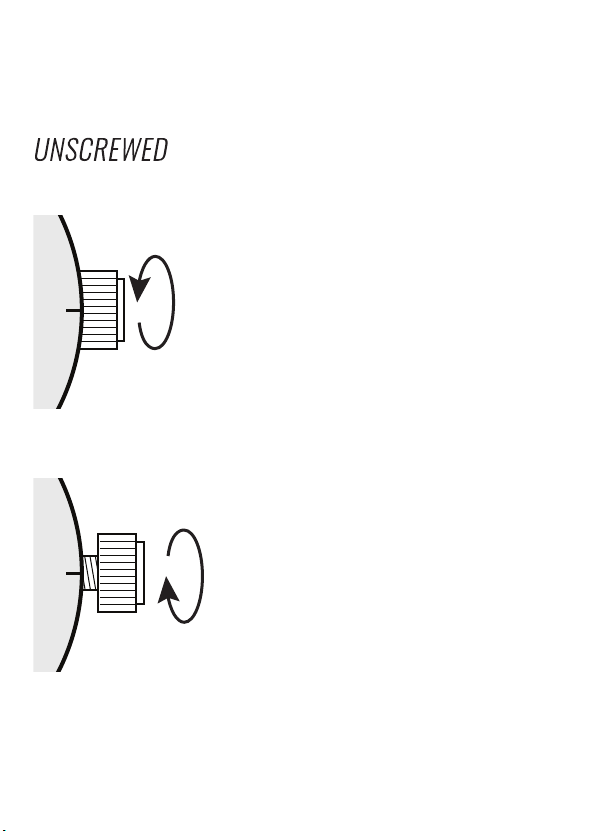
USING THE SCREW-DOWN CROWN
DO NOT PULL THE CROWN UNLESS IT IS
FIRST:
NOTE: Failure to SECURELY screw down the crown
after setting the watch may affect its water
resistance.
TO UNSCREW: Turn the
crown anti-clockwise until it
turns freely without tension.
GENTLY pull the crown out to
the other desired positions for
watch setting (see specific
operating instructions on the
following pages).
TO SCREW: Push the crown
ALL THE WAY IN (towards the
watch) THEN begin to turn
clockwise until it is securely
screwed down.
1
0