Page 2 of 2
IMPORTANT PLEASE READ ASSEMBLY & INSTALLATION:
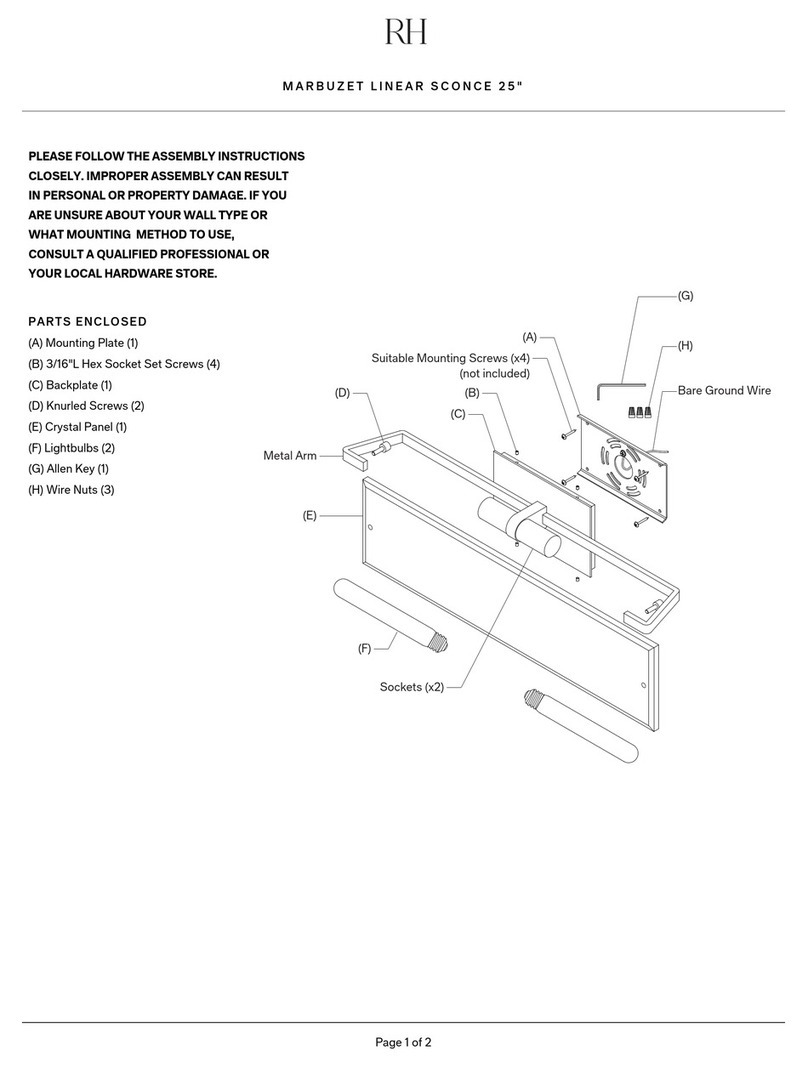
1. Carefully remove all parts from the box and remove all plastic
covering.
2. Attach Mounting Plate (A) to wall’s outlet box and secure with (x2)
1”L Phillips Flat Head Screws (B).
3. Carefully inspect the sconce’s fixture wires. White Color is the
NEUTRAL WIRE. Black Color is the HOT WIRE. Bare wire is the
GROUND WIRE.
4. Carefully lift up the Backplate (C) with the light fixture and place it
close to outlet box for wiring.
5. Connect the GROUND WIRE from the fixture with the ground wire
(usually bare) from your outlet box using a wire nut. If your house
does not have ground wire, then attach the GROUND WIRE from
the fixture to the green grounding screw inside of the outlet box.
IT IS IMPERATIVE THAT THE OUTLET BOX IN YOUR HOME BE
PROPERLY GROUNDED.
6. Connect the NEUTRAL WIRE from your fixture with the neutral
wire (usually white) from your outlet box using a wire nut.
7. Connect the HOT WIRE from your fixture with the hot wire
(usually black) from your outlet box using a wire nut. DO NOT
REVERSE THE HOT AND NEUTRAL CONNECTIONS;
OTHERWISE, SAFETY WILL BE COMPROMISED.
8. Tuck the wire connection neatly into the wall’s outlet box.
9. Attach Backplate (C) with light fixture to affixed Mounting Plate (A)
and secure with (x2) 3/16”L Hex Socket Set-screws (D).
10. Secure Glass Shade (G) to the Socket Holder (E) with Knurled
Screws (F).
11. Insert the recommended bulb (H) into socket.
12. Assembly is complete.
SAFETY INSTRUCTIONS:
(1) Must use an authorized and certified electrician for consultation
and installation. Electrician must be familiar with commercial-type
application of very heavy wall lamp and hazards involved. Electrician
should install it as per applicable local installation code.
(2) FOR NONCOMBUSTIBLE SURFACE ONLY.
(3) This fixture has been rated for (1) 40-watt maximum Type T10
standard light bulb (included). To avoid the risk of fire,do not
exceed the recommended wattage.
(4) The manufacturer and distributor accept no liability for incorrect
installation.
(5) Keep away from children.
WARNINGS:
All wires are connected. When unpacking, be careful not to pull
wires as a bad connection may result. Do not connect electricity
until your fixture is fully assembled. To reduce the risk of fire,
electrical shock, or personal injury, always turn off fixture and allow
it to cool prior to replacing the light bulb. Do not touch the bulb
when fixture is turned on or look directly at lit bulb. Keep flammable
materials away from lit bulb.
THIS IS NOT A TOY AND THE PRODUCT HAS
NO PLAY VALUE
CARE INSTRUCTIONS:
Wipe all surfaces with a soft dry cloth. Clean glass with a mild
soap and water mixture. Do not use any harsh cleaners (including
ammonia-based products) or abrasives, as they will damage
the finish.
WARNING: STRANGULATION HAZARD
Keep cord at least 3 ft away from cribs, bassinets, and toddler beds.
Keep out of reach of children under 3.
CHARLEROI SINGLE SCONCE


