RHEINZINK CLIPFIX 2.0 Guide

PROCESSING AND INSTALLATION
CLIPFIX 2.0
Operation, Installation, Maintenance, Spare Parts

RHEINZINK-CLIPFIX
GB
Foreword
The present operation manual and instal-
lation instructions describe the professional
application of the new fixing clip system for
RHEINZINK-Standing Seam Profiles. The
centrepiece represents RHEINZINK-CLIPFIX.
Please read this manual carefully before ini-
tial operation of this device and adhere to
the safety instructions.
We assume original RHEINZINK-Profiles,
RHEINZINK-Fixing Clips made of stainless
steel and RHEINZINK-CLIPFIX Single and
Collated Screws being used for the proper
application of RHEINZINK-CLIPFIX as de-
scribed in the following illustrations.
All contents are based on building practise
experience and correspond to the latest
state of knowledge in the field of research
and development and to the generally ac-
cepted standards of modern engineering.
Please note that despite the detailed instal-
lation instructions you are always personally
responsible for your manner of proceeding.
We have to point out, that the RHEINZINK-
CLIPFIX is related to the European Guideline
2006/42/EG and in this meaning an “in-
complete machine”. Therefore a CE-marking
is not required. We also reserve the right to
make any necessary modification resulting
from the technical progress of this system.
Datteln, September 2019
1. Using the CLIPFIX Page
1.1 Safety Instructions 1
1.2 Assembly/Initial Operation 1
1.3 Operation/Application 2
1.3.1 Screwing 3
2. Installation with CLIPFIX 4
2.1 Static 4
2.2 Installation Sliding Clip 5
2.3 Adjusting the pins on the
SPECIAL TOOL ATTACHMENT
for installation of the fixed Clips
2.4 Installation Fixed Clip 7
3. Maintenance and Care 8
4. Warranty 8
5. Troubleshooting/Spare Parts 9|10
Technical Support 11
CONTENT
6

1|2
RHEINZINK-CLIPFIX
GB
OPERATION
1. Operation Manual
1.1 Safety Instructions
General Instructions
RHEINZINK-CLIPFIX should be used only
with original RHEINZINK-CLIPFIX screws for
industrial and craftsmen work. Only use this
tool when you are aware of handling and
possible risks.
Refer to the safety regulations as well as to
the local regulations for your country.
User protective Information
To avoid accidents and damages, please
refer to below listed information!
■Operate the RHEINZINK-CLIPFIX only
with the FEIN-Motor.
■Refer always to the safety instructions
and operation manual of the company
FEIN.
■Never point the tool against another
person while the tool is in operation.
■Load the magazin with the collated
screws only when the motor is switched
off.
■Observe a secure stand before operati-
on, hold the tool with both hands only.
■Do not touch the work piece while
operating the tool.
■Be aware that the Sliding Block of the
device is under spring force, when
taking it apart.
Operation Safety Information
Please refer always to below mentioned in-
formation in order to avoid malfunctions.
■Do always use only RHEINZINK-CLIP-
FIX screws for clip fixing.
■Only use original RHEINZINK-CLIPFIX
bits and change them as soon as they
are worn out or damaged.
■Switch the FEIN-Motor to “clockwise”
rotation to use the tool.
■To remove screws with “counter clock-
wise” rotation, cannot be advised by
operation with magazin.
1.2 Assembly/Initial Operation
Mounting the CLIPFIX MAGAZIN ATTACH-
MENT to the FEIN-Screwdriver (seedrawing
on the right)
■Put the CLIPFIX bit into the bit holder of
the FEIN-Screwdriver.
■Place the CLIPFIX MAGAZIN ATTACH-
MENT on to the FEIN-Screwdriver until
it locks in place.
■Adjust the CLIPFIX MAGAZIN ATTACH-
MENT and the FEIN-Screwdriver in one
line.
■The CLIPFIX now is ready for operation.

RHEINZINK-CLIPFIX
GB
OPERATION
1
2
3
4
Assembling the RHEINZINK-CLIPFIX to
the FEIN-Screwdriver
1 Insert CLIPFIX bit into the FEIN-
Screwdriver
2 Push CLIPFIX MAGAZIN ATTACH-
MENT (3) incl. CLIPFIX SPECIAL TOOL
ATTACHMENT (4) on FEIN-Screwdriver (1)
until it is locked in place.
1.3 Operation/Application
■Put the belt with screws into the Belt
Guide and Sliding Block, until the first
screw reaches the screwing position.
■Switch the motor to “clockwise” rota-
tion.
■Set the FEIN-Screwdriver in steady
operation and clockwise rotation.
■Hold the RHEINZINK-CLIPFIX with both
hands.
■Press the RHEINZINK-CLIPFIX against
the clip and screw with sufficient force.
(see pages 6-7)
■The screw will be transported in defined
working position and mounted.
■Only remove the tool from the clip
when the clutch is released.
■The tightening torque also depends on
the force with which the FEIN-Screw-
driver is pressed against the screw.
■Checking the depth of engagement
and, if necessary, adjusting the CLIPFIX
MAGAZIN ATTACHMENT.

3|4
RHEINZINK-CLIPFIX
GB
OPERATION
1.3.1 Screwing
Correct Insertion Depth
1 Screw head totally screwed in flush with
the fixing clip hole
Incorrect Screwing
2 Protruding screw head
3 Screwing in too deep = strong deformati-
on clip
If the screw is permanently screwed in too
deep, the bit wears off very strongly and
quickly.
1 23
How to change the Insertion Depth
The insertion depth can be varied by turning
the adjusting ring of the CLIPFIX MAGAZIN
ATTACHMENT. Please carry out test screw-
ings afterwards.
Attention!
Max. screw size Ø 4,2mm x 55 mm on timber boarding and OSB/veneer plywood
sheathing.
The machine is not suitable to be used as a usual screw driller!

RHEINZINK-CLIPFIX
GB
INSTALLATION WITH CLIPFIX
2. Installation with CLIPFIX
2.1 Static
There are many factors influencing a secure
and durable installation of RHEINZINK
standing seam roofs. Apart from choosing
the most suitable substructure the choice of
the single components of the roofing system
is most important. All measures and functions
of the different parts should fit perfectly.
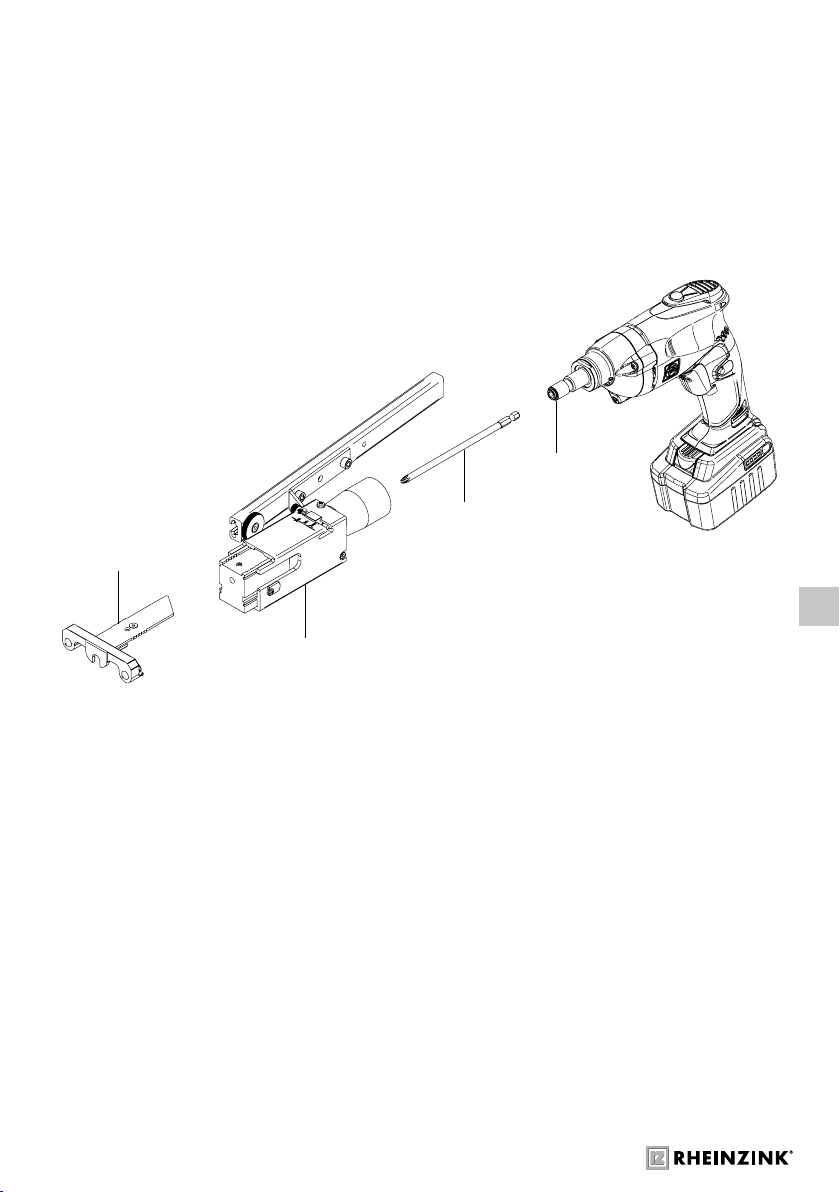
The RHEINZINK-clips are made of stainless
steel, the CLIPFIX MAGAZIN ATTACHMENT
and the CLIPFIX-Single and Collated Screws
meet highest safety demands.
In wind tunnel studies we tested our RHEIN-
ZINK-Standing Seam System simulating a
wind load over 50 years in combination
with these system elements. At the same time
we simulated a 20-year period in which the
movement of the sliding clips and their be-
havior was examined. The result marks the
beginning of a new era in the installation of
standing seam roofs. The permissible design
load of 600 Newton considerably exceeds
that load of traditional clips. You will work
more economically as processing (screwing
instead of nailing) requires less time due to
greater distances between the clips.
We offer a standard clip with a suitable
height for the installation of RHEINZINK-
Standing Seam Panels either on a (natural)
roof boarding or on suitable wood-based
panels like plywood or oriented strand
boards (OSB). If building physics make the
installation of the structured underlay AIR-Z
or VAPOZINC inevitable, a higher clip is
available. While the standard clips are la-
beled with ST, the higher clips are marked
with H.
You should consult an architect/planner or
a structural engineer for calculating the wind
loads for your construction project. These data
make it easy to determine the number of clips
needed per square metre. Please make use
of our declaration of conformity for your pro-
ject for documenting the wind loads and the
number of installed fixing clips.
It is available for free download on our homepage
www.rheinzink.de / www.rheinzink.com
Information: Assembly of Snow Guard
Systems and Clamps
Snow guard clamps, as well as the RHEIN-
ZINK-Clamp S5 should be mounted in a dis-
tance of at least 25 mm to the next clip to
ensure that the sliding function and the ex-
pansion behaviour of the RHEINZINK roof-
ing still works.

5|6
RHEINZINK-CLIPFIX
GB
2.2 Installation Sliding Clip
1. Put the
CLIPFIX-Tool/
screwdriver verti-
cally on the slid-
ing clip. Edge of
the CLIPFIX-tool
and edge of the
clip are flush.
4. Remove the tool
2. The left adjustment pin needs to be
placed exactly on the centre hole
5. Put the right adjustment pin on the centre
hole for fixing the left screw
3. Press the clip against the seam while
screwing with sufficient force on right side
6. Proper mounting with two flush screws
INSTALLATION WITH CLIPFIX

RHEINZINK-CLIPFIX
GB
2.3
Adjusting the pins on the SPECIAL TOOL ATTACHMENT for installation of the fixed Clips
2. Turn split pin by 90°1. Pull up split and adjustment pin
3. Let it click into place
INSTALLATION WITH CLIPFIX

7|8
RHEINZINK-CLIPFIX
GB
2.4 Installation Fixed Clip
1. Put the
CLIPFIX-Tool/
screwdriver verti-
cally on the fixed
clip. Edge of the
CLIPFIX-tool and
edge of the clip
are flush.
4. Remove the tool/screwdriver head
2. Place the tool exactly on the right-sided
halfround edge of the clip
5. Place the tool again on the left-sided
halfround edge of the clip
3. Press the clip against the seam while
screw in the right screw with sufficient force
6. Proper mounting with two flush screws
INSTALLATION WITH CLIPFIX

RHEINZINK-CLIPFIX
GB
MAINTENANCE AND CARE/WARRENTY
3. Maintenance and Care
■Check the CLIPFIX MAGAZIN SCREW-
DRIVER continuously for damages and
clean it with compressed air.
■The individual movable parts should be
greased/oiled regularly.
■The CLIPFIX-MAGAZIN ATTACHMENT
must be stored in a dry place.
■Check the hexagon screws occasion-
ally for tightness.
■Check the bits regularly and replace
them if necessary.
■Check the depth setting of the bit
regularly. If the screws are permanently
screwed in too deep, the bit wears out
very strongly and quickly.
■For care instructions of the FEIN-Screw-
driver, please refer to the FEIN Opera-
tion Manual.
Repair work should only be carried out
by professional personnel, using original
spare parts.
4. Warranty
The RHEINZINK-CLIPFIX was designed and
manufactured according to the latest tech-
nology.
RHEINZINK grants the original buyer for
proper function, material and workmanship
a warranty according to governmental or-
ders. Normal wear and tear excluded.
The warranty is null and void when improper
handling, use of force, repair by third parties
and use of non-original parts can be rec-
ognized.
A warranty extending further than the items
covered by delivery (RHEINZINK-Standing
Seam System, RHEINZINK-AIR-Z, RHEIN-
ZINK-VAPOZINC, RHEINZINK-CLIPFIX,
RHEINZINK-CLIPFIX Screws, RHEINZINK-
CLIPFIX-Bits) is excluded as RHEINZINK has
no influence over the operation of the equip-
ment in combination with other products.
Please observe our General Terms of Sale.
The warranty for the FEIN-Motor, FEIN-
Screwdriver, is described in the FEIN Op-
eration Manual.

9|10
RHEINZINK-CLIPFIX
GB
1
11
6
5
4
10
9
3.2
Error Solution
1 The RHEINZINK adapter can-
not be pushed onto the autofeed
screwdriver or slips off during
operation.
Tighten the threaded screw on the machi-
ne head carefully using a 27 mm open-end
wrench.
2 The RHEINZINK adapter sticks
when pushing on/removing from
the autofeed screwdriver.
Grease the RHEINZINK adapter occasional-
ly, so that it can be pushed on to the autofeed
screwdriver smoothly.
Loosen the threaded screw on the machine
head slightly, if this is over-tightened causing
a crown to form on the screwdriver neck.
3.1 The RHEINZINK-CLIPFIX does not
sit flush. Readjust the CLIPFIX so that it is aligned flush.
Loosen the 3.00 mm hexagon screw on the
adapter (2).
3.2 The RHEINZINK-CLIPFIX is loose. Tighten the 2.5 mm hexagon screws (x3) on
the adapter (2).
TROUBLESHOOTING
5. Troubleshooting
2
3.1
78

RHEINZINK-CLIPFIX
GB
TROUBLESHOOTING/SPARE PARTS
Error Solution
4 The screw adjustment head
is loose. Tighten the 3.0 mm hexagon screw on the
screw adjustment head.
5 The guide of the MAGAZIN
ATTACHMENT sticks. Grease the guide section of the MAGAZIN
ATTACHMENT.
6 Screws are ejected. Replace the bit.
7 Check the depth setting of the bit.
If the screws are permanently screwed in too
deep, the bit wears out very strongly and
quickly.
8 The „belt carrier“ sticks (see item 8).
10 The belt is not conveyed properly (see item10)
8 The „belt carrier“ sticks. Clean the „belt carrier“ regularly using
compressed air and oil it occasionally.
9 The belt guide is loose. Tighten the 5.00 mm hexagon screws (x2)
on the belt guide.
10 The belt is not conveyed properly. Set the dial on the belt guide to „4“.
If this is stiff or rusted, please use a lubricant
or corrosion remover.
11 Screws can only be tightened using
considerable force. Switch the motor to clockwise rotation!
Article No.
Bit for CLIPFIX MAGAZIN SCREWDRIVER, 2 pcs 9898009
CLIPFIX SPECIAL TOOL ATTACHMENT 2.0 9898013
CLIPFIX MAGAZIN ATTACHMENT 2.0 9898014
CLIPFIX MAGAZIN SCREWDRIVER 2.0 9399062
Spare Parts

11
RHEINZINK-CLIPFIX
GB
At times, even quality products suffer oc-
casional defects. If you should encounter a
problem with your RHEINZINK-CLIPFIX or
your FEIN-Screwdriver/battery, our techni-
cal support is always at hand.
Please always enclose a copy of your original invoice when returning your item.
TECHNICAL SUPPORT
For technical questions about our CLIPFIX
system, please contact your RHEINZINK
representative. You can find your colleagues
near you at www. rheinzink.com


105778-RZ-S_GB-005-08-19_EP
RHEINZINK Sverige
Tillfällavägen 15
43363 Sävedalen
T: +46 31 7554500
www.rheinzink.se
Table of contents