RHOX 300 Series User manual

Caution: Please read through the instructions carefully. Installer is respon-
sible for damage if instructions are not followed properly. Look behind each
drill or cut location BEFORE YOU DRILL OR CUT. Installer is responsible for
damage (i.e. drilling/cutting into a wiring harness, battery, fuel tank etc.).
Extra installers will be helpful in some parts of the installation. Refer to vehi-
cle’s maintenance manual for torqueing specifications on reused hardware.
SEAT-331
Club Car Precedent
RHOX Seat Kit
Installation Instructions
Contents of SEAT-331 RHOX 300 Series Rear Seat Kit:
a (2 ea.) Vertical Support Brackets
b (1 ea.) Seat Platform
c (1 ea.) Foot Plate
d (2 ea.) Handrails
e (2 ea.) Foot Plate Support Brackets
f (1 ea.) Seat Back Support Frame
g (1 ea.) Seat Back Bracket, Passenger Side
h (1 ea.) Seat Back Bracket, Driver Side
i (1 ea.) Seat Bottom Handle
j (2 ea.) Rear Strut Brackets
k (2 ea.) Rear Struts
l (1 ea.) Box of Hardware (Contents on Next Page)

Page 2
Tools Needed For Installation
- Sockets and Open Ended Wrenches: 8mm, 10mm, 13mm, 17mm
- Torx Bit Socket: T40
- Phillips and Flat Head Screwdrivers
- Drill and Drill Bit (3/8”)
- Rubber Mallet (Optional)
- Chisel (Optional)
Contents of SEAT-331 Hardware Kit Bag #1 #2 #3 #4 #5
a10mm x 80 Hex Head Bolts 2
b10mm x 75 Hex Head Bolts 2
c10mm x 70 Hex Head Bolts 4
d10mm x 50 Hex Head Bolts 22
e10mm x 45 Hex Head Bolts 2
f10mm x 30 Hex Head Bolts 2
g10mm x 25 Hex Head Bolts 2
h10mm x 40 Phillips Head Truss Bolts 2
i10mm Flat Washers 412 414 4
j10mm Nylock Nuts 26282
k10mm x 4mm Thick Spacers 22
l6mm x 25 Hex Head Bolts 4
m6mm x 20 Phillips Head Countersunk Screws 2
n6mm Lock Washers 4
o6mm Flat Washers 4
pPlastic Plugs for Platform (not shown) 4

Page 3
Installation Preparation
1. Engage parking brake.
2. Turn key OFF.
3. Electric Carts Only: Place
Tow/Run Switch in Tow.
4. Remove canopy
(black arrows). Retain
hardware.
5. Remove rear struts
(red arrow). Hardware is
located inside of sweat-
er basket. Discard struts
and hardware.
6. Remove the front seat
back cushion (black
arrows). Retain seat
back and hardware.
NOTE: Remove TORX
bolts by hand. Do not
use air tools.
7. Remove sweater
basket / SAM Assembly
(red arrows, 4 bolts
total). Discard sweater
basket / SAM assembly.
Retain hardware.
8. Remove both canopy supports. Discard supports and
retain hardware.
Rear Strut (Driver Side)
Front Strut
(Driver Side)
(Driver Side)

Page 4
Rear Seat Kit Installation
1. Use a 3/8” drill bit to open up the (2) rear
and outer most holes in the bagwell area.
Drill completely through the rivet and the
frame. Driver side hole not shown.
2. Loosely fasten the vertical support brackets
to the bagwell area using (2) 10mm x 50
Hex Head Bolts, (4) Flat Washers and (2)
Nylock Nuts (Bag #1).
3. Loosely install the seat platform to the rear
body using the Original Hardware removed
in Step 7 (red arrows) and 8 (black arrows).
NOTE: Protect the rear body from scratches
with a thick blanket or clean piece of card-
board. An extra installer is recommended
to help with the platform.
4. With the platform folded, loosely install the seat platform to the vertical support
brackets using (2) 10mm x 25 Hex Head Bolts, (4) Flat Washers and (2) Nylock
Nuts (Bag #2).
(Folded Edge of Platform)

Page 5
5. Loosely fasten the foot-
plate to the vertical
support brackets using
(2) 10mm x 30 Hex
Head Bolts,
(4) Flat Washers and (2)
Nylock Nuts (Bag #3).
6. Loosely fasten the
longer leg of a handrail
to the rearmost portion
of the seat platform
(blue arrow) using
(1) 10mm x 40 Phillips
Head Truss Bolt,
(1) Flat Washer & (1)
Nylock Nut (Bag 4).
7. Slide a footplate sup-
port bracket over the
long end of the handrail
until the holes align
(black arrow). The
bracket will cradle the
footplate. Loosely fas-
ten the bracket and
handrail to the footplate
using (1) 10mm x 80
Hex Head Bolt, (2) Flat
Washers & (1) Nylock
Nut (Bag #4).
8. Repeat Steps 6 and
7 for the opposite
handrail.
9. Place the seat back
support frame between
the handrails. Loosely
fasten the support
frame to the bottom of
the handrails (red
arrow) using (2) 10mm
x 70 Hex Head Bolts, (4)
Flat Washers
and (2) Nylock Nuts
(Bag #4).

Page 6
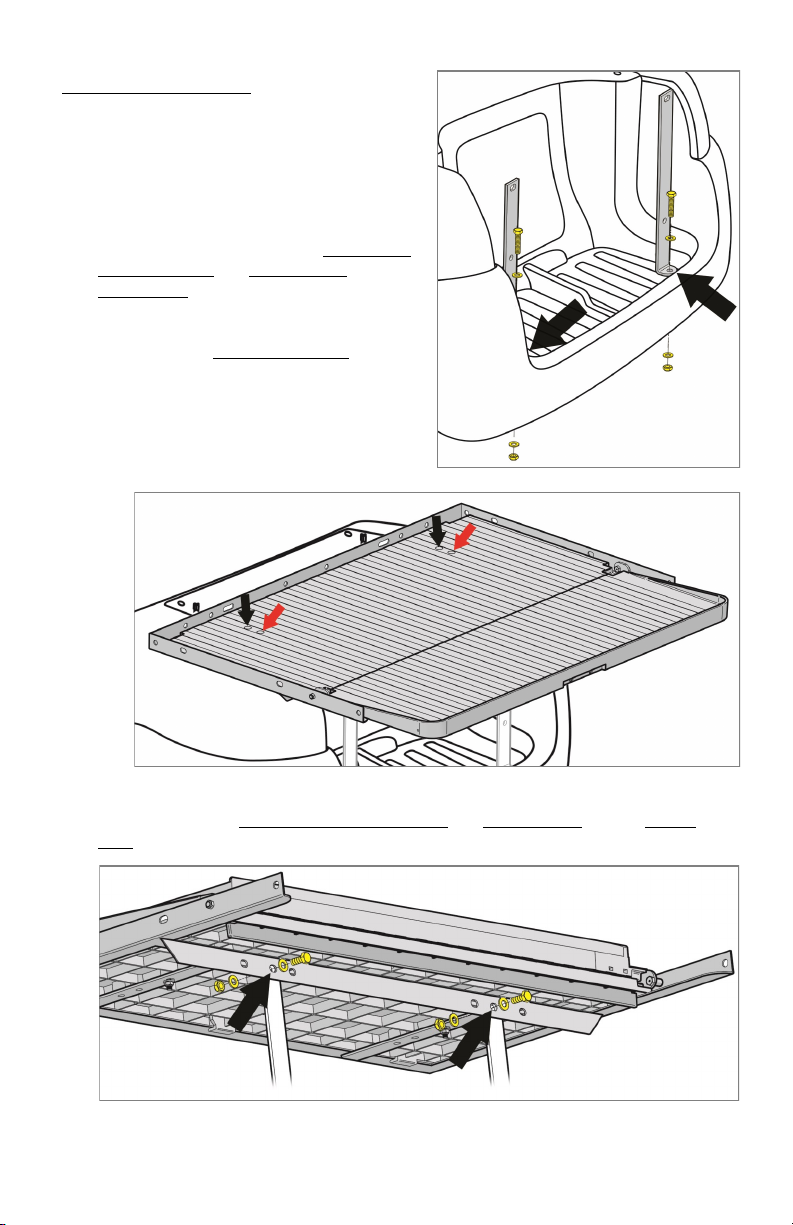
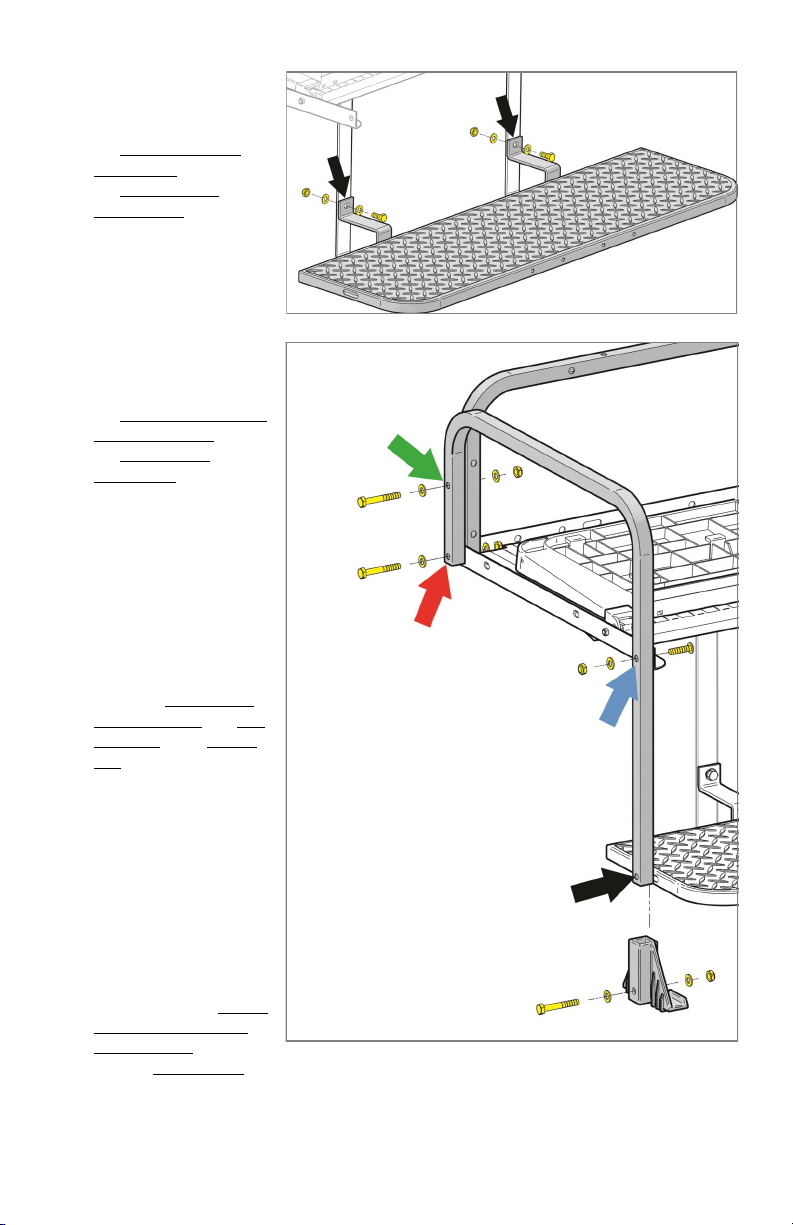
10. Loosely fasten the top of the handrails to the support frame (green arrow, page 5)
using (2) 10mm x 70 Hex Head Bolts, (4) Flat Washers, (2) Nylock Nuts and (2)
Spacers (Bag #4).
11. If reinstalling the OE top, complete
steps 12-15.
12. Use a chisel or flat head screwdriver
to remove the (2) sweater basket
assembly pins that were under the
canopy support brackets.
13. Loosely fasten the new rear struts
to the seat back support frame
(red arrows) using (2) 10mm x 75
Hex Head Bolts, (2) Spacers, (4)
Flat Washers and (2) Nylock Nuts
(Bag #2).
14. Loosely fasten the rear strut
brackets to the rear struts and
the seat platform (black arrows)
using (2) 10mm x 50 Hex Head
Bolts, (4) Flat Washers and (2)
Nylock Nuts (Bag #2).
15. Loosely fasten the rear strut
brackets to the body of the cart
using the Original Hardware (blue
arrows).
16. Install the seat back
brackets to the rear seat
back using (4) 6mm x 25
Hex Head Bolts, (4) 6mm
Lock Washers and
(4) 6mm Flat Washers
(Bag #5). Hand tighten.
NOTE: The driver and
passenger side brackets
are different.

Page 7
17. Loosely fasten the seat back support
brackets on top of the support frame using
(2) 10mm x 45 Hex Head Bolts, (4) 10mm
Flat Washers and (2) 10mm Nylock Nuts
(Bag #5). Rear seat back is not shown.
NOTE: The seat back support brackets have
(2) vertical mounting holes for adjustment.
They can be mounted closer to the front or
closer to the rear of the cart depending on
the driver’s height.
18. Install the front seat back cushion using the Original Hardware. Hand tighten.
19. Tighten all hardware.
20. Align the recessed areas on the seat bottom cushion with the locking tabs on the
seat platform (yellow). Slide the seat bottom onto the platform until it locks into
place on the locking tabs.
21. Fasten the handle to the seat platform
using (2) 6mm x 20 Phillips Head
Countersunk Screws (Bag #5). Hand
tighten to lock the seat bottom into place.

22. If installing struts for an extended top, install TOP-0108
rear struts to the rear seat back support frame.
NOTE: RHOX 88” Tops require TOP-0108 rear struts.
23. Reinstall top using Original Hardware (if applicable).
This completes the installation of your
RHOX 300 Series Rear Seat Kit. Please enjoy safely!
Scan QR code or use the link below to
view the installation video.
https://vimeo.com/user39935056
Page 8
This manual suits for next models
1
Table of contents
Other RHOX Car Seat manuals
Popular Car Seat manuals by other brands

Mamas & Papas
Mamas & Papas Vito installation instructions

CYBEX gold
CYBEX gold SIRONA M2 i-Size user guide

Toyota
Toyota Auris 2006 installation instructions

BRITAX RÖMER
BRITAX RÖMER KID User instructions

VERTBAUDET
VERTBAUDET 1004234-0907 SA ISIZE 1/2/3 instruction manual

Britax
Britax BOULEVARD 65 CS manual