Ricatech PR85 User manual

PR85 Recorder 80's Radio Cassette
AUTO STOP SYSTEM
4 BANDS RADIO CASSETTE USB/SD MP3 PLAYER
PLAY/PAUSE REPEAT
530
88 91 95
650 850
101 106 108
1100 1300 1600
2.3 3.6 5.5
10 11.5
7.6 9.3 10
15.0 7.8 21 22
0 1 2 3
4 5 6 789 10
REW F.F
PLAY
INDICATOR USB SD
FM
AM
SW1
Sw2
USER MANUAL GEBRUIKERSHANDLEIDING MODE D'EMPLOI

IMPORTANT SAFEGUARDS FOR AUDIO PRODUCTS
PLEASE READ CAREFULLY THE FOLLOWING IMPORTANT SAFEGUARDS THAT ARE
APPLICABLE TO YOUR EQUIPMENT.
1. Read Instructions -All the safety and operating instructions should be read before the
appliance is operated.
2. Retain Instructions -The safety and operating instructions should be retained for future
reference.
3. Heed Warnings -All warnings on the appliance and in the operating instructions should be
adhered to.
4. Follow Instructions -All operating and use instructions should be
followed.
5. Water and Moisture - The appliance should not be used
near water-for example, near a bathtub, washbowl, kitchen
sink, laundry tub, in a wet basement, or near a swimming
pooland the like.
6. Carts and Stands -The appliance should be used only with a
cart or stan that is recommendedby the manufacturer.
6A.An appliance and cart combination should be moved with care. Quick stops, excessive force,
and uneven surfaces may cause the appliance and cart combination to overturn.
7. Wall or Ceiling Mounting -The appliance should be mounted to a wall or ceiling
only as recommended by the manufacturer.
8. Ventilation -The appliance should be situated so that its location or position does not
interfere with-its proper ventilation .For example, the appliance should not be situated on a
bed, sofa, rug, or similar surface that may block the ventilation penings; or, placed in a built-in
installation, such as a bookcase or cabinet that may impede the flow of air through the
ventilation openings.
9. Heat -The appliance should be situated away from heat sources such as radiators, heat
registers, stoves,or other appliances (including amplifiers) that produce heat.
10.Power Sources -The appliance should be connected to a power supply only of the type
described in the operating instructions or as marked on the appliance.
11.Grounding or Polarization -Precautions should be taken so that the grounding or
polarization means of an appliance is not impeded.
12.Power -Cord Protection - Power-supply cords should be routed so that they are not likely to
be walked on or pinched by items placed upon or against them, paying particular attention to
cords at plugs, and the point where they exit from the appliance.
13.Cleaning -The appliance should be cleaned only as recommended by the manufacturer.
14.This product is designed for use with the antenna attached and should not be connected to
any other external antennas.
15.Non-use Periods -The power cord of the appliance should be unplugged from the outlet
when left unused for a long period of time.
16.Object and Liquid Entry -Care should be taken so objects do not fall and liquids are not
spilled into the enclosure through openings
17.Damage Requiring Service -The appliance should be serviced by qualified service
personnel when:
A. The power-supply cord of the plug has been damaged;or
B. Objects have fallen, or liquid has been spilled into the appliance;or
C. The appliance has been exposed to rain;or
D. The appliance does not appear to operate normally or exhibits a marked change
inperformance; or
E.The appliance has been dropped, or the enclosure damaged.
18.Servicing -The user should not attempt to service the appliance beyond that described in
the operating instructions. All other servicing should be referred to qualified service personnel.
GB-1

WARNING:
TO PREVENT FIRE OR SHOCK HAZARD, DO NOT EXPOSE THIS APPLIANCE TO RAIN OR
MOISTURE. DO NOT REMOVE COVER. PILOT LAMPS SOLDERED IN PLACE. NO USER
SERVICEABLE PARTS INSIDE. REFER SERVICING TO QUALIFIED SERVICE PERSONNEL.
htiwhsalfgnithgilehT
arrowhead within the triangle
is awarning sign alerting
you of "dangerous voltage"
inside the product .
CAUTION: TO REDUCE THE RISK
OF ELECTRIC SHOCK, DO NOT
REMOVE COVER (OR BACK). NO
USER – SERVICEABLE PARTS
INSIDE. REFER SERVICING TO
QUALIFIED SERVICE PERSONNEL.
CAUTION
RISK OF ELECTRIC SHOCK DO
NOT OPEN
The exclamation point within
the triangle is a warning sign
alerting you of important
instructions accompanying the
product.
SPECIFICATIONS:
Frequency :FM:88-108MHz
: AM:530-1600KHz
:SW1:2.3-10MHz
:SW2:10-22MHz
Power Consump on :13Wa
)SCP4X1-MU(V6rozH05/V022~CA
1. Do not install this equipment in a confined or building-in space such as a book case or similar unit, and
remain a well ventilation conditions at open site. The ventilation should not be impeded by covering the
ventilation openings with items such as newspaper, table-cloths, curtains etc.
2. WARNING:To reduce the risk of fire or electric shock, do not expose this apparatus to rain or
moisture. The apparatus shall not be exposed to dripping or splashing and that objects filled with
liquids, such as vases, shall not be placed on apparatus.
3. WARNING: The battery (battery or batteries or battery pack) shall not be exposed to excessive heat
such as sunshine, fire or the like.
4. WARNING: The mains plug is used as disconnect device, the disconnect device shall remain readily
operable
5. No naked flame sources, such as lighted candles, should be placed on the apparatus.
6. Attention should be drawn to environmental aspects of battery disposal.
CURRENT 65mA POWER 13W

Radio Operation
1. Select required band (FM/AM/SW1-SW2) with BAND selector.
2. Turn to required station by rotating the TUNING Control.
3. The built-in AM antenna and the antenna are directional. When receiving FM or SW1-SW2
broadcast, pull out the telescopic antenna in full length; the strongest reception can be achieved by
rotating the set or antenna.
4. Adjust VOLUME control to your listening preference.
5. Set the Function Selector SLEEP position, Press PLAY Button. The radio will be automatically
Turn off when the tape reaches the end.
6. To turn off the radio, set the function selector to TAPE(OFF) button. Or unplug the plug.
Listening with Headphones(not included)
For private listening, you can use headphones with the unit .Connect the headphones(not included)to
the Headphones jack at the side of the unit .The sound from the speakers is automatically turned off
when headphones are connected to the unit.
Play Back Operation
Cassette play
1. Set the Function selector to the TAPE position
2. Press the STOP/ELECT button to open the cassette door. Insert the cassette to the open side faces up.
Close the cassette door.
3. Use the following buttons and controls for cassette play:
PRESS TO
PLAY Begin cassette play
F.FWD Rapidly advance the tape
REWIND Rapidly rewind the tape .
STOP Stop play or release the F.FWD and REW buttons
Auto Stop Feature Tape plays automatically stop when the end is reached .
PAUSE Stop tape play or record. The use of the PAUSE button dose not
disturb the setting for either play or record .
Caution this function should be used for temporary stop during tape
which is recording .Press PAUSE again to resume play .
VOLUME Control Adjust the volume. Slide the control to the right to increase the
volume slide the control to the left to decrease the volume .
Recording from the Built-in Microphone
1.Set the Function Selector to the TAPE position.
2. Insert a blank cassette into the tape compartment.
3.Push down the Record and Play Button. The recording process start. All sound detected
by the microphone will be recorded until the STOP or PAUSE button is pressed, or until
the tape reaches the end.

Directly Recording from the In-In Radio
1. Set the Function Selector to the RADIO position.
2. Turn in the radio station you want to record.
3. Insert a blank cassette into the tape compartment.
4. Press the Record button, Play button will be pressed automatically and recording starts.
5.Direct recording will continue until the STOP or PAUSE button is pressed, or until the tape reaches the
end.
Care and Maintenance
TO ensure optimum performance from your unit, keep the tape inside clean. To clean the tape
path, open the cassette door. Moisten a cotton swab with isopropyl alcohol or special tape head
cleaning fluid. Remove any excess alcohol front the swab. Clean the tape head, capstan and pinch
roller. Avoid scratching the head surface. To clean the unit housing, use a soft damp cloth. After
cleaning, wipe the unit surface with a dry cloth.
Caution: Never use chemicals such as benzene or paint thinner for cleaning; otherwise, the case
may be deformed or discolored.
Keep magnets and metallic objects away from the tape head. If the bead becomes magnetized,
noise will increase and the tone will deteriorate possible damage from battery corrosion.
Troubleshooting
Check The Following Guide For Problem Resolution
SYMPTOM CAUSE SOLUTION
Tape fails to
move
Head of weak batteries AC cord not
connect properly.
Function Selector not set properly
Defective tape
Replace battery
Check AC cord connection
Set function selector to position
Try another tape
Sound fades
or is
unsteady
Dead or weak batteries
Headphones not connected properly
Tape mechanism dirty
Defective tape
Replace battery
Check headphone connection
Clean the head, pinch roller and capstan
Try another tape
Poor radio
reception
Station not tuned Use TUNING control to adjust, extend
telescopic ANTENNA for FM/SW1-SW2
reception, rotate the unit for AM reception.

1.TELESCOPE ANTENNA
2. HANDLE
3. TAPE & RADIO USB SWITCH
4. BAND SELECTOR
5. EXTERNAL EARPHONE JACK
6.MIC
7.TUNING KNOB
8. VOLUME CONTROL KNOB
9. PAUSE BUTTON (BACK)
10. STOP BUTTON
11. FAST FORWARD BUTTON
12. REW BUTTON
13.PLAY BACK BUTTON
14. REC BUTTON
15.LOUD SPEAKER
1.TURN ON THE POWER
2.SET THE FUNCTION SELECTOR TO USB/SD
3.INSERT A USB FLASH DRIVE (OR A SD CARD) WITH MP 3 FORMAT MUSIC,
THE UNIT WILL PLAY AUTOMATICALLY. PRESS PAUSE/PLAY BUTTON TO HOLD
THE PLAYBACK, PRESS IT AGAIN TO CONTINUE THE PLAYBACK. PRESS REPEAT
BUTTON TO REPEAT THE PLAYING SONG. PRESS REW BUTTON TO SELECT THE
PREVIOUS SONG AND F.F BUTTON TO THE NEXT SONG.
USB/SD PLAYBACK

25.USB/SD FAST FORWARD BUTTON
26.MP3 INDIC ATOR
Sources of Power
AC Operation
1. Before connecting the unit to an AC Outlet, check that the operating VOLTAGE of the unit is
identical with the VOLTAGE of your Local Power Supply.
2. Connect the supplied AC Power Cord to the AC Socket at the side of unit.
3. The Battery will be automatically disconnected, when The AC Power Cord is plugged
into the socket.
Battery Operation
Unplug the AC cord from AC jack. This unit requires UM1X4(not included), open battery
compartment cover. insert the batteries in the battery compartment at the downside of the unit,
being careful of position according to the notes. Close the battery compartment cover.
Battery Precautions
1.Maintain correct polarity(+and-) when installing battery.
2.Take out batteries when the unit will not be used for a long time.
CUSTOMER SUPPORT
You can contact the Ricatech customer service when you have a question or a problem
with your Ricatech product.For full procedure or contact information please visit the
website of Ricatech at: www.ricatech.com
16.DC JACK
17. CASSETTE COMPARTMENT
18.AC SOCKET
19.BATTERY COMPARTMENT
20.USB PORT
21.SD SLOT
22.USB/SD PLAY/PAUSE BUTTON
23.USB/SD REPEAT BUTTON
24.USB/SD REW BUTTON

BELANGRIJKE VOORZORGSMAATREGELEN VOOR
AUDIOPRODUCTEN
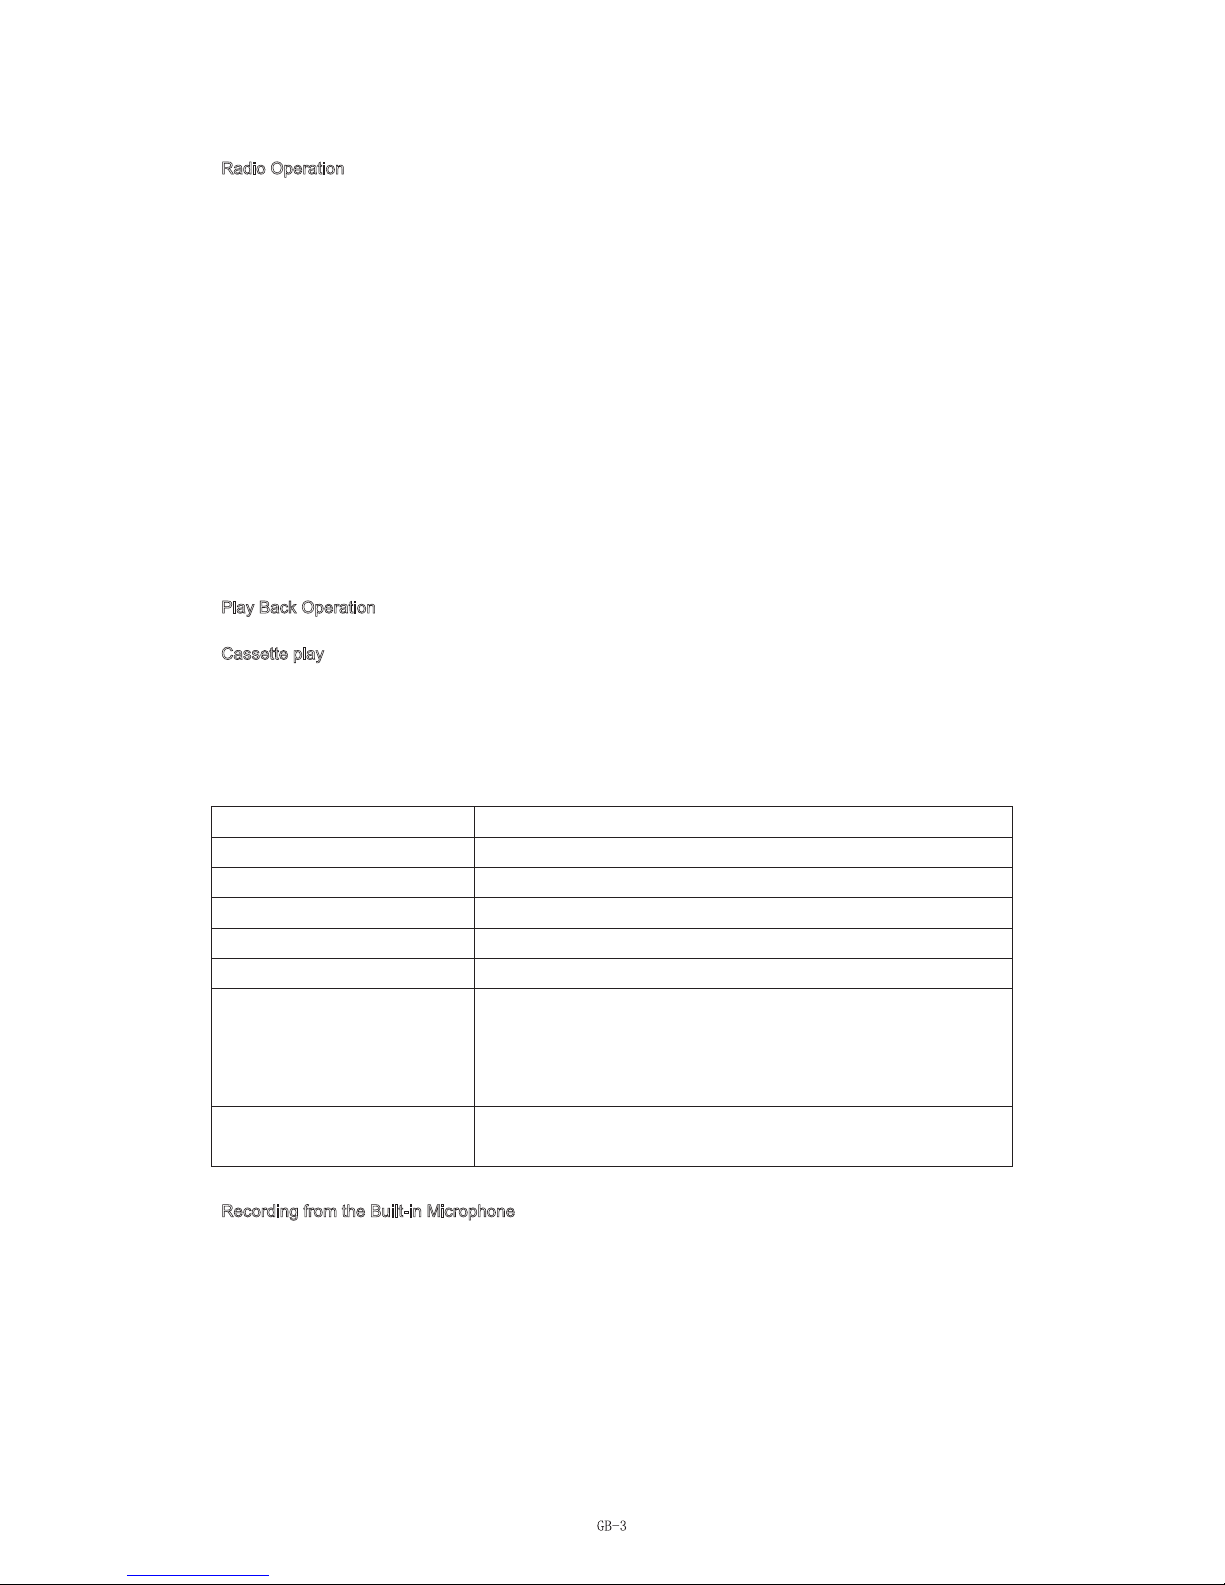
LEES DE VOLGENDE BELANGRIJKE VOORZORGSMAATREGELEN DIE VAN TOEPASSING ZIJN
OP UW APPARATUUR AANDACHTIG DOOR.
1. Lees instructies -Alle veiligheids- en bedieningsinstructies dienen te worden gelezen alvorens het
apparaat te gebruiken.
2. Bewaar instructies - De veiligheids- en bedieningsinstructies dienen te worden bewaard voor
toekomstige referentie.
3. Gehoorzaam waarschuwingen - Alle waarschuwingen op het apparaat en in de
bedieningsinstructies dienen opgevolgd te worden.
4. Volg instructies - Alle bedienings- en gebruiksinstructies dienen
te worden opgevolgd.
5. Water en Vocht - Het apparaat dient niet te worden gebruikt
in de buurt van water-bijvoorbeeld, in de buurt van een badkuip, wasbasin of
keuken
wasbak,wastobbe, in een vochtige kelder, of in de buurt van een zwem-
bad en dergelijke.
6. Karretjes en standaards -Het apparaat mag alleen gebruikt worden met een
karretje of standaard aanbevolen door de fabrikant.
6A. Een combinatie van apparaat en karretje moet voorzichtig worden verplaatst. Plotseling stoppen,
buitengewoon veel kracht en ongelijkmatige oppervlakken kunnen ervoor zorgen dat de combinatie van
het apparaat en karretje omslaat.
7. Wand- of plafondmontage -Het apparaat mag alleen aan een wand of plafond worden gemonteerd
zoals aanbevolen door de fabrikant.
8. Ventilatie - Het apparaat moet op zodanige wijze geplaatst worden dat de locatie of positie niet
interfereert met correcte ventilatie. Bijvoorbeeld, het apparaat mag niet op een bed, bank, tapijt of
een vergelijkbaar oppervlak geplaatst worden dat de ventilatie-openingen kan blokkeren; deze mag ook
niet in een ingebouwde installatie geplaatst worden zoals een boekenkast of kabinet die de
luchtstroom door de ventilatie-openingen mogelijk kunnen onderbreken.
9. Warmte -Het apparaat dient te worden gesitueerd uit de buurt van warmtebronnen, zoals radiatoren,
verwarmingsroosters, fornuizen of andere apparaten (inclusief versterkers) die warmte produceren.
10.Voedingsbronnen -Het apparaat dient alleen te worden aangesloten op een voedingsbron van het
type dat wordt beschreven in de bedieningsinstructies of zoals aangegeven op het apparaat.
11. Aarden of polarisatie -Er dienen voorzorgsmaatregelen te worden genomen zodat de aardings- of
polarisatiemiddelen van het apparaat niet worden belemmerd.
12.Vermogen -Kabelbescherming - Stroomtoevoerkabels dienen zodanig gelegd te worden dat er niet
overheen gelopen wordt of dat ze beklemd raken door voorwerpen die er bovenop of tegenaan
geplaatst worden, besteed extra aandacht aan snoeren bij stopcontacten en het punt waar ze het
apparaat verlaten.
13.Schoonmaken -Het apparaat dient alleen te worden schoongemaakt zoals aanbevolen door de
fabrikant.
14.Dit product is ontworpen voor gebruik met de bevestigde antenne en mag niet worden verbonden
met andere externe antennes.
15.Periodes van geen gebruik -Het netsnoer van het apparaat dient uit het stopcontact te worden
gehaald wanneer het apparaat een lange tijd niet wordt gebruikt.
16.Objecten en vloeistoffen -Let op dat er door de openingen geen objecten of gemorste vloeistof
in de behuizing vallen
17. Schade die onderhoud vereist -Het apparaat dient te worden onderhouden door gekwalificeerd
onderhoud personeel als:
A. Het netsnoer van de stekker is beschadigd; of
B. Objecten zijn gevallen in, of vloeistof is gemorst in het apparaat; of
C. Het apparaat is blootgesteld aan regen; of
D. Het apparaat lijkt niet normaal te werken of vertoont een opvallende verandering in de
werking; of
E.Het apparaat is gevallen of de behuizing is beschadigd.
18.Onderhoud -De gebruiker mag niet proberen het apparaat te onderhouden anders dan beschreven
in de bedieningsinstructies. Alle andere onderhoudswerkzaamheden dienen te worden overgelaten
aan gekwalificeerd onderhoudspersoneel.
NL-1

WAARSCHUWING:
OM BRAND OF GEVAAR VAN EEN ELEKTRISCHE SCHOK TE VOORKOMEN, MAG HET
APPARAAT NIET WORDEN BLOOTGESTELD AAN REGEN OF VOCHT. VERWIJDER HET
DEKSEL NIET. CONTROLELAMPJES VASTGESOLDEERD OP HUN PLAATS. GEEN
DE GEBRUIKER TE ONDERHOUDEN ONDERDELEN AAN DE BINNENKANT. LAAT
ONDERHOUD OVER AAN GEKWALIFICEERD ONDERHOUDSPERSONEEL.
SPECIFICATIES:
Frequentie : FM:88-108MHz
: AM:530-1600KHz
: SW1:2.3-10MHz
: SW2:10-22MHz
Vermogensgebruik : 13 Watt
-antenne telescopisch
Vermogensbron : AC~220V/50Hz or 6V(UM-1X4PCS) batterijen
1 x 8 Watt
De Bliksemschicht en pijl
in een driehoek is een
waarschuwing die
“gevaarlijke spanning”
binnen het product aan
u bekend maakt.
LET OP
RISICO OP ELEKTRISCHE SCHOK
LET OP: OM HET RISICO OP
ELEKTRISCHE SCHOKKEN TE
VERMINDEREN VERWIJDERT U DE
KLEP (OF ACHTERKANT) NIET. GEEN
ONDERDELEN VOOR
GEBRUIKERSONDERHOUD BINNEN
IN. LAAT ONDERHOUD OVER AAN
GECERTIFICEERD
ONDERHOUDSPERSONEEL.
Het uitroepteken in
de driehoek is een
waarschuwing die
belangrijke
instruc es van het
product ann u
bekend maakt.

4. WAARSCHUWING: De hoofdstekker wordt als uitschakelingsapparaat gebruikt, het
uitschakelingsapparaat dient gemakkelijk bereikbaar te zijn
5. Er dienen geen open vlambronnen, zoals brandende kaarsen, op het apparaat geplaatst te
worden.
6. Neem de milieu-aspecten van het weggooien van ba erijen in acht.
STROOM 65 mA VERMOGEN 13 W
Bediening van de Radio
1. Selecteer de vereiste band (FM/AM/SW1-SW2) met de BAND-keuzeknop.
2. Schakel naar het gewenste sta on door te draaien aan de TUNING-knop.
3. De ingebouwde AM-antenne en de antenne zijn rich gsgevoelig. Trek de telescopische
antenne volledig uit bij het ontvangen van FM- of SW1-SW2-uitzendingen; het sterkste ontvangst
kan worden behaald door te draaien aan de apparatuur of antenne.
4. Stel de VOLUME-knop bij naar uw luistervoorkeur.
5. Stel de Func ekeuzeknop SLEEP-posi e in en druk op de PLAY-knop. De radio wordt
automa sch uitgeschakeld als de casse e afgelopen is.
6.
Luisteren met Hoofdtelefoon (niet inbegrepen)
U kunt de hoofdtelefoon met de eenheid gebruiken voor het luisteren in afzondering. Verbind de
hoofdtelefoon (niet inbegrepen) met de Hoofdtelefoonaanslui g aan de zijde van de eenheid.
Het speakergeluid wordt automa sch uitgeschakeld wanneer er een hoofdtelefoon op de
eenheid aangesloten wordt.
1. Installeer dit apparaat niet in een afgesloten of ingebouwde ruimte zoals een boekenkast of
een vergelijkbare ruimte en zorg voor een goede ven la e. De ven la e mag niet gehinderd
worden door de ven la e-openingen te bedekken met voorwerpen zoals kranten, tafelkleden,
gordijnen, enz.
2. WAARSCHUWING: Om het gevaar voor brand of een elektrische schok te verkleinen, dient het
apparaat niet te worden blootgesteld aan regen of vocht. Het apparaat dient niet te worden
blootgesteld aan druppels of spe ers en voorwerpen gevuld met vloeistoffen, zoals vazen,
mogen niet op het apparaat worden geplaatst.
3. WAARSCHUWING: De ba erij (ba erij of ba erijen of accu) dient niet te worden blootgesteld
aan overma ge hi e zoals zonneschijn, vuur of dergelijke.

Opnemen met de Ingebouwde Microfoon
1. Stel de Func ekeuzeknop in op de TAPE-posi e.
2. Plaats een lege casse e in het casse evak.
3. Druk de Opname- en Afspelen-knop in. Het opnameproces begint. Al het geluid dat wordt
opgevangen door de microfoon wordt opgenomen tot er op de STOP- of PAUSE-knop wordt
gedrukt, of totdat de casse e afgelopen is.
Direct Opnemen van de In-In Radio
1. Stel de Func ekeuzeknop in op de RADIO-posi e.
2. Schakel naar het radiosta on dat u wenst op te nemen.
3. Plaats een lege casse e in het casse evak.
4. Druk op de Opname-knop, de Afspelen-knop wordt automa sch ingedrukt en het opnemen
begint.
5. Het direct opnemen zal doorgaan totdat er op de STOP- of PAUSE-knop wordt gedrukt, of
totdat de casse e afgelopen is.
Terugspeelwerking
Casse e afspelen
1. Stel de Funcekeuzeknop in op de TAPE-posi e
2. Druk op de STOP/ELECT-knop om de casse eklep te openen. Plaats de casse e zodat de open
zijde omhoog wijst. Sluit de casse eklep.
3. Gebruik de volgende knoppen en toetsen voor het afspelen van de casse e:
DRUK IN OM
PLAY
Te beginnen met afspelen van de cassette
F.FWD
De cassette snel vooruit te spoelen.
REWIND
De cassette snel terug te spoelen.
STOP Het afspelen te stoppen of de F.FWD- en
REW-knoppen te stoppen.
Auto Stop Feature Cassettes stoppen automatisch met afspelen als de
cassette is afgelopen.
PAUSE Stop het afspelen of opnemen. Het gebruik van de
PAUSE-knop verstoort de instelling van afspelen of
opnemen niet.
Let op: deze functie dient gebruikt te worden voor het
tijdelijk stoppen tijdens het opnemen. Druk opnieuw
op PAUSE om het afspelen te hervatten.
VOLUME-knop Pas het volume aan. Draai de knop naar rechts om
het volume te verhogen en naar links om het volume
te verlagen.

SYMPTOOM OORZAAK OPLOSSING
Cassette
beweegt niet
Koppen van zwakke
batterijen of AC-snoer niet
correct verbonden.
Functiekeuzeknop niet
correct ingesteld.
Kapotte cassette
Vervang batterij.
Controleer verbinding
AC-snoer.
Stel de functiekeuzeknop in
op de Tape-positie.
Probeer een andere cassette.
Geluid vervaagt
of is instabiel
Lege of zwakke batterijen
Hoofdtelefoon niet correct
aangesloten.
Cassettemechanisme is
vies.
Kapotte cassette.
Vervang batterij.
Controleer de
hoofdtelefoonaansluiting.
Reinig de kop, aandrukrol en
kaapstander.
Probeer een andere cassette.
Slechte
radio-ontvangst
Radiostation niet goed
ingesteld.
Gebruik de TUNING-knop om
aan te passen.
Schuif de telescopische
ANTENNE uit voor
FM/SW1-SW2-ontvangst.
Draai de eenheid voor
AM-ontvangst.
Problemen oplossen
Controleer de Volgende Gids voor het Oplossen van Problemen
Verzorging en Onderhoud
Houd de casse e binnenin de eenheid schoon voor op male presta es. Open de casse eklep om
het casse epad te reinigen. Bevoch g een wa enstaa e met isopropylalcohol of speciale
reinigingsvloeistof voor casse ehoofden. Verwijder overtollige alcohol van het wa enstaa e.
Reinig het casse ehoofd, de kaapstander en de aandrukrol. Voorkom het bekrassen van het
hoofdoppervlak. Gebruik een zachte, voch ge doek voor het reinigen van de eenheidsbehuizing.
Veeg het eenheidsoppervlak of met een droge doek na het reinigen.
Let op: Gebruik nooit chemicaliën zoals benzine of verfverdunner voor het reinigen; anders kan
de behuizing vervormen of verkleuren.
Houd magneten en metalen voorwerpen uit de buurt van het casse ehoofd. Als de knop
gemagne seerd wordt, kan geluid toenemen en kan de toon mogelijk verslechteren vanwege
schade door ba erijcorrosie
Pinch Roller = Aandrukrol
Capstan = Kaapstander
Head = Kop
Co on Swab = Wa enstaa e

1. TELESCOPISCHE ANTENNE
2. HANDGREEP
3. CASSETTE & RADIO-USB-SCHAKELAAR
4. BANDKEUZEKNOP
5. EXTERNE HOOFDTELEFOONAANSLUITING
6. MIC
7. TUNING-KNOP
8. BEDIENINGSKNOP VOLUME
9. PAUSE-KNOP (TERUG)
10. STOP-KNOP
11. FAST FOWARD-KNOP
12. REW-KNOP
13. PLAY BACK-KNOP
14. REC-KNOP
15. LUIDSPREKER
USB/SD-TERUGSPELEN
1. SCHAKEL DE STROOM IN
2. STEL DE FUNCTIEKEUZEKNOP IN OP USB/SD
3. PLAATS EEN USB-STICK (OF EEN SD-KAART) MET MUZIEK VAN MP3-FORMAAT EN DE EENHEID
ZAL AUTOMATISCH AFSPELEN. DRUK OP DE PAUSE/PLAY-KNOP OM HET AFSPELEN TE PAUZEREN,
DRUK OPNIEUW OM VERDER TE GAAN MET HET AFSPELEN. DRUK OP DE REPEAT-KNOP OM HET
HUIDIGE LIEDJE TE HERHALEN. DRUK OP DE REW-KNOP OM HET VORIGE LIEDJE TE SELECTEREN
EN OP DE F.F-KNOP VOOR HET VOLGENDE LIEDJE.

25. USB/SD-FAST FORWARD-KNOP
26. MP3-INDICATOR
Voedingsbronnen
AC-werking
1. Voor het aansluiten van de eenheid of een AC-uitgang, controleert u of het werkende VOLTAGE
van de eenheid gelijk is aan het VOLTAGE van de uw Lokale Voedingsbron.
2. Verbind het meegeleverde AC-stroomsnoer met het AC-stopcontact aan de zijde van de
eenheid.
3. De Ba erij wordt automa sch ontkoppeld als het AC-stroomsnoer in de aanslui g wordt
gestoken.
Ba erijwerking
Ontkoppel het AC-snoer uit de AC-aanslui g. Deze eenheid gebruikt UM1X4 (niet inbegrepen),
open klep van het ba erijvak. Plaats de ba erijen in het ba erijvak aan de onderkant van de
eenheid, neem de posi e volgens de no es in acht. Sluit de klep van het ba erijvak.
Ba erijvoorzorgsmaatregelen
1. Zorg voor correcte polariteit (+en-) bij het plaatsen van de ba erij.
2. Haal de ba erijen uit de eenheid als deze gedurende lange jd niet gebruikt wordt.
KLANTENSERVICE
U kunt contact opnemen met de Ricatech-klantenservice wanneer u een vraag of een
probleem heeft met uw Ricatech-product .Voor de volledige procedure of
contactinformatie, bezoek alstublieft de website van Ricatech op: www.ricatech.com
16. DC-AANSLUITING
17. CASSETTEVAK
18. AC-STOPCONTACT
19. BATTERIJVAK
20. USB-POORT
21. SD-SLEUF
22. USB/SD-PLAY/PAUSE-KNOP
23. USB/SD-REPEAT-KNOP
24. USB/SD-REW-KNOP

INSTRUCTIONS IMPORTANTES RELATIVES À LA SÉCURITÉ
DES PRODUITS AUDIO
VEUILLEZ LIRE ATTENTIVEMENT LES INSTRUCTIONS SUIVANTES RELATIVES À LA SÉCURITÉ
ET S'APPLIQUANT À VOTRE ÉQUIPEMENT.
1. Lire les instructions -Toutes les consignes de sécurité et les instructions de fonctionnement doivent
être lues avant la mise en marche de l'appareil.
2. Conserver les instructions -Les consignes de sécurité et les instructions de fonctionnement doivent
être conservées pour une consultation ultérieure.
3. Tenir compte des avertissements -Tous les avertissements concernant l'appareil et toutes les
instructions de fonctionnement doivent être respectés.
4. Suivre les instructions -Toutes les instructions de fonctionnement et d’utilisation
doivent être
suivies.
5. Eau et humidité - L'appareil ne doit pas être utilisé
près de l'eau - par exemple, près d'une baignoire, d'un lavabo, d'un évier
de cuisine, d'une cuve à lessive, dans un sous-sol humide ou près d'une piscine
et tout lieu similaire.
6. Chariots et supports -L’appareil ne doit être utilisé qu’avec un
chariot ou un support recommandé par le fabricant.
6A.Un appareil posé sur son chariot doit être déplacé avec soin. Des arrêts brusques, une force
excessive et des surfaces inégales peuvent entraîner le renversement de l’ensemble appareil-chariot.
7. Montage au mur ou au plafond -L’appareil ne doit être monté au mur ou au plafond que de la
manière préconisée par le fabricant.
8. Ventilation - L’appareil doit être placé de telle sorte que son emplacement ou sa position
n'interfère pas avec sa propre ventilation.Par exemple, l'appareil ne doit pas être placé sur un lit,
un canapé ou une surface similaire qui pourrait bloquer les ouvertures de ventilation ; ou bien, placé sur
une installation intégrée, comme une bibliothèque ou une armoire qui pourrait empêcher le flux d'air à
travers les ouvertures de ventilation.
9. Chaleur -L'appareil doit être situé à l'écart de sources de chaleur telles que des radiateurs, des
cuisinières, des poêles ou d’autres appareils (y compris les amplificateurs) produisant de la chaleur.
10.Sources d'alimentation -L'appareil ne doit être branché que sur une source d'alimentation du
type décrit dans le mode d'emploi ou selon ce qui est indiqué sur l'appareil.
11.Mise à la terre ou polarisation -Des précautions doivent être prises pour que la mise à la terre ou
la polarisation de l’appareil ne soit pas compromise.
12.Protection du cordon d'alimentation - Les cordons d'alimentation doivent être acheminés de
manière à ce qu'ils ne soient ni piétinés ni comprimés par des éléments placés sur ou contre eux, et
faire tout particulièrement attention aux cordons au niveau des prises et de l'endroit d'où ils sortent de
l'appareil.
13.Nettoyage -L'appareil doit être nettoyé uniquement selon les recommandations données par le
fabricant.
14.Ce produit est conçu pour être utilisé avec l'antenne fixée et ne doit être connecté à aucune autre
antenne externe.
15.Périodes d'inutilisation -Le cordon d'alimentation de l'appareil doit être débranché de la prise en
cas d’inutilisation prolongée pendant une longue période.
16.Entrée d'objets et de liquides -Des précautions doivent être prises afin que des objets ne tombent
pas sur l'appareil et que des liquides ne pénètrent pas à l’intérieur de l’appareil par les ouvertures
17.Dommages nécessitant une réparation-L’appareil doit faire l'objet de l'intervention d'un technicien
qualifié quand :
A. Le cordon électrique de la prise est endommagé, ou
B. Des objets sont tombés ou du liquide a été répandu à l'intérieur de l'appareil, ou
C. L’appareil a été exposé à la pluie, ou
D. L’appareil ne semble pas fonctionner normalement ou présente un net changement dans ses
performances, ou
E. L'appareil est tombé ou le boîtier est endommagé.
18.Réparation -L'utilisateur ne doit pas tenter de réparer l'appareil au-delà de ce qui est décrit
dans les instructions de fonctionnement. Toute autre réparation doit être confiée à du personnel
d'entretien qualifié.
FR-1

AVERTISSEMENT :
POUR ÉVITER TOUT RISQUE D'INCENDIE OU DE CHOC ÉLECTRIQUE, NE PAS
EXPOSER CET APPAREIL À LA PLUIE OU À L'HUMIDITÉ. NE PAS RETIRER LE
COUVERCLE. VOYANTS SOUDÉS À L'APPAREIL. NE CONTIENT AUCUNE PIÈCE
RÉPARABLE PAR L'UTILISATEUR. CONFIER L'ENTRETIEN À UN TECHNICIEN
QUALIFIÉ.
L’éclair et la pointe de
flèche dans le
triangle est un signe
d’avertissement vous
alertant d’une
«tensiondangereuse»
à l’intérieur du produit.
ATTENTION
POUR RÉDUIRE LE RISQUE
D’ÉLECTROCUTION, NE
PAS RETIRER LE
COUVERCLE (NI LE
RABATTRE EN ARRIÈRE)
AUCUNE PIÈCE
UTILISABLE PAR
L’UTILISATEUR À
L’INTÉRIEUR. S’ADRESSER
À UN PERSONNEL
QUALIFIÉ.
MISE EN GARDE
RISQUE
D'ÉLECTROCUTION, NE
PAS OUVRIR
Le point
d’exclamation dans le
triangle est un signe
d’avertissement vous
alertant au sujet
d’instructions
importantes
accompagnant le
produit.
CARACTÉRISTIQUES :
Fréquence : FM:88-108MHz
: AM:530-1600KHz
: SW1:2.3-10MHz
: SW2:10-22MHz
Consommation électrique : 13 Watt
Alimentation :AC~220V/50Hz or 6V(UM-1X4PCS)
Haut-parleurs stéréo :1x8 Wa

1. Ne pas installer cet équipement dans un espace confiné ou encastré tel qu'une
bibliothèque ou autre, et maintenir de bonnes conditions de ventilation. La ventilation ne
doit pas être entravée en couvrant les ouvertures d'aération avec des objets tels que des
journaux, des nappes, des rideaux, etc.
2. AVERTISSEMENT : Pour réduire les risques d'incendie ou d'électrocution, ne pas
exposer cet appareil à la pluie ou à l'humidité. L'appareil ne doit pas être exposé aux
gouttes d'eau ni à des éclaboussures, et aucun objet rempli de liquide, comme un vase,
ne doit être placé sur l'appareil.
3. AVERTISSEMENT : La batterie (batterie ou piles) ne doit pas être exposée à une
chaleur excessive comme la lumière du soleil, le feu ou similaire.
4. AVERTISSEMENT : La prise principale étant utilisée comme dispositif de déconnexion,
le dispositif de déconnexion doit rester prêt à l’emploi
5. Aucune source de flamme nue, telle que des bougies allumées, ne doit être placée sur
l'appareil.
6. Une attention toute particulière doit être portée sur les aspects environnementaux de la
mise au rebut de la batterie.
COURANT 65 mA PUISSANCE 13 W
Utilisation de la radio
1. Sélectionner la bande requise (FM/AM/SW1-SW2) avec le sélecteur de BANDE.
2. Régler la station requise en tournant la commande de SYNTONISATION.
3. L'antenne AM intégrée et l'antenne sont directionnelles. Lors de la réception FM ou
SW1-SW2, sortir l'antenne télescopique sur toute sa longueur ; la réception la plus
complète peut être obtenue en tournant le lecteur ou l'antenne.
4. Régler le VOLUME sonore au niveau de votre préférence d'écoute.
5. Régler la position SLEEP (SOMMEIL) du sélecteur de fonction et appuyer sur le bouton
LECTURE. La radio est automatiquement désactivée lorsque la bande arrive à la fin.
6.
Écouter avec les écouteurs (non fournis)
Pour une écoute privée, vous pouvez utiliser les écouteurs avec l'appareil. Connecter les
écouteurs (non inclus) à la prise des écouteurs sur le côté de l'appareil. Le son des
haut-parleurs est automatiquement désactivé lorsque les écouteurs sont connectés à
l'appareil.
Fonctionnement de la relecture
Lecture de la cassette
1. Régler le sélecteur de fonction sur la position CASSETTE
2. Appuyer sur le bouton STOP/ELECT pour ouvrir la porte de la cassette. Insérer la
cassette du côté ouvert vers le haut. Fermer la porte de la cassette.
3. Utiliser les commandes et les boutons suivants pour lire la cassette :

APPUYER
POUR
LECTURE
Démarrer la lecture de la cassette
AV. RAPIDE
Avance rapide de la cassette.
RETOUR Retour rapide de la cassette.
STOP Arrêter la lecture ou relâcher les boutons
AV. RAPIDE et RETOUR
FONCTION D’ARRÊT AUTO
La lecture de la cassette s’arrête
automatiquement lorsque la cassette est
terminée.
PAUSE Arrêter la lecture ou l’enregistrement de la
cassette. L’utilisation du bouton PAUSE ne
perturbe pas le réglage de la lecture ni de
l’enregistrement.
Attention : cette fonction doit être utilisée
pour des arrêts temporaires pendant
l’enregistrement de la cassette. Appuyer à
nouveau sur PAUSE pour reprendre la
lecture
Contrôle du VOLUME
Régler le volume. Faire glisser le contrôle
vers la droite pour augmenter le volume et
vers la gauche pour baisser le volume.
Enregistrement à partir du microphone intégré
1. Régler le sélecteur de fonction sur la position CASSETTE.
2. Insérer une cassette vierge dans le compartiment à cassette.
3. Appuyer sur le bouton Enregistrement et Lecture. Le processus d'enregistrement
démarre. Tous les sons détectés par le microphone sont enregistrés jusqu'à ce que vous
appuyez sur la touche STOP ou PAUSE, ou jusqu'à ce que la bande arrive à la fin.
Enregistrement directement à partir de la radio In-In
1. Régler le sélecteur de fonction sur la position RADIO.
2. Régler la station de radio que vous souhaitez enregistrer.
3. Insérer une cassette vierge dans le compartiment à cassette.
4. Appuyer sur le bouton Enregistrement, le bouton Lecture sera automatiquement
enfoncé et l'enregistrement démarre.
5. L'enregistrement direct se poursuit jusqu'à ce que vous appuyez sur le bouton STOP
ou PAUSE, ou jusqu'à ce que la bande arrive à la fin.

l'appareil, utiliser un chiffon doux et humide. Après le nettoyage, essuyer la surface de
l'appareil avec un chiffon sec.
Attention : Ne jamais utiliser de produits chimiques tels que du benzène ou du diluant à
peinture pour le nettoyage ; sinon, vous pourriez déformer ou décolorer le boîtier.
Éloigner les aimants et les objets métalliques de la tête de la bande. Si le grain devient
magnétisé, le bruit augmente et le ton se détériore suite à d'éventuels dommages causés
par la corrosion des piles
Résolution des problèmes
Vérifier les points suivants pour la résolution des problèmes
Pinch Roller = Galet
Capstan = Cabestan
Head = Tête
Co on Swab= Coton-tige
SYMPTÔME CAUSE SOLUTION
La bande ne se
déplace pas
Batteries faibles
Le cordon d’alimentation CA n’est
pas correctement connecté
Le sélecteur de fonction n’est pas
correctement réglé
Bande défectueuse
Remplacer la batterie
Vérifier la connexion du cordon
d’alimentation CA
Régler le sélecteur de fonction sur la
position Cassette
Essayer une autre cassette
Son faible ou
instable
Batteries mortes ou faibles
Les écouteurs ne sont pas
correctement connectés
Le mécanisme de la cassette est
sale
Cassette défectueuse
Remplacer la batterie
Vérifier la connexion des écouteurs
Nettoyer la tête, le galet et le cabestan
Essayer une autre cassette
Mauvaise
réception radio
Station non réglée
Utiliser la commande SYNTONISATION
pour la régler, déployer l’ANTENNE
télescopique pour la réception
FM/SW1-SW2, tourner l’appareil pour la
réception AM
Soin et Entretien
Pour garantir une performance optimale de votre appareil, garder la bande propre à
l'intérieur. Pour nettoyer le chemin d'accès de la bande, ouvrir la porte de la cassette.
Imbiber un coton-tige avec de l'alcool isopropylique ou un liquide de nettoyage de tête de
bande spécial. Retirer tout excès d'alcool du tampon. Nettoyer la tête de bande, le
cabestan et le galet. Éviter de gratter la surface de la tête. Pour nettoyer le boîtier de

LECTURE USB/SD
1. METTRE L'APPAREIL SOUS TENSION
2. RÉGLER LE SÉLECTEUR DE FONCTION SUR USB/SD
3. INSÉRER UN LECTEUR FLASH USB (OU UNE CARTE SD) AVEC UN FORMAT DE
MUSIQUE MP3, L'APPAREIL LIT LES FICHIERS AUTOMATIQUEMENT. APPUYER
SUR LE BOUTON PAUSE/LECTURE POUR ARRÊTER MOMENTANÉMENT LA
LECTURE, APPUYER À NOUVEAU SUR LE BOUTON POUR REPRENDRE LA
LECTURE. APPUYER SUR LE BOUTON RÉPÉTER POUR RÉPÉTER LE MORCEAU
LU. APPUYER SUR LE BOUTON RETOUR POUR SÉLECTIONNER LE MORCEAU
PRÉCÉDENT ET SUR LE BOUTON F.F POUR SÉLECTIONNER LE MORCEAU
SUIVANT.
1. ANTENNE TÉLESCOPIQUE
2. POIGNÉE
3. COMMUTATEUR USB POUR CASSETTE ET RADIO
4. SÉLECTEUR DE BANDE
5. PRISE POUR ÉCOUTEUR EXTERNE
6. MIC
7. MOLETTE DE SYNTONISATION
8. MOLETTE DE CONTRÔLE DU VOLUME
9. BOUTON PAUSE (RECUL)
10. BOUTON D'ARRÊT
11. BOUTON D'AVANCE RAPIDE
Table of contents
Languages: