Ringway RS400 User manual


Precaution
Thankyouforpurchasingthisdigitalinstrument. Forperfectoperationandsecurity,
please readthemanualcarefullyandkeepitforfuturereference.
SafetyPrecautions
CAUTION
RISK OF ELECTRIC SHOCK
DO NOT OPEN
Thelightningflashwitharrowheadsymbolwithinanequilateraltriangleisin
tendedtoalerttheusertothepresenceofuninsulateddangerousvoltage
withintheproductsenclosurethatmaybeofsufficientmagnitudetoconstitutea
riskofelectricshocktopersons.
Theexclamationpointwithinan equilateraltriangleisintendedtoalerttheuser
tothepresenceofimportantoperatingandmaintenance(servicing)instructionsin
theliteratureaccompanyingtheproduct.
ImportantSafetyInstructions
1)Readtheseinstructions.
2)Keeptheseinstructions.
3)Heedallwarnings.
4)Followallinstructions.
5)Donotusethisapparatusnearwater
.
6)Cleanonlywithdrycloth.
(Figure1)
7)Donotblockanyventilationopenings, install inaccordancewiththemanufacturersinstructions.
8)Donotinstallnearanyheatsourcessuchasradiators,heatregisters, stoves, orotherapparatus
(includingamplifiers)thatproduceheat.
9)Donotdefeatthesafetypurposeofthepolarizedorgrounding-typeplug. A polarizedplughastwo
bladeswithone widerthantheother. Agroundingtypeplughastwobladesandathirdgrounding
prong. The widebladeorthethirdprongisprovidedforyoursafety. If theprovidedplugdoesnotfit
into youroutlet, consult an electricianforreplacementoftheobsoleteoutlet.
10)Protectthepowercordfrombeingwalkedon orpinchedparticularlyatplugs. convenience
receptacles, and thepointwheretheyexitfromtheapparatus.
11)Onlyuseattachments/accessoriesspecifiedbythemanufacturer.
12)Useonlywiththecart, stand, tripod, bracket, ortablespecifiedbythemanufacturer, orsoldwith
the apparatus. When acartisused, usecautionwhenmovingthecart/apparatuscombinationtoavoid
injury fromtip-over(Figure
1).
13)Unplugthisapparatusduringlightningstorms orwhenunusedforalongperiodsoftime.
14)Referallservicingtoqualifiedservicepersonnel. Servicing isrequiredwhentheapparatushas
beendamagedinanyway, for examplepower-supplycordorplugisdamaged, liquid hasbeenspilled
,
objectshavefallenintotheapparatus, the apparatushasbeenexposedtorainormoisture, does not
operatenormally, or hasbeendropped.
WARNING: To reducetheriskoffireorelectricshock, do notexposethisapparatus
to rainormoisture.
CAUTION: Apparatus shallnotbe exposedtodrippingorsplashingandno objects
filledwithliquids, suchasvases, shall beplacedontheapparatus.

Thank you for purchasing the RS400 electronic organ
The RS400 EU isaqualityorganwithtouchsensitivitykeyboardand combines
themostadvancedPCMtonegenerationtechnology.
LargebacklitLCDdisplayandeasy-to-usealsogreatlyenhancestheoperability
ofthisadvancedinstrument.
Inordertoobtainmaximumperformanceandenjoyment,pleasereadthis
manualthoroughlywhiletryingoutthevariousfeaturesdescribed.

1
Contents
Panel Controls...................................................................2
Main Controller Layout.....................................................3
Connectors.........................................................................5
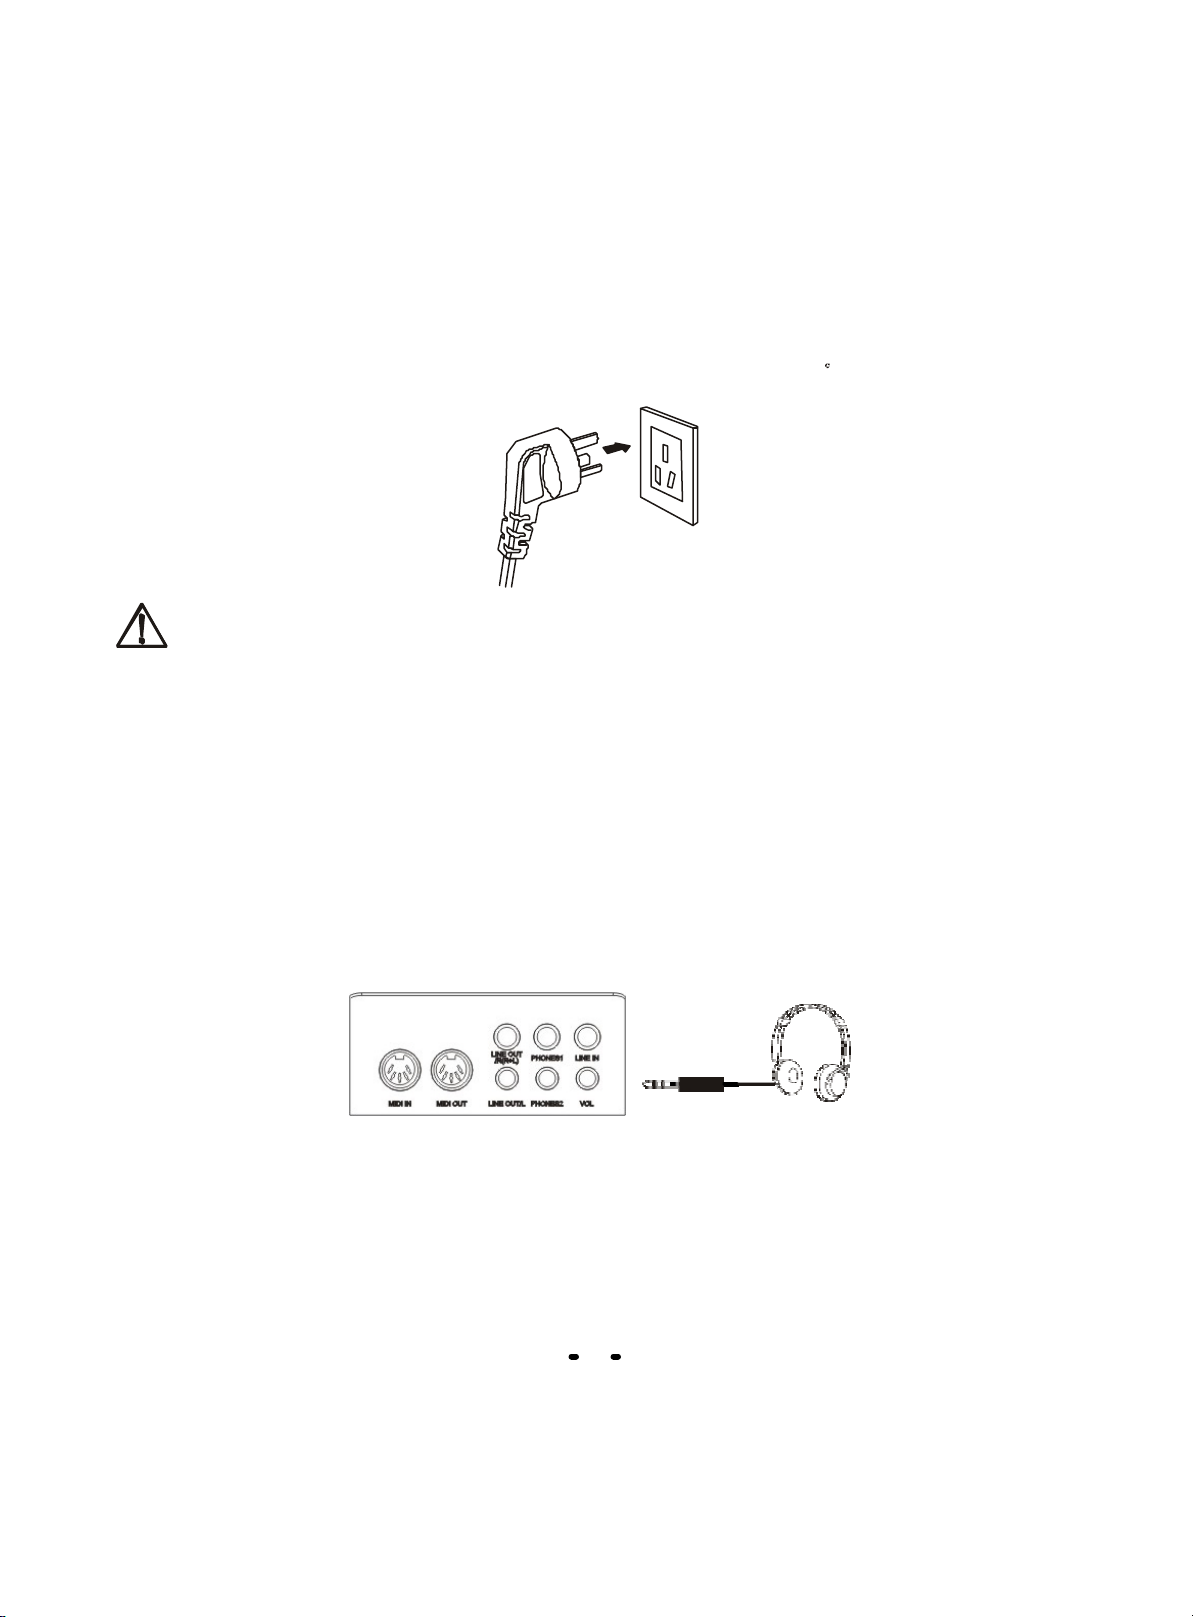
Using ACpower...............................................................5
Use Headphones.............................................................5
Line Out...........................................................................6
Line In.............................................................................6
MIDI IN / MIDI OUT.........................................................6
Basic Operation.................................................................7
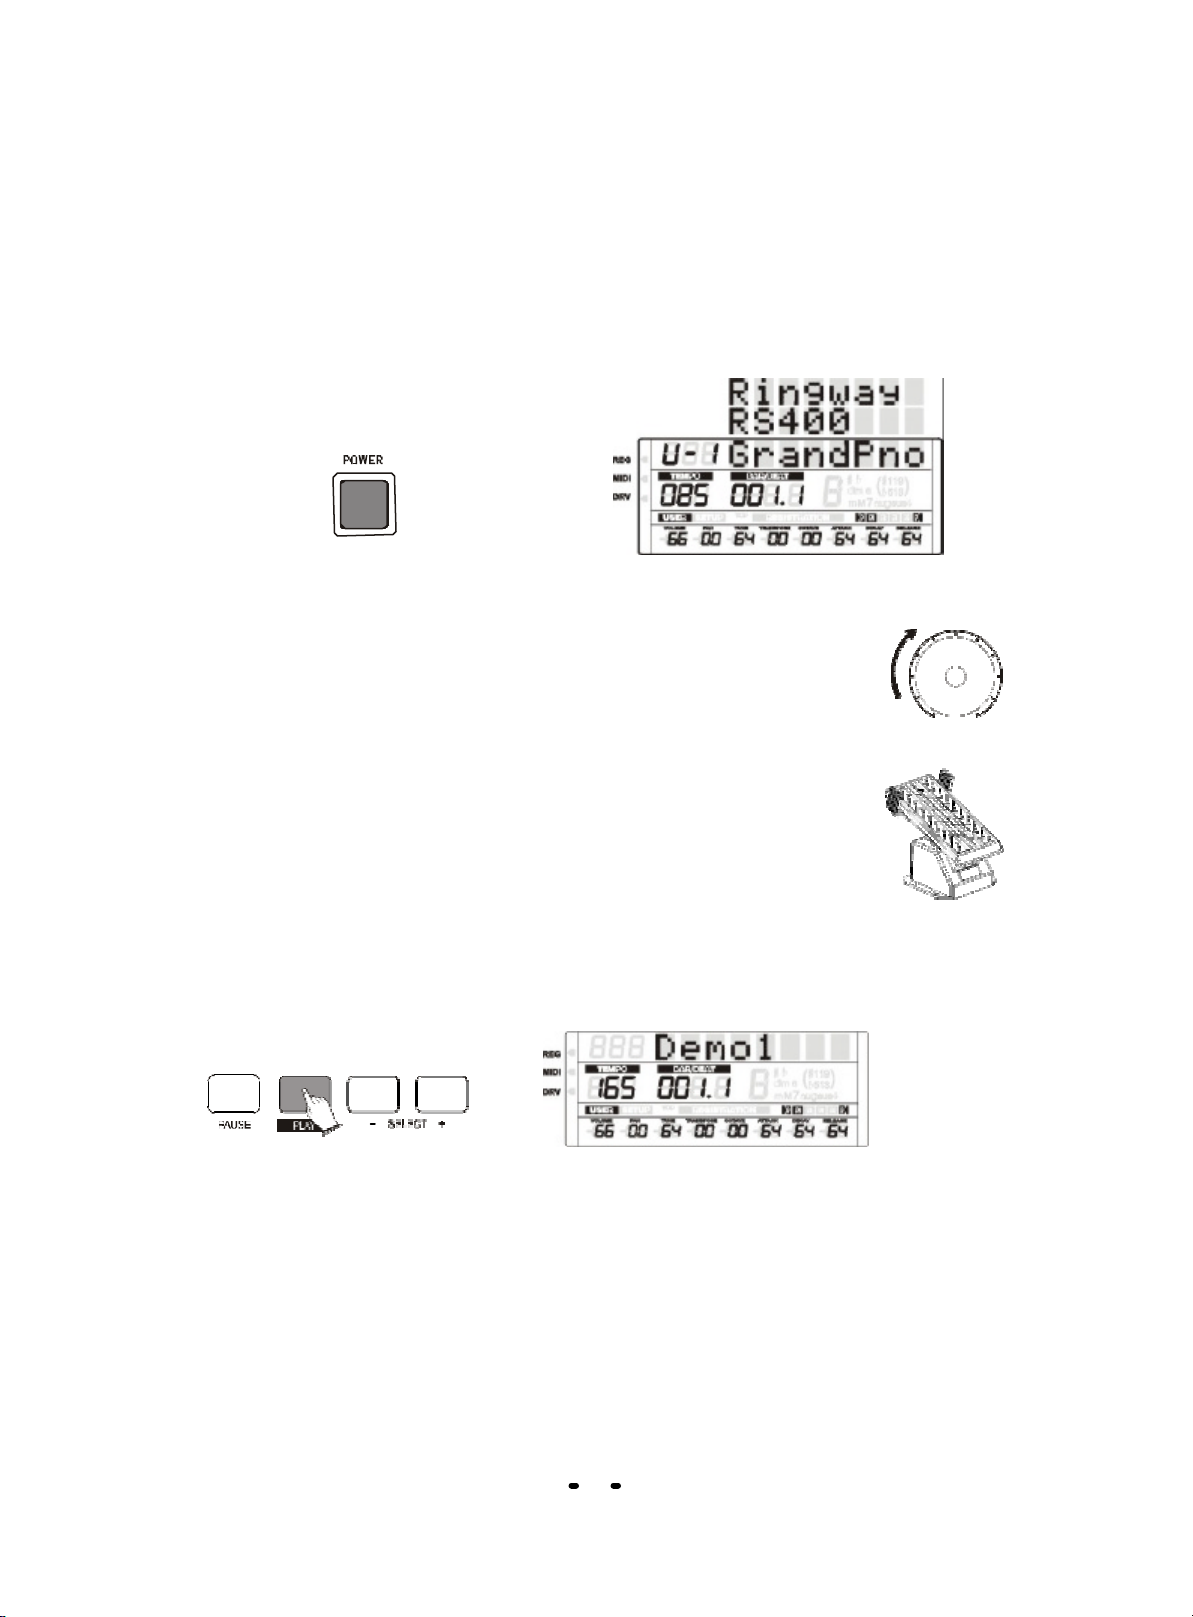
Power Switch...................................................................7
Set the Volume................................................................7
Using Expression Pedal..................................................7
Play Demo.......................................................................7
Factory Set......................................................................8
Voice...................................................................................9
Upper Keyboard Voices...................................................9
Lead Voice......................................................................9
Lower Keyboard Voices.................................................10
Pedal Keyboard voices..................................................10
Voices controller..............................................................11
1.Volume........................................................................11
2.Pan..............................................................................11
3.Tune............................................................................11
4.Transpose..................................................................12
5.Octave........................................................................12
6.Attack.........................................................................12
7.Decay.........................................................................13
8.Release......................................................................13
9.Vibrato rate.................................................................13
10.Vibrato depth............................................................14
11.Vibrato delay.............................................................14
12.Resonance...............................................................14
13.Cut.Freq...................................................................15
Effect................................................................................16
1.Reverb Type...............................................................16
2.Reverb PreLPF...........................................................16
3.Reverb Mlevel............................................................16
4.Reverb Time...............................................................17
5.ReverbDelay Feedback..............................................17
6.Reverb Send Level Voice...........................................17
7.Reverb Send Level-Rhythm........................................18
8.Chorus Type...............................................................18
9.Chorus PreLPF............................................................18
10.Chorus Master Level................................................19
11.Chorus Feedback.....................................................19
12.Chorus Delay............................................................19
13.Chorus Rate.............................................................20
14.Chorus Depth...........................................................20
15.Chorus Send Level Voice.........................................20
16.Chorus Send Level Rhythm.....................................21
Automatic Accompaniment............................................22
1.Selecting rhythms with the Rhythm buttons...............22
2.Rhythm Volume..........................................................22
Start ...........................................................................22
Synchro Start.............................................................22
Intro/End....................................................................23
Fill..............................................................................23
3.AdjustAccompanimentVolume..................................23
ChordVolume................................................................23
Percussion Volume.......................................................24
BassVolume.................................................................24
MOC. Harmony............................................................24
4.Automatic Accompaniment...…………………………25
Fingered Chord............................................................25
Custom.........................................................................25
Single Finger................................................................25
Tempo...........................................................................26
6.RhythmSequence........................................................26
InsertRhythmNumber..................................................27
Deleterhythmnumber...................................................27
Deleteallrhythmsequencesetting...............................27
Userhythmsequence...................................................27
7.Percussion....................................................................27
SelectPercussionVoice...............................................28
SettingPercussionShift...............................................28
Function.............................................................................29
1.Mode............................................................................29
Normal..........................................................................29
Mixer.............................................................................29
RegShift.......................................................................30
2.MasterTranspose.........................................................31
USBTranspose.............................................................31
3.Others...........................................................................31
F.PitchSetting...............................................................31
F.FootSW......................................................................32
Lock..............................................................................32
MIDIOut.......................................................................33
F.Other1........................................................................34
F.Other2......................................................................36
4.Touch............................................................................37
RegistrationMemory.........................................................38
1.Storingregistration........................................................38
2.SelectingRegistrations.................................................38
3.Usingthe[D](Disable)button.......................................38
4.SavingtheRegistrationdatatoUSBdisk......................38
5.SavetheregistrationdatatotheOrgan..........................39
6.RegistrationShift...........................................................40
Recorder.............................................................................42
1.Recording.....................................................................42
2.ReworkRecording........................................................42
3.SetTrack......................................................................42
USBControl.......................................................................45
1.USBFile.......................................................................45
2.DeleteFile....................................................................45
3.PlayMIDIFile...............................................................45
4.USBVolume..................................................................45
Factory Registrations..…......................................................46
Foot.Switch.........................................................................47
Appendix............................................................................48
ChordList........................................................................48
VoiceList.........................................................................49
PercussionList................................................................52
StyleList..........................................................................56
MIDIImplementationChart..............................................58
Specifications..................................................................59
Troubleshooting...............................................................60

2
PanelControls


4
LCDdisplay
Upper Voice1LeadVoice
Upper Voice2Rhythm
Lower Voice1Page
Lower Voice2Effect Display
Pedal Voice1
Pedal Voice2

5
Connectors
UsingAC power
Makesuretheswitchisoff beforeyouputtheplugintothesocket
TipsofUsingElectricalSafety
Please ensure that the instrument is connected to an earthed supply.
Mustuseaseparatesocket,plugthemains plug into an earthed 3 Pin socket.For
yourpersonalsafetyandtheproduct longevity,pleasecomply withthisproduct’s
powerinputandreliablegroundingrequirements.Do not use with a non earthed
supply to avoid electric shock.
Headphones
Astandardpairofstereoheadphonescanbepluggedintothephones1orphones2jack
forprivatepracticeorlate-nightplaying.Theinternal speakersystemisautomaticallyshut
offwhentheheadphonesarepluggedintothephonesjack.

6
LineOut
Yourinstrumenthastwolineoutjacks,Lineout/R(R+L),andLineout/L.
Usedtosendtheaudiosignalouttoan externalamplifier,mixerconsoleorrecording
equipment.Toconnecttheinstrumentinstereotoanexternalamplificationsystem
connectsbothleftandrightoutputs.
LineIn
TheaudiooutputfromothersoundsystemconnectedtotheLINEINjackontherear
panelcanbemixedwiththesoundoftheunit.Thisfunctionisconvenientwhenyouwant
toplayalongwithafavouritesong.LineInvolumecanbesetbyvolume knob.
MIDIIn/MIDIOut
Midiin---receivemididatafromanexternalmididevice.
Midiout---transmitmididatageneratedbyyourinstrument.

7
BasicOperation
PowerSwitch
TurnthepoweronbypressingthePowerswitch,thepanelLCDdisplaywillshow:
Orla RS400 EUthen U1Flute168
SettheVolume
Setthe[MAINVOLUME]toappropriateposition
betweentheMINandMAX.
Using Expression Pedal
After setting the master volume you can use the
expression pedal to control volume while playing.
PlayDemo
You canpress[PLAY]buttontolistenitwithoutplugUSBdisk.
MAIN
VOLUME
MIN
MAX
Press[PLAY]buttonagaintostopplaying.

8
FactorySet
Press[SHIFT]button, andholdthenpress5 button.
Press[CONFIRM]button,itcanrestorecurrent16 registrationstofactoryset.

9
Voice
UpperKeyboardVoices
UpperKeyboardVoice1andUpperKeyboardVoice2canbe selectedfromthe
panel'sUpperKeyboardVoice1/2section.
Press[VOICE]buttontoturnontheindicatorlamp,youcanselectUpperKeyboardVoice2.
Press[VOICE]buttontoturnofftheindicatorlamp,youcanselectUpperKeyboardVoice1.
Pressvoicegroupbutton(suchasSTRINGS),thenuseDATA+/-ordatadialto
selectyourneededvoice.
Press[VOLUMEUP/DOWN]buttonstoadjustthecurrentuppervoicevolume.
Press[SUSTAIN]toturnon/offthecurrentvoice'ssustain-effect.
LeadVoices
Lead Voicecanbe selectedfromthepanel'sLead Voicesection.
Press[TOLOWER]buttontoturnon theindicatorlamp,youcanplayLead Voiceon lower
keyboard.
Press[TOLOWER]buttontoturnofftheindicatorlamp,youcanplayLead Voiceon upper
keyboard.
Press[VOLUMEUP/DOWN]buttonstoadjustthecurrentLead voicevolume.

10
LowerKeyboardVoices
Voicesforeachsectioncanbe selectedfromthepanel'sLowerKeyboardVoicesection.
Press[VOICE]buttontoturnon theindicatorlamp,youcanselectLowerKeyboardVoice2.
Press[VOICE]buttontoturnoff theindicatorlamp,youcanselectLowerKeyboardVoice1.
Press[VOLUMEUP/DOWN]buttonstoadjustthecurrentlowervoicevolume.
Press[SUSTAIN]toturnon/offthecurrentvoice'ssustain-effect.
PedalboardVoices
Voicesforeachsectioncanbe selectedfromthepanel'sPedalVoice1/2section.
Press [VOICE] button to turn on the indicator lamp , you can select Pedal Keyboard Voice 2.
Press [VOICE] button to turn off the indicator lamp , you can select Pedal Keyboard Voice 1.
Press [VOLUME UP/DOWN] buttons to adjust the current pedal voice volume.
Press [SUSTAIN] to turn on/off the current voice's sustain-effect.
Press [TOLOWER] button to turn on the indicator lamp , you can play Pedal Voice on lower
keyboard.
Press [TOLOWER] button to turn off the indicator lamp , you can play Pedal Voice on Pedal
keyboard.

11
Voicescontroller
Afteryouselectthe voice,youcanadjustcurrentvoice'sparameters. Some voices have
fixed parameters for either vibrato tremolo or filter and resonance as they are part of the
sample. These cannot be modified.
1.Volume
Press[ITEM/PAGE+]button,selectVolume,thenpress[DATA+/-]buttonorusethe
datadialtoadjust
voice
’s
volume,Range:00-127
2.Pan
Press[ITEM/PAGE+]button,selectPan,thenpress[DATA+/-]buttonorusethe
datadialtoadjust
voice
’s
pan,Range:00-127
3.Tune
Press[ITEM/PAGE+]button,selectTune,thenpress[DATA+/-]buttonorusethe
datadialtoadjust
voice
’s
tune,Range:00-127

12
4.Transpose
Press[ITEM/PAGE+]button,selectX.Pose,thenpress[DATA+/-]buttonorusethe
datadialtochangethesetting.Range:-6~6
5.Octave
Press[ITEM/PAGE+]button,selectOctave,thenpress[DATA+/-]buttonorusethe
datadialtochangetheoctavevalue.Range:-2~2 Some voices will go out of range if
the octave is changed too high or low.
6.Attack
Attack time. This is the time during which the sound goes from zero to it smaximum level.
Press[ITEM/PAGE+]button,selectAttack,thenpress[DATA+/-]buttonorusethe
datadialtochangethesetting.Range:00~127

13
7.Decay
Decaytime.TimefromthefinalAttackleveltothebeginningoftheSustain.
Press[ITEM/PAGE+]button,selectDecay,thenpress[DATA+/-]buttonorusethe
datadialtochangethesetting.Range:00~127
8.Release
Release timeduringwhichthesoundgoesfromthesustainingphase,tozero.
Press[ITEM/PAGE+]button,selectRelease,thenpress[DATA+/-]buttonorusethe
datadialtochangethesetting.Range:00~127
9.VibratoRate
Speedofthevibratoeffect.
Press[ITEM/PAGE+]button,selectVib-rate,thenpress[DATA+/-]buttonorusethe
datadialtosetvibratorate. Range:00~127

14
10.VibratoDepth
Theintensityofthevibratoeffect.
Press[ITEM/PAGE+]button,selectVib-dpth,thenpress[DATA+/-]buttonorusethe
datadialtosetvibratodepth. Range:00~127
11.VibratoDelay
Delaytimefromplayingakeytothestartofthevibratoeffect.
Press[ITEM/PAGE+]button,selectVib-dlay,thenpress[DATA+/-]buttonorusethe
datadialtosetvibratodelay. Range:00~127
12.Resonance
emphasizestheportionofthesoundintheregionofthecutofffrequency.
Press[ITEM/PAGE+]button,selectResonance,thenpress[DATA+/-]buttonoruse
thedatadialtoset
voice
’s
resonance. Range:00~127

15
13.Cut.Freq
Frequencyatwhichthefilterbeginstohavean effecton thewaveformsfrequency
components
Press[ITEM/PAGE+]button,selectCut.Freq,thenpress[DATA+/-]buttonoruse
thedatadialto changethesetting.Range:00~127

16
Effect
Thisfunctionallowsyoutoperformtheoverallsoundinarealisticstyle.
Afterpoweron,effectfunctionisopen,[EFFECT]buttons indicatorlampislight,press
thisbuttontoturnonoroff [EFFECT]function.
1.ReverbType
Press[ITEM/PAGE+]button,selectR.Type,thenpress[DATA+/-]buttonoruse
thedatadialtoselectreverbtype(00Room1;01Room2;02Room3;03Hall1;04Hall2;
05Plate;06Delay;07PanDelay).
2.ReverbPreLPF
Press[ITEM/PAGE+]button,selectR.PreLPF,thenpress[DATA+/-]buttonoruse
thedatadialtosetlowpassfilter.Range:00~07
3.ReverbM.level
Press[ITEM/PAGE+]button,selectR.MLevel,thenpress[DATA+/-]buttonoruse
thedatadialtosetreverbmasterlevel.Range:00~127

17
4.ReverbTime
Press[ITEM/PAGE+]button,selectR.Time,thenpress[DATA+/-]buttonorusethe
datadialtosetreverbtime.Range:00~127
5.ReverbDelayFeedback
Press [ITEM/PAGE +]button,select R.DlyFdk ,thenpress [DATA+/-]buttonor use the
dialtosetreverbdelayfeedback.Range:00~127
6.ReverbSendLevelVoice
Press [ITEM/PAGE +]button,select R.U1Levl ,thenpress [DATA+/-]buttonor use the
datadialtochangethesetting.
R.U1Levl-----UpperKeyboardVoice1'sreverbsendlevel.
R.U2Levl-----UpperKeyboardVoice2'sreverbsendlevel.
R.LDLevl-----UpperKeyboardLeadVoice'sreverbsendlevel.
R.L1Levl------LowerKeyboardVoice1'sreverbsendlevel.
R.L2Levl------LowerKeyboardVoice2'sreverbsendlevel.
R.P1Levl------PedalVoice1'sreverbsendlevel.
R.P2Levl------PedalVoice2'sreverbsendlevel.
Other manuals for RS400
2
Table of contents
Other Ringway Musical Instrument manuals