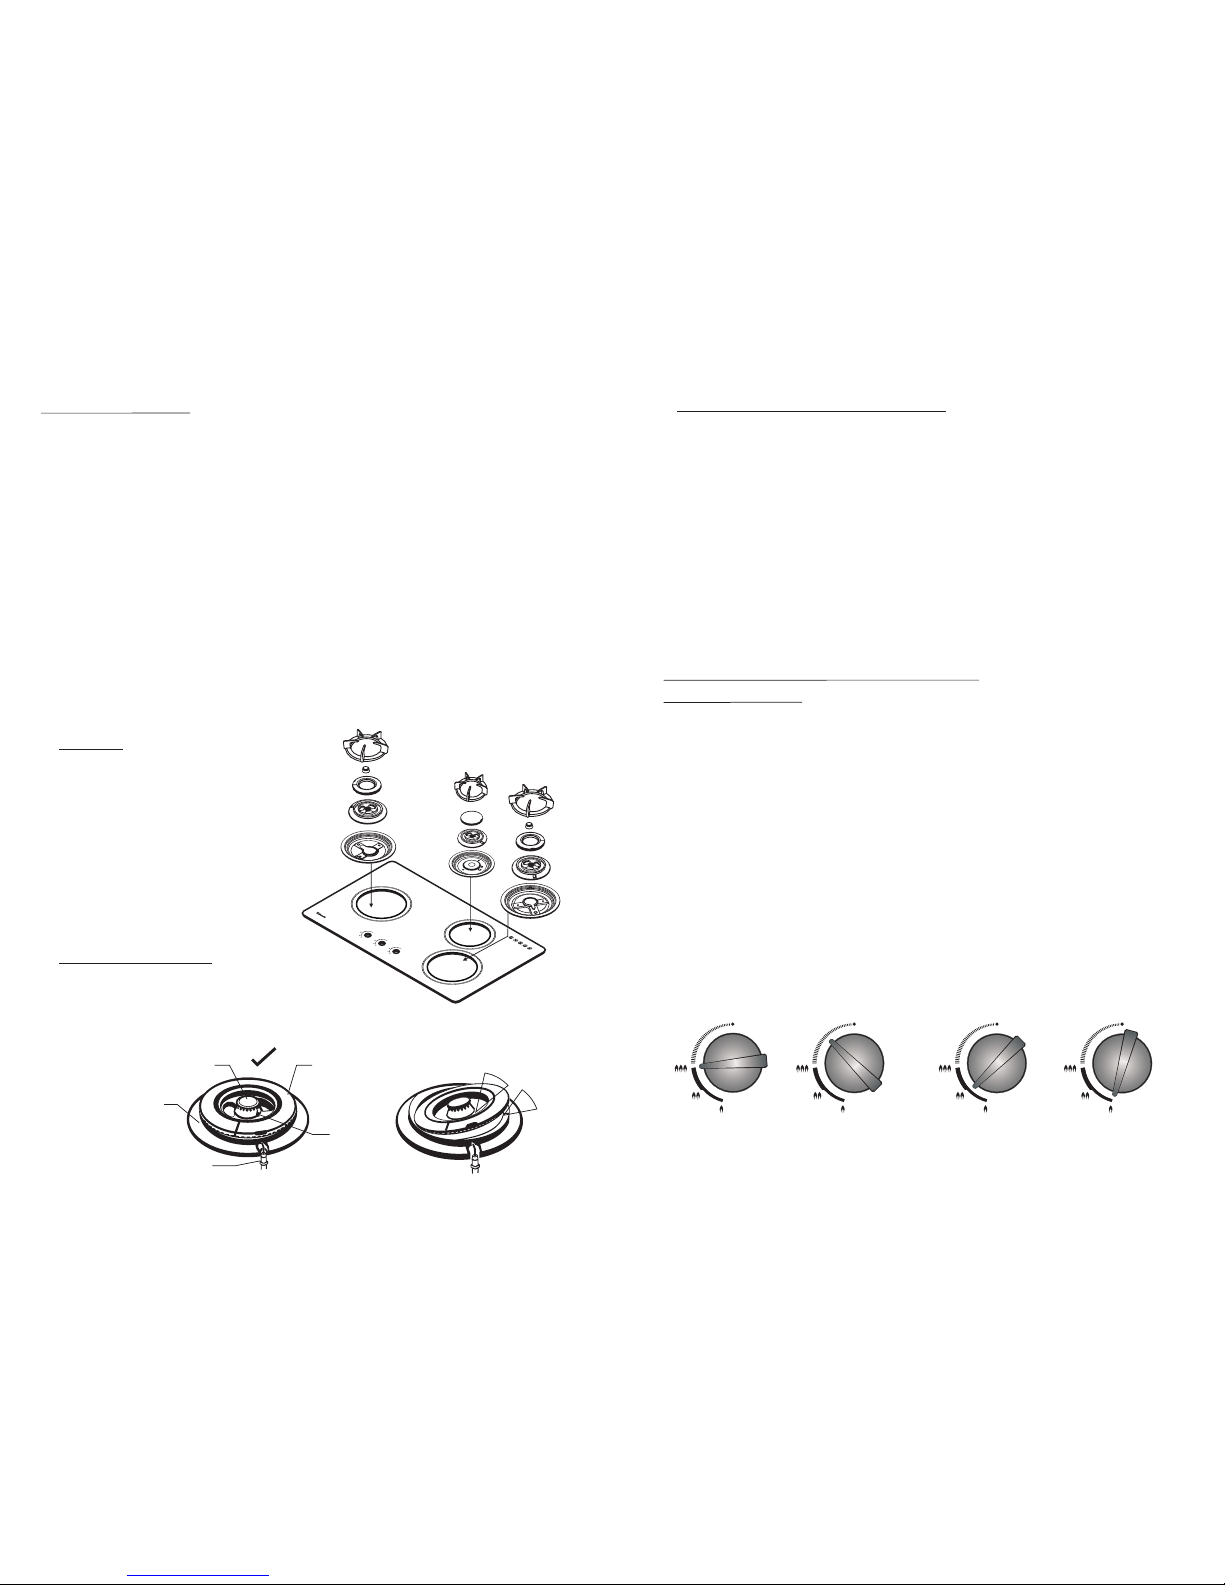
manuals.online logo
Brands
  1. Home
  2. •
  3. Brands
  4. •
  5. Rinnai
  6. •
  7. Cooker
  8. •
  9. Rinnai RB-3SS-C User manual

Rinnai RB-3SS-C User manual

•Installation on the table.
Pemasangan pada meja.
RB3SS-32-3
LAYANAN BEBAS PULSA: 0800-1-889-889
http://www.rinnai.co.id
SMS Center : 0815-112-99999
PT. RINNAI INDONESIA
Tangerang - Indonesia
Meja Casing Screw Casing
Stainless Top Plate / Tempered Glass
The fixing Screw x 6 pcs
•Confirm that the six screws are firmly into the burner
cover (6 screws are included in packaging).
Pastikan enam screw sudah terpasang dengan kencang ke dalam
burner cover (6 screw terdapat di dalam kemasan).
secured
030113
RB-3SS-C
NOMOR TANDA PENDAFTARAN
DIRJEN PDN NO: P.45.RI8.00301.0310
INSTRUCTION MANUAL
PETUNJUK PEMAKAIAN
THREE-BURNERS GAS COOKER
KOMPOR GAS TIGA TUNGKU
Caution for the tempered glass / Perhatian untuk tempered glass
•Never use oversized cooking
utensils or overload the cooking
appliances.
Jangan memakai alat-alat memasak
yang berukuran besar atau berat
pada kompor.
•Do not remove the pan support and
enclose the burner with a wok stand
as this will concentrate and deflect
the heat onto the gas hob.
Jangan melepas pan support dan
menutupi burner dengan dudukan
pe ng go re ng an k ar en a da pa t
mengakibatkan penumpukan dan
pembelokan panas ke kompor.
•Do not place anything, e.g., flame tamer, asbestos mat between pan and pan support as
serious damage to appliance may result.
Jangan meletakan benda seperti, penutup api, tatakan asbes diantara panci dan pan
support karena dapat merusak kompor.
•Do not place the cooker pan
over the pan support side as it
can cause tumbling.
Janga n melet ak an pa nci
pemasak tidak pas dengan pan
s u p p o r t , k a r e n a b i s a
menyebabkan panci terguling.
•Use only a wok support
supplied or recommended by
the manufacturer of the
appliance.
Gunakan wok support yang
sudah direkomendasikan oleh
pabrik.
This product and term of warranty is just for Indonesia use only.
Produk ini dan syarat garansi hanya untuk penggunaan di Indonesia saja.
- 1 -
Components and Features / Komponen dan Fitur
In order to obtain the best results and to maintain your Rinnai gas cooker in the best condition, please
read the instruction carefully.
Agar mendapat hasil yang baik dan untuk memelihara kompor gas Rinnai anda dalam kondisi yang baik,
silahkan baca petunjuk di bawah ini dengan seksama.
- 6 -
Trouble Shooting Manual for Rinnai RB-3SS-C Gas Cooker
Petunjuk Cara Mengatasi Gangguan untuk Kompor Gas Rinnai RB-3SS-C
FAULT
KESALAHAN
CAUSE
PENYEBAB
1. No Ignition. Spark electrode is wet, especially
in high humidity season.
Electrode basah, khususnya disaat
kelembaban tinggi.
Dry the electrode with clean tissue
or dry cloth.
Keringkan electrode dengan tissue
atau kain kering.
2. Flame cannot be
held.
Api tidak bisa
dipertahan kan
(mudah mati).
Incorrect turning of gas control
knob.
Pemutaran tombol pengatur gas
kurang tepat.
Push and turn the gas control knob
anti-clockwise until a ‘click’sound
is heard. Hold for a few seconds
until flame is ignited.
Tekan dan putar tombol pengatur
gas berlawanan arah jarum jam,
sampai terdengar bunyi “klik”.
Tahan beberapa detik sampai api
menyala.
4. Yellow flame.
Api berwarna
kuning.
Accumulated grease and dirt on the
burner.
Penumpukan minyak dan kotoran
pada burner head.
Wash the burner in warm water
with detergent. Leave it to dry, then
place it back in the correct position.
Cuci burner head dalam air hangat
yang telah diberi detergen.
Keringkan, lalu letakan kembali
pada posisi yang benar.
3. No main flame.
Api utama tidak
menyala.
5. Unstable flame.
Api tidak stabil.
Gas Regulator has been turned off.
Regulator gas belum dibuka.
Incorrect location of burner head.
Penempatan burner head yang
kurang tepat.
Open gas regulator completely.
Buka regulator gas.
Refit burner head into burner ring.
Cocokan kembali penempatan
burner head ke burner ring.
REMEDY
PERBAIKAN
Tidak ada
pengapian.
Attention: when installing the casing
Perhatian: saat memasang casing
•
•Confirm that six screws are firmly secured into the casing.
Pastikan enam screw sudah terpasang dengan kencang ke dalam casing.
Adjust screw position as bench cut out size.
Atur posisi screw pada lubang meja.
Components and parts names / Komponen dan nama bagian
Fig. 1
Casing
Electrode
Knob
Safety Sensor
Stainless Top Plate
Burner Cap
Pan Support
H Burner Head
H Burner Body
H Burner Cover
Tempered Glass
RB-3SS
Pan Support
M Burner Head
M Burner Body
M Burner Cover
RB-3SS
RB-3SS
RB-3SS
- 3 - - 4 -
Burner Cap
Burner Body
Burner Head
Spark Electrode
Safety Sensor
GAP
GAP
X
Installation / Instalasi
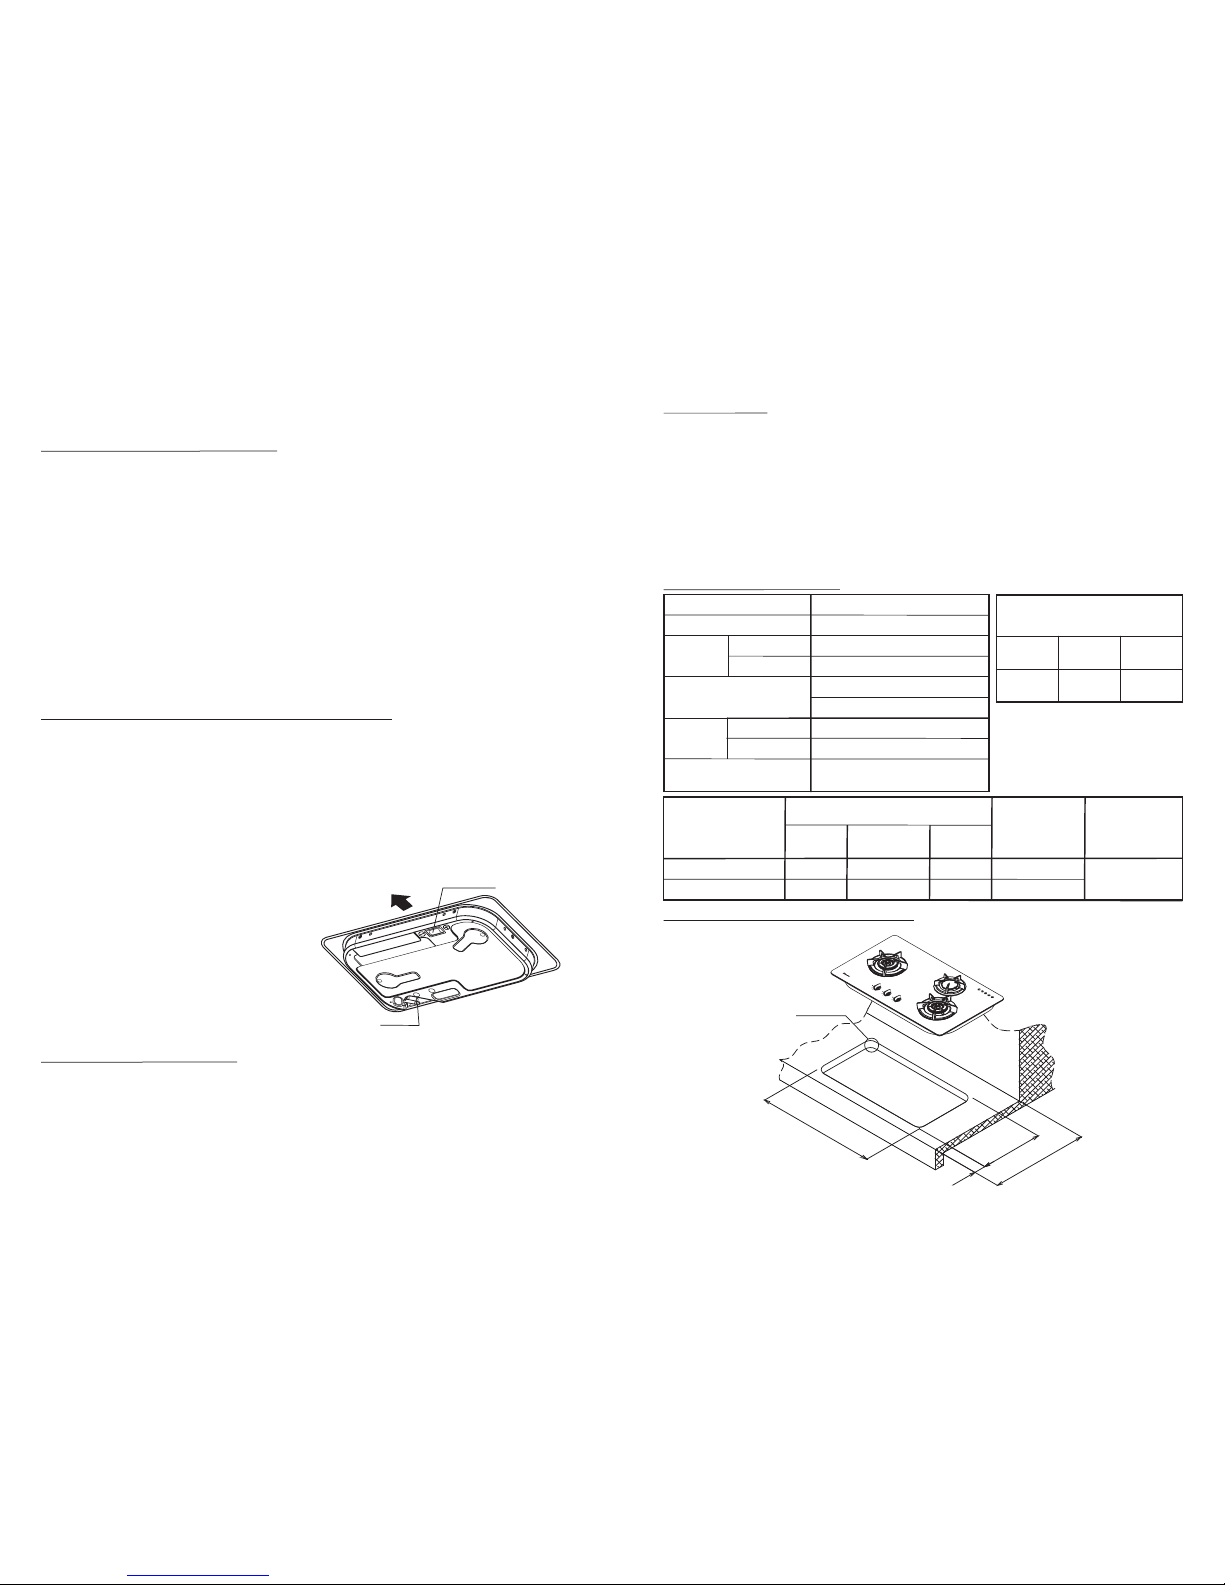
1. Pan Support
Fit pan support into top plate / tempered glass. (Fig. 3)
Pasang pan support ke atas top plate / tempered glass.
(Gambar. 3)
•Install the gas cooker in well ventilated area and keep away from any combustible or inflammable
object i.e. paper, oil, etc.
Pasang kompor gas ini pada ruangan dengan ventilasi udara yang baik, jauhkan dari benda yang
mudah terbakar seperti kertas atau minyak.
•If the gas cooker is to be installed near any combustible surrounding i.e. wooden walls, wooden
shelves, etc, there should be a distance of more than 15 cm (6 in) away from the surrounding
combustible. If the surrounding materials are fireproof, the clearance is not required.
Bila kompor gas dipasang dekat/dikelilingi benda mudah terbakar (seperti dinding kayu, rak kayu),
harus dipasang lebih dari 15 cm dari sisi dinding. Bila material/dinding disekelilingnya tahan api, bisa
dipasang pada jarak kurang dari 15 cm dari dinding.
•Place the gas cooker on a stable and level surface.
Taruh kompor gas ini pada permukaan yang stabil dan rata.
• This gas cooker is to be used for cooking purposes only. Do not use it to dry towel, clothes or any
other materials over it.
Kompor gas ini digunakan hanya untuk memasak. Jangan digunakan untuk mengeringkan handuk,
baju atau yang lain diatasnya.
• Make sure that the following parts are fitted properly before use.
Sebelum digunakan, pastikan seluruh bagian kompor sudah lengkap dan sudah terpasang dengan
benar.
2. Burner Head and Burner Cap
Fit burner head into burner cap onto the burner body
correctly, without any gap. (Fig. 4)
Pasang burner head dan burner cap ke dalam burner body
dengan benar, tanpa adanya celah sedikit pun. (Gambar. 4)
Fig. 3
Fig. 4
3. Installation of Gas Hose / Pemasangan Selang Gas
•Aspecific rubber hose for gas cooker must be used .
Gunakan selang karet khusus untuk kompor gas ini.
•The rubber hose must not be bent during installation and must be of an appropriate length (less than
2m).
Selang karet tidak boleh bengkok, dengan panjang kurang dari 2 m.
•During installation, make sure that the rubber hose does not come into contact with the body of the
gas cooker pass through the bottom part of the gas cooker to prevent melting of the hose.
Pada saat pemasangan selang gas, pastikan selang tidak bersentuhan dengan badan kompor gas,
dan pastikan selang tidak melewati bagian bawah kompor agar selang tidak meleleh karena panas.
• Place the securing ring over the rubber hose and connect the rubber hose to the coupler below the
rear side of the gas cooker till the marked red line. Then secure the rubber hose in position with the
securing ring (For LP Gas).
Masukan selang ke dalam cincin penguncinya dan pasangkan ke saluran gas pada sisi bawah
bagian belakang kompor sampai ke tanda merah. Kemudian kencangkan cincin penguncinya (Untuk
LPG).
Operating Instruction / Petunjuk Penggunaan
Ignition / Penyalaan
1. Depress the control knob to about 2 mm, then turn to the left (counter clock-wise) to the “ON”
position.
Tekan tombol kira-kira 2 mm, lalu putar ke kiri (berlawanan arah jarum jam) ke posisi “ON”.
2. When the control knob is being turned for ignition, sparks are generated to ignite the burning
device, accompanied by clicking sound.
Ketika tombol diputar ke kiri untuk penyalaan, akan dihasilkan percikan untuk menyalakan tungku
diikuti dengan suara klik.
3. Do not release the control knob for 2-5 seconds after the sparks have ignited the burner to activate
the safety device. Otherwise, the ignition will fail.
Jangan lepaskan tombol untuk beberapa detik setelah penyalaan, supaya alat pengaman dapat
bekerja. Jika tidak, api tidak akan menyala.
4.In the event of the burner flames being accidentally extinguished, turn off the burner control and do
not attempt to re-ignite the burner for at least 1 min. The device shall not be operated for more than
15 seconds. If the burner has not lit up after 15 seconds, stop operating the gas cooker and open the
compartment door and/or wait for at least 1 minute before attempting to ignite the burner again.
Pada kejadian dimana api padam secara tidak disengaja, matikan kompor dan jangan coba untuk
menghidupkannya selama 1 menit. Alat ini tidak boleh dioperasikan lebih dari 15 detik. Jika setelah
15 detik dan tungku masih belum menyala, hentikan penggunaan dan buka pintu serta jendela
dan/atau tunggu selama lebih kurang1 menit sebelum mencoba menyalakan kompor lagi.
5. The flame can be controlled between “MAX” “MED”and “MIN” position, please adjust the flame
slowly.
Api dapat diatur antara posisi “MAX” ”MED” dan “MIN”, silahkan mengatur api dengan perlahan.
out side flame
api besar
inside flame
api kecil
: Max
: Max
out side flame
api besar
inside flame
api kecil
: Sedang
: Middle
: Off
: Max
: Middle
: Sedang
out side flame
api besar
inside flame
api kecil
: Mati
: Max
: Off
: Min
out side flame
api besar
inside flame
api kecil
: Min
: Mati: Max
: Max
Fig. 5
RB-3SS
Product
Net Weight
Model
Ignition
Overall
Dimension
Cut out hole size
Gas Cooker
RB-3SS
18.6 kg
22.9 kg
435~480 mm x 725~840 mm
R0 mm ~ R110 mm
Continuous Ignition
“C” Size Battery (1.5V x 1)
RB-3SS-C(S)
RB-3SS-C(GB)
RB-3SS-C(S)
RB-3SS-C(GB)
Burners
280 mm
Max
Main
Min
120 mm
- 5 - - 2 -
131 mm 510 mm xx 870 mm
131 mm 520 mm xx 880 mm
Cut-Out Hole Size / Dimensi Lubang
Specification / Spesifikasi
1. The tempered glass and stainless top plate is beautiful and stylish.
Tempered glass dan top plate stainless yang cantik dan bergaya.
2.The enamel pan supports are durable and will not deform, making it stable for your cooking vessels.
Pan support enamel tidak pernah berubah bentuk dan stabil untuk kuali dan panci.
3. The continuous ignition device will ensure a 100% ignition rate.
Pemantikan dengan continuous ignition akan memastikan tingkat penyalaan 100%.
4. Each gas cooker is equipped with a safety valve which will cut off the gas supply automatically if the
flame is accidentally extinguished (For SV model only).
Dilengkapi dengan alat pengaman yang akan otomatis menutup aliran gas pada saat api padam
secara tidak disengaja, misalnya tertiup angin, tertumpah air atau kuah, berguna untuk memastikan
keamanan. (Hanya untuk model SV).
Features / Fitur
Diameters of pan which may be used on cooker
Diameter panci yang dapat digunakan
* Maksimal beban masing-masing tungku 20 kg.
* Maximum weight for each burners 20 kg.
Gas Type
Gas Consumption per hour
Respective gas consumption (kW)
Left
Gas
Connecting Tube
3.9 3.9
L.P.G (280 mmH2O) 3.5 3.5 Ø9.5 mm
gas specific
rubber hose
N.G. (15 )0 mmH2O
Bottom Right
2.3 9.3
2.0 8.6
Top Right
Total Gas
Consumption
(kW)
How to Handle Safety Device and Change Battery
Menangani alat pengaman dan mengganti baterai
1. If the flame is extinguish during operation, the Flame Failure Safety Device will automatically cut
off the gas within second.
If you notice that the flame has been extinguished, please turn the knob to “OFF” position.
J
setelah beberapa saat. Jika anda menyadari api telah padam, putar tombol ke posisi “OFF”.
2. The Safety Sensor is delicate, please do not use stiff brushes or rough cleaning pads when cleaning.
Sensor pengaman ini sensitif, jangan dibersihkan menggunakan sikat kasar atau kaku.
ika api padam saat pengoperasian, secara otomatis alat pengaman akan menutup aliran gas
1.After use, turn the control knob right to the “OFF” position and the flame will be extinguished.
Setelah digunakan, putar tombol ke kanan ke posisi “OFF” dan api akan padam.
2.Make sure that the control knob is fully turned to the “OFF”position, lest there would be a danger of
gas leakage.
Pastikan tombol berada pada posisi “OFF”, jika tidak bisa terjadi kebocoran gas.
3. After extinguishing the flame, do not touch the conductive parts of the cooker as they remain at
very high temperatures.
Setelah memadamkan api, jangan menyentuh beberapa bagian kompor, suhunya bisa sangat
tinggi.
4. There is may be a slight hissing sound after the flames is extinguished.
Setelah api pada tungku padam mungkin diikuti sedikit suara mendesis.
5. If the gas cooker is not in use, turn off the main gas supply to avoid gas leakage or unnecessary
accidents.
Jika kompor tidak digunakan, matikan suplai gas untuk menghindari kebocoran gas dan bahaya
kebakaran.
Flame Extinguishing / Api Padam
6.Do not clean the top of the sensor with a hard brush, as it may damage the sensor.
Jangan membersihkan ujung sensor dengan sikat kasar, karena akan merusak sensor.
Maintenance / Pemeliharaan
•Wipe the tempered glass / stainless top plate with a soft damp cloth and mild detergent.
Bersihkan tempered glass / top plate stainless dengan lap basah yang lembut dan detergen ringan.
•Wash the Pan Support and Burner Covers in warm water and detergent.
Bersihkan Pan Support dan Burner Cover dengan air hangat dan detergen.
please do not attempt to adjust it.
Pengaturan udara telah diset dipabrik, jangan
dirubah.
•Battery Box is located at right front of bottom
side (Size C, 1.5V x 1). (Fig. 6)
Open the cabinet door and change the battery.
Kotak baterai terletak di bagian bawah kompor
sebelah kanan depan (Ukuran C, 1.5V x 1).
(Gambar. 6)
Buka pintu kabinet dan ganti baterai.
• Aeration is preset at factory during assembly,
Fig. 6
Gas Inlet
”C” Size Battery
(1.5Vx1)
Front Side
Fig. 2
R0 ~ R110
725~840
65
435~480
550
RB-3SS

Other Rinnai Cooker manuals

Rinnai RB-2AS User manual

Rinnai

Rinnai RB-2AS User manual

Rinnai RB-2EHII User manual

Rinnai

Rinnai RB-2EHII User manual

Rinnai RB-3SS-C User manual

Rinnai

Rinnai RB-3SS-C User manual

Rinnai RETS-320A Owner's manual

Rinnai

Rinnai RETS-320A Owner's manual

Rinnai RB-713N(S) User manual

Rinnai

Rinnai RB-713N(S) User manual

Popular Cooker manuals by other brands

Parkinson Cowan U02019 ASTORIA3 Owner's handbook

Parkinson Cowan

Parkinson Cowan U02019 ASTORIA3 Owner's handbook

Indesit CI6V E97 A1 HA operating instructions

Indesit

Indesit CI6V E97 A1 HA operating instructions

THERMEx VERTICAL 805 quick start guide

THERMEx

THERMEx VERTICAL 805 quick start guide

Diamond EERV Installation, use and maintenance instructions

Diamond

Diamond EERV Installation, use and maintenance instructions

H&K CST059 manual

H&K

H&K CST059 manual

Salvis Smartline AKP1 Operating	 instruction

Salvis

Salvis Smartline AKP1 Operating instruction

Leisure Cooker manual 

Leisure

Leisure Cooker manual 

Zanussi GCF5621 Instruction booklet

Zanussi

Zanussi GCF5621 Instruction booklet

Tecnoinox P70DG7 Instruction manual for installation, maintenance and use

Tecnoinox

Tecnoinox P70DG7 Instruction manual for installation, maintenance and use

AEG FV 64.1 GL operating instructions

AEG

AEG FV 64.1 GL operating instructions

Smeg Classic manual

Smeg

Smeg Classic manual

Bosch HXA060B2 Q Series instruction manual

Bosch

Bosch HXA060B2 Q Series instruction manual

Morris MKE-64380 instruction manual

Morris

Morris MKE-64380 instruction manual

Bush BFCX100DFC instruction manual

Bush

Bush BFCX100DFC instruction manual

MPM MKE-23 user manual

MPM

MPM MKE-23 user manual

Flavel Milano 100 ML 10 CRS Users guide & installation

Flavel

Flavel Milano 100 ML 10 CRS Users guide & installation

Cannon CARRICK Use and Installation Instructions

Cannon

Cannon CARRICK Use and Installation Instructions

Proline PECNE604WH manual

Proline

Proline PECNE604WH manual

manuals.online logo
manuals.online logoBrands
  • About & Mission
  • Contact us
  • Privacy Policy
  • Terms and Conditions

Copyright 2025 Manuals.Online. All Rights Reserved.