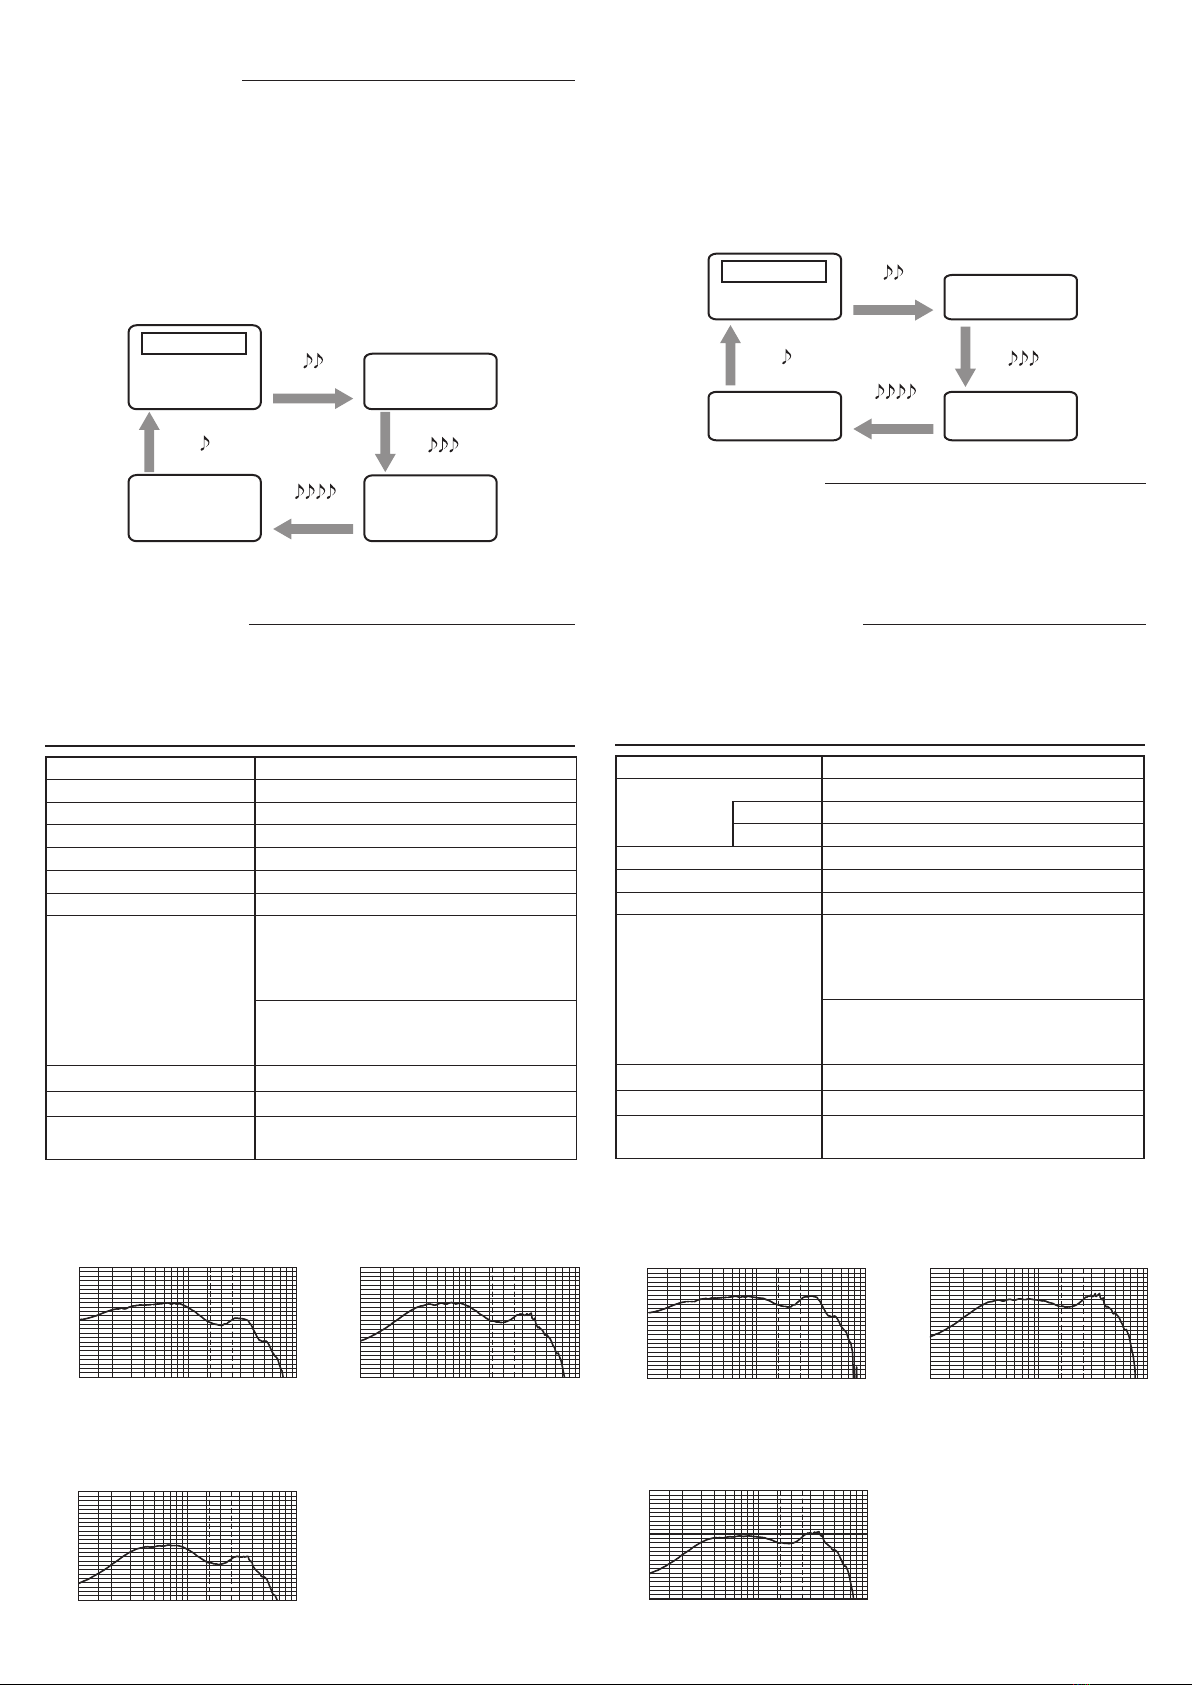
manuals.online logo
Brands
  1. Home
  2. •
  3. Brands
  4. •
  5. Rion
  6. •
  7. Hearing Aid
  8. •
  9. Rion RIONET HB-L1 User manual

Rion RIONET HB-L1 User manual

* The communication connector serves for adjustment of
the hearing aid by the hearing aid professional.
Battery Placement
1. Peel off the sticker on the positive side of battery (PR41 or
312 zinc-air battery).
2. Open the battery holder with the tip of your finger.
3. Insert a PR41 or 312 battery into the
battery holder. You do not have to
worry about the polarity.
4. Close the battery holder.
Battery life (PR41 or 312, for continuous use)
ANSI: Approx. 160 hours
IEC: Approx. 170 hours
- Battery life will change depending on the operat-
ing condition.
Putting on Hearing Aid
This hearing aid does not have a power switch. The battery
holder also functions as power switch.
Power/OFF: Open the battery holder.
Power/ON: Close the battery holder firmly.
1. Open the battery holder slightly, so that the
hearing aid is set to the OFF condition.
2. Place the hearing aid on the ear.
HOW TO USE YOUR FIRST HEARING AID
Any hearing aid cannot return level of your hearing to normal or
halt further hearing deterioration, but proper use of your hearing
aid can help you hear what is going on around you and let you
get more enjoyment of life.
If this is your first hearing aid, you - like most new users - will
probably be surprised at the loudness of the sounds, and after
using it for a short while, you may even feel that it is too noisy. The
following three tips are important in overcoming your concerns.
1) Read this manual and become familiar with the hearing aid's
various mechanisms and how to use them correctly.
2) First, use your hearing aid in a quiet place and listen to quiet
sounds and give yourself sufficient time to get accustomed to
the sound of your hearing aid.
3) If any physical problems develop, consult your doctor.
FOR KEEPING YOUR HEARING AID LONGER
Always keep the hearing aid clean. Clean the hearing aid with dry
cloth periodically and also remove earwax plugged in the earpiece
or earmold using eyebrush or toothbrush.
Do not expose the hearing aid to the heat from stoves, etc. Also,
avoid leaving it in places with high humidity.
Operate the controls with care. Do not press hard.
If the hearing aid is dropped in water, wipe with dry cloth and ask
the dispenser for check.
Do not pick the microphone with nail, pin, etc., because this may
damage the microphone.
Do not disassemble or attempt any repairs by yourself. Ask the
dispenser for repair.
3-20-41 Higashimotomachi, Kokubunji, Tokyo 185-8533, Japan
HB-L1
DIGITAL HEARING AID
or
Selector button
Battery holder
Earpiece
Tube
Hook
Microphone
Selector button
Communication
connector
"Either way"
circuit
OPERATING INSTRUCTIONS
Parts and Controls
3. Turn the power on.
4. Press the selector button to adjust the volume to a suitable
setting.
The selector button serves either for "volume switching" or
for "memory switching", depending on which function was
specified by the customer.
* Adjust the volume according to the situation (volume of
other voices, ambient noise, etc.).
Volume switching
The selector button gives access to four different volume level
settings *. Using the selector button in the way shown below
lets you switch between the settings. When power to the hear-
ing aid is turned on (the battery holder is closed), the volume
setting will be "Level 1". Depending on the environment (noisy
location, quiet location, etc.) you may want to change the setting.
When you operate the button, a beep sound pattern indicates
the change.
* These have been optimized for your individual requirements.
No. 51970 07-06
you switch between the settings. When power to the hearing
aid is turned on (the battery holder is closed), the setting will be
"Memory 1". Depending on the environment (noisy location, quiet
location, etc.) you may want to change the setting. When you op-
erate the button, a beep sound pattern indicates the change.
* These have been optimized for your individual requirements.
There may be from 1 to 4 different memory settings.
120 0dB=20µPa 1600 2500
110
100
90
80
70
100 200 500 1000 2000 5000 10000
Frequency (Hz)
Output SPL (dB)
Input SPL 60dB
130 0dB=20µPa 1600 2500
120
110
100
90
80
100 200 500 1000 2000 5000 10000
Frequency (Hz)
Output SPL (dB)
Input SPL 90dB
60 1600 2500
50
40
30
20
10
100 200 500 1000 2000 5000 10000
Input SPL 50dB(0dB=20µPa)
Frequency (Hz)
Acoustic Gain (dB)
120 0dB=20µPa 1600 2500
110
100
90
80
70
100 200 500 1000 2000 5000 10000
Frequency (Hz)
Output SPL (dB)
Input SPL 60dB
60 1600 2500
50
40
30
20
10
100 200 500 1000 2000 5000 10000
Input SPL 60dB(0dB=20µPa)
Frequency (Hz)
Acoustic Gain (dB)
Full-on gain curve
Frequency response curve
OSPL90 curve Full-on acoustic gain
frequency response curve
Basic frequency response
curve
Note:
(1) Production number (serial
number) is indicated at
the upper rear side of the
unit.
(2) Manufacturer's name is
imprinted at the lower rear
side of the unit.
TECHNICAL DATA (According to ANSI standard S3.22 2003)
Maximum OSPL90 113 dB (660 Hz)
HFA-OSPL90 107 dB
HFA-full-on Acoustic
Gain 38 dB
Reference Test Gain 30 dB
Frequency Range 200 Hz to 5000 Hz
Equivalent Input Noise Level
31 dB
Total Harmonic Distor
tion 500 Hz: 1% 800 Hz: 1% 1600 Hz: 1%
AGC
(Attack / Recovery Time)
Input AGC
Attack: 3 msec or 400 msec
Recovery: 100 msec or 600 msec or
15 sec
Output AGC
Attack: 3 msec
Recovery: 50 msec
Battery Type/Supply Voltage
312/1.4 V
Battery Current/Battery Life
0.90 mA/160 hours
Dimensions/Weight 3.82 × 2.03 × 0.80 cm /
1.9 g (excluding battery)
(Typical value)
TECHNICAL DATA ( )
Reference Test Frequency
1600 Hz
OSPL90 113 dB
500 Hz 116 dB
Peak 117 dB
Full-on Acoustic Gain 43 dB
Equivalent Input Noise Level
30 dB
Total Harmonic Distortion
500 Hz: 1% 800 Hz: 1% 1600 Hz: 1%
AGC
(Attack / Recovery Time)
Input AGC
Attack: 3 msec or 400 msec
Recovery: 100 msec or 600 msec or
15 sec
Output AGC
Attack: 3 msec
Recovery: 50 msec
Battery Type/Supply Voltage
PR41 (312)/1.4 V
Battery Current/Battery Life
0.85 mA/170 hours
Dimensions/Weight 3.82 × 2.03 × 0.80 cm /
1.9 g (excluding battery)
(Typical value)
According to IEC standard Pub. 60118-0-1983
Amendment 1-1994
Level 1
(Medium*) 2 beeps
Beep sound
Power-on
Beep sound
Beep sound
Level 2
(High*)
Level 3
(Maximum*)
Level 4
(Low*)
3 beeps
4 beeps
Beep sound
1 beep
* These are the standard volume settings.
They can be changed by your hearing aid professional.
Memory 12 beeps
Beep sound
Power-on
Beep sound
Beep sound
Memory 2
Memory 3Memory 4
3 beeps
4 beeps
Beep sound
1 beep
Memory switching
The selector button gives access to four different memory set-
tings *. Using the selector button in the way shown below lets
Turn-on precaution
If the hearing aid is turned on again immediately after turning it off,
there may be no sound, but this is not a defect. In such a case,
turn the power off (open battery holder) and wait 10 seconds.
Then turn the power on again (close battery holder).
Adjusting the Controls
This hearing aid is a digital type. Any adjustments must be done
at the dealer. For details, please contact the dealer.
130 0dB=20µPa 1600 2500
120
110
100
90
80
100 200 500 1000 2000 5000 10000
Frequency (Hz)
Output SPL (dB)
Input SPL 90dB
OSPL90 curve

Other Rion Hearing Aid manuals

Rion HA-20DX User manual

Rion

Rion HA-20DX User manual

Rion HB-54 User manual

Rion

Rion HB-54 User manual

Rion Rionet Risa HB-G5DR User manual

Rion

Rion Rionet Risa HB-G5DR User manual

Rion HI-G5A User manual

Rion

Rion HI-G5A User manual

Rion HB-79P User manual

Rion

Rion HB-79P User manual

Rion HB-41 User manual

Rion

Rion HB-41 User manual

Rion HB-M1 User manual

Rion

Rion HB-M1 User manual

Popular Hearing Aid manuals by other brands

Puretone P680RW user guide

Puretone

Puretone P680RW user guide

Bellman & Symfon Audio Maxi BE2020 Medical device information

Bellman & Symfon

Bellman & Symfon Audio Maxi BE2020 Medical device information

Advanced Bionics M T-Mic Instructions for use

Advanced Bionics

Advanced Bionics M T-Mic Instructions for use

Soundworld BLUETOOTH Series quick start guide

Soundworld

Soundworld BLUETOOTH Series quick start guide

Advanced Bionics Marvel CI Faq

Advanced Bionics

Advanced Bionics Marvel CI Faq

Cochlear Baha Attract System user manual

Cochlear

Cochlear Baha Attract System user manual

Phonak Roger Clip-On Mic Quick setup guide

Phonak

Phonak Roger Clip-On Mic Quick setup guide

Unitron Yuu user guide

Unitron

Unitron Yuu user guide

Widex C2-CIC User instructions

Widex

Widex C2-CIC User instructions

Widex RE-CIC User instructions

Widex

Widex RE-CIC User instructions

oticon minirite Instructions for use

oticon

oticon minirite Instructions for use

oticon Engage miniRITE user manual

oticon

oticon Engage miniRITE user manual

Beltone ACS 85 Instructions for use

Beltone

Beltone ACS 85 Instructions for use

Widex CLEAR Series C4-FS User instructions

Widex

Widex CLEAR Series C4-FS User instructions

Unitron Stride B9-UP user guide

Unitron

Unitron Stride B9-UP user guide

ReSound Phone Clip+ Getting started

ReSound

ReSound Phone Clip+ Getting started

Siemens ConnexxLink user guide

Siemens

Siemens ConnexxLink user guide

Unitron Quantum micro BTE user guide

Unitron

Unitron Quantum micro BTE user guide

manuals.online logo
manuals.online logoBrands
  • About & Mission
  • Contact us
  • Privacy Policy
  • Terms and Conditions

Copyright 2025 Manuals.Online. All Rights Reserved.