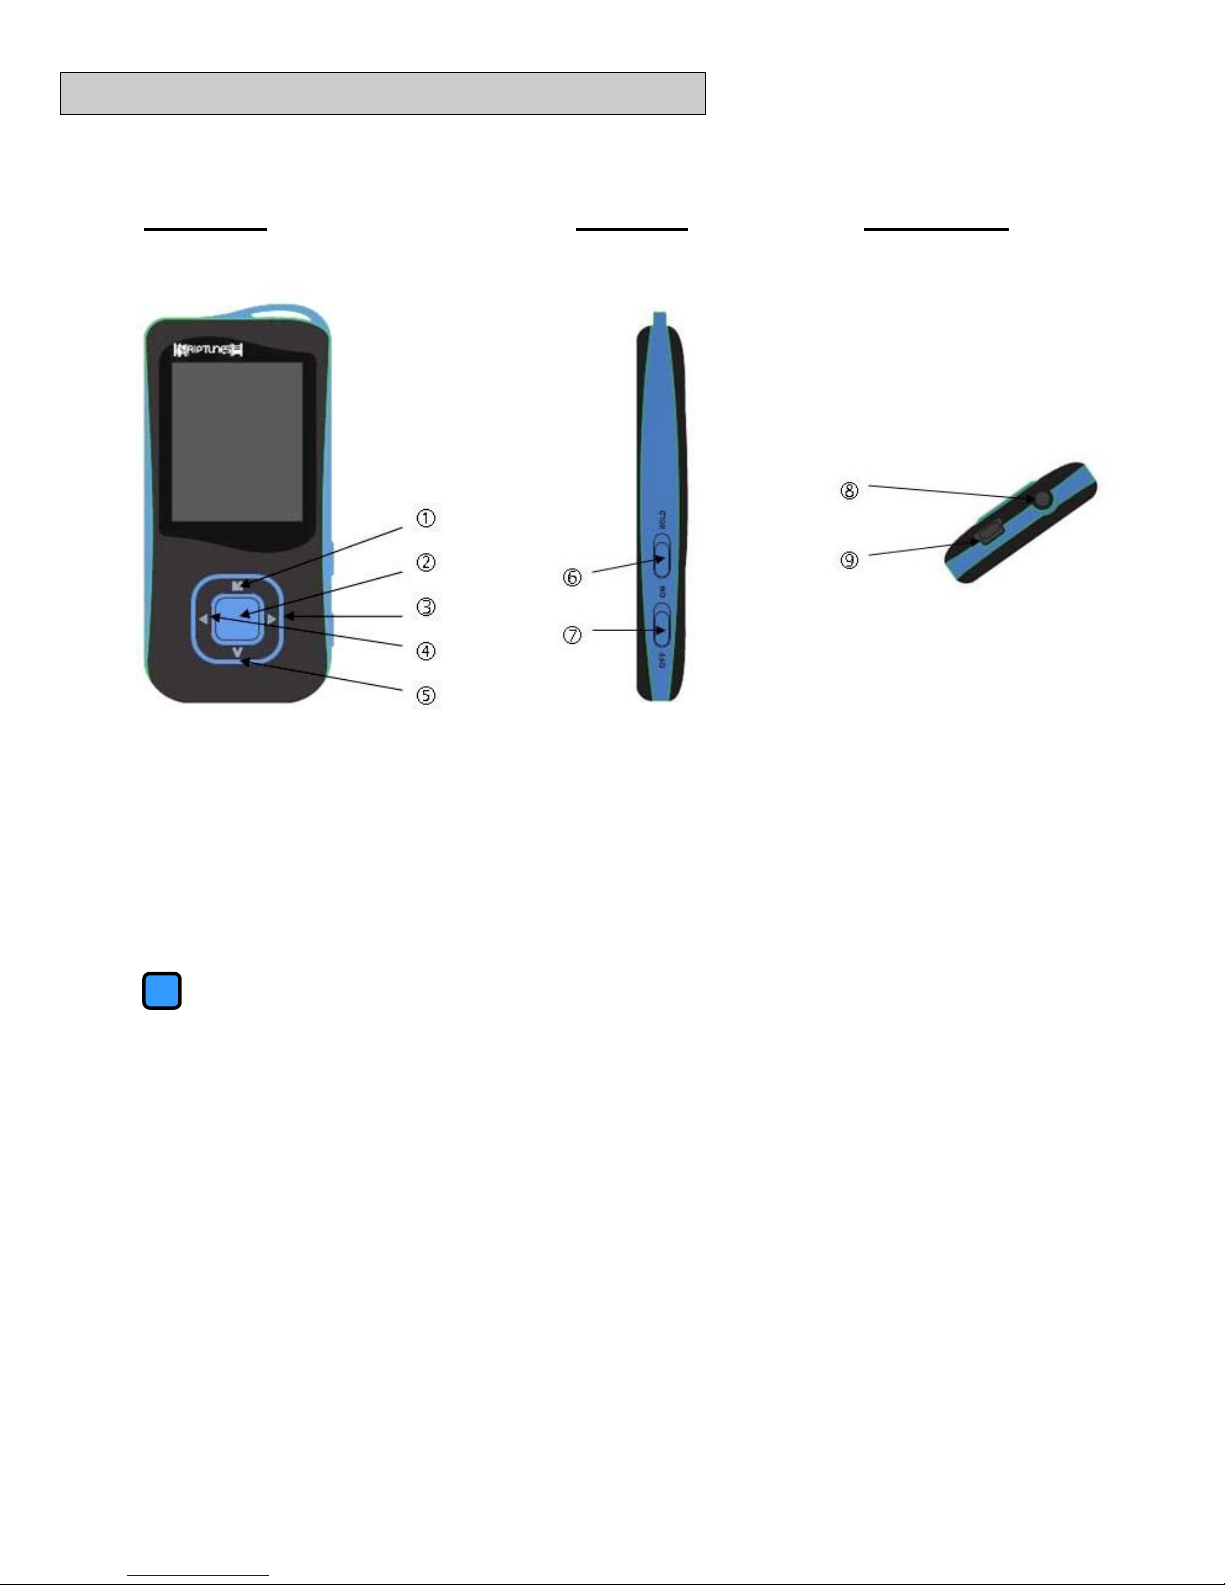
RIP TUNES MP 1857 User manual

User’s Guide
Manual del Usuario / Manual de l’utilisateur
Model: MP 1857

TABLE OF CONTENTS
Introduction..........................................................................................................2
Getting to know your MP3 Player.........................................................................3
Basic Functions.................................................................................4
Adding Media to your Digital Media Player ........................................5
Music .................................................................................................................6
Music Options and Features..............................................................7
Movies and Videos...............................................................................................8
Voice Recording ..................................................................................................8
Recording Options and Features.......................................................8
Play back a recorded file....................................................................8
Pictures................................................................................................................9
E-Book.................................................................................................................9
Settings................................................................................................................9
Troubleshooting.................................................................................................10
Specifications.....................................................................................................11

- 2 -
INTRODUCTION
Congratulations on your purchase of the RIPTUNES MP-1857 Digital Media Player. Before using
your digital media player, it is recommended that you familiarize yourself with the features,
functions, and operating procedures described in this manual. Due to slight modifications in
production, the instructions, features, and/or descriptions found in this manual might be slightly
different from your product.
Features at a Glance
•High Quality 1.8” Screen Display
•Plays Most Audio File Formats
•E-Book Functions
•Video Playback
•Photo Browsing
•Audio Recording
Precautions
Follow these tips to preserve the operational lifespan of your Digital Media Player:
•It is recommended that you allow the battery to fully charge before using the device for the first time. Do not
recharge unattended for longer than 5 hours.
•Do not hang the player by its earphones or cables
•Never force any cable connectors into the ports of your Digital Media Player or computer. Always make sure that
your cable connectors are identical in shape and size before attempting to connect.
•When disconnecting your digital media player from a computer, use the Safely Remove Device function on your
computer. Do not disconnect your digital media player while transmitting data.
•Do not use this player in extreme temperatures. Keep away from extreme hot, cold, dry, or damp areas. Also
keep away from water, fire, and radiation.
•Do not disassemble your digital media player.
•Do not allow young children to use your player unsupervised.
•Do not install foreign software onto your digital media player.
•Battery should only be charged with approved adaptors (available for purchase at the RipTunes website).
•Permanent hearing damage or hearing loss may occur if earphones are used at a high volume. Hearing experts
advise against continuously listening to music at a high volume. If you hear a “hissing” noise in your ears, or if
you experience discomfort, lower the volume, or temporarily discontinue use of this product until discomfort
subsides.

- 3 -
GETTING TO KNOW YOUR MP3 PLAYER
Front View Side View Bottom View
Buttons and Controls
MMenu button - Enter or exit from menus and sub-menus and confirm
selections. While in any mode, press and hold “M” to access the main
menu.
Play/Pause - Press and hold to enter sleep mode.
►Next - While playing music or video, press and hold to Fast Forward.
◄Previous - While playing music or video, press and hold to Rewind.
VVolume Control - While playing music or video, press the V button and
then use the arrow buttons to adjust volume.
Hold Toggle switch that locks the MP4 device from use. While locked, buttons
will not function.
ON/OFF Turns the Digital Media Player on or off.
Earphone Jack 3.5 mm standard earphone connector
USB Jack USB Jack – Interface with a USB cable to a PC to manage media files.

- 4 -
Basic Functions
Power On/Off
Use the ON/OFF switch on the side of the Digital Media Player to turn on the device. If the
device is already on but is in sleep mode, press and hold the (“Play/Pause”) button to
activate (On/Off switch must be set to ‘ON’). While the Digital Media Player is in use, press
and hold the button to enter sleep mode. Use the ON/OFF switch on the side of the Digital
Media Player to turn off the device.
Note: Using the ON/OFF switch will cause you to lose your current bookmark or
location (if playing a file).
Hold / Lock
The hold function can help you lock all buttons to avoid accidental player operation.
To lock all buttons of MP3 player, slide the HOLD switch in the direction of the arrow. All
buttons are disabled. To deactivate the lock function, slide back the HOLD switch.
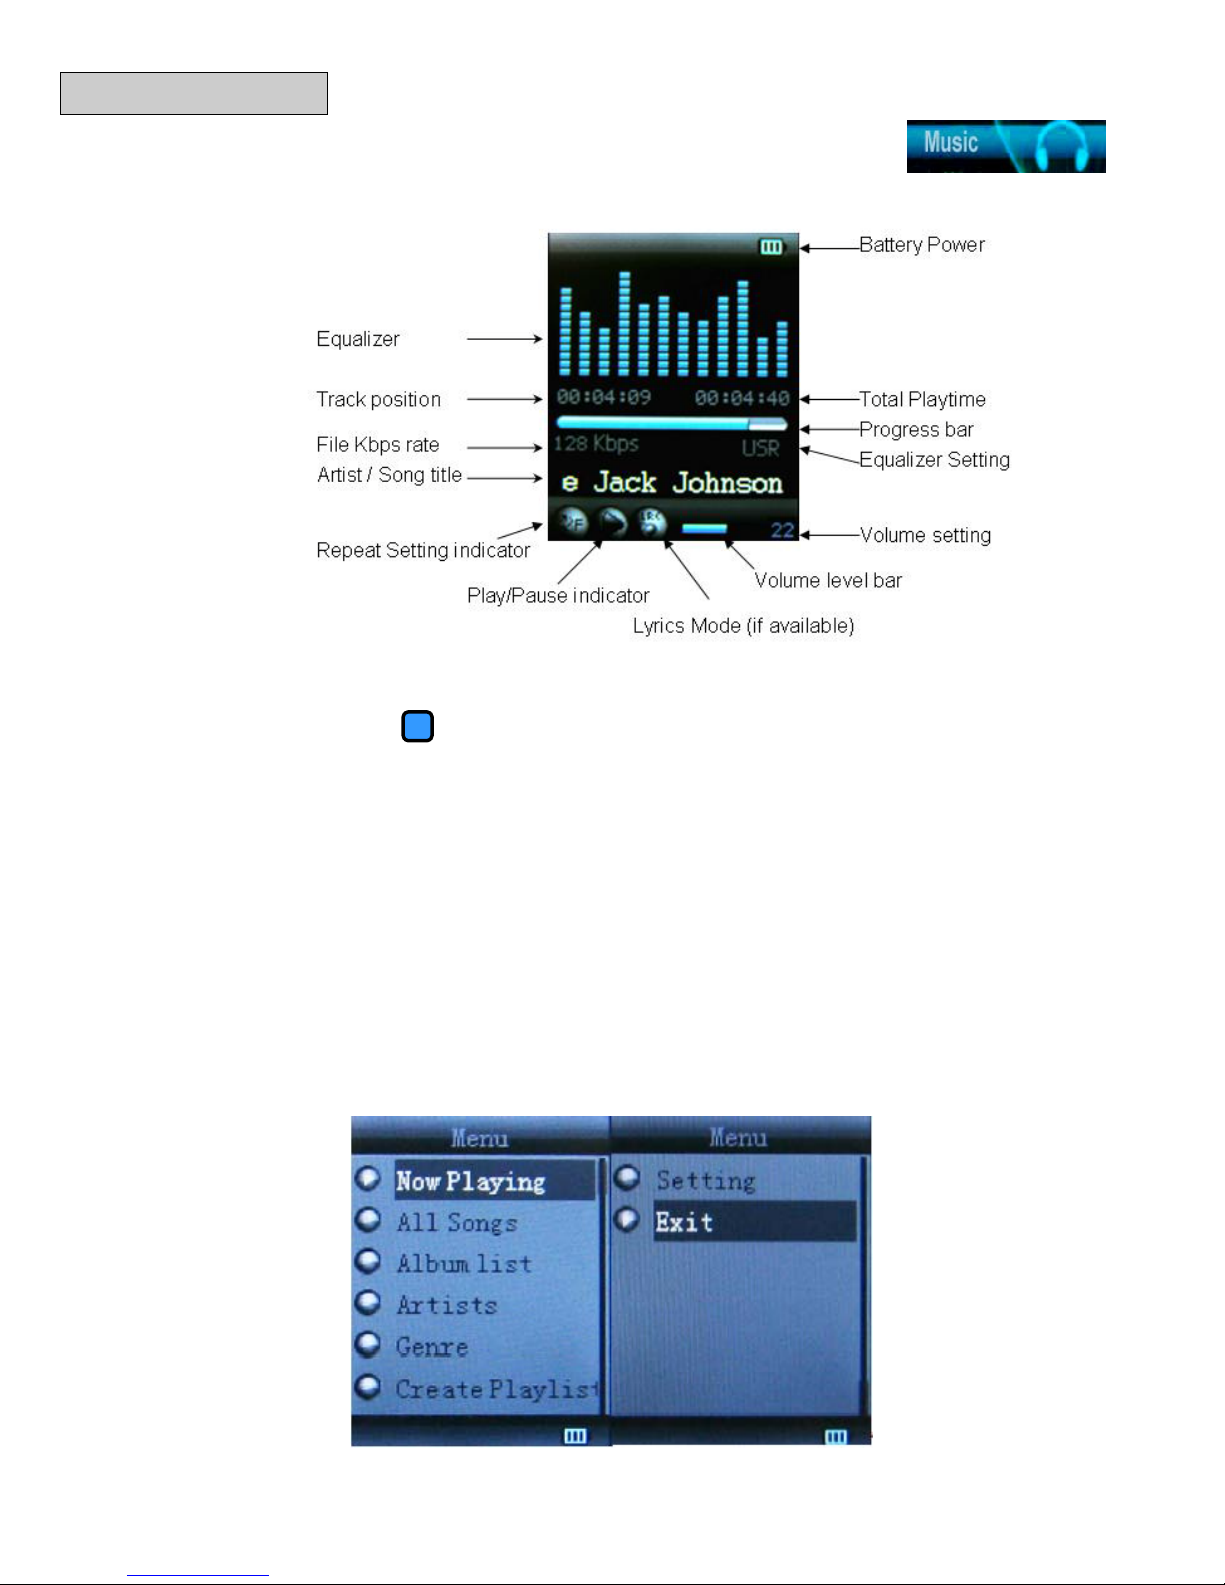
Menu
Press the “M” button to access the Main Menu. Use the “◄” or “►” arrows to navigate
between Music, Movie, Record, Recordings, Picture, Settings,and E-book modes. Press
the “M” button again to enter a mode. While in a mode, press the “M“ button to access
features, options, or sub-menus. Press and hold the “M“ button to exit and return to the Main
Menu.
Volume
While playing music or video, press the “V” button to adjust volume.
Press “►” to increase the volume.
Press “◄” to decrease the volume.
When you are done adjusting the volume, press the “V” button to confirm your setting.
Recharging your Battery
The battery in your Digital Media Player can be recharged by connecting your Digital Media
Player to your computer. Connect the USB cable to the Digital Media Player USB Jack and
connect the other end of the cable to a USB port on your computer.
NOTE: Please also make sure the [ON]/[OFF] switch is placed in the [ON] position while
charging.
You can also charge your Digital Media Player by using an adaptor (not included). Connect
one end of the enclosed USB cable to the MP3 Player, and attach the other end to the
adaptor. Connect the adaptor to an electrical outlet. The AC Adaptor is an optional accessory
available for purchase on the Riptunes website - http://www.rip-tunes.com
When the battery is fully charged, the battery icon will look like this.
When battery power is low, the battery icon will look like this
Note: Charging will automatically stop when the battery is full. Charge time is
approximately 2 to 3 hours.

- 5 -
Adding Media To Your Digital Media Player
1. Connect one end of the enclosed USB cable to a computer. Connect the other end to
your Digital Media Player.
2. Your computer should automatically recognize your MP3 player. If the AutoPlay window
does not open automatically, double-click the My Computer icon (which should be
located on your desktop), and navigate to the Removable Disk. On a Mac, double-click
the Removable Disk icon on your desktop.
3. Copy and paste music/picture/video files into the folder of your Digital Media Player.
4. To transfer files from your Digital Media Player to your PC, drag the files or folders from
the player to your preferred location on your PC.
5. To delete files from your Digital Media Player, select the file or folder that you want to
remove and press the “Del” (delete) key on your keyboard.
6. When you are done, make sure to safely remove your Digital Media Player. If you are
using a Windows PC, you can eject your Digital Media Player by clicking the Safely
Remove Hardware icon in the Windows System tray, and selecting your Digital Media
Player. If you are using a Mac, you can eject your Digital Media Player by dragging its
icon to the trash.
When ready to disconnect your Digital Media Player, make sure that it is safely
removed in order to avoid data corruption.
Do not disconnect or remove your Digital Media Player while files are being
transferred.
To view a tutorial on working with media files, please visit:
http://www.rip-tunes.com/howitworks.html

- 6 -
PLAYING MUSIC
From the Main Menu, use the“◄” or “►” buttons and select Music.
1. Press “M” to enter Music mode.
In Music Mode:
a. Press the “M” button to select music from a different folder or directory.
b. Press the (“Play/Pause”) button to begin playing the currently selected
music. Press again to pause.
c. Press the “◄” or “►” button to select the previous or next song.
d. While a song is playing, press and hold the “◄” or “►” button to fast forward or
rewind.
e. Press the “V” button to adjust the volume. Use the “◄” or “►” button to
increase or decrease the volume, and then press “V” to confirm.
f. If the Lyrics Mode icon is illuminated, press and hold the “M” button to enter
Lyrics Mode. The Lyrics Mode will only be available if a “.lrc” file is associated
with the current song.
Music Options
While a song is playing, press the “M” button to enter the Music Play Setting menu.

- 7 -
Repeat Settings
Select ‘Repeat’ from the Music Options menu. A sub-menu of Repeat settings will display.
Choose a Repeat option and press “M” to confirm. Refer to the Repeat options in the table
below.
Repeat Option
Repeat Icon
Function
Normal
1
The music files under the current path are played one by
one until all have been played.
Repeat One
1
Repeats a single song until stopped by user.
Folder
F
Plays all music files (one time) contained within the chosen
folder or directory.
Repeat Folder
F
Continuously plays all music files contained within the
chosen folder or directory until stopped by user.
Repeat All
A
Continuously plays all music files contained in the Digital
Media Player until stopped by user.
Random
A
Plays all music files in a random order.
Intro
I
Plays the first ten seconds of each song within the current
folder.
Equalizer Settings
1. Use the “◄” or “►” button to select an EQ setting:
Natural / Rock / Pop / Classic / Soft / Jazz / DBB (Digital Bass Booster)
2. Press “M” to confirm your selection.
Replay Feature
The Replay feature allows you to select and repeat portions of a song or voice recording.
Replay is useful for practicing lyrics or for memorizing languages through repetition. You can
also use the built-in microphone to record your input for playback.
1. While playing a song, press “M” to access the Music Play Settings menu, and then
select ‘Replay’. The Repeat icon will flash at the top of the screen
2. Press the “►” button once to begin the section that you wish to repeat.
3. Press the “►” button again to end the section.
4. To add voice response, press the “►” button again. The AB Microphone icon will
appear. You can repeat the sentence or lyrics using the same timeframe as the
selection you have made.
5. To execute playback of the selection and your input, press the “►” button again. The
AB Playback icon will appear.
Replay Times –Set the number of times that the section will replay before continuing (1 -10).
Replay Gap – Set the gap between the playback of each section (1-10 seconds).

- 8 -
WATCHING VIDEOS
From the Main Menu, use the“◄” or “►” buttons and select Movie.
1. Press “M” to enter Movie mode.
a. Press the (“Play/Pause”) button to begin playing the currently selected
movie or video file. Press again to pause.
b. Press the “◄” or “►” button to select the previous or next video or movie.
c. While a movie or video is playing, press and hold the “◄” or “►” button to fast
forward or rewind.
d. Press the “V” button to adjust the volume. Use the “◄” or “►” to increase or
decrease the volume, and then press “V” to confirm.
There are no sub-menu options accessible while a movie or video is playing. To enable
‘Repeat’, access the Movie options menu before playing a movie. A sub-menu of Repeat
settings will display. Refer to the Repeat options described in the Music section of this
manual. Choose a Repeat option and press “M” to confirm.
VOICE RECORDING
From the Main Menu, use the“◄” or “►” buttons and select Record.
1. Press “M” to enter Record mode.
a. Press “M” to select a recording format. There are four different recording formats
to choose from. For further explanation, see table below.
b. Press the (“Play/Pause”) button to begin recording. Press again to
pause.
c. Press and hold the “M” button to end recording and save to disk.
Recording types:
Fine REC
32 BPS
Long REC
64BPS
Fine VOR
128 BPS
Long VOR
256 BPS
Note: When using voice-controlled recording, be sure to speak clearly into the Digital Media
Player to ensure voice-activation.
Play a recorded file
From the Main Menu, use the“◄” or “►” buttons and select Recordings.
1. Press “M” to play voice recordings.
2. Press the (“Play/Pause”) button to begin playback.
3. While a file is playing, press “M” to access the following options:
Repeat, Replay
Note: Refer to the Music section for descriptions of these options.

- 9 -
VIEWING PHOTOS
From the Main Menu, use the“◄” or “►” buttons and select Picture.
1. Press “M” to enter Picture mode.
2. Use the “◄” or “►” buttons to select the picture you want to view or press “M” to
access the Picture options menu.
3. Select ‘local folder’ to navigate to a different folder or directory.
4. Select ‘play set’ to configure the way that photos are displayed.
a. Manual play – You will need to use the “◄” or “►” buttons to browse each
photo.
b. Auto play – You can configure photos to automatically display as a slide show by
configuring the time interval between each photo ( 1 to 10 seconds ).
E-Book
From the Main Menu, use the“◄” or “►” buttons and select E-Book.
1. Press “M” to enter E-Book mode.
2. Use the “◄” or “►” buttons to select the TXT file you wish to read or press “M” to
access the E-Book options menu.
3. Select ‘local folder’ to navigate to a different folder or directory.
4. Select ‘play set’ to configure the way that photos are displayed.
a. Manual play – You will need to use the “◄” or “►” buttons to scroll through
each page.
b. Auto play – You can automatically scroll through the contents of your ‘E-Book’ by
configuring the time interval between each page ( 1 to 10 seconds ).
5. Use the “◄” or “►” buttons to scroll to the next page.
6. To add a bookmark, press “M” and then select ‘Bookmark Add’.
7. To return to a bookmark, press “M” and then select ‘Bookmark Select’. If you have
set more than one, you will need to choose which one you wish to skip to.
SYSTEM SETTINGS
From the Main Menu, use the“◄” or “►” buttons and select Settings.
Record Time
Configure Date and Time settings.
LCD Set
Set the time that the LCD light will remain on after the last input
made. Options- Always on, 10 sec, 20 sec, 30 sec.
Language
Set user language preference.
Power off
Off time – Set auto-shutdown mode
Sleep time – Set auto sleep mode
Replay Mode
Configure replay settings – Manual or Automatic
Memory Info
Displays the total memory available and the % of memory used.
Firmware ver
Displays the current firmware version installed.

- 10 -
TROUBLESHOOTING
No power
1. Check battery level.
2. Recharge as per directions in User Manual
Unable to locate or play files
1. Check that the file is in a compatible format
2. Check to see if the file is stored in a different directory.
No music is heard in the earphones
1. Check the volume level
2. Check the connection (earphone to the earphone jack)
3. Check if your music file is compatible with your MP3
player.
Not charging
1. Check to make sure that your Digital Media Player is
connected to a USB port on your computer.
2. If you are using an A/C Adaptor (not included), check to
be sure that red & green indicator lights are on.
Unable to download music.
1. Check if you have enough space on your Digital Media
Player to download the music file.
2. Check to make sure that the USB cable is connected to
the PC and to the Digital Media Player.
Computer not recognizing Digital
Media Player
1. Check that the USB cable is properly connected to your
computer.
2. Try plugging the USB cable into one of the back ports
of your computer.
If you experience any issues that are not listed above, or if you are unable to resolve your issue after trying the
methods and solutions described above, please contact the Rip-Tunes technical support team:
Call: 1-888-217-7688
Email: custserv@rip-tunes.com
http://www.rip-tunes.com/contactus.html

- 11 -
SPECIFICATIONS
DIMENSIONS
3.46 x 1.6 x 0.35 inches
WEIGHT
1.24 oz.
DISPLAY AREA
1.8” TFT
COMPUTER INTERFACE
USB 2.0
MEMORY
Flash memory: 2GB
RECORD
Record Format
WAV (32 Kbps) or ACT (8 Kbps)
Record time
35 hours (for 128 MB)
EARPHONES
Earphone max output
(L) 10mW + (R) 10mW (32 Ohm)
MP3 bit rate
8 Kbps – 320 Kbps
WMA, WAV bit rate
5 Kbps – 384 Kbps
Frequency response
20 Hz – 20 KHz
AUDIO FORMATS
MP3, WMA, WAV, ACT
MOVIE FORMATS
AMV, AVI(128X160)
IMAGE FORMATS
JPEG, GIF, BMP
SIZES: 128*160 ,160*128,128*128
E-BOOK FORMAT
TXT
TEMPERATURE RANGE
-5 to + 40 Degrees Celsius
LANGUAGE SUPPORT
Simplified Chinese, English, Traditional Chinese, Japanese, Korean,
Russian, Hebrew, Thai, French, German, Italian, Dutch, Portuguese,
Spanish, Swedish, Czech, Polish, Finnish, Danish, Hungarian,
Slovakian
OPERATING SYSTEM
Windows ME/2000/XP, Vista, 7, Mac OS 10, Linux 2.4.2,
Riptunes ® Product works with the above mentioned operating systems.
This product is not made by or approved by the above mentioned firms.
Riptunes ® is a division of WBH Inc., all rights reserved.
All other trademarks are the property of their respective owners.
Used by WBH Inc. solely for descriptive purposes.
To obtain a warranty, please register your product online at: www.rip-tunes.com

User’s Guide
Manual del Usuario / Manual de l’utilisateur
Model: MP 1857

- 1 -
CONTENIDO
Introducción.........................................................................................................2
Conociendo su reproductor de MP3.....................................................................3
Funciones Básicas.............................................................................4
Agregando Medios de comunicación a su Reproductor Digital..........5
Música ...............................................................................................................6
Opciones y Características de Música...............................................7
Películas y Videos................................................................................................8
Grabación de Voz................................................................................................8
Opciones y Características de Grabación..........................................8
Reproducir un archivo grabado..........................................................8
Fotos....................................................................................................................9
Libro Electrónico..................................................................................................9
Funciones............................................................................................................9
Resolución de problemas...................................................................................10
Especificaciones................................................................................................11

- 2 -
INTRODUCCÍON
Felicitaciones por la compra del RIPTUNES MP-1857 Reproductor de Medios Digitales. Antes de
utilizar el reproductor de medios digitales, se recomienda que se familiarice con las
características, funciones y procedimientos de operación descritas en este manual. Debido a
ligeras modificaciones en la producción, las instrucciones, funciones y / o descripciones que se
encuentran en este manual pueden ser ligeramente diferentes de su producto.
Características de un vistazo
•Pantalla de Alta Calidad1.8”
•Reproduce la Mayoría de Formatos de Archivos de Audio
•Funciones de Libro Electrónico
•Reproducción de video AMV
•Foto navegación
•Grabación de Audio
Precauciones
Siga estos consejos para preservar la vida operativa de su Reproductor Digital de Medios.
•Se recomienda que permita que la batería se cargue completamente antes de utilizarlo por primera vez. No recargue
de manera desatendida por más de 5 horas.
•No cuelgue el reproductor por sus auriculares o cables
•Nunca fuerce un conector del cable en los puertos de su reproductor digital multimedia o un ordenador. Asegúrese
siempre de que los conectores del cable son idénticos en forma y tamaño antes de intentar conectarse.
•Al desconectar el reproductor digital de medios desde un ordenador, utilice la función Quitar hardware de
dispositivos en el ordenador. No desconecte el reproductor de medios digitales mientras haya transmisión de datos.
• No utilice el reproductor a temperaturas extremas. Manténgase lejos de zonas de mayor calor, frío, seco o húmedo.
También siempre se debe tener lejos del agua, fuego y radiación.
•No desarme el reproductor de medios digitales.
•No permita que los niños pequeños usen el reproductor sin supervisión.
•No instale software extranjero en su reproductor de medios digitales.
•La batería sólo se debe cargar con los adaptadores aprobados (a la venta en el sitio web RipTunes).
•Daño permanente de la audición o la pérdida de audición puede ocurrir si se utilizan auriculares a un volumen alto.
Los expertos en audición desaconsejan escuchar música continuamente a un volumen alto. Si escucha un "silbido"
de ruido en los oídos, o si nota alguna molestia, baje el volumen o interrumpa el uso de este producto temporalmente
hasta que desaparezca la molestia.

- 3 -
CONOCIENDO SU REPRODUCTOR DE MP3
Vista Frontal Vista Lateral Vista Inferior
Botones y Controles
MBotón de Menu - Entre o salga de menús y sub-menúsyconfirme
selecciones. Mientras en cualquier modo, oprima y mantenga oprimida la
tecla “M” para ir al menu principal.
Reproducir/Pausa – Oprima y tenga oprimido para entrar en modo espera.
►Siguiente – Mientras reproduce música o video, oprima y tenga oprimido
para adelantar.
◄Previo – Mientras reproduce música o video, oprima y tenga oprimido
para retroceder.
VControl de Volumen- Mientras reproduce música o video, oprima el botón
V y luego use los botones de flecha para ajustar el volumen.
Hold Mueva el interruptor que bloquea el aparato MP4 de uso. Mientras este
bloqueado, los botones no funcionarán.
ON/OFF Enciende o apaga el Reproductor Digital de Medios.
Earphone Jack Conector estándar de audífonos 3.5 mm.
USB Jack Conexión USB – Interface con un cable USB a un ordenador para
administrar archivos de medios.

- 4 -
Funciones Básicas
Encendido/Apagado
Use el interruptor ON/OFF a un lado del Reproductor Digital de Medios para encender el
aparato. Si el dispositivo ya está encendido, pero está en modo de espera, presione y
mantenga presionado el botón ("Play / Pause") para activar (Interruptor ON/OFF en 'ON').
Mientras que el Reproductor Digital de Medios este en uso, presione y mantenga presionado
el botón para entrar en modo de espera. Utilice el interruptor ON/OFF a un lado del
Reproductor Digital de Medios para apagar el dispositivo.
Nota: Utilizando el interruptor ON/OFF le hará perder su marcador actual o la ubicación
(si se está reproduciendo un archivo).
Hold /Lock
La función de bloqueo le puede ayudar a bloquear todos los botones para evitar el
funcionamiento accidental del interruptor. Para bloquear todos los botones del reproductor de
MP3, deslice el interruptor HOLD en la dirección de la flecha. Todos los botones están
desactivados. Para desactivar la función de bloqueo, deslice el interruptor HOLD de nuevo.
Menu
Pulse el botón "M" para acceder al menú principal. Utilice las flechas "◄" o "►" para navegar
entre Música, Película, Grabar, Gabraciónes, Imagen, Configuraciones,y los modos de
Libros Electrónicos. Pulse el botón "M" de nuevo para entrar en un modo. Mientras está en
un modo, presione el botón "M" para acceder a las funciones, opciones o submenús. Presione
y mantenga presionado el botón "M" para salir y volver al menú principal.
Volumen
Durante la reproducción de música o vídeo, pulse el botón "V" para ajustar el volumen.
Pulse el botón "►" para aumentar el volumen.
Pulse "◄" para bajar el volumen.
Cuando haya terminado de ajustar el volumen, presione el botón "V" para confirmar la
configuración.
Recargando su Batería
La batería de su reproductor digital de medios puede ser recargada mediante la conexión del
Reproductor Digital de Medios a su ordenador. Conecte el cable USB al puerto USB del
Reproductor Digital de Medios y conecte el otro extremo del cable a un puerto USB de su
ordenador.
NOTA: Asegúrese de que el [ON] / [OFF] se sitúa en el [ON] posición mientras se está cargando.
También puede cargar su reproductor digital de medios mediante el uso de un adaptador (no
incluido). Conecte un extremo del cable USB al reproductor de MP3, y conecte el otro extremo
al adaptador. Conectar el adaptador a una toma eléctrica.El adaptador de CA es un accesorio
opcional disponible para su compra en el sitio web Riptunes - http://www.rip-tunes.com
Cuando la batería está completamente cargada, el icono de la batería se verá así.
Cuando la batería está baja, el icono de la batería se verá así.
Nota:La carga se detiene automáticamente cuando la batería está llena. El tiempo de carga
es de aproximadamente 1 a 2 horas.

- 5 -
Adición de contenido multimedia a tu Reproductor Digital de Medios
1. Conecte un extremo del cable USB a un ordenador. Conecte el otro extremo a su
Reproductor Digital de Medios.
2. Su computadora debe reconocer automáticamente el reproductor de MP3. Si la
ventana de reproducción automática no se abre automáticamente, haga doble clic en el
icono Mi PC (que debe estar ubicado en su ordenador), y navegue al disco extraíble.
En un ordenador Mac, haga doble clic en el icono de disco extraíble en el ordenador de
escritorio.
3. Copie y pegue la música / fotos / archivos de videos en la carpeta de su Reproductor
Digital de Medios.
4. Para transferir archivos desde el Reproductor Digital de Medios en su PC, arrastrar los
archivos o carpetas desde el reproductor a la ubicación que desee en su PC.
5. Para borrar archivos de su reproductor digital multimedia, seleccione el archivo o la
carpeta que desea eliminar y presione la tecla "Del" (borrar) en el teclado.
6. Cuando haya terminado, asegúrese de remover de forma segura su Reproductor Digital
de Medios. Si está usando una PC con Windows, puede expulsar su Reproductor
Digital de Medios haciendo clic en el icono de Quitar hardware con seguridad en la
bandeja del sistema Windows, y seleccionar el reproductor digital de medios. Si usted
está usando un ordenador Mac, puede expulsar su Reproductor Digital de Medios
arrastrando su icono a la papelera.
Cuando esté listo para desconectar el reproductor multimedia digital, asegúrese de
que es eliminado de forma segura con el fin de evitar la corrupción de datos.
No desconecte o elimine su Reproductor Digital de Medios mientras se están
transfiriendo archivos.
Para ver un tutorial sobre cómo trabajar con archivos multimedia, visite:
http://www.rip-tunes.com/howitworks.html

- 6 -
REPRODUCIENDO MUSICA
Desde el menú principal, utilice los botones "◄" o "►" y seleccione Música.
1. Pulse el botón "M" para acceder al modo Música.
En Modo de Musica:
a. Pulse el botón "M" para seleccionar música de una carpeta o directorio distinto.
b. Pulse el botón ("Play / Pause") para comenzar a reproducir la música
seleccionada. Pulse de nuevo para hacer una pausa.
c. Pulse el botón "◄" o "►" para seleccionar la canción siguiente o anterior.
d. Mientras se reproduce una canción, pulse la tecla "◄" o "►" para avanzar o
retroceder.
e. Pulse el botón "V" para ajustar el volumen. Utilice la opción "◄" o "►" para
aumentar o disminuir el volumen, y pulse en "V" para confirmar.
f. Si el icono del modo de Letras está iluminado, presione y mantenga presionado el
botón "M" para entrar en el modo de Letras. El modo de letras sólo estará disponible si
el archivo con extensión”. lrc" se asocia con la canción actual.
Opciones de Musica
Mientras una canción está sonando, presione el botón "M" para entrar en el menú de
configuración de reproducción de música.

- 7 -
Ajustes de Repetición
Seleccione 'Repeat' desde el menú Opciones de Música. Un sub-menú de la configuración de
repetición se mostrará. Elija una opción del menu Repetir y pulse "M" para confirmar. Refiérase a las
opciones de repetir en la siguiente tabla.
Opción Repetir
Icono Indicador
Repetir
Función
Normal
1
Los archivos de música en la ruta actual se reproducen
uno por uno hasta que todos han reproducido.
Repita Uno
1
Repite una sola canción hasta detenido por usuario.
Folder (carpeta)
F
Reproduce todos los archivos de música (una vez)
incluidos en la carpeta o directorio seleccionado.
Repetir Folder F Continuamente reproduce todos los archivos de música
contenidos en la carpeta elegida o directorio hasta que
sea detenido por el usuario.
Repetir Todo
A
Continuamente reproduce todos los archivos de música
contenidos en el reproductor digital de medios hasta que
sea detenido por el usuario.
Random
(aleatorio)
A
Reproduce todos los archivos de música en orden
aleatorio.
Intro
I
Reproduce los primeros diez segundos de cada canción
dentro de la carpeta actual.
Ajustes del Ecualizador
1. Use los botones “◄” o “►” para seleccionar un ajuste de EQ:
Natural / Rock / Pop / Clásico / Suave / Jazz / DBB (Booster Digital de Bajo)
2. Pulse el botón "M" para confirmar su selección.
Función de Repetición
La función de repetición le permite seleccionar y repetir las partes de una canción o grabación de voz.
Repetición es útil para la práctica de lirica o de memorización de los idiomas a través de la repetición.
También puede utilizar el micrófono incorporado para grabar su entrada para la reproducción.
1. Mientras reproduce la canción, oprima “M” para acceder el menu de Configuración de
Reproducción de Musica, y luego seleccione ‘Replay’ (repetir).El icono de Repetir
parpadeará en la parte superior de la pantalla.
2. Oprima el botón “►” una vez para comenzar la sección que desea repetir.
3. Presione el botón “►” de nuevo para detener la sección.
4. Para agregar respuesta de voz, presione el botón "►" de nuevo. El icono del micrófono
AB aparecerá. Se puede repetir la frase o lirica con el mismo periodo de tiempo como la
selección que haya hecho.
5. Para llevar a cabo la reproducción de la selección y su entrada, pulse el botón "►" de nuevo. El
icono de reproducción AB aparecerá.
Frecuencia de repetición - Establecer el número de veces que se volverá a reproducir la sección
antes de continuar (1 -10).
Brecha de repetición - Establecer el espacio entre la reproducción de cada sección (1-10 segundos).
Table of contents
Languages:
Other RIP TUNES MP3 Player manuals

RIP TUNES
RIP TUNES MP1202 User manual

RIP TUNES
RIP TUNES MP2868BTB User manual

RIP TUNES
RIP TUNES MP1898 User manual

RIP TUNES
RIP TUNES MP2868BT 8GB User manual

RIP TUNES
RIP TUNES MP1874 User manual

RIP TUNES
RIP TUNES MP 1587 User manual

RIP TUNES
RIP TUNES MP1898 User manual

RIP TUNES
RIP TUNES MP1872 User manual
Popular MP3 Player manuals by other brands

Sony
Sony SEP-30BT - Rolly™ Sound Entertainment... Limited warranty

Nextar
Nextar MA794 instruction manual

Sony
Sony VAIO Music Clip MC-P10 Basic guide

Transcend
Transcend TS25PSP20G user guide

Digital Blue
Digital Blue Disney Mix Stick 1GB Getting started guide

Coby
Coby MP-C838 - 128 MB Digital Player user manual