Riptide Nautilus SuperPro User manual
OWNER’S MANUAL
Riptide Nautilus SuperPro
/ Manta SuperPro
Swim Spas & Exercise Pools
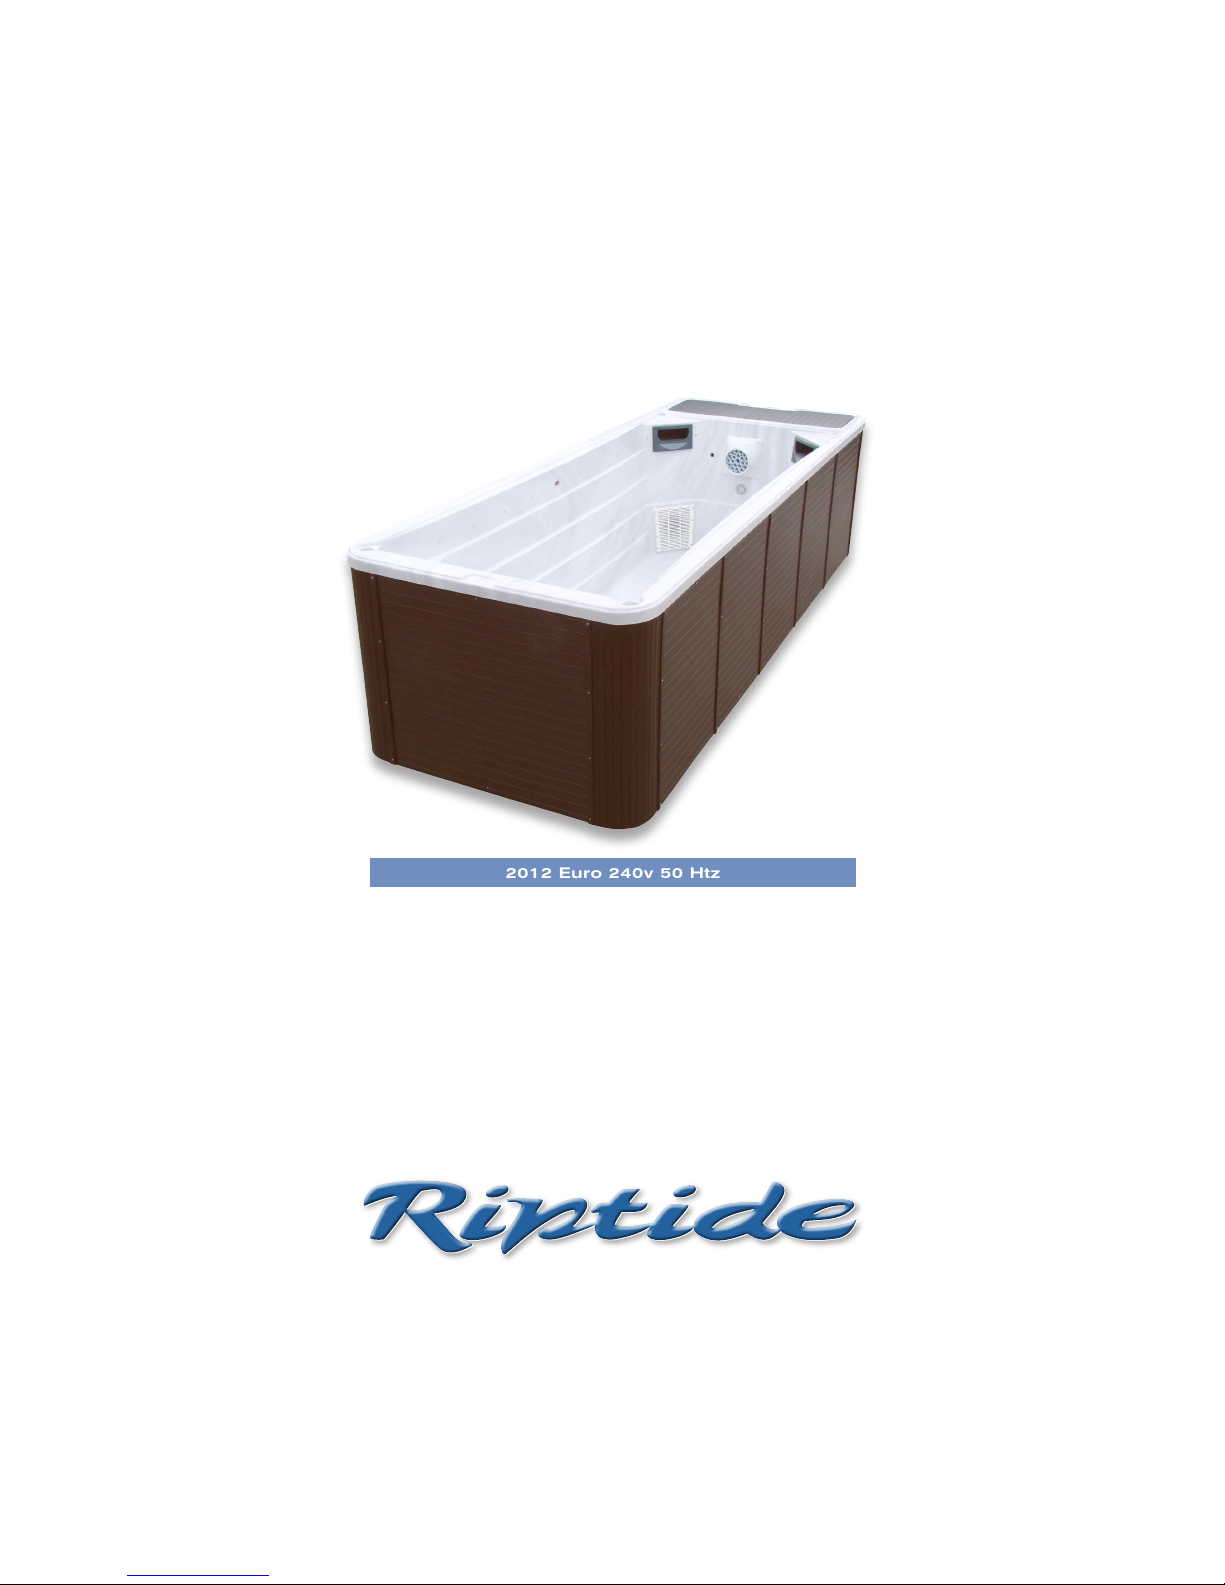
2012 Euro 240v 50 Htz

TABLE OF CONTENTS
2
IMPORTANT SAFETY INFORMATION 3
INSTALLATION AND SETUP
Selecting a site for your swim spa 4
Electrical requirements and connections 4
Checklist before filling your swim spa 5
CONTROL PANEL OPERATIONS
Control system features 6
Main control panel operating instructions 6
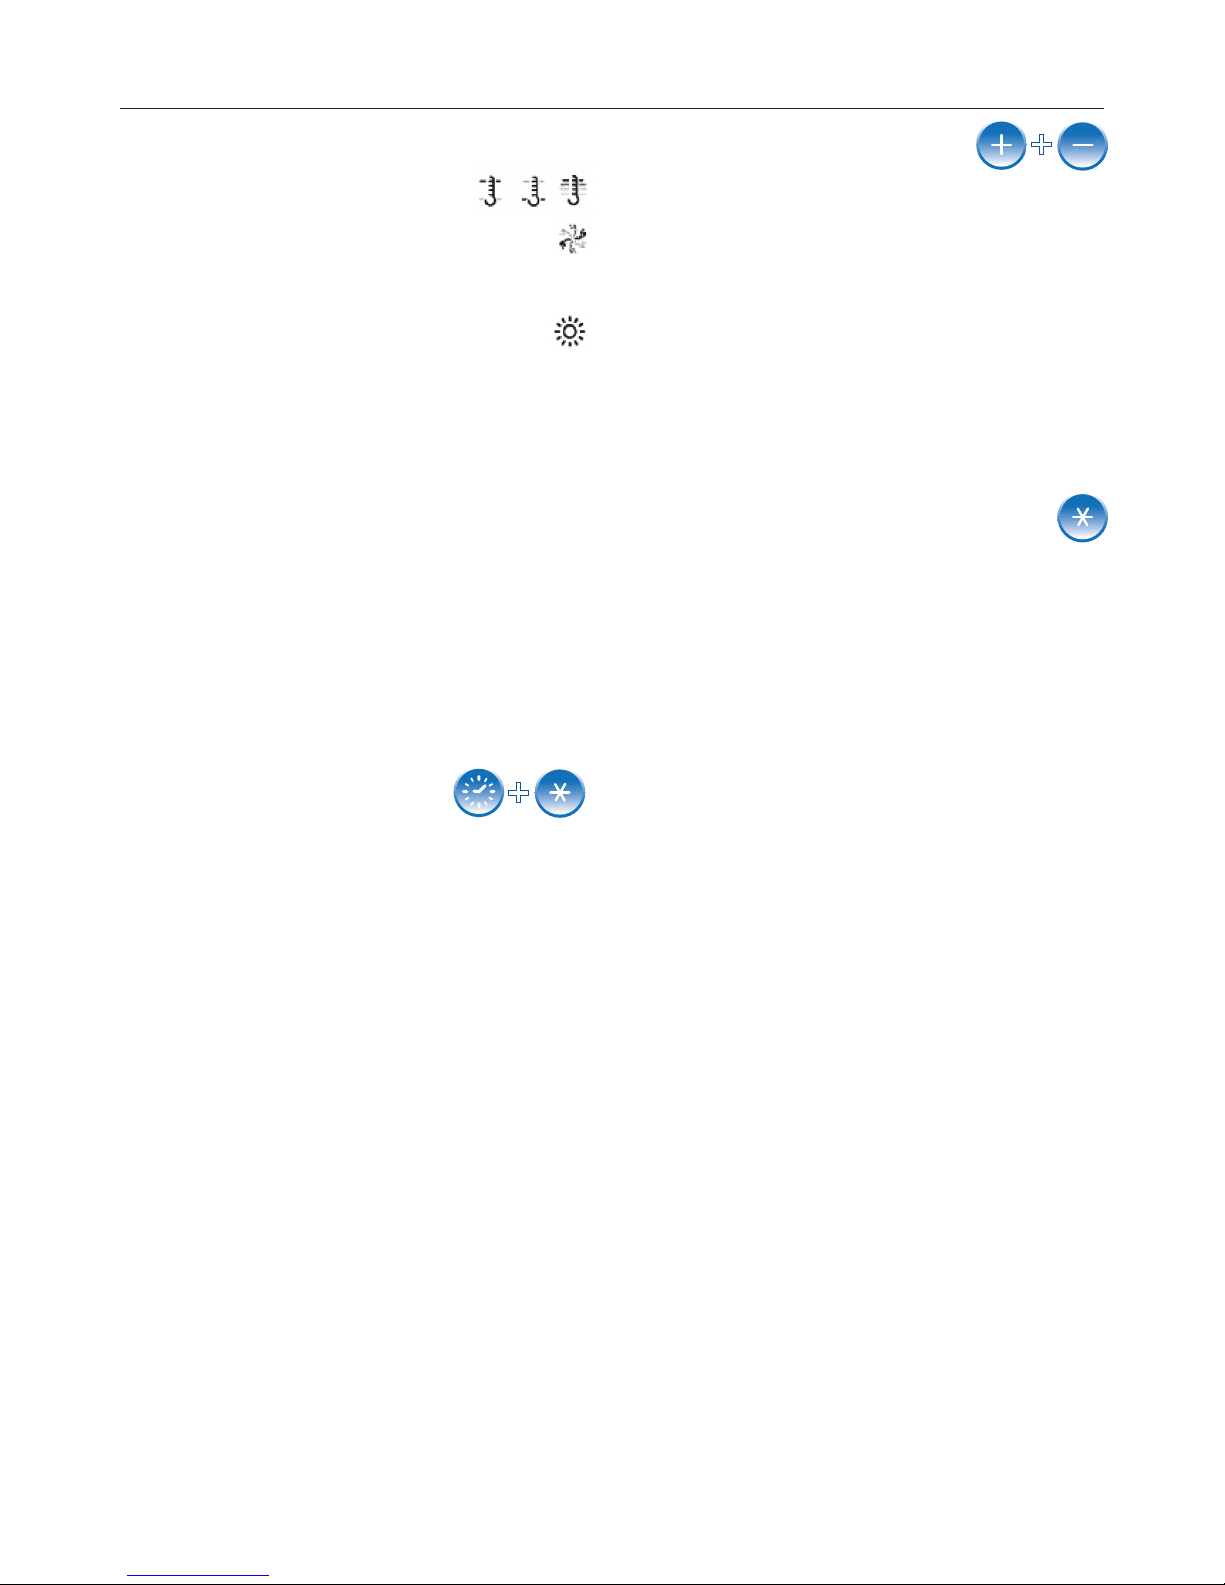
Icon Legend 7
Initial Start-up 7
Setting the time 7
Temperature setting 7
Mode setting 7
Variable Speed Drive 8
Filtration Cycles 8
Light 8
Freeze Protection 8
Locking the Control Panel 8
Locking the Temperature setting 8
Clean-Up Cycle 8
Circulation Pump 8
Ozone Generator 8
Auxiliary control panel 9
Diverter controls 9
User Preferences 9
Editing User Preferences 9
TROUBLESHOOTING GUIDE
Diagnostic Messages 10
Periodic Reminder Messages 12
Diagnostics - Operation 13
MAINTENANCE
Water chemistry 14
Overview of water chemistry 14
Starting your swim spa with new water 15
Maintaining swim spa water 15
Water chemistry troubleshooting 15
Riptide Total Alkalinity (TA) adjustment chart 16
Changing your swim spa water 17
Cleaning your filters 17
Swim spa shell care 17
Cleaning and protecting the headrests 17
Cover care 18
Miscellaneous care 18
Low-use or no-use periods 18
Swim spa winterization 18
Swim spa de-winterization 18
SERVICE 18
RIPTIDE LIMITED WARRANTY 20
WARRANTY REGISTRATION FORM 22

When installing and using this electrical equipment, basic
safety precautions should always be followed, including the
following:
1. READ AND FOLLOW ALL INSTRUCTIONS.
2. WARNING - To reduce the risk of injury, do not
permit children to use this product unless they
are closely supervised at all times.
3. In standard form the Riptide Nautilus or Manta SuperPro
requires only one supply of 240 volts 32 amp. Please consult
with a qualified electrician to verify current legislation
ALWAYS USE A QUALIFIED ELECTRICIAN
TO CONNECT THIS Swim spa TO YOUR
ELECTRICITY SUPPLY
4. DANGER - risk of accidental drowning. Extreme
caution must be exercised to prevent unauthorised access
by children. To avoid accidents, ensure that children cannot
use the Riptide swim spa unless they are supervised at all
times.
5. DANGER - risk of injury. The suction fittings in the
Riptide swim spa are sized to match the specific water flow
created by the pump. Should the need arise to replace the
suction fittings or the pump, be sure that the flow rates are
compatible. Never operate the Riptide swim spa if the suction
fittings are broken or missing. Never replace a suction fitting
with one rated less than the flow rate marked on the original
suction fitting.
6. DANGER - risk of electric shock. Do not permit
any electric appliance, such as a light, telephone, radio, or
television, within 5 feet (1.5m) of the unit. These units have
an integral ground fault circuit interrupter, but this only covers
the pools own electrics.
7. WARNING - to reduce the risk of injury:
a) Before entering the swim spa check the temperature.
b) Since excessive water temperatures have a high potential
for causing foetal damage during the early months of
pregnancy, pregnant or possibly pregnant women should
seek advice before using pool and should maintain safe
water temperatures.
c) The counter-current of the Riptide swim spa is extremely
powerful and could cause injury if used incorrectly. Do not
stand next to the counter-current nozzles when the motor is
running. Ideally you should be placed at least 1 meter from
the nozzles. Never attempt to adjust the swim jet nozzles
whilst the motor is running
d) The use of alcohol, drugs, or medication before or during
swim spa use may lead to unconsciousness with the
possibility of drowning.
e) Persons suffering from obesity or with a medical history of
heart disease, low or high blood pressure, circulatory system
problems, or diabetes should consult a physician before
using swim spa.
f) Persons using medication should consult a physician
before using the swim spa since some medication may
induce drowsiness while other medication may affect heart
rate, blood pressure and circulation.
ADDITIONAL SAFETY INSTRUCTIONS:
1. WARNING - risk of fatal hypothermia.
a) The use of alcohol, drugs, or medication can greatly
increase the risk of fatal Hypothermia in a swim spa.
b) The causes, symptoms, and effects of Hypothermia may be
described as follows: Hypothermia occurs when the internal
temperature of the body reaches a level several degrees
above the normal body temperature of 37°C (98.6°F). The
symptoms of Hypothermia include an increase in the internal
temperature of the body, dizziness, lethargy, drowsiness, and
fainting. The effects of Hypothermia include:
• Unawareness of impending hazard;
• Failure to perceive heat;
• Failure to recognize the need to exit the Pool;
• Physical inability to exit the Pool;
• Foetal damage in pregnant women; and
• Unconsciousness and danger of drowning.
2. WARNING - risk to infants, the elderly, and
women planning pregnancy or during pregnancy.
Please consult your physician if the above applies to you or
anyone using your swim spa.
3. WARNING - risk of children drowning. Although
your Riptide swim spa cover is not rated as a safety cover, it
is wise to always keep the swim spa cover securely fastened
when not in use. This will help discourage children from
attempting to enter the swim spa when not supervised by
an adult.
4. WARNING - risk of drowning. Use caution when
bathing alone. Overexposure to hot water may
cause nausea, dizziness, and fainting.
5. WARNING - risk of injury. Always use extreme
caution while entering or exiting the swim spa. Surfaces can
be very slippery when wet. Do not step on or sit on head
rests. Keep all breakable objects out of the swim spa area.
6. WARNING - risk of injury. Never use the swim spa
immediately after strenuous exercise.
7. WARNING - risk of injury. Individuals with infectious
diseases should not use the swim spa
8. WARNING - risk of injury. Maintain water chemistry
in accordance with chemical manufacturer’s instructions.
9. WARNING - risk of shock. The swim spa shall not be
operated in severe weather conditions, i.e. electrical storms.
10. CAUTION - unauthorised access. Secure the
swim spa area against unauthorised access. Make sure all
barriers meet local codes. Keep the swim spa cover on swim
spa when not being used.
11. CAUTION - risk of damage to pool or
equipment. By performing maintenance as described
later in this Owner’s Manual, the chance of damage to your
swim spa and it’s equipment will be greatly reduced. Never
block the air vents that lead to the equipment compartment.
Doing so may cause the swim spa equipment to overheat.
12. CAUTION - non-approved accessories. Using
accessories not approved by the manufacturer could void
your guarantee or cause other problems. Please consult with
your authorised Riptide dealer.
13. CAUTION - location of your riptide swim spa.
Locate your Riptide swim spa on a surface that can
withstand the weight bearing requirements of the swim
spa (see Selecting a Site for your Riptide swim spa in this
Manual). Also, locate your swim spa in an environment that
can withstand repeated exposure to water and the possibility
of a major spill.
IMPORTANT SAFETY INFORMATION
3

SELECTING A SITE FOR YOUR RIPTIDE
SWIM SPA
Your Riptide swim spa was designed for either indoor
or outdoor use. Whether indoors or outdoors, please
adhere to the following guidelines:
1. Select a site that is stable and capable of supporting
the weight of your swim spa, its water, and the people
using it (refer to the model brochure or contact an
authorised Riptide dealer for the filled weight of your
swim spa). If installed on a suspended floor/deck,
the floor/deck should be capable of supporting your
swim spa. If you have concerns on this matter, please
contact a qualified licensed contractor.
2. Select a surface that is flat and level. This surface
must provide continuous support for the entire bottom
of the swim spa structure. Do not shim or block up the
swim spa creating voids below the base framework. If
you do not intend to use a pit please ensure you have
adequate drainage or a soak away.
3. Avoid installing the swim spa in a pit or low area
where water may accumulate and damage the swim
spa or its equipment. Choose a site where water will
drain away from the swim spa and not towards it.
4. Important: With all installations, the Riptide swim
spa must be located at least 150cm [5 feet] from all
electrical outlets, switches, and other permanently
installed electrical devices.
Indoorconsiderations:Thereareseveralconsiderations
when installing your Riptide swim spa indoors: the
environment both around and below the swim spa
should be water resistant. It must be capable of
handling water splashed out from the swim spa as
well as the possibility of a leak from the vessel ( a catch
basin equivalent to the volume of your swim spa is
recommended); it is recommended that the room you
install the swim spa in has proper ventilation. Proper
ventilation can usually be achieved by an exhaust fan
or a dehumidifier if swim spa is used for less than one
hour per day.
Note: Typical indoor surfaces include, but are not
limited to: concrete, wood, non-slip tile or linoleum.
Outdoor Considerations: When selecting an
outdoor site, several things should be considered.
Firstly, avoid selecting a site where excessive water
may contact the swim spa such as from sprinklers or a
roof edge without rain gutters. If possible, avoid areas
of direct, prolonged sunlight. The ultraviolet rays of
sunlight will tend to fade and damage your Riptide
swim spa cover and cabinet. Lastly, avoid locating
your swim spa in an area where debris could be
blown into the swim spa. If sinking your Riptide swim
spa into the ground a suitable drainage system must
be installed to avoid the risk of hydrostatic pressure
from rising ground water.
Note: Typical outdoor surfaces include, but are not
limited to: concrete, brick, non-slip tile, wood-decking,
pea shingle or sand.
ELECTRICAL REQUIREMENTS
and CONNECTIONS
All Riptide swim spas must be wired in accordance
with all national electric codes. Always use a qualified
electrician to perform the electrical installation.
WIRING DIAGRAMS
Please reference the wiring diagram that is specific to
your Riptide swim spa‘s control system:
• Standard Riptide swim spa 32 amp control system
— one input 240V 32 amp single phase or 240V 32
amp three phase
220/240 VOLT INSTALLATION
Use only a qualified Licensed Electrician to make 240
Volt electrical installations.
The 220/240V Riptide swim spa 32amp model
requires one fused and dedicated electrical circuit of
32amp and a minimum supply wire size of 6mm. It is
important that these circuits are dedicated (not being
used by any other electrical appliance) or your swim
spa may not function properly.
Position your Riptide swim spa at least (1.5m) from all
electrical outlets or devices.
ELECTRICIAN’S INSTRUCTIONS
We strongly recommend that a suitable seal cable
guide is installed to retain the water tight seal of the
controlboxes.Theincomingpower linemust besuitably
fused and protected to a C.E. minimum standard and
any national specific regulations required.
INSTALLATION & SET-UP
4
IMPORTANT INFORMATION
Never, under any circumstances, install your
Riptide pool on an electrically heated floor.

CHECKLIST BEFORE FILLING YOUR
SWIM SPA
Important: The equipment should never be operated
without water in the swim spa. Serious damage to the
equipment will occur.
1. Installing your cover: Your Riptide swim spa cover
comes with tie-down straps and locking hardware to
attach the cover to the swim spa cabinet or decking.
2. Check drain valves: Check that the swim spa
drain valve is fully closed.
3. Tighten equipment fittings: In the equipment
compartment, hand-tighten all PVC pipe unions,
pump bleed valve and pump drain plugs to prevent
the possibility of leakage (sometimes these fittings
loosen during shipment). Check also that all fittings
on the filter are closed (HAND TIGHT ONLY! ).
4. Check Valve: Verify that all valves aside from the
drainage valves described previously are in the fully
open position. A valve that is half closed will result in
INSTALLATION & SET-UP
a noisy pump due to lack of water flow.
5. Fill the pool: Fill the swim spa to approximately
the halfway point on the skimmers.
Note 1: The higher the water level, the less pool users
it will take to cause the water to overflow the pool
edge. Also, water will splash out more easily whilst
swimming in the pool if it is over filled.
Note 2: If you live in a hard water area and have
access to awater softener, you can fill the pool with a
50/50 mix of hard and soft water. The calcium balance
should be between 250 and 500 parts per million.
6. Check for leaks: After the Riptide swim spa is
full, but before turning the power on, check all the
fittings and equipment in the equipment compartment
for signs of leakage. If a leak is detected, except
from fittings that can be hand-tightened, call your
authorised Riptide dealer.
Auxiliary Control Panel Suction
Panel
Weir
/ Filter
Counter
Current
Main
Control
Panel
5

Tempº
Time
F1
F2
PL
TL
Mode/Prog Tempº
Light
Variable Speed Drive
Swim Spas .Exercise Pools
Nautilus SuperPro
Quick Guide to Control Panel SYMBOLS FUNCTION
Variable Speed Drive (VSP) ON/OFF Variable Speed Drive
Light ON/OFF LED Lighting / change LED Lighting mode
Mode/Prog Function 1. Sleep / Economy / Standard mode
Function 2. YES/NO
Time Time setting
Tempº+ Adjust Temperature (+) / Time / select modes
Tempº− Adjust Temperature (−) / Time / Select modes
Time then VSP then Tempº+ or Tempº− Panel lock (PL) / unlock Press each button within 3 secs
Tempº+ then Time then VSP then Tempº+ Temperature setting lock
Tempº+ then Time then VSP then Tempº− Temperature setting unlock
CONTROL PANEL OPERATIONS
MAIN CONTROL PANEL OPERATING INSTRUCTIONS
6
CONTROL SYSTEM FEATURES
The fully programmable computer based control
system on Riptide swim spas allows total control of
the water temperature and jet power at the touch of
a button. Also included is an automatic timer switch
and operational safety features to ensure a safe and
relaxing swim spa experience.
Heater control
You can set the water temperature to suit the activity:
hot for just relaxing, cooler for exercise. You can also
set the water temperature in advance ensuring your
swim spa is ready for use anytime you wish.
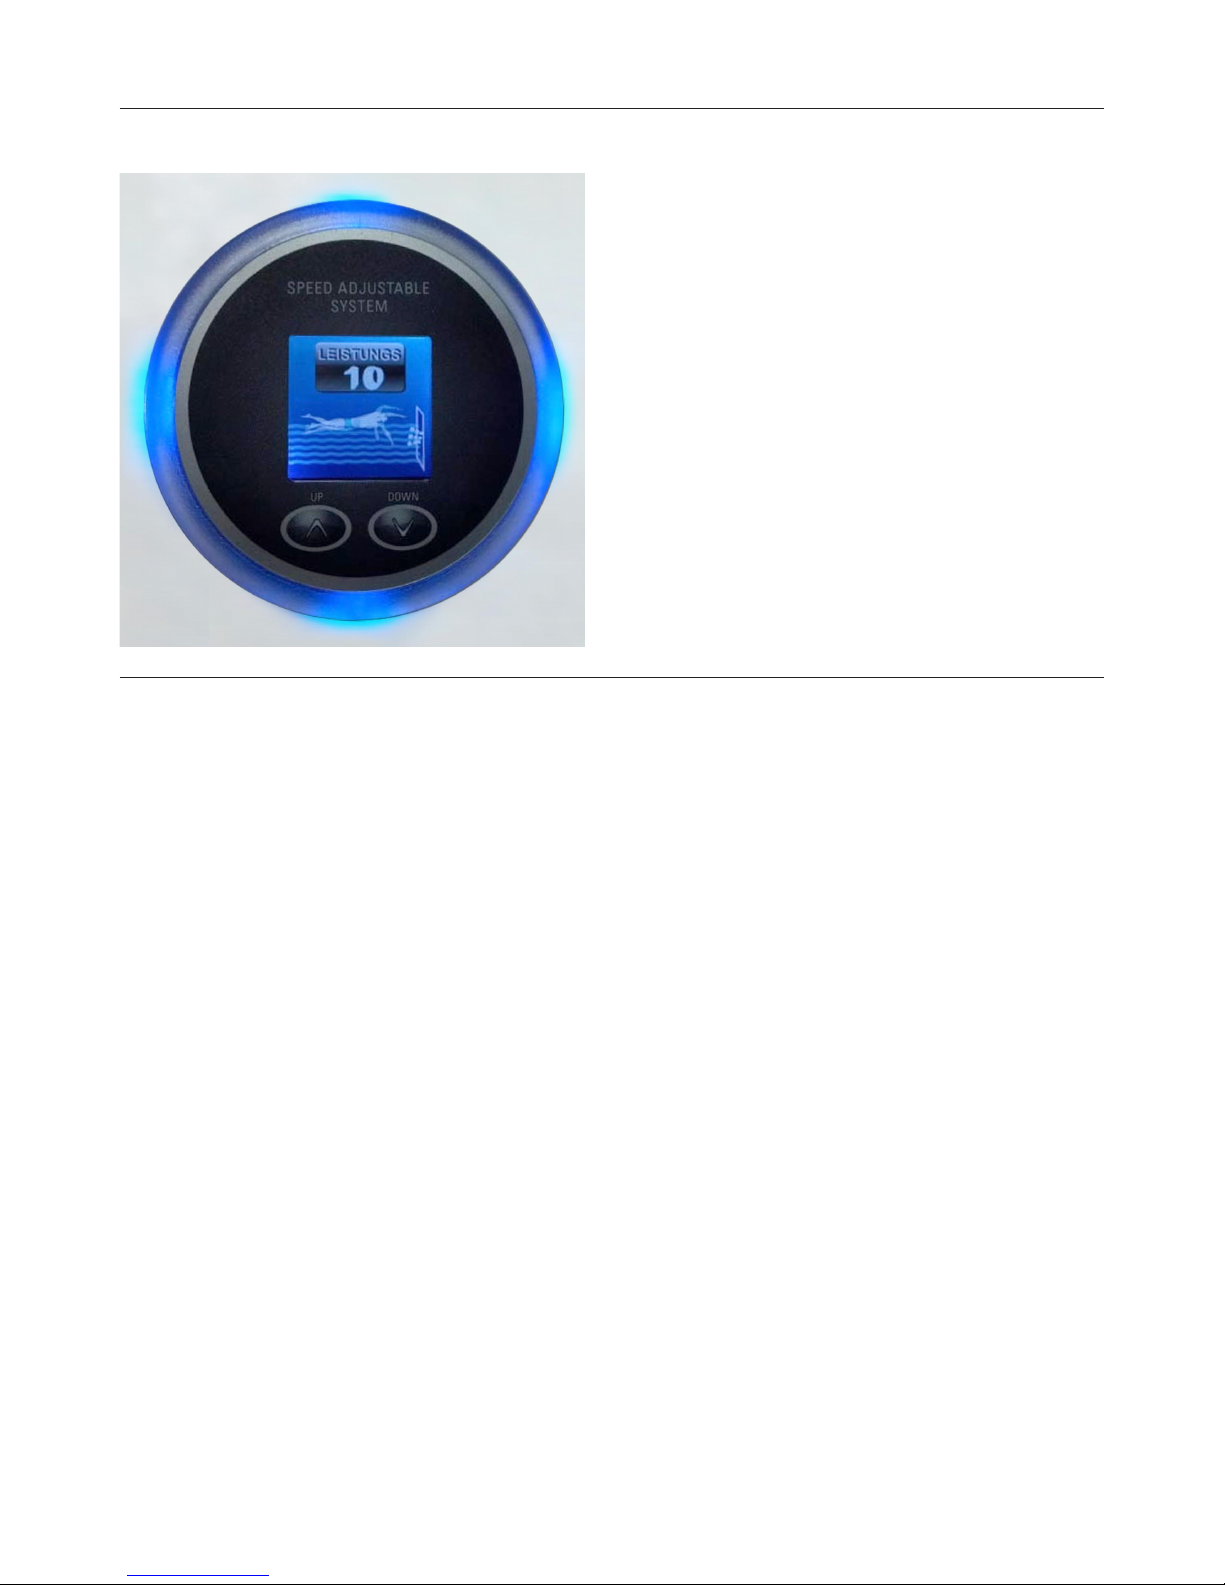
Variable Speed Drive control
The speed of the Variable Speed Drive jet is fully
adjustable via the simple to operate auxiliary control
panel.
Audio system (optional)
The integrated audio system features 4 pop-up
speakers, a sub woofer speaker and an iPod dock.
Safety features
The control system has multiple safety features
including water flow protection, high and low voltage
protection, high and low temperature protection and
anti dry heating protection to guarantee the swim spa
operates safely. The control box is fully waterproof
with International Protection Rating (IP) 55.
F1
- illuminated during first filtration cycle
F2
- illuminated during second filtration cycle
PL
- Panel Lock - Illuminated when control panel is locked
TL
- Temperature Lock - illuminated when setting is locked.
CONTROL PANEL OPERATIONS
7
TEMPERATURE SETTING
The actual temperature of the pool water is constantly
displayed on the screen The temperature will show
once the pump has been operating for 1 minute.
Press the Tempº + or Tempº − button once to display
the set temperature. Each time either + or − button is
pressed again, the set temperature will increase or
decrease. After 3 seconds the screen will automatically
return to display the actual water temperature. If
the water is cooler than the set temperature the
thermostatically controlled heater will automatically
turn on to heat the spa water. The temperature setting
can be adjusted from between 26°C - 40°C.
MODE SETTING
The Mode button is used to switch between Standard,
Economy and Sleep modes.
Press Mode to enter mode programming. Press
Tempº − to cycle through to the desired mode (the
mode will flash on the screen until confirmed), then
press Mode to confirm selection.
Standard mode maintains the desired temperature.
Note that the current water temperature is displayed
only when the pump has been operating for at least
1 minute. The Std icon will display until the mode is
changed.
Economy mode heats the spa to the set
temperature only during filtration cycles. The Ecn
icon will display until mode is changed.
Pressing VSP while in Economy mode puts the spa
in Standard-In-Economy mode, which operates
the same as Standard mode for 1 hour, then
automatically reverts back to Economy mode. Both
the Std and Ecn icons display in this mode. During
this time you can press the Mode button to revert
back to Economy mode immediately.
Sleep mode heats the water to 11° C only during
filter cycles. The SLP icon will display until mode is
changed.
INITIAL START-UP
Priming mode
When your Riptide pool is first connected it will go into
Priming mode (after displaying some configuration
information). The screen will display Pr.
The Priming mode will last for up to 4 minutes and
then the spa will begin to heat and maintain the water
temperature in the Standard mode. You can exit Priming
mode early by pressing Tempº + or Tempº -.
SETTING THE TIME
To set the time press the Time button and then the
Mode button and the digital display window will display
a digital clock with the HOUR setting flashing. Use the
Tempº + or Tempº − buttons to change to the correct
hour (each press changes the time by 1 hour). When
the HOUR is correct, press the Mode button to save
changes and the MINUTES setting will flash. Use the
Tempº + or Tempº − buttons to change to the correct
minutes (each press changes the time by 1 minute).
Press the Mode button to save changes and complete
the time setting.
Note:
1. The time displayed is set as a 12-hour clock
(AM/PM). To change to a 24-hour clock see User
Preferences on page 9.
2. If you don’t touch the Tempº + or Tempº − buttons,
after 3 seconds the display will exit the time setting.
ICON LEGEND
Heat Icon - indicates different
temperature level.
Variable Speed Drive Icon - when
the Variable Speed Drive is switched
on the jet icon will show on the screen.
Light Icon - when the lights in the spa
are on the light icon will show.

VARIABLE SPEED DRIVE
Press the Variable Speed Drive button once
to turn it on or off. When turned on you can adjust
the current via the auxiliary control panel.
FILTRATION CYCLES
The pump and the ozone generator will run during
filtration. At the start of each filter cycle the Variable
Speed Drive will run briefly on its lowest speed.
There are 2 filter cycles per day: 8.00am - 10.00am
and 8.00pm - 10.00pm.
The start/end times of each cycle are programmable.
To change the filter cycle settings press Time then
the Mode button 3 times (within 3 seconds).
The PROGRAM, FILTER 1 and START TIME icons
will appear on the screen.
Press Tempº + or Tempº − to choose the Filter 1
start time hour. Set the hour by pressing Mode.
Press Tempº + or Tempº − to choose the Filter 1
start time minutes. Each press changes the start time
by 5 minutes. Set the minutes by pressing Mode.
Press Mode to see the PROGRAM, FILTER 1 and
END TIME icons. Change the settings as for the
start time procedure.
Press Mode to display the PROGRAM, FILTER 2
and START TIME icons and change as above.
Press Mode to see the PROGRAM, FILTER 2 and
END TIME icons and change as above.
Finally, press Mode and the new filter cycle times
will be entered into the system and the screen will
revert back to display the current water temperature.
Pressing Time at any time during this programming
sequence will save the values entered up to that
point and exit programming.
The
F1
icon will light when filter 1 is running. The
F2
icon will light when filter 2 is running.
If you would like to select continuous filtration, set
the filter 1 start and end times to be the same.
In this case, the filter 2 start time only operates when
the second purge happens. Filter 2 end time will be
unavailable.
8
CONTROL PANEL OPERATIONS
LIGHT
Press the Light button to turn on the LED
lighting. Press the button once again to turn off the
lighting. Press the button a third time and you can
change the mode for the underwater LED lighting
and Multi Point perimeter LED light system. If left on,
the lighting will automatically turn off after a time-out
period.
FREEZE PROTECTION
If the temperature sensors within the heater detect
a very low temperature then the pumps and Variable
Speed Drive automatically activate to provide freeze
protection. The pumps and Variable Speed Drive will
run continuously or periodically depending on the
conditions.
LOCKING THE CONTROL PANEL
To lock the control panel press Time then VSP then
Tempº + each within 3 seconds. The
PL
indicator
will light up on the control panel. All buttons will be
frozen except the Time button. To unlock the panel
press Time then VSP then Tempº −.
LOCKING THE TEMPERATURE SETTING
To lock the temperature setting press Tempº +
then Time then VSP then Tempº + each within 3
seconds. To unlock press Tempº+ then Time then
VSP then Tempº−.
CLEAN-UP CYCLE
At the beginning of the filtration cycle the Variable
Speed Drive will automatically operate for 1 minute to
clean the spa water.
CIRCULATION PUMP
The circulation pump operates during filtration and
when the heater is in operation.
OZONE GENERATOR
The ozone generator will operate during filtration
cycles.
CONTROL PANEL OPERATIONS
9
USER PREFERENCES
There are several aspects of spa operation that you
can customise using the User Preferences sub menu
from the main control panel.
Press Tempº + or Tempº− then Variable Speed
Drive (VSP) then Light (each press within 3
seconds). At this point if USr is not showing on the
display press Tempº + or Tempº− until USr appears.
Then press VSP to enter the User Preferences sub
menu.
Once in the User Preferences sub menu press
Tempº + or Tempº− or to cycle between these
settings:
Sr - Suppress reminders
When set to Sr.Y reminders are never displayed on
the panel. When set to Sr.n reminders are displayed
on the control panel periodically.
tc - Temperature in °C (Celsius)
When set to tc.Y temperatures are displayed in
°C (Celsius). When set to tc.n temperatures are
displayed in °F (Fahrenheit).
24 - 24 hour time display
When set to 24.n time is displayed as a 12 hour
(am/pm) clock. When set to 24.Y time is displayed
as a 24 hour clock.
cc - Clean up Cycle Duration
When set to cc.
D
clean up cycles are disabled.
When set to cc.1 through cc.4 the number
indicates how many hours each clean up cycle
will run.
EDITING USER PREFERENCES
View the setting you wish to adjust (see User
Preferences).
The left 2 characters (before the decimal point) tell you
what setting you are viewing or editing. The character
after the decimal point tells you the value of that setting
(for example: .Y for yes, .n for no).
Press VSP to switch editing on and the value will flash.
Press VSP once again to turn editing off and it will stop
flashing.
When editing the value (when it is flashing) use the
Tempº + or Tempº− to change the value to the setting
you want. After you have changed the value press VSP
again to save the change - the value will then stop
flashing.
If you don’t make any changes during editing it will time
-out after 30 seconds. If you press Light to back out of
the menu or pause long enough for it to time-out while
a value is flashing, the changes you were making to that
setting won’t be saved. However, changes you made to
previous settings will be saved.
AUXILIARY CONTROL PANEL
The auxiliary control panel operates the Variable
Speed Drive (VSP): ON/OFF function and jet speed.
The Variable Speed Drive must first be turned on
at the Main Control Panel and then turned on at
the Auxiliary Control Panel. The counter current will
then start up and go to power level 1. You can then
increase the counter current speed 1-10 and then
back down 10-1.
RISK OF DAMAGE WARNING:
NEVER turn the Variable Speed Drive off at the Main
Control Panel without first switching it off at the
Auxiliary Control Panel.

DIAGNOSTIC MESSAGES
Control Panel Message Definition Action required
No message on display
OHH
OH5
ICE
SnA /Snb
SnS
HFL
LF
Power has been disconnected
from the spa
Overheat - the spa will have shut
down. One of the sensors has
detected that the heater has
reached a temperature of 47.8°C.
Overheat - the spa will have shut
down. One of the sensors has
detected that the spa water is
43.3°C.
Potential freeze condition
detected.
Spa is shut down. The sensor that
is plugged into A or B as indicated
is not working.
Sensors are out of balance. If
this message is alternation with
the temperature it may just be
a temporary condition. If the
display shows only this message
(periodically blinking the spa will
have shut down.
A substantial difference between
the temperature sensors has been
detected. This could indicate a
water flow problem.
Persistant low water flow problems
(will display this message on
the fifth occurrence of the HFL
message within 24 hours). The
heater will have shut down but
other spa functions will continuer
to operate normally.
The control panel will be disabled
until power returns. The clock
time may have to be reset after
reconnection. All other spa
settings will be preserved.
DO NOT ENTER THE WATER.
Remove the spa cover and allow
the water to cool. Once the heater
has cooled, reset by pushing any
button on the control panel. If the
spa does not reset, disconnect
from the power and call your
dealer for assistance.
DO NOT ENTER THE WATER.
Remove the spa cover and allow
the water to cool. At 41.7°C the
spa should automatically reset.
If the spa does not reset,
disconnect from the power and
all your dealer for assistance.
No action required. The pumps will
automatically activate regardless of
spa status.
If the problem persists contact
your dealer. This message may
appear temporarily in an overheat
situation and will disappear when
the heater cools.
If the problem persists contact
your dealer.
Check water level in spa. Add
water if necessary. If the water is
at the correct level make sure the
pumps have been primed. Press
any button to reset.
Check water level in spa. Add
water if necessary. If the water is
at the correct level make sure the
pumps have been primed. Press
any button to reset.
TROUBLESHOOTING GUIDE
10

dr
drY
Pr
---F or ---C
---
SbY
PHL
PHH
SAL
SAH
drn
rtC
PSt
CrC
Insufficient water detected flowing
through the heater.
Insufficient water detected flowing
through the heater (message
displayed on the third occurrence
of dry message). Spa will have
shut down.
When your spa is first connected
to power it will go into priming
mode.
Water temperature unknown.
Temperature does not appear
when spa is in Economy or Sleep
mode for an extended period.
Stand mode has been activated by
pressing a button combination on
the user panel.
pH level in water is low.
pH level in water is high.
Sanitiser level is low.
Sanitiser level is too high.
The pump is on during Standby
mode to assist in draining the spa.
Hardware failure.
Hardware failure.
Firmware install problem.
Check water level in spa. Add
water if necessary. If the water is
at the correct level make sure the
pumps have been primed. Press
any button to reset.
Check water level in spa. Add
water if necessary. If the water is
at the correct level make sure the
pumps have been primed. Press
any button to reset.
The priming mode will last up to
4 minutes and the spa will begin
to heat and maintain the water
temperature in the Standard mode.
After the pump has been running
for 1 minute the temperature will
be displayed.
If you wish to see the current spa
water temperature either switch to
Standard mode or turn on ‘VSP’
for a minimum of 1 minute.
Press any button except ‘VSP’ to
leave standby mode and return to
normal operation.
Add pH increaser according to
manufacturer’s instructions.
Add pH reducer according to
manufacturer’s instructions.
Add satiniser according to
manufacturer’s instructions.
Remove spa cover and allow
sanitiser to dissipate.
Press ‘VSP’ to turn off the pump
when the water has drained (or
power-off the spa).
Contact your dealer.
Contact your dealer if message
appears on more than one
power-up.
Contact your dealer if message
appears on more than one
power-up.
DIAGNOSTIC MESSAGES
Control Panel Message Definition Action required
TROUBLESHOOTING GUIDE
11

DIAGNOSTIC MESSAGES
Control Panel Message Definition Action required
TROUBLESHOOTING GUIDE
12
CFE
StU
HOt
Configuration error. Spa cannot
start up.
A pump appears to be stuck on
causing the water temperature to
rise, possibly to a hazardous level.
A pump appears to be stuck on
from the last time the spa was
powered up.
Contact your dealer.
DISCONNECT THE SPA
IMMEDIATELY. DO NOT ENTER
THE WATER. Contact your dealer.
DISCONNECT THE SPA
IMMEDIATELY. DO NOT ENTER
THE WATER. Contact your dealer.
rPH
rSA
rCL
rdr
rCO
rtr
rCH
rCA
Every 7 days
Every 7 days
Every 30 days
Every 90 days
Every 180 days
Every 180 days
Every 365 days
As required
Test and adjust pH chemical levels
as per manufacturer’s instructions.
Test and adjust sanitiser chemical
levels as per manufacturer’s
instructions.
Remove, clean and re-install filter
as per manufacturer’s instructions.
Drain and refill spa as per
manufacturer’s instructions.
Clean and condition cover as per
manufacturer’s instructions.
Clean and condition spa skirt as
per manufacturer’s instructions.
Install new filter.
Install new Mineral cartridge.
PERIODIC REMINDER MESSAGES
Control Panel Message* Frequency Action required
* Spa owner can hide all periodic reminders in User Preferences. Press the ‘Mode’
button to reset a displayed reminder. Some of these periodic reminders may be
changed or disabled before installation.

DIAGNOSTICS - OPERATION
Once commissioned, your Riptide swim spa should operate normally when properly set up. If, however, you
encounter operating problems please use this general guide. If this guide does not help you solve the problem
please contact your dealer. Please also refer to DIAGNOSTIC MESSAGES on pages 10-12.
Operating problem Analysis Action required
TROUBLESHOOTING GUIDE
13
The error message appears on
the display panel and the spa is
not operating.
Spa can’t start in any mode.
Water jets turns off automatically
when using the spa.
The water pumps are operating
but no water is coming out of
the jets.
Spa water is heating slowly
and / or not reaching required
temperature.
The power of the jets is low.
The jet water power fluctuates.
• The control system will have digital
diagnostics functions which turn it off
if there is something wrong with spa
operations and will only restart when
the problem is solved.
• Power is off.
• Control panel is locked.
• Electric control failure (display
shows error message).
• The default time setting has
switched of the jets.
• The pump motor is overheating.
• Water pump is sucking in air.
• Filter cartridge needs cleaning
• There is no cover on the spa
creating heat loss.
• Heater is faulty.
• Jets are blocked.
• Water pump’s valve is not
fully open.
• Filter is blocked.
• Water pump’s valve is not
fully open.
Please check the error message
in DIAGNOSTIC MESSAGES
section on pages 10-12 and
contact your dealer.
Check the power supply to the spa.
Check whether the control panel
is locked - see LOCKING THE
CONTROL PANEL ON PAGE 8.
Check the error message on pages
10-12 and contact your dealer.
Press the pump button to restart
the pump
Stop running pump for 1 hour until
cool and then restart the pump
Try to restart the jet. If still not
operating, open the cap on the
water pump to release any possible
air trapped in the system and then
screw tightly. Introduce water
into the filter opening to clear any
possible air block.
Re-set the temperature.
Clean or replace the filter.
Put the cover on the spa.
Contact your dealer.
Check whether there are foreign
bodies inside the jets.
Check if water pump’s valve is fully
open.
Check whether there are foreign
bodies inside the filter.
Check if water pump’s valve is
fully open.

WATER CHEMISTRY
Tap water that is safe to drink is not always right for
your swim spa. Normal tap water is usually filled with
minerals and micro-contaminants that are not visible
to the naked eye. Properly testing and treating your
spa water is essential for the health of your swim spa
as well as the people that use it.
Proper chemical maintenance can control and
help prevent the following:
1. Bacteria, algae and fungi, which can spread disease
and infection to humans.
2. Staining and scale build-up on your swim spa shell,
equipment, and piping.
3. Clogged filters. With the swim spa please be aware
that the chemical maintenance of your hot water spa
section and the cooler pool section will be different
and not always proportional to the volume of water.
Note 1: When using chemicals, always follow the
instructions provided on the manufacturer’s labels.
Note 2: Use an accurate test kit to perform all
chemistry tests.
Note 3: Never mix chemicals.
Note 4: Always add chemicals directly to the swim
spa water, evenly spreading the chemicals over the
surface. Run the Filter Pump for 15 or more minutes
after applying any chemical. To help with the mixing
of chemicals you can turn on your massage system
as well.
OVERVIEW OF WATER CHEMISTRY
1. Sanitation
Sanitisers kill bacteria and keep the water clean.
Effective and safe sanitisers include any of the
following: STABILISED CHLORINE GRANULES
(sodium dichloro isocyanurate dihydrate).
Note: Trichlor chlorine tablets and/or non-dichlor
granular chlorines must not be used in your swim
spa , they may damage the swim spa , voiding your
warranty.
2. Weekly shock dose
As your swim spa is used, non-filterable wastes,
including perspiration, oils, hair sprays, etc, will
build up in the water. These substances make the
water unattractive in appearance and odour, and can
also interfere with sanitizer effectiveness. Normal
sanitation does not eliminate these waste substances
but shock dosing does. Shock dosing is achieved
by ‘shocking’ the spa water with a weekly dose of
NON CHLORINE SHOCK.
MAINTENANCE
3. pH Control
Proper pH balance is extremely important in controlling
bacteria, providing water that’s comfortable for the
user, and in preventing damage to the swim spa
and its equipment. Using the scale of 0-14, pH is
the measure of acidity and alkaline in the water. pH
levels under 7.0 are acidic while pH levels over 7.0 are
alkaline. The proper pH range for a spa is 7.2 to 7.6.
High pH levels (over 7.6) can cause the following:
Scale build-up on the swim spa and its equipment,
cloudy water, a prematurely dirty filter, and less
effective chlorine sanitation. To correct high pH levels,
add a pH DECREASER.
Low pH levels (under 7.4) can cause the
following: Discomfort to the user and corrosion to
the swim spa and its equipment. To correct low pH
levels, add a pH INCREASER.
Note: Never use muriatic or hydrochloric acid to
adjust pH as it can damage your swim spa shell and
surroundings.
4. Total alkalinity (TA)
Total Alkalinity (TA) is the measure of carbonates and
bicarbonates in the spa water. Low TA can cause pH
to be unstable, bouncing from one level to another,
causing the water to be corrosive or scale forming
to the swim spa and it’s equipment. To correct low
TA, add a TOTAL ALKALINITY INCREASER. High
TA can cause scale build-up, cloudy water, as well as
other pH problems. To correct high TA, contact your
authorised Riptide dealer.
5. Calcium hardness (CH) 250-500 PPM
Calcium hardness (CH) is the measure of dissolved
calcium in the water. Low CH (soft water) can result in
staining to the swim spa’s surface as well as corrosion
to the swim spa and it’s equipment. To correct low
CH, add a CALCIUM HARDNESS INCREASER.
High CH (hard water) can cause cloudy water as
well as rough scale build-up on the spa’s surface and
equipment. To correct or manage high CH, contact
your authorised Riptide dealer.
6. Stain & scale control
Stain and scale problems are common in hot water
environments. To help prevent and control staining
and scaling, add a STAIN & SCALE INHIBITOR.
7. Foam control
Water emulsifies shampoo, soap and detergents, and
combined with high water temperatures, can cause
surface foaming. To prevent and control foam on the
surface of the swim spa water add a small amount of
FOAM REDUCER.
14

8. Clearing cloudy water
There are two basic reasons that swim spa water
becomes cloudy. First, non-filterable liquid wastes
(perspiration, etc.) have contaminated the water. To
remove these waste substances, shock the water (as
described previously). Second, non-filterable micro-
particulate wastes (dust, etc.) have contaminated
the water. To remove these waste substances, use a
WATER CLARIFIER.
9. Sanitising with non-chlorine shock
(potassium peroxymonosulfate)
When sanitising your swim spa with Non-Chlorine
Shock you should add the correct dose directly to the
swim spa/pool water with the jets running.
Non-Chlorine Shock will give up to, two hours of safe
bathing. If you use the spa/pool for more than two
hours it will be necessary to re-dose.
On a weekly basis it is important to shock your spa/
pool with NON CHLORINE SHOCK.
Note: Use only branded Hot Tub Barn chemicals to
ensure premium performance.
STARTING YOUR SWIM SPA WITH
NEW WATER
1. As your swim spa fills with tap water, add 10
teaspoons of STABILISED CHLORINE GRANULES
to the pool end and in a swim spa add 2 and a half
teaspoons to the spa end. This will provide the initial
protection against bacteria in your pipes.
Note: If you live in a hard water area you can fill the
pool with a 50/50 mix of hard and soft water. The
calcium balance should be between 250 and 500
parts per million.
2. When the swim spa is completely filled with water
complete the following.
3. If possible, have your authorised Riptide dealer test
the Calcium Hardness (CH) of your water and adjust
as per your dealer’s recommendation (the correct level
of CH depends on your overall water conditions).
4. Test and adjust the Total alkalinity (TA) to the range
of 125-150 PPM (parts per million).
5. Test and adjust the pH to the range of 7.4-7.6.
6. After the water has circulated for approximately
a quarter of an hour, retest the chlorine level in your
water and add the correct amount to raise the level to
between 3—5 PPM.
Start-up water chemistry is now complete. However,
it may take several days for the filter to completely
clear the water.
MAINTENANCE
MAINTAINING SWIM SPA WATER
Sanitizer and pH Levels
It is important to test and adjust the sanitizer and pH
levels of your swim spa on a daily basis.
With each sanitizer test, use STABILISED CHLORINE
GRANULES to maintain the following levels:
With ozone
Chlorine Level: 3—5 PPM
To maintain the above sanitizer level with CHLORINE,
please refer to your authorised Riptide dealer for
assistance.
Shock dose
Once a week, and when the swim spa is not in use,
shock dose the spa water by adding the following:
Add four tablespoons of NON CHLORINE SHOCK
to the spa end and eight tablespoons of NON
CHLORINE SHOCK to the pool end, or if only
one volume of water, eight tablespoons of NON
CHLORINE SHOCK into the pool.
Stain and scale control
Use a STAIN & SCALE INHIBITOR as per the
instructions on the manufacturer’s label.
Foam control
As required, use FOAM REDUCER as per the
instructions on the manufacturer’s label.
Cloudy water prevention and control
Use a WATER CLARIFIER as per the instructions
on the manufacturer’s label. If the swim spa water is
cloudy call your Riptide dealer for advice.
WATER CHEMISTRY TROUBLESHOOTING
Prior to each swim spa use, check the water. If the
water appears cloudy or off-colour, has significant
surface foam or smells of chlorine, then there is a
problem with the water and it needs to be treated
or drained. Using the spa of the swim spa section in
these conditions could result in a skin rash or other
irritation.
For assistance in handling water chemistry problems,
consult your authorised Riptide dealer or another
service centre capable of performing a detailed Water
Analysis.
15
16
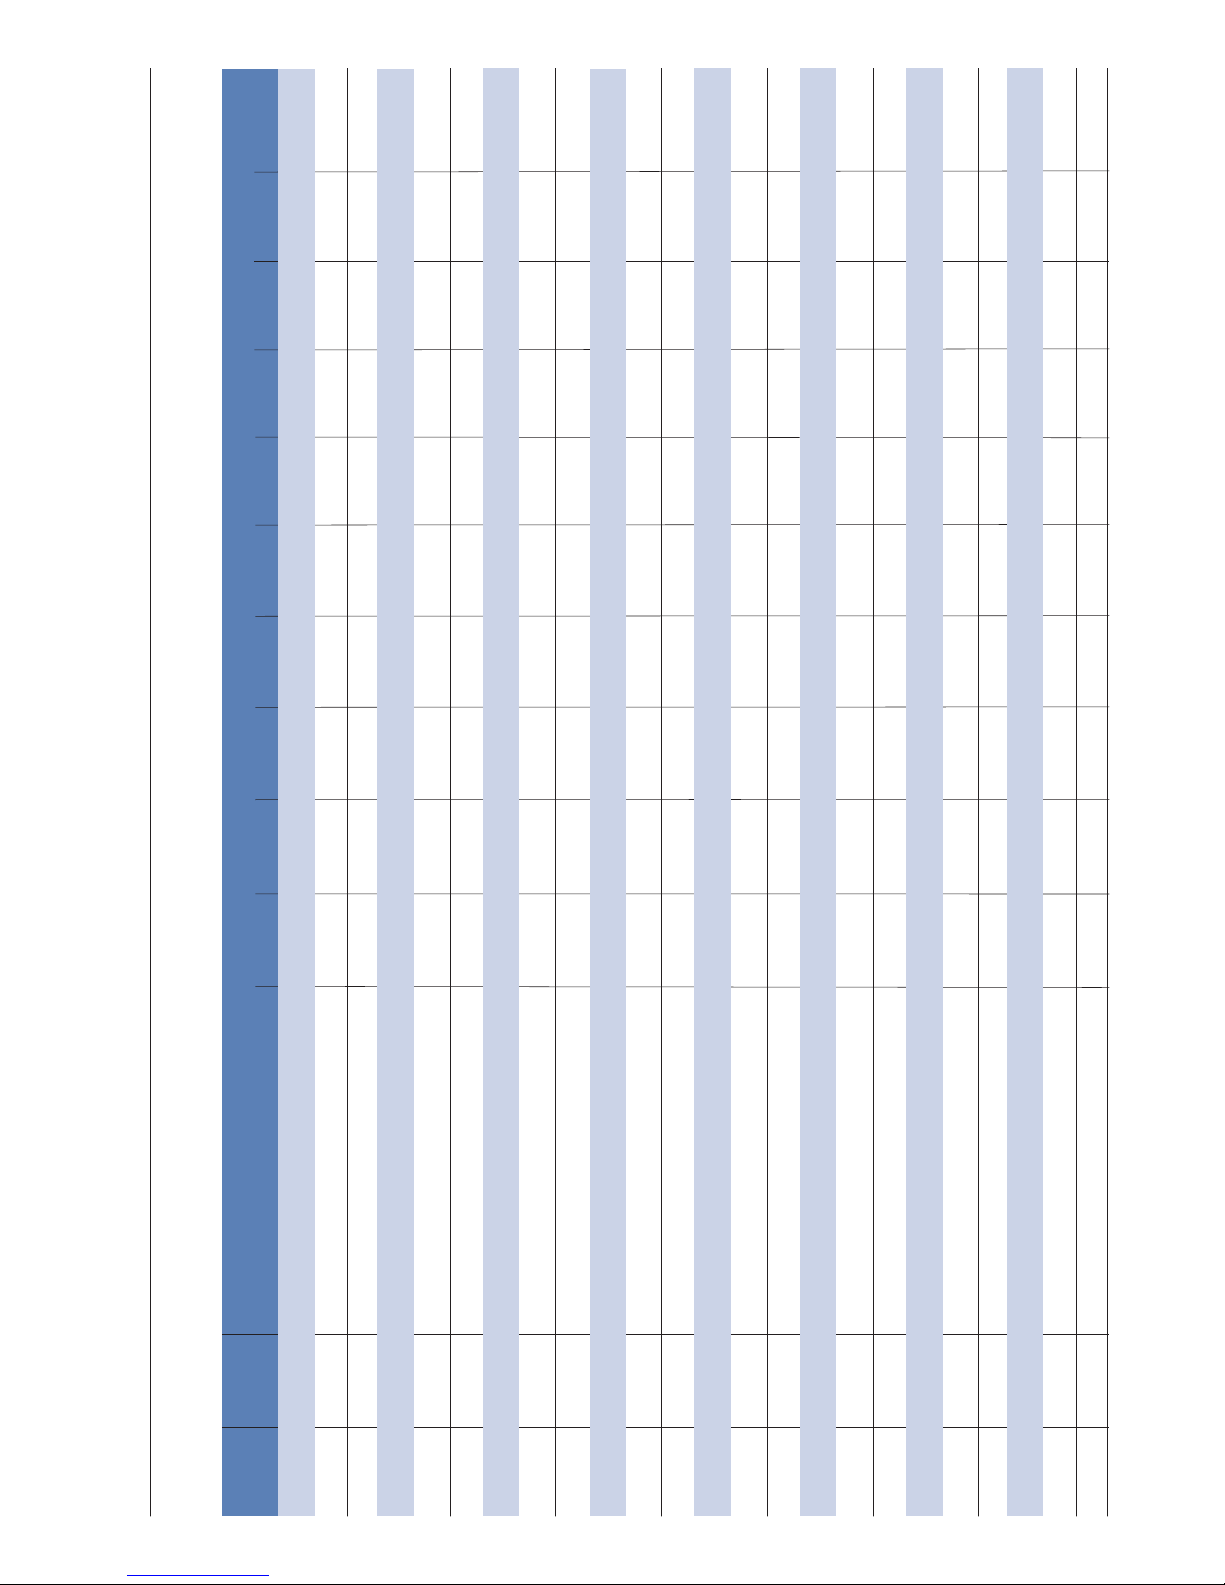
RIPTIDE TOTAL ALKALINITY (TA) ADJUSTMENT
Additions based upon: 2.4kg Sodium Bisulphate reducing the TA by 20.00mg/L per 50.00 cubic metres
2.0kg Sodium Bicarbonate Increasing the TA by 20.00mg/L per 50.00 cubic metres
Volume Alkalinity Chemical Addition Total alkalinity adjustment required in mg/L
(Metre³) Effect 10 20 30 40 50 60 70 80 90 100
HYDROS
4.602 Reduce Sodium Bisulphate ‘pH Reducer’ 110.45g 220.90g 331.34g 441.79g 552.24g 662.69g 773.14g 883.58g 994.03g 1104.48g
4.602 Increase Sodium Bicarbonate ‘Alkalinity Increaser’ 92.04g 184.08g 276.12g 368.16g 460.20g 552.24g 644.28g 736.32g 828.36g 920.40g
NEPTUNE
4.981 Reduce Sodium Bisulphate ‘pH Reducer’ 119.54g 239.09g 358.63g 478.18g 597.72g 717.26g 836.81g 956.35g 1075.90g 1195.44g
4.981 Increase Sodium Bicarbonate ‘Alkalinity Increaser’ 99.62g 199.24g 298.86g 398.48g 498.10g 597.72g 697.34g 796.96g 896.58g 996.20g
TITAN
7.475 Reduce Sodium Bisulphate ‘pH Reducer’ 179.40g 358.80g 538.20g 717.60g 897.00g 1076.40g 1255.80g 1435.20g 1614.60g 1794.00g
7.475 Increase Sodium Bicarbonate ‘Alkalinity Increaser’ 149.50g 299.00g 448.50g 598.00g 747.50g 897.00g 1046.50g 1196.00g 1345.50g 1495.00g
POSEIDON Pool End
4.981 Reduce Sodium Bisulphate ‘pH Reducer’ 119.54g 239.09g 358.63g 478.18g 597.72g 717.26g 836.81g 956.35g 1075.90g 1195.44g
4.981 Increase Sodium Bicarbonate ‘Alkalinity Increaser’ ’99.62g 199.24g 298.86g 398.48g 498.10g 597.72g 697.34g 796.96g 896.58g 996.20g
POSEIDON Spa End
1.491 Reduce Sodium Bisulphate- ‘pH Reducer’ 35.78g 71.57g 107.35g 143.14g 178.92g 214.70g 250.49g 286.27g 322.06g 357.84g
1.491 Increase Sodium Bicarbonate ‘Alkalinity Increaser’ 29.82g 59.64g 89.46g 119.28g 149.10g 178.92g 208.74g 238.56g 268.38g 298.20g
ATLANTIS / ATLANTIS PRO
6.500 Reduce Sodium Bisulphate ‘pH Reducer’ 156.00g 312.00g 468.00g 624.00g 780.00g 936.00g 1092.00g 1248.00g 1404.00g 1560.00g
6.500 Increase Sodium Bicarbonate ‘Alkalinity Increaser’ 130.00g 260.00g 390.00g 520.00g 650.00g 780.00g 910.00g 1040.00g 1170.00g 1300.00g
NAUTILUS / NAUTILUS PRO / SUPERPRO
9.500 Reduce Sodium Bisulphate ‘pH Reducer’ 228.00g 456.00g 684.00g 912.00g 1140.00g 1368.00g 1596.00g 1824.00g 2052.00g 2280.00g
9.500 Increase Sodium Bicarbonate ‘Alkalinity Increaser’ 190.00g 380.00g 570.00g 760.00g 950.00g 1140.00g 1330.00g 1520.00g 1710.00g 1900.00g
MANTA / MANTA PRO / SUPERPRO
7.500 Reduce Sodium Bisulphate- ‘pH Reducer’ 180.00g 360.00g 540.00g 720.00g 900.00g 1080.00g 1260.00g 1440.00g 1620.00g 1800.00g
7.500 Increase Sodium Bicarbonate – ‘Alkalinity Increaser’ 150.00g 300.00g 450.00g 600.00g 750.00g 900.00g 1050.00g 1200.00g 1350.00g 1500.00g

It is recommend that on a regular basis the filters are
either cleaned with INSTANT FILTER CLEANER or
allowed to soak overnight in CARTRIDGE CLEANER.
In either case after degreasing use a high pressure
hose or pressure cleaner to remove cleaner residue
and calcium.
Filter replacement:
Replace the filters ever two years or when
necessary. Only use genuine Riptide filter cartridge
replacements.
CAUTION: Using a brush to clean a cartridge could
damage it. Commercially available cartridge cleaners
may be used and can be obtained from your authorised
Riptide dealer.
SWIM SPA SHELL CARE
Your Riptide swim spa surface is durable and easy to
clean:
Swim spa shell surface:
For normal cleaning use WATERLINE CLEANER
solution.Forsurface marks, use SURFACE CLEANER.
To apply these cleaners, use a soft, damp cloth or
sponge. Rinse well and dry with a clean cloth.
General cleaning:
With normal use of your spa, oils, lotions and hairsprays
will build up on the surface of the water, sometimes
leaving a scum line around the perimeter of your shell.
This scum line can easily be removed with SURFACE
CLEANER.
To remove grease, oil, paint and ink stains, use 25%
isopropyl (rubbing) alcohol in water.
Note 1: Never allow your swim spa surface to come in
contact with acetone (nail polish remover), nail polish,
dry cleaning solution, lacquer thinners, gasoline, pine
oil, abrasive cleaners or any other harsh chemical.
These chemicals can damage your swim spa shell
and void your warranty.
Note 2: Avoid using cleaning agents that will leave
suds in your swim spa water.
CLEANING AND PROTECTING THE
HEADRESTS
Clean on a regular basis with soap, water and a clean
cloth. Use 303® Protectant or it’s equivalent once per
month. This will maintain water resistance and lustre
of the product. Between uses it is recommended to
remove the headrests and store in a dry place.
Note: if headrests are left in the swim spa you must
expect colour loss and gradual breakdown of headrest
material due to the corrosive effect of chlorine and
ozone.
CHANGING YOUR SWIM SPA WATER
Depending on usage, your spa section water will
need to be changed approximately every 4 months or
whenever your spa water becomes difficult to manage.
For the pool section we recommend that you replace
1/3 rd of your pool water every 4 months.
Steps to drain your swim spa:
1. Disconnect electrical power supply.
2. Open door to Equipment Compartment.
3. Drain water from spa by completing the following:
a). Locate drain valve at floor level.
b). Open drain valve by twisting ball valve.
c). Allow to drain by gravity only.
d). At the end of the procedure re-close the ball valve
by reversing the instructions.
e). For swim spas with two volumes of water, to
drain the spa end of the swim spa follow the same
procedures as above but using the ball valve dedicated
to the spa end.
Note 1: Drain water to an area that can handle the
water volume of your swim spa.
Note 2: If draining water onto vegetation, make sure
that the sanitizer level (chlorine level) of your spa
water is less than 5 PPM.
4. To clean the swim spa shell refer to ‘SWIM SPA
SHELL CARE’.
Steps to refill your swim spa:
1. Check that the drain valves are fully closed.
2. Close door to Equipment Compartment.
3. Refill swim spa with tap water. Fill the swim spa
to the midway level of the skimmer in each section.
The depth should be approximately 150mm -190mm
(6-7½”) down from top rim of the swim spa.
Note 1: The higher the water level, the fewer spa
users it will take to cause the water to overflow the
top of the spa.
Note 2: If you live in a hard water area you can fill
the pool with a 50/50 mix of hard and soft water. The
calcium balance should be between 250 and 500
parts per million.
4. Restore electrical power supply.
5. See ‘Starting Your Swim spa with New Water’
under ‘Water Chemistry’.
CLEANING YOUR FILTERS
The filters are located inside the skimmer. Put your
hand into the skimmer and remove each filter one at
a time. On a regular basis it is important to remove
excessive pollution and organic matter from the filters.
MAINTENANCE
17

COVER CARE
Your cover has a one year warranty.
Basic instructions are provided below. It is important
that you refer to the information that came with your
cover, which provides detailed information on caring
for your cover and what to do to protect its warranty.
Cleaning and conditioning your cover:
On a monthly basis, complete the following:
1. Remove the cover and lay it down on a flat, clean
surface near a garden hose.
2. Rinse the cover to remove any loose debris.
3. Using a soft bristle brush, clean the top (vinyl
portion) of the cover with a mild solution of washing
up liquid — about one teaspoon of soap to two gallons
of water. Scrub the cover, using a gentle circular
motion, being careful not to let any areas of the cover
dry before rinsing with water.
4. Rinse the cover thoroughly and then dry with a
clean cloth.
5. We recommend the use of 303 Protectant to give
your cover a shiny appearance and UV protection.
6. Wipe and/or rinse any dirt from the bottom side of
the cover.
7. Replace the cover and secure with cover locks.
MISCELLANEOUS CARE
Vacuuming the swim spa:
Debris from wind, trees and spa users will occasionally
accumulate on the bottom of your swim spa. Your
swim spa’s filtration system will remove the smaller
debris. Debris that is too large or too heavy for the
filtration system will have to be removed by the use
of a spa vacuum, such as a Pool Buster. If you do not
have a spa vacuum, please contact your authorised
Riptide dealer.
Cleaning the scum line:
With normal use of your swim spa, oils, lotions and
hairsprays will build up on the surface of the water,
sometimes leaving a scum line around the perimeter
of your swim spa shell. This scum line can easily be
removed with waterline cleaner or its equivalent.
See your authorised Riptide dealer for this product.
LOW-USE OR NO-USE PERIODS
At certain times of the year you may not use your swim
spa as often as expected. For these low-use or no-use
periods, we recommend the following:
Low-use:
If your swim spa is being used less than once per
month, then you may wish to lower the temperature
MAINTENANCE
setting of the spa section by approximately 5°C.
Lowering the temperature on your spa will cut your
cost of operation if you are not using the swim spa
for extended periods, however, you will need to adjust
the temperature setting approximately 120 minutes
before each use to heat the spa section to the desired
level.
No use for 1-2 weeks:
If you plan to not use your swim spa for one-two weeks,
then we suggest that you not make any changes in
operating your swim spa.
No use for 2-6 weeks:
If you plan to not use your swim spa for two-six weeks,
then you may wish to lower the temperature setting to
approximately 26°C during the No-Use period.
No use for over 6 weeks:
If you plan to not use your swim spa for over six weeks,
then it is suggested that you winterise your swim spa
by taking the following steps:
SWIM SPA WINTERIZATION
1. Drain the water from the swim spa (see ‘Steps to
drain your swim spa’ under ‘Changing your swim spa
water” in this owner’s manual).
2. Drain the swim spa equipment. This is done by
removing the drain plug from the pumps, loosening
all PVC pipe unions and pump air bleed valves in
the equipment compartment. On the base of the
filter columns there is a drain plug which you need to
unscrew.
3. Clean the swim spa shell (see ‘Swim spa shell care’
in this owner’s manual).
4. Remove filter cartridge(s), clean filter (see ‘Cleaning
your filter’ in this owner’s manual), allow to dry, and
then store inside your garage or home.
5. Reattach and secure cover to the swim spa
SWIM SPA DE-WINTERIZATION
De-Winterisation is completed by reversing the above
procedure and then refilling the swim spa (see ‘Steps
to refill your swim spa’ under ‘Changing your spa
water’ in this owner’s manual).
Note: If your swim spa water is not emptied during
periods of No-Use, you should test and chemically
treat the water approximately once per week. Not
doing so may lead to corrosion, staining and/or
scaling to your swim spa and its equipment. If there
is no one available to take care of the swim spa on
a weekly basis, then it is recommended that you
winterise your swim spa as described above.
18

Before requesting service from your dealer, refer to
the TROUBLE SHOOTING GUIDE in this owner’s
manual to determine the necessary coarse of action. If
you are not able to solve the problem using the trouble
shooting guide, please contact your authorised
Riptide dealer.
GUARANTEE SERVICE
If your Riptide swim spa fails within the guarantee
period and within the scope of its guarantee, contact
your authorised dealer and schedule a service call.
Note: Damage caused by repairs made by someone
other than an authorised Riptide technician will not
be covered by your warranty.
NON-GUARANTEE SERVICE
We recommend having an authorised Riptide
technician perform all repairs on swim spa that fail
outside of warranty coverage or beyond the warranty
period. If you are not able to use an authorised Riptide
technician, we encourage you to request and use
genuine Riptide replacement parts.
If you are not able to obtain service in your area, call
us on 01245 265036.
PURCHASE INFORMATION
YOUR SWIM SPA SERIAL NUMBER
PURCHASE DATE
DELIVERY DATE
Riptide Pools Limited
41 Robjohns Road
Chelmsford
Essex CM1 3AG
United Kingdom
Company No. 06356472
VAT No. 921 904 829
SERVICE
19

3Year UV Resistant Synthetic Wood
Cabinet Warranty
Riptide warrants the UV Resistant Synthetic Wood
cabinet material not to peel, crack, wrinkle, blister
or delaminate and to be free from defects in
workmanship for a period of three years from the
Swim Spa’s delivery date. This warranty specifically
covers the cabinet’s structural integrity, including all
glue and integral bonded joints.
2Year Component Warranty
Riptide warrants the electrical components, pumps,
ozone generators, and other Riptide Swim Spa
components against malfunction or defects in
workmanship for a period of two years from its
delivery date. Filter cartridges, light bulbs, spa pillows
and cover locks are not included in this warranty, but
are warranted to be free from defects in materials or
workmanship at the time of delivery to the original
consumer purchaser.
1Year Trim (Tile) And Cover Warranty
Riptide warrants the cosmetic trim and Swim
Spa cover to be free from defects in materials and
workmanship for a period of one year from the Swim
Spa’s delivery date.
Riptide Pools Limited
United Kingdom
5Year Structural / 5Year Surface Warranty
Riptide warrants the galvanised steel sub frame not to
crack or fracture for a period of five years from delivery
date. Additionally, the Aristech surface material of the
Riptide Swim Spa is warranted not to peel, crack,
wrinkle, blister, yellow, efface or delaminate for a
period of five years from the Exercise Pool/Swim
Spa’s delivery date. The Aristech surfaces are non-
permeable and will not absorb odours, bacteria or
pollutants.
3Year No Leak Warranty
Riptide warrants the Riptide Swim Spa not to leak
for a period of three years from its delivery date.
This warranty specifically covers leaks from the wall
fittings, jet fittings, internal plumbing, internal glue
joints, freeze drains and all bonded parts including the
filter chamber, light lens and counter currents.
3Year Lavaflow 3000 Warranty
Riptide warrants the Lavaflow 3000 heater against
fault in manufacture or faulty workmanship.
LIMITED WARRANTY
20
Swim Spas & Exercise Pools
This manual suits for next models
1
Table of contents
Other Riptide Hot Tub manuals


