BullFrog Spas User manual

Page 1Bullfrog Spas Owner’s Manual
Owner’s
Manual
For all 1999 Bullfrog Portable Spas
(Multiple Patents Pending)
TABLE OF CONTENTS
IMPORTANT SAFETY INSTRUCTIONS
U.L. Safety Instructions ........................................ P. 02
Additional Safety Instructions .............................. P. 04
UPGRADES & ACCESSORIES ..................... P. 06
INSTALLATION & SET-UP
Selecting a Site for your Spa ................................ P. 06
Electrical Requirements & Hook-Up ..................... P. 08
Checklist Before Filling Your Spa ......................... P. 11
Initial Start-Up....................................................... P. 12
OPERATION
Control Systems ................................................... P. 13
JetPaks .................................................................. P. 23
Jetting ................................................................... P. 24
JetZones ................................................................ P. 25
MAINTENANCE
Water Chemistry ................................................... P. 26
Changing Your Spa Water .................................... P. 31
Cleaning Your Filter.............................................. P. 32
Light Bulb Replacement........................................ P. 33
Ozone Sterilizer Replacement.............................. P. 33
Spa Shell Care....................................................... P. 34
Spa Cabinet Care .................................................. P. 34
Spa Cover Care ..................................................... P. 34
Miscellaneous Care............................................... P. 35
LOW-USE OR NO-USE PERIODS ............... P. 36
SERVICE............................................................. P. 37
TROUBLESHOOTING GUIDE ..................... P. 38
MISCELLANEOUS
Parts Identification Diagram ................................ P. 40
Notes..................................................................... P. 41
(Revised: November 5, 1999)

Page 2 Bullfrog Spas Owner’s Manual
IMPORTANT SAFETY
INSTRUCTIONS
When installing and using this electrical
equipment, basic safety precautions should
always be followed, including the following:
U.L. SAFETY INSTRUCTIONS:
1. READ AND FOLLOW
ALL INSTRUCTIONS.
2. WARNING - To reduce the risk of injury, do
not permit children to use this product unless
they are closely supervised at all times.
3. A wire connector is provided on this unit to
connect a minimum No. 8 AWG (8.4 mm²) solid
copper conductor between this unit and any
metal equipment, metal enclosures of electrical
equipment, metal water pipe, or conduit within 5
feet (1.5 m) of the unit.
4. For 120 Volt Cord-Connected Units:
DANGER - Risk of Injury.
a) Replace damaged cord immediately.
b) Do not bury cord.
c) Connect to a grounded, grounding type
receptacle only.
5. For 120 Volt Units with a GFCI:
WARNING - This product is provided with a
ground-fault circuit-interrupter (G.F.C.I.) located
on the end of the power supply cord. The GFCI
must be tested before each use. With the plug
connected to the power supply and the unit
operating, push the “Test” button on the GFCI.
The unit should stop operating and the “Reset”
button should pop out. Push the reset button
and the unit should start to operate once again.
If the unit fails to operate in this manner, there
is a ground current flowing indicating the
possibility of an electric shock. Disconnect the
power unit until the fault has been identified and
corrected.
6. DANGER - Risk of Accidental Drowning.
Extreme caution must be exercised to prevent
unauthorized access by children. To avoid
accidents, ensure that children cannot use this
spa unless they are supervised at all times.
7. DANGER - Risk of Injury. The suction fittings

Page 3Bullfrog Spas Owner’s Manual
in this spa are sized to match the specific water
flow created by the pump. Should the need arise
to replace the suction fittings or the pump, be
sure that the flow rates are compatible.
Never operate the spa if the suction fittings are
broken or missing. Never replace a suction
fitting with one rated less than the flow rate
marked on the original suction fitting.
8. DANGER - Risk of Electric Shock. Install at
least 5 feet (1.5 m) from all metal surfaces. As
an alternative, a spa may be installed within 5
feet of metal surfaces if each metal surface is
permanently connected by a minimum No. 8
AWG (8.4 mm²) solid copper conductor to the
wire connector on the terminal box that is
provided for this purpose.
9. DANGER - Risk of Electric Shock. Do not
permit any electric appliance, such as a light,
telephone, radio, or television, within 5 feet (1.5
m) of a spa. (These units DO NOT have an
integral ground fault circuit interrupter. The
installation of a integral ground fault circuit
interrupter MUST be done by a qualified
Electrician and must meet all local and national
codes.)
10. WARNING - To reduce the risk of injury:
a) The water in a spa should never exceed 40°
C (104°F). Water temperatures between 38°C
(100°F) and 40°C are considered safe for a
healthy adult. Lower water temperatures are
recommended for young children and when
spa use exceeds 10 minutes. (Before entering
the spa or hot tub measure the temperature
with an accurate thermometer.)
b) Since excessive water temperatures have a
high potential for causing fetal damage
during the early months of pregnancy,
pregnant or possibly pregnant women should
limit spa water temperatures to 38°C (100°F).
c) Before entering a spa, the user should
measure the water temperature with an
accurate thermometer since the tolerance of
water temperature-regulating devices varies.
d) The use of alcohol, drugs, or medication
before or during spa use may lead to
unconsciousness with the possibility of
drowning.
e) Persons suffering from obesity or with a
medical history of heart disease, low or high
blood pressure, circulatory system problems,
or diabetes should consult a physician before
using a spa.

Page 4 Bullfrog Spas Owner’s Manual
f) Persons using medication should consult a
physician before using a spa since some
medication may induce drowsiness while
other medication may affect heart rate, blood
pressure and circulation.
SAVE THESE
INSTRUCTIONS.
WARNING SIGN
Included with this spa is a warning sign (Fig. A)
to inform occasional users and guests of the risk
of using the spa. This warning sign is suitable
for indoor or outdoor use. Place this warning
sign in a conspicuous place adjacent to the spa.
For free extra copies call Bullfrog International,
L.C. at (801) 565-8111.
ADDITIONAL SAFETY
INSTRUCTIONS:
1. WARNING - Risk of Fatal Hyperthermia.
a) The use of alcohol, drugs, or medication
can greatly increase the risk of fatal
Hyperthermia in spas and hot tubs.
b) The causes, symptoms, and effects of
Hyperthermia may be described as follows:
Hyperthermia occurs when the internal
temperature of the body reaches a level
several degrees above the normal body
temperature of 37°C (98.6°F). The symptoms
of Hyperthermia include an increase in the
internal temperature of the body, dizziness,
lethargy, drowsiness, and fainting. The effects
of Hyperthermia include:
•Unawareness of impending hazard;
•Failure to perceive heat;
•Failure to recognize the need to exit the spa
or hot tub;
•Physical inability to exit the spa or hot tub;
•Fetal damage in pregnant women; and
•Unconsciousness and danger of drowning.
2. WARNING - Risk to Infants, the Elderly, and
Women Planning or Experiencing Pregnancy.
Please consult your physician if the above
applies to you or anyone using your spa.
3. WARNING - Risk of Children Drowning.
Although your spa cover is not rated as a safety
cover, it is wise to always keep the spa cover
securely fastened when not in use. This will help
discourage children from attempting to enter the
spa while not supervised by an adult.
(Figure A) Warning Sign

Page 5Bullfrog Spas Owner’s Manual
4. WARNING - Risk of Drowning. Use caution
when bathing alone. Overexposure to hot water
may cause nausea, dizziness, and fainting.
5. WARNING - Risk of Injury. Always use
extreme caution while entering or exiting the
spa. Surfaces can be very slippery when wet. Do
not step or sit on HeadRests. Also, keep all
breakable objects out of the spa area.
6. WARNING - Risk of Injury. Never use the spa
immediately after strenuous exercise.
7. WARNING - Risk of Injury. Prolonged use of
the spa may be injurious to your health.
8. WARNING - Risk of Injury. Individuals with
infectious diseases should not use the spa.
9. WARNING - Risk of Injury. Short term
inhalation of high concentrations of ozone and
long term inhalations of low concentrations of
ozone can cause serious physiological effects.
Do not inhale ozone gas produced by your spa's
Ozone Sterilizer.
10. WARNING - Risk of Injury. Maintain water
chemistry in accordance with chemical
manufacturer’s instructions.
11. WARNING - Risk of Shock. Spa shall not be
operated in severe weather conditions, i.e.
electrical storms, tornadoes, etc.
12. CAUTION - Unauthorized Access. Secure
the spa area against unauthorized access. Make
sure all barriers meet both state and local codes.
Keep spa cover on spa when spa is not being
used.
13. CAUTION - Risk of Damage to Spa or
Equipment. By performing maintenance as
described later in this Owner's Manual, the
chance of damage to your spa and it's
equipment will be greatly reduced. Never block
the air vents that lead to the spa equipment
compartment. Doing so may cause the spa
equipment to overheat.
14. CAUTION - Non-Approved Accessories.
Using accessories not approved by Bullfrog
International, L.C. could void your warranty or
cause other problems. Please consult with your
authorized Bullfrog Portable Spa Dealer.
15. CAUTION - Location of Your Spa. Locate
your spa on a surface that can withstand the
weight bearing requirements of the spa (see
"Selecting a Site for your Spa" in this Manual).
Also, locate your spa in an environment that can
withstand repeated exposure to water and the
possibility of a major spill.

Page 6 Bullfrog Spas Owner’s Manual
UPGRADING YOUR BULLFROG
SPA
The following are possible upgrades for your Bullfrog
Spa:
New JetPak™ designs: As new jet types and styles
become available so will new innovative JetPak
modules (Fig. B). Check will your authorized Bullfrog
Spa Dealer on a yearly basis to see what's available.
PowerPlus™: When you're ready for more horsepower
and more jets, just call your authorized Bullfrog Spa
Dealer and ask for PowerPlus.
WellSpring™ Ozone Sterilizer: For cleaner spa water,
we use the most simple, reliable, user-friendly,
affordable ozone system on the market. If your spa
did not come with one, its well worth the investment
IMPORTANT: Your spa was designed, tested, and UL
Listed with a Bullfrog ZO-310 Ozone Sterilizer. No
other Ozone Sterilizer is recommended for your
Bullfrog Portable Spa.
Tablet Feeder - Chlorine/Bromine: This Tablet
Feeder allows you to sanitize your spa water each time
your filter pump turns on, saving you from having to
do so. Also, your Tablet Feeder is out of sight and yet
easy to get to.
Miscellaneous Upgrades: For upgrades as they
become available, keep in touch with your authorized
Bullfrog Spa Dealer.
INSTALLATION & SET-UP
Before attempting to install or use your spa, please
read the U.L. Safety Instructions, the Additional Safety
Instructions, as well as all of the Installation
Instructions that follow:
SELECTING A SITE FOR YOUR SPA:
Your Bullfrog Spa was designed for either indoor or
outdoor use. Whether indoors or outdoors, please
adhere to the following guidelines:
1. Select a site that is stable and capable of
supporting the weight of your spa, its water, and the
people using it (refer to the “Technical Specification
Sheet” in this manual for the Filled Weight of your
spa). If installed on a suspended floor/deck, the floor/
deck should be capable of supporting your spa. If you
have concerns on this matter, please contact a
qualified Licensed Contractor.
2. Select a surface that is flat and reasonably level.
This surface must provide continuous support for the
entire bottom of the spa. Do not shim or block up the
spa creating voids below the spa.
3. Avoid installing the spa in a pit or low area where
water may accumulate and damage the spa or its
equipment. Choose a site where water will drain away
(Figure B) Several JetPak™ Variations

Page 7Bullfrog Spas Owner’s Manual
from the spa and not towards it.
4. Important: With all installations, the spa must be
located at least 5 feet from all electrical outlets,
switches, and other permanently installed electrical
devices.
Indoor Considerations: There are several
considerations when installing your spa indoors: First,
the environment both around and below the spa
should be water resistant. It must be capable of
handling water splashed out from the spa as well as
the possibility of a leak from the spa (Your Bullfrog
portable spa is the most leak-free spa in the industry,
but there is still the possibility of a leak from the spa.
A catch basin equivalent to the volume of your spa is
recommended); Second, it is recommended that the
room you install the spa in has proper ventilation.
Proper ventilation can usually be achieved by an
exhaust fan or an open window.
Note: Typical indoor surfaces include, but are not
limited to: concrete, wood, non-slip tile, or linoleum.
Outdoor Considerations: When selecting an outdoor
site, several things should be considered: First, Avoid
selecting a site where excessive water may contact the
spa, such as from sprinklers or a roof edge without
rain gutters; Second, and if possible, avoid areas of
direct, prolonged sunlight. The ultraviolet rays of
sunlight will tend to fade and damage your spa cover
and cabinet; Third, Check your local codes on possible
restrictions that require fencing or childproof gates
around your spa; Last, avoid locating your spa in an
area where debris will be tracked into the spa.
Note: Typical outdoor surfaces include, but are not
limited to: concrete, brick, non-slip tile, wood-decking,
peagravel or sand.

Page 8 Bullfrog Spas Owner’s Manual
ELECTRICAL REQUIREMENTS &
HOOK-UP
All Bullfrog Portable Spas must be wired in accordance
with all local & national electric codes. Have a licensed
electrician perform the electrical installation.
Important: All metal enclosures, pipe or conduit
located within 5 feet (1.5m) of the spa must be
bonded to the Control Center Box located inside the
equipment compartment of the spa. The wire used to
complete this bonding must be a minimum No. 8
(8.4mm²) solid copper wire. It is to be connected to
the ground lug connector on the exterior surface of
the Control Center Box and all metal items described
above.
WIRING DIAGRAMS
Please reference the wiring diagram that is specific to
your spa’s Control System:
•Economy Control System /BULF30 (Fig. C)
•Deluxe Control System/BULF50 (Fig. D)
•Premium Control System/BULF60 (Fig. E)
120V/240V CONVERTIBLE EQUIPMENT
Unless you special ordered 120 Volt equipment, your
Bullfrog Portable Spa comes standard as a 240 Volt
spa.
If your spa is equipped with an Economy Control
System (BULF30), it can be wired as either a dedicated
120V or 240V system.
With the Economy Control System, you can take
advantage of the Bullfrog PowerPlus feature by
upgrading your 120V system to a more powerful
240V system. The 240V system allows you to increase
horsepower as well as heating capacity.
For specific conversion instructions, please refer to
the system wiring diagram locating inside of the
control system box.
120 VOLT INSTALLATION
Use only a qualified Licensed Electrician to make 120
Volt electrical installations.
Your 120 Volt spa requires a dedicated GFCI 20 AMP
electrical circuit and a minimum supply wire size of
12 gauge. It is important that this circuit is dedicated
(not being used by any other electrical appliance) or
your spa may not function properly.
Position your Bullfrog Portable Spa at least 5 feet
(1.5m) from all electrical outlets or devices.
(Figure C) Economy 120V/240V Wiring

Page 9Bullfrog Spas Owner’s Manual
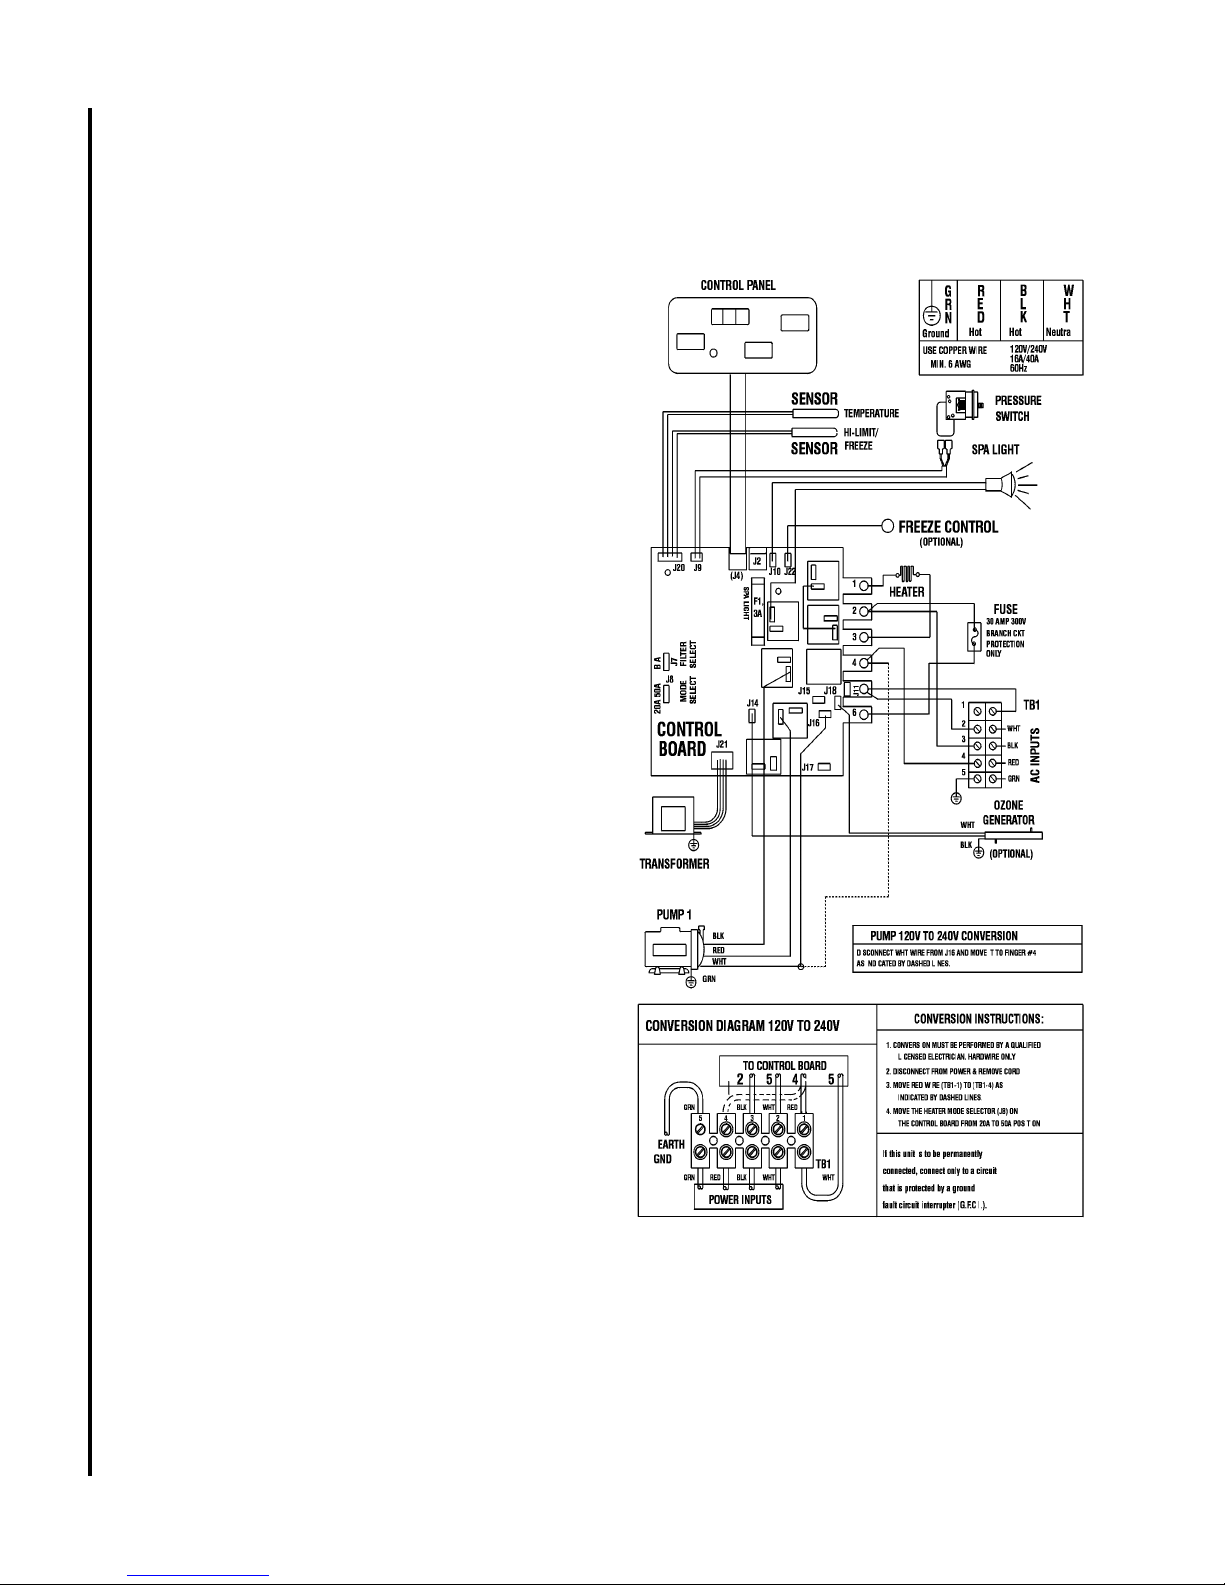
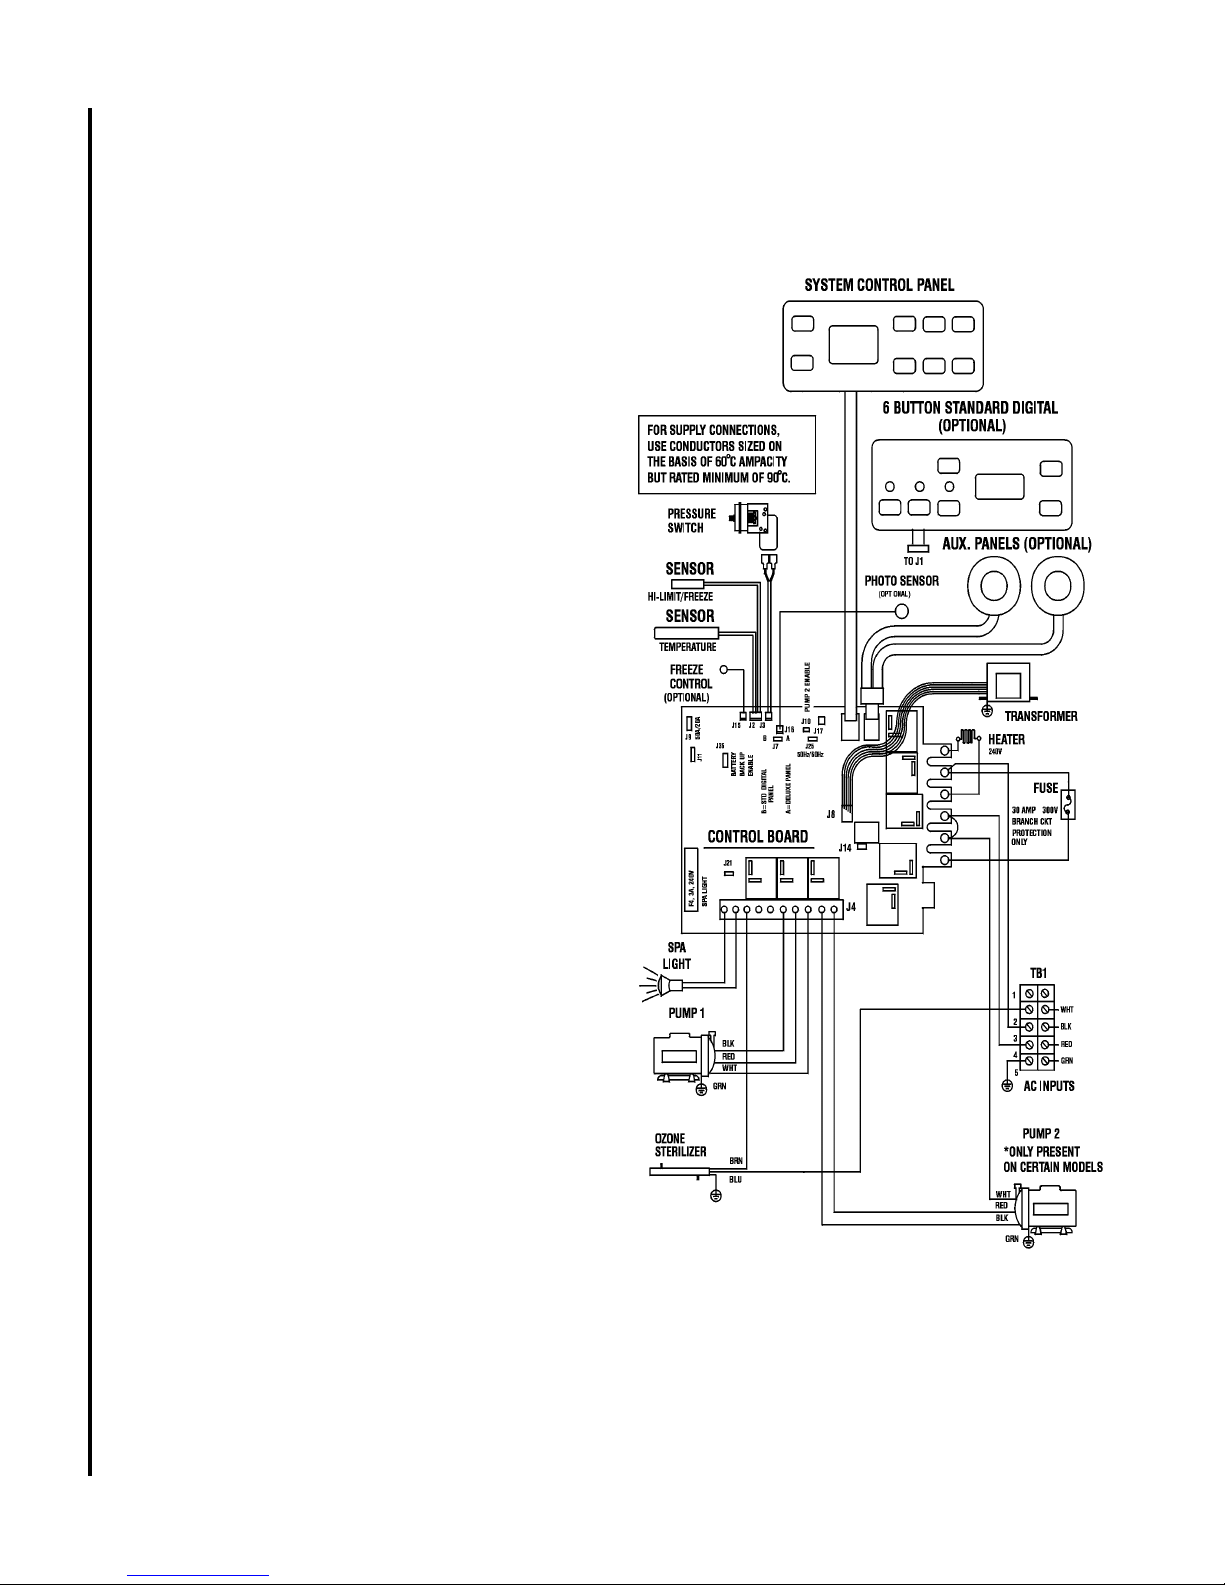
240 VOLT INSTALLATION
Use only a qualified Licensed Electrician to make 240
Volt electrical installations.
Your 240 Volt Bullfrog Portable Spa requires a
dedicated 50 AMP electrical circuit and a minimum
supply wire size of 6 gauge. It is important that this
circuit is dedicated (not being used by any other
electrical appliance) or your spa may not function
properly.
Position your Bullfrog Portable Spa at least 5 feet
(1.5m) from all electrical outlets or devices.
30 AMP Conversion Option: If you do not have 50
AMPS of electrical service available, your authorized
Bullfrog Portable Spa Dealer or electrician can easily
convert your spa to operate on 30 AMPS with a
minimum supply wire size of 10 gauge. Please be
aware, that spas converted to 30 AMPS are only
capable of heating the water when the circulation
pump is in low-speed, not high-speed. This heating
limitation is acceptable in most climates as well as in
indoor installations.
ELECTRICIAN'S INSTRUCTIONS:
NOTICE: As of January 1, 1994, the National Electric
Code (Article 680-42) requires that all spas, hot tubs,
and associated electrical components shall be
protected by Ground Fault Circuit Interrupters.
Providing 120 Volt Service to the Bullfrog Portable
Spa: As per code, supply a GFCI protected, 3-wire
(Line 1, Neutral & Ground), 20-AMP, 60HZ, Single-
Phase service to the back, left corner (when you are
facing the control pad) of the Bullfrog Portable Spa.
This service must include a disconnect that is visible
from the spa and located not less than five feet from
the spa and not more than 50 feet from the spa (a
GFCI Sub-Panel may be used to substitute the
disconnect if located within the same parameters).
Providing 240 Volt Service to the Bullfrog Portable
Spa: As per code, supply a GFCI protected, 4-wire
(Line 1, Line 2, Neutral & Ground), 50-AMP, 60HZ,
Single-Phase service to the back, left corner (when you
are facing the control pad) of the Bullfrog Portable
Spa. This service must include a disconnect that is
visible from the spa and located not less than five feet
from the spa and not more than 50 feet from the spa
(a GFCI Sub-Panel may be used to substitute the
disconnect if located within the same parameters).
Installation of the GFCI: All conductors except the
green ground must be routed through the GFCI,
including the neutral. Never bypass the neutral line. If
the neutral line is bypassed, then the current will be
imbalanced and cause the GFCI to trip.
Note: For a GFCI wiring diagram, please contact
Bullfrog International, L.C. or an authorized Bullfrog
Portable Spa Dealer.
(Figure D) Deluxe 240V Wiring Diagram

Page 10 Bullfrog Spas Owner’s Manual
Connecting the Spa:
1. Remove the equipment compartment door.
2. Remove the face-plate to the Control Center by
removing the four screws located in the front.
3. Connect a 1" non-metallic coupling and conduit to
the 1" male CPVC pipe found at the base of the spa
cabinet (see “Parts Identification Diagram” in this
manual).
4. Run the required wires through the conduit and to
the Control Center.
5. Connect the 3 wires (120V systems)/4 wires (240V
systems) to the terminal block located in the Control
Center (see appropriate “Wiring Diagram”).
6. Replace the Control Center face-plate and the
equipment compartment door.
7. The electrical hook-up is complete.
Important: Do not fill or start-up the spa until you
have completed the following section.
(Figure E) Premium 240V Wiring Diagram

Page 11Bullfrog Spas Owner’s Manual
(Figure G) Spa Fittings
(Figure F) Drain Cap
(Figure H) Fill Level Indication Marks
CHECKLIST BEFORE FILLING
YOUR SPA
Important: The equipment should never be operated
without water in the spa. Serious damage to the pump
and/or heater may occur.
1. Installing Your Cover: Your spa cover comes
with tie-down straps and locking hardware to attach
the cover to the spa or decking. If your Dealer did not
install your cover, then refer to Cover Installation
Instructions that come in the cover cardboard
packaging.
2. Check Drain-Cap: At the end of the drain hose
(located in the Equipment Compartment) is the Drain-
Cap (Fig. F) Make sure it is securely fastened to the
end of the drain hose.
3. Tighten Equipment Fittings: In the equipment
compartment, hand-tighten all PVC Pipe Unions and
Pump Drain Plugs (Fig. G) to prevent the possibility of
leakage (sometimes these fittings loosen during
shipment).
4. Fill the Spa: Fill the spa to any point between
the two Water Level Indentation marks (Fig. H) on the
back wall of the filter/skimmer cavity.
Note 1: The higher the water level, the less spa users
it will take to cause the water to overflow the top of
the spa.
Note 2: Do not fill the spa with soft water unless the
mineral content is raised immediately (see your
Dealer).
5. Check for Leaks: After the spa is full, but
before turning the power on, check all the fittings and
equipment in the equipment compartment for signs of
leakage. If a leak is detected, except from fittings that
can be hand-tightened, call your authorized Bullfrog
Spa Dealer.

Page 12 Bullfrog Spas Owner’s Manual
INITIAL START-UP
Important: Bullfrog Spas come with either an
Economy,Deluxe or Premium Control System. Refer
only to the Control System that applies to your spa.
ECONOMY CONTROL SYSTEM:
Turn on the circuit breaker. Your spa will start up
automatically and will heat to 100°F (38°C) if no other
temperature is set. Depending on the outside ambient
temperature, your spa will heat at the rate of .5-1° per
hour for 120 Volt systems and between 5-10° per hour
for 240 Volt systems.
One minute after start-up, the spa will begin a 4-hour
filter cycle to clean the water. To select a different
duration, see "Preset Filter cycles" under “Operation”.
DELUXE CONTROL SYSTEM:
Turn on the circuit breaker. Your spa will start up
automatically and will heat to 100°F (38°C) if no other
temperature is set. When your spa is first actuated it
will start up in the Economy Mode and the LCD will
alternately flash “Econ”, the current spa temperature,
and “COOL”until the spa water is less than 15°F cooler
than the set temperature. During each filter cycle, the
spa will heat to the set temperature. Depending on the
outside ambient temperature, your 240 Volt spa will
heat at the rate of 5-10° per hour.
One minute after start-up, the spa will begin a four
hour filter cycle to clean the water. To select a
different duration, see " Preset Filter cycles" under
“Operation”.
PREMIUM CONTROL SYSTEM:
Turn on the circuit breaker. Your spa will start up
automatically and will be in the Economy Mode. Simply
press the “#” button to switch the spa to the Standard
Mode and begin heating. The spa will heat to 100°F
(38°C) if no other temperature is set. Depending on
the outside ambient temperature, your 240 Volt spa
will heat at the rate of 5-10° per hour.
Time of Day: You will see the words “set time”
flashing on the display. To set the time, press the
“Time” button then the “*” button then the “Warmer” or
“Cooler” button. After either button is pressed once,
the time will begin changing in one-minute
increments. Press either button to stop the time from
changing. Press the “#” button to enter your correct
time into the system.
Now that the time has been set correctly, your spa will
automatically filter itself for a 2-hour period every 12
hours. For average use, a 4-hour filter cycle is
recommended. To select a different duration, see
“Filter Cycles” under “Operation”.
Note: If the spa does not activate after turning on the
circuit breaker, it may be necessary to press the
"Reset Button" on the GFCI breaker.

Page 13Bullfrog Spas Owner’s Manual
OPERATION
Important: Bullfrog Spas come with either an
Economy,Deluxe or Premium Control System. Please
refer only to the Control System that applies to your
spa.
ECONOMY CONTROL SYSTEM
MASTER CONTROL PAD (Fig. I)
Temperature Adjustment (80°F - 104°F)
Temperature adjustment is controlled by pushing the
“Temp Set” button. The display shows the actual water
temperature unless the button is pressed. When the
button is pressed, the display will show the set
temperature. Pressing the button a second time will
cause the set temperature to increase or decrease
depending on what direction was last chosen. Each
successive press will change the set temperature in
the same direction.
If the opposite direction is desired, release the button
and let the display revert to the actual water
temperature again. Press the button to display the set
temperature, and again to make the temperature
change in the desired direction.
Jets
Press the "Jets" button to operate the pump. Press the
button once to turn on the low-speed pump. Press the
button again to turn on the high-speed pump, and
again to turn off the pump. The low-speed pump will
automatically turn off after 2 hours and the high-
speed pump after 30 minutes. Due to Automatic Spa
Control, the low-speed pump will start automatically
when the heater is turned on, when a filter cycle is
activated, or when a freeze condition is detected. If
the low-speed pump is on under the Automatic Spa
Control, it can only be deactivated by entering the
Standby Mode.
Light
Press the "Light" button to turn the spa light on and
off. The spa light will turn itself off after 4 hours of
operation.
Standard and Economy Mode
The Standard Mode is the default operation mode for
the spa. When in Standard mode, the spa maintains
the desired temperature at all times. In Economy
mode, the spa only heats water during filter cycles
and has a fixed temperature setting of 100°F. To
activate the Economy Mode, change the temperature
setting on the Master Control Pad down to 80°F by
pressing the “Temp Set” button. Press the button
again and your spa will enter into the Economy Mode.
(Figure I) Economy Control Pad

Page 14 Bullfrog Spas Owner’s Manual
Standby Mode
(Use when removing JetPaks or cleaning the filter)
Press the “Temp Set” temperature button and then the
"Light" button. The display will show "Sb" and all
functions will be disabled except for freeze control.
Press any button to reset the system.
Preset Filter Cycles: Your spa will automatically filter
itself twice each day. The first filter cycle will begin
one minute after the spa is energized. The second
filter cycle will begin twelve hours after the start of
the first filter cycle. Filtration duration is
programmable at the Master Control Pad. Press the
"Temp Set" button, then the "Jets" button, and "F4" will
be displayed on the panel. F4 is the default filter time
and indicates a 4 hour cycle. Continue pressing the
“Temp Set” button to cycle through the rest of the
filter time options; "F2" = 2 hours, "F4" = 4 hours, and
"F6" = 6 hours. Press the "Jets 1" button to exit filter
programming. During filtration, the low-speed pump
and ozone sterilizer (if installed) will run.
Ozone Sterilizer (optional): For safety purposes, your
Ozone Sterilizer is disabled for a 30 minute period
whenever a “Jets” button is pressed.
SAFETY/FEATURE MESSAGES:
Overheat Protection (Spa is Deactivated.)
DO NOT ENTER THE WATER. If a malfunction occurs
and the spa water has reached 112°F, the display will
flash “OH” (meaning over-heat) and the system will
completely shut down. Remove the cover to cool the
water. Overheating may also occur if the filter
duration is set too long. At 110°F, the spa should
reset itself. If the high-limit sensor detects 118°F at
the heater, the spa will shut down. When the heater
cools to 110°F, press any button to reset the spa. If
the spa will not reset, then shut off power to the spa
and contact your authorized Bullfrog Spa Dealer.
Flow Switch Detection
If the panel display is flashing “FL” (meaning flow)
alternately with Temperature, one of the following
may have occurred:
1- The filter may be plugged. Remove the filter and
clean.
2- The amount of water flow may be inadequate. Make
sure the spa is filled correctly.
3- A pressure switch may have malfunctioned. The spa
will continue to operate, but the heater will not
activate. Contact your authorized Bullfrog Spa Dealer.
Open Sensor (Spa is deactivated)

Page 15Bullfrog Spas Owner’s Manual
If the Control Pad display shows “Sn” (meaning
sensor), then either the high-limit or water
temperature sensor has malfunctioned. This must be
repaired only by an authorized Bullfrog Portable Spa
Dealer.
Standby Mode (Spa is deactivated.)
When “Sb” appears on the panel display, all spa
functions have been disabled except for freeze
control. Press any button on the control pad to reset
the system. The "Standby Mode" is primarily used to
prevent the pumps from being activated while
changing JetPaks, cleaning the filter or cleaning the
skimmer basket.
Warning! Shock Hazard! No User Serviceable Parts.
Do not attempt service of this control. Contact you
authorized Bullfrog Spa Dealer. Follow all Owner’s
Manual power connection instructions. Installation
must be performed by a licensed electrician, and all
grounding connections must be properly installed.
DELUXE CONTROL SYSTEM
MASTER CONTROL PAD (Fig. J:)
Temperature Adjustment (80°F - 104°F)
The current temperature is constantly displayed on
the LCD. Press either the "Warmer" or "Cooler" button
once to display the set temperature. (The set
temperature is designated by a triangle in the upper
left corner.) Each time either button is pressed again,
the set temperature will increase or decrease
depending upon which button is pressed. After three
seconds, the LCD will automatically display the
current spa temperature.
Jets 1
Press the "Jets 1" button to operate pump 1. Press the
button once to turn on the low-speed pump. Press the
button again to turn on the high-speed pump, and
again to turn off the pump. The low-speed pump will
automatically turn off after 2 hours and the high-
speed pump after 30 minutes. Due to Automatic Spa
Control, the low-speed pump will start automatically
when the heater is turned on, when a filter cycle is
activated, or when a freeze condition is detected. If
the low-speed pump is on under the Automatic Spa
Control, , it can only be deactivated by entering the
Standby Mode.
Jets 2
Press the "Jets 2" button to operate pump 2 (if
installed). Press the button once to turn on the low-
speed pump. Press the button again to turn on the
high-speed pump, and again to turn off the pump.
The low-speed pump & the high-speed pump will
(Figure J) Deluxe Control Pad

Page 16 Bullfrog Spas Owner’s Manual
automatically turn off in 30 minutes.
Light
The spa light has 3 settings. Pressing the "Light"
button changes the intensity from the brightest
setting to the dimmest setting, then turns it off. The
spa light will turn itself off after 4 hours of operation.
Standard and Economy Mode
Press the "Mode" button to switch between Economy
and Standard modes. When in Economy mode, the spa
only heats water during filter cycles. In Standard
mode, the spa maintains the desired temperature at
all times.
Standby Mode
(Use when removing JetPaks or cleaning the filter)
Press either the "Warmer" or "Cooler" button and then
the "Light" button. The display will show "Stby" and all
functions will be disabled except for freeze control.
Press any button to reset the system.
Auxiliary Control Pads - Optional (See Fig. K)
Pump 1: Press the "Jets 1" button to operate pump 1.
Press the button once to turn on the low-speed pump.
Press the button again to turn on the high-speed
pump, and again to turn off the pump. The low-speed
pump will automatically turn off after 2 hours and the
high-speed pump after 30 minutes.
Pump 2: Press the "Jets 2" button to operate pump 2
(if installed). Press the button once to turn on the low-
speed pump. Press the button again to turn on the
high-speed pump, and again to turn off the pump.
The low-speed pump and the high-speed pump will
automatically turn off after 30 minutes.
Preset Filter Cycles: Your spa will automatically filter
itself twice each day. The first filter cycle will begin
one minute after the spa is energized. The second
filter cycle will begin twelve hours after the start of
the first filter cycle. Filtration duration is
programmable at the Master Control Pad. Press the
"Warm" or "Cool" button, then the "Mode" button, and
"FIL4" will be displayed on the panel. FIL4 is the
default filter time and indicates a 4 hour cycle. To
increase or decrease the filter times, press the "Warm"
or "Cool" button respectively. "FIL2" =2 hours, "FIL4" =
4 hours, and "FIL6" = 6 hours. Press the "Mode" button
to exit filter programming. During filtration, the low-
speed pump and ozone sterilizer (if installed) will run.
The low speed of pump 2 purges for 5 minutes at the
beginning of each filter cycle.
Ozone Sterilizer (optional): For safety purposes, your
Ozone Sterilizer is disabled for a 30 minute period
whenever a “jets” button is pressed.
(Figure K) Auxiliary Control Pad

Page 17Bullfrog Spas Owner’s Manual
SAFETY/FEATURE MESSAGES:
Economy Mode
The spa is in economy mode. "Econ" is flashed
alternately with the current temperature and "COOL"
until the spa water is less that 15°F cooler than the set
temperature.
Overheat Protection (Spa is Deactivated.)
DO NOT ENTER THE WATER. If a malfunction occurs
and the spa water has reached 112°F, the display will
flash “OH” (meaning over-heat) and the system will
completely shut down. Remove the cover to cool the
water. Overheating may also occur if the filter
duration is set too long. At 110°F, the spa should
reset itself. If the high-limit sensor detects 118°F at
the heater, the spa will shut down. When the heater
cools to 110°F, press any button to reset the spa. If
the spa will not reset, then shut off power to the spa
and contact your authorized Bullfrog Spa Dealer.
Flow Switch Detection
If the panel display is flashing “FLO” (meaning flow)
alternately with Temperature, one of the following
may have occurred:
1- The filter may be plugged. Remove the filter and
clean.
2- The amount of water flow may be inadequate. Make
sure the spa is filled correctly.
3- A pressure switch may have malfunctioned. The spa
will continue to operate, but the heater will not
activate. Contact your authorized Bullfrog Spa Dealer.
Flow Switch Failure
If the panel display shows a constant “FLO”, a
pressure switch has malfunctioned. Contact your
authorized Bullfrog Spa Dealer.
Temperature Set Back
When the display shows “COOL”, the spa water is
more than 20°F cooler than the set temperature. The
heater will automatically activate to provide freeze
protection. This is a normal spa function; no
corrective action is necessary.
Freeze Protection
If a freeze condition is detected “ICE” will be
displayed on the panel. The pump(s) will be
automatically activated. This is a normal spa function;
no corrective action is necessary. Freeze protection is
enabled regardless of the spa's status.
High-Limit Sensor Failure (Spa is deactivated.)

Page 18 Bullfrog Spas Owner’s Manual
When the panel display shows “Sn1”the high-limit
temperature sensor is non-functional. This must be
repaired only by an authorized Bullfrog Spa Dealer.
Main Sensor Failure (Spa is deactivated.)
If “Sn3”appears on the display, the main sensor is
non-functional. This must be repaired only by an
authorized Bullfrog Spa Dealer.
Standby Mode (Spa is deactivated.)
When “Stby” appears on the panel display, all spa
functions have been disabled except for freeze
control. Press any button on the control pad to reset
the system. The "Standby Mode" is primarily used to
prevent the pumps from being activated while
changing JetPaks, cleaning the filter or cleaning the
skimmer basket.
Warning! Shock Hazard! No User Serviceable
Parts.
Do not attempt service of this control. Contact you
authorized Bullfrog Spa Dealer. Follow all Owner’s
Manual power connection instructions. Installation
must be performed by a licensed electrician, and all
grounding connections must be properly installed.
PREMIUM CONTROL SYSTEM
MASTER CONTROL PAD (Fig. L:)
Liquid Crystal Display
This feature constantly displays the spa
temperature, as well as the various monitoring
functions.
Program Buttons
The “*” button initiates time setting, filter
programming, and panel lock routines.
The “#” button is used to switch between Economy
and Standard operation modes and also serves as
an “enter” button to initiate various programming
features.
Time
Press the “Time” button to view the time of day.
Press again to view the temperature of the spa
water. To change the time of day, see “Time of Day”
in the “Initial Startup” section of this Owner’s
Manual.
Temperature Adjustment (80°F - 104°F)
The current temperature is constantly displayed on
the LCD. Press either the "Warmer" or "Cooler"
button once to display the set temperature and the
(Figure L) Premium Control Pad
Program

Page 19Bullfrog Spas Owner’s Manual
ac
words “set heat”. Each time either of these buttons is
pressed again, the set temperature will increase or
decrease depending upon which button is pressed.
After three seconds, the LCD will automatically display
the current spa temperature.
Jets 1
Press the "Jets 1" button to operate pump 1. Press the
button once to turn on the low-speed pump. Press the
button again to turn on the high-speed pump, and
again to turn off the pump. The low-speed pump will
automatically turn off after 2 hours and the high-
speed pump after 30 minutes. Due to Automatic Spa
Control, the low-speed pump will start automatically
when the heater is turned on, when a filter cycle is
activated, or when a freeze condition is detected. If
the low-speed pump is on under the Automatic Spa
Control, , it can only be deactivated by entering the
Standby Mode.
Jets 2
Press the "Jets 2" button to operate pump 2 (if
installed). Press the button once to turn on the low-
speed pump. Press the button again to turn on the
high-speed pump, and again to turn off the pump.
The low-speed pump & the high-speed pump will
automatically turn off in 30 minutes.
Light
The spa light has 3 settings. Pressing the "Light"
button changes the intensity from the brightest
setting to the dimmest setting, then turns it off. The
spa light will turn itself off after 4 hours of operation.
Standard and Economy Mode
Press the "#" button to switch between Economy and
Standard modes. When in Economy mode, the spa
only heats water during filter cycles. In Standard
mode, the spa maintains the desired temperature at
all times.
Standby Mode
(Use when removing JetPaks or cleaning the filter)
Press either the "Warmer" or "Cooler" button and then
the "Light" button. The display will show "Stby" and all
functions will be disabled except for freeze control.
Press any button to reset the system.
Locking the Control Pad
To lock the entire control pad, press the “*” button
then the “#” button then the “Warmer” button all
within 3 seconds. When locked, the display will show
the spa temperature along with the lock symbol. All
buttons will be frozen except the “*” button which is
used to initiate the unlock sequence.

Page 20 Bullfrog Spas Owner’s Manual
Locking the Temperature Only
To lock the temperature, press either the “Warmer” or
“Cooler” button to initiate the “set heat” mode. Next,
and within a 3 second time span, press the “*” button
then the “#” button then the “”Warmer” button. When
locked, the display will show the spa temperature, the
“set heat” statement, and the lock symbol. All buttons
will be frozen except the “*” button which is used to
initiate the unlock sequence.
Unlocking the Control Pad
By pressing the “*” button then the “#” button then the
“Cooler” button within 2 seconds, the lock symbol will
disppear and the control pad buttons will work again.
Auxiliary Control Pads - Optional (See Fig. M)
Pump 1: Press the "Jets 1" button to operate pump 1.
Press the button once to turn on the low-speed pump.
Press the button again to turn on the high-speed
pump, and again to turn off the pump. The low-speed
pump will automatically turn off after 2 hours and the
high-speed pump after 30 minutes.
Pump 2: Press the "Jets 2" button to operate pump 2
(if installed). Press the button once to turn on the low-
speed pump. Press the button again to turn on the
high-speed pump, and again to turn off the pump.
The low-speed pump and the high-speed pump will
automatically turn off after 30 minutes.
FILTER CYCLES:
Preset Filter Cycles: Your spa will automatically filter
itself for a 2-hour period every 12 hours. The first
filter cycle will begin at 2:00 AM and will continue
until 4:00 AM. The second filter cycle will begin at
2:00 PM and will continue until 4:00 PM. When a filter
cycle is active, it will be indicated on the display with a
message stating “Filter 1” for the first (AM) cycle or
“Filter 2” for the second (PM) cycle. During filtration,
the low-speed pump and ozone sterilizer (if installed)
will run. The low speed of pump 2 purges for 5
minutes at the beginning of each filter cycle.
Custom Filter Cycles: While you are not required to
set filter cycles, if you want to change them, press the
“Time” button and the time of day will be shown.
Then press the “*” button and “set time” will appear
on the display. Then press the “*” button within 3
seconds and “SET START FILTER 1” (AM cycle) will
appear on the display.
Press the “Warmer” or “Cooler” button to reset the
filter start time.
Next, press the “*” button and when “SET HEAT” is on
the display, press the “Warmer” (on) button to heat the
water during filtering, or press the “Cooler” (off)
button to disable the heater during filtering.
(Figure M) Auxiliary Control Pad
Other manuals for Spas
2
Table of contents
Other BullFrog Hot Tub manuals

BullFrog
BullFrog I 331 Series User manual

BullFrog
BullFrog M Series User manual

BullFrog
BullFrog Spas User manual

BullFrog
BullFrog SWIM Series User manual

BullFrog
BullFrog 2000 User manual

BullFrog
BullFrog A Series User manual

BullFrog
BullFrog STIL7 User manual

BullFrog
BullFrog A7L User manual

BullFrog
BullFrog 2001 Portable Spas User manual

BullFrog
BullFrog X Series User manual