Rixen TX-600N User manual

CONTENTS
TX-600N Specifications-----------------------------------1
Instrument descriptions ----------------------------------2
Display descriptions --------------------------------------3
Key descriptions ------------------------------------------4
Instructions -----------------------------------------------6
RS-232 transfer protocol --------------------------------11
Precautions----------------------------------------------14
※Please make sure to read the operation manual before using.
※Please use the device correctly on the basis of complete
understanding.
■TX-600N Specifications
Input Types
K, J, E, T, B, R, N, S, C thermocouple types; With Dual-channel input
Measurement Range
K: -200.0 ~ +1370.0℃(-328.0~+2498.0℉)
J:-200.0 ~ +1200.0℃(-328.0~+2192.0℉)
E:-210.0 ~ +1000.0℃(-346.0~+1832.0℉)
T:-220.0 ~ +400.0℃(-364.0~+752.0℉)
B:+320.0 ~ +1800.0℃(+608.0~+3272.0℉)
R:-20.0 ~ +1700.0℃(-4.0~+3092.0℉)
N:-200.0 ~ +1300.0℃(-328.0~+2372.0℉)
S:-20.0 ~ +1750.0℃(-4.0~+3182.0℉)
C:0.0 ~ +2300.0℃(+32.0~+4172.0℉)
Accuracy
± 0.1% of rdg + 0.1℃(In 23±5℃operating environment)
± 0.1% of rdg + 0.2℃(Out off 23±5℃operating environment)
※Built-in cold junction compensation function
Resolution
K, J, E, T, N, C Type: 0.1℃/0.1℉;
B, R, S Type: 0.5℃/0.5℉
Reading Rate
Approx 0.4 sec
Logging Sampling Rate
2 second to 120 minutes (User Selectable)
Memory
16,000 readings x 2CH
Baud Rate
57,600
Main Functions
Switchable 9 kinds of thermocouple type input, Hi/Lo Alarm, T1-T2,
Data hold, Max/Min/Avg Functions, USB/RS-232 interface, Perpetual
calendar, Data-Logging, Switchable ℃/℉, AC/DC power, Battery
sign and low battery warning, Auto / Manual shutdown, Calibration
function, Large LED back-light, IP66 water and dust proof.
Output
Software with USB Interface cable, RS-232 Output
Power Source
One 9 V battery or AC Adaptor
Dimensions / Weight
150 x 75 x 28 mm, Approx 320g (battery included)
Input Connections
Standard mini thermocouple socket x 2
Operating Environment
-20~+60℃; 0~100%RH
※About accuracy and sampling rate excludes errors generated by temperature probe.
Option Accessories
Temperature Probes LP series
Please select from LP series temperature probe (Customized)
TU-RS232-W
RS-232 interface cable
TU-USB-W
USB interface cable and WINDOWS software
TU-609
9 V battery
※Specifications are subject to change without notice.
-1-

Instrument descriptions
部名稱
○
1Multi-Function LCD display
○
8Battery cover
○
2Function key and setting key
○
9AC Adaptor input
○
3Record key and thermocouple switch key
○
10 USB Output port
○
4Movement key
○
11 RS-232 Output connector
○
5Movement key
○
12 T1 Probe input connector
○
6Power switch
○
13 T2 Probe input connector
○
7Model No. and Serial No.
-2-
※This instrument is a completely waterproof (IP66), in order to maintain the stability of
its characteristic function, please avoid falling, shocking or disassemble.

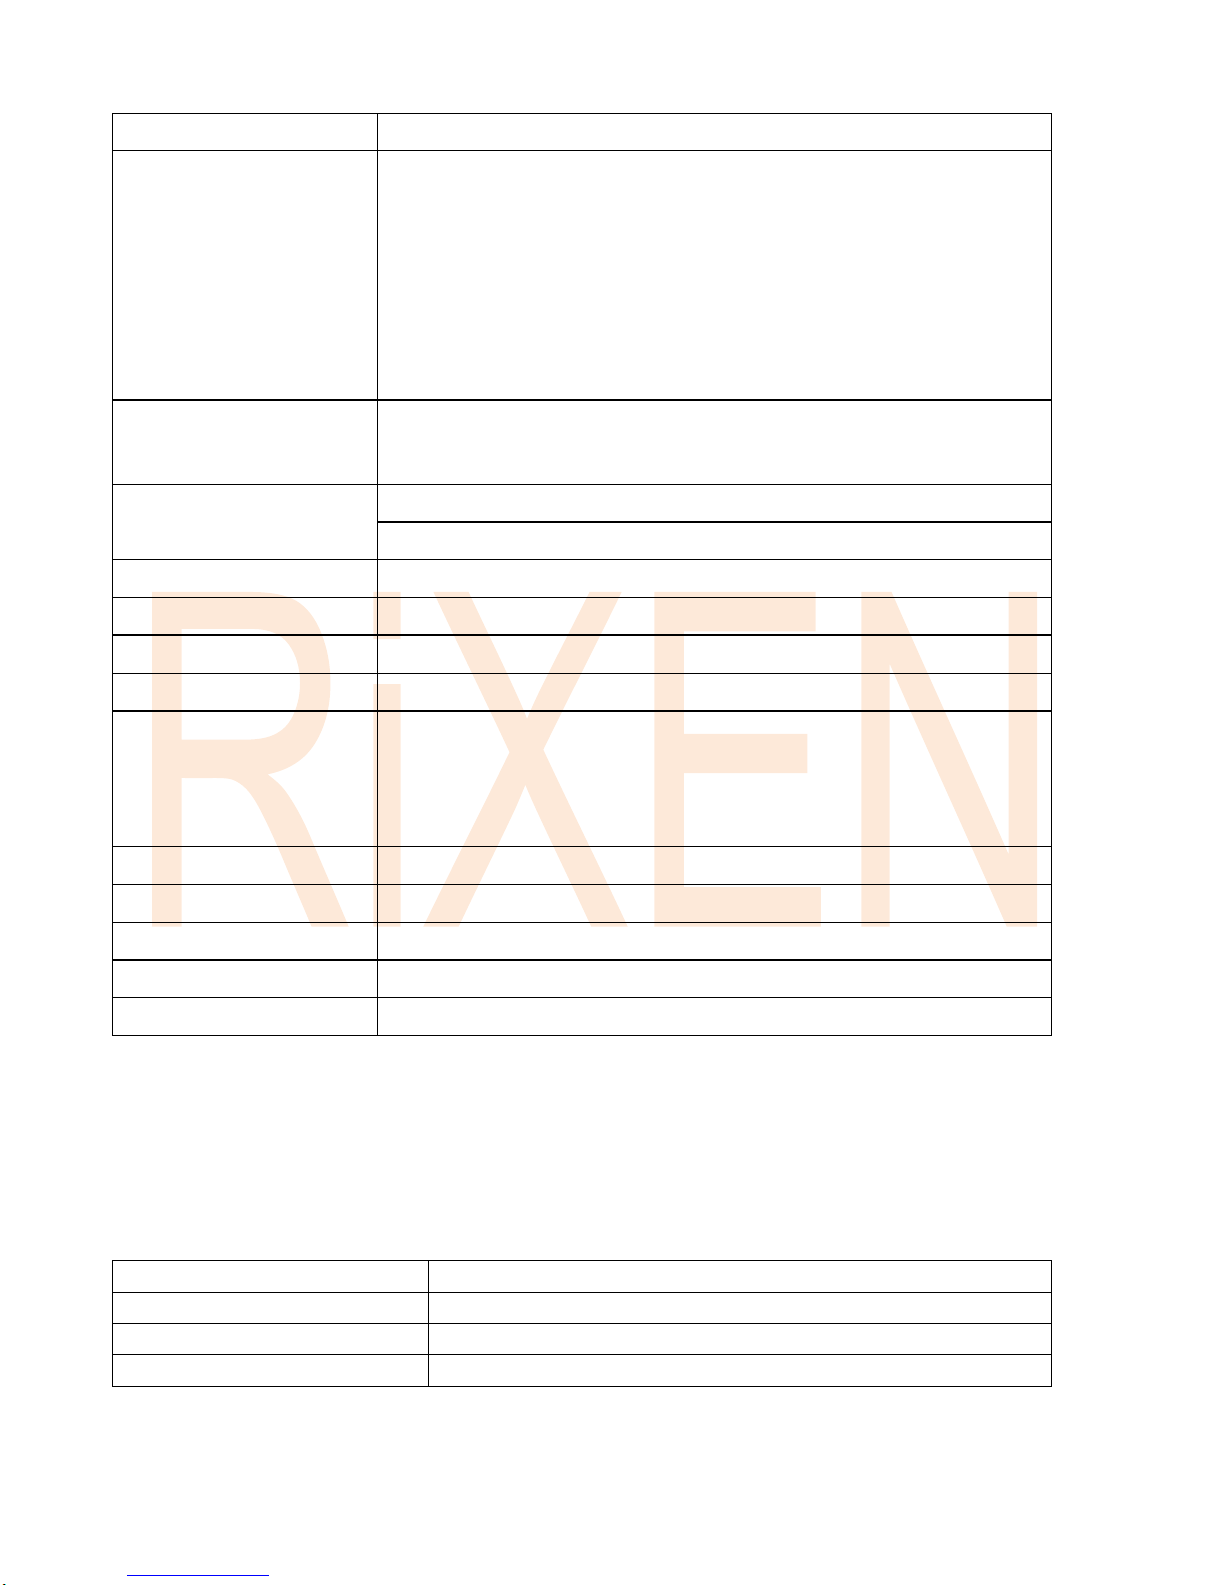
Display descriptions
Display
Descriptions
Battery power symbol
Manual shut down
Buzzer on
CAL
Under calibrating
HOLD
Data hold
RCD
Data-logging
MAX
Maximum value
MIN
Minimum value
AVG
Average value
T1
T1 probe
T2
T2 probe
Hi.A
High point alarm
Lo.A
Low point alarm
English words zone
thermocouple types
A.B.C. figures zone
Data value display
℃/℉
℃:Celsius units, ℉: Fahrenheit
Hidden symbols
Appeared when entering the setup mode or unusual condition
Abnormal displays
A. When Area A shows , please release all keys until the device return to normal
status
B. When AreaA shows , the situations may be causes by the following reasons:
1. Exceed the measuring range of this device.
2. The Temperature probe is damaged or not inserted the connector.
3. The probe is abnormal when showing the T1 - T2 real temperature.
4. If is appears when turn on the instrument¸please release all keys and tune it on again.
-3-

Key descriptions
Key
Function
Descriptions
LCD display
On/Off
Press one second (Be-) can turn on the power.
Press one second (Be---) can turn off the power.
If the instrument is left without any operation for five
minutes, it will turn off automatically.
+
+
Manual
turn off
When the device is on off state, hold ,then press
to turn on. When appears, please release
this two keys. It is finished to entering the manual turn
off mode.
Hold
mode
Under testing mode, press to enter the reading
HOLD mode. Use and to change the
displayed functions. Press to exit.
When MAX and MIN are showed, area B will shows the
first occurred data sheet, area C will shows the time
(hour : minute).
WhenAVG is showed, area B and area C will shows the
total recording time ( hour-minute: second)
Setting
mode
(Hi.A/Lo.A
Ref,Span,
date,time,
sampling
rate,
temperature
unit )
Under measurement mode, press and hold more
than two seconds, when area A appears , release
the to enter the setting mode, there are several
selects in the setting mode, press to enter.
Hi.A/Lo.A setting: Entering this mode when Hi.A and
Lo.A appeared on the screen. Use and to
change the data value, values are from 0 to 9 cycles,
press to switch to the value, and press the
to determine the value.
Ref, Span setting: To enter when and
appeared on the screen, use and to
switching the value, press to switch to the value,
and press to determine the value.
Date setting: Entering when appears, use
and to switching the value, long press can
speed up the switch, press to switch to the value,
and press to determine the value.
Sampling rate setting: Entering when appears,
use and to switching it, press to
determine the value.
Temperature setting: Entering when ℃℉appears,
use and to switching the value, press
to determine the value.
Exit: when the screen shows , use to exit.
-4-
(2S)
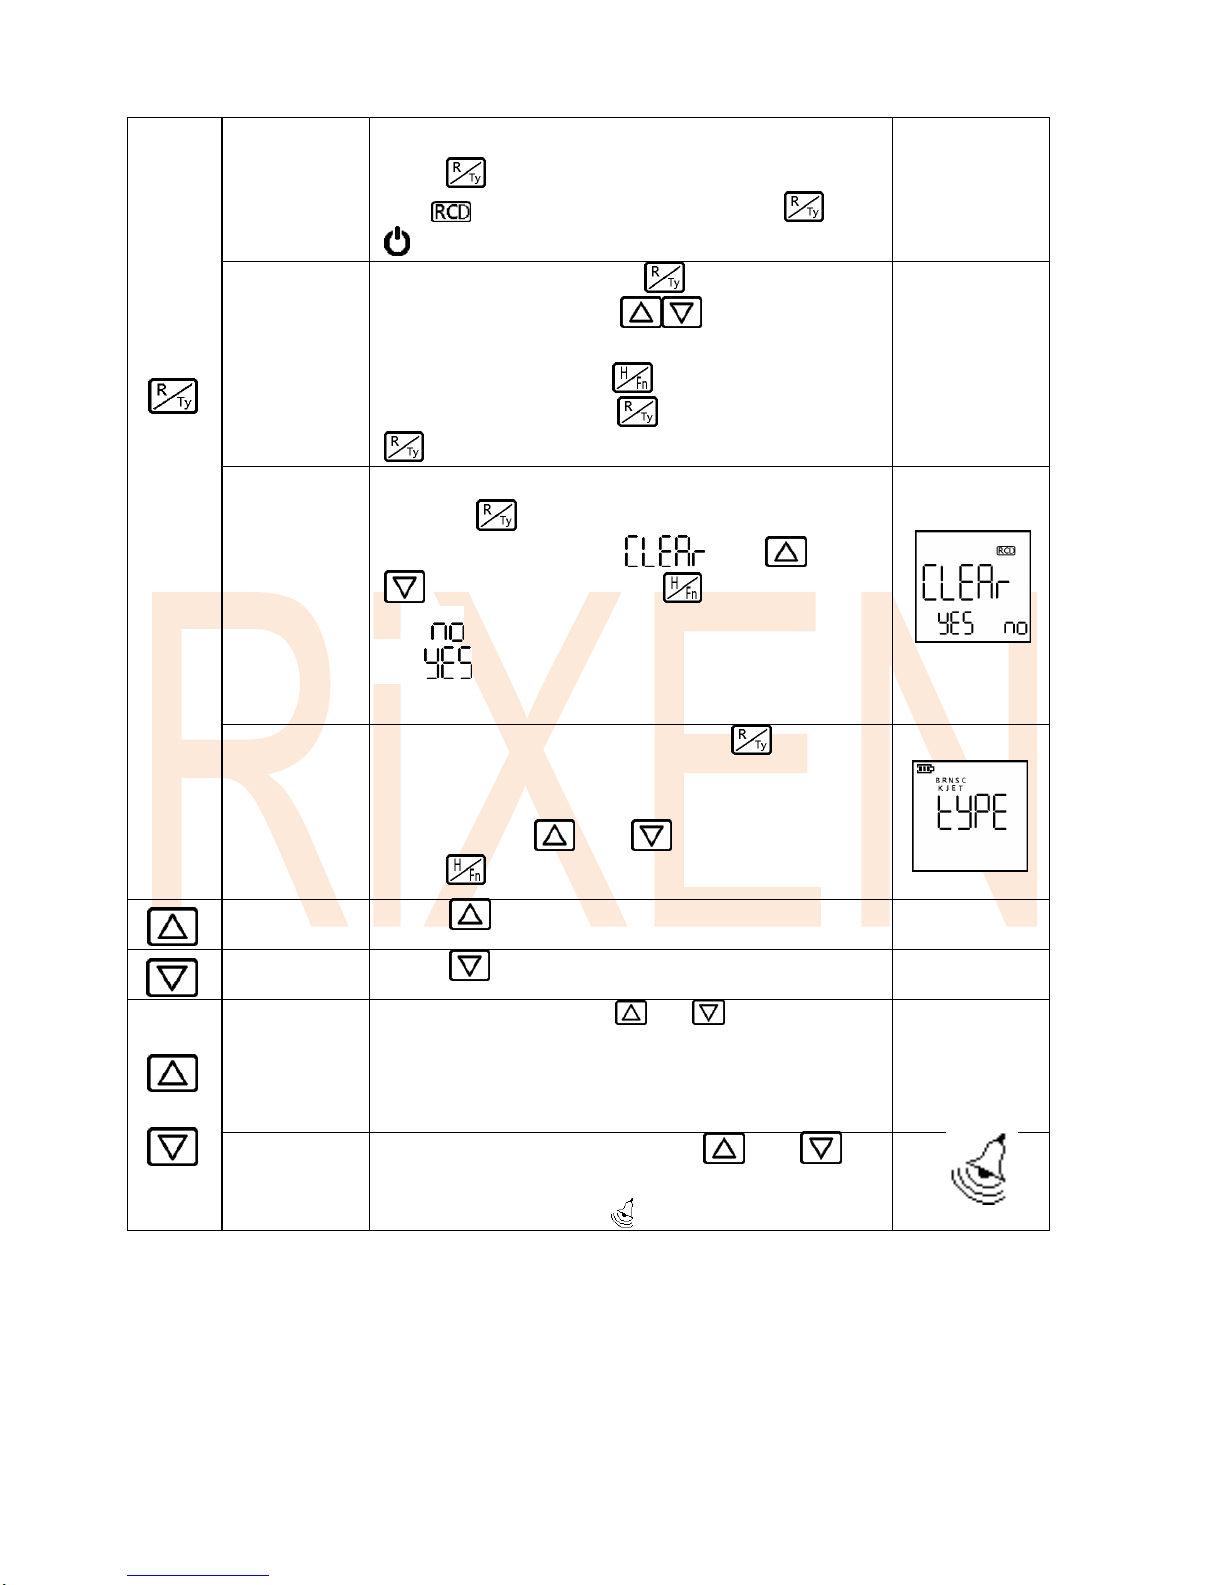
RCD
Recode
mode
Under testing mode, and there is no recording data,
press to enter RCD record mode.
The will flashes when record. Press or
to stop recording.
RCD
Reading
mode
Under testing mode, press to into the data
reading hold mode. Use to switch the
displayed record value; long press the can switch
quickly. Press and hold can switch 100
readings at once. Press to exit. Press and hold
can switch to the RCD clear mode.
RCD
Clear mode
Under RCD reading mode or RCD hold mode, press
and hold two seconds to entering the RCD
Clear mode. It will display . Use and
to select options, press to confirm.
The twinkled means not to clear the data, and
the twinkled means to clear the data. It needs
7 to 10 seconds when processing this instruction.
Thermocouple
switch mode
Under testing mode, press and hold more than
two seconds to entering the thermocouple switch
modes when the 9 type of thermocouple are
displayed. Use and to select options,
press to confirm.
Change the
value
Press in any mode to change the values
--
Change the
value
Press in any mode to change the values
--
+
turn on
back light
Under any mode, press and simultaneously,
the back light will be turned on.
Note:When the battery power is under 25%,the LED
back light will not be able to function.
turn on
buzzer (2S)
Under any mode, press and hold and
simultaneously more then 2 seconds. The buzzer
will be turned on when appeared.
-5-

■Instructions
A. Testing Mode:
Press and to switch display conditions.
In the testing mode, the display content as below:
Status
Display contents
Normal conditions
Probe condition, Probe type, warning data condition,
Power indication
T1 Real-time
Temperature display
AreaA: T1 Measuring data value
Area B: High point alert data
Area C: Low point alert data
T2 Real-time
Temperature display
AreaA: T2 Measuring data value
Area B: High point alert data
Area C: Low point alert data
T1-T2 Real-time
Temperature display
AreaA: T1-T2 Temp. data
Area B: T1 Measuring data value
Area C: T2 Measuring data value
Time and Date display
AreaA: Year
Area B: Month, day
Area C: Hour, minute
※Warning alert
When the temperature is higher than the HI.A, the HI.A symbol will flash.
When the temperature is lower than the LO.A,the LO.A symbol will flash.
The buzzer will make the warning sound if is turned on.
※Please let go off all keys, while waiting for the reading test mode and setting mode to
return to the testing mode.
T1 Real-time temperature display
T2 Real-time temperature display
T1 and T2 Real-time temperature display
Time and Date display
-6-

B.RCD Record mode:
※Please use the AC Adaptor when you need to record for a long time
Under testing mode, press into the record mode, It will show the
sampling rate before starting record. Under the record mode press
and can switch the display, the will flashed when recording.
T1 and T2 will show the number of records with the present time, Press
Or to stop record. The will be displayed when there are log data in
the internal. The screen will shown FULL when the amount of record are full.
Press or to exit. Alarm function cannot be switched on the record mode.
Status
Display contents
Normal conditions
Probe condition, Probe type, warning data condition,
Power indication
T1 Real-time
Temperature display
AreaA: T1 Measuring data value
Area B: Reading Record
Area C: Current time
T2 Real-time
Temperature display
AreaA: T2 Measuring data value
Area B: Reading Record
Area C: Current time
T1-T2 Real-time
Temperature display
AreaA: T1-T2 Temp. data
Area B: T1 Measuring data value
Area C: T2 Measuring data value
Time and Date display
AreaA: Year
Area B: Month, day
Area C: Hour, minute
C. Thermocouple switch mode:
Under the testing mode, press and hold more than two seconds.
Entering the thermocouple switch mode when appeared, press
and to switching the type, press to finish the switch.
-7-

D.Hold Mode:
In lock mode, display content as description below:
E. RCD Reading Mode:
Under the testing mode, press to enter the RCD clear mode. Use and to
switch the displayed record value. Press the again can back to the testing mode.
Press and hold the and can speed us the switch. Press and hold than
press the and can switch 100 readings at once. Press for 2 seconds to
switch to the RCD clear mode.
Display content
Description (Area A)
T1-HOLD display
Hold the T1 temperature data
T1-MAX display
T1 maximum temperature data
T1-MIN display
T1 minimum temperature data
T1-AVG display
T1 average temperature data
T2-HOLD display
Hold the T2 temperature data
T2-MAX display
T2 maximum temperature data
T2-MIN display
T2 minimum temperature data
T2-AVG display
T2 average temperature data
Under testing mode, press to enter the
reading hold mode, Use and to switch
the T1 and T2 values, press again to return to
the testing mode. If there are data log in internal,
the record will show the maximum, minimum,
average. Press and hold two seconds to entering
the RCD clear mode.
-8-
F. RCD Clear Mode:
Under the RCD reading mode or the hold mode, press and hold to enter
the RCD clear mode. Then will be displayed. Press and to
select and use to confirm. The twinkled means not to clear the data,
and the twinkled means to clear the data. When clearing the data,
the will twinkled, please waiting for the –below disappeared.
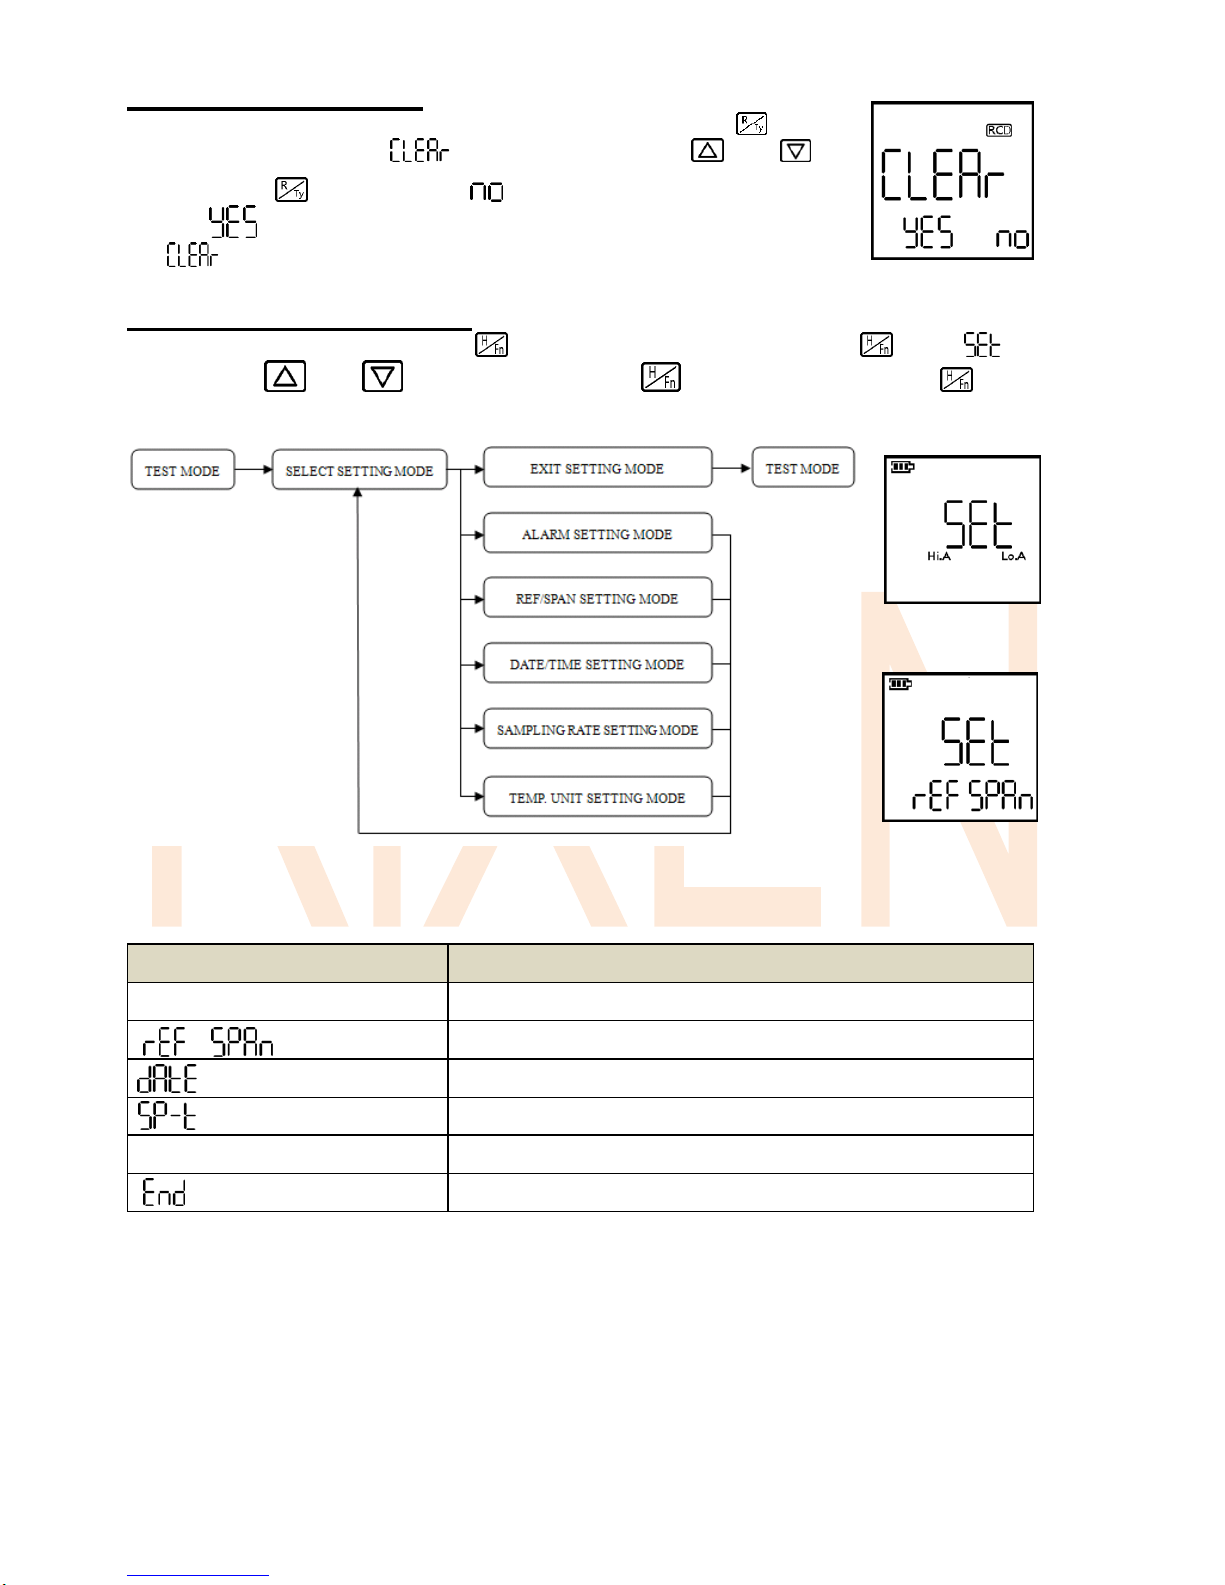
G.Select Setting Mode:
Under testing mode, press and hold for more than two seconds, release when
appears, Use and to select options, press to enter that mode. Press again
can exit.
Select the setting mode to view the content as described below:
Display content
Description
Hi.A Lo.A
Enter the alarm setting mode
Enter the REF/SPAN setting mode
Enter the DATE/TIME setting mode
Enter the sampling rate setting mode
℃℉
Enter the temperature unit setting mode
Exit the setting mode
-8--9-

Setting mode instructions
1. Alarm setting mode
This mode is for setting the Hi.A and Lo.A, press to change the digit you
want to change, and press and to select the circulation figures from 0
to 9. It’s thousands of bits can be switched to the negative sign. Press to
confirm the setting. Setting range: 2300 ℃~ -220 ℃(4172 ℉~ -364 ℉)
2. REF/SPAN setting mode
This mode is for setting the REF and SPAN, press to change the digit you
want to change, and press and to select the circulation figures from 0
to 9. it's thousands of bits can be switched to the negative sign. Press to
confirm the setting. REF setting range: 100.0℃~ -100.0 ℃(180.0℉~ -180.0℉);
SPAN setting range: 200.00%~ 0.00%
3. DATE/TIME setting mode
This mode is for setting the date and time, press to change the digit you
want to change, and press and to select the circulation figures. Press
and hold and can accelerate switching. The number of seconds
cannot be set, the maximum of year is set to 2099. Press to confirm the
setting.
4. Sampling rate setting mode
This mode is use to setting the sampling rate, press and to switch the
rate. Display format: hour- min: sec; Press to confirm the setting.
Sampling rate setting: 2 seconds, 5 seconds, 10 seconds, 20 seconds,
30 seconds, 1 minute, 2 minutes, 5 minutes, 10 minutes, 30 minutes,
1 hour, 2 hours
5. Temperature unit setting mode
This mode is for setting the temperature unit, press and to switch the
unit. Press to confirm the setting.
6. Exit the setting mode
Use this option when you finish your setting.
-10-

■ RS-232 Transmission Agreements
※Please connect theAC Adaptor if it required a long time to transfer the data.
RS-232 is for one-way data transfer, receive and input the signal by three
grounded wires. Recommending using the transmission line which is
manufacture by OE factory or shorter than 10 meters of cable to connect the
computer and the instrument.
Transfer rate: 57600
Transfer Status: /8 / N / 1
Transmission Content: (8 BIT)
Read instructions: by function 03H (Read Holding Registers)
Modbus RTU CRC16 check
A. Request Data Frame
Ex: Read the data from address 00h (Read 1-byte of data from address 0000H)
Slave
address
Function
Starting
address
Hi
Starting
address
Lo
No. of
Word
Hi
No. of
Word
Lo
CRC
Lo
CRC
Hi
03H
03H
00H
00H
00H
01H
85H
E8H
Response Data Frame Ex: response data 2-Byte = 0x109D
Slave
address
Functio
n
Byte
count
Data
Hi
Data
Lo
CRC
Lo
CRC
Hi
03H
03H
02H
10H
9DH
0DH
EDH
0x109D=4253,actual value =(Data-4000)/10=25.3
B. Request Data Frame
Ex: Read the data from address 00h (Read 2-byte of data from address 0000H)
Slave
address
Function
Starting
address
Hi
Starting
address
Lo
No. of
Word
Hi
No. of
Word
Lo
CRC
Lo
CRC
Hi
03H
03H
00H
00H
00H
02H
C5H
E9H
Response Data Frame Ex. response data 4-Byte =0x109C and 0x109D
Slave
address
Function
Byte
count
Data(1)
Hi
Data(1)
Lo
03H
03H
04H
10H
9CH
Data(2)
Hi
Data (2) Lo
CRC
Lo
CRC
Hi
10H
9DH
D1H
74H
0x109C=4252,actual value =(Data-4000)/10=25.2
0x109D=4253,actual value = (Data-4000)/10=25.3
-11-

C. Request Data Frame
Ex: Read the data from address 02h (Read 5-byte of data from address 0002H)
Slave
address
Function
Starting
address
Hi
Starting
address
Lo
No. of
Word
Hi
No. of
Word
Lo
CRC
Lo
CRC
Hi
03H
03H
00H
02H
00H
05H
25H
EBH
Response Data Frame Ex. response data =10-byte
Slave
address
Function
Byte
count
Data(1)
Hi
Data(1)
Lo
Data(2)
Hi
Data
(2) Lo
03H
03H
0AH
08H
FCH
FFH
24H
Data(3)
Hi
Data (3)
Lo
Data(4)
Hi
Data (4)
Lo
Data(5)
Hi
Data(5)
Lo
CRC
Lo
CRC
Hi
08H
FCH
FFH
24H
00H
01H
38H
9FH
Data(1) =T1-Hi.A 0x08FC=2300
Data(2) =T1-Lo.A 0xFF24=-220
Data(3) =T2-Hi.A 0x08FC=2300
Data(4) =T2-Lo.A 0xFF24=-220
Data(5) Hi and Data(5) Lo of MOD = 0x0001
1. Data(5) Hi =Thermocouple type >>> Value=0 represent K type thermocouple
2. Data(5) Lo bit 05=℉/℃Judgment >>> Value =0 represent ℃
>>> Value =1 represent ℉
3. Data(5) Lo bit 04 No value
4. Data(5) Lo bit 03=T2-Error judgment >>> Value =1 represent T2-Error
5. Data(5) Lo bit 02=T1-Error judgment >>> Value =1 represent T1-Error
6. Data(5) Lo bit 01~00=Power gauge >>> Value =1 represent battery power of
50~25%
-12-

【Example】Set mode:
1. K Type thermocouple
2. Temperature unit=℃
3. T1 no ERROR
4. T2 no ERROR
5. Power74~50%
MOD setting mode
0= K Type thermocouple, 1= J Type thermocouple, 2= E Type thermocouple,
3= T Type thermocouple, 4= B Type thermocouple, 5=R Type thermocouple,
6=N Type thermocouple, 7= S Type thermocouple, 8= C Type thermocouple.
Bit 07
Bit 06
Bit 05
Bit 04
Bit 03
Bit 02
Bit 01~ Bit
00
X
X
℉=1
℃=0
X
T2
Error=1
T1
Error=1
Power
☆Power Meter is divided into 4 parts 11=100~75% 10=74~50%
01=49~25% 00=24~0%
Interpretation of data:
The data value read only observed in the real-time testing mode
The actual value of T1-real-time and T2-real-time is (Data-4000) / 10
The actual value of T1-Hi.A, T1-Lo.A, T2-Hi.A, and T2-Lo.A is read data value
Address/ Data name Comparison Table
Address
Data name
0000h
T1 Real-Time Data
0001h
T2 Real-Time Data
0002h
T1 Hi.A
0003h
T1 Lo.A
0004h
T2 Hi.A
0005h
T2 Lo.A
0006h
T1 T2 status (Type, ℃/℉,Battery)
0007h
Record amount
-13-

D. Cable illustrated
■ Precautions
1. This instrument has a waterproof function; please do not use it in a high temperature
environment or with corrosive materials to avoid leakage or damage.
2. Proposed to use the company's original signal cable (sold separately) to avoid the
instrument inability to communicate to computer.
3. If you want to get a more accurate measurement value, keep a moment to let the
temperature uniform and steady when measuring.
4. When the instrument shows power shortages, please replace the battery immediately.
5. When the device will not be used in a long time, please set the device and all accessories
into the protective case, stored in a dry place, and avoid exposure to sunlight directly.
6. If there are any operation questions or malfunction, please contact your local distributor or
our service department.
-14-

MEMO
------------------------------------------------------------------
-------------------------------------------------------------------
-------------------------------------------------------------------
-------------------------------------------------------------------
-------------------------------------------------------------------
-------------------------------------------------------------------
-------------------------------------------------------------------
-------------------------------------------------------------------
-------------------------------------------------------------------
-------------------------------------------------------------------
-------------------------------------------------------------------
-------------------------------------------------------------------
Table of contents
Popular Other manuals by other brands


Kalamazoo
Kalamazoo KAL-OL-MB180 brochure

Panasonic
Panasonic TY-FB7SD operating instructions

Painless Performance Products
Painless Performance Products 20110 installation instructions

ZKTeco
ZKTeco PB3000 Series user manual

HID Corporation
HID Corporation MIFARE WIEGAND READER 6074A installation manual

Aquadistri
Aquadistri IQ40 Reef Warranty and manual

Fluval
Fluval SPEC Quick start up guide

Costalab
Costalab Natural Drive MKII quick start guide

Endress+Hauser
Endress+Hauser SOP300 operating instructions

Aquadistri
Aquadistri SuperFish Mini Waterfall Pond Instructions for use

Ferplast
Ferplast DUBAI user manual

ReelCraft
ReelCraft 5005 Series operating instructions