RNIB PenFriend DL76 Operating and maintenance instructions

PenFriend audio labeller
DL76
Please retain these instructions for future reference.
Contents
1. General description................................................................................. 1
1.1 Items supplied with the PenFriend........................................................ 2
1.2 Orientation ........................................................................................... 2
1.3 Controls and other features.................................................................. 2
2. Getting started......................................................................................... 3
2.1 Turning on the pen............................................................................... 3
2.2 PenFriend storage box and audio instruction hot spots........................ 3
2.3 Demonstration video about PenFriend................................................. 4
2.4 Volume................................................................................................. 4
2.5 Recording............................................................................................. 4
2.6 Listening to your recording................................................................... 5
2.7 Battery insertion and removal............................................................... 5
2.8 Lanyard................................................................................................ 6
2.9 Additional label packs........................................................................... 6
3. Advanced Features.................................................................................. 7
3.1 Mode button......................................................................................... 7
3.2 Backup................................................................................................. 7
3.3 Download - site in development - not currently available...................... 8
4. Terms and conditions of sale ................................................................. 8
4.1 Product regulations .............................................................................. 8
1. General description
Discover the easy way to label items around your home using your own
voice. The handy PenFriend provides unique labels for you to identify items
such as food, letters, CDs and medicines.
The PenFriend audio labeller enables you to easily record, and re-record
information using this versatile, pocket-sized, easy-to-use product. Simply
allocate one of the coded self-adhesive labels and record and store your

2
message on the PenFriend, to instantly playback the recordings hold the
PenFriend over the label - no computer required.
1.1 Items supplied with the PenFriend
1 PenFriend labelling pen
127 mixed size labels (small round, large round, large square)
1 USB cable
1 neck lanyard
2 AAA batteries
1 storage box
1 small cable to convert 2.5mm headphone socket to 3.5mm socket
1.2 Orientation
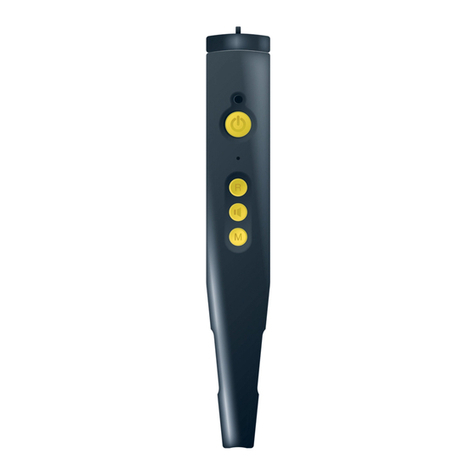
Turn the PenFriend so that the pointed end is downwards and the buttons
facing you. Keep the device in this position for correct identification of the
controls and other features in accordance with the information below.
1.3 Controls and other features
PenFriend's loudspeaker is in the very top protruding section of the device.
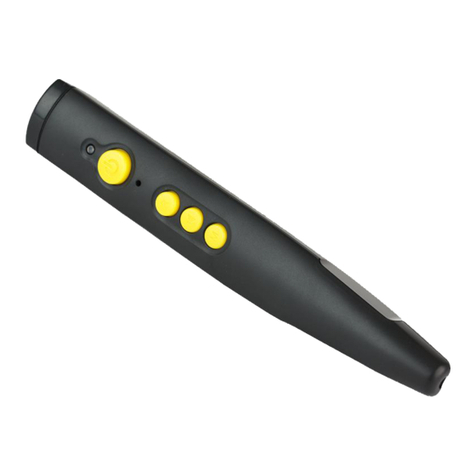
On the front of your PenFriend there are four buttons. Starting from the
top, thickest end they are: the power on/off button; below that is the toggled
volume switch - press the top part to increase the volume and bottom part to
decrease; the next button down is the mode button; below this is a small hole
with a tactile surround where the microphone is situated; the bottom button,
closest to the pointed end of the pen, is the record button.
On the left-hand side towards the top there is a rubberised flap with a
slight protrusion at the top, which is used to pull it open. Under this are three
sockets - from the top downwards they are the headphone, USB and external
microphone sockets. In the packaging there is a small cable to enable the
use of standard microphones and headphones in the top socket.
On the back surface of the PenFriend is the battery compartment (see
section "2.2 Battery insertion and removal" below), and a hole which only
holds a recessed screw and is not used.
On the back of the pen at the top there is a nodule containing two holes
side by side that can be used to attach the supplied lanyard (see section 2.3
for instructions on how to attach the lanyard). The nodule protrudes from the
unit slightly, which ensures the unit does not roll when put down on a flat
surface.

3
2. Getting started
2.1 Turning on the pen
To start the pen, press and hold the power button for two to three seconds -
this is the button nearest the top of the device. You will hear an audible beep.
To switch off, press the same button until you hear a chime. If you do not use
the pen for more than three minutes it will automatically switch off to conserve
battery power, and this is also indicated by a chime.
2.2 PenFriend storage box and audio instruction hot
spots
PenFriend comes in a re-usable plastic box. We recommend that you keep
the box, since it will neatly hold any new set of labels, etc, that you may buy
in the future.
Audio instruction hot spots
If you would prefer to listen to the operating instructions, the packaging also
includes audio instructions preloaded on to 11 “hotspots”, five of which are
small round indentations on the outer-face of the cardboard packaging and
six of which are small raised circles on the back of the cardboard packaging.
Switch your PenFriend on and touch these “hotspots” to hear audio
instructions.
Four of the indented “hotspots” are on the front of the packaging, down the
right-hand side as it faces you (below the cut out for the lanyard nodule).
From top to bottom they contain information on: power, volume, mode and
record.
The fifth indented “hotspot” is in the middle of the left side of the packaging
and contains information about the contents of the box.
To access the raised circular hot spots on the back of the cardboard
packaging, have the outer-face of the packaging towards you with the
indented hot spots on the right-hand side and the raised section at the
bottom, in which the PenFriend sits facing upwards. Pick it up and turn over,
lengthways away from you, so the raised section is now at the top on the
underside.
The six raised hot spots are located on the right-hand side and from top to
bottom they contain information on: saving files, download, batteries, general
information, package contents and other uses for your PenFriend.

4
2.3 Demonstration video about PenFriend
If you have access to a computer and the internet you can find a short
demonstration video about PenFriend on YouTube.com, simply type "RNIB
Penfriend" into the YouTube search field.
2.4 Volume
The second button from the top is volume up/down. The upper part of the
button increases the volume and the lower part decreases it. Click repeatedly
until you reach the desired volume. When you switch the pen off the volume
settings will return to the level you previously set.
2.5 Recording
The fourth button, which is nearest to the pointed end of your PenFriend,
allows you to make voice recordings to be associated with the supplied self-
adhesive labels.
Press and hold down the record button, and with the pen in an upright
position, briefly touch any PenFriend label. You will hear a beep, and then
you can start recording your voice. Remember to keep holding the record
button down while you speak. When you have finished, release the record
button and your recording is automatically saved on to your PenFriend. To
play it back at any time, just briefly touch the label with the point of the
PenFriend, again with the device in an upright position.
This is best explained by making a practice recording - either use the practice
label situated on the top right-hand side of the cardboard packaging (above
the cut out for the lanyard nodule) or any of the supplied labels. Each time
you power on the PenFriend it automatically starts in the correct mode for
recording or finding labels.
Having powered on, select a label from those supplied. Press the record
button and keep it held down, then with the pen in an upright position briefly
touch the label with the point, and when you hear a beep, speak a message
to be associated with that label. Release the button when you have finished
speaking.
Once you have heard the beep you no longer have to keep the PenFriend
touching the label, but remember to keep the record button pressed until you
have finished speaking.
When making your recording, bring the pen about 30cm or 12 inches from
your mouth. The microphone is in the small hole with a tactile surround

5
between the mode and record buttons. You may need to experiment to find
the right distance for you.
Remember the sequence for recording labels: Press and hold record,
touch, beep, speak, release.
2.6 Listening to your recording
Without pressing any of the buttons and with PenFriend in an upright position,
touch the label with the point and your message will be played back. If you
have recorded a long message and wish to stop the playback, briefly press
the record button. This will stop the message but will not delete any of the
recording.
Each time you power on the PenFriend it automatically starts in the correct
mode for making recordings or playing back messages that you have already
recorded. Having powered on, to hear any label you have recorded, simply
touch it with the tip of the PenFriend.
Reusing labels
You can practice the recording procedure either by reusing the same label (all
the labels are reusable) or with other supplied labels. If you reuse the label,
the previous recording will automatically be deleted from the PenFriend's
memory when you make the new recording.
Recording length
There is no limit to the length of individual recordings, so they can be used for
short messages as well as long. The internal memory is 1GB which allows
up to 70 hours of recording.
2.7 Battery insertion and removal
PenFriend comes with two AAA batteries installed. Replacement batteries
are available from RNIB (product code CP05). Please note: RNIB does not
guarantee batteries.
Your recordings will not be affected when replacing the batteries.
Removing the battery cover
When you need to change the batteries first locate the battery cover on the
rear surface of the unit. Working your way up from the nib of the pen, you will
come across three small tactile lines, followed by a semi-circular recess,
above this is the battery cover. Insert your thumb into the recess and gently
push and lift up to remove the cover.

6
Inserting new batteries
Remove the spent batteries and insert the new ones, taking care that the
terminals are the correct way round. Feel for the spring in the battery
compartment, since this will indicate where the negative terminal, or flat end
of the battery, should be positioned.
If you insert the batteries the wrong way round, no damage will be done but
the pen will not start.
Replacing the battery cover
Replace the battery cover, by inserting the small nodule at the top of the
cover into the hole at the top of the battery compartment then push the cover
down, you will hear a click when it is in place.
Automatic shut down
To save on battery life, your PenFriend switches off if not in use after three
minutes. It will give an audible tone to notify you. If you use headphones (via
the uppermost of the three sockets under the flap on the left-hand side of
PenFriend), then battery life is maximised, by not using the speaker.
Batteries low warning
PenFriend has an audible battery low alert. This is a different audible tone
than you hear when the unit powers down when not in use for three minutes.
2.8 Lanyard
To affix the neck lanyard, which is included in the pack, thread the lanyard
through the two small holes at the top rear of the pen. This is the protruding
block that also stops the pen from rolling when put on a flat surface. Insert
the end of the lanyard in one side and hook out using a ballpoint pen or
similar.
2.9 Additional label packs
There are additional packs of labels available separately to the sample labels
supplied with your PenFriend. Each pack is unique and Pack A (DL77) has
380 additional labels with Pack B containing another 380 labels. This means
that if you have the first pack (Pack A) you will need to purchase the next
pack (Pack B) in sequence to continue with your labelling. Further additional
packs (C, D, etc) will be introduced into the range.

7
3. Advanced Features
3.1 Mode button
The third button down is the Mode button, which is used to switch the pen
between different functions.
Recording mode
When you first power on the pen it is in the recording mode. In this setting
you can record, store and play back voice recordings to be used in the
PenFriend's labelling function. This is fully explained in section 3.1.
Print setting
After switch on, if you press and hold the Mode button for two seconds, you
will hear two beeps to confirm that you have moved to the “print” setting. This
setting allows you to listen to pre-recorded information from RNIB which is
currently in development (see section 4.3 for further details).
MP3 setting
If you then press and hold the mode button again, you will hear three beeps.
Now you are in the MP3 setting. In this mode the PenFriend functions as an
MP3 player and you can listen to your own music, which you can transfer to
the pen using the USB port and a computer. If there is no MP3 content on
the PenFriend it will chime and automatically go back to record mode.
Pressing and holding the mode button again will take PenFriend back round
to the recording setting, with a single confirmatory beep.
Note: If at any time you are uncertain which mode the PenFriend is
currently set to, simply press and hold the mode button, remembering
for each press and hold, that one beep indicates the recording/labelling
mode, two beeps the print/information mode and three beeps the MP3
mode.
3.2 Backup
If you have access to a computer you can backup your recordings. To do so,
connect PenFriend to the computer using the USB cable supplied. Your
computer will show that a new drive called PenFriend has been detected.
Open the drive and you will find three folders listed: AP4, REC and MP3. To
take a backup of your recording, copy the REC folder and paste it in to a new
folder, for example c:\penfriend. To restore the recordings from your
computer to the PenFriend simply copy the REC folder back to the PenFriend
drive. Always remember to copy files and not to move them.

8
3.3 Download - site in development - not currently
available
RNIB are developing some associated products that contain pre-recordings
which will be available to download in the future. Future product releases will
be announced at www.rnib.org.uk/penfriend
4. Terms and conditions of sale
All goods are guaranteed against faults for 12 months from date of invoice.
You should advise your retailer of any faults at your earliest convenience.
For more information on PenFriend related products or technical queries
please contact RNIB’s International team at
RNIB
PO Box 173
Peterborough PE2 6WS
United Kingdom
Telephone: +44 (0) 1733 37 5400
Export direct fax: +44 (0) 1733 23 8541
Email: exports@rnib.org.uk
Email: shop@rnib.org.uk
RNIB website: rnib.org.uk
Registered charity No. 226227
4.1 Product regulations
This product is CE marked to meet requirements in Europe.
The materials, components, and assemblies in this product comply with 'The
Restriction of the Use of Certain Hazardous Substances in Electrical and
Electronic Equipment Regulations 2006' (RoHS).
Compiled July 2009, revised August 2009.
Table of contents
Other RNIB Label Maker manuals
