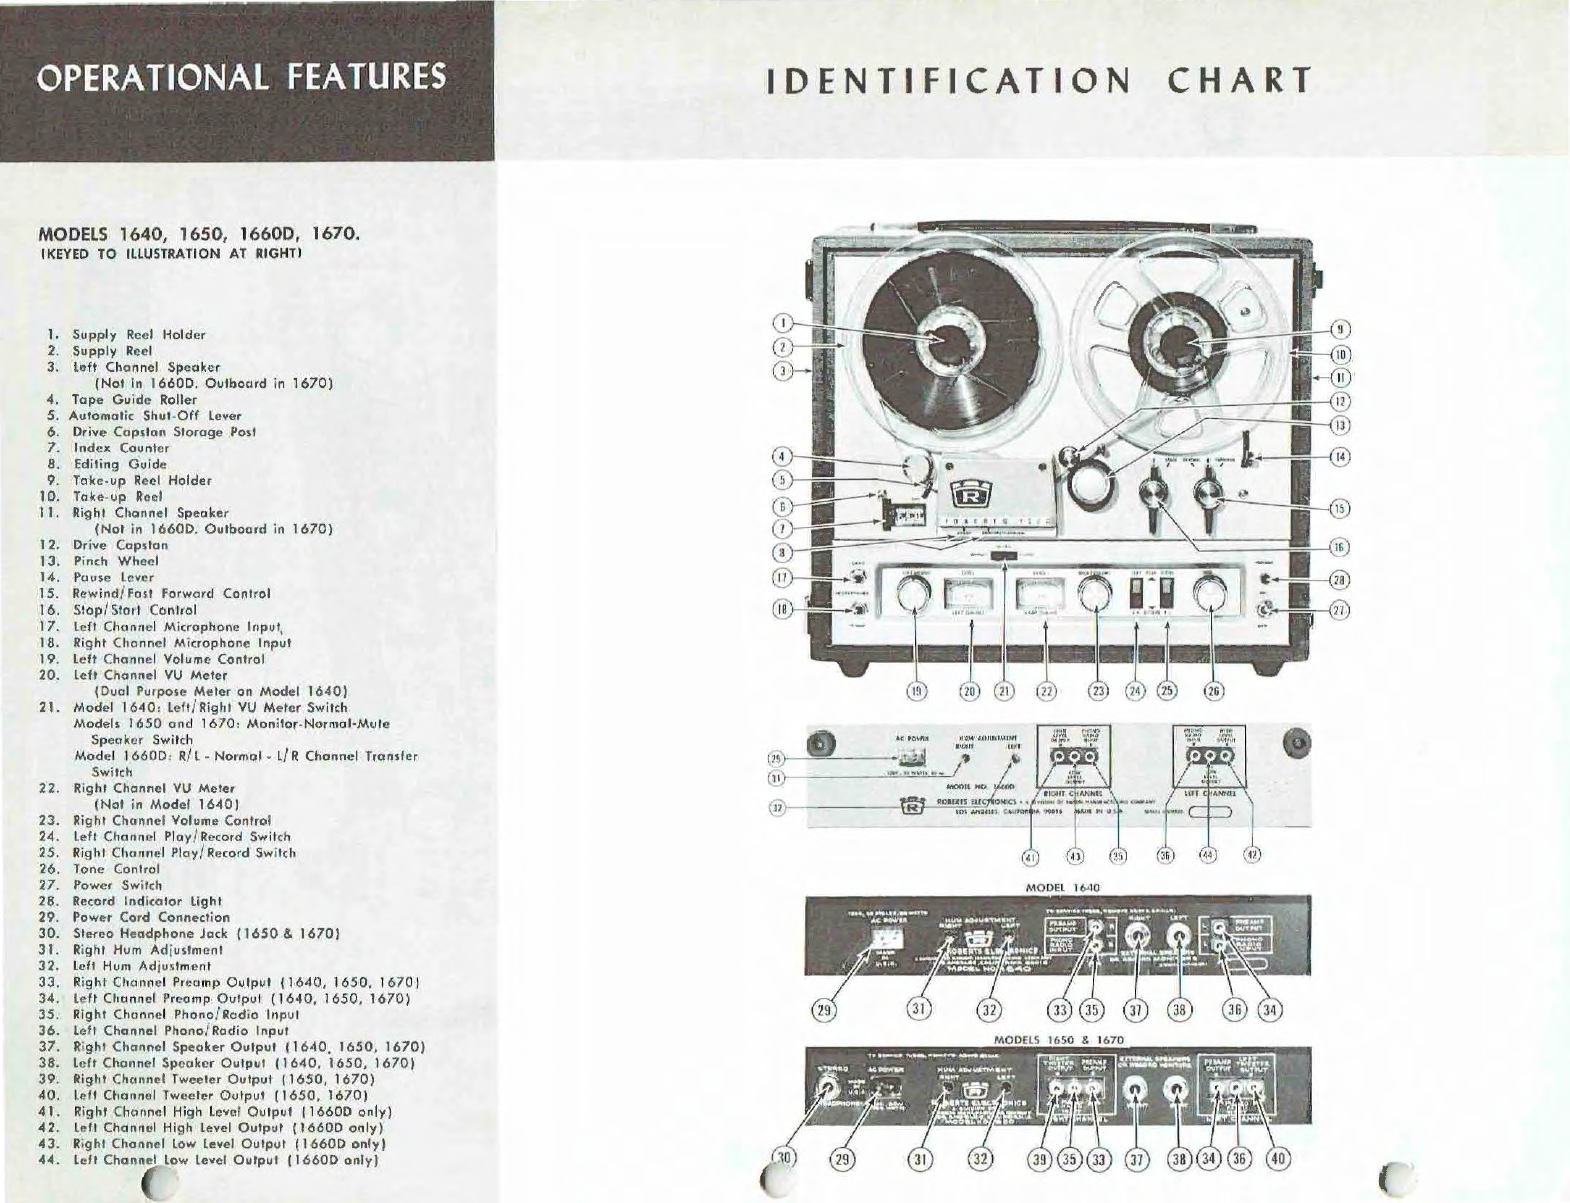
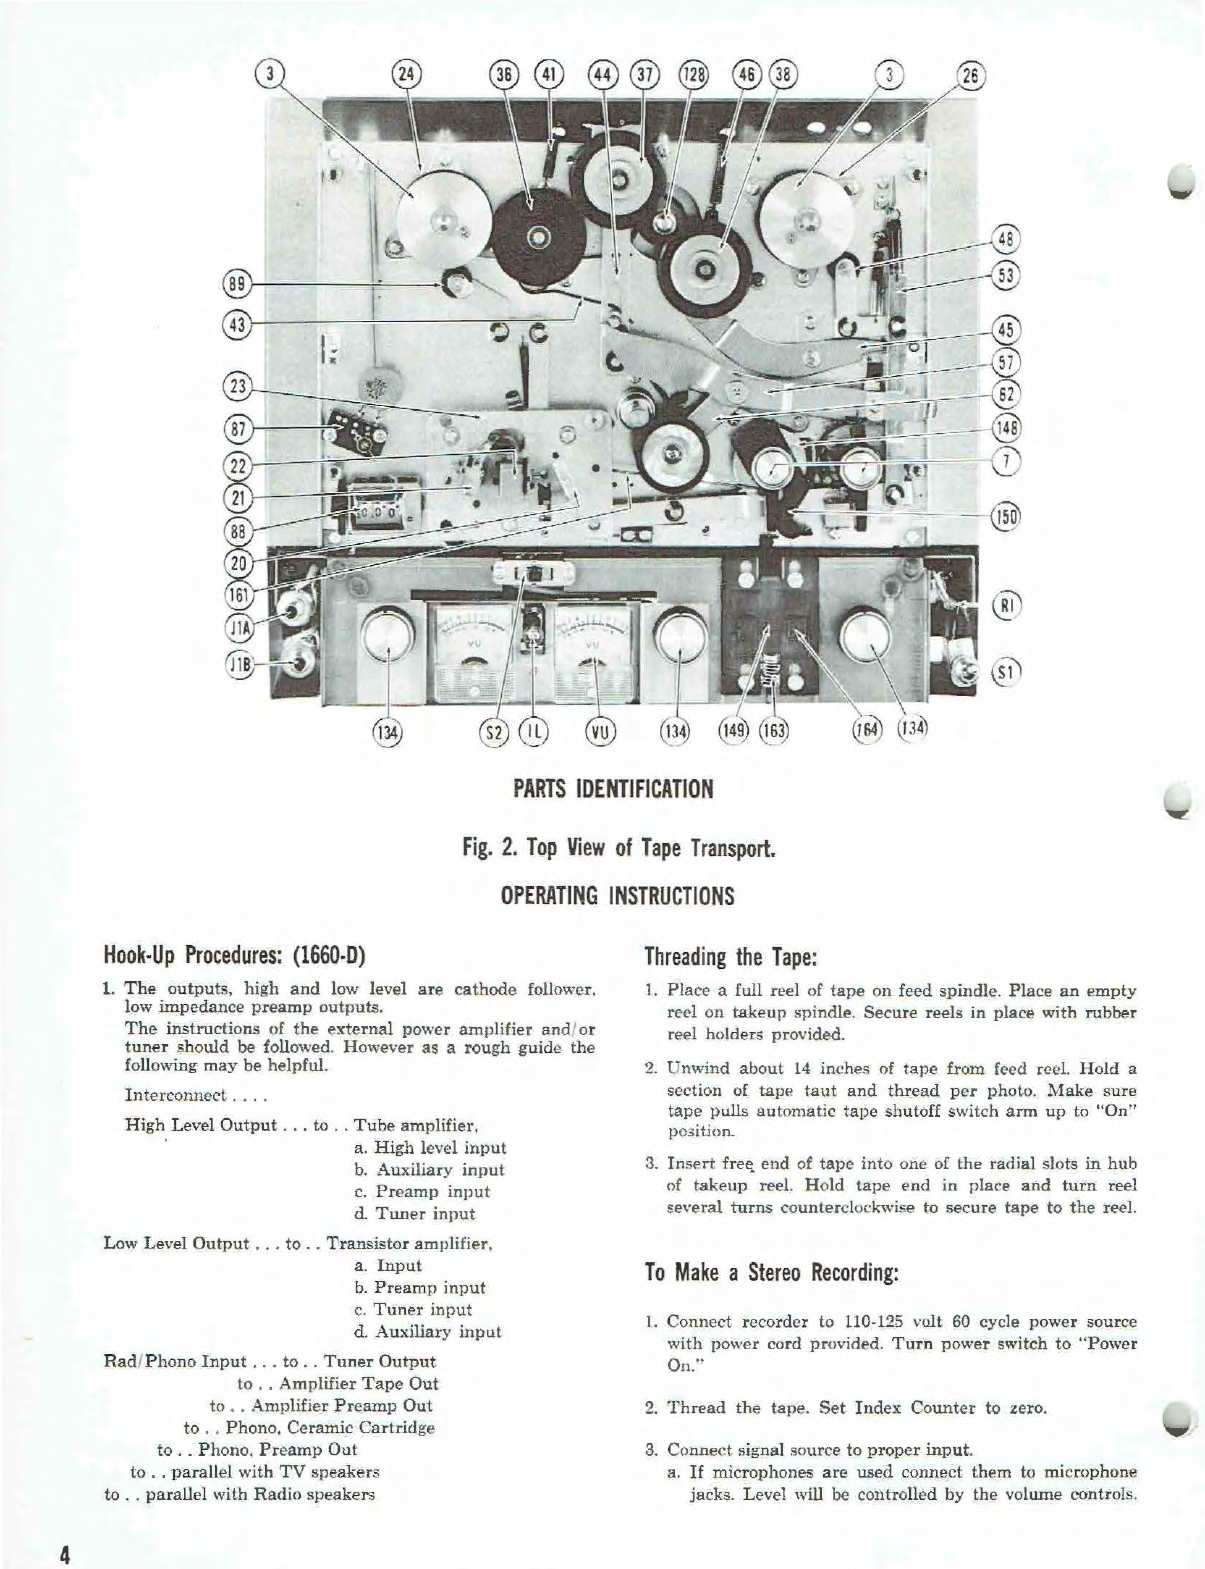
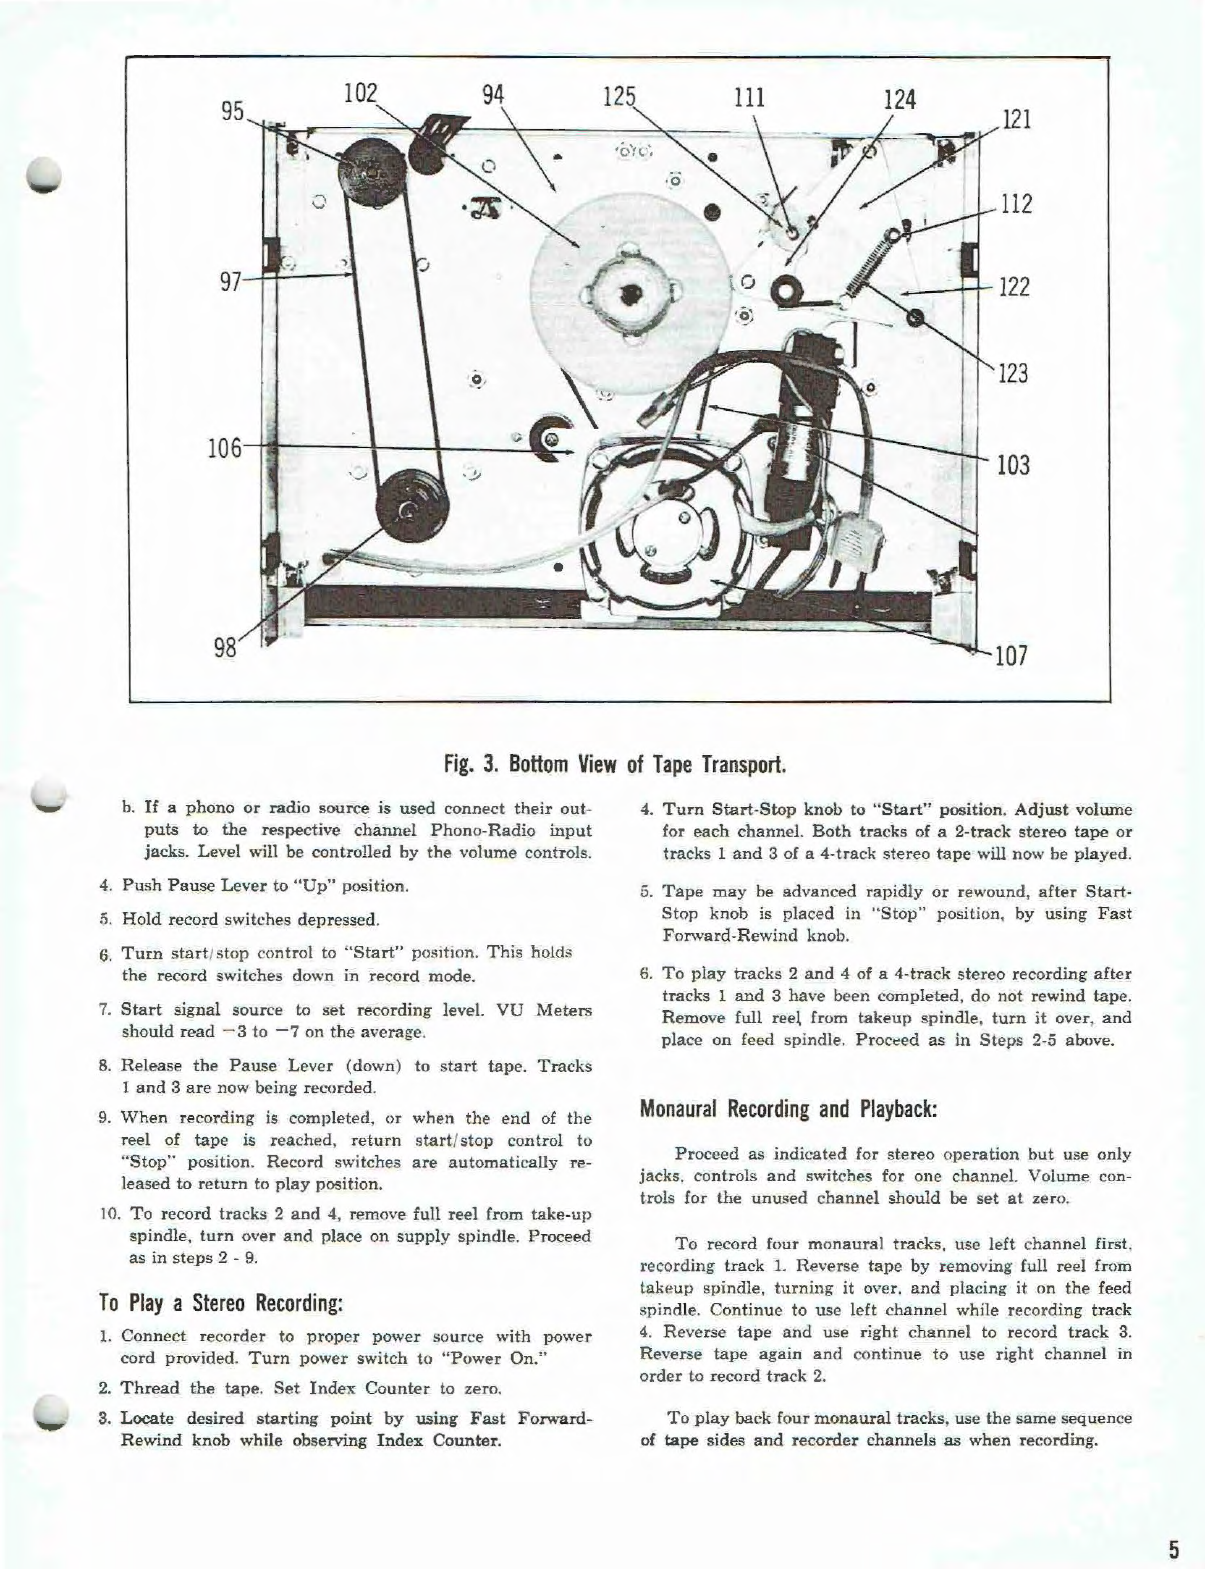
Roberts 1640 User manual

SERVICE
MANUAL
1B40-1B50-1BBDD-1B70
TAPE
RECORDERS
~
·
_;.
,,
~··
IMJ
$2.50

MODELS
1640,
1650,
1
6600,
1
670.
!KEYED
TO
ILLUSTRATION AT RIGHT!
1.
Supp
ly
Re
el
Hol
der
2.
Suppl
y Reel
3.
l e
ft
Chan
n
el
Spco~cr
(Not
in
1660D.
Ou
t
board
In
1670)
4.
Tope
Guide
Roller
5.
Automa
ti
c Shut-
Off
l
ever
6.
Drive
Cop1tan
S
tora
ge
Post
7. I
ndex
Count
er
8.
Editing
Guide
9. Ta
ke
-
up
R
eel
Ho
ld
er
I0. Toke-
up
Reel
I I . Right
((ronne
l S
peak
er
(Not
in
1660D.
Ou
tb
oa
rd
in
1
670)
12.
Drive
Capst
an
13. Pi
nc
h
Wheel
14.
Pau>e
leve
r
15
.
R
ewi~d
/
Fasl Fo
rwar
d Co
ntro
l
16.
Stop
/ Storl Co
n1
ro
l
17. l e
ft
Channel
Miaophonc
Inpu
t,
18.
Ri
ght
Cha
nn
el
Microphone
I
npu
t
19. l e
ft
Channel
Volume
C
on
trol
20.
le
ft C
hann
el VU
Meter
(Oual
Purpose
Me
t
er
on
Madel
1640)
21.
Modl!l
1
640
: le
ft
/ Rig
hi
VU Me
ier
S
wit
ch
Model.
1650
an
d 1
670
: Mo
nilor
-
Norma
i·
Mul
e
Speqkcr
Switch
Mod
el
1660D:
R/ l - NOI'I!IOI • l / R
Channe
l
Tr
ansfer
Sw
it
ch
22
. Right
Channe
l VU
Meter
(N
ot
in
Mo
d
el
1
640
)
23
.
Ri
gh
t
Channel
Vo
lume
Control
24. L
ef
t
Channe
l Play/ Record Sw
it
ch
25. Right Ch
anne
l
Ploy/
Record Sw
it
ch
26.
Ton
e Control
27
. Power Switch
28
. Record I
ndicator
li
gh
t
29
. Power
Cord
Conn
ectio
n
30
. St
ereo
He
adphone
J
ock
(
1650
&
16
70
J
31. Right Hum
Ad
justment
32.
l
eft
Hum
Adjustmen
t
33.
R
ight
ChoM cl Preornp Ou
tp
ut ( 164
0,
1650
,
1670
I
34.
l
C!
ft
Chonnel
Pr,omp
Outpu
t (
164
0,
1650
, 1
670)
35
.
Right
Channe
l Phono/ R
od
io
Inp
ut
36.
l
ei
I C
hann
el
PhonofRadio
In
put
37
. Ri
ghi
Cha
nn
el
Speaker
Output
(I
6
40
.
1650,
1670)
38.
Left
Channel
Sp
eake
r
Output
(
1640,
1650
,
1670)
39
. Right Channel
Tw
eeter
Oulpul
(
1650,
1670)
4
0.
Loll
C
hann
el TwDet
cr
Ou
t
put
(16
50,
1
670)
4 1. R
ig
hi
Cho nnol
High
Levol
Ou
t
put
II660D
on
l
y)
4 2. l
ei
I
Cllonnol
Hi
gh
Level
Ou
tp
ut (
1660D
o
nl
y)
43.
Ri
ghi
Channel
Low Level
Output
( 1
660
0 onl
y)
44
. l
ell
C
honn
al l
ow
level
Ou
tp
ut (
1660D
onl
y)
IDENTIFICATION
CHART
Ll
V)-
--"'~-
-
-,
{ll)
l--
--
-
-=-==='-'

FUNCTIONS
OF
CONTROLS
Power
Switch:
Moving
Lhe
power
switch
to
the
·'
ON
"
posilion
applies
power
to
the
motor
and
amplifier.
In
the
"
OFF
" position,
power
is
cut
off
to
the
entire
unit
.
Volume:
A
separate
volume
control is
provided
for
each
channel.
The
volume
control
varies
the
playback
vol
ume,
and
the
record
level
when
making
a recording.
Tone:
The
tone
control
setting
determines
the
[re
guency
r
e-
sponse
of both amplifiers.
Tone
controls do nut. work
during
record.
VU
Meters:
The
VU
Meters
are
used to
monitor
the
record
level
when
recording,
and
to
balance
stereo
play.
Meter
indication
sho
uld
be
between - 3
and
-7
for
best
recording
results.
Record
Switches
:
To
operate,
depress
either
or
both
record
switches,
then
t
urn
the
stop
/
start
conh·ol to
"start.
..
This
holds
the
record
switch
in
record
mode
.
When
the
stop
/
start
control
is retu
rned
to "
stop,
"
the
record
switch
automatically
snaps
back to
play
mode_
Channel
Transfer
Switch:
(1660
-D
)
This
switd1
inte
rnally
tr
ansfers
the
output
of
one
chan-
nel
over
to
the
input
of
the
other
channel.
A
microphone
or
radio
/
phono
addition
is
added
to
the
transfer
receiv-
ing
channel
during
recording.
The
process
may
be r
epeated
back
and
forth
between
c
hann
els
to
make
a
multiple
recording.
Tape
Lifter:
The
tape
lifter
is
under
the
head
cover
and
is
operated
by
the
stop
/
start
control.
When
the
stop
/
start
control
is in
stop
mode
,
the
lifter
pushes
the
tape
away
from
the
h
eads
to pr
event
excessive
wear
du
ring
the
fast
rewind
and
fru;t
forward
oper
ations.
This
also
mules
the
~ound
during
these
modes.
Stop-Start:
Starts
tape
movement
i11
"Play'
' or
"Record"
position.
Stops
tape
mo
vement
when
moved
lo
the
"Stop''
position.
Rewind
-
Fast
Forward:
Fast
Fo
rwa
rd
position
advances
U1e
tape
on
to
the
take-
up
reel
at
a
fast
rate
of speed.
Re
wi
nd
position wi
nds
the
tape
onto
the
feed
reel
at
a
fast
rate
of
speed
.
Pause
Lever:
In
t.he
"Up
' posilion,
pinch
roller
is moved
away
from
capstan,
and
take-up
tor
que
is r
emoved
from
take-up
spin-
dle.
Tape
stops
instantly.
This
permits
an
adjustm
ent
of
the
record
level
without
tape
movement.
\Vhen
lever
is re-
tmned
to
"Down"
position,
the
t
ape
movement
begins.
Index
Counter:
Pr
ovides a
means
of
locating
desired
select
ions
on
a
reel
of
tape
without
skipping
and
h
un
ting
.
Hum
Adjustment
Controls:
On
Lhe
l'
ear
paneL
next
to
lhe
A.C.
Receptacle
are
two
openings,
these
are
the
Right
and
Left
Channel
hum
ad-
justing
Potentiometers.
They
are
screw
driver
adjustment.>.
Without
tape
on
the
unit,
turn
the
volume
up
full
and
ad
-
just
the
cont
rols for
minimum
hum
on
each
ch
ann
el.
Auto-Stop
Switch:
When
tape
holds
the
aut
o-stop
switch
''U
p," the
motor
circuit is
completed
and
the
motor
runs.
If
the
tape
br
ea
ks,
runs
out,
is
of
insufficient
tension,
the
switch
lever fails,
breaking
the
circuit,
shutting
off
the
motor.
IN
PUT
AND
OUTPUT
JACKS
Microphones
:
A
microph
o11e
input
is
provided
for
each
channel.
These
input
jacks
are located on
the
front
panel
to
the
left
of
the
left
cha
nn
el
volume
control.
Note:
When
using
the
P
hone-Radio
inputs,
the
mi-
crophone
plugs
must
be removed from
the
mi-
crophone
jacks.
Phono-Radio
Input:
Each
channel
is
provided
with
a
Phono
-Raclio
input
for
making
direct
rec
o
rdin
gs
from
a radio.
phonograph,
or
tuner.
Th
ese
inputs
are
located
on
the
rear
panel.
Outputs:
1660D .
..
There
are
two
high
and
two low level
preamp
outputs.
each
adjustable
by
the
volume
cont
rols.
These
out-
puts
are
used
to collllect
the
1·ecorcler
playback
system
to
an
external
power
amplifier.
The
output
jacks
are
located
on
the
rear
panel.
The
high
level
outputs
are
used
with
standard
tube
type
amplifiers
that
have
tu_ner,
auxiliar
y
or
othe
r high
level
inputs.
The
low level
outputs
are
for solid
state
amplifiers
.
Te5ts will show
which
is
best
for
each
individual
case.
The
high
and
lo
w level
outputs
are
low
impedance
cath-
ode
follower
outputs
allowing for
lvnger
interconnecting
c.:ables
without
l
ine
losses.
1640
..
. On
the
rear
(Janel
are
two
external
speaker
jacks
and
two
high
impedance
pr
eamp
outputs.
1650 & 1670 . . .
Ha
s
the
same
outputs
as
the
1640,
plus
two
phono
type
jacks
for
extension
speakers
to
work
with
the
internal
speakers.
There
is
also
a
stereophone
jack.
3

4
PARTS
IDENTIFICATION
Fig.
2.
Top
View
of
Tape
Transport.
OPERATING
INSTRUCTIONS
Hook-Up
Procedures:
(1660-D)
1. T
he
outputs,
high
and
low level
ar
e
cathode
follower.
low
impedance
preamp
outputs.
Th
e
instructions
of
the
externa
l
power
amplifier
and
or
t
un
er
should
be
followed.
However
as
a
rou
gh
guide
the
following
may
be
helpful.
I
nterconnecl
..
. .
Hi
gh
l-ev
el
Output
..
. to
..
Tube
amplifier
.
·
a.
Hi
gh
level i
np
ut
b.
Auxillary
input
c.
Preamp
input
d.
Tuner
input
Low
Level
Output
...
to
..
Transis
tor
amplifier.
a.
Input
b.
Preamp
input
c.
Tu
ne
r
input
d.
Auxiliary
input
Rad
/
Ph
ono
I
nput
...
to
..
Tuner
Output
to
..
Amplifier
T
ape
Ou
t
to
..
Amplifier
Pr
eamp
Out
to . . P hono.
Ceramic
Cartridge
to
..
Ph
ono.
Pr
ea
mp
Out
to
..
parall
el w
ith
TV
spe
aker
s
to
..
parallel
wit
h
Radio
speakers
Thread
i
ng
the
Tape:
1.
Place
a full
reel
of
tape
on
feed
spindle.
P
lace
an
empty
re
el
on t.ak
eup
spindle.
Secure
reels
in
place
with
rubber
r
ee
l
holders
provided.
2.
Unwind
aboul
14
inches
of
tape
from
feed r
ed.
H"old a
section
of
tap!'
taut
and
thread
p
er
ph
oto
.
Make
sure
!.ape
pulls
automatic
tape
shutoff
switch
arm
u p
to
"On
"
p
o.>
ition.
3. T
nsPrt
fre~t
end
of
tape
into
one
of
t
he
r
adial
slots
in
hub
of
takeup
reel. Ho
ld
tape
end
in
place
and
turn
r
eel
seve
ral
turns
co
un
terclockwise to
secure
tape
to
the
reel.
To
Make
a
Stereo
Recording:
1.
Connect
reco
rder
to 110-125 volt 60 cycle
po
wer
so
ur
ce
with
power cord provided.
Tur
n power s
witch
to
"
Po
wer
On.''
2.
Thread
the
t.ape.
Set
Index
Counter
to
zero.
3. Co
nn
ect
signal
sou
r
ce
to
proper
input.
a.
If
microphones
ar
e
used
connect
them
to
microphone
jacks. Level will
be
contro
lled
by
the
vo
lum
e c
ontrols
.

Fig.
3.
Bottom
View
of
Tape
Transport.
b.
If
a
phono
or
radio
source
is
used
connect
their
out-
puts
to
the
respective
channel
Phono
-
Radio
input
jacks. Level will
be
controlled
by
the
volume
controls.
4.
Push
Pause
Lever
to
"Up"
position.
!i.
Hold
record switches depressed.
6.
Tum
start
/
stop
c
ontrol
to "
Start"
po
s
it1
on.
This
hold;;
the
record
switches down
in
record
mode.
7.
Start
signal
so
ur
ce to
set
recording
level.
VU
Meters
should
read
-3
to - 7 on
the
average
.
8.
Release
the
Pause
Lever
(down)
to
start
tape.
Tracks
1
and
3
are
now being recorded.
9.
When
recor
ding
is
completed,
or
when
the
end
of
the
reel
of
tape
is
reached,
return
start
/
stop
control
to
·
'Stop''
position.
Record
switches
are
automaticaUy
re-
leased
to
r
eturn
to
play
position.
10. T o
record
tracks
2
and
4, remove full reel from
take-up
spind
le
.
turn
over
and
pl
ace
on
supply
spindle.
Proceed
as
in
steps
2 - 9.
To
Play
a
Stereo
Recording:
1. Co
nnect
recorder
to
proper
power
sour
ce
with
power
cord
provided.
Turn
power
switch
to
"Power
On."
2.
Thread
the
tape.
Set
Ind
ex
Counter
to zero.
3.
Locate
desir
ed
start
i
ng
point
by
using
Fast
Forward-
Rewind
kn
ob
while
observing
Index
Counter.
4.
Turn
Start-Stop
knob to "
Start"
position.
Adjust
volume
for
each
channel.
Both
tracks
of
a
2-track
ste
reo
tape
or
tracks
1
and
3
of
a
4-track
stereo
tape
will
now
be
played.
5.
Tape
may
be
advanced
rapidly
or rewound,
after
Start-
Stop
knob
is
placed
in
·
·stop
" position,
by
using
F
ast
Forward-Rewind
knob.
6.
To
play
tracks
2
and
4 of a 4
-track
stereo
recording
after
tracks
1
and
3
have
been
completed
,
do
not
rewind
tape.
Remove
full ree\ from
ta
keup
spindle,
turn
it
over.
and
place
on
feed spindle.
Proceed
as
in
Steps
2-5 above.
Monaural
Recording
and
Play
bac
k:
Proceed
as
indicated
for
stereo
operation
but
use
only
jacks.
contro
ls
and
switches for
one
channel.
Volume
con
-
trols for
the
unused
c
hannel
should
be
set
at
ze
ro.
To
record four
monaural
tracks.
use
left
channel
f
ir
st.
recording
track
1.
Reverse
tape
by
removing full r
eel
from
Lakeup
spindle,
turning
it
over.
and
placing
it
on
the
feed
spind
le.
Continue
to
use
left
ch
annel
while
recording
track
4.
Reverse
tape
and
use
right
channe
l
to
record
track
3.
Rever.se
tape
again
and
continue
to
use
right
channel
in
order
to record
track
2.
To
play
back
four
monaural
tracks.
use
the
same
sequence
of
tape
sides
and
recorder
channels
as
when recording.
5

6
SOUND
-
WITH-SOUND
RECORDING
This
is a
procedure
by
whi
ch
you
may
record
yam
fa
vorite
orchest
ra
on one
channel,
and
then
play
or
sing
with
t
he
re-
cording
in
suc
h a
manner
as
to
make
the
playback
sound
as
t
hough
you
were
"
right
there
..
with
the
orchestra
.
Or
it
ma
y
be
used
for
language
study.
with
the
teacher
's
voice on one
channel
and
your
re
spo
nses which
may
be
erased
and
re-re
corded
as
often
as
desired)
on the o
ther
channel.
ROBERTS
Langua
ge
Lab
o
rator
y
Tapes.
available from
your
Robe
rts
de
aler
,
have
tne
instru
cor's
voice
pre-recorded
in
this
manner
in fo
ur
differe.
nt
language
s.
PROCEDURE:
1.
Make
a
master
recording on
Trac
k 1.
using
Left
chrumel
only
.
Turn
Right
channel
volun1e
controls
to zero
and
fol·
low
procedure
m1der "
To
Make
a
Stereo
Recording
,"
using
L
eft
channe
l only.
2.
Rew
ind
tape
.
3.
Re
co
rd
on
Track
3,
using
Ri
gh
t
ch
ann
el
only
while
listening
to
Track
1.
4.
Rewind
t.ape.
5.
Play
back
re
co
rd
ing,
as
in
stereo
play
.
Master
rec
or
din
g will
be
heard
on
L
eft
channel
and
added
reco
rding
will
be
heard
on
the
Ri
ght
ch
ann
el.
6.
Track
3
may
be
erased
and
r
ereco
r
ded
without
di
s
turbing
master
t
rack
by
repeating
Steps
2
through
4.
SOUND-ON-SOUND
RECORDING
(1660D
ONLY)
1.
Make
original
recor
ding
on
Track
1
usi
ng
L
eft
channel
only.
Turn
Right
channel
volume
cont
rol to ze
ro
and
follow
proced
ur
e
unde
r, ''To
Make
a
Stereo
Recording."
2.
Re
wind
tape
to
be
ginning
of
original
recording.
3.
Set
Channel
Tran
sfer
Switch
io
"L
to
R" position.
4.
Pu
sh
Pa
use
Lever
up
to
"
Stop
'' position.
5. H
old
Ri
g
hi
Reco
rd
Switch
depressed
and
turn
Start-St
o p knob
to
"S
tart''
posi
tion
.
6.
Connect
Right
challllel
microphone
.
Appl
y
sig11
al
to
microphone
and
ad
just
the
Ri
ght
cha
nn
el
volume c
ontro
l
fo
r ap-
proximat
e
ly
half
the
normal
re
co
rding
level
re
ading
on
the
Right
c
hannel
VU
Meter.
7.
DO
N0'1'
READJUST
THE
RIGHT
CHANNEL
V
OL
UME
CO
NT
ROL
AFTER
PRESETTING
FOR
THE
MIC-
ROPHONE
RECORDING
LEVEL.
(V:!
•Jormal)
8.
R
elea~e
Pau
:e
L
ever
and
make a
tdal
recording
of
the
Lef
t
cba~el
trSllSfer
and
the
R
ight
channel
microphone
added
.
9.
Adjust
the
L
eft
channel
volume
cont
rol only, while
watching
the
Ri
ght
channel
VU
Meter
readin
g.
Th
e
Righ
t chan-
nel
VU
Meter
should
be
read
ing
full
normal.
Ha
lf
of
the
reading
will
be
the
L
eft
cbrumel
tr
ansfer
ru1d
the
other
half.
the
Ri
ght
channel
micr
opho
ne.
10.
Rewind
the
tape.
play
the
trial
recordin
g.
If
the
test
run
was
satis
fa
cto
ry.
proceed
with
the
final
recording
by
re-
peatin
g
St
eps
2
!hrcu
gh
9.
11.
Play
back
rec
ording. So
und
-
On-S
ou
nd
re
co
rdin
g is on
Tra
ck 3 (
Right
channel
) so volume
controls
for
Left
cha
nnel
sho
uld
be
set
to zero.
(N
OTE:
The
original
Track
l
recording
of
the
L
eft
amplifier
is
still
intact
at
this
point,
so
Step
s 2
through
9
may
be
repeated
if
the
final
re
cor
ding
was
no
t
satisfactory
.)
12.
The
abo\·e process
ma
y
be
repeated,
using
Tra
ck 3
as
the
original reco
rding
and
add
more
ma
te
rial
to
it
for a rnul-
tirl
e reco
rdin
g.
In
this
case
the
Channel
Transfer
Switch
should
be
se
t
at
"R to L" position,
and
the
L
eft
channel
microphone
input
will
be used.
ASSEMBLY
-
DISASSEMBLY
Assembly
(mounting):
(1660-D)
1. Check for
dearance,
(deck & prean1ps, reels,
ease
of
op-
eration.
etc.).
Transfer
cutout
pattern
from
template
to
panel.
C
ut
out
panel
open
ing.
2.
Rem
ove
side
angle
bra::k
ets
{rom
metal
cage.
3.
In
sta
ll
un
it
into
panel
cutout.
4. R
einst
all side
angle
brackets
onto
rne.tal c
age
,
and
press
up
against
underside
of
panel.
5.
If
panel
is
.1f2"
or
mar~
thick,
fasten
angle
brackets
from
underside
w
it
h wood screws,
into
panel.
6.
If
panel
is
less
th
an
1
/2"
thick
use
fanc
y
headed
bolts
and
nuts
clear
through
panel.
For
Access
to
Top
of
Tape
Deck:
l.
Remove
Start-Stop
Jmob
an
d
Fa
st
F
orw
ard
-R
ewin
d
kn
ob.
2.
Remove
3 tr
ansport
deck
mounting
screws, c
ap
sta
n bush-
ing
sto
ra
ge
r
ost
.
3.
Pr
y o
ut
pinc:hwheel
cap.
take o
ut
pinchwheel
mounting
screw.
and
lift
oU
pinchwheel.
4.
Remove
bc>th
reel tables
after
taking
CJ
ut
re
el
table
screws.
Note
hu
m
ber
of fibre
spacers
und
er
reel tables
as
th
ey
are
removed.
5.
Lift
off
transport
deck
panel.

MAINTENANCE
INSTRUCTIONS
LUBRICATION
L
ubricate
the
following
parts
every
th<ee
months
when
the
<eco
rder
is
subjected
to
heavy
usage.
every
six
months
under
mod
erate
usage,
and
once a
yea
r unde<
conditions
of
occasiona1 use.
l.
Feed
and
take-up
spindle
sh
af
ts
with
two
drops
of
light
machine
oil
on
each
shaft.
2.
Rewind
idler
bearing
and
wind
idler
bearing
.
with
two
dr
ops
of
Light
ma
ch
ine
oil
on
each
bea
r
ing
.
3.
Apply
a
liberal
amount
of
light
grease
to
each
roller
and
on
all
levers
and
cams
.
4.
Sa
tuTate
the
felt
washe
r
in
the
re
t
ainin
g
cup
of
the
drive
capstan
with
light
machine
oil.
Caution:
Do
not
allow
grease
or
oil
to
remain
on
any
of
the
drive
surf
ace
s,
or
on
plastic
su
rfac
es
or
any
part
touch-
ing
the
tape.
CLEANING
The
capstan,
pinchwbeel,
tape
guides,
and
.reco.rd/
play
head
and
erase
head
accumulate
a
tape
oxide
coating
as
the
ta
pe
passes
these
parts.
Clean
these
parts
pe
riodically
with
a
soft
cotton
swab
dipped
in alcohol.
MECHANICAL
ADJUSTMENTS
1.
Record-Play
Head
Heigh
t
-L
oosen
the
two
mounting
nuts
at
the
side
of
the
.he
ad
mounting
bra
cket.
Move
the
head
so
that
the
top
pole
piece
is
even
with
the
top
edge
of
the
tape.
Gently
tigh
ten
t
he
nuts.
Azimuth
-Pla
ce a
prerecorded
azimuth
alignment
tape
on
the
recorde.r.
While
playing
tape
alternately
t
ighten
up
per
and
loosen lo
wer
head
mo
u
nting
nuts
or vice
versa
until
position
of
maximum
output
is
found.
2.
Erase
Head
The
erase
b
ead
hei
gh
t is
adjusted
in
the
same
manner
as
th
e
Rec
ord
-Pla
y
head.
3.
Brake
Shoes
When
br
ake
shoes
become worn, loosen
the
mounting
scre
ws a
nd
rotate
the
shoes
a few
deg
r
ees
until
a
new
brake
surface
is exposed
to
the
supply
and
take-
up
reel
discs.
4.
Rewind
Idler
Wheel
To
bring
the
wheel
in
alignment
with
the
rewind
reel
shaft
adjust
both
the
idler
load
spring
and
the
rewind
roller.
The
press
ur
e on
the
knurled
motor
bushing
shou
ld
be
about
50 gr
ams
durin
g
th
e
rewind
operation.
5.
Pinch
Wheel
To
bring
the
wheel
in
ali
gnme
nt with t
he
capstan
shaft
adjust
th
e
pi
nch
w.heel
load
sp
r
ing.
The
pinch
whee
l
pres-
sure
shou
ld
be
between
1,000
and
1,150
grams
whe
n
the
unit
is
operating
at
7%
ips.
6.
Rewind
Intermediary
Idler
Adjust
the
intermediate
wheel
sp
ring
to
obtain
about
50 g
ram
s
of
pressure
equally
exerted
to
both
the
rewind
idler
wheel
and
the
rubber
ring
on
the
supply
reel
shaft
assembly
.
Make
adju
stment
in
the
r
ew
ind
mode.
7.
Supply
Spindle
Tension
A c
han
ge in
to
rqu
e is
accomplished
by
either
adding
another
metal
washer
next
to
the
one
in
the
clutch
assembly
which
increases
tension,
or
by
removing
the
exist
i
ng
one
w
hi
ch
has
the
reverse effect..
See
explo
ded view
for
location.
The
r
eq
uired
tensi
on
is
determined
by
placing
a s
tand-
ard
seven
inch
r
eel
with
a
two
and
one
fourth
(21,.4)
inch
hub
diameter
on
the
supply
spindle.
The
re
el
should
have
twenty
six
feet
of
leade.r
tape
wound
on
it.
Attach
the
end
of
the
leader
t.ape to a scale
with
a
range
of
0
to
250 g
rams.
Position
the
scale
vertically
with
respect
to
the
re
el
hori-
zontal
axis.
Exert
a
ste
ad
y pulL
The
r
equ
ir
ed
to
rque
should
be
between
145
grams
and
160
grams
.
8.
Take
Up
Spindle
Tension
Th
e
procedure
is
identical
as
the
supply
spi
ndle,
ex
-
cept
the
r
equired
t
orque
is
between
180 g
ra
ms
and
220
gr
ams.
7

8
GE
NERA
L
TEST
PROC
E
DURES
NOTE:
Wh
enever
an
ex
te
rnal
test
instrum
e
nt
is used from
an
a
mplif
ie
r
ou
tput,
an
8 ohm resistor
sho
u
ld
be placed
acro
ss
the
amplifi
er
o
utpu
t or the
test
in
strument
input
,
if
the
use of
the
test
instrument
diseng
age
s
th
e
amplifier speakers.
II
Prea
mp out
pu
ts
are
used
for
measureme
nts
,
us
e a 270K 1W load r
es
istor.
Durin
g Record
modE'.
an
int
e
rn
al 8
or
10 o
hm
dummy
load resistor is
au
tomatica
Ti
y inserted to
re
pla
ce
the
speake
rs.
Anytime a high level signal
is
u
se
d,
the
wavPform
mo
uld be ch
ec
ked for d
jstort
ion
on
an oscilloscope.
Outpu
t:
Pla
y back
at
full
,-o
lume
and
ton
e.
a 700 cps
ton
e. recordE'd
at
0 ob.
as
meas
ur
ed
on
an
external l
abo
r
at
or
y
type
VU
Meter.
Measur
e
th
e
output
on
th
e s
am
e
type
exte
rn
al
VU
Meter
with
the
recorde
t·
termn
ate
d
into
8 ohms.
Square
the
resultant
voltage n•arung from
th
e
VU
Me
ter
an
d
di
v
id
e by 8 o
hms
to
get
th
e
RMS
power o
utput
in
watts. (P =E2/ R) .
Si
gnal
-
To-Noise
:
Pl
ay
back a 700 cps tone
pr
e-recorded
at
0 db,
as
measur0d
on
an external laboratory t
ype
VU
Meter.
Adjust
th
e
re
corder vol
um
e control
until
an
exte
rnal
VU
Meter
fr
om
the
output
reads
0 db.
Without
changing
the
record
er
volume control
sett
ing
,
stop
the
tape
motion wHh the
Pau
se
Lever
and
1·ead
the
e
xternal
VU
Meter.
The
VU
M
ete
r
is
now reading r
es
idual noise
on
ly, no signaL
Th
e reading
in
db
of
the
residual noise level
at
t
hat
vo
lume
sett
ing is
the
signal/
no
i
se
ratio
at
0 db level.
Frequency
Response
:
NOTE:
F
ir
st
cl
ean
and
demagn
etize
an
d
adjust
azimuth
of
the
heads.
Set
the
counter
io
'000' a
nd
reco
rd
a -12
db
line
input
700 cps tone
at
-1
0
db
as
measured
on
an
exter-
na
l VU
Met
er. (
If
in
put
me
ter
no
t
avai
lable,
set
record
er
volume control
1/.t
turn
open
an
d
adjust
the
os-
cilla
tor
output
, for -10
db
amplifier
out
pu
t.)
R
ec
ord
th
e 700 cps tone at - 10
db
f
or
10 digi
ts
on
the
counter,
the
n c
hang
e tones on
the
oscillator
fo
r
10
di
gi
ts
per
tone. without changing
the
oscillator
output
level
or
the record
er
volume control
se
ttin
g.
Th
e tones to
be
reco
rd
ed
after
the
700 cps reference
ton
e
are
50, 1
00
, 250, 500, 1000,
2.5K
,
5K,
7.5K,
lOX
,
12.5K,
15K
,
16K
,
and
17K
cp
s for 10
di
g
it
s each.
After recording above, rewind
th
e
tape
to th
e beg
inning
'000',
and
set
the tone control for the '
fl
at' se
tt
i
ng
for
the speed
that
is
be
in
g used.
Play
th
e 700 cps
lo
ne referen
ce
frequency
at
the
begi
nnin
g of
the
tones
an
d ad
just
the recorder vol
ume
for
an
ou
tp
ut of -
lO
db
on
an
ex
tern
al
VU
Meter.
Do
not
ch
an
ge
th
e volume or tone c
ont
ro
l
sett
in
gs
after
th
e 700 cps
-lOdb is
sd.
R
ea
d the external VU
Meter
evpry 10 digits
as
the
tone
changes from
the
50 cps
to
17K
cps
.
The v
ari
ati
on
::.
from
th
e - IOdb, 700 cps referen
ce
frequency original setting, is
the
frequency respons
e,
w
hi
ch
may
be plo
tte
d on log
paper
f
or
a curv('
o1
·
simply
by
the
numbers.
Wow
And
Flutter:
Play
back a 3000 cps
st
and
a
rd
prerecord
ed
wow
and
flutt
er
tE'st tape,
that
guarantees
a wow a
nd
flutter
wit
hin
.07%. a
nd
read
the
E'ffeclive v
alu
e on a wow a
nd
flutt
er
meter.

SPEC~
&
PROCEDURES
Hum
At
max.
volwne
-30
db
( -
40
db
at
preamp
)
At
min
. vol
um
e
-60
db
Signal-to-
Noise
Record
to
Play
-43
db
min.
Pre-recorded
-
44
db
min.
Wow
&
Flutter
.2%
max
at
7%
.3%
max
at
3%
Tone
Conlrol -
12
db
at
10KC
+13
db
at
lOKC
H
ea
d
Current
(OSC,
Fr
eq. lOCke)
Erase
12
MA
to
15
MA
Bi
as
.54
MA
to
.56
MA
Record .029
MA
to
.031
MA@
lKC
Power
consumption
at
117
V.A.C.
60
cps
55W
(1660D)
BO
W (1640-1650-1670)
Erasure
R
ecord/P
lay
at
0 db, 1000
cps
-42
db
using
1KC
filter
Fus
e: 1%A. 250V.
Gain from
sta
ndard
operating
l
eve
l pre-recorded
tape
7¥2
ips
volume full .4 vo
lts
at
preamp
minimum
<!MV
at
700
cps
head
input
= .25 vo
lts
at
preamp
minimum
2 MV
at
mike
for 0 level record
125MV
at
pbono
for 0 le
vel
record
Cros
sta
lk
Reco
rd
Ch # 1
at
0
db
, 700
cps
Play
Ch
#2
at
same
set
ting
that
Cb
# 1 is
set
at
for
.25 V
output
on
Ext.
meter
at
preamp
output
-55
db
min.
Cross
Channel
R
ejec
tion
Reco
rd
both
channels
at
0 db, 700
cps
Play
tape
and
set
both
channels
to .25 V
at
preamp
output
Re
verse
tape
and
play
-55
db
minimum
9

-
00
TAPE
DECK
PROBLEMS
j
Capstan
does
not
rotate.
Troubles
with motor
-"'
1
~,oken
field coil.
Check
field
coil
with
tester,
and
replace
motor
if
coil
IS
broken.
I
HDefective motor
starting
capacitor
Replace
I
H
Rotor
shaft
dragging due to lack
of
oiL
Overhaul
motor. Clean and re·lubncate oilite metal. \
y
Some
foreign
matter
exists
between
rotor
and
stator.
Check
and
eliminate
foreign
matter
for
free
rotation
of
rotor.
1
Troubles
with
power
transmission
r-
---1
.
Replace
belt. I
mech.anism.
Broken
capstan
dnve
belt.
---i
Capstan
drive
belt
off
of
driving position.
Place
belt
in position. I
-1
Motor
bushing
slippmg
on
motor
shaft.
Tighten
mounting
screw.
\
-i
Oil
attached
to motor bushing and/or flywheel Wipe
off
oil with
cotton
swab
soaked
in alcohol. j
r1Decreased
motor torque.
Check
motor
torque
and
replace
motor. j
I
Capstan
rotates
in
Stop
position,
but
I
tape
does
not
advance
when
switched
Troubles
With
motor.
WDefective
Replace
to
Play
pos1t10n. screw. 1
Motor
bushing slipping
on
motor
shaft.
Tighten
mounting
Troubles
with power
transmission
f-rl_
mechanism. Capstan drive
belt
stretched
Replace
belt. I
HOil
attached
to
motor
bushing
and/or
flywheel. Wipe
off
oil. I
H
Capstan
bushing
sllping on flywheel
shaft.
Tighten
capstan
mountmg screw. I
H
Excessive
tension
in
Takeup/Supply
reel
table
assembly.
Readjust
tension.
!.
rl_Oil
attached
to
capstan
and/or pmch
wheeL
Wipe
of
oil. I
Y
Insufficient
pmch
wheel
pressure.
Check and
re-adjust
pinch wheel pressu,re. I
!.Capstan
advances
tape.
but
take-up
reei-rl
Reel
shaft
dragging
due to lack
of
oil. Check take-up
reel
shaft
assembly.
1
Overhaul
reel
shaft
assembly:
relubricate.
Replace
I
does
not
take
up
tape. H
Take-up
idler
wheel
does
not
rotate
properly.
Check
idler
wheel.
Replace
if
necessary.
I
reel
shaft
assembly
If
not
repairable.
HOil
attached
to
idler
wheel and
or
ro-
ller
on
take-up
reel
shaft
assembly. Wipe
off
oil. I
Y
Take-up
idler
whee!
does
not
keep
good
contact.
Check
idler tension
spnng.
Replace
spring
if
necessary.
J
Check
lever
J
ITake-up
flinctwns
normally.
but
tape
jrl
Troubles
with motor. w
Rotor
shaft
dragging
due
to
lack
of
oil. Overhaul motor. Clean and
re-lubricate
oilite metal. J
speed
lower
than
regular
speed.
Defective
motor
starting
capacitor
Replace I
~Fluctuation
in
power supply.
Check
line voltage
and
cycle.
Use
voltage
regulator
1f
line voltage is
lower
than
standard. I
Troubles
with power
transmission
Qlpstm
drive
belt
stretched
mechanism.
and
slipping
on
motor
bushing
Replace
belt. I
Capstan
drive belt
not
in
correct
driving
position.
Place
belt
in position. J
Oil
attached
to
motor
bushing
and/or
flywheel. Wipe
off
oil. I
!wow·
flutter.
Irregular
tape
movement.
r-
---1
Troubles
with motor.
Rotor
shaft
dragging due to lack
of
oil. Overhdul motor. Clean
and
re-lubricate
oilite metal. J
W
Defective
motar
starting
capacitor
Replace I
~Troubles
with power
transmission
r--
Check
reel
shaft
assemblies.
Replace
reel
shaft
I
H
Take-up,
supply
reel
shaft
dragging
or
excessive
tension.
assembly
if
tension
not
adjustable.
mechamsm. H
Capstan
drtve belt stretched
and
slipping.
Replace
belt. ]
HUnbalanced flywheel
rotation.
Check balance. Replace flywheel. I
H Rubber on pinch wheel
deteriorated.
Replace pinch wheeL I
H
Pinch
wheel
or
tape
guide
does
not
rotate
smoothly.
Check
and
replace
defective
part.
Clean
and
re-oil I
if
it
again
provides
smooth
rotation.
H
Dust
on
heads.
Clean heads. I
H
Insufficient
pinch wheel
pressure.
Re-adjust
pinch wheel
pressure.
l
H_
Gapstan
bushing
slipping
on
flywheel
shaft.
Tighten
capstan
mounting screw. I
Y Worn-out
idler
wheel
or
no
oil.
Replace
worn-out
Idler.
Lubricate oilite
metal
in
center
of
idler.
I
IUnit
does
not
operate
in
Fast.
ForwardJ-n
Troubles
with
power
Oil
attached
to
take-up
idler
wheel
or
motor
Wipe
off
oil. J
Take-up
reel
shaft
does
not
rotate
even
without placing
recording
tape
on unit. transmission
mechanism.
bushing.
Loose
motor bushing.
Tighten
motor
bushing
moWlting
screw.
l
Take-up
idler
wheel
does
not
fllilction
properly.
Check and
readjust
idler
wheeL I
Take-
up
reel
shaft
assembly
does
not
function
Check.
clean
and re-oil
reel
shaft
J
properly.
assembly.
Check
lever
I
/Check
motor torque.
Replace
mo
-~
y_
Take-up
reel
shaft
does
not
rotate
when
recording
tape
IS
placed
on unit.
Troubles
with motor.
Decreased
motor torque.
tor
if
required.
Defective
motor
starting
capacitor
Check
and
replace
I
I
Troubles
with
power
.
~
Excessive
slippage
of
clutch
mate-
rial
(felt} in
take-up
reel
shaft
Check take-up
reel
shaft
assemblyj
J
transmission
mechanism. assembly.
I
Tape
guide
roller
does
not
rotate
smoothly.
Check guide roller. Re-Oil
or
replace.!
Take-reel
warped
and
sticking
to
Defective
reel.
Check
and
replace
reel.J
deck
top
panel.
I
f-~
Supply (rewind)
reel
shaft
does
not
rotate
Troubles
with power
trans-
Oil
attached
to
rewind
idler
or
mo-
Unit
does
not
rewmd tape. mission mechanism. Wipe
off
oil. l
even
without placing
recording
tape
on unit.
tor
bushing.
]Intermediate
idler(black
bakelite
Check
internal
idler. I
I
wheel}
not
working
correctly.
Loose
motor
bushing
.
Tighten
motor
bushing
mounting
screw.
l
. jRewind
idler
does
not
rotate
or
not
Check rewind idler. Clean and re·Oil-l
Jin
position.
~upply
reel
shaft
assembly
does
no
Check
supply
reel
shaft
assembly. I
~tate
smoothly. Clean and re-oil
y
Supply
(rewind}
reel
shaft
does
not
rotate
rrlTroubles
with motor. ]Check motor torque.
Replace
motor I
Decreased
motor
torque
when
tape
is
placed
on unit. lif
not
repairable.
Defective
motor
starting
capacitor
Replece I
Excessive
slippage
of
clutch
mate-
~Trouble
with power
trans-
Check
supply
reel
shaft
assembly. I
mission mechanism.
rial
(felt)
in
supply
reel
shaft
assembly.
Loose
tape
winding
after
being
placed
in
Rewind
or
Fastforward
mode.
Tape
spills
when
stopped
from
Rewind
or
Fast
forward
mode.
Break
does
not
functwn
properly.
PenodJcal
clack
noise when
rewmdmg
or
fast
forwardmg tape.
Loud motor VIbration.
Y
Defective
reel.
Decreased
back
tenswn
of
take-up and supply
reel
shaft
assemblles.
Excessive
sllppage
of
felt
clutch
matenal
m take-up and
rewmd
reel
shaft
assemblles.
Reels
of
different
s1ze
are
used.
For
example. 5·
reel
on
take-up s1de and
7~
reel
on
supply Side.
Worn-out
brake
shoes.
Oil
attached
to
surface
of brake
shoes.
Loose
brake
shoes.
Brake
lever
does
not
function properly.
Worn-out and
ragged
Idler wheeL
Loose
motor mountmg screw.
Defective
motor
starting
capacitor
Tape
gmde
roller
does
not
rotate.
Check guide roller. Re-oil
or
replace.
_j
!supply (rewind)
reel
warped and
stick-
Check and
replace
reel. l
ling to
deck
top panel.
Disassemble
reel
shaft
assemblies
and
strengthen
back
tension.
Readjust
slippage
of
felt
clutch
matenal.
Replace
defective
reel
shaft
assembly
if
this
readjustment
IS
difficult.
Always
use
reels
of same
size
on
both Sides.
Check and
replace
brake
shoes.
Check
and
re-adjust
brake
lever.
Replace
idler
wheel.

10
J
Modes
of
Operation
1al
STOP
I
(b) FAST-FORWARD
c) REWIND
II
d) RECORDING
PLAYBACK
l01
IC
(
v~
\.....
~-==-
Pinch
ITo!r.e-up [
!iewtnd
Take
-
Roller
Idler
Idler
up-s1de
Wheel Wheel
Brake
X X X 0
X 0 X X
X X 0 X
0 0 I X X
N
OT
E
S:
X-m
arks
indicat
es
~o
p
en"
and
0-
marks
"engagedh
Supply-
side
! Brake
0
X
0
X
FAS
T
-FORWARD
MECHANISM
Turn
the
FAST
FWD
-
REWTND
knob (Al
to
~F
AST
FWD•
position,
and
the cam
(B
)
under
the
knob
pushes
up
the Lever (C).
The
Tdler tDJ
moves
in
to
the
space
between
the Plastic Roller IFl
above
the
Take-Up Reel
Sp
mdl
e
and
the
upper
part
of
the
rotatin
g
motor
driv
bushing
to
transmit
the
motor
rotation
to
the
take
-
up
reel
spindle.
At
the
sam
e time,
the
brakes (H )
and
{I)
come
off
the
reel
spindle
to
free
the Supply Reel Spindle
(G l,
thereby
allowing
fast
winding
of
th
e
tape
onto
the
take-up
reel.
Fre
e Rotation
High
-
Speed
Rotation
RE
WI
ND MECHANISM
Turn
the
FAST
FWD-REW
I
ND
knob fA)
to
"REWIND~
position,
and
the cam (B)
under
the
knob
pus
h
es
the
Lever (
C)
up.
The
Idler (D)
moves
into
the
space
bet
-
ween
the
upper
part
of
the
rotating
Motor drive bushing
(E)
and
the Intermediate Pulley (F) to transmit
the
high-
speed
rotation
of
the
motor
through
the
Int
ermedi
a
te
pulley
to
the
Supply
Reel
Spindle
(G). At
the
same
time, Brakes (H) and
(I
)
come
off
the
reel
spindle
to
free
the take-up reel spindle r
n.
thereby
rewinding
the
tape
in
to the
supply
reel
at
a fast
speed.
High-speed
Rotation
Free
Rotation
~tP
·
;..~
~
(
II
'
(\~
0
0
"--.__/
·J
'-......-/
r '
\.-;
, i I
I~
Q____D--o
0
I
ST
OP
CONTROL
Push
the
Stop
lever
to
qSTOPh position, brake rubber
(A
),
and
(B)
depress
reel
spindles
to
stop
rotation
of
the
reel
spindles.
As
brake
rubber
depresses
the
plastic rollers
under
the
reel
spindles,
no
friction works
on
the
ta
pe
itself.

(2~)WASHER
FELT
WASHER
~SCREW(2)
~
REEL
TABLE
(
3)
c:::=====t=:s::P===:f
SPINDLE
TABLE
(z Y)
FELT
WASHER
.....-----
DRIVE RING {).5)
~S
CREW
' REEL
TABLE
SPINDLE
TABLE
FELT
WASHER
CLUTCH
PLATE
SPR
I
NG
(
:z
7}
WASHER -
-------.
_ _
---
®RETA
INING RING
===t====
CLUTCH DISC
_ _
__
@RETAINING
RING
{29)
C::::==l===:r
CLUTCH
DlSC (
3o)
WASHERS--
~~~~
~~
STAR
SPRING WASHER
(3J)
---
---
~~
~a===::::~
-
WA
SHERS
(:2-g)
(33
~-
.....
,
__
_
!3)
_
6RETA
INING RI
NG
(zq)
__
-
®RETAINING
RING
~~~~
--~
~
----
-
SCREWS--
--------~~--~~~
H~~~~:JIW
E~fS~
S~P~I~N=DL:E~('i?~~N
Tt
NG p
LA
T~E
:=:~;;~
~ftf~~s:
1
~
1
/.,B
ASE
PLATE
~
NUT
------------~--~
~
r-~
SUPPLY
REEL
SPINDLE
ASSEMBLY
TAKE-UP
REEL
SPINDLE
ASSEMBLY
#
62-49
#62-50
5-2
0-
64
A
DATE
REV
.
APP
.

N
0
"RAD./PHONO
'-
MI c
'ROPHONE
'-
.------11~~
12AX
7
r--
~
12AX?
1-
+--e
----:
~:»...,.t---1
~1'2AU?
t------t~
12AU7
r--tcATHODE
VOLUME
C.A.THOl>E CATHOt>IE
? CONTROL
{
~
CI-IANNEL..
TRANS.~E'R
SWI'T"C
...
R
-L
NORM.
L.
· R
,
--
-
----
,
; '
--
~
-~·::
'
-~
J
--
~
I
"RIGHT
I
RIGHT
H l (ioH
LOW
L.li.VEL
L.EVIi.&..
OUTPUT
OUT
PLAT
STAGE
ST.A.GE
'----e-
-----+--to'"
H
I~H
L-EVEL.
OUTPUT
&..OW
LEVEL
OUTPUT
'B
I
AS.
'REJECT.
'PRE-
EMPHA~IS
NETWORK
~
1
T
.l
t
T
t
vu
METER
95
KC
~ECORl>
~lAS
'PUS.H-PUJ..L
.------!!~~
-
--1
0
~C
IL
L.ATO'R
r---
':>l(ioNAL
12.
AU
7
CATHOl>E
ERA~~
CURR£NT'
--
I
--
-
1--
---
-
-y----
-o
'REC.
"'REC.
I
'REC.
I
4 I
J'
--
-
--
'PLAY
'PLA'(/R£C.
HE
AI>
j_
.---._
I • I
'PLAY
'PL.Al
•
~
? -
? -
>
TONE
j C
ONTROL
'PLAY
I
BLOC
K
DIAGRAM
MODEL
1660D
L
EFT
PREAMP
ONLY
(Right
Preamp
the
r,)

N
-
r--
"RE
C
.I
I
'P
L
A.Y
1
212AX7
CATHOD
E
k 12AX7
FEEDBACK
-
'PLAY
'PLAY/REC.
HE.AD
VoLUt-IE
CoNTROL
TONE
CONTROL
l'
'R
E.AMP
OUTPUT
'"R
I
GHT
CHANNEL
~
----v-
0
~TE
REO
r------------1
l'HONO
s
r----
,
.--~~~--•
I
:
MON.
1
I
'i'LJI.'Y
I
2.
1.
GBM8
1---4..._....,j
Til.ANS
1--._-~...-
I MUTE 1
~ORMlll
I I
l
~-
-
D
CATHODE
FEED ll£C. B
'!SACK
I
I
-I
I
BIAS
~
l
'REJECt T
'P'R
E.- l
~
EM~A~
I
S
T -
NETWORK
"l
e:
co~b
100
KC
StCaNAL
B I
A$
PUSH-PULL
osc.
CA
T
HODE.
12AU
7
'P
L
AY
BLOCK
DIAG~MA
MOOE.
L I
650
- 1&70
L
EFT
AMP.
OttLY
CRiiht
amp
. tile
Scl~rte)

22
PLAYBACK
PROBLEMS
1.
NO
SOUND.
(a)
Pilot
light
and
tubes
do
not
light
up
and
the
motor
does
not
run.
(1) D
efective
fuse.
(2)
Defective
A.C.
cord
or
its
connection.
(3)
Defective
power
switch.
(b) P
ilot
light
anrl
tubes
do
not
light
up
but
the
motor
does
run.
(1) D
efectivc
power
transformer.
(2)
Defective
conn
e-cti
on
in
power
transformer
primary
leads.
(c)
Tubes
lit.
but
no
sounci
from
either
channel.
(not
even
faint
bwn).
(1)
Defecth·e
re
ctiUe
r
tube.
(2)
Power
supply
component
defective.
(d)
One
ehannel
normal,
other
channel
dead,
(not
even
f
aint
hum).
(1)
Speake
r
open
or
d.
isconnected
.
(2)
External
speaker
jack
de[ective.
(3}
Output
tube
defect.ive.
(4)
Output
circuit
defective.
(5)
Output
transformer
defective.
(e)
One
channel
normal.
other
channel
has
faint
hum
but
no
signa
l
so
u
nd
.
(1)
D
efective
head
or
head
connection.
(2)
Defective
input
or
preamp
tube
.
(3)
Incorrect
voltages.
(4)
Open
coup
ling
c
apacitor
or
shorted
grid.
2.
SOUND
BUT
WITH
LOUD
HU
M.
(a)
Hum
controllable
with
volume
control.
(1)
Impr
oper
head
lead
shit>ld
grounding.
(2)
Misadjusted
hum
controls.
(3)
DefectivE>
input
lubes.
(4)
Improper
h
ea
d l
ead
or
input
tube
grid
lead
positionin
g.
(5)
Leaky
coupling
capa
citor.
(6)
Gr
ou
nd
loop
between
external
equipment
and
re
co
rder.
(7)
High
resistive
solder
joint
at
g
round
connec
tion.
(b)
Hwn
n
ot
controllable
with
vo
lwne
control.
(1)
Defe
ct
ive
driver
or
output
tubes.
3.
LOW
VOLUME.
(2)
Leaky
coupling
capacitor
between
driver
and
output
tube.
(3) D
efective
power
supply
filter.
(4) High rE-sistive
so
l
der
join
t
at
ground
connection.
(a)
Record
sensitivity
normal
according
to
the
VU
Meter.
(1)
Dirty
beads.
(2)
Tape
threaded
with
oxioe
side
away
from
the
nead.
(3)
Defective
bead.
(4)
Defe
ctive
tape
lifter
.
(b)
Re
cord l<Pnsitivily
also
l
ow
acc
ordi
ng
to
the
VU
Meter.
(1)
Defectiv
e
amplifier
tube
if
only
one
side
low.
(2)
Def
ective
rectifier
t
ube
if
holh
sides
low.
(3)
Defecti
ve
plate
re
s
istor
causing
low
voltage.
(4)
DefectivP
output
transformer.
(fi)
Leak
y
feedback
capacitor.
4.
DISTORTION
.
(
a)
At
low volume.
(1)
Defective
tube.
(2) Tncorr
ect
plate
voltages.
(3) Leak")'
coupling
capacitor.
(b)
At
any
volume
but
woJ:Se
at
high
volume.
(1)
Same
as
4
(a).
(2) Defective
loudspeaker.
(3)
Defective
feedback
netw
or
k.
(4)
Bad
wow
and
flutte
r
in
tape
transport.
(see
deck
problems).

RECORDING
PROBLEMS
(Prerecorded
tapes
play
alright)
1.
NO
RECORD.
(a)
VU
Meter
not
working
in
record
mode.
(
1.
) Defective
microphone.
(2)
Input
jack
contact
poor.
(3)
R/ P slide
switch
not
functioning.
(b)
VU
Meter
reads
alright
in
record
mode.
(1)
Defective
R/P
head.
(2
)
Broken
wire
in
record
circuit.
(3)
Defec
tive
re
cord
current
cir
cuit
component
.
2.
DISTORTION.
(a)
VU
Meter
&
amplifier
monitor
normal.
(1)
Faulty
oscillator
bias voltage.
(2
)
De
fective r
eco
rd
cur
ren
t
circuit
component.
(b)
VU
Meter
normal
but
amplifier
monitor
distorted.
(1) Excessive
signal
input.
(2)
Defe
ctive R/P
slide
switch.
(3) D
efect
ive
microphone
or
radio
/
phono
.
(4
)VU
Meter
reading
incorrectly.
3.
ERASE
PROBLEM
.
(
a)
No
erase.
(1)
Faulty
e
rase
head.
(
2)
Faulty
erase
cable
or
con
nec
tion.
(3)
Open
erase
coupling
capacitor.
(4)
Tape
lifter
not
functioning.
(b)
Po
or
erase
.
(1)
Dirty
er
ac;e
head.
(2) Defective
erase
head.
(3)
Low
erase
voltage.
(4)
Def
ective
head
elevation.
4.
HIGH
BACKGROUND
NOISE
LEVEL
ON
TAPE.
(his
s,
sc
ratch
y)
(a)
Hiss.
(1)
Magnetized
beads.
(
2)
Defective
tape
.
(
3)
'
Hash
' on
oscillator
output
waveform.
(4)
Dir
ect
current
leakil1g
to
heads.
(b) R
umblin
g.
(1)
Defective
tape.
(2)
Distorted
oscillator
output
waveform.
(3) Excessive
tape
pressure
against
heads.
(4)
Exces!iive
tape
'wrap'
around
beads.
5.
LOSS
OF
HIGH
FREQUENCIES
.
(a)
No
sparkle.
(1)
Dirty
heads.
(2)
Record
bias
incorrect
voltage.
(3)
Wnrn
beads
.
6.
LOW
SENSITIVIT
Y.
(
a)
VU
Me
ter
reads
normal.
(1)
Dirty
heads.
(
2)
Def
eciJve
heads.
(3)
Defective
r
eco
rd
current
circuit
component.
(4)
Defective
tape.
7.
LOSS
OF
LOW
FREQUENCIES.
(a)
No
bass.
(1)
Mismatch
of
impedances
of
input.
(2)
Incorrect
sped.
(fast)
23


This manual suits for next models
3
Table of contents
Other Roberts Tape Deck manuals