Robur PS300/E31 User manual

Robur S2-Skåp | Användarmanual
1 Användning
Låset kan användas med två separata 6-8-siffriga koder, PIN1 och PIN2 men att använda två koder
är Inte nödvändigt. Skåpet är programmerat med en kod, PIN1 är vid leverans 1-2-3-4-5-6.
2 Signaler
+ Enkel ljudsignal + Grön lampa blinkar en gång:
Bekräftar att låset är okej.
+ Dubbel ljudsignal + Grön lampa blinkar två gånger: Bekräftar att
programmering lyckades.
+ En lång ljudsignal + blinkande Röd lampa: Någonting blev fel
+ Fem ljudsignaler + Röd lampa blinkar fem gånger: Låg batterispänning
3 Öppna skåpet
3.1 Öppna med förprogrammerad (1-2-3-4-5-6) eller ändrad PIN1-kod:
[ON] [PIN1] [ENTER] Vrid handtaget medurs
3.2 Öppna med tillagd PIN2-kod:
[ON] [PIN2] [ENTER]
3.3 Låsa skåpet
Stäng dörren och vrid handtaget moturs

Robur S2-Skåp | Användarmanual
4 Programmera låset Observera! All programmering görs med öppen, olåst dörr.
4.1 Byt PIN1-kod
[ON] [ENTER] [1] [ENTER] [PIN1] [ENTER] [ny PIN1] [ENTER] [repetera ny PIN1] [ENTER]
4.2 Programera ny eller byt PIN2-kod –Obs, att använda två koder är Inte nödvändigt.
[ON] [ENTER] [2] [ENTER] [PIN1] [ENTER] [ny PIN2] [ENTER] [repetera ny PIN2] [ENTER]
4.3 Byt PIN2-kod utan PIN1-kod –Obs, att använda två koder är Inte nödvändigt.
[ON] [ENTER] [3] [ENTER] [PIN2] [ENTER] [ny PIN2] [ENTER] [repetera ny PIN2] [ENTER]
4.4 Ta bort PIN2-kod
[ON] [ENTER] [0] [ENTER] [PIN1] [ENTER]
5 Byta batteri
5.1 Beroende på skåpmodell sitter batterierna antingen i låset eller på dörrens ovankant.
I båda fallen är batterihållaren placerad på dörrens insida. På de mindre skåpen sitter
batterihållaren på dörrens ovankant, se fig. 2.
Fig. 1 Fig.2
5.2 Nödöppning
Fig. 1
Lossa täckbrickan på knappsatsens ovankant med hjälp av en skruvmejsel, se fig. 1.
Fig. 2
Håll emot ett 9V batteri och slå koden, se fig. 2.
Öppna och byt batteri på dörrens insida.

S2 - Safe Digital Lock PS300/E31 USER MANUAL
S2-Safe - Digital Lock PS300/E31
USER MANUAL
1Main Components
Image 1.1
1 –Keypad
2 –Folding handle
3 –Green LED [G]
4 –Red LED [R]
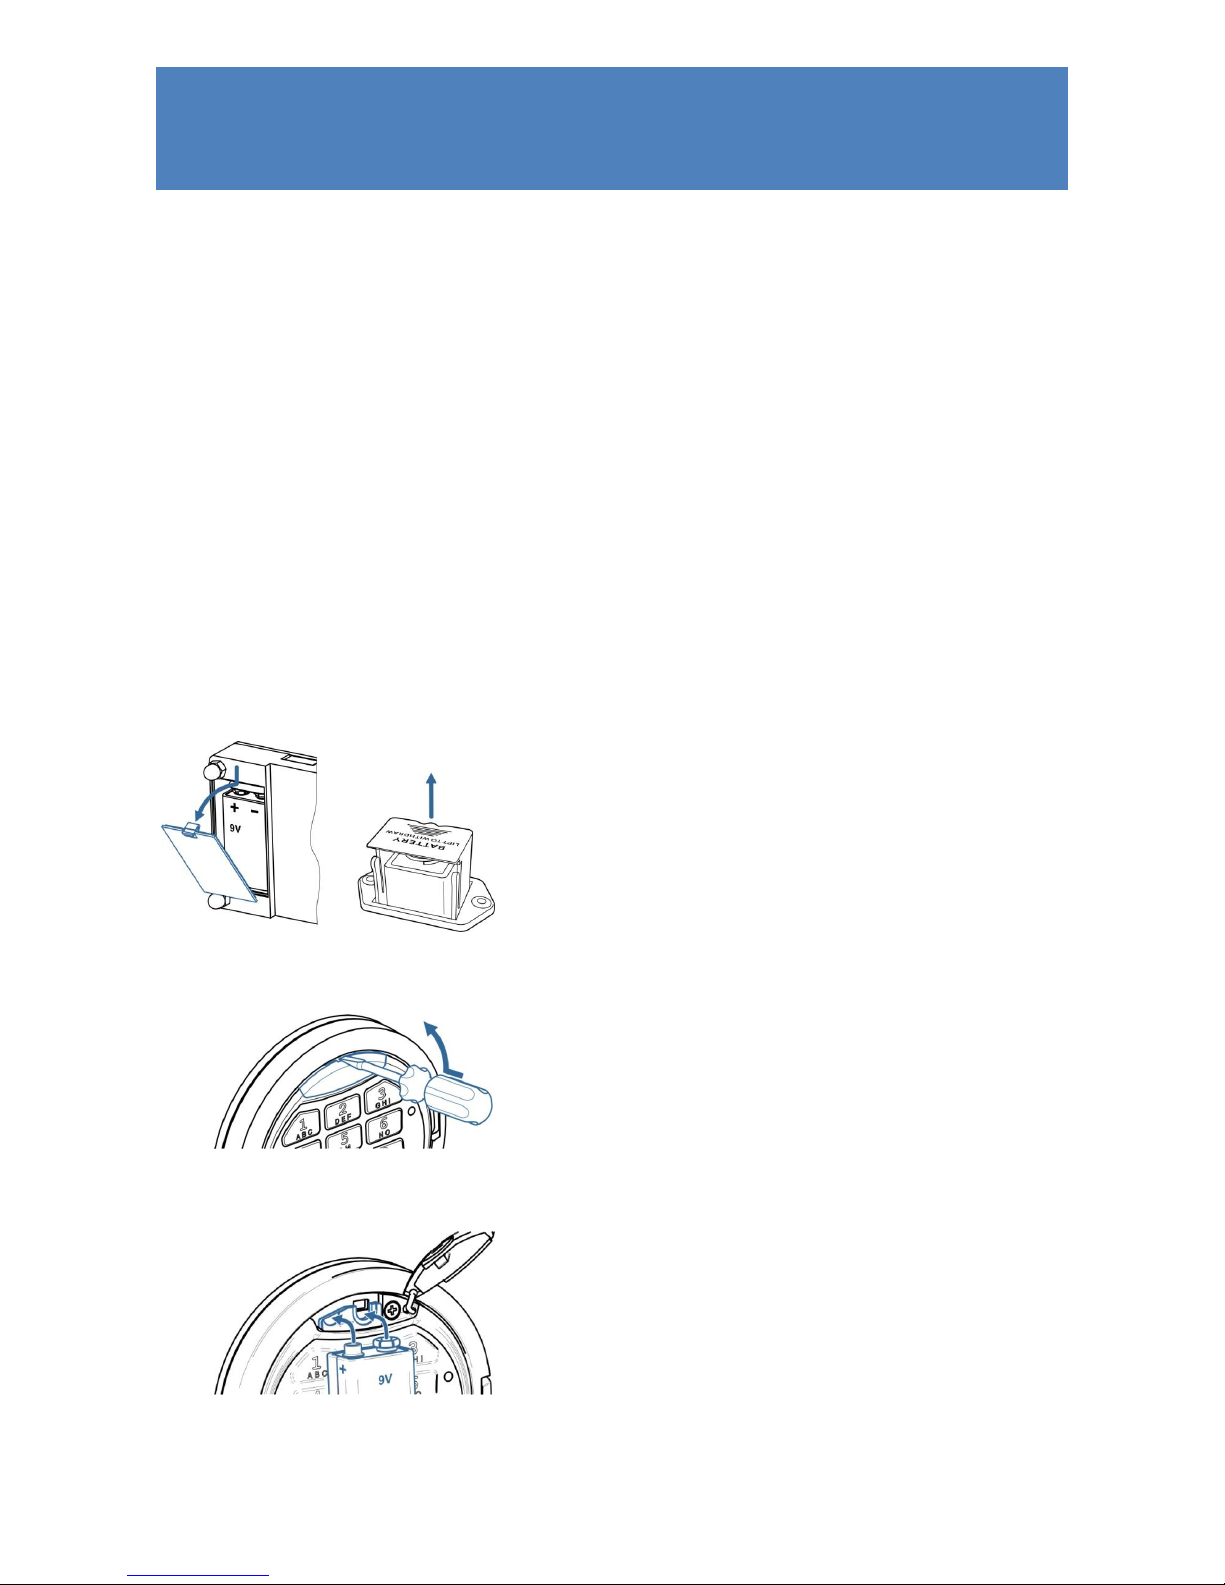
5 –Plastic cover for emergency power
2Definitions
Master Code [PIN1]2.1
A set of numbers (from 6 to 8 digits) which
opens the lock and allows to operate the settings.
Before using the safe, please change the
factory Master code (see par.4.1). It is
strongly recommended to keep the master
code safe from unauthorized people.
Factory Master Code:
1–2–3–4–5–6
User Code [PIN2]2.2
A set of numbers from 6 to 8 digits which
opens the lock and has limited functions to change
the settings.
The lock with default factory settings does not
have the User code. Please see par.4.2 to set
the User code.
Signals2.3
[G]1Short single acoustic signal with single
green LED flash (3) –confirmation of the button
pressing on the keypad.
[G]2Short double acoustic signal with
double green LED flash (3) –confirmation of
successfully finished operation.
[R]-- Long single acoustic signal with single
red LED flash (4) –error message.
[R]5Short acoustic signal sounds 5 times
with 5 red LED flashes (4) –low battery message.
Please see par.5.1 how to change the battery.
3Main Functions
Opening the Lock3.1
3.1.1 Opening with the Factory Master code
[ON][1][2][3][4][5][6][Enter]
3.1.2 Opening with the Master Code
[ON][PIN1][Enter]
3.1.3 Opening with the User Code
[ON][PIN2][Enter]
If the code is right, there will be a green LED
flash and it will be possible to open the door within 5
seconds by turning the handle (2) clockwise.
If you enter a wrong code three times in a
row, the lock will be blocked for 5 minutes.
The blocking of the lock will be indicated
periodical red LED flashes.
Closing the Lock3.2
Close the door and turn the handle (2) anti-
clockwise until it stops.
4Service Functions
It is strongly recommended to change the
settings of the lock with the door opened.
The service functions will be unavailable in
case low power supply which is indicated by
the signals. [R]5.

S2 - Safe Digital Lock PS300/E31 USER MANUAL
Changing the Master Code [PIN1]
4.1
[ON] [Enter] [1] [Enter]
[PIN1] [Enter]
[new PIN1] [Enter]
[repeat new PIN1] [Enter]
Checking the new Master code:
[ON][new PIN1][Enter]
Changing the User Code [PIN2] with the4.2
Master Code [PIN1]
[ON] [Enter] [2] [Enter]
[PIN1] [Enter]
[new PIN2] [Enter]
[repeat new PIN2] [Enter]
Checking the new User code:
[ON][new PIN2][Enter]
Changing the User Code [PIN2] without the4.3
Master Code
[ON] [Enter] [3] [Enter]
[PIN2] [Enter]
[new PIN2] [Enter]
[repeat new PIN2] [Enter]
Checking the new User Code:
[ON][new PIN2][Enter]
Deleting the User Code4.4
[ON] [Enter] [0] [Enter]
[PIN1] [Enter]
5Servicing
Changing the Battery5.1
The battery is located on the inner side
of the door. Depending on the safe
model, battery could be either inside
the lock battery compartment (image
5.1a) or in a special pull-out battery box
(image 5.1b).
The exact location of the battery
compartment or the batter box could be
different depending on the safe model.
Take out the cover of the battery
compartment of the lock (see Image
5.1a. or pull out the box (see Image
5.1b).
Image 5.1 a. b.
Install a new battery (9V, type 6LF22).
Take the cover or the box back to their
location.
Opening the lock when the Battery is5.2
Discharged
Take a new battery (9V, type 6LF22).
Take out the plastic cover for
emergency power (5), see Image 5.2.
Image 5.2
Press the new battery to emergency
power pins and fix it in this position
(see Image 5.3).
Do not make the battery’s contacts to the
metal parts of the lock in order to prevent
possible discharging of the battery.
Image 5.3
Enter the valid code on the keypad
(1).
Disconnect the emergency battery,
open the door and change the
discharged battery, see par. Fel!
Hittar inte referenskälla..
Edition 3/1 as of 07.11.2014
Table of contents
Languages: