Rock The Bike Icycleta User manual

you pedal,
something
amazing happens

Look for the screen icon around this manual for
video tech tips on our website.
The wheel must have a pulley
to engage the belt. Older Fender
Blenders don’t have this type
of wheel. Please contact us at
1-888-354-2453 to purchase
the correct wheel.
Find assembly and use instructions for your Fender
Blender Pro frame at:
rockthebike.com/fender-blender-pro/
Attaching Icycleta to Fender Blender Pro: rockthebike.com/icycleta/
what you will need
for assembly
We first started bike churning ice cream to refresh the audience
and raise funds at the San Francisco Bicycle Music Festival.
We saw how much kids loved helping out with their pedaling,
the mechanisms and the science, and of course, the delicious
results. Now we're excited to have you joining our quest to spread
the spirit of pedaling.
Pedaling to churn ice cream is a small, sweet act, one that
will be many people’s first chance to give energy back. It can
open the door to many other personal choices that benefit their
health and fitness and our environment. So thank you! And
please keep us posted on your progress as you Rock The Bike!
Yours,
Paul Freedman,
Founder
Contents ................................................................... 3
Assembly .................................................................. 4
Usage Tips .............................................................. 11
General Information .................................................... 14
TOOLS: Adjustable wrench
TIME: Allow 5 minutes
TEAM: 1 person, but 2 people
works best
find rock the bike on
3
THANK YOU!
TABLE OF CONTENTS
BELT riser spreader bar
Icycleta box includes these parts:
3
contents
gears & pulley tub
CANISTER A. Canister lid
B. Dasher and
Scraper blades
WHEEL with pulley
May ship with Pro frame
A
B

5
4
assembly
1. Loosen the axle nuts counterclockwise to the end of the
axle (a).
2. Loop the chain over the chainring (b), and over the teeth of
the wheel cog (c). Then loop the belt over the pulley (d).
5. Check chain tension by rotating the pedals backwards a few
turns. If there is a tight spot in the rotation, loosen the skewer and
move the wheel backwards so the chain is taught as possible
without causing a tight spot in the rotation. If the chain is loose
and sagging, loosen the skewer and pull the wheel forward.
WHEEL WHEEL
For wheels with axle skewers, refer to the Fender Blender Pro user
manual for tightening instructions: rockthebike.com/fbpro-manual/
(a)
(c)
(b)
ASSEMBLY
For more help and details about wheel install, watch
videos at: rockthebike.com/troubleshooting-tips
To check wheel alignment, look
past the wheel to see equal
distance on both sides.
4. Lift the wheel and slide the axle into the wheel mounting
slots. Pull the wheel toward you, and while holding the chain
taught, adjust the wheel so it is straight and aligned with the
frame. Then have a friend tighten the axle skewer with an
adjustable wrench wrench (e).
(d)
(e)

6
3. Loosen the four bolts on top of the wood deck a few turns
(e). Slide the wood deck to touch the frame (g, h), then
tighten the four top bolts.
RISER
assembly
Riser must lay flat on the ground to avoid damage (b).
Leveling feet can be turned with a wrench to raise or
lower the front crossbeam (c).
Do not over tighten!
(a)
(c)
(b)
(d)
(e) (f)
(g)
This step is only needed the first time you install
the Icycleta
7
assembly
RISER
1. Slide the riser clamps onto the left side of the front crossbeam (a).
2. Close the latch and tighten the brass nut until secure (d).

8
assemblyassembly
PULLEY AND GEARS
Slide the gear housing tab into the hole of the tub bracket (a).
Center the canister and lower the gear onto the dasher and lid.
You may need to spin the pulley a few turns to align and fully
seat the gears (b). Lock the housing by rotating the latch (c).
Place the canister base onto the centering guide in the bottom of
the tub.
CANISTER
Misalignment while churning can cause damage!
We recommend practicing the steps on this page
with an empty canister before your event. On event
day you will do these steps with the canister full.
(a) (b) (c)
(a) (b)
Watch the steps for Pulley and Gears, and Belt
at: bit.ly/2Mn1AZK 9
TUB
BELT
Place the churn into the wood deck with the pulleys in line.
Place the belt around the wheel pulley. Then place the belt onto
the churn pulley, and turn the pulley, guiding the belt into its
groove (b).

USage tips
1. Chill your ice cream base in the refrigerator, or in an insulated
beverage cooler with ice water. You can use your own recipe,
or try one of ours at rockthebike.com/recipes.
2. Place the stainless steel canister into the empty tub so that it
rests on the guide at the bottom of the tub. Then, insert the
dasher into the canister.
3. Pour your chilled ice cream base into the canister. Don’t fill
the canister more than 2/3 of the way, as the ice cream will
expand while you churn. Cover with the lid.
4. Attach the gears, belt, and spreader bar. (Refer to pages 8-10)
5. Use a scoop or hands to pack layers of ice and salt around
the canister. We recommend table salt, but rock salt is fine too.
Not all ice is the same temperature! For best results on hot
days, keep ice in freezer as long as possible, then use large
coolers and extra ice to keep your churning ice extremely
cold. Use approximately 3/4-1 pound of ice per churn.
6. Pedal! Churn your ice cream for 20-25 minutes until it takes
on the consistency of soft ice cream.
7. Undo the Spreader Bar. Undo the belt. Push down on the clear
lid while you lift up the Gear & Pulley assembly. Remove the
canister from the brine, take off its lid, then pull out the dasher
and scrape off any excess ice cream. Serve as is, or pack and
freeze for a harder consistency.
MAKING ICE CREAM
assembly
SPREADER BAR
1. Place the clamp of the spreader bar around the frame, just
above the wheel pulley (a). Close the latch and turn the wing
nut a few turns (b), leaving it loose enough to slide.
2. Place the notched end of the spreader bar onto the pulley
shaft (c).
3. Gently push the spreader bar down to tighten the belt, then
tighten the wing nut fully to hold the bar in place.
(a)(b)
(c)
10 11

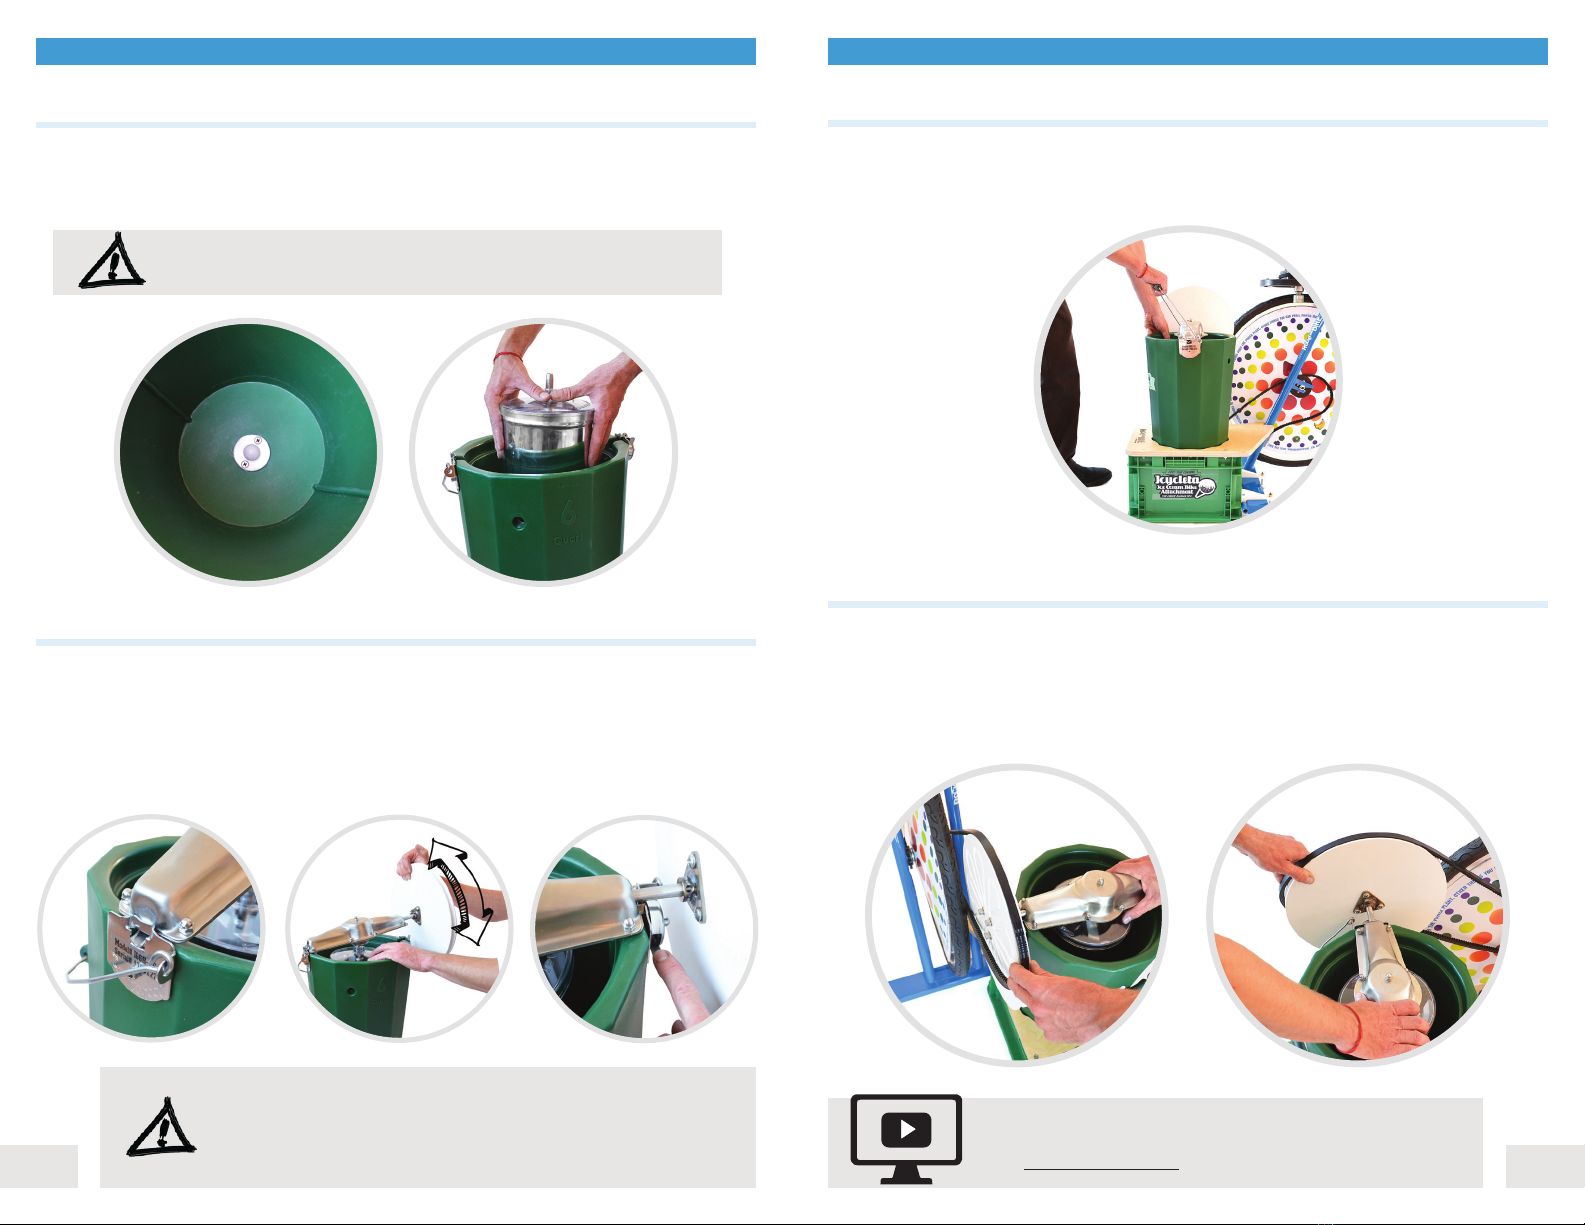
Once you are done churning, the icy cold brine can be used in
a second container to keep ice cream cold while making more
batches. Be careful if you are outdoors: salt is deadly to plants!
• The brine should be kept at 8-12 degrees Fahrenheit to provide
the rapid cooling and freezing needed to make smooth, creamy
ice cream. The best way to know the temperature of your brine is
to use a compost thermometer with a long probe. The second best
way is to plunge your hand in and see if it is unbearably cold.
• Salt is corrosive, be careful not to kill plants when churning outdoors.
Protect work surfaces with newspaper, and use a glass or plastic
measuring cup for rock salt.
• Use rubber gloves to protect your hands from cold and salt.
• Prepare an ice cream base the day before your event, giving it plenty
of time to chill overnight.
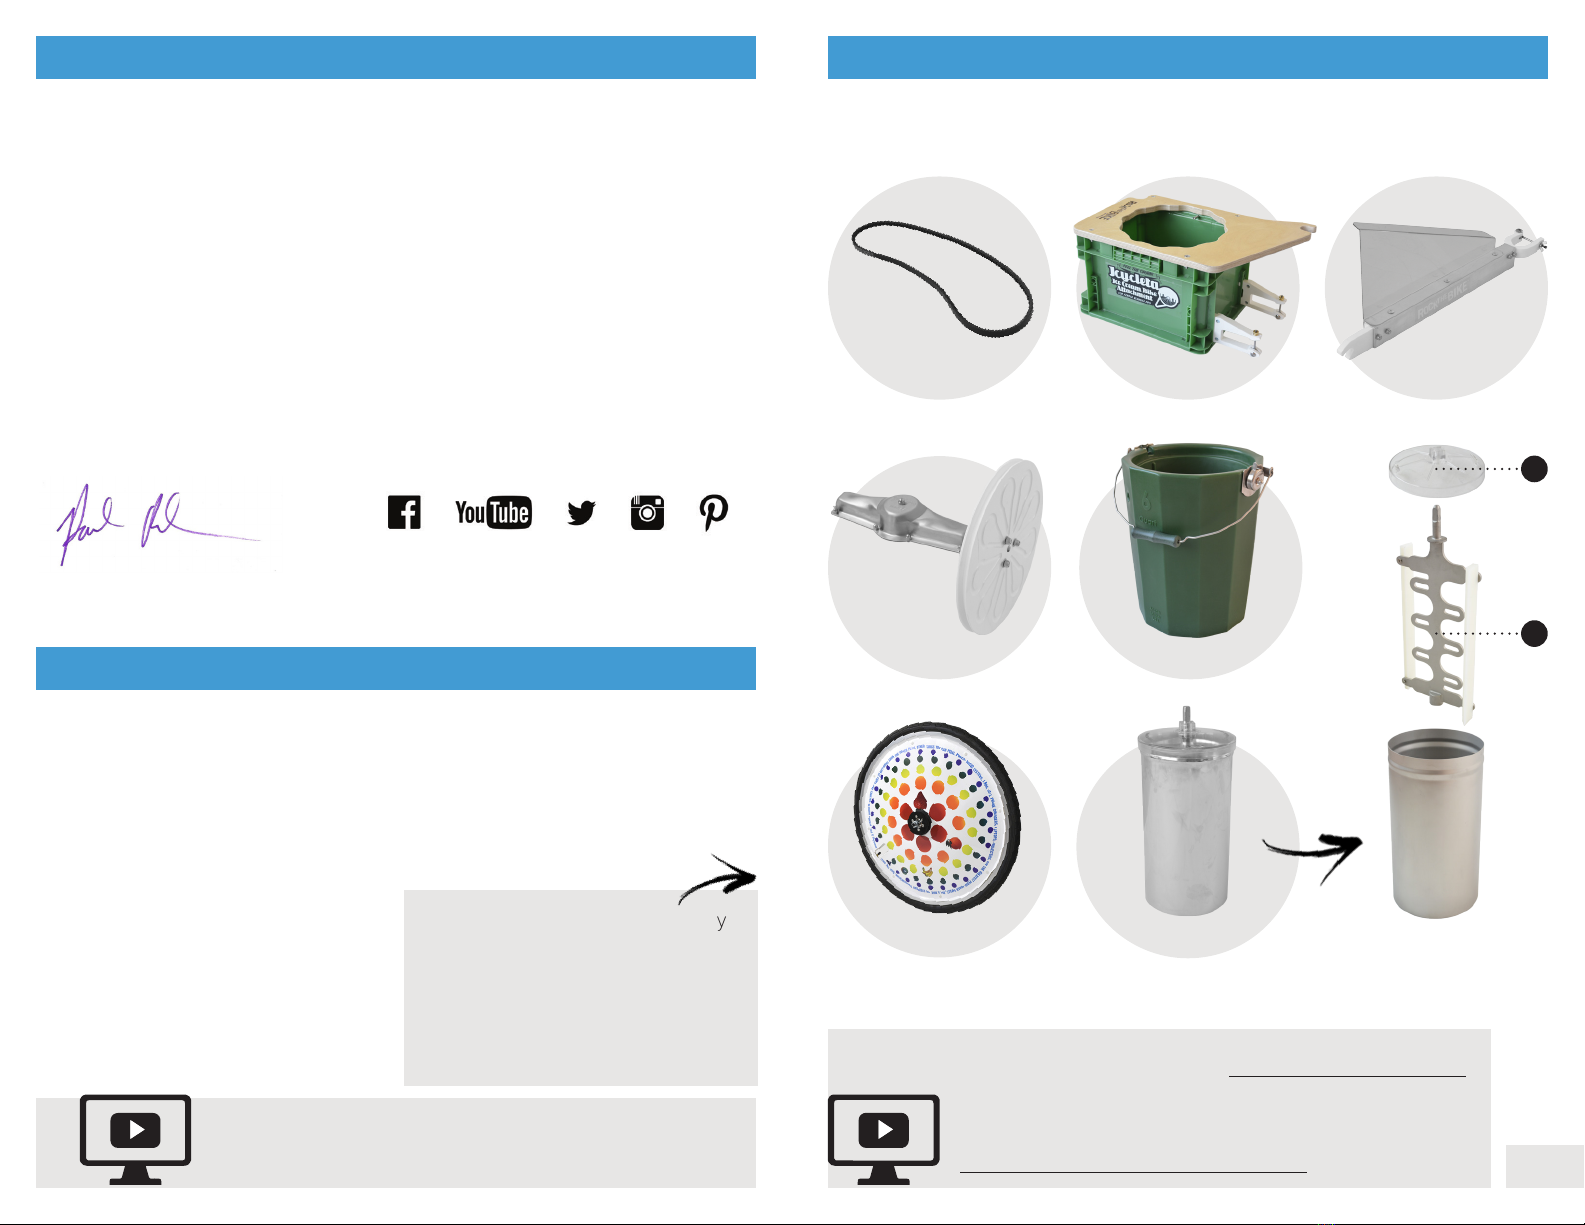
• If switching from churning to blending with Fender Blender Pro,
remove the belt, or secure the belt with velcro (a), to ensure that it
won't rub and scuff the wheel cover.
CARE AND CLEANING
How to clean the Icycleta and Fender Blender Pro frame:
Clean the frame immediately after use to avoid rust from the salty
brine. Wipe the frame with a sponge or cloth, using soap and water
or a non-toxic all-purpose cleaner. Dry with a clean rag immediately
after washing.
How to clean the canister after use:
The stainless steel canister, its dasher, and lid are all dishwasher safe,
but keep the canister on the top rack, and do not use extremely hot
water. Hand wash away all salt from the components’ metal parts
beforehand. Bleach can be used to sanitize the canister.
How to care for the chain:
After cleaning, apply lube to the chain. We recommend Boeshield T-9.
This brand is both an effective chain lube, and a general anti-rust spray
that protects the frame.
12
(a)
13
usage tipsusage tips
HELPFUL HINTS

14
• For more information, refer to the Fender Blender Pro manual.
• If you’re having problems, call Tech Support at 1-888-354-2453
(10am-5pm PST M-F).
• Use the Icycleta on a level surface.
• Do not use this product in the rain, snow, or other wet conditions
that could cause damage to you or your Rock the Bike product.
• Children should be supervised when using this product.
• Avoid contact with moving parts on the Icycleta’s assemblage. This
includes, but is not limited to: fingers, hands, toes, feet, hair, clothing,
and shoes.
• Never operate the Icycleta if the spreader bar, churn, canister, belt,
wheel pulley, or frame appear damaged. Call Tech Support at
1-888-354-2453 for assistance.
• Use gloves when reaching your hands into the brine.
• Remove the Icycleta attachment before moving Fender Blender Pro.
• Remove or secure the belt before moving the Icycleta.
Maximum Rider Weight: 220 lbs.
Manufacturer: Rock the Bike - Oakland, CA USA
TROUBLESHOOTING
SAFETY
SPECS
general INFORMATION
15
Rock the Bike products come with a 2-year warranty against
manufacturing defects. This warranty does not cover damage due to
wear and tear, loss, overloading, misuse, abuse, incorrect assembly,
incorrect use, or anything else beyond Rock the Bike’s direct control.
The warranty is valid if you purchase from any of our approved
distributors or dealers.
The use of an unauthorized attachments may cause injury or damage
and will void the warranty.
Store indoors and out of direct sunlight, with the belt removed from the
wheel pulley.
WARRANTY
STORAGE
general information

TM
Rock the Bike
6323 San Pablo Ave.
Oakland, CA 94608
www.rockthebike.com
888-354-BIKE (2453)
510-338-3326
fax 510-735-9838
Other Rock The Bike Bicycle Accessories manuals