Rocker COSMOS RGB 2112001 User manual

T-03/01/2021
MPORTANT – READ CAREFULLY – RETA N FOR FUTURE REFERENCE
OSMOS RGB BED RGB
2112001
Width - 41.3in
Depth - 79.3in
Height - 42.5in
Dimensions
1
MPORTANT: You must Keep your original retail receipt as proof of purchase.
w--%ژO-k¥ّژ
-uUkيژ°Å¥¥¨¾ۮã¨h-¨GuUwGِuژ
-°Uwژ%ٔU%-ّژ
Ũ¨U-kيژ°Å¥¥¨¾ۮã¨h-¨GuUwGِuژ
ْw--°U¾°ژäÅ%ّژ
¨¨-ژ-k-¾¨wUيژ°Å¥¥¨¾ۮã¨h-¨GuUwGِu

2
Safety and are Advice
Caution
Handy Hints
● Assemble all parts and bolts loosely during assembly, only once the product is complete
should you fully tighten the bolts
● Regularly check and ensure that all bolts and fittings are tightened properly.
WARNINGS
● Call 866-969-2603 if you need assistance.
● Work in a spacious area and near where the unit will be used, preferably on a carpet,
or use a piece of the cardboard packaging to protect your floor and product.
● Recommended # of people needed for assembly: 2 (however it is always better to
have an extra hand).
● Estimated assembly time is 1.5 hours.
● Make sure all parts are included. Most parts are labeled or stamped on the raw edge.
● Read each step carefully. It is very important that each step of the instructions is
performed in the correct order. If these steps are not followed in sequence, assembly
difficulties will occur.
● This product is designed for home use and not intended for commercial use.
● This product contains small components. Please ensure that they are kept away from small children.
● Clean the product with a soft damp cloth. DO NOT use harsh chemicals or abrasive cleaners.
● Move your new furniture carefully, with two people lifting and carrying the unit to its new location.
● Your furniture can be disassembled and reassembled to move.
● Always use the recommended size mattresses or mattress supports, or both, to help prevent the likelihood
● Use only a mattress which is long and wide.
● This bed is not intended for use by children under 4 years old.
● Do not allow horseplay on or under the bed and prohibit jumping on the bed.
● Do not use substitute parts. Contact the manufacturer or dealer for replacement parts.
● The use of water or sleep flotation mattresses is prohibited.
● eep these instructions for future reference.
of entrapment or falls.
Read Before Beginning Assembly
74"-75" 37 1/2"-38 1/2"
● Do not use risers under this bed.

3
Safety and are Advice
Avant de commencer l'assemblage
● Si vous avez besoin d'aide, appelez notre numéro de service 866-969-2603.
● Travaillez dans un endroit spacieux et près du lieu où l'unité sera utilisée,
préférablement sur un tapis, ou sur un morceau de l'emballage, afin de protéger le
plancher et le produit.
● Nombre de personnes recommandées pour l'assemblage : (cependant il est
toujours préférable d'être assisté par une personne supplémentaire).
● Temps d'assemblage estimé : 1.5 heures.
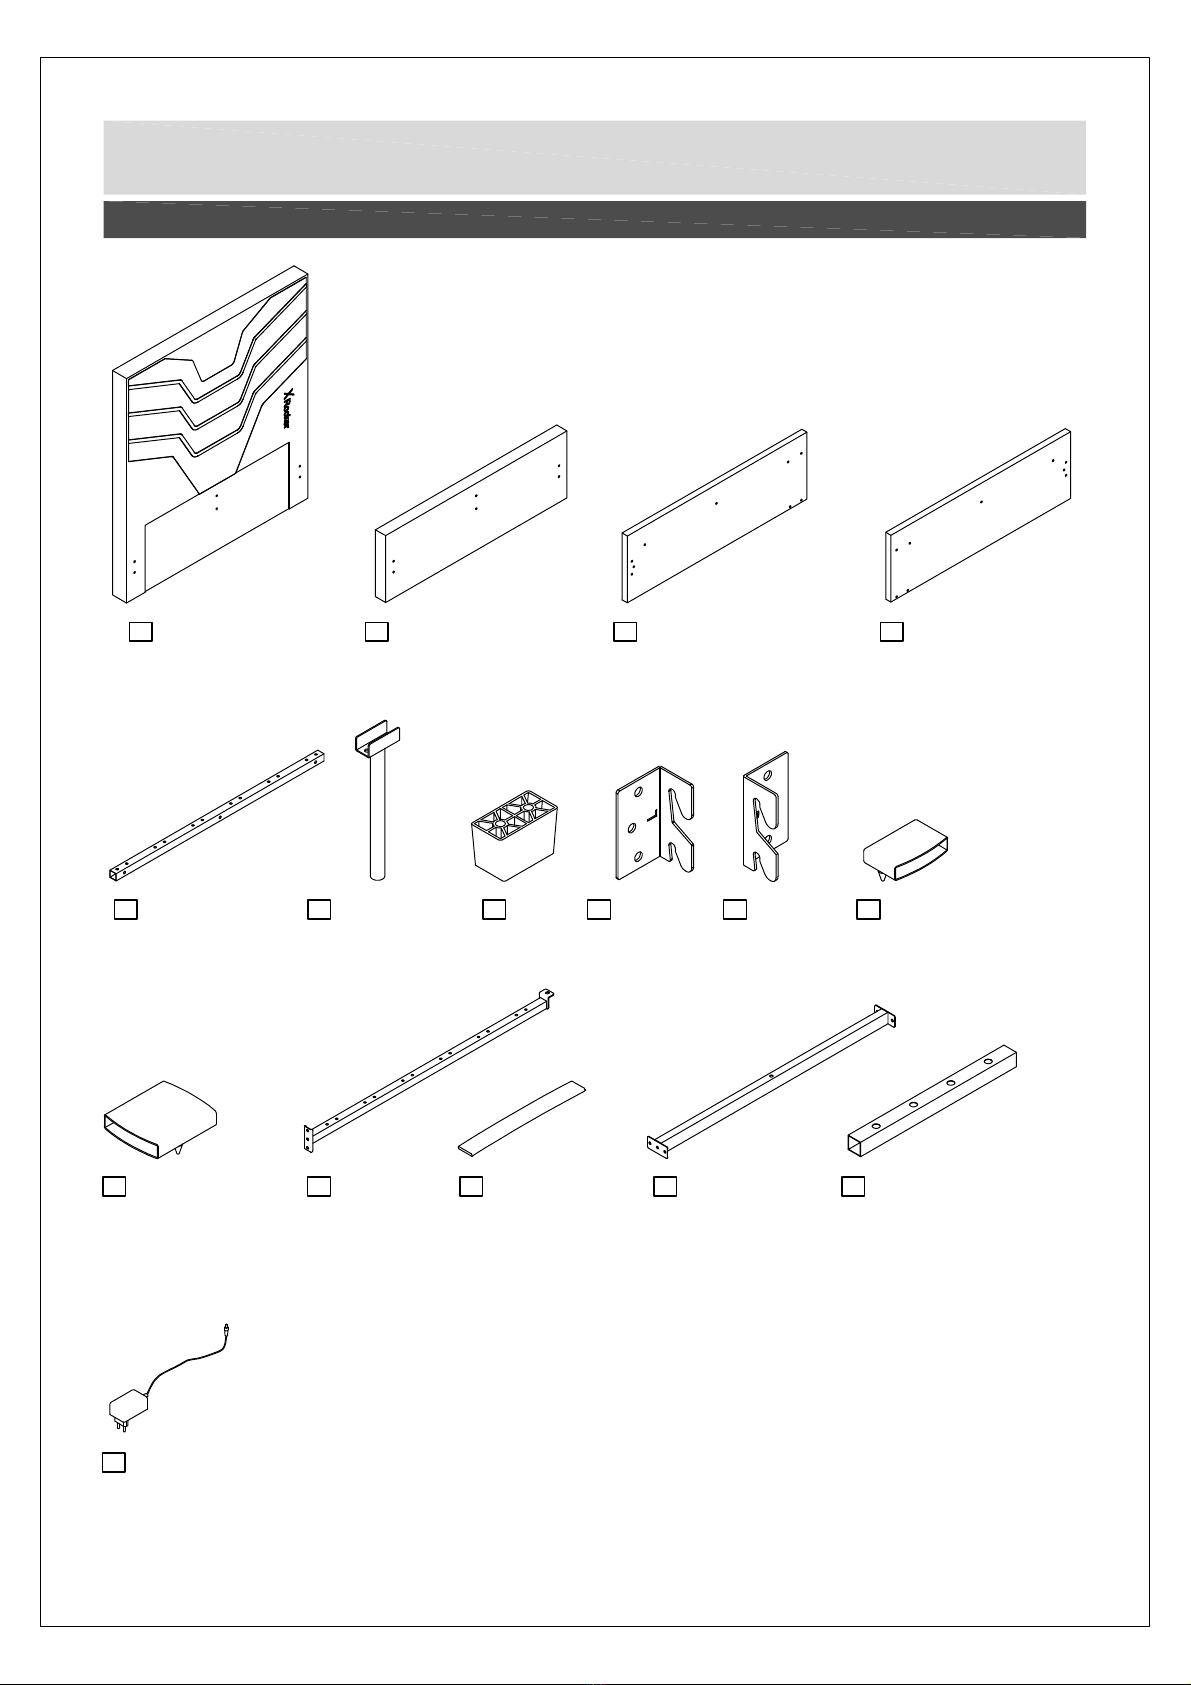
● Assurez-vous d'avoir bien reçu toutes les pièces. La plupart de celles-ci sont
étiquetées ou estampées sur leur côté non fini.
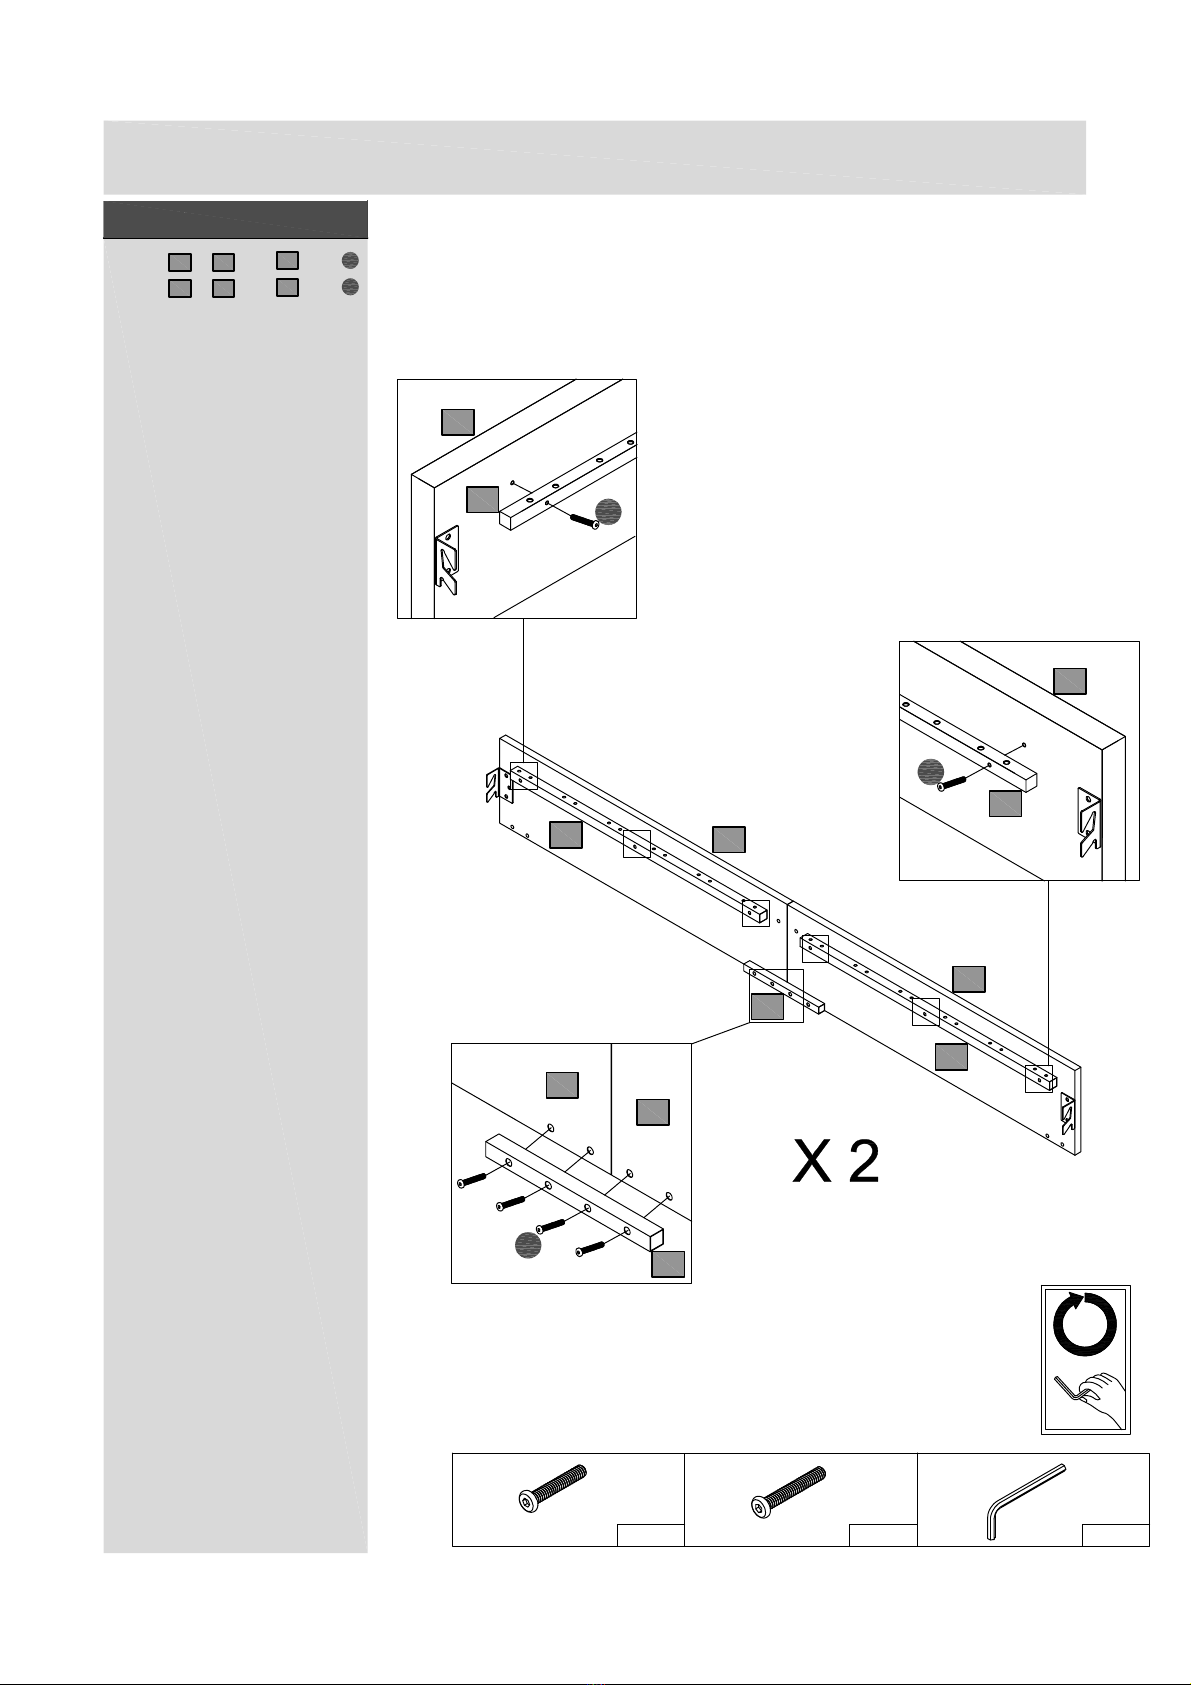
● Lire attentivement chaque étape avant de débuter. Il est très important que chaque
étape de montage soit exécutée dans le bon ordre, sinon vous risquez d'éprouver de la
difficulté à assembler votre meuble.
Précautions
● Ce produit est conçu pour un usage domestique et n'est pas destiné à des
fins commerciales.
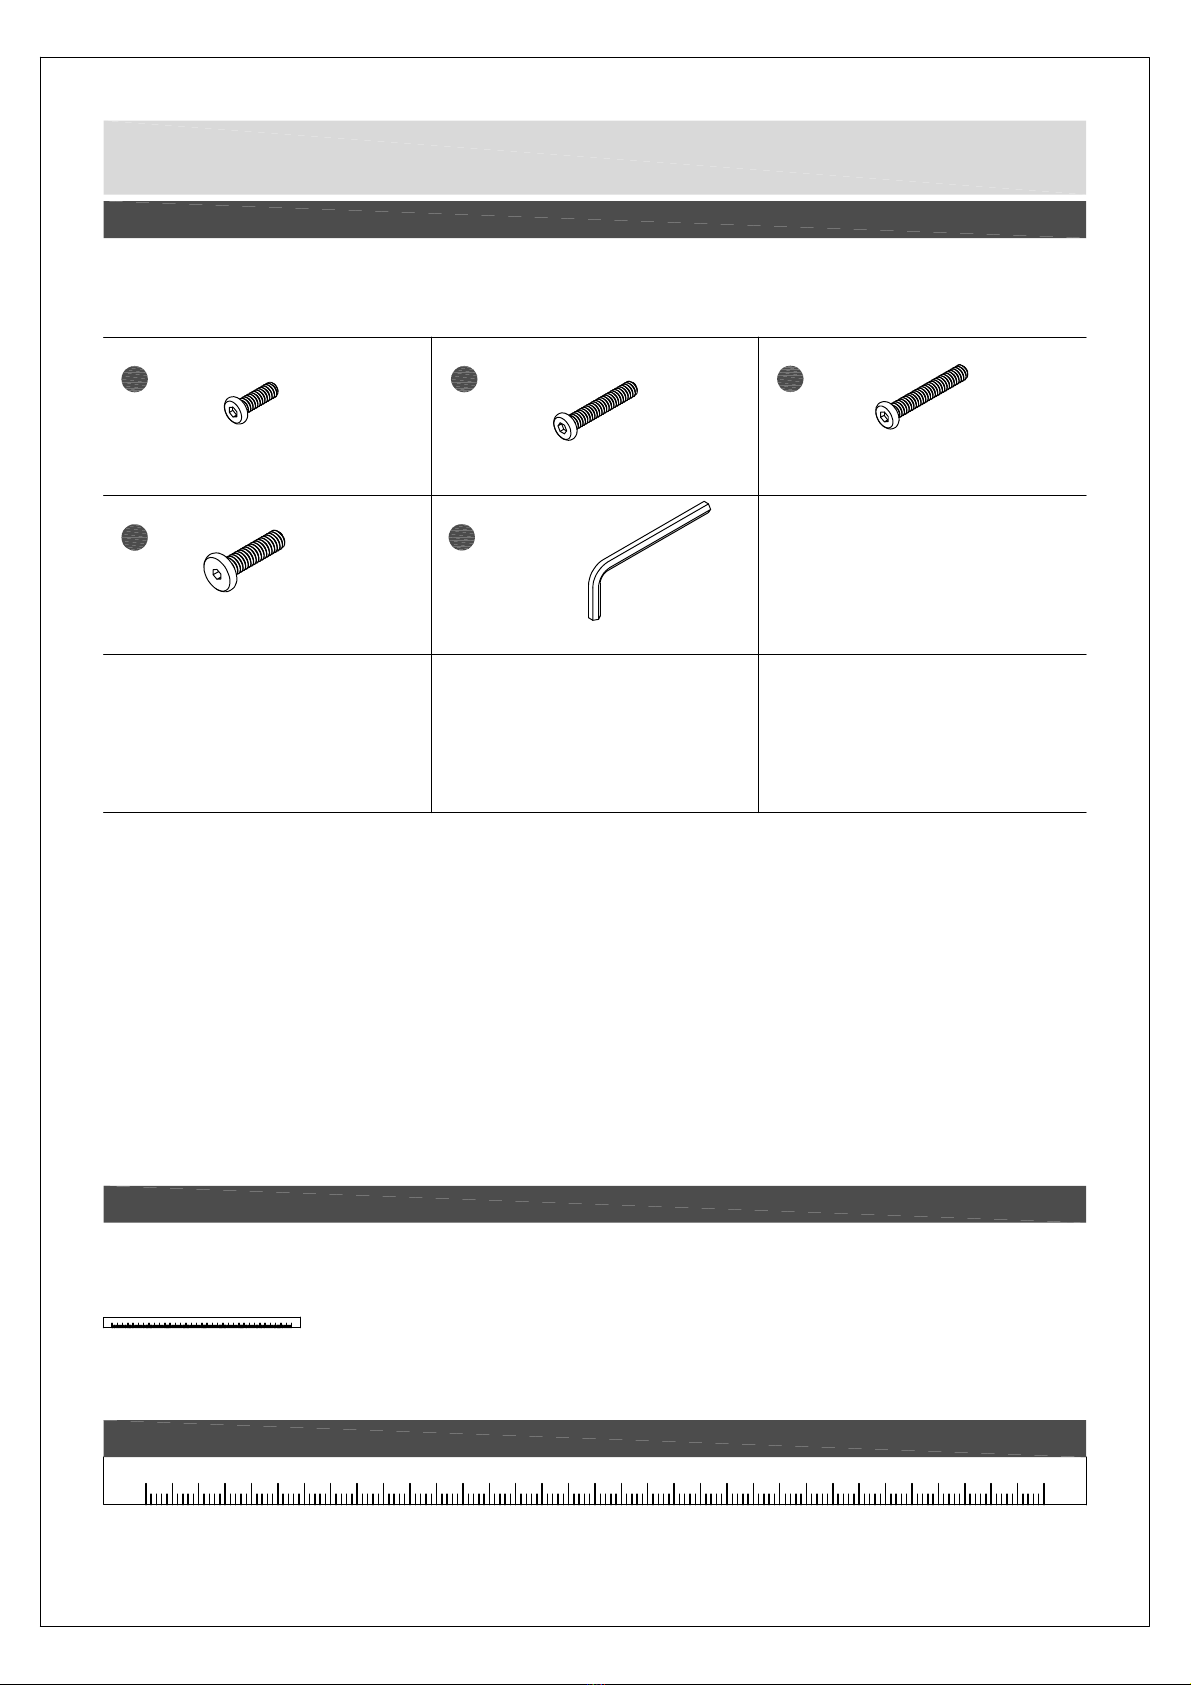
● AVERTISSEMENT CONCERNANT LES JEUNES ENFANTS: Ce produit
contient des petits composants. S'il vous plaît assurez-vous qu'ils soient gardés
loin d'eux.
● Certaines pièces ont été pré-assemblées.
Elles sont illustrées sur cette page et
elles sont disponibles pour un remplacement.
Conseils utiles
● Déplacez votre nouveau mobilier avec soin, nous recommandons soulever et
transporter le mobilier vers son nouvel emplacement à deux.
● Votre mobilier peut être démonté et ré-assemblé pour faciliter les
déménagements.
Avertissements
● Utilisez toujours la dimension recommandée de matelas, ou de support de matelas, ou les deux
pour aider à prévenir les risques possibles de coinçage ou de chute.
● Utilisez uniquement un matelas de 74" - 75" de long par 37 1/2"-38 1/2" de large.
● Ce lit n'est pas conou pour rtre utilisp par des enfants de moins de 4 ans.
● Ne jouez pas sur ou sous le lit et ne sautez pas sur le lit.
● Ne substituez pas de pièces. Communiquez avec ACE pour obtenir des pièces de rechange.
● L'utilisation de matelas d'eau ou de matelas gonflable est strictement interdite.
● Ne pas utiliser de rehausseur de lit sous ce produit.
● Conservez ces instructions pour référence ultérieure.
● Vérifiez régulièrement et assurez-vous que tous les boulons et raccords sont
bien serrés.
● Assemblez toutes les pièces et les boulons desserrés pendant l'assemblage,
seulement une fois le produit terminé, si vous serrez complètement les boulons.

● Llame a nuestro número 866-969-2603 si necesita asistencia.
● Trabaje en un área espaciosa y cerca de donde su producto será utilizado,
preferiblemente sobre una alfombra o utilice el cartón del empaque para proteger su piso
y su producto.
● El número de personas recomendadas para el montaje de este producto es: 2 (sin
embargo es recomendable contar con ayuda adicional).
● Tiempo estimado de ensamble es: 1.5 Horas.
● Asegúrese de que todas las partes están incluidas. La mayoría de las partes están
etiquetadas o selladas en los bordes.
● Lea cada paso cuidadosamente. Es muy importante que cada paso de las
instrucciones sea realizado en el orden correcto. Si estos pasos no se siguen en
secuencia, pueden ocurrir dificultades durante el ensamblado.
● Este producto está diseñado para uso doméstico y no para uso comercial.
● ADVERTENCIA PARA NIÑOS PEQUEÑOS - Este producto contiene
componentes pequeños. Por favor asegúrese de que las piezas estén fuera del
alcance de los niños.
4
Safety and are Advice
Lea antes de comenzar a ensamblar
Precauciones
● Algunas partes han sido pre-ensambladas en este producto. Se encuentran
ilustradas en esta página y disponibles para reemplazo.
Consejos útiles
● Mueva sus muebles nuevos con cuidado, se requiere de dos personas para
levantar y trasladar su producto a su nueva ubicación.
● Sus muebles se pueden desmontar y volver a ensamblar en caso de mudanza.
Precaucíones
● Utilice siempre el colchón del tamaño recomendado, el soporte del colchón recomendado, o ambos, para ayudar
a prevenir la probabilidad de quedar atrapado o de caídas.
● Utilice ~nicamente un colchyn que sea de 74" - 75" de largo y 37 1/2"-38 1/2" de ancho.
● Este producto no ha sido disexado para ser utilizado por ninos menores de 4 axos.
● No permita jugar en o debajo de la cama y prohíba saltar en la cama.
● No utilice piezas sustitutas. Entre en contacto con A E para las piezas de reemplazo.
● Se prohíbe el uso de colchones de agua.
● No utilice elevadores para cama con este producto.
● Guarde estas instrucciones para futura referencia.
● Ensamble todas las piezas y pernos sueltos durante el ensamblaje, solo una vez que el
producto esté completo, debe apretar completamente los pernos.
● Verifique y asegúrese regularmente de que todos los pernos y accesorios estén apretados
correctamente.

Headboardx1 Footboardx1 SidePanelx2
SideRail x4 SupportLegx2 Legx4 Bracketx2 SingleSlatCap x24
CenterRailx2 WoodenSlatsx24 CenterRailx1 SideRail x2
SidePanelx2
Bracketx2
DoubleSlatCap x12
Components-Panels
Please checkyouhaveall the panels listedbelow
1 2 3 4
5 6 7 9 10 11
12 13 14 15 17
5
LEDDriverx1
37

20mm M6Bolt x28 35mm M6Bolt x12 40mm M6Bolt x20
30mm M8Bolt x1 Allen Keyx1
Components-Fittings
Please checkyouhaveall the panels listedbelow
ote:Thequantitiesbelowarethecorrectamounttocompletetheassembly. Insome cases morefittings
maybesuppliedarerequired.
0 5 10 15 20 25 30 35 40 45 50 55 60 65 70 75 80 85 90 95 100 105 110 115 120 125 130 135 140 145 150 155 160 165 170
Ruler-Userthisrulertohelp correctly identitythe screws
Toolsrequired
0 5 10 15 20 25 30 35 40 45 50 55 60 65 70 75 80 85 90 95 100 105 110 115 120 125 130 135 140 145 150 155 160 165 170 Ruler/tape
measure
ABC
DE
6

AssemblyInstructions
Step1
7
Step1
Attach to and
with.
7
C
21
1
7
1
7
C
40mmM6Bolt Cx8 Ex1
4mm
00%
2

AssemblyInstructions
Step1
8
Step2
B
2
1
35mmM6Bolt Bx4 Ex1
20mmM6Bolt Ax4
1
1
B
A
A
2
2

AssemblyInstructions
Step1
9
Step3
Attach to with.
10 A
3
Ex1
4mm
00%
A
A
20mmM6Bolt Ax12
Attach to with.
9A
4
3
3
4
4
9
9
10
10

AssemblyInstructions
Step1
10
Step4
Attach to and with.
5 C
3
Ex1
4mm
75%
40mmM6Bolt Cx12
C
C
B
35mmM6Bolt Bx8
4
Attach to and with.
17 B
34
3
3
3
4
4
4
5
5
5
5
17
17

AssemblyInstructions
Step1
11
Step5
Hang sub-assembly and
on and asillustrated,
don't completely tighten the
boltsuntil STEP 8 is
complete.
3
4 21
1
1
2
3
3
3
4
4
4
2

AssemblyInstructions
Step1
12
Step6
Attach to with.
6 A
15
Ex1
4mm
00%
A
20mmM6Bolt Ax4
15
6
15
6
6

AssemblyInstructions
Step1
13
Step7
Attach to and with.
3 A
15
Ex1
4mm
75%
20mmM6Bolt Ax4
A
A
4
3
3
3
4
4
4
15
15

AssemblyInstructions
Step1
14
Step8
Attach to and with.
1 A
13
Ex1
4mm
00%
20mmM6Bolt Ax4
2
1
1
A
D
30mmM8Bolt Dx1
Attach to with.
Then properlytighten all the
bolts.
15 D
13
2
13
13
13
13
13
15
15

9.1 9.2 9.3
AssemblyInstructions
Step1
15
Step9
9.1 Insert into ,
9.2 Press into , repeat
the sameprocedureforthe
oppositeside ofthe bed with
anew and.
9.3 Insert endsof bothslats
into , then press
into asillustrated.
Repeat the sameprocedures
goingbackwardsforevery
rowofslats.
14 11
11 5
14 11
14 12 12
13
14 14
14
11
11 12
13
5

AssemblyInstructions
Step1
16
Step10

AssemblyInstructions
Step1
17
Step11

Turnon/off the strip withmemory
Switchof7constantcolorsonthe
stripand a “7-colorlitatthe same
time”on the strip
Switchofflashand breathingcolor
changingmodes
Swtichof4lightflowdirections
a)Fromleft toright
b)Fromrighttoleft
c)Fromcentertotwo sides
d)Fromtwo sidestocenter

Safety notes
• The userof the Neo Motion LEDmust haveread and understood
theseoperating instructionspriortoitsfirst usein ordertosafely
usethisproduct.
• TheLEDsmust onlybeused when theyfunctionsproperly.Ifthe
LEDsorpartof the LEDsaredefective, pleasecontact yourretailer
foradviceand ceasetousethe lighting function.
• Always keep the operating instructionswithin reach.
• Ifyousellorpassonthedevice,youmustalsopassonthese
operating instructions.
• Neverusethe LEDfunctionin aroomwherethereisadangerof
explosion orin the vicinityofflammable liquidsorgases.
• TheLEDsmayonlybeconnectedtoagroundedsocketwhich
hasbeen installed professionally, isgrounded and checked.
• Main powervoltage and fusemust meet the Technical data
specifications.
• If the powercable orthe deviceisdamaged immediatelyturn
offthe plug and pull out the plug. Do notusethe Cable again and
disposeof it properly.
• Do not bend, crushorpull the cable,protect fromsharpedges, oil
and heat.
• IftheLEDsarenot in usemakesuretheplug ispulled out.
• Do not touchthe powerconnectorwithwet hands! Always
unplug bypulling the connector, not the cable.
• Do not lift the bedusing the cable orusethe cable forpur-
posesotherthan intended.
• The powercable maynot be shortened.
RGB LED ‘Neo Motion’ Lighting nstructions
Riskofdamagetotheeyes!NeverlookdirectlyintotheLED.
The light can onlybe usedin dryindoorareas.
Not suitable forordinarylighting in household room
illumination
Operation
Storage and transport
Storing
–Storethe deviceand anyaccessoriesin adry, wellventilated place.
–Incaseof longerperiodswithout operation, protect the LEDsandits
accessoriesagainst soiling and corrosion.
Disposing of the packaging
Transport
–Usethe original packaging toship wheneverpossible.
Troubleshooting
f something stops working…
DANGER! Danger to life and limb! Improperrepairscan resultin
the productfunctioning unsafely.Thisendangersyourselfandyour
environment.
Malfunctionsareoften caused byminorfaults. You can easilyremedy
most of theseyourself. Pleaseconsult the following table
beforecontacting the vendor. You will saveyourself alot of trouble
andpossiblymoneytoo.
-Ensurethe poweradapter, controllerand strip areconnected well
-The LEDStrip can be controlled bythe buttonson the controller
1-Turnon/off the strip withmemory
2-Switchof 7constant colorson the strip and a “7-colorlit
at the sametime”on the strip
3-Switchof flashand breathing colorchanging modes
4-Swtichof 4light flow directions
a)Fromleft toright
b)Fromrighttoleft
c)Fromcentertotwo sides
d)Fromtwo sidestocenter
DANGER! Risk of fatal injury due to electric shock! Allworkto
eliminatepossiblefaultsshouldbecarriedoutwiththefuse
switched off. All workshould be carried out bya
qualified electrician.
Fault/malfunction Cause Remedy
Thelampdoesnot
light up Nomainsvoltage?
Lightsourcedefective?
LEDLightsswitchedonvia
switch?
Switchdefective?
Connectioncabledefective?
Incorrectconnection?
Checkfuse.Contactaspecialist.
Contactourhelpdeskforsupport
Checkswitchposition
Contactaspecialist.
Contactaspecialist.
Switchoffthefuseandcheckthe
connectionaccordingtothewiringdiagram.
Contactaspecialist.
Ifyoucan’tfixthefaultyourself,contactXRockersupport.Pleasebe
awarethat anyimproperrepairswill alsoinvalidatethe warrantyand
additional costsmaybe incurred.
Disposal
Disposing of the device
Acrossed-out wheelie bin icon means: Batteriesand
rechargeable batteries, electrical orelectronicdevices
must not be disposed of withhousehold waste. Theymay
contain substancesthat areharmful tothe environment
and human health.
Consumersmust disposeof wasteelectrical devices, spent portable
batteriesand rechargeable batteriesseparatelyfromhousehold
wasteat an official collection point toensurethat theseitemsare
processed correctly. Information on returning theseitemsisavailable
fromthe seller. Sellersarerequired toaccept theseitemsfree of
charge.
Batteriesand rechargeable batteries, whicharenot per-
manentlyinstalled in wasteelectrical devices, must be
removed priortodisposal and must be disposed of sep-
arately.Lithiumbatteriesandbattery packsinallsystems
must onlybe retuned toacollection point when dis-
charged.Batteriesmustalwaysbeprotectedagainstshortcircuitsby
covering the poleswithadhesivetape.
All end usersareresponsible fordeleting anypersonal datastored on
wastedevicespriortotheirdisposal.
Disposal of batteries
Disused batteriesdonotbelong in domesticrefuse;theymustbe
disposed of asprescribed byregulations.
–Bringbatterieswhicharenolongerusabletothebatterycollection
point of the dealerorof yourlocal authority.
–Do not burnbatteries. Risk of explosion!

Thepackagingconsistsofcardboardandmarkedplastics
thatcanberecycled.
Takethesematerialstoarecyclingcenter.
Technicaldata
ArticlenumberH3960-3.75M
Dimensions1250x10x4mm* 3PCS
Illuminant 60 xLED/M
RatedVoltage 12V
Capacity 25W
Protectionclass II
Degreeofprojection IP20
Table of contents
Other Rocker Indoor Furnishing manuals
Popular Indoor Furnishing manuals by other brands

Dorel Living
Dorel Living DL8559-LS manual

Winners Only
Winners Only GX164PT-PB Assembly instructions

Birlea
Birlea URBMSURUS Assembly instructions

KI
KI Ruckus Tote Storage Assembly instructions

Whittier Wood Furniture
Whittier Wood Furniture McKenzie 2346AFGAC Assembly instructions

BLUM
BLUM Tandem Fitting instructions