manuals.online logo
Brands
  1. Home
  2. •
  3. Brands
  4. •
  5. Rocket Fish
  6. •
  7. Camera Accessories
  8. •
  9. Rocket Fish RF-TRPM70 User manual

Rocket Fish RF-TRPM70 User manual

QUICK SETUP GUIDE
70" Tripod Monopod Combo
RF-TRPM70
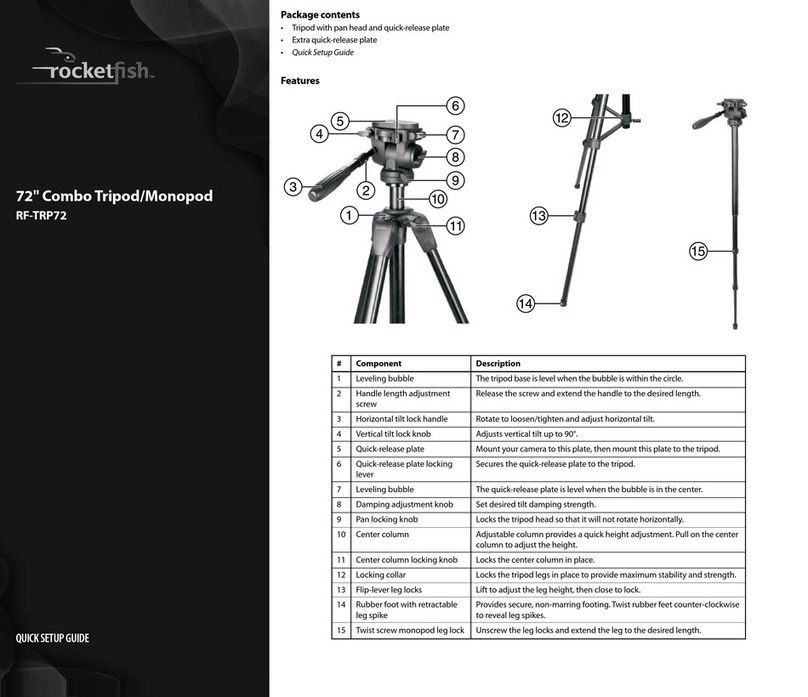
# Component
1 Leveling bubble
2 Center column
3 Leveling bubble
4 Horizontal tilt lock knob
5 Vertical lock button
6 Quick-release plate locking
lever
7 Quick-release plate
8 Vertical tilt lock knob
9 Handle
10 Pan locking knob
11 Center column locking knob
12 Locking collar
13 Flip-lever leg locks
14 Rubber foot with retractable
leg spike
15 Twist screw monopod leg lock
Description
The tripod base is level when the bubble is within the circle.
Adjustable column provides a quick height adjustment. Loosen the center
column locking knob (11), then pull on the center column to adjust the
height.
The panhead base is level when the bubble is within the circle.
Rotate this knob to loosen/tighten and adjust handle (9) for desired
horizontal tilt.
Push this button to release camera platform for vertical setting.
Pull lever to remove the quick-release plate. Place the quick-release plate back
on the tripod and press the lever back into place to secure the plate into
place.
Mount your camera to this plate, then mount this plate to the tripod.
Rotate this knob to loosen/tighten and adjust the vertical tilt up to 90°.
Rotate horizontal tilt lock knob (4) to loosen/tighten and adjust this handle for
desired horizontal tilt.
Rotate this knob to loosen/tighten and rotate the tripod head horizontally.
Rotate this knob to loosen/tighten and pull the center column (2) for desired
height.
Twist to lock the tripod legs in place to provide maximum stability and
strength.
Lift to adjust the leg height, then close to lock.
Provides secure, non-marring footing. Twist rubber feet counter-clockwise to
reveal leg spikes.
Unscrew the leg locks and extend the leg to the desired length.
Before using your new product, please read these
instructions to prevent any damage.
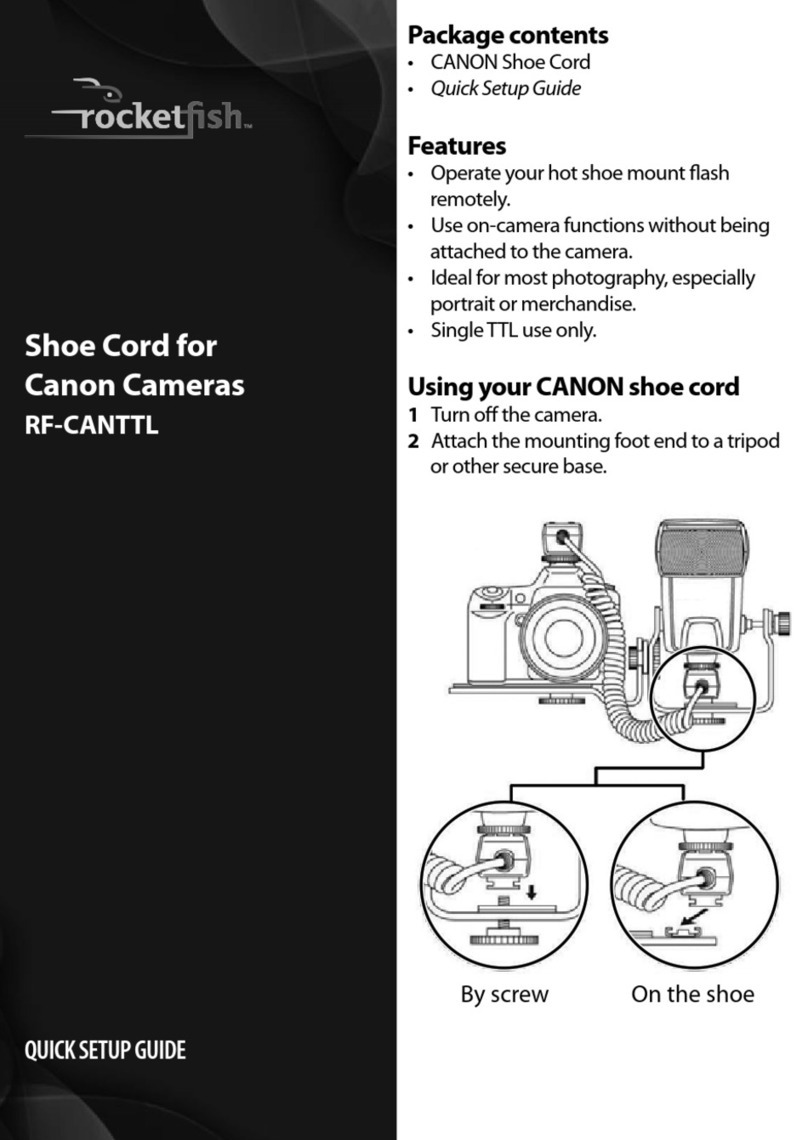
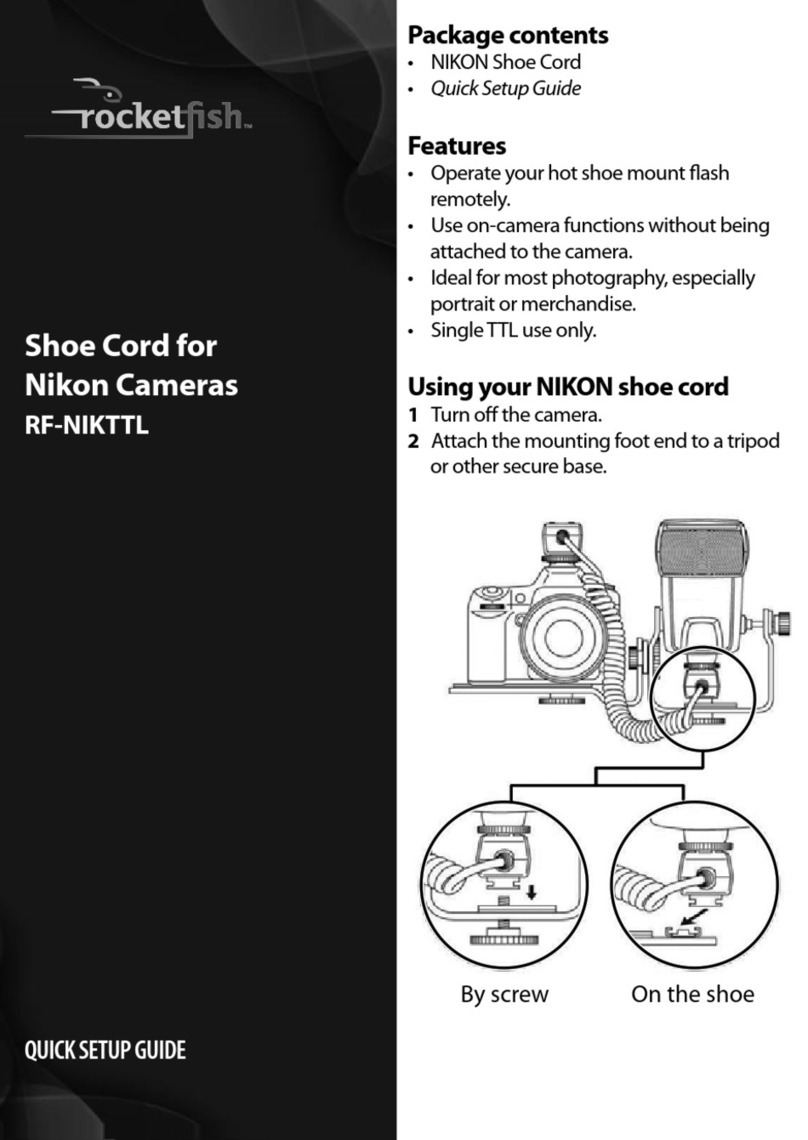
Package contents
• Tripod/Monopod with pan head and quick-release plate
• Extra quick-release plate
• Quick Setup Guide
Features
RF-TRPM70_13-0367_QSG_V3_EN.ai 1 4/9/2013 1:21:48 PMRF-TRPM70_13-0367_QSG_V3_EN.ai 1 4/9/2013 1:21:48 PM
90°
Using your tripod
1Open the ip-lever leg locks on
each leg. Pull out the leg sections
from the top down (thickest
section rst) to the length you
want. Pulling out the thickest
section rst gives your tripod
more stability and support.
2Close the leg locks to lock each
leg at the selected length.
Caution: Incorrectly securing a
leg lock can cause the tripod leg
to retract unexpectedly and
could result in damage to the
tripod or equipment mounted on the tripod.
3Loose the locking collar, then spread the legs to the preset angle.
Set the tripod on a rm surface. Tighten the locking collar to
stabilize your tripod. (Close the tripod by loosening the locking
collar and pushing in on any leg.)
4Adjust the height of the center column by releasing the center
column locking knob (A), raising the center column (B) to the
desired height and rotating center
column to desired shooting angle.
Then, tighten the center column
locking knob (A).
Caution: Do not raise the center
column over the safety line.
5Hold the quick-release plate
locking lever (A) open, then lift the
mounting plate (B) to remove it.
6Align the bottom of your camera
with the 1/4" mounting screw on
the plate, then secure your camera
to the plate with the screw. The
screw should be tight.
7Open the quick-release plate
locking lever and mount the plate
onto the tripod head. Push the
lever until it stops to secure the
plate.
8To adjust vertical tilt, push the
vertical lock button (A) to release
camera platform, loosen the
vertical tilt knob (B), then rotate
the plate up to 90° and tighten the
knob.
9To adjust horizontal tilt, rotate the
horizontal tilt lock knob
counter-clockwise, adjust handle
for desired horizontal tilt, then
tighten the lock knob.
10 To pan, turn the pan locking knob
counter-clockwise, pan the tripod
head as desired, then tighten to
lock in place.
V3 ENGLISH 13-0367
Using your monopod
1Loosen the center column locking knob, then
remove the center column from the tripod base.
2Unscrew the leg locks and extend the leg to the
desired length. Open the leg section from the top
down (thickest section rst) to reach the desired
height. Adjusting the thickest leg section rst gives
your monopod more stability and support.
3Tighten the leg locks to lock the monopod at the
desired height.
Note: Unscrew leg locks from bottom to top (rubber
foot A- smaller leg lock B - bigger leg lock C) to fold
monopod leg sections.
Caution: Incorrectly securing a leg lock can cause
the monopod leg to retract unexpectedly and could
result in damages to the monopod or equipment
mounted on the monopd.
4Hold the quick-release plate locking lever open, then lift the
mounting plate to remove it.
5Align the bottom of your camera with the 1/4" mounting screw
on the plate, then secure your camera to the plate with the screw.
The screw should be tight.
6Open the quick-release plate locking lever and mount the plate
onto the tripod head. Push the lever until it stops to secure the
plate.
7To adjust vertical tilt, push the vertical lock button to release
camera platform, loosen the vertical tilt knob, then rotate the
plate up to 90° and tighten the knob.
8To adjust horizontal tilt, rotate the horizontal tilt lock knob
counter-clockwise, adjust handle for desired horizontal tilt, then
tighten the lock knob.
9To pan, turn the pan locking knob counter-clockwise, pan the
monopod head as desired, then tighten to lock in place.
Important safety instructions
• Make sure that all levers, handles, knobs, and leg locks are
correctly tightened, and all three legs are fully opened before use.
• Do not carry or transport the tripod with camera equipment
attached (for example, over your shoulder, or cradled in your
arms).
• Do not store or expose your tripod to excessive heat or cold, or
use near any ame or re.
• Do not use any solvents or thinners to clean your tripod.
• Do not exceed the load limit of this product. Load limit is 8.8 lbs.
(4 kg).
Specifications
Tripod Monopod
Folded height: 26.8 in (68 cm) Folded height: 21.6 in (55 cm)
Max height: 70 in (178 cm) Max height: 57 in (145 cm)
Min height: 25.6 in (65 cm) Min height: 21.6 in (55 cm)
Net weight: 4.4 lbs (2 kgs) Net weight: 1.5 lbs (0.68 kgs)
Load capacity: 8.8 lbs (4 kgs) Load capacity: 8.8 lbs (4 kgs)
One-year limited warranty
Visit www.rocketshproducts.com for details.
ROCKETFISH is a registered trademark of BBY Solutions, Inc.Registered in
some countries.Distributed by Best Buy Purchasing, LLC, 7601 Penn Ave
South, Richfield,MN 55423 U.S.A.
©2013 BBY Solutions,Inc.All Rights Reserved.
lock loosen
RF-TRPM70_13-0367_QSG_V3_EN.ai 2 4/9/2013 1:21:48 PMRF-TRPM70_13-0367_QSG_V3_EN.ai 2 4/9/2013 1:21:48 PM
Other Rocket Fish Camera Accessories manuals

Rocket Fish RF-AC9023 User manual

Rocket Fish

Rocket Fish RF-AC9023 User manual

Rocket Fish RF-TRP72 User manual

Rocket Fish

Rocket Fish RF-TRP72 User manual

Rocket Fish RF-GWII028 User manual

Rocket Fish

Rocket Fish RF-GWII028 User manual

Rocket Fish RF-GWII053 Parts list manual

Rocket Fish

Rocket Fish RF-GWII053 Parts list manual

Rocket Fish RF-GWII053 Installation and operation manual

Rocket Fish

Rocket Fish RF-GWII053 Installation and operation manual

Rocket Fish RF-GWII053 User manual

Rocket Fish

Rocket Fish RF-GWII053 User manual

Rocket Fish RF-CANTTL User manual

Rocket Fish

Rocket Fish RF-CANTTL User manual

Rocket Fish RF-KL12 Installation and operation manual

Rocket Fish

Rocket Fish RF-KL12 Installation and operation manual

Rocket Fish RF-MONO70C Parts list manual

Rocket Fish

Rocket Fish RF-MONO70C Parts list manual

Rocket Fish RF-GXBX1202 Installation and operation manual

Rocket Fish

Rocket Fish RF-GXBX1202 Installation and operation manual

Rocket Fish RF-MONO70C User manual

Rocket Fish

Rocket Fish RF-MONO70C User manual

Rocket Fish RF-GWII053 User guide

Rocket Fish

Rocket Fish RF-GWII053 User guide

Rocket Fish RF-MONO70C Installation and operation manual

Rocket Fish

Rocket Fish RF-MONO70C Installation and operation manual

Rocket Fish RF-GXBX1202 Training manual

Rocket Fish

Rocket Fish RF-GXBX1202 Training manual

Rocket Fish RF-NIKTTL User manual

Rocket Fish

Rocket Fish RF-NIKTTL User manual

Rocket Fish RF-KL12 User manual

Rocket Fish

Rocket Fish RF-KL12 User manual

Rocket Fish RF-GXBX1202 User manual

Rocket Fish

Rocket Fish RF-GXBX1202 User manual

Rocket Fish RF-TRP65C User manual

Rocket Fish

Rocket Fish RF-TRP65C User manual

Popular Camera Accessories manuals by other brands

Growatt GBLI 6532 manual

Growatt

Growatt GBLI 6532 manual

Glide Gear F2F 25 user manual

Glide Gear

Glide Gear F2F 25 user manual

Gitzo GT2540EX parts list

Gitzo

Gitzo GT2540EX parts list

Canon VI-L manual

Canon

Canon VI-L manual

AMPHIBICO VH-2000 Instructional manual

AMPHIBICO

AMPHIBICO VH-2000 Instructional manual

Gardena BLi-40/160 Operator's manual

Gardena

Gardena BLi-40/160 Operator's manual

EB A-038105-03 user manual

EB

EB A-038105-03 user manual

Dräger Evita V Series manual

Dräger

Dräger Evita V Series manual

Nikon AF-S DX NIKKOR 18-300mm f/3.5-5.6G ED VR user manual

Nikon

Nikon AF-S DX NIKKOR 18-300mm f/3.5-5.6G ED VR user manual

Tiffen Vista RangerV Specification sheet

Tiffen

Tiffen Vista RangerV Specification sheet

DUR-line SF 2500 Pro manual

DUR-line

DUR-line SF 2500 Pro manual

SEC CELLYTE 6-12TLA Installation and operating instructions

SEC

SEC CELLYTE 6-12TLA Installation and operating instructions

Power works P24B2 Operator's manual

Power works

Power works P24B2 Operator's manual

Panasonic WV-7120D operating instructions

Panasonic

Panasonic WV-7120D operating instructions

Panasonic HFS1442A operating instructions

Panasonic

Panasonic HFS1442A operating instructions

Pentax Bulk Film Magazine MX manual

Pentax

Pentax Bulk Film Magazine MX manual

Aquatica Digital A30D Instruction

Aquatica Digital

Aquatica Digital A30D Instruction

Aquatica Digital 20061 operating manual

Aquatica Digital

Aquatica Digital 20061 operating manual

manuals.online logo
manuals.online logoBrands
  • About & Mission
  • Contact us
  • Privacy Policy
  • Terms and Conditions

Copyright 2025 Manuals.Online. All Rights Reserved.