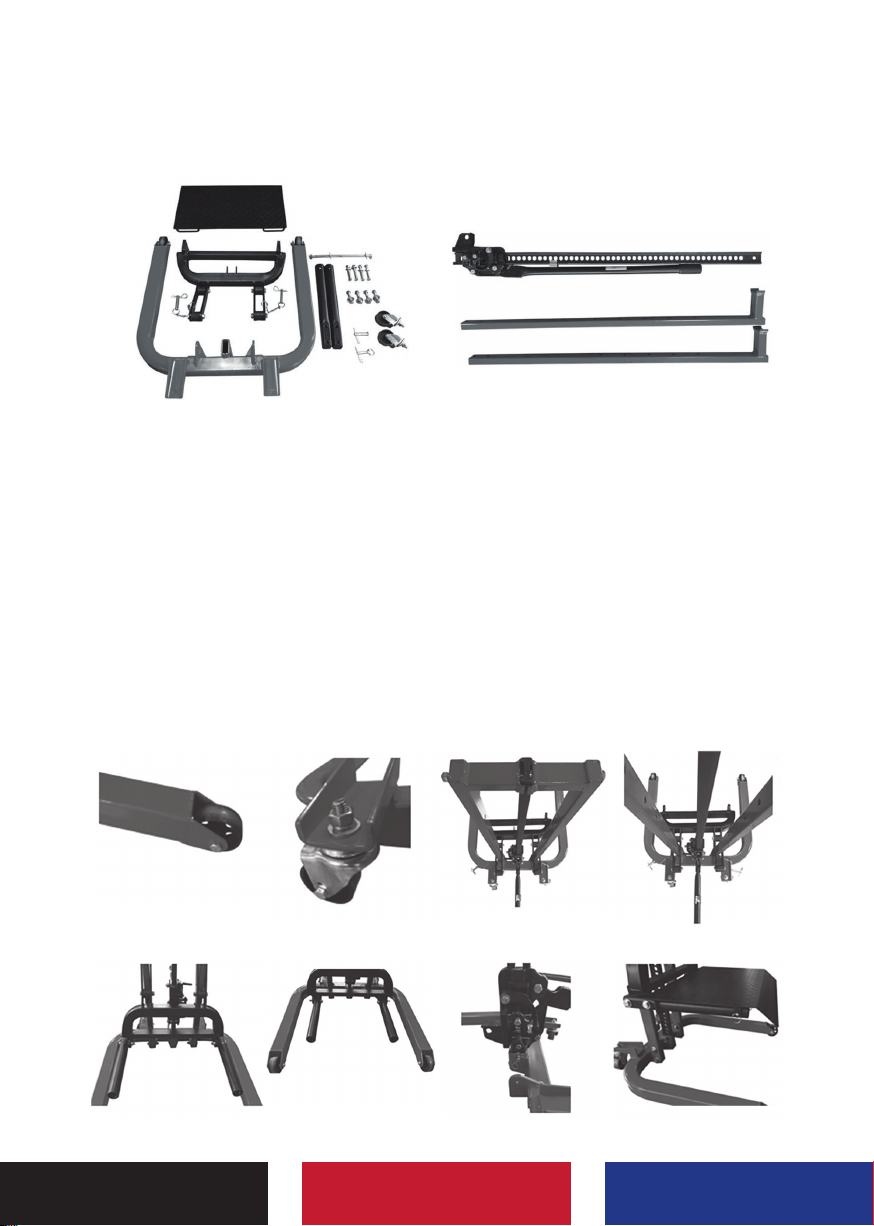
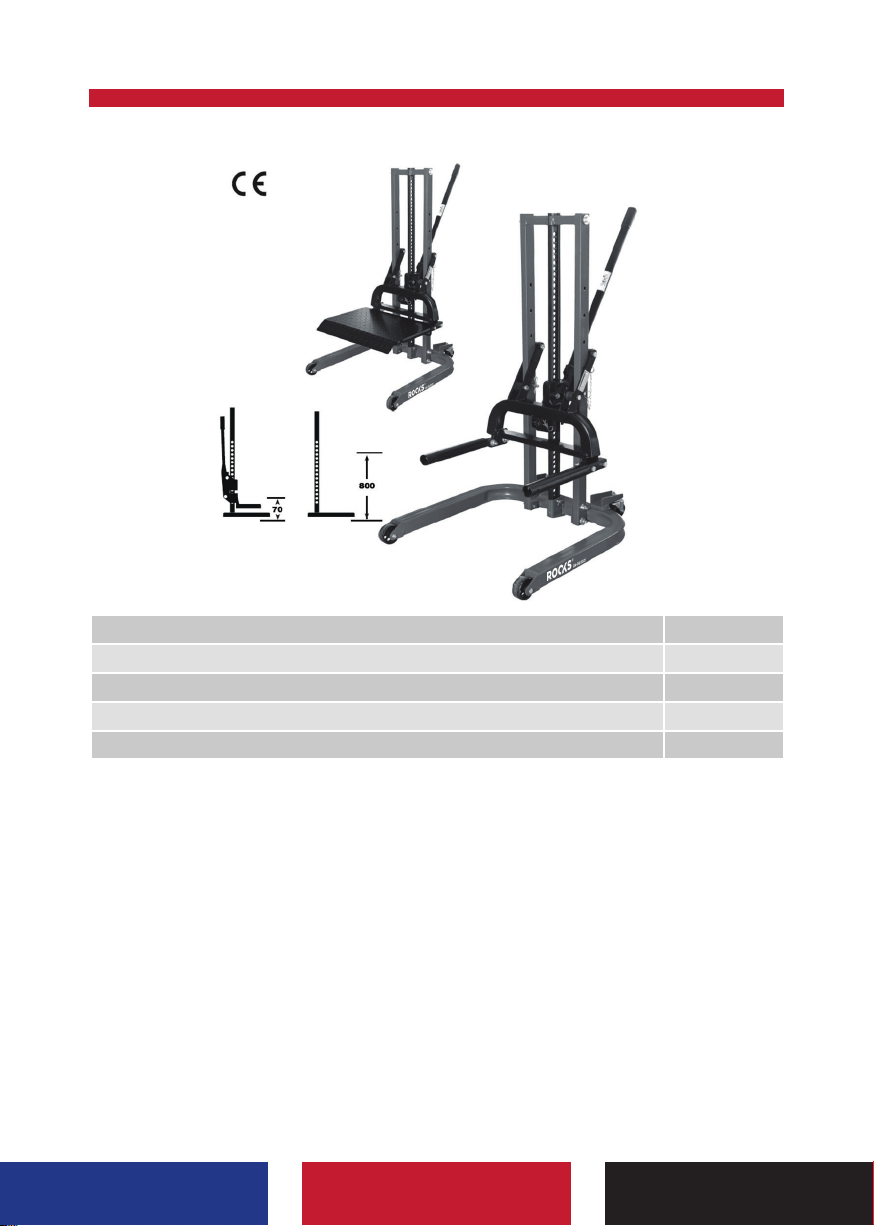
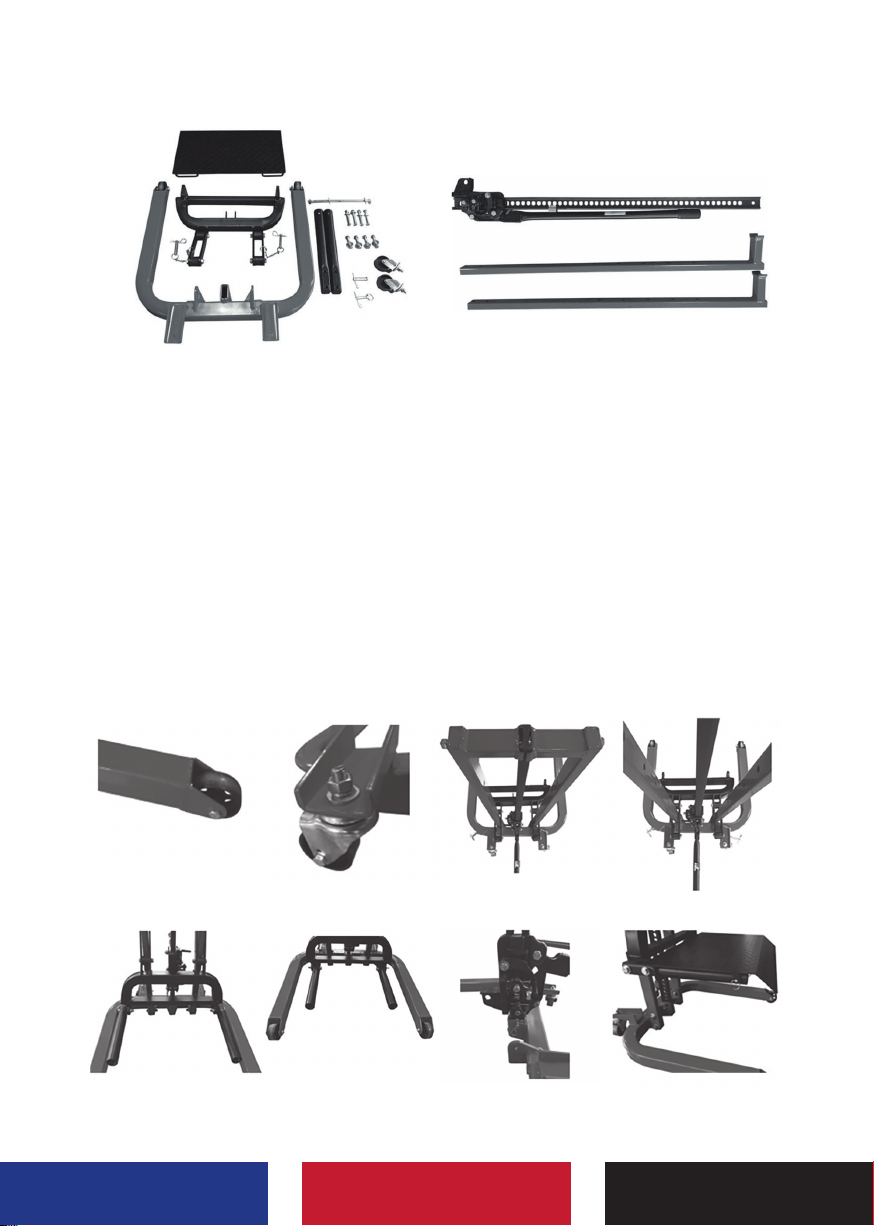
Rocks OK-08.0021 User manual

EN |PL |DE
User manual / Instrukcja obsługi / Bedienungsanleitung
OK-08.0021
Mobile lift, single column, mechanical, 815 kg, 70-710 mm
Podnośnik mobilny, jednokolumnowy, mechaniczny, 815 kg, 70-710 mm
Mobile Hebebühne, einsäulig, mechanisch, 815 kg, 70-710 mm
EN
PL
DE

3
2
Thank you very much for your excellent choice and purchase of the
ROOKS device. Please read the operating manual for all important safety
and usage instructions.
Bardzo dziękujemy za Twój doskonały wybór i zakup urządzenia ROOKS.
Prosimy przeczytaj instrukcję obsługi, w której znajdziesz wszystkie ważne
wskazówki dotyczące bezpieczeństwa i użytkowania.
Vielen Dank für Ihre ausgezeichnete Wahl und den Kauf des ROOKS-
Geräts. Bitte lesen Sie die Bedienungsanleitung, in der Sie alle wichtigen
Sicherheits - und Anwendungshinweise finden.
EN
PL
DE
TECHNICAL DATA
Lifting capacity 815 kg
Weight 63 kg
Height min 70 mm
Height max 800 mm
Height 1245 mm
EN

3
2
INTRODUCTION
The ROOKS single-column mobile lift is used for safe, spot lifting of passenger cars in
order to perform service repairs. The lift has a strong construction and an ecient manual
lifting and lowering mechanism. The strong L-shaped arm allows you to lift the car in the
range of 70-800 mm. The jack has a U-shaped wheel holder with two-point support and
an additional plate for lifting the car over the threshold.
SAFETY INFORMATION
Read and understand the instructions and follow them. Never work when you are tired or
under the influence of alcohol and stimulants. Always use common sense and take care of
your work safety. The device is intended for use by trained and qualified adult employees.
• Work with the use of personal protective equipment, goggles and protective gloves.
• Do not overload the device.
• Always work on even and hard surfaces (concrete, cobblestones, tiles, asphalt).
• Always secure the wheels with chocks on both sides.
• Jack up the car and immediately rest it on the brace. It is not allowed to work on the
lift itself, without a safety support.
• The jack is intended only for raising and lowering cars.
• It is forbidden to move the jack while a car is resting on it.
• It is not allowed to work on soft ground.
• It is not allowed to work during strong gusts of wind.
• It is unacceptable to work with a damaged lift.
• When lifting and lowering, it is absolutely necessary to use the safety pins, moving
them gradually in the frame in order to secure the lifting mechanism.
• It is strictly forbidden to put your head or other body parts between the lifting jack
and the frame.

5
4
PREPARATION AND WORK
The lift is folded and delivered in two packages and requires self-assembly before use.
Package 1/2 Package 2/2
Installation instructions
1. Assemble the 2 fixed front wheels on the chassis.
2. Assemble the 2 rear swivel wheels on the chassis.
3. Attach the posts to the chassis.
4. Place the lifting mechanism between the two posts. The lift lever must be mounted
on the same side as the guide rollers. The forks must be mounted on the side
of the fixed rollers.
5. Align the posts and raise slightly the lifting mechanism to fit the pin of the lifting
mechanism, then place the safety pin.
6. Make sure the forks are resting on the plattorm.
7. Assemble the lifting mechanism.
8. Install the lifting plate on the 2 forks and secure it by fixing the pins to connect the
lifting plate to the 2 forks.
1 2 3 4
5 6 7 8

5
4
Lifting:
• Slide the forks of the jack under the wheel.
• Make sure there are no people in the lifting area.
• If the vehicle tips over, a safety perimeter of at least 3 meters must be provided.
• Place chocks under the opposite wheel to immobilize the car.
• Move the mechanism lever to the UP position (2) - lifting.
• Pump the jack to raise the car.
• Move the safety pins (1) to the next holes on the frame so that the pin is always as
close as possible under the lifting mechanism.
• Be careful not to stand between the jack and the frame, always stand to the side
of the jack to avoid being hit by it.
• Regularly clean and lubricate the lifting mechanism.
Lowering:
• Move the mechanism lever to the DOWN position (3).
• Stand to the side of the jack and carefully start pumping it - note the jack
will work quickly.
• Move the safety pins down - one step at a time until the vehicle is fully lowered.

6
TECHNICAL DRAWING
No. Name Number No. Name Number
1 Chasis 1 16 Flat washer 4
2 Front wheel axle 2 17 Mounting pin 1
3 Front wheel axle nut 2 18 Guide roll 4
4 Front wheel axle washer 4 19 Spacers 4
5 Front wheel axle spacer 2 20 Safety pin 2
6 Front fixed castor 2 21 Fork support 1
7 Rear swivel castor 2 22 Lifting mechanism pin 1
8 Nut 13 23 Lifting fork 2
9 <Beta> pin 6 24 Lifting plate pin 2
10 Lifting mechanism pin 1 25 Fork fixing screw 4
11 Screw 4 26 Lifting plate 1
12 Flat washer 14 27 Mounting 2
13 Nut 2 28 Lifting mechanism 1
14 Flat washer 2 29 Guide screws 4
15 Lock washer 2

7
DANE TECHNICZNE
Udźwig 815 kg
Waga 63 kg
Wysokość minimalna 70 mm
Wysokość maksymalna 800 mm
Wysokość 1245 mm
WPROWADZENIE
Jednokolumnowy podnośnik mobilny ROOKS służy do bezpiecznego, punktowego
unoszenia samochodów osobowych, w celu wykonania napraw serwisowych. Podnośnik
posiada mocną konstrukcję oraz sprawny mechanizm unoszenia i opuszczania ręcznego.
Mocne ramię o konstrukcji litery L pozwala na unoszenie samochodu w zakresie
70-800 mm. Podnośnik posiada uchwyt koła w kształcie litery U z dwupunktowym
podparciem oraz dodatkową płytę do unoszenia samochodu za próg.
PL

9
8
INFORMACJE DOTYCZĄCE BEZPIECZEŃSTWA
Przeczytaj ze zrozumieniem instrukcję i stosuj się do informacji w niej zawartych. Nigdy
nie pracuj w stanie przemęczenia oraz pod wpływem alkoholu i używek. Zawsze używaj
zdrowego rozsądku i zadbaj o swoje bezpieczeństwo pracy. Urządzenie przeznaczone jest
do pracy dla przeszkolonych i pełnoletnich pracowników wykwalifikowanych.
• Pracuj z użyciem środków ochrony osobistej, okularów i rękawic ochronnych.
• Nie przeciążaj urządzenia.
• Pracuj zawsze na równej i twardej nawierzchni (beton, kostka, kafle, asfalt).
• Zawsze zabezpiecz koła klinami z dwóch stron.
• Podnieś samochód i natychmiast oprzyj go na podporze zabezpieczającej.
Niedopuszczalna jest praca na samym podnośniku bez podpory zabezpieczającej.
• Podnośnik służy wyłącznie do podnoszenia i opuszczania samochodu.
• Zabronione jest przesuwanie podnośnika z opartym na nim samochodem.
• Niedopuszczalne jest pracowanie na miękkim gruncie.
• Niedopuszczalne jest pracowanie podczas mocnych podmuchów wiatru.
• Niedopuszczalna jest praca uszkodzonym podnośnikiem.
• Podczas podnoszenia i opuszczania należy bezwzględnie używać bolców zabezpie-
czających, przekładając je stopniowo w ramie w celu zabezpieczenia mechanizmu
podnoszenia.
• Kategorycznie zabrania się wkładania głowy i innych części ciała pomiędzy lewarek
podnoszący a ramę.
PRZYGOTOWANIE I PRACA
Podnośnik dostarczany jest w stanie złożonym w dwóch kartonach i wymaga
samodzielnego złożenia przed użyciem.

9
Paczka 1/2 Paczka 2/2
Instrukcja montażu
1. Zamontuj 2 stałe przednie koła na podwoziu.
2. Zamontuj 2 tylne koła skrętne na podwoziu.
3. Przymocuj słupki do podwozia.
4. Umieść mechanizm podnoszący między dwoma słupkami. Dźwignia podnoszenia
musi być zamontowana po tej samej stronie co rolki prowadzące. Widły muszą być
zamontowane z boku stałych rolek.
5. Wyrównaj słupki i lekko podnieś mechanizm podnoszący, aby pasował do sworznia
mechanizmu podnoszącego, a następnie umieść sworzeń zabezpieczający.
6. Upewnij się, że widelce spoczywają na platformie.
7. Zamontuj mechanizm podnoszący.
8. Zamontuj płytę do podnoszenia na 2 widłach i zabezpiecz ją, mocując kołki, aby
połączyć płytę do podnoszenia z 2 widłami.
1 2 3 4
5 6 7 8

11
10
Podnoszenie:
• Wsuń widły podnośnika pod koło.
• Upewnij się, że w obszarze podnoszenia nie przebywają żadne osoby.
• W przypadku przechylenia pojazdu należy zapewnić obwód bezpieczeństwa
o długości co najmniej 3 metrów.
• Umieść kliny zabezpieczające pod przeciwległym kołem, aby unieruchomić samochód.
• Przesuń dźwignię mechanizmu w pozycję DO GÓRY (2) – podnoszenie.
• Pompuj lewarkiem, aby podnieść samochód.
• Przekładaj sworznie zabezpieczające (1) do kolejnych otworów na ramie, tak żeby
bolec był zawsze możliwie blisko pod mechanizmem podnoszenia.
• Zachowuj ostrożność, aby nie stanąć pomiędzy lewarkiem a ramą, stój zawsze z boku
lewarka, aby nie zostać nim uderzonym.
• Regularnie czyść i konserwuj olejem mechanizm podnoszenia.
Opuszczanie:
• Przesuń dźwignię mechanizmu w pozycje W DÓŁ (3).
• Stań z boku lewarka i ostrożnie zacznij nim pompować. Uwaga – lewarek będzie
pracował szybko.
• Przesuwaj sworznie zabezpieczające w dół – co jeden stopień aż do pełnego
opuszczenia pojazdu.

11
10
RYSUNEK TECHNICZNY
No. Name Number No. Name Number
1 Chasis 1 16 Flat washer 4
2 Front wheel axle 2 17 Mounting pin 1
3 Front wheel axle nut 2 18 Guide roll 4
4 Front wheel axle washer 4 19 Spacers 4
5 Front wheel axle spacer 2 20 Safety pin 2
6 Front fixed castor 2 21 Fork support 1
7 Rear swivel castor 2 22 Lifting mechanism pin 1
8 Nut 13 23 Lifting fork 2
9 <Beta> pin 6 24 Lifting plate pin 2
10 Lifting mechanism pin 1 25 Fork fixing screw 4
11 Screw 4 26 Lifting plate 1
12 Flat washer 14 27 Mounting 2
13 Nut 2 28 Lifting mechanism 1
14 Flat washer 2 29 Guide screws 4
15 Lock washer 2

13
12
TECHNISCHE DATEN
Tragfähigkeit 815 kg
Waage 63 kg
Höhe min 70 mm
Höhe max 800 mm
Höhe 1245 mm
EINLEITUNG
Die mobile Einsäulen-Hebebühne ROOKS dient zum sicheren, punktuellen Anheben
von Pkw zur Durchführung von Service-Reparaturen. Die Hebebühne hat eine robuste
Konstruktion und einen ezienten manuellen Hebe- und Senkmechanismus. Mit dem
starken L-förmigen Arm können Sie das Auto im Bereich von 70-800 mm anheben. Der
Wagenheber hat einen U-förmigen Radhalter mit Zweipunktauflage und eine zusätzliche
Platte zum Anheben des Autos über die Schwelle.
DE

13
12
SICHERHEITSINFORMATION
Lesen und verstehen Sie die Anweisungen und befolgen Sie sie. Arbeiten Sie niemals, wenn
Sie müde sind oder unter dem Einfluss von Alkohol und Aufputschmitteln stehen. Verwenden
Sie immer Ihren gesunden Menschenverstand und achten Sie auf Ihre Arbeitssicherheit.
Das Gerät ist für den Gebrauch durch geschultes und qualifiziertes erwachsenes Personal
bestimmt.
• Arbeiten Sie mit der Verwendung von persönlicher Schutzausrüstung, Schutzbrille
und Schutzhandschuhen.
• Überlasten Sie das Gerät nicht.
• Arbeiten Sie immer auf ebenen und harten Oberflächen (Beton, Kopfsteinpflaster,
Fliesen, Asphalt).
• Sichern Sie die Räder immer beidseitig mit Unterlegkeilen.
• Fahrzeug aufbocken und sofort auf der Strebe abstellen. An der Hebebühne selbst
darf ohne Sicherheitsstütze nicht gearbeitet werden.
• Der Wagenheber ist nur zum Anheben und Absenken des Fahrzeugs bestimmt.
• Es ist verboten, den Wagenheber zu bewegen, während das Auto darauf steht.
• Arbeiten auf weichem Untergrund sind nicht erlaubt.
• Bei starken Windböen darf nicht gearbeitet werden.
• Es ist nicht akzeptabel, mit einer beschädigten Hebebühne zu arbeiten.
• Beim Heben und Senken unbedingt die Sicherungsstifte verwenden und diese
schrittweise im Rahmen bewegen, um den Hebemechanismus zu sichern.
• Es ist strengstens verboten, den Kopf oder andere Körperteile zwischen den
Wagenheber und den Rahmen zu bringen.

15
14
VORBEREITUNG UND ARBEIT
Der Lifter wird gefaltet in zwei Kartons geliefert und muss vor Gebrauch selbst
zusammengebaut werden.
Paket 1/2 Paket 2/2
Installationsanleitung
1. Montieren Sie die 2 festen Vorderräder am Fahrgestell.
2. Montieren Sie die 2 hinteren Schwenkräder am Fahrgestell.
3. Befestigen Sie die Pfosten am Chassis.
4. Platzieren Sie den Hebemechanismus zwischen den beiden Pfosten. Der Hubhebel
muss auf der gleichen Seite wie die Führungsrollen montiert werden. Die Gabeln
müssen seitlich an den Bockrollen montiert werden.
5. Richten Sie die Pfosten aus und heben Sie den Hebemechanismus leicht an, um den
Stift des Hebemechanismus einzupassen, und setzen Sie dann den Sicherheitsstift ein.
6. Stellen Sie sicher, dass die Gabeln auf der Plattform aufliegen.
7. Bauen Sie den Hubmechanismus zusammen.
8. Installieren Sie die Hubplatte an den 2 Gabeln und sichern Sie sie, indem Sie die Stifte
befestigen, um die Hubplatte mit den 2 Gabeln zu verbinden.
1 2 3 4
5 6 7 8

15
14
Heben:
• Schieben Sie die Gabeln des Wagenhebers unter das Rad.
• Stellen Sie sicher, dass sich keine Personen im Hebebereich aufhalten.
• Beim Umkippen des Fahrzeugs muss ein Sicherheitsbereich von mindestens
3 Metern vorhanden sein.
• Legen Sie Unterlegkeile unter das gegenüberliegende Rad, um das Fahrzeug
zu blockieren.
• Bewegen Sie den Mechanismushebel in die AUF-Position - Anheben (2).
• Pumpen Sie den Wagenheber, um das Auto anzuheben.
• Bewegen Sie die Sicherheitsstifte (1) zu den nächsten Löchern am Rahmen, sodass
der Stift immer so nah wie möglich unter dem Hebemechanismus ist.
• Achten Sie darauf, nicht zwischen dem Wagenheber und dem Rahmen zu stehen,
sondern stehen Sie immer neben dem Wagenheber, um nicht von ihm getroen
zu werden.
• Reinigen und schmieren Sie den Hubmechanismus regelmäßig.
Senkung:
• Bewegen Sie den Hebel des Mechanismus in die Position UNTEN (3).
• Stellen Sie sich neben den Wagenheber und fangen Sie vorsichtig an zu
pumpen – beachten Sie, dass der Wagenheber schnell arbeitet.
• Bewegen Sie die Sicherheitsstifte nach unten – Schritt für Schritt, bis das
Fahrzeug vollständig abgesenkt ist.

17
16
TECHNISCHE ZEICHNUNG
No. Name Number No. Name Number
1 Chasis 1 16 Flat washer 4
2 Front wheel axle 2 17 Mounting pin 1
3 Front wheel axle nut 2 18 Guide roll 4
4 Front wheel axle washer 4 19 Spacers 4
5 Front wheel axle spacer 2 20 Safety pin 2
6 Front fixed castor 2 21 Fork support 1
7 Rear swivel castor 2 22 Lifting mechanism pin 1
8 Nut 13 23 Lifting fork 2
9 <Beta> pin 6 24 Lifting plate pin 2
10 Lifting mechanism pin 1 25 Fork fixing screw 4
11 Screw 4 26 Lifting plate 1
12 Flat washer 14 27 Mounting 2
13 Nut 2 28 Lifting mechanism 1
14 Flat washer 2 29 Guide screws 4
15 Lock washer 2

17
16
We / My / Wir: Auto Partner SA
ul. Ekonomiczna 20, 43-150 Bieruń, Polska
We declare with full responsibility that the device / oświadczamy, że urządzenie
/ Wir erklären, dass das Gerät:
Mobile lift, single column, mechanical, 815 kg, 70-710 mm
Podnośnik mobilny, jednokolumnowy, mechaniczny, 815 kg, 70-710 mm
Mobile Hebebühne, einsäulig, mechanisch, 815 kg, 70-710 mm
Model:
OK-08.0021
towhichthis declarationapplies, complies with thefollowingnormative documents/ którego
dotyczy niniejsza deklaracja, jest zgodne z poniższymi dokumentami normatywnymi / auf
die sich diese Erklärung bezieht, den untenstehenden normativen Dokumenten entspricht
complies:
• Mechinery Directive / Dyrektywa mechaniczna / Mechanische Direktive:
2006/42/EU
And it is compliant with EN standards / I jest zgodny ze standardami EN
/ Und es ist konform mit den EN-Normen:
• EN 1494:2000 / A1:2008
Responsible person / Osoba odpowiedzialna / Verantwortlich:
Name, surname / Imię i nazwisko / Vorname Familienname: Szymon Zawada
Position / Stanowisko / Position : ROOKS Development Director
/ Dyrektor rozwoju ROOKS / ROOKS-Entwicklungsleiter
Note: This declaration loses its validity if technical or operational modifications are
made without the manufacturer’s consent.
Uwaga: Niniejsza deklaracja traci ważność, jeśli bez zgody producenta wprowadzone
zostaną modyfikacje techniczne lub operacyjne.
Hinweis: Diese Erklärung verliert ihre Gültigkeit, wenn technische oder betriebliche
Änderungen ohne Zustimmung des Herstellers vorgenommen werden.
Podpis / Signature
CERTIFICATE / CERTYFIKAT / ZERTIFIKAT
Data i miejsce:
Date and place:
Domasław, 20.11.2022
DECLARATION OF CONFORMITY
DEKLARACJA ZGODNOŚCI
EU-KONFORMITÄTSERKLÄRUNG

19
18

19
18

Table of contents
Languages:
Popular Lifting System manuals by other brands

Guardian
Guardian Voyager Portable Ceiling Lift System 98000 Installation instructions manual

DINGLI
DINGLI BA14J-AWD Operation and maintenance manual

Bend-Pak
Bend-Pak HD-7ZM Installation and operation manual

Bend-Pak
Bend-Pak HD-9AE Installation and operation manual

Bend-Pak
Bend-Pak XPR-10 Series Installation and operation manual

Bend-Pak
Bend-Pak HDS-14 Installation and operation manual

Dino lift
Dino lift DINO XT II 160 operating instructions

Bend-Pak
Bend-Pak HD-14T Installation and operation manual

PRO LIFTS
PRO LIFTS VMB TE-076 Operating instructions & user manual

SAFE-TECH
SAFE-TECH Palift MK3 user manual

Bend-Pak
Bend-Pak HDS-14 Service manual

Bend-Pak
Bend-Pak XPR-10AS-168 Service manual