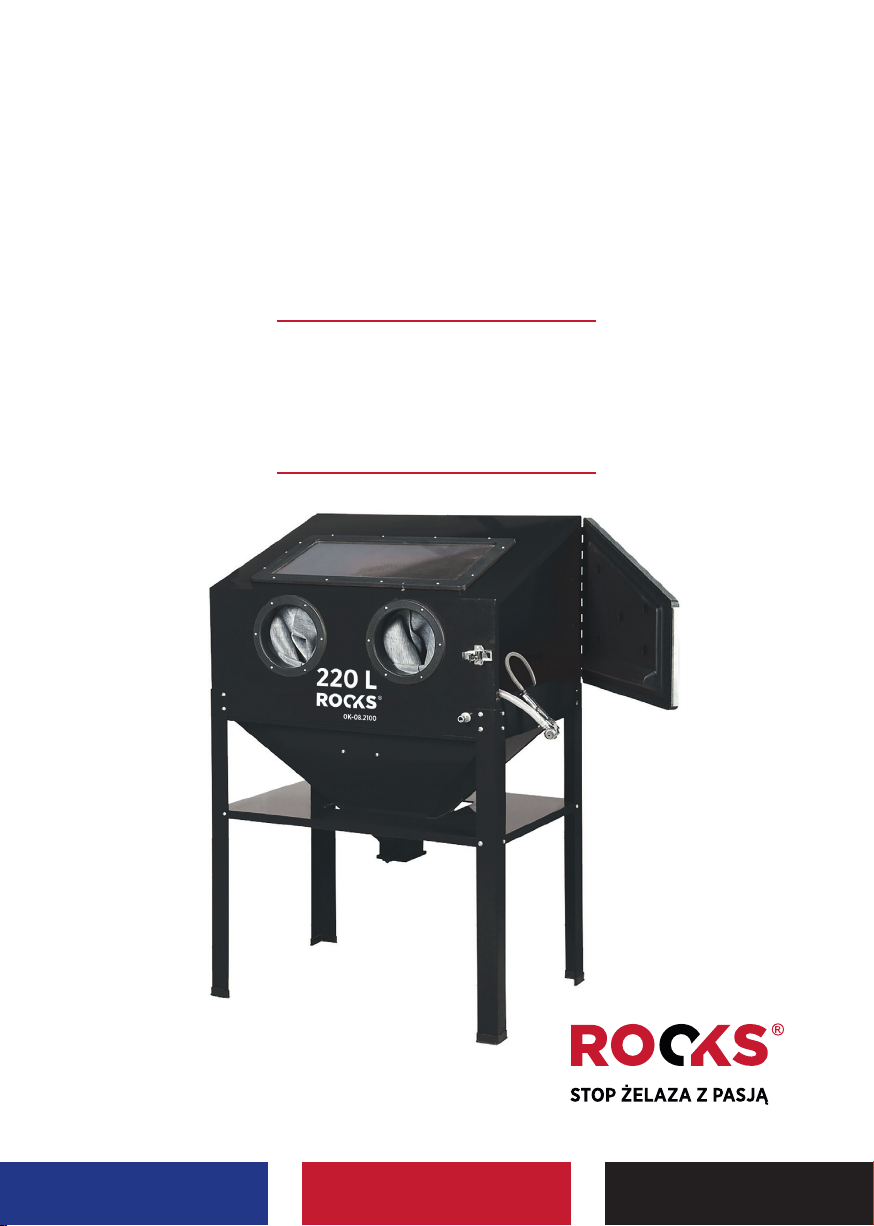
Rocks OK-08.2102 User manual

EN |PL |DE
USER MANUAL
INSTRUKCJA OBSŁUGI
BEDIENUNGSANLEITUNG
OK-08.2102
Sandblasting cabin 220 l, 8 bar
Piaskarka kabinowa 220 l, 8 bar
Sandstrahlkabine 220 l, 8 bar

3
2
EN TECHNICAL DATA
EN CONSTRUCTION
Max work pressure
Work pressure
Media capacity
Dimensions (LxWxH)
Work light
Power suply
Recommended
vacuum flow
Weight
Ceramic nozzles
diameters
EN PL DE
PL DANE TECHNICZNE
PL BUDOWA
Max. ciśnienie pracy
Ciśnienie robocze
Pojemność czynnika
Wymiary (DxSxW)
Lampa robocza
Zasilanie
Zalecany przepływ
powietrza
Waga
Średnice dysz
ceramicznych
DE TECHNISCHE DATEN
DE WERKZEUGBAU
Max. Arbeitsdruck
Arbeitsdruck
Medienkapazität
Abmessungen (LxBxH)
Arbeitslampe
Energieversorgung
Empfohlener
Vakuumfluss
Gewicht
Durchmesser
der Keramikdüsen
8,5 bar
6,3 bar
22 l
85 x 55 x 139 cm
12 V
230 V / 50 Hz
400-700 l/min.
53 kg
4-5-6-7 mm

3
2
1
2
3
4
5
6
7
8
9
10
11
12
13
14
15
16
17
18
19
20
21
22
23
24
25
26
27
28
29
30
31
32
33
34
35
36
37
38
39
40
41
42
43
EN PL DE
Cabinet
Air outlet gasket
(breather)
Cover of behind intake
vent
Hinge
Plastic door
Metal liner
Gloves
Clamp for glove x 2
Mounting ring glove x 2
Rubber insert x 2
Suction flange
for vacucleaner
Cover of suction flange
Switch
Switch box low voltage
Plug low voltage
Adaptor
Plastic frame
Plexiglass
Glass
Protection film
Sealant cotton
Knob
Air adapter nut
LED lamp
Light clamp x 2
Steel screen
Sealant cotton
Cabinet funnel
Abrasive suction pipe
Abrasive removal cover
Cover lock
Shelf
Legs x 4
Feet x 4
Abrasive intake hose
Abrasive gun
Nozzle adapter nut
Nozzle x 4
Clamp
Air hose adapter x 2
Clamp x 2
Air hose
Flat washer x 2
The sandblaster should
be completed and prepared
before the first use.
Kabina
Uszczelka wylotu powietrza
(odpowietrznik)
Osłona wylotu powietrza
Zawias
Boczne drzwi plastikowe
Metalowa wkładka
Rękawice
Obejma rękawic x 2
Pierścień montażowy rękawicy x 2
Podkłądka gumowa x 2
Kołnierz ssący do odkurzacza
Przykrywka kołnierza
Włącznik
Skrzynka włącznika
Wtyczka niskiego napięcia
Adapter
Ramka plastikowa
Pleksi
Szkło
Folia ochronna
Uszczelka bawełniana
Pokrętło
Nakrętka adaptera powietrza
Lampa LED
Zacisk lampy LED x 2
Ekran stalowy
Uszczelka bawełniana
Lejek kabiny
Rura ssąca ścierniwa
Zamknięcie przewodu ścierniwa
Zamek pokrywy
Półka
Noga x 4
Stopa x 4
Przewód wlotu ścierniwa
Pistolet piaskarki
Nakrętka dyszy
Dysza x 4
Zacisk
Adapter przewodu x 2
Zacisk x 2
Przewód powietrza
Podkładka płaska x 2
Piaskarkę należy skompletować
i przygotować przed pierwszym
użyciem.
Kabinett
Luftauslassdichtung (Entlüftung)
Abdeckung hinter Ansaugönung
Scharnier
Kunststotür
Metall-Liner
Handschuhe
Klemme für Handschuh x 2
Montageringhandschuh x 2
Gummieinsatz x 2
Saugflansch für den Staubsauger
Abdeckung Saugflansch
Schalter
Schaltkasten Niederspannung
Stecker Niederspannung
Adapter
Plastik Rahmen
Plexiglas
Glass
Schutzfilm
Dichtsto Baumwolle
Knopf
Luftadaptermutter
Leichte Niederspannung
Lichtklemme x 2
Stahlsieb
Dichtsto Baumwolle
Schranktrichter
Abrasives Saugrohr
Abdeckung zum Entfernen
von Schleifmitteln
Deckelschloss
Regal
Beine x 4
Füße x 4
Abrasiver Ansaugschlauch
Schleifpistole
Düsenadaptermutter
Düse x 4
Klemme
Luftschlauchadapter x 2
Klemme x 2
Luftschlauch
Unterlegscheibe x 2
Der Sandstrahler sollte vor dem
ersten Gebrauch fertiggestellt
und vorbereitet werden.

5
4
APPLICATION
The Sandblasting cabin is used for cleaning, polishing and grinding contaminated and rusty metal,
wooden and composite surfaces with a dry abrasive, most often sand or corundum. The sandblasting
cabin allows for precise, dust-free and environmentally friendly sandblasting of technical and
decorative elements. Removes old paint, rust, dry dirt and smoothes surface defects on the material.
SAFETY INFORMATION
READ AND UNDERSTAND ALL INSTRUCTIONS REGARDING THE USE AND CARE OF TOOLS.
FAILURE TO OBSERVE THEM COULD RESULT IN DAMAGE TO THE BODY OR PROPERTY,
AND THE LOSS OF THE WARRANTY. IMMEDIATELY AFTER PURCHASE CHECK THAT THE PRODUCT
IS COMPLETE AND UNDAMAGED. ANY IRREGULARITIES REPORT TO THE DEALER.
The sandblaster cabin generates a powerful force from the flow of abrasive particles.
It is a dangerous factor that may only be handled by a qualified adult, not under the influence
of alcohol and drugs.
• Disconnect the device from the power supply and disconnect the pneumatic connection
before any checking, service and repair activities.
• Do not direct the cleaning jet on hands and skin.
• Make sure the cabin is properly sealed.
• Make sure the glass, gloves and pneumatic hoses are not damaged.
• Do not exceed the maximum operating pressure.
• Do not direct the stream from the gun at other people.
• Never use a damaged, chipped, cracked or poorly attached accessory.
• Check the operation of the device during the first operation without load for 30 seconds.
If vibrations or malfunctions occur during this time, switch o immediately.
• Use eye and hearing protection, it is also recommended to use other means of protection:
gloves, apron, dust mask.
• Never work on wet ground or in rain.
• Make sure that the power supply complies with the requirements of the tool. Never use the tool
with an improper power supply.
• Always use knowledge and common sense when working with tools, especially in
unusual working conditions. First of all, take care of your own work safety and the safety
of outsiders.
• Tool designed for use by qualified adults.
ATTENTION!
Despite the inherently safe construction, the use of safety measures and additional protective
measures, there is always a residual risk of injury during work.
CAUTION - to reduce the risk
of injury, be sure to read the
instruction manual.
Always use hearing protection.
Always use eye protection.
Always use a dust mask to
protect against dirt and dust
after cleaning and sanding,
which can cause cancer.
In accordance with the applicable
safety standards of European
directives
This product or its power cord contains
chemicals, including lead. Wash hands after
handling.
Fire or explosion hazard. Do not use the
device near flammable materials and volatile
chemicals.
Abrasives similar to alumina can generate
static electric sparks which can cause fires
or explosions in hazardous environments.
Beware of possible static electric shocks.
EN

5
4
If the sandblasting gun (28) needs cleaning or replacement, install
it as shown. Supply the cleaning agent through the thicker hose in
front of the trigger of the gun. Lead the compressed air hose with
the thinner hose to the connection in the handpiece.
Leg installation:
• place the cabin on its side,
• fix the legs with M6x12 screws, use washers
and nuts from the set.
Mounting of safety feet:
• mount the feet without screws,
• press your feet onto the sand spreader’s legs,
• stand the machine on its feet.
Funnel installation:
• place a steel screen (grid) on the funnel,
• fix the funnel to the frame with the four bolts,
nuts and washers from the kit,
• bolt size: M6x20.
Installation of the steel shelf (grate):
• place the cabin vertically,
• use 8 size M6x12 bolts, nuts and washers,
• insert the screws into the holes in the legs and
the shelf, tighten the screws,
• adjust the cabin level.
ASSEMBLY AND OPERATION

6
TROUBLESHOOTING
Excessive pollution in the
cabin
Uneven sand discharge
Incorrect speed or insucient
cleaning power.
Blocked trigger on the
andblasting gun
1. Clogged line or vent
2. Loose air connections
3. Too much cleaning agent
(sand)
The sand may be damp
1. Used cleaning sand
2. Incorrect air pressure
Damaged O-rings in gun
valves
1. Clean the breather and move it
away from walls
2. Seal and tighten all connections
3. Remove excess sand
This can lead to permanent damage
to the sand spreader. Work only
with a dry medium. Replace it and
dry the sandblaster.
1. Replace the sand
2. Pressurize and make sure the
control valve is fully open
Replace the O-rings in the gun
Symptoms Possible causes Possible solutions
SANDBLASTER OPERATION
Use a compressor with appropriate eciency and engine power (700 l/min. and 5 hp) for power
supply.
• Connect the air supply cable to the adapter on the right side of the cabin (you can use an
additional plug, e.g. OK-04.1108 or OK-04.1106).
• The sandblasting gun is connected via the ¼” connector on the bottom of the handle.
• The wiper suction hose is connected to the front of the gun, in front of the trigger.
• The hose sucks the abrasive from the funnel, which must be filled with a suitable
sandblasting agent (corundum, sand, glass) with appropriate granulation.
• Select the nozzle with the correct diameter for the granulation of the cloth.
• Pour the cleaning cloth through the side door to about half the funnel capacity.
• The cleaning cloth is worn and contaminated, replenish and replace as needed.
• Removal of sand with impurities is carried out by the bottom closure of the abrasive pipe
in the funnel. Stand the bag open, open the valve and dispose of the used cleaning cloth.
• To avoid high levels of dust, connect an external workshop vacuum cleaner to the suction flange
(11). The vacuum cleaner must have a paper bag that protects its motor from damage.
Pull o excess dust while working, so you can see the progress of your work clearly.
• Do not cover or block the breather (2) in the rear wall of the sand spreader. During operation,
you blow a large amount of air into the device, which must escape freely.
• Place the item on the steel grate, close the cabin door tightly.
• Put your hands inside the gloves fastened to the front wall of the cabin.
• Take the cleaning gun and start working.
• Work with continuous, uninterrupted movement, properly regulating the working pressure.
• Pressure range from 2.5 to 8.5 bar. The best results are obtained at 6.3 bar.
ZASTOSOWANIE
Piaskarka kabinowa służy do czyszczenia, polerowania i szlifowania zanieczyszczonych
i zardzewiałych powierzchni metalowych, drewnianych i kompozytowych za pomocą suchego
ścierniwa, najczęściej piasku lub corundu. Piaskarka kabinowa pozwala na dokładne, bezpyłowe
i nieuciążliwe dla środowiska wypiaskowanie elementów technicznych i dekoracyjnych.
Usuwa starą farbę, rdzę, suchy bród oraz wygładza defekty na powierzchni materiału.
PL

7
Ten produkt lub jego przewód zasilający
zawierają substancje chemiczne, w tym ołów.
Umyj ręce po obsłudze.
Zagrożenie pożarem lub eksplozją. Nie używaj
urządzenia w pobliżu łatwopalnych materiałów
i lotnych związków chemicznych.
Materiały ścierne podobne do tlenku glinu
mogą generować statyczne iskry elektryczne,
które powodują pożary lub wybuchy
w niebezpiecznym środowisku.
Uwaga na możliwe wstrząsy elektryczne
statyczne.
UWAGA - aby zmniejszyć ryzyko
obrażeń, koniecznie przeczytaj
instrukcję obsługi.
Zawsze używaj ochrony słuchu.
Zawsze używaj ochrony oczu.
Zawsze używaj maski przeciwpyłowej,
która chroni przed brudem i kurzem
po czyszczeniu i szlifowaniu, które
mogą wywołać choroby
nowotworowe.
Zgodnie z obowiązującymi normami
bezpieczeństwa dyrektyw
europejskich
INFORMACJE DOTYCZĄCE BEZPIECZEŃSTWA
PRZECZYTAJ ZE ZROZUMIENIEM WSZYSTKIE INSTRUKCJE DOTYCZĄCE UŻYWANIA
I KONSERWACJI NARZĘDZI. NIEPRZESTRZEGANIE ICH MOŻE DOPROWADZIĆ DO USZKODZENIA
CIAŁA LUB MIENIA ORAZ UTRATĘ GWARANCJI. NIEZWŁOCZNIE PO ZAKUPIE SPRAWDŻ PRODUKT
CZY JEST KOMPLETNY I NIEUSZKODZONY. WSZELKIE NIEPRAWIDŁOWOŚCI ZGŁOŚ SPRZEDAWCY.
Piaskarka kabinowa wytwarza potężną siłę wynikającą z przepływu cząstek ściernych.
Jest to niebezpieczny czynnik, którym może posługiwać się wyłącznie pełnoletnia osoba
wykwalifikowana, niebędąca pod wpływem alkoholu i środków odurzających.
• Wyłącz urządzenie z zasilania sieciowego oraz odepnij podłączenie pneumatyczne
przed jakimkolwiek działaniem sprawdzającym, serwisowym i naprawczym.
• Nie kieruj strumienia z czyściwem na ręce i skórę.
• Upewnij się, że kabina jest prawidłowo uszczelniona.
• Upewnij się, że szyba, rękawice i przewody pneumatyczne nie są uszkodzone.
• Nie przekraczaj maksymalnego ciśnienia pracy.
• Nie kieruj strumienia z pistoletu na inne osoby.
• Nigdy nie używaj uszkodzonych, wyszczerbionych, pękniętych lub źle
zamocowanych akcesoriów.
• Sprawdź działanie urządzenia podczas pierwszej pracy bez obciążenia przez
30 sekund. Jeśli w tym czasie występują drgania lub usterki, natychmiast je wyłącz.
• Stosouj ochronę oczu i słuchu, zaleca się również stosowanie innych środków ochrony:
rękawic, fartucha, maseczki przeciwpyłowej.
• Nigdy nie pracuj na mokrym podłożu i w deszczu.
• Upewnij się, że zasilanie jest zgodne z wymogami narzędzia. Nigdy nie używaj narzędzia
z niewłaściwym zasilaniem.
• Zawsze używaj wiedzy i zdrowego rozsądku podczas pracy narzędziami, w szczególności
w niestandardowych warunkach pracy. Przede wszystkim dbaj o własne bezpieczeństwo
pracy oraz bezpieczeństwo osób postronnych.
• Narzędzie przeznaczone do obsługi przez wykwalifikowanych dorosłych.
UWAGA!
Mimo zastosowania konstrukcji bezpiecznej z samego założenia, stosowania środków
zabezpieczających i dodatkowych środków ochronnych, zawsze istnieje ryzyko szczątkowe
doznania urazów podczas pracy.

9
8
MONTAŻ I OBSŁUGA
Jeśli pistolet do piaskowania (28) wymaga czyszczenia lub
wymiany, zamontuj go jak na rysunku.
Czynnik czyszczący doprowadź grubszym przewodem przed
spustem pistoletu. Przewód ze sprężonym powietrzem
doprowadź cieńszym przewodem do podłączenia w rękojeści.
Instalacja nóg:
• umieść kabinę na boku,
• przykręć nogi śrubami M6x12, użyj podkładek i nakrętek
z kompletu.
Montaż stóp zabezpieczających:
• stopy montuj bez śrub,
• wciśnij stopy na nogi piaskarki,
• ustaw maszynę na nogach.
Instalacja lejka:
• umieść stalowy ekran (kratkę) na lejku,
• zamocuj lejek do ramy za pomocą czterech
śrub z nakrętkami i podkładkami z zestawy,
• rozmiar śrub: M6x20.
Montaż półki stalowej (kratki):
• ustaw kabinę pionowo,
• użyj 8 śrub, nakrętek i podkładek w rozmiarze M6x12,
• włóż śruby w otwory w nogach i półce, dokręć śruby,
• wyreguluj poziom kabiny.

9
8
PRACA PIASKARKĄ
Zastosuj do zasilania kompresor o odpowiedniej wydajności i mocy sinika (700 l/min. i 5 KM)
• Podłącz przewód zasilający powietrzem do adaptera po prawej stronie kabiny (możesz
użyć dodatkowego wtyku np. OK-04.1108 lub OK-04.1106).
• Pistolet do piaskowania podłączony jest za pomocą złącza ¼” w dolnej części rękojeści.
• Przewód zasysający czyściwo podłączony jest do przedniej części pistoletu, przed
spustem włączającym.
• Przewód zasysa ścierniwo z lejka, który należy wypełnić odpowiednim czynnikiem do piaskowania
(korund, piasek, szkło) o odpowiedniej granulacji.
• Dobierz dyszę o prawidłowej średnicy do granulacji czyściwa.
• Czyściwo nasyp przez boczne drzwiczki do około połowy pojemności lejka.
• Czyściwo zużywa się i zanieczyszcza, należy je uzupełniać i wymieniać zgodnie z potrzebą.
• Usuwanie piasku z zanieczyszczeniami odbywa się przez dolne zamknięcie przewodu
ze ścierniwem w lejku. Podstaw worek, otwórz zawór i usuń zużyte czyściwo.
• Aby uniknąć dużego zapylenia podłącz zewnętrzny odkurzacz warsztatowy do kołnierza ssącego
(11). Odkurzacz musi mieć worek papierowy, który chroni jego silnik przed zniszczeniem.
Podczas pracy odciągaj nadmiar kurzu i dzięki temu będziesz dokładnie widział postęp pracy.
• Nie zasłaniaj i nie blokuj odpowietrznika (2) w tylnej ścianie piaskarki. Podczas pracy
wdmuchujesz do urządzenia dużą ilość powietrza, które musi mieć swobodne ujście.
• Umieść przedmiot na stalowej kratce, zamknij szczelnie drzwiczki kabiny.
• Włóż ręce do rękawic zamocowanych w przedniej ścianie kabiny.
• Weź pistolet czyszczący i zacznij pracę.
• Pracuj ruchem ciągłym, nieprzerywanym, odpowiednio regulując ciśnienie pracy.
• Zakres ciśnienia od 2,5 do 8,5 bar. Najlepsze efekty uzyskuje się przy 6,3 bar.
ROZWIĄZYWANIE PROBLEMÓW
Nadmierne zanieczyszczenie
w kabinie
Nierównomierny wyrzut
piasku
Niewłaściwa prędkość lub
niewystarczająca siła
czyszczenia.
Zablokowany spust
w pistolecie do piaskowania
1. Zatkany przewód lub
odpowietrznik
2. Poluzowane złącza
pneumatyczne
3. Za dużo czynnika
czyszczącego (piasku)
Piasek może być
zawilgocony
1. Zużyty czynnik
czyszczący
2. Niewłaściwe ciśnienie
powietrza
Uszkodzone oringi
w zaworach pistoletu
1. Wyczyść odpowietrznik i odsuń
go od ścian
2. Uszczelnij i dokręć wszystkie
złącza
3. Usuń nadmiar piasku
Może to doprowadzić do trwałego
uszkodzenia piaskarki.
Pracuj wyłącznie suchym czynni-
kiem. Wymień go i osusz piaskarkę.
1. Wymień czynnik czyszczący
2. Zwiększ ciśnienie i upewnij się,
że zawór sterujący jest całkowicie
otwarty
Wymień oringi w pistolecie
Objawy Możliwe przyczyny Możliwe rozwiązania
ANWENDUNG
Die Sandstrahlkabine wird zum Reinigen, Polieren und Schleifen von verschmutzten und
rostigen Metall-, Holz- und Verbundoberflächen mit einem trockenen Strahlmittel, meistens
Sand oder Korund, verwendet. Die Sandstrahlkabine ermöglicht ein präzises, staubfreies und
umweltfreundliches Sandstrahlen von technischen und dekorativen Elementen. Entfernt alten
Lack, Rost, trockenen Schmutz und glättet Oberflächenfehler am Material.
DE

11
10
VORSICHT - um das Verletzungsrisiko
zu verringern, lesen Sie unbedingt die
Bedienungsanleitung.
Verwenden Sie immer Gehörschutz
Verwenden Sie immer einen
Augenschutz
Verwenden Sie nach dem Reinigen
und Schleifen immer eine Staubmaske
zum Schutz vor Schmutz und Staub,
die Krebs verursachen können.
In Übereinstimmung mit den
geltenden Sicherheitsstandards
der europäischen Richtlinien
Dieses Produkt oder sein Netzkabel enthält
Chemikalien, einschließlich Blei. Nach der
Handhabung Hände waschen.
Brand- oder Explosionsgefahr. Verwenden Sie
das Gerät nicht in der Nähe von brennbaren
Materialien und flüchtigen Chemikalien.
Aluminiumoxidähnliche Schleifmittel können
elektrostatische Funken erzeugen, die in
gefährlichen Umgebungen Brände oder
Explosionen verursachen können.
Vorsicht vor möglichen statischen
Stromschlägen.
SICHERHEITSINFORMATION
LESEN UND VERSTEHEN SIE ALLE ANWEISUNGEN ZUR VERWENDUNG UND PFLEGE VON
WERKZEUGEN. DIE NICHTBEACHTUNG KANN ZU SCHÄDEN AM KÖRPER ODER EIGENTUM UND
ZUM VERLUST DER GARANTIE FÜHREN. ÜBERPRÜFEN SIE UNMITTELBAR NACH DEM KAUF, DASS
DAS PRODUKT VOLLSTÄNDIG UND UNBESCHÄDIGT IST. JEGLICHE UNREGELMÄSSIGKEITEN,
HÄNDLER MELDEN.
Die Sandstrahlkabine erzeugt aus dem Strahl der abrasiven Partikel eine starke Kraft.
Es ist ein gefährlicher Faktor, der nur von einem qualifizierten Erwachsenen gehandhabt werden darf,
nicht unter dem Einfluss von Alkohol und Drogen.
• Trennen Sie das Gerät von der Stromversorgung und trennen Sie den pneumatischen Anschluss
vor allen Kontroll-, Service- und Reparaturarbeiten.
• Richten Sie den Reinigungsstrahl nicht auf Hände und Haut.
• Stellen Sie sicher, dass die Kabine richtig abgedichtet ist.
• Stellen Sie sicher, dass Glas, Handschuhe und Pneumatikschläuche nicht beschädigt sind.
• Überschreiten Sie nicht den maximalen Betriebsdruck.
• Richten Sie den Strahl der Pistole nicht auf andere Personen.
• Verwenden Sie niemals ein beschädigtes, abgebrochenes, rissiges oder schlecht befestigtes
Zubehör.
• Überprüfen Sie die Funktion des Geräts während des ersten Betriebs, ohne Last für 30 Sekunden.
Treten während dieser Zeit Vibrationen oder Störungen auf, sofort abschalten.
• Tragen Sie Augen- und Gehörschutz, es wird auch empfohlen, andere Schutzmittel zu verwenden:
Handschuhe, Schürze, Staubmaske.
• Niemals auf nassem Boden oder bei Regen arbeiten.
• Stellen Sie sicher, dass die Stromversorgung den Anforderungen des Werkzeugs entspricht.
Verwenden Sie das Werkzeug niemals mit einer falschen Stromversorgung.
• Verwenden Sie beim Arbeiten mit Werkzeugen immer Wissen und gesunden Menschenverstand,
insbesondere unter ungewöhnlichen Arbeitsbedingungen. Sorgen Sie zunächst für Ihre eigene
Arbeitssicherheit und die Sicherheit von Außenstehenden.
• Werkzeug zur Verwendung durch qualifizierte Erwachsene.
BEACHTUNG!
Trotz der eigensicheren Konstruktion, des Einsatzes von Sicherheitsmaßnahmen und zusätzlicher
Schutzmaßnahmen besteht bei der Arbeit immer ein Restrisiko von Verletzungen.

11
10
Wenn die Sandstrahlpistole (28) gereinigt oder ausgetauscht
werden muss, installieren Sie sie wie abgebildet. Führen Sie das
Reinigungsmittel durch den dickeren Schlauch vor dem Abzug
der Pistole zu. Führen Sie den Druckluftschlauch mit dem
dünneren Schlauch zum Anschluss im Handstück.
Beininstallation:
• Legen Sie die Kabine auf die Seite,
• Beine mit M6x12 Schrauben befestigen, Unterlegscheiben
und Muttern aus dem Set verwenden.
Montage von Sicherheitsfüßen:
• Sie montieren die Füße ohne Schrauben,
• Drücken Sie Ihre Füße auf die Beine des Sandstreuers,
• Stellen Sie die Maschine auf die Füße.
Trichterinstallation:
• Legen Sie ein Stahlsieb (Gitter) auf den Trichter,
• Befestigen Sie den Trichter mit den vier Schrauben, Muttern
und Unterlegscheiben aus dem Bausatz am Rahmen,
• Schraubengröße: M6x20.
Montage des Stahlregals (Rost):
• Stellen Sie die Kabine senkrecht auf,
• Verwenden Sie 8 M6x12 Schrauben, Muttern und
Unterlegscheiben,
• Setzen Sie die Schrauben in die Löcher in den Beinen
und im Regal ein, ziehen Sie die Schrauben fest,
• Passen Sie das Kabinenniveau an.
MONTAGE UND WARTUNG

13
12
FEHLERBEHEBUNG
Übermäßige Verschmutzung
in der Kabine
Ungleichmäßiger
Sandaustrag
Falsche Geschwindigkeit
oder unzureichende
Reinigungsleistung.
Blockierter Abzug an
der Sandstrahlpistole
1. Verstopfte Leitung oder
Entlüftung
2.Luftanschlüsse locker air
3.Zu viel Reinigungsmittel
(Sand)
Der Sand kann feucht sein
1. Verwendetes
Reinigungsmittel
2.Falscher Luftdruck
Beschädigte O-Ringe in
Pistolenventilen
1. Reinigen Sie den Entlüfter und
entfernen Sie ihn von den Wän
den
2.Alle Verbindungen abdichten und
festziehen
3.Überschüssigen Sand entfernen
Dies kann zu dauerhaften Schäden
am Sandstreuer führen. Nur mit
trockenem Medium arbeiten. Er-
setzen Sie es und trocknen Sie den
Sandstrahler.
1. Ersetzen Sie das Reinigungsmittel
2.Setzen Sie Druck auf und stellen
Sie sicher, dass das Steuerventil
vollständig geönet ist
Ersetzen Sie die O-Ringe in der
Pistole
Symptome Mögliche Ursachen Mögliche Lösungen
SANDSTRAHLARBEITEN
Verwenden Sie einen Kompressor mit entsprechender Ezienz und Motorleistung
(700 l/min. und 5 PS) zur Versorgung.
• Verbinden Sie das Luftversorgungskabel mit dem Adapter auf der rechten Seite der Kabine (Sie
können einen zusätzlichen Stecker verwenden, zB OK-04.1108 oder OK-04.1106).
• Die Sandstrahlpistole wird über den ¼” Anschluss an der Unterseite des Gris angeschlossen.
• Der Saugschlauch des Wischers wird an der Vorderseite der Pistole, vor dem Abzugshebel,
angeschlossen.
• Der Schlauch saugt das Strahlmittel aus dem Trichter, der mit einem geeigneten Sandstrahlmittel
(Korund, Sand, Glas) mit entsprechender Körnung gefüllt werden muss.
• Wählen Sie die Düse mit dem richtigen Durchmesser für die Körnung des Tuches.
• Gießen Sie das Reinigungstuch durch die Seitentür bis etwa zur Hälfte der Trichterkapazität.
• Das Reinigungstuch ist abgenutzt und verschmutzt, bei Bedarf auüllen und ersetzen.
• Die Entfernung von Sand mit Verunreinigungen erfolgt durch den unteren Verschluss des
Schleifrohrs im Trichter. Legen Sie den Beutel darunter, önen Sie das Ventil und entsorgen Sie das
gebrauchte Reinigungstuch.
• Um hohe Staubbelastung zu vermeiden, schließen Sie einen externen Werkstattstaubsauger an den
Saugflansch (11) an. Der Staubsauger muss über eine Papiertüte verfügen, die seinen Motor vor
Beschädigungen schützt. Ziehen Sie während der Arbeit überschüssigen Staub ab und Sie
können den Fortschritt Ihrer Arbeit deutlich sehen.
• Die Belüftung (2) in der Rückwand des Sandstreuers nicht abdecken oder blockieren. Während des
Betriebs blasen Sie viel Luft in das Gerät, die frei entlüftet werden muss.
• Legen Sie den Gegenstand auf den Stahlrost, schließen Sie die Kabinentür fest.
• Verwenden Sie 8 M6x12 Schrauben, Muttern und Unterlegscheiben.
• Setzen Sie die Schrauben in die Löcher in den Beinen und im Regal ein, ziehen Sie die Schrauben
fest.
• Passen Sie das Kabinenniveau an.
• Arbeiten Sie mit kontinuierlicher, ununterbrochener Bewegung und regulieren Sie den Arbeitsdruck
richtig.
• Druckbereich von 2,5 bis 8,5 bar. Die besten Ergebnisse werden bei 6,3 bar erzielt.

13
We / My / Wir: Auto Partner SA
ul. Ekonomiczna 20, 43-150 Bieruń, Polska
declare with full responsibility that the device /
oświadczamy, że urządzenie / erklären, dass das Gerät:
Sandblasting cabin 220 l, 8 bar / Piaskarka kabinowa 220 l, 8 bar /
Sandstrahlkabine 220 l, 8 bar
Model:
OK-08.2102
to which this declaration applies, complies with the following normative documents /
którego dotyczy niniejsza deklaracja, jest zgodne z poniższymi dokumentami
normatywnymi / auf die sich diese Erklärung bezieht, den untenstehenden
normativen Dokumenten entspricht complies:
• Electromagnetic Directive / Dyrektywa elektromagnetyczna /
Elektromagnetische Richtlinie: 2014/30/EU
• And Directives / oraz Dyrektywy / und Richtlinien:
2006/45/EC, 2014/35/EC
And it is compliant with EN standards / I jest zgodny ze standardami EN /
Und es ist konform mit den EN-Normen:
• EN ISO 12100:2010, 13849:1-2015
• EN 60204-1:2006=A1:2009
• EN 61000-3-3:2013
Responsible person / Osoba odpowiedzialna / Verantwortlich:
Name, surname / Imię i nazwisko / Vorname Familienname:
Szymon Zawada
Position / Stanowisko / Position: ROOKS Development Director /
Dyrektor rozwoju ROOKS / ROOKS-Entwicklungsleiter
Note: This declaration loses its validity if technical or operational modifications
are made without the manufacturer’s consent.
Uwaga: Niniejsza deklaracja traci ważność, jeśli bez zgody producenta wprowadzone
zostaną modyfikacje techniczne lub operacyjne.
Hinweis: Diese Erklärung verliert ihre Gültigkeit, wenn technische oder betriebliche
Änderungen ohne Zustimmung des Herstellers vorgenommen werden.
Podpis / Signature
CERTIFICATE / CERTYFIKAT / ZERTIFIKAT
Data i miejsce:
Date and place:
Domasław, 01.07.2021
DECLARATION OF CONFORMITY
DEKLARACJA ZGODNOŚCI
EU-KONFORMITÄTSERKLÄRUNG
Table of contents
Languages:
Other Rocks Measuring Instrument manuals
Popular Measuring Instrument manuals by other brands

Electro-Sensors
Electro-Sensors TR400 Installation & operation manual

Calculated Industries
Calculated Industries DigiRoller user guide

wtw
wtw Avantor VWR pH 1100 L operating manual

Dwyer Instruments
Dwyer Instruments DPGA series Specifications-installation and operating instructions

Elcomponent
Elcomponent EnergyPro EP600 user manual

DIS Sensors
DIS Sensors QG65N2 Series user manual