ROCWARE RM850 User manual

1
Array Microphone Quick Start Guide
11 Packing List
Item
Quantity
Array Microphone
1
USB Data Cable
1
USB Power Cable
1
3.5mm Audio Cable
1
Remote Control (with bracket)
1
Microphone Mounting Bracket (optional)
1
Quick Start Guide
1
22 Appearance and Interface
No.
Name
Function
1
USB Power
USB interface is used to power the microphone.
2
Spk-out
Audio signal output interface, remote classroom
audio can be output to active speakers or amplifiers.
3
Line-out
Audio signal output interface, sound collected by the
local microphone can be output to the local terminal
or recording host.
4
Line-in
Audio signal input interface, input the reference
audio signal sent from the remote classroom.
33 Remote Control
No.
Key
Description
1
Turn on the microphone's amplification function, there
will be voice announcements when pressing
2
Turn off the microphone's amplification function, there
will be voice announcements when pressing
3
F1
Reserved function (not enabled), there will be a music
prompt when pressing
4
Restore the default loudspeaker volume of the
microphone, there will be voice announcements when
pressing
5
Increase the loudspeaker volume of the microphone
(the maximum volume is +4), there will be a beep when
pressing
6
Decrease the loudspeaker volume of the microphone
(minimum volume is -4), there will be a beep when
pressing
44 Product Feature
Advanced Audio Algorithms
Built-in powerful audio processing unit, ultra-low signal processing delay;
Adaptive fast convergence algorithm, voice intelligent tracking, howling
suppression, intelligent noise reduction, echo cancellation, automatic gain,
de-reverberation and other advanced technologies, you can easily listen in
noisy environments.
Microphone Array
The ring microphone array design enables long-distance pickup. Teachers can
move freely in a wider area of the classroom. All the speeches of students in the
2
classroom can be picked up, and teachers and students can hear each other's
clear voices.
One-key Interactive Sound Reinforcement
Integrated local sound reinforcement and pickup functions, equipped with
infrared remote control, remote interaction, one-key switching of local sound
reinforcement, flexible and convenient.
Ceiling/Wall Flexible Installation
It can effectively solve the problem of using and managing lavalier/handheld
microphones, supports various installation methods such as ceiling/wall
mounting, flexible and quick deployment, and one-time installation, which can
free the hands of the lecturer or teacher and go into battle lightly!
55 Product Specification
Audio Parameter
Microphone Type
Omnidirectional Microphone
Microphone Array
Built-in six omnidirectional microphones form a
circular array, 360-degree omnidirectional pickup
Pickup Range
3m
Sensitivity
-38 dBFS
Signal Noise to Ratio
65 dB(A)
Frequency Response
50Hz - 8kHz
Howling Suppression
Support
Automatic Gain Control (AGC)
Support
Reverberation Suppression
Support
Hardware Interface
Audio Input
1 x 3.5mm Line-in Interface
Audio Output
1 x 3.5mm Spk-out Interface
1 x 3.5mm Line-out Interface
USB Interface
1 x USB Power Interface
General Specification
Power Input
USB 5V
Dimension
147mm x 147mm x 38mm
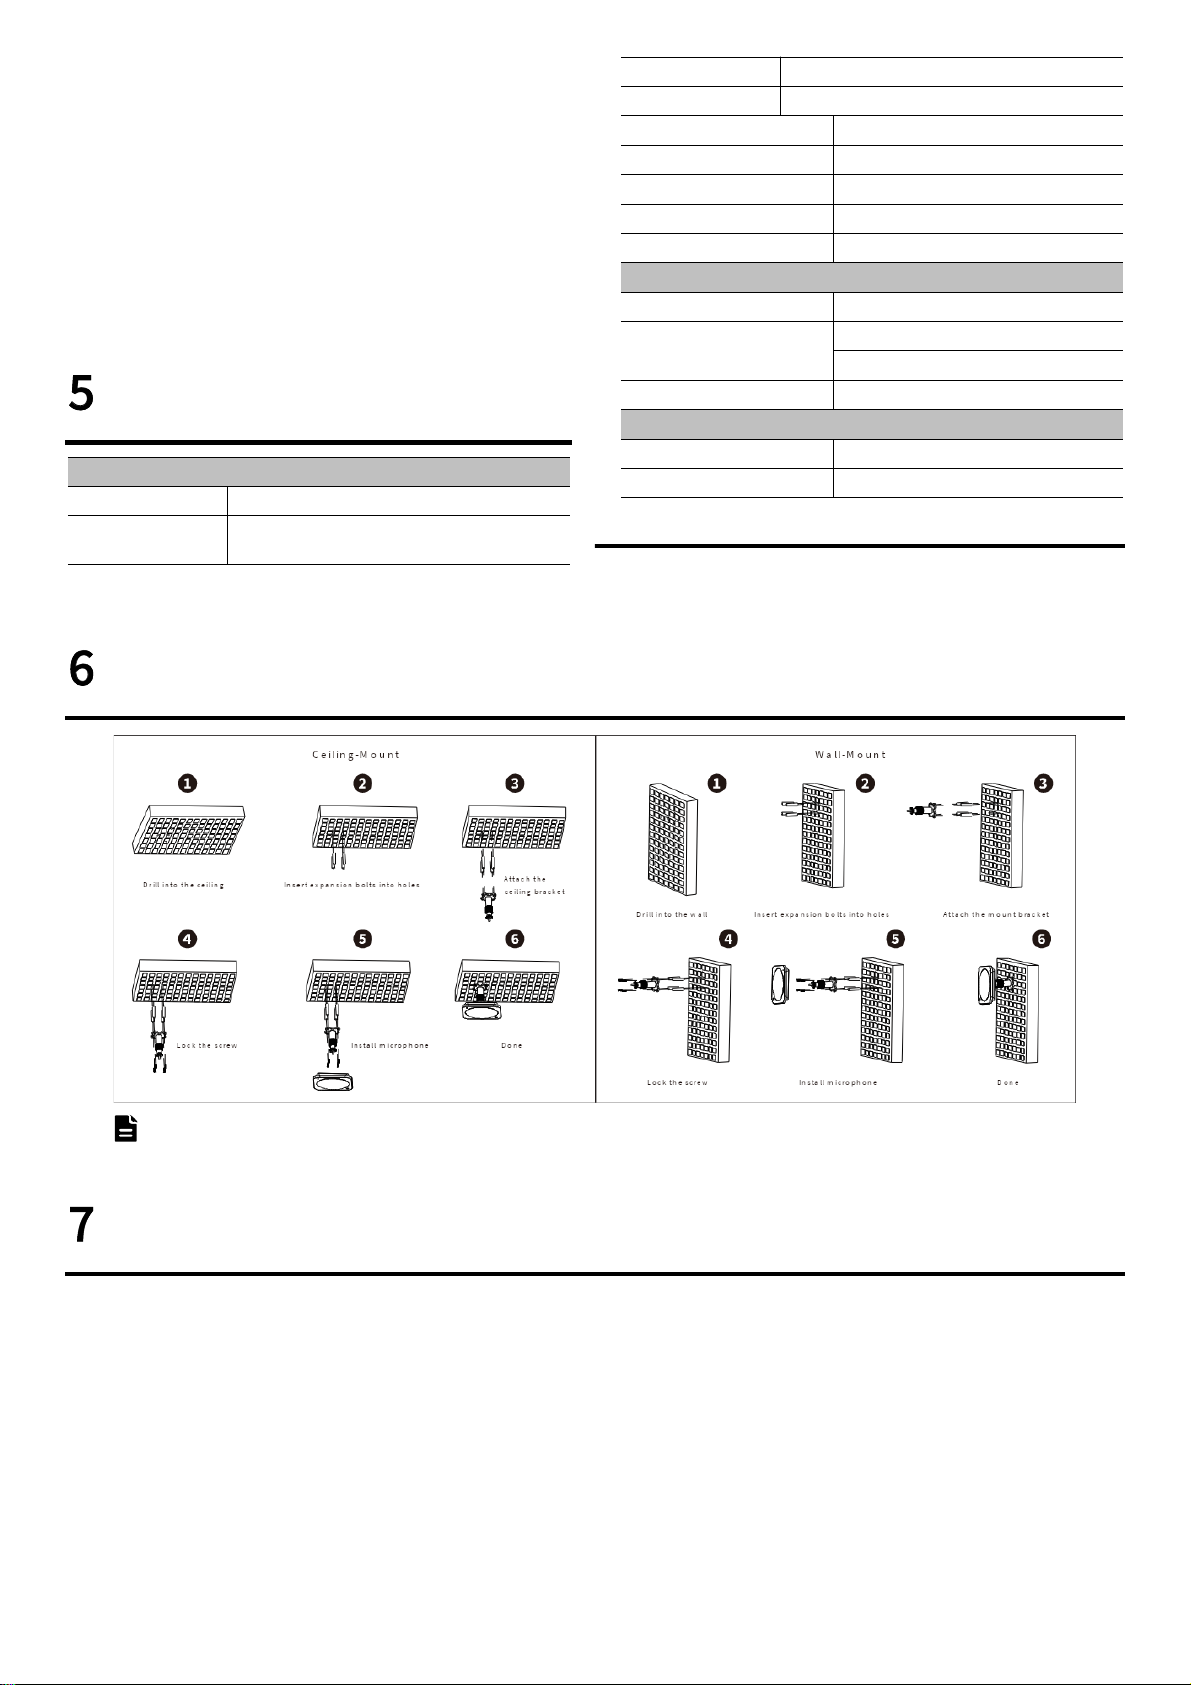
66 Product Installation
N o t e
The installation diagram is for reference only. The bracket is not standard. Please refer to the actual product for the packing accessories.
77 Network Application
3
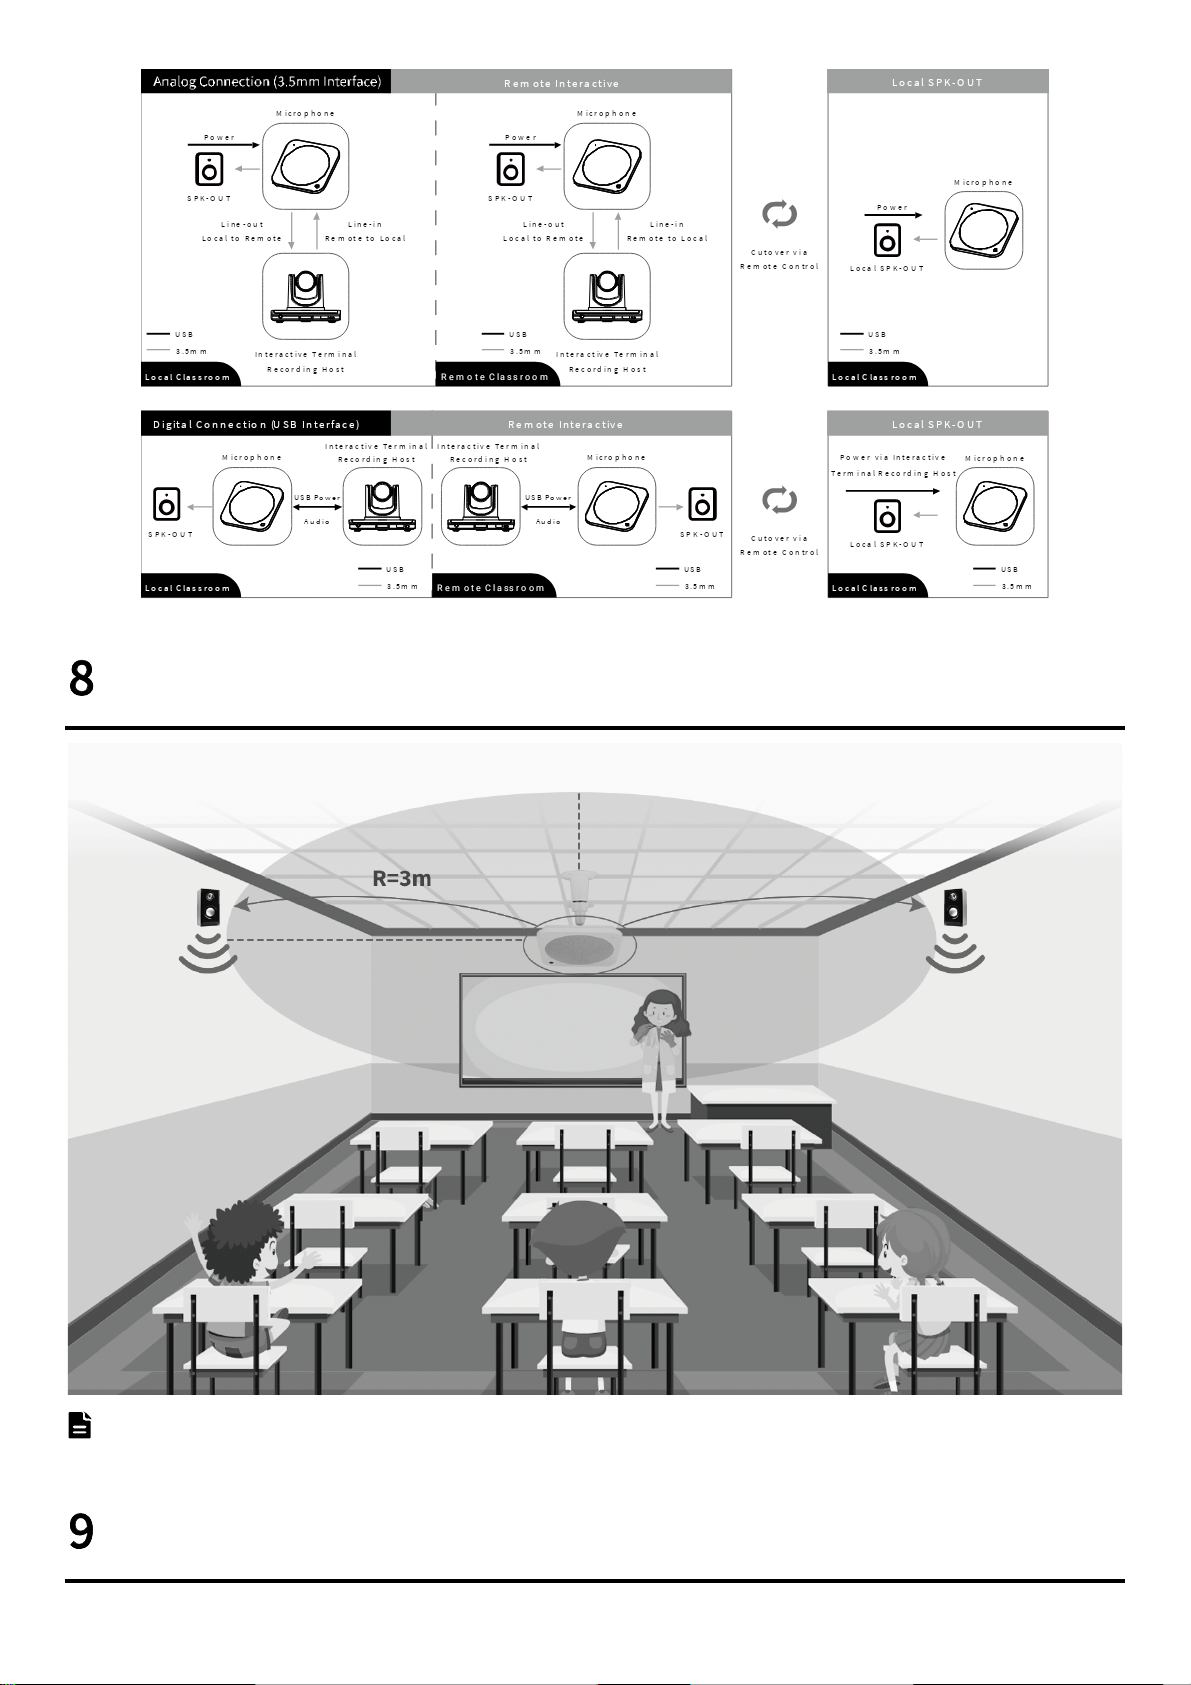
88 Application Scenario
N o t e
The schematic diagram is for reference only. Please refer to the actual application scenario for equipment and installation.
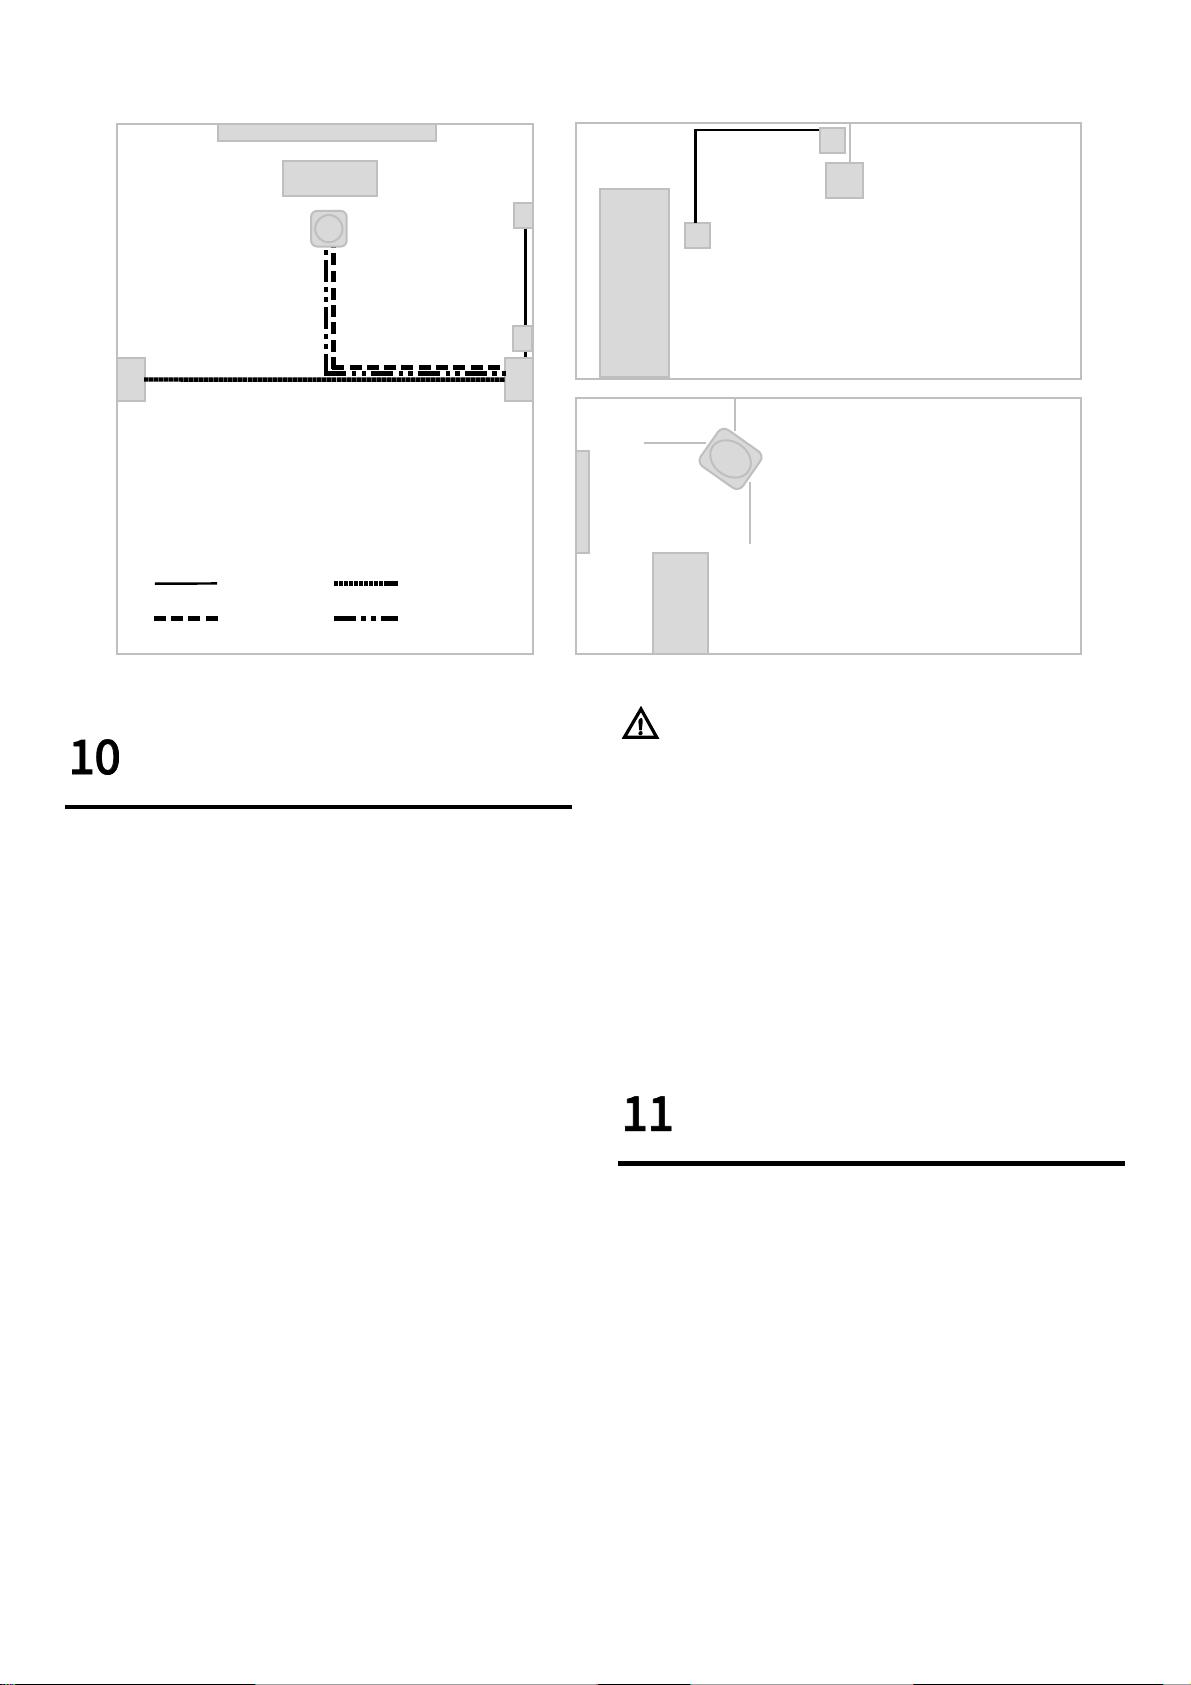
99 Scenario Installation (Classroom)
For classroom installation, please refer to the figure below. The USB interface is used as the power supply port of the microphone, and can be connected to
4
a socket or adapter with a USB interface. The power supply voltage is DC 5V. The SPK-OUT audio output interface is output to active speakers or power amplifiers
through a 3.5mm interface audio cable. It is recommended to use low-latency active speakers first, and the speaker experience will be better.
P o d iu m
M ic ro p h o n e
P o w e r C a b le
F ro n t
D o o r
T o p V ie w S id e V ie w
S w itch
S o c k e t
S p e ak e r 1 S p e ak e r 2
U S B C a b le
S p e a ke r C a b le
A u d io C a b le
S w itch
S o c k e t
S p e ak e r 2
M ic ro p h o n e
P o d iu m
1010 Classroom Installation
10.1 Microphone Installation
1) Installation Height: In theory, the closer the microphone is to the speaker,
the better, but considering that it is too low, there may be a risk of students
accidentally reaching out and hitting the speaker, causing damage or falling.
principle, while considering security and flexible processing.
2) Installation Method and Location: It is hoisted with a boom, and the
position near the podium is centered horizontally, and the microphone disk
is facing the podium area, focusing on picking up the teacher's lecture
sound in the podium area.
10.2 Speaker Installation
1) Installation Height: The recommended height from the ground is 2.0-2.6
meters.
2) Installation Method and Location: It is wall mounted with brackets. It is
recommended to install it in the middle of the left and right sides of the
classroom, with a straight line distance of more than 3 meters from the
microphone. Avoid fans or beams in the middle, so as not to affect the
microphone sound field learning. When choosing this location for
installation, the first consideration is that the speakers can take care of the
students in the back row. Secondly, the time for the sound to return to the
speaker is short, and the listening experience is more comfortable.
10.3 Socket Installation
An optional socket panel with a USB socket can be installed next to the speaker
for easy access to the microphone and speaker. It can also be powered by a USB
adapter or directly use a device with a USB interface
(TV or large display, etc.).
N o t ic e
When the microphone and speaker are connected to the same wall plug for
power supply, the microphone and speaker need to be turned on or off at the
same time.
10.4 Switch Installation
You can choose a single switch panel, installed on the side of the door or the
blackboard, with a label, easy for teachers to open and close.
10.5 Remote Control Installation
The remote control comes with its own hanger, which can be fixed on the edge
of the blackboard or on the podium. The remote control is labeled with a label,
which is easy for teachers to place after use.
1111

5
Problem and Solution
1) Howling appears at startup
For example, it is normal for the microphone to whistle slightly when it is
just started. When the device is just started, it needs to learn to adapt to the
live sound field environment, and it will stop automatically after the learning
is completed.
2) Persistent howling
First, rule out whether the speaker is too near to the microphone,
and whether the distance is more than 3 meters. Check to see if the speaker
volume or microphone volume is too loud, and try turning the volume down.
The volume can be adjusted according to the on-site environment to meet
the needs. If the volume of the speaker is too large, it will not only damage
the hearing of the students, but also easily produce howling.
3) The sound reverberation is not clear
First check whether the room is too small and the reverberation is too large,
and then check the settings of the power amplifier or speaker EQ to see if the
low frequency part is adjusted too much.
4) No sound reinforcement (check the following steps)
a) Check whether the indicator light at the microphone cover is on. If it is
not on, it means that it is not activated. You need to check the power
supply line. If the red light is on, it means that the microphone is in the
state of stopping the amplification at this time, and the remote control
can be used to start the amplification;
b) If there is no sound when the indicator light is in the green amplification
state, first confirm whether the speaker is powered on and the volume is
turned on;
c) If there is no problem with the microphone and the speaker, check
whether there is any error in the wiring of the audio output line. If the
line is not wrong, unplug the 3.5mm audio cable from the microphone,
connect it to the mobile phone to play sound, and check whether the
line is normal;
d) If the above steps are all correct, you can replace the microphone and
test again.
5) Low Volume
After turning on the amplifier, if the volume is low, you can use the remote
control to adjust the volume to see if the microphone volume is set too low,
or check whether the speaker volume is set too low.
6) The remote control does not respond
When the remote control controls the microphone, a prompt sound will be
played from the speaker. If there is no response, you can check the
following points:
a) Make sure the remote control has batteries installed;
b) The remote control is infrared control, it is necessary to aim at the
infrared receiving port of the microphone as much as possible, and the
distance is within 3 meters;
c) Observe the color of the indicator light of the microphone, it will be red
when the amplification is stopped, and green when the amplification is
turned on. If the indicator light can be switched normally during control,
it means that there is no problem with the remote control, and if there is
no prompt sound, it is necessary to check the problem of outputting to
the speaker.
079.79.1101344_V1.0
Table of contents


