RODMOUNTS ROD-UP RUPC User manual
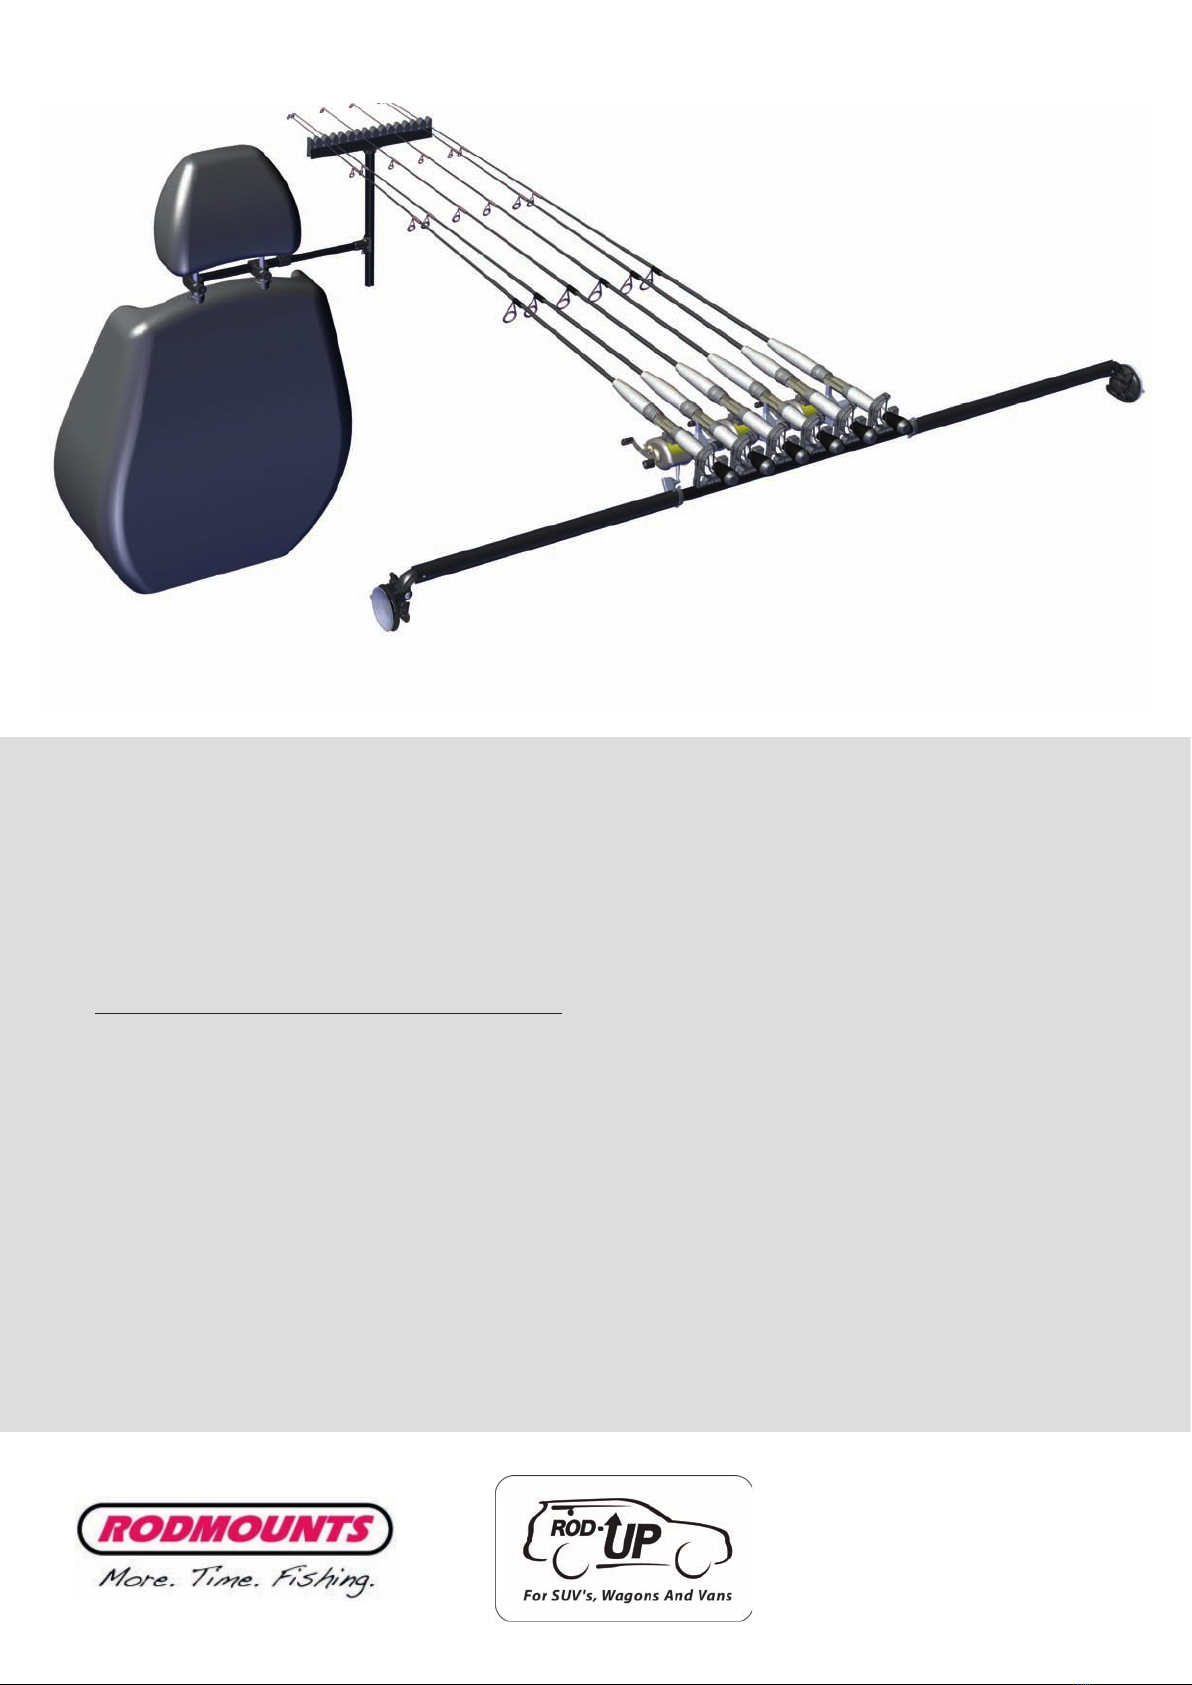
INSTALLATION INSTRUCTIONS
ROD UP - Model RUPC - For SUV’s, Wagons and Vans
www.rodmounts.com
Please read these instructions carefully
• Make sure the suction cups and windows are clean before attaching
• Do not place suction mounts on the applied resistive conductors (defoggers) or antennae on the glass.
Doing so will prevent a vacuum from forming
• Check and secure all connections before driving
• Maximum weight capacity: 15 lbs. / 7kg
• Suction mounts should be re-set at least every 2 weeks
• Phillips screwdriver may be required, see section B of the installation instructions
Dovetail Tube - Vertical
180mm / 7”
Front Assembly (optional)
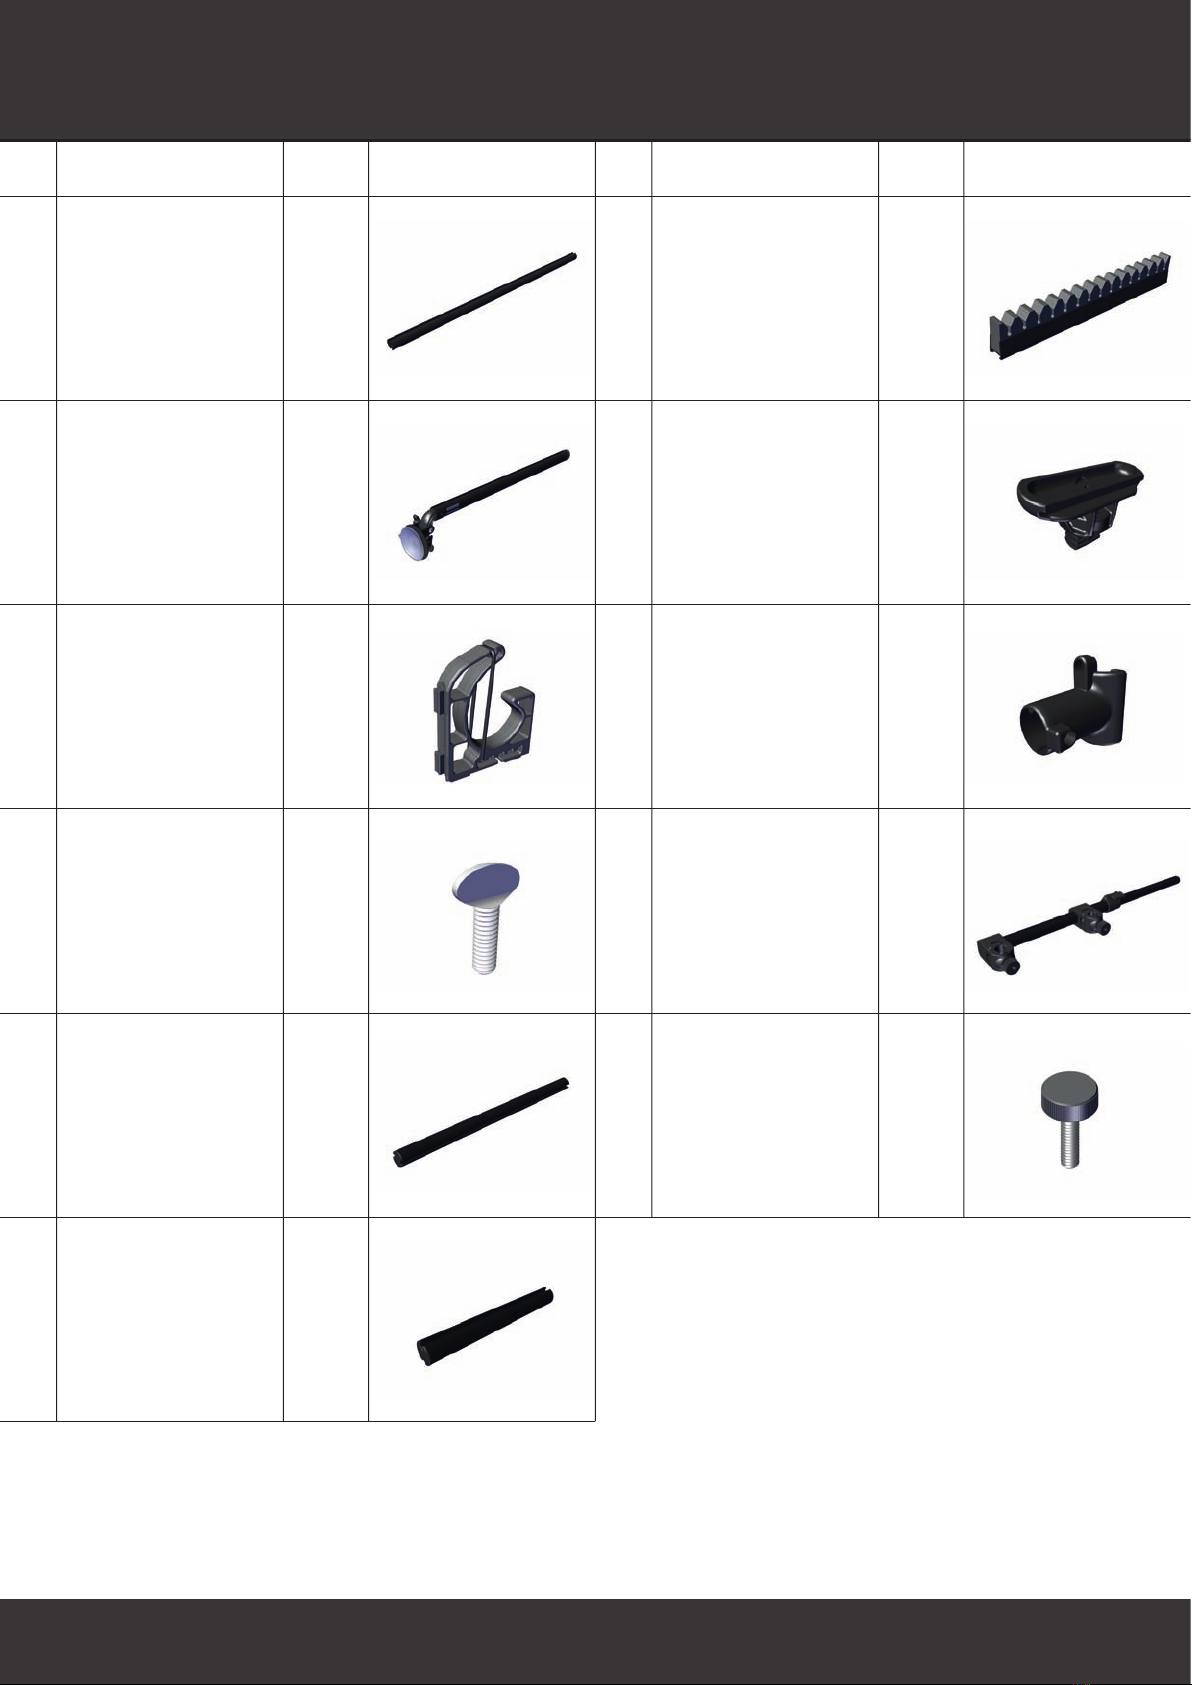
PACKAGE CONTAINS
Part
No. Part Name Quantity Drawing Part
No. Part Name Quantity Drawing
1 Telescopic Tube -
Small OD
Rear Assembly
1
2 Dovetail Tube Assembly 2
3
4
4
Rod Holder
5 Dovetail Tube - Vertical
380mm / 15”
Front Assembly
1
6 1
7 1
8
Foam Tip Holder
1
9
Adapter
1
10
Half-Wrap Tee
1
11 2
Horizontal Assembly
Plastic Thumbscrew
Metal Thumbscrew
6
4
1
IMPORTANT INFORMATION
2
Please Note:
It will be very helpful to have an idea of where you want the rod holders to be positioned on the rear tube
assembly before assembling to your vehicle. Depending on the width of your vehicle, some or all of the
rod holders can be positioned on the small tube, narrower vehicles may require that some of the rod holders
be positioned on the small and large tubes.
We recommend that you rst layout the tube assembly on the oor in the back of your vehicle to get an idea
of which tube(s) the rod holders will be positioned:
• Do you want the rod holders above or below the tubes?
• Rod holders can be positioned above and below the tubes if required
If all the rod holders can be positioned on the small center tube, proceed to the section A.
If some of the rod holders need to be positioned on the larger tubes, proceed to section B.
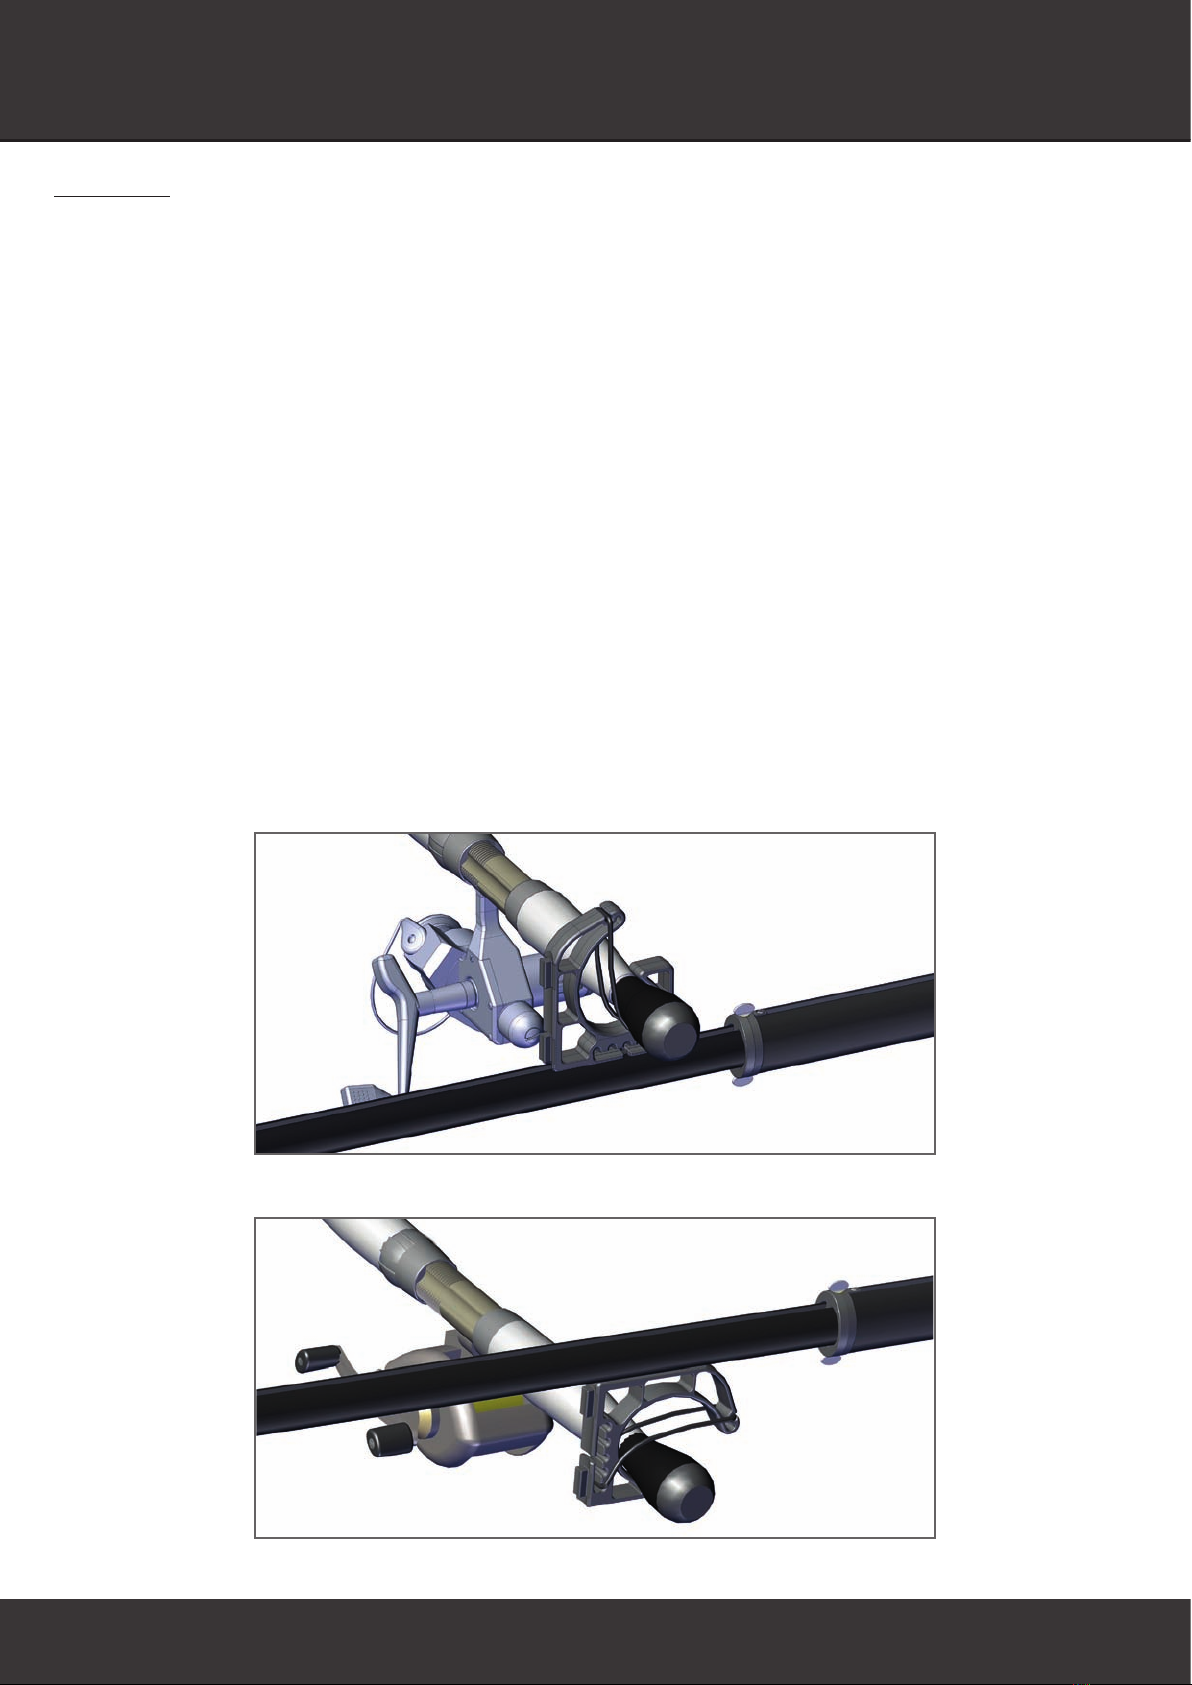
Correct position of rod holder for mounting above the tube
Correct position of rod holder for mounting below the tube
8. Adjust Telescopic Tube (1) as required and re-position
Rod Holders (3) if necessary. Tighten all 4 Thumbscrews (4)
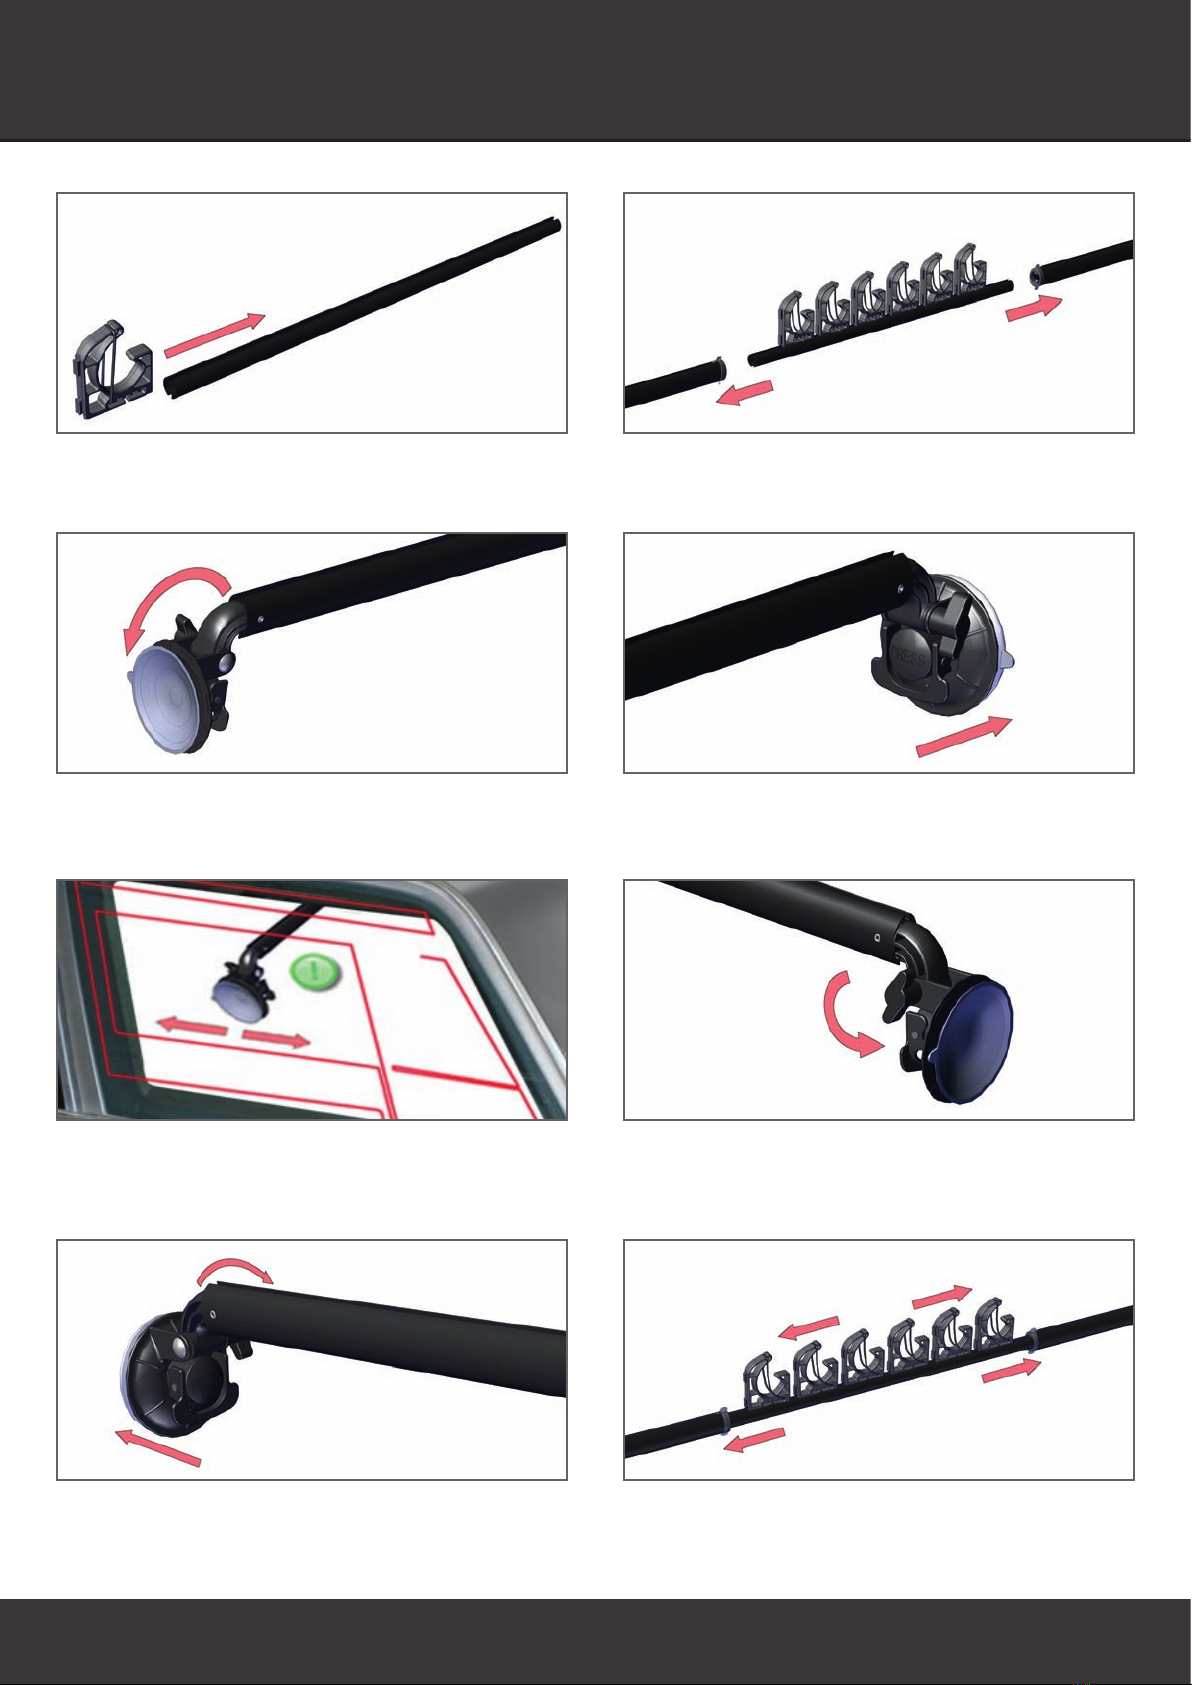
SECTION A - ASSEMBLING REAR ASSEMBLY
1. Position Rod Holders (3) onto Telescopic Tube (1) 2. Insert Telescopic Tube (1) into each Dovetail Tube
Assembly (2)
3. Loosen wing nut on suction mount 4. Attach one suction mount to rear side window. Be sure
suction cups and windows are clean. Apply pressure to
the suction mount against the window. Be sure to press
the PRESS button down rmly while ipping the lever up
6. Tighten wing nut
7. Attach opposite suction mount and tighten wing nut
3
5. IMPORTANT! Do not place suction mounts on the defog
resistive conductors. The conductors, if applied on the
window, will prevent the suction mounts from maintaining
a vacuum.

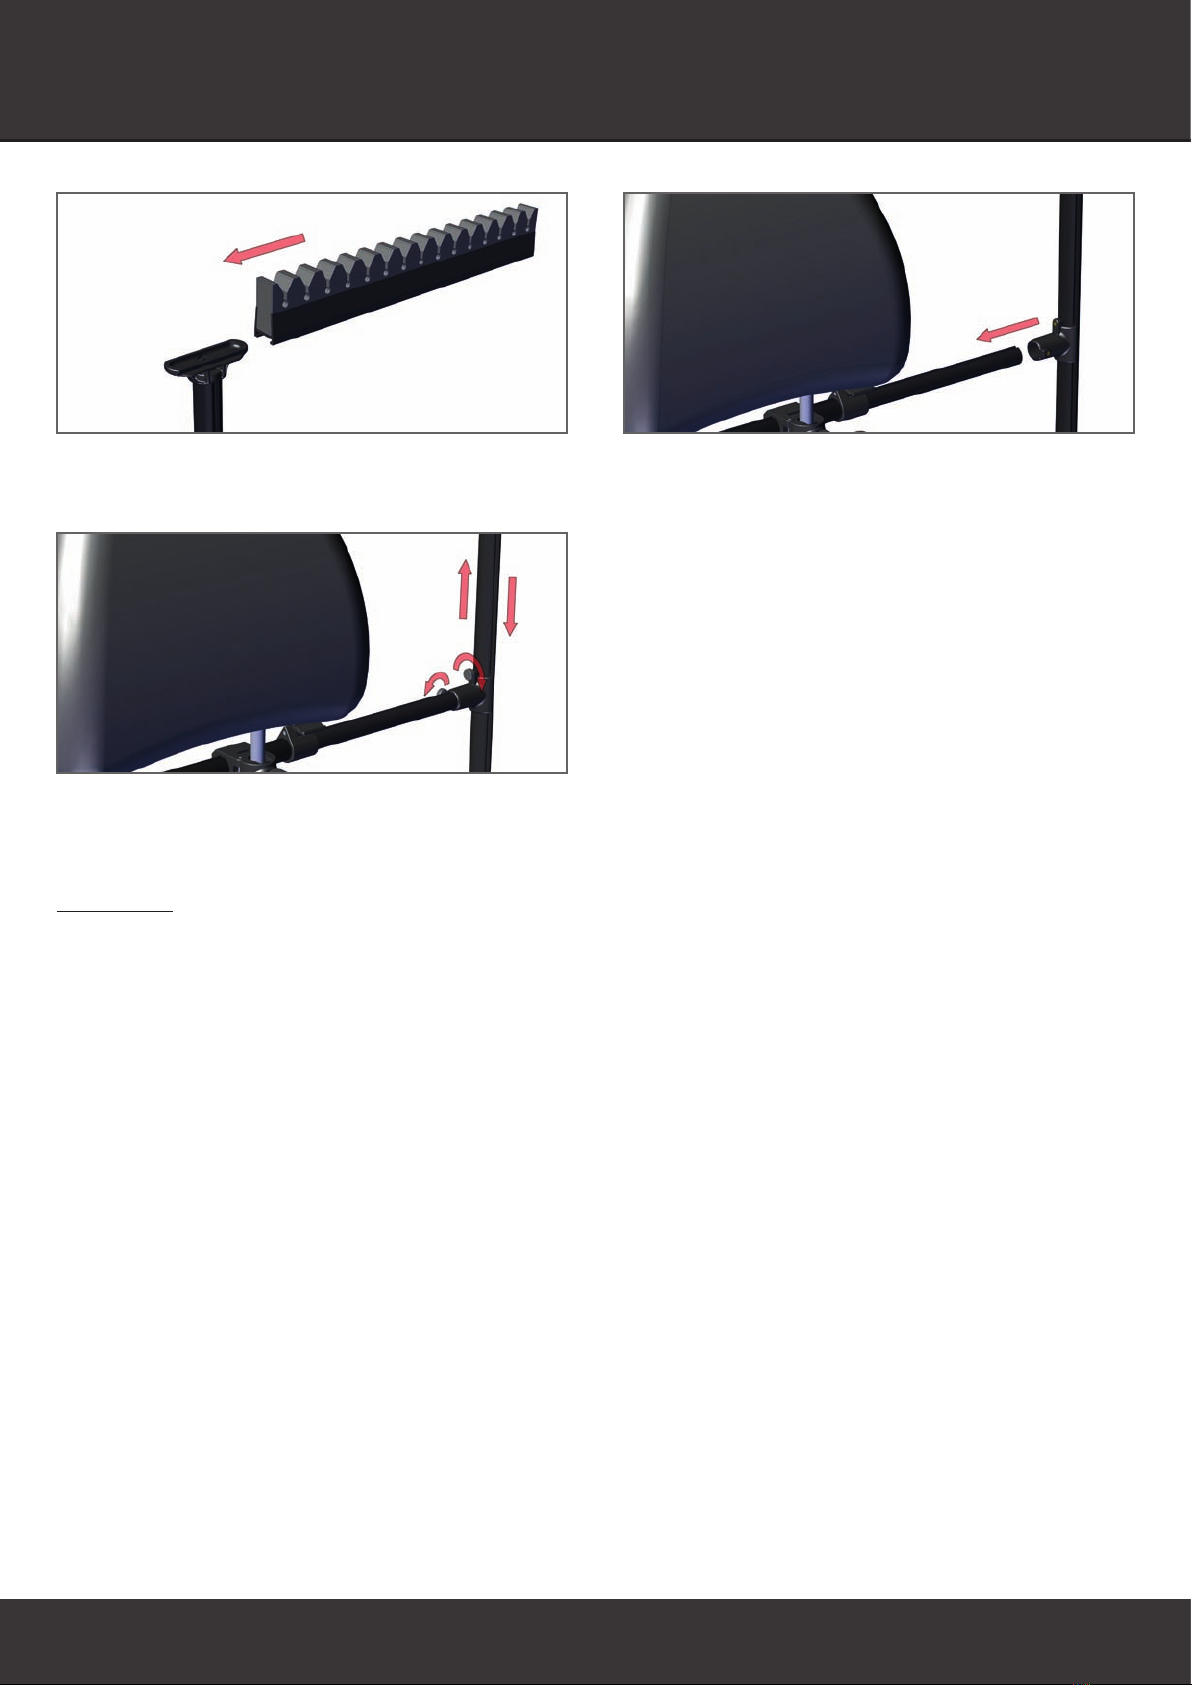
1. If positioning the Rod Holders (3) topside of the Dovetail
Tube Assembly (2), it is possible to slide the Rod Holders
from the Suction Mount end, proceed to step 4
4. Attach one suction mount to rear side window. Be sure
suction cups and windows are clean. Apply pressure to
the suction mount against the window. Be sure to press
the PRESS button down rmly while ipping the lever up
2. To position Rod Holders (3) below the tube, remove the
Tube Stop (requires philips screwdriver). Slide Rod Holders
on and replace Tube Stop.
3. Insert Telescopic Tube (1) into each Dovetail Tube
Assembly (2)
3
5. Attach opposite suction mount and tighten wing nut 6. Adjust Telescopic Tube (1) as required and re-position
Rod Holders (3) if necessary. Tighten all 4 Thumbscrews (4)
4
SECTION B - ASSEMBLING REAR ASSEMBLY.
POSITIONING ROD HOLDERS TO LARGE TUBE
7. IMPORTANT! Do not place suction mounts on the defog
resistive conductors. The conductors, if applied on the
window, will prevent the suction mounts from maintaining
a vacuum.

6. Readjust headrest height
1. Determine which headrest you want to use and the
appropriate Dovetail Tube - Vertical, long (5) or short (6)
2. Install Adapter (8) to the correct Dovetail Tube - Vertical
4. Attach Horizontal Assembly (10) to headrest posts and
engage clamps
5. Tighten clamp thumbscrews securely
3
7. Flip lever lock up and pull out the telescopic tube to
desired position
5
3. Lift headrest to its fullest height
8. Slide Half-Wrap Tee (9) onto the Dovetail Tube - Vertical
ASSEMBLING TIP HOLDER ASSEMBLY
ASSEMBLING TIP HOLDER ASSEMBLY
9. Slide Foam Tip Holder (7) onto Adapter (8)
11. Adjust height of Dovetail Tube - Vertical and tighten
Thumbscrew (11)
3
10. Install Half-Wrap Tee (9) over extended Horizontal
Assembly (10) securely
6
Please Note:
The tip holder can be adjusted horizontally and vertically for maximum passenger room.

PLACING RODS IN THE ROD-UP
1. Adjust the rubber tension bands on the Rod Holders (3)
for maximum security
2. Adjust the Foam Tip Holder (7) height for easy loading
4. Position rod tip into Foam Tip Holder (7) slots
3
3. Place rod grip in Rod Holder (3)
7
5. Before driving, adjust tips in Foam Tip Holder (7) 6. Re-position Foam Tip Holder (7) toward ceiling for
maximum passenger room
7. Tighten Thumbscrews (11)
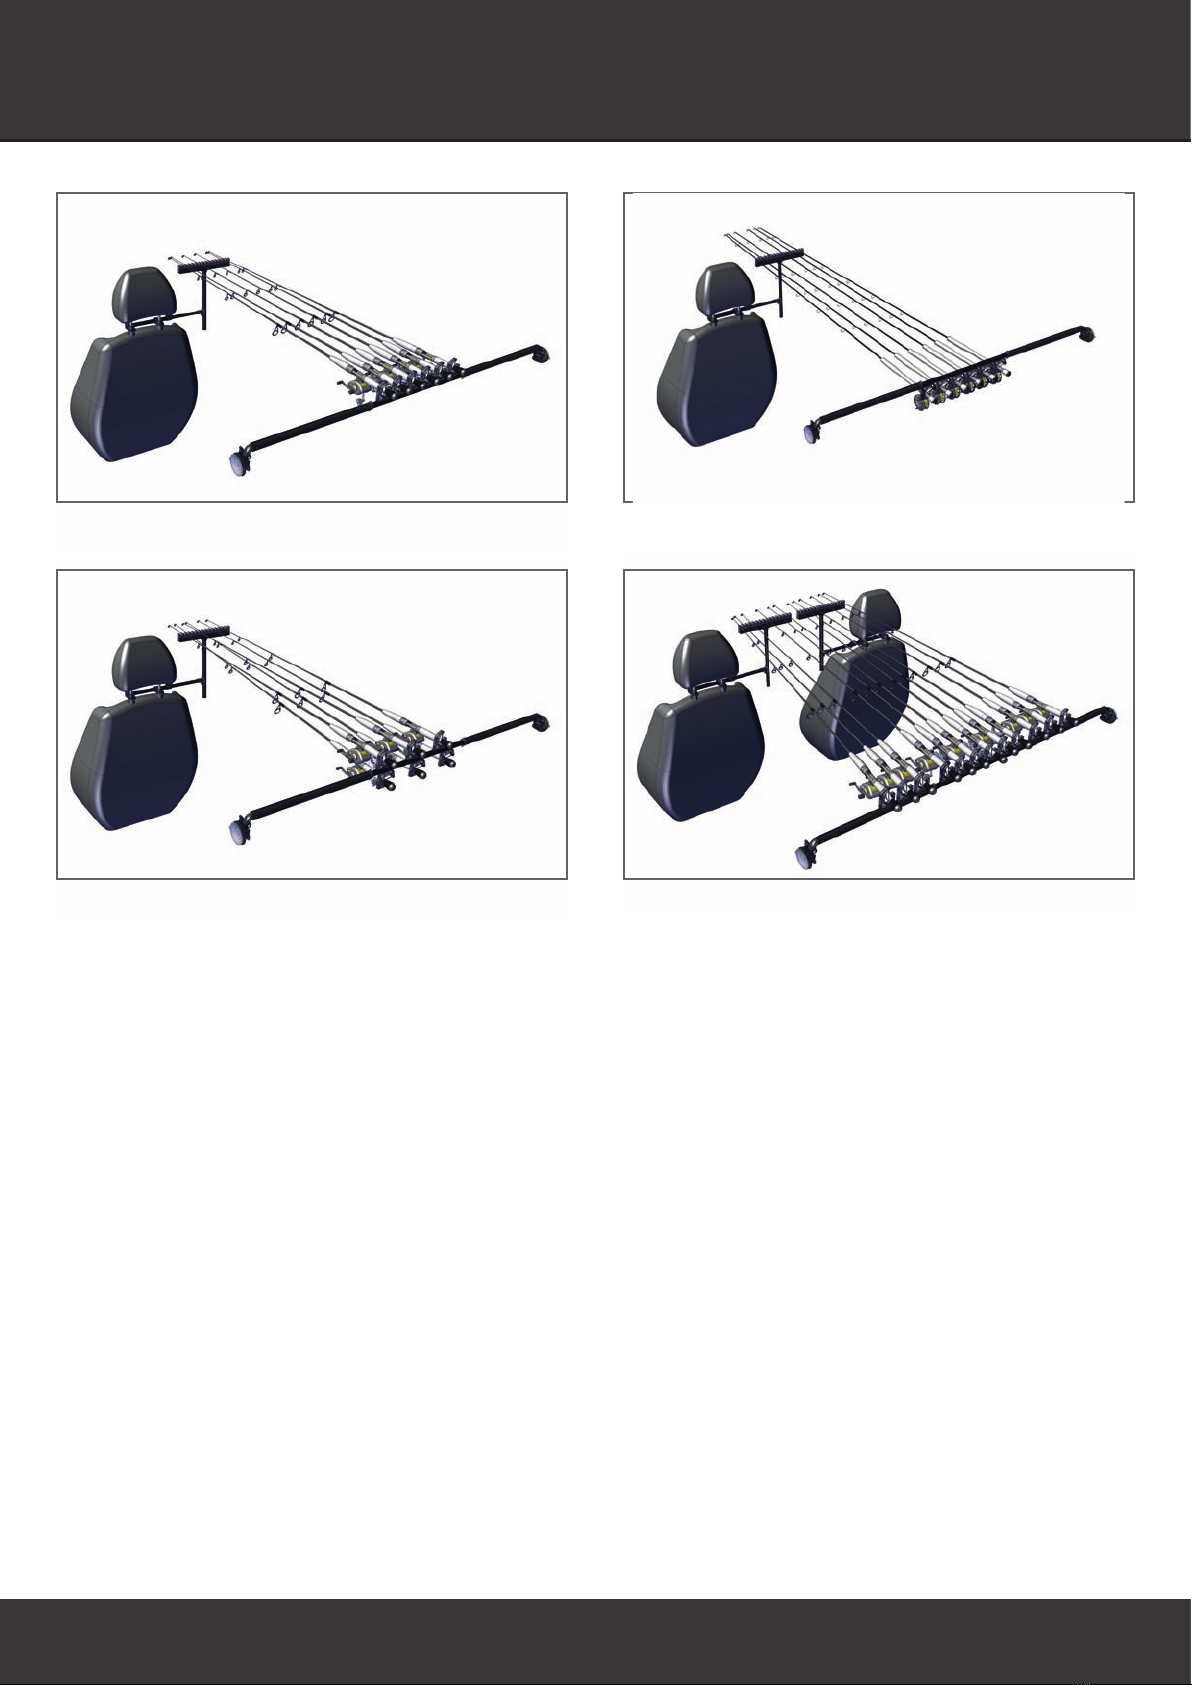
POSSIBLE ROD HOLDERS POSITIONS
38
The above images show just a few of the possible positions for the rod holders on the rear tube assembly.
You may want to position the rod holders to accommodate your vehicle for optimum usage.
Additional rod holders are sold seperately.

IMPORTANT INFORMATION
9
Warranty:
RodMounts warranties our product against defects in materials or workmanship for one year from the date
of purchase. This warranty applies to the original purchaser; proof of purchase is required. This warranty
specically excludes damage caused by failure to follow instructions, misuse, abuse, improper storage
or use in a commercial application. No warranty of merchantability or tness for a particular purpose is made.
In the event of a claim against this warranty, the manufacturer’s obligation, and the claimant’s sole remedy,
shall be replacement of the product, repair or refund of the original purchase price, at RodMounts’ option.
Disclaimer:
Handling, storage and use of this product by the buyer or user are beyond the control of RodMounts.
Risks such as ineectiveness or other unintended consequences resulting from, but not limited to, failure
to follow instructions will be assumed by the buyer or user. In no case will RodMounts be held liable for
consequential, special or indirect damages resulting from the improper handling, storage or use of this
product.
www.rodmounts.com
PO Box 8105, Bend, Oregon 97708 USA
customerservice@rodmounts.com
ROD-UP is a trademark of RODMOUNTS
Copyright 2016
Table of contents


