Rohl G7545 User manual

HOT WATER DISPENSER COLLECTION
FOR USE ONLY WITH PERRIN AND ROWE HOT WATER TANK
SCALDING HAZARD: The tap dispenses water up to
208.4°F (98°C), which can instantly cause scalds or
burns. Use care when operating this appliance.
RECOMMENDED WORKING PRESSURE
Min 1.5bar / 22psi | Max 5bar / 75psi
9.2”
5.5”
1.2/8”
HOLE
1/4”
2MAX
10”
5.5”
1.2/8”
HOLE
1/4”
2MAX
10”
5.5”
1.2/8”
HOLE
1/4”
2MAX
10”
5.5”
1.2/8”
HOLE
1/4”
2MAX
G1445
G7545 MB7945
G1655

The Hot Water Dispenser Collection
Installation & User Guide
Congratulations on the purchace pf your ROHL product. Correctly installed and with sensible care, this product
will give you many years of trouble free service.
IMPORTANT INFORMATION
Before you proceed... We recommend you engage the services of a registered plumber / builder to
install this product.
Ensure you also read and understand the instruction manual that accompanies your Perrin and Rowe
heater tank unit.
To avoid perminent damage to the heater tank it is important not to plug the unit until indicated in
heater tank installation manual. Only operate the tank after it is lled with water.
In addition to the guide below it is essential that the written information is carefully read and
understood.
Preparation Check Box for Installer
Flush the plumbing system before installing
the kitchen product
Once unpacked, remove nut and clamping
plate ready for installation.
1. Unpack the hot water dispenser on a rm
at surface.
2. Carefully straighten the tubing from the
bottom of the dispenser.
3. Ensure the base ring and the O seal are
in place.
Attach to the tank inlet
Attach silicone tube using the clip
Mains water inlet from lter if aplicate

The Hot Water Dispenser Collection
Installation & User Guide
base ring
base seal
work surpace
clamp plate
nut
threaded stud
water inlet
silicone tube
seal
1. Feed the tubes down through the hole.
In the work surface until the base seal
and base ring are at rest.
2. From under the sink, place the semi-
circular clamping plate and xing nuts
onto the threaded stud.
3. Ensure the tap is the desired angle Insert
a screw driver into the hole in the hex
tool (creating a T), and use to tighten
and secure the faucet.
NOTICE
AN ASSISTANT MAY BE NEEDED TO HOLD
THE TAP IN PLACE WHILE SECURING.
TO EASE FEEDING OF THE TUBES THROUGH
THE HOLE, FIRST INSERT THE BLUE TUBE
WITH QUICK-CONNECT ATTACHMENT AND
THEN INSERT THE REMAINING TUBES.
PLEASE ENSURE YOU HAVE READ & UNDERSTOOD THE
PERRIN AND ROWE TANK GUIDE BEFORE USE.
BEFORE USE
• If further building work is to be carried out in the vicinity, cover the faucet to avoid damaging the nish.
• Please ensure that the installation complies with local plumbing codes.
CARE & MAINTENANCE
Wipe down after use to avoid water spotting and mineral build up.
Occasional cleaning with warm soapy water, followed by a polish with a soft cloth is all that is required to keep the plated
nish in good condition.
Don’t use abrasive liquids, powders, or pads to clean the shower. Don’t use any products with ammonia, bleach, or
limescale remover. You will damage the plated nish and void your guarantee.

Electronic Instant Hot Water Appliance
Installaon, Operaon and Care Instrucons
Please read these instrucons fully before commencing the installaon and
operaon of the Electronic Instant Hot Water Appliance

We are delighted that you have chosen the electronic instant hot water appliance to compli-
ment your instant hot water Dispenser. This unique electronic instant hot water appliance
will save you me and eort when requiring near boiling water for making tea and coee
and we are sure you will discover many new uses each day.
Please read and follow our step by step guide to the installaon, operaon and care for the
electronic instant hot water appliance and you will soon be making that rst cup of coee or
tea from your new appliance.
WHAT YOU NEED TO KNOW BEFORE YOU START
For your safety and sasfacon please read all the instrucons, cauons and warnings be-
fore installing or using this electronic instant hot water appliance.
This electronic instant hot water appliance is not intended for commercial use
IMPORTANT NOTICE: This product can cause harm if installed incorrectly and should only be
installed by a competent person, if you feel for any reason unsure about the installation
please contact a qualified plumber or electrician to install the appliance.
Make sure all electrical wiring and connecons conform to local standards.
Make sure all water connecons conform to local standards.
Make sure all electrical wiring and water connecons conform to local codes. Standard 120v
electrical outlet is required under the sink. If possible, use a separate circuit dedicated to
your Hot Tank.
The instant hot water appliance is an open vented system appliance. The water supply
pressure should not exceed 72psi. If it does a pressure reducing valve must be installed.
The required water supply pressure is a minimum of 22psi to maximum of 72psi.
The water lter must be connected to the electronic instant hot water appliance and re-
placed every 6 months or the guarantee will be void.
Equipment Required:
Tape Measure Adjustable Wrench

SAFETY INSTRUCTIONS PLEASE READ BEFORE YOU START
The alert symbols displayed on the right point to important safety
informaon to make you aware of potenal hazards that can cause
serious injury or death. Please pay special aenon to the infor-
maon following these warning alerts. Failure to comply with these
instructions could result in property damage, serious injury or
death.
Please read this chapter carefully for your own safety and the safety of those around you.
Please read the safety informaon in
this instrucon, installaon guide and on the prod-
uct, in order to install and use the product accordingly
, so as to avoid any injury. The
safety informaon will tell you what the potenal danger is, how to avoid it, and idenfy
what will happen if you do not operate following the instrucon.
Electric Shock: Using an ungrounded connecon or improper connecon of the power sup-
ply to the product can result in a serious injury or death from electrical shock.
Electric Shock: Do not remove the earthing terminal
Do not reconstruct the plug
Do not disassemble main box and any part for the power.
Important
The instrucons are only intended as a guide, if there is any doubt then please contact a
cered plumber or electrician or point of purchase and avoid using the appliance unl it
has been checked.
The electronic instant hot water appliance is supplied with the following:
Electronic Instant Hot Water Appliance with USA IEC Power lead.
The water connecons are to allow correct connecons from the instant hot water Dis-
penser to the electronic instant hot water Appliance.
Outlet Connector 3/8”BSP to Silicon Tube
Inlet Connector 3/8”BSP
COMPONENTS INCLUDED

IMPORTANT SAFETY INSTRUCTIONS
PLEASE READ ALL INSTRUCTIONS CAREFULLY
When using all electrical appliances, basic safety precauons should always be followed
including the informaon below:
To protect against electrical shock, do not place cord, plugs or unit near or in water or other
liquids and do not operate the electronic instant hot water appliance controls or power
socket with wet hands.
Check the power rang of your electronic instant hot water appliance is suitable for the
power rang of the electrical circuit it is being installed on.
Do not operate or install the electronic instant hot water appliance if it appears to have any
missing parts, be damaged / faulty eg damaged cord, plug.
Do not use outdoors or in a damp area or if below 32F. Humidity should stay in a range of
10% to 60%. Be sure there is no dew.
Do not use the electronic instant hot water appliance for anything other than the intended
Domesc use only.
The electronic instant hot water appliance must be installed vercally as shown on front
cover with inlet and outlet connecons at the top of appliance.
Ensure the front of the unit is visible and the front temperature dial can be easily reached.
Do not aempt to open, modify or service this electronic instant hot water appliance. Re-
pairs should be carried out by Authorised Service personnel. Opening the unit will void the
guarantee.
The required water supply pressure is a minimum of 22psi to maximum of 72psi.
Turn o all controls before unplugging. Do not unplug by pulling the cable. To unplug, grasp
the plug, not the cable.
Property Damage: To avoid the risk of ooding, regularly inspect the connecons for any
signs of leakage.
This electronic instant water appliance is not intended for use by persons (including chil-
dren) with reduced physical, sensory or mental capabilies, or lack of experience and
knowledge, unless they have been given supervision or instrucon concerning use of the
appliance by a
person responsible for their safety. Children should be supervised to
ensure that they do not play with the electronic instant hot water appliance or in-
stant hot water Dispenser, a safety springback handle is used to control the ow of
the near boiling water for addional safety.
.

Electrical Requirements
A standard
120v electrical outlet is required under the sink. If possible, use a separate circuit dedicated to your Hot
Tank.
It is recommended that a separate circuit
serving only your electronic instant hot water appliance be provided
or use an outlet that can be turned on/o by a switch. This electronic instant hot water appliance is equipped with a
power supply cord with a power plug. To minimise possible shock hazard, the cord must be plugged into mang,
ground-type outlet, grounded in accordance with all naonal and local codes and ordinances. If a socket outlet is not
available, it is the responsibility and obligaon of the customer to have a properly grounded outlet installed by a
qualied electrician.
Water Supply Requirements
If local codes permit, the instant hot water Dispenser feed line should be connected to the hot and cold water supply
line using an isolaon valve or another means for providing the hot and cold water to the Dispenser. IMPORTANT: If
local codes do not permit the use of isolaon valves, special feed valves can be obtained from your local plumbing
supply distributor. f the water is mixed with impurity, ironing chips, grains of sand, and so on, the pipes of the electron-
ic instant hot water appliance and Dispenser will be blocked and will void the guarantee.
Environment requirement
Don't install the electronic instant hot water appliance outdoors or in a locaon that may fall below 32F, otherwise the
pipes and the Dispenser and tank will be frozen and there will be serious safety trouble, possible bodily -injury, acci-
dents and damaged caused and the guarantee will be void. It's forbidden to wash the electronic instant hot water
appliance with water directly. The installaon environment should be venlated, with protecon from the direct sun-
shine. When installing the electronic instant hot water appliance, provide approximately 10cm to 15cm (4 -5 ½”) of air
space on the sides of the unit for air circulaon and approximately 2.5cm (1”) from the mounng wall. The environ-
ment humidity should be in the range of 10% to 60%. Be sure there is no dew.
Instant Hot Water Dispenser Informaon
Connecng a standard Dispenser may cause injury and will damage the electronic instant hot water appliance and void
the guarantee. Due to high water temperature, and for safety reasons, the electronic instant hot water appliance is not
under pressure.
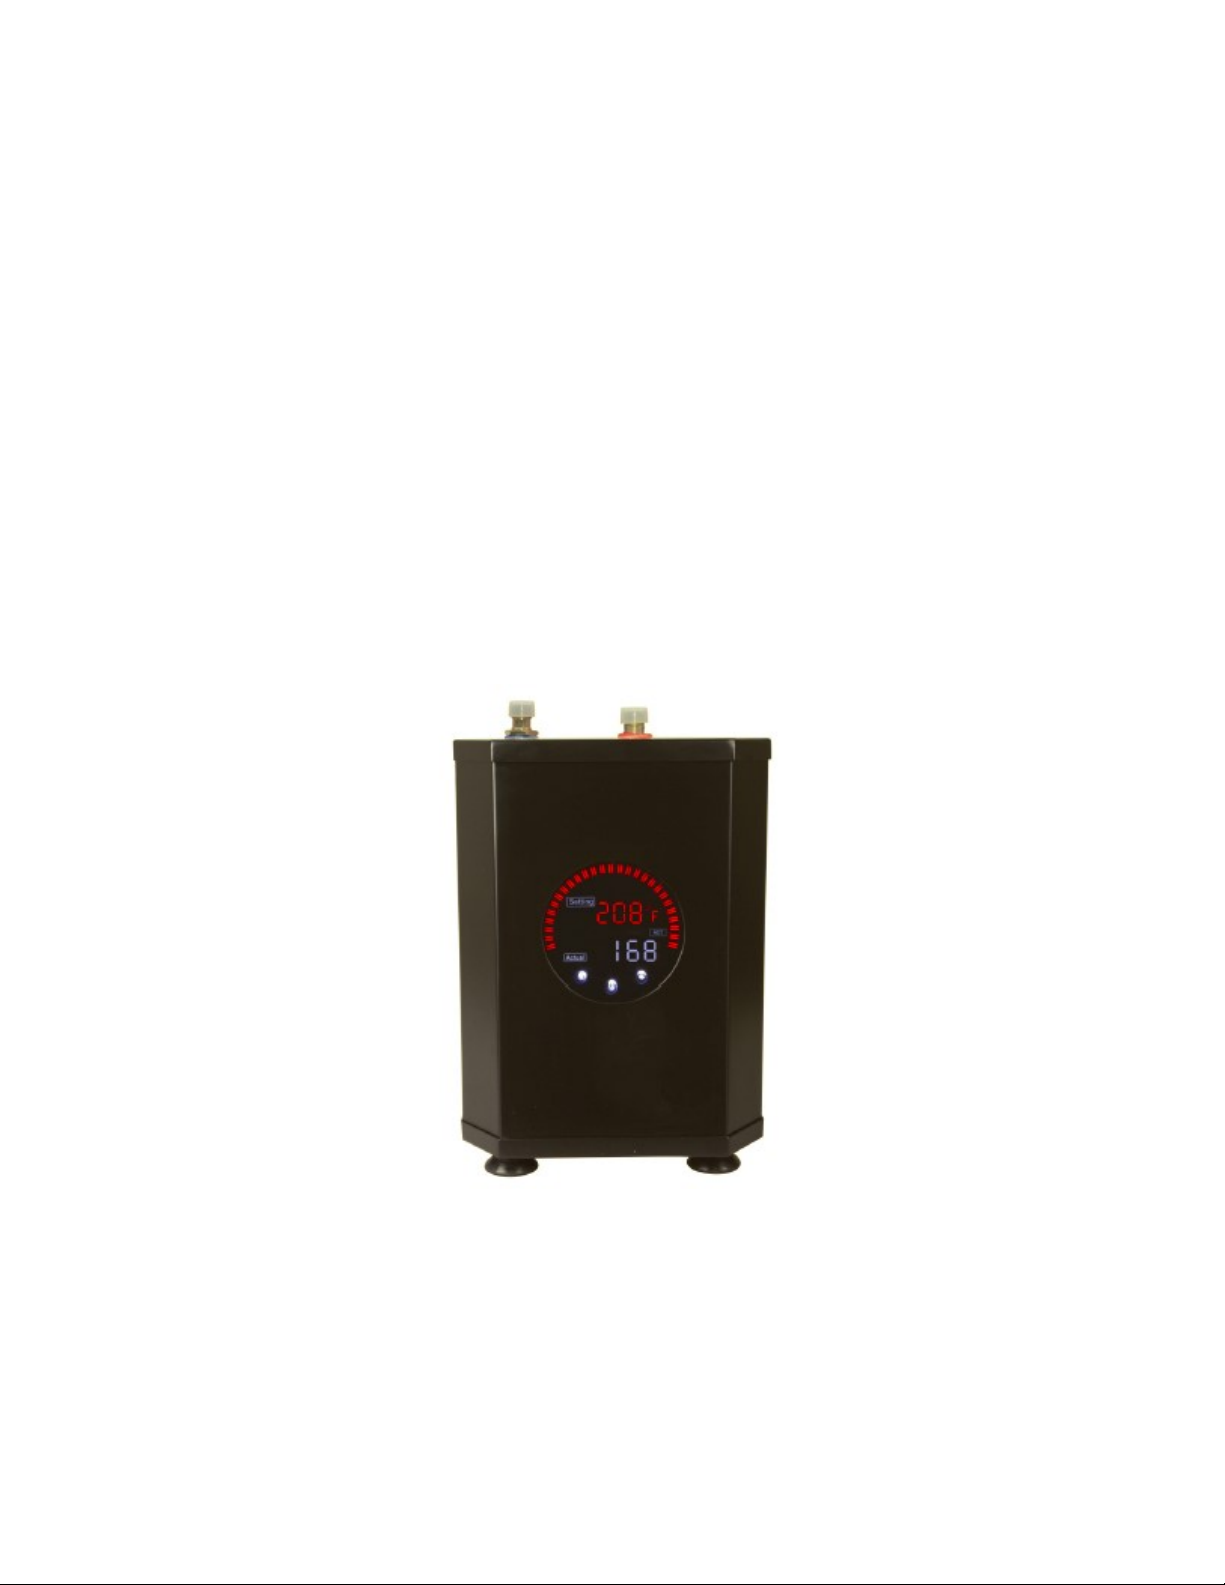
Instant Hot Water Appliance Temperature Adjustment
For temperatures above 203F:-it has been set for opmum performance in most common and typical known installa-
ons. However there are factors which may inuence the performance of the instant hot water appliance such as
incoming water temperature, atmospheric pressure and altude. Should you experience any discharge of water from
the spout during heat up, you can reduce the seng to compensate for this by 3F degrees at a me. If in doubt please
ask your dealer for further guidance.
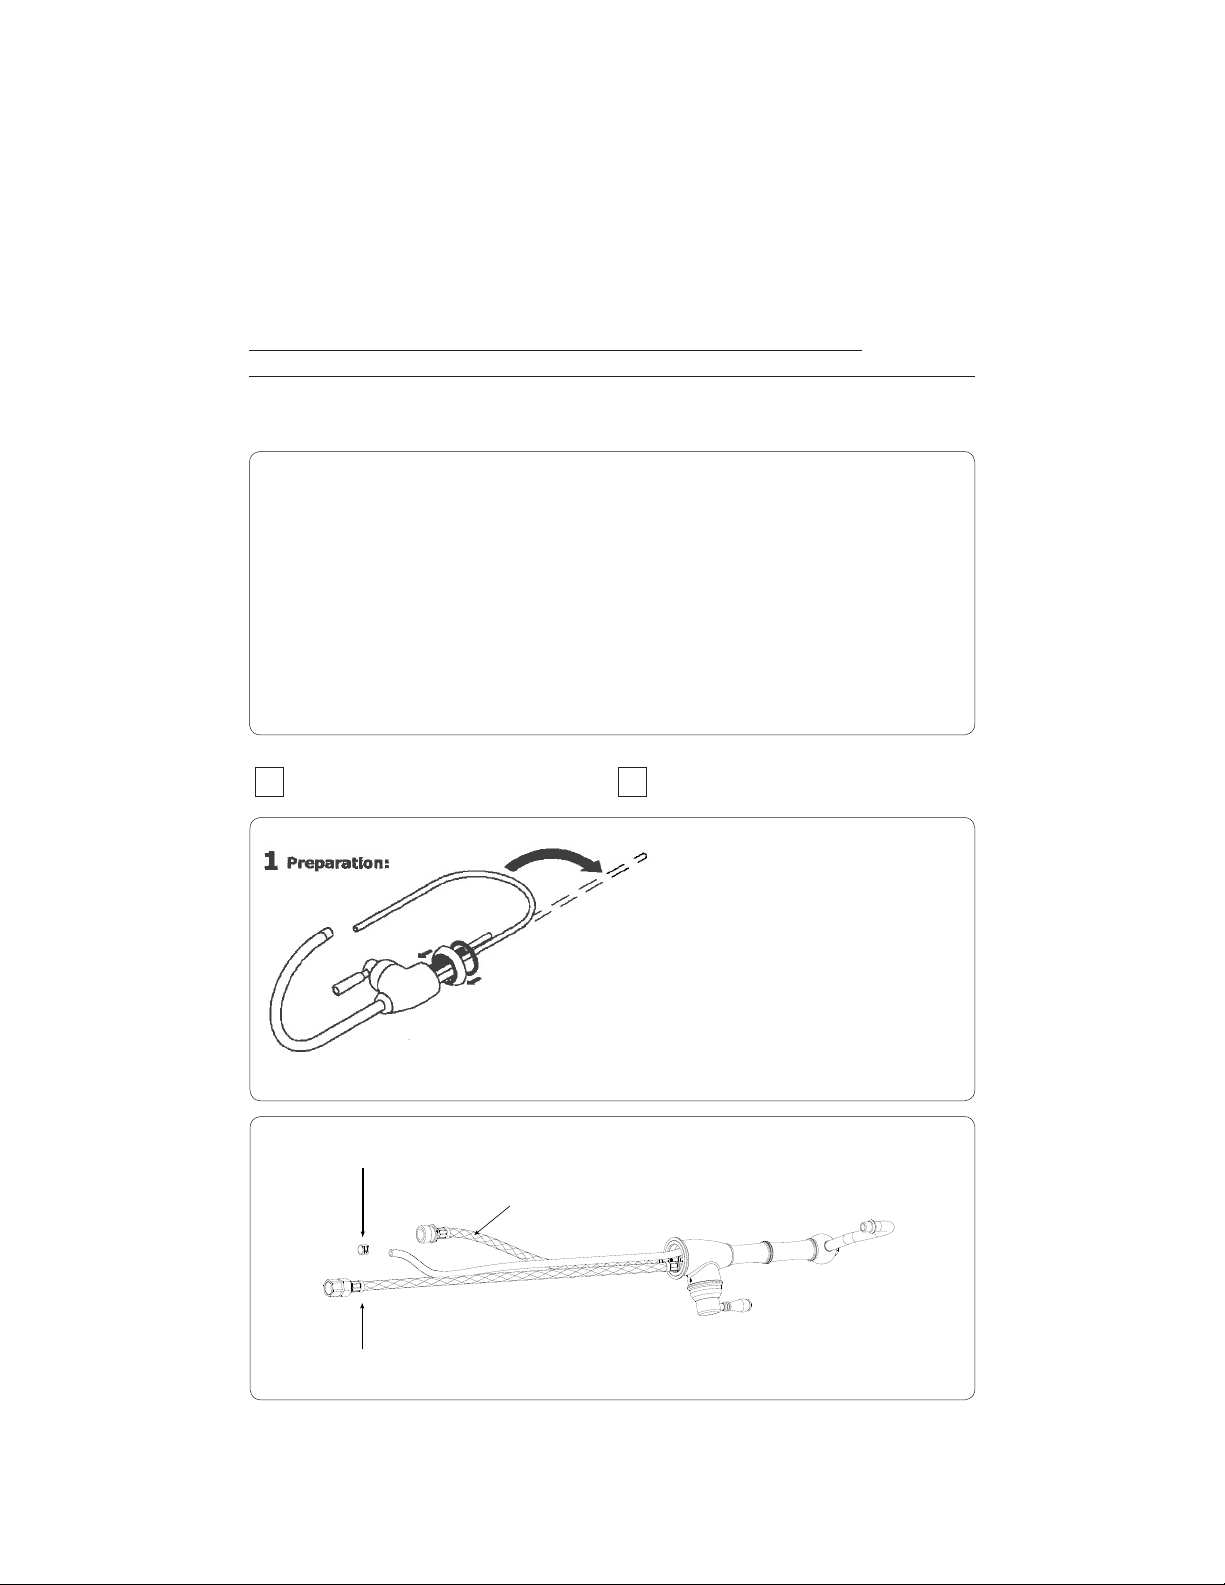
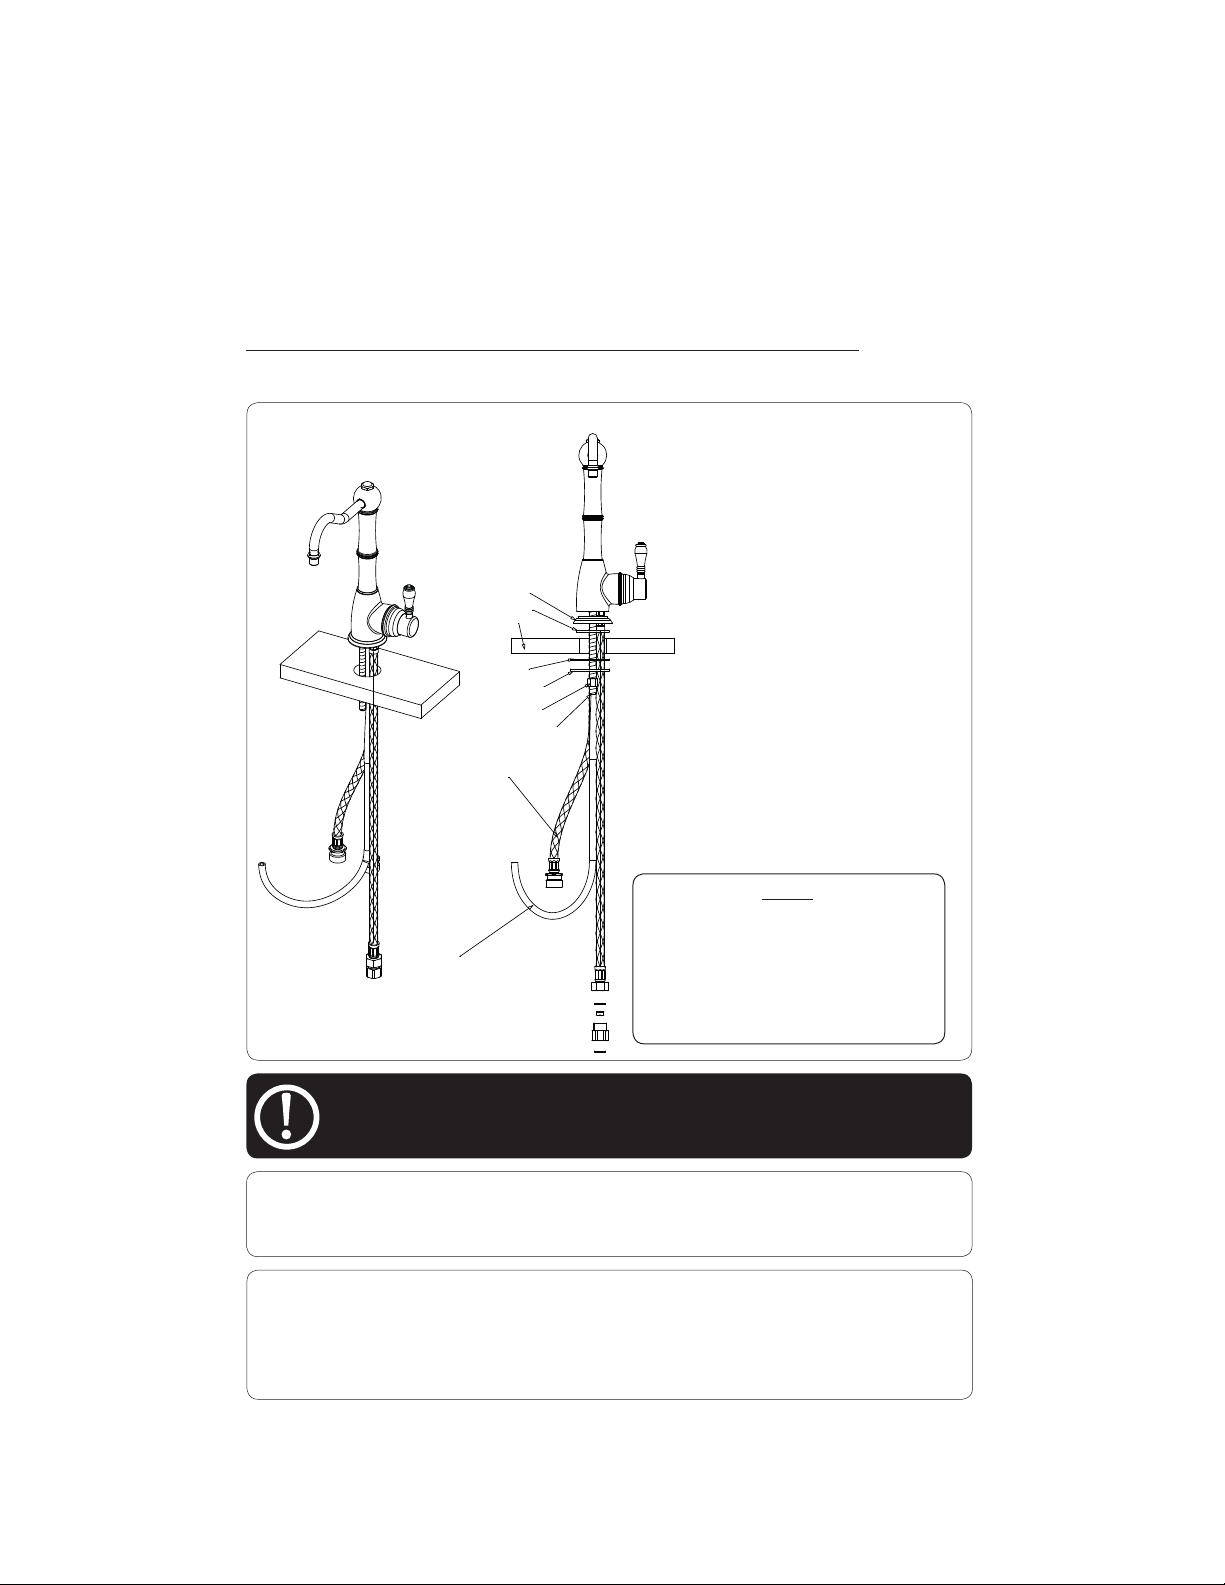
INSTALLATION REQUIREMENTS

Unlike other household hot water appliances, this electronic instant hot water appliance is
Non Pressurised for safety reasons. For this electronic instant hot water appliance, the
Instant Hot Dispenser is placed before the electronic instant hot water appliance, creang
an “open vent” system and consequently no pressure is built up inside the appliance.
IMPORTANT: Install the Instant Hot Water Dispenser in accordance with
the ng Instrucons provided with the Hot Water Dispenser.
Preparaon for the electronic instant hot water appliance installaon
IMPORTANT: Observe all local governing codes and ordinances.
The electronic instant hot water appliance must be mounted vercally and level.
Before you begin, select a proper locaon ideally directly under the instant hot water Dis-
penser or close to it to ensure the connecon pipes will connect from the instant hot wa-
ter Dispenser to the electronic instant hot water appliance.
The electronic instant hot water appliance is not under pressure, consequently, there is a
slight delay in water ow aer the hot water springback Dispenser handle has been turned
on. This is normal and indicates that the electronic instant hot water appliance is funcon-
ing properly.
It is recommended that you have access to a separate power circuit serving only your elec-
tronic instant hot water appliance. See previous pages for more informaon on
“ELECTRICAL REQUIREMENTS”.
PREPERATION FOR INSTALLATION
INSTALLATION
Step 1– Posion the Instant Hot Water Appliance
Ensure the electronic instant hot water appliance is NOT connected to the Electric Power
during installaon.
Place the electronic instant hot water appliance in posion and check to ensure that the
instant hot water Dispenser connecon pipes and the power cord will reach without being
stretched.
The electronic instant hot water appliance must be posioned so the tubes from and to
the instant hot water Dispenser do not twist or kink.

INSTALLATION CONTINUED
Step 2 – Connect Dispenser
The electronic instant hot water appliance inlet connection is a 3/8” BSP male threaded
connector. The outlet connector is a 3/8” BSP male thread connector.
Check the connections type and size on the instant hot water Dispenser for the inlet and
outlet connections.
Screw on the inlet and outlet pipe the correct connectors and tighten with a wrench.
Connect the cold and hot Dispenser inlet hoses to the mains in the normal way. Fitting a
pressure reducing valve to the cold mains inlet if the mains pressure is above 5bar. Tighten
with a wrench and move to check the complete installation for leaks.
Step 3 – Priming and Checking for Water Tightness
Before the electronic instant hot water appliance is plugged into the power socket it must
be tested for water ghtness and no leaks.
Open all water valves to allow water to ow to the instant hot water Dispenser.
Turn the spring back instant hot water handle and hold to ll the electronic instant hot
water appliance this will take about 90 seconds.
When the electronic instant hot water appliance is full, water will ow from
the instant hot water Dispenser spout. Inially as air is purged the out let
may spit or spluer. To remove air from the system connue to operate the lever for 1-2
gallons or more if needed. Turn the instant hot water handle o and check all connecons
for water ghtness and leaks.
Any leaking joint must be ghtened to ensure no water leakage and the above priming
undertaken again and checked for water ghtness before connecng to the power socket.

INSTALLATION CONTINUED
Step 4 – Electrical Connecon
Ensure that the installaon area is dry and no water has spilled.
Connect the plug to the power socket and turn on the power socket at the switch.
The electronic instant hot water appliance display panel will now light up with
the on / o buon illuminated.
Step 5 –Electronic Instant Hot Water Appliance Operaon
Electronic Control Display Panel
ON/OFF to control the power it will also control the display ON/OFF.
Conrmaon and heang control switch
Temperature seng, 7 temperature sengs: 208°F max. 206°F; 203°F; 194°F;185°F’
176°F; 167°F
To turn on the electronic instant hot water appliance touch the buon and hold for 3
seconds unl the display lights up.
Touch the buon and press each me so that the temperature sengs will change
from 167°F to 176°F to 194°F to 185°F to 194°F to 203°F to 206°F to 208°F connue to
press ll the required temperature is seen.To conrm the temperature and start the elec-
tronic instant hot water appliance press the buon and the electronic instant hot
water appliance will start to heat up the water and an audible beep will be heard.

MAINTENANCE AND CARE INSTRUCTIONS CONTINUED
Flushing the Instant Hot Water Tank
It is recommended that the user flushes through the system completely by drawing off
the instant hot water and allowing to reheat and repeating the process for a further 2 or 3
times to ensure the system is fully operational.
Water Draw Back and Contamination in the Tank
During the lling of any vessel the user must ensure at all mes that the spout outlet is
not submerged in the water during the dispensing of the instant hot water and especially
when the instant hot water handle is released.
Maintenance & Power Saving
If the electronic instant hot water appliance is not being used for long periods of time ie:
over 2 days, to save power we recommend you switch off using the “ON/OFF” switch.
Seasonal Shutdown
The hot water system (tank and Dispenser) must not be exposed to freezing tempera-
tures. If there is a possibility of this the system must be drained of water. Shut-off the
mains supply and unplug the unit from the electricity mains and allow the tank to cool for
at least 1 hour. Disconnect the inlet supply to the tank and remove the silicone hose out-
let pipe, lift the unit to the sink, turn upside down and drain all the water from the tank.
When re-installing follow the original installation instructions.
The electronic instant hot water appliance like any water heater has a limited operaonal
life span and will eventually fail. In order to ensure maximum protecon and to avoid possi-
ble damage to any property or personal injury the electronic instant hot water appliance
should be inspected regularly for any water leakage or damage.
Regularly check for any signs of water leakage, if there is any water leakage then replace any
loose or split silicon tubes or exi tails which can cause water leakage and damage.
To provide addional water security to avoid property damage the electronic instant hot
water appliance can be placed in a drain pan and connected to a suitable drain outlet to
avoid any water damage. The drain pan should be installed using the manufacturers installa-
on instrucons.
NOTICE

PROBLEM POSSIBLE CAUSE WHAT TO DO
Water and Steam is sping
from the instant hot water
Dispenser spout
Unit is boiling Turn instant hot water Dis-
penser handle on and release at
least 1 pint of water.
Adjust the water temperature
on the display to a lower
seng.
Check aerator is not blocked
Bleed system to remove any air
Re-Prime bladder to allow cor-
rect operaon.
Water is not hot. The electronic instant hot
water appliance is un-
plugged.
The electronic display has
not been powered up
Make sure the electronic instant
hot water appliance is plugged
in and connected to a grounded
electric outlet
Make sure that the circuit
breaker and fuse are working
correctly
Turn on the power and touch
the on / o buon and then set
the required temperature and
conrm the heat up.
Water is too hot. Water temperature
seng on display panel is
set to high.
Re-set the temperature to the
required temperature and con-
rm the heang up
Water is dripping from the
instant hot water Dispenser
spout.
The expansion chamber
isn't draining the system
correctly due to very
small draw o of water
The spout is blocked
Draw o 1 pint of water to clear
and prime the system. Avoid less
than 1/3 of a pint draw os of wa-
ter. Remove and clean the aerator.
Check silicon pipe length.
TROUBLE SHOOTING

TROUBLE SHOOTING CONTINUED
PROBLEM POSSIBLE CAUSE WHAT TO DO
Slow Flow from the spout Water Filter may be
clogged from impurities
in the inlet mains water
The water lter must be
changed every 6 months or this
will void the guarantee
Water does not ow straight
away
The electronic instant hot
water appliance is design
for non-pressurised oper-
aon and there will be
slight delay ll the near
boiling water appears
Aer a large volume of water
has been drawn o there may a
slightly longer delay in the wa-
ter appearing from the instant
hot water Dispenser spout.
Check length of silicon pipe.
No Water Flowing Water Valves have been
turned o
Inlet Pipes have been
twisted or blocked
Turn on all the water valves
Ensure the pipes are not twisted
or kinked to restrict ow
Remove and clean the aerator
IF YOU ARE IN ANY DOUBT THEN POWER OFF THE ELECTRONIC
INSTANT HOT WATER APPLIANCE AND CALL THE SERVICE AGENT

•®
• CARTRIDGE REPLACMENT
The filter cartridge in your instant hot tap system needs to be changed every six months in order to
ensure the system works at its optimum performance.
Changing the filter cartridge is a simple matter:
1. Switch off the heater tank either at the mains or by pressing
the centre button on the heater tank touch screen.
***Important Notice*** – run off all hot water until
just cold water is coming out of the tap.
2. Place a small bowl under the filter housing sump to catch the
small amount of water that will be released when removing the
filter housing sump.
3. Turn the filter housing sump anti-clockwise a quarter turn, to
allow the filter housing sump to drop down from the filter
housing head.
4. Once the sump is removed, unscrew the filter housing cap
from the sump and tip any water out of the sump into the bowl
or sink.
5. Remove the old filter by pulling the filter from the cap.
6. Dispose of the old filter in the normal household waste bin.
Remebering to keep the filter insert as you will need
this for the replacement filter.
7. Fit the new filter by pushing the filter insert into the top of
the filter then into the cap; you may need to wet the ‘O’ seals in
the top of
the filter as shown in the attached drawing referenced A.
Always inspect the 'O' seals for damage; for replacements use
contact details below.
8. Screw the sump back onto the cap (Ensuring that the ‘O’ seal
is in place), referenced B.
9. Push the filter housing sump back into the filter housing head
and turn clockwise until it stops.
Important Notice
The filter is now ready to use – it is vitally important that you
follow the process below to ensure that all air is bled from the
system. Place a jug under the spout as water will splutter
from the spout until all of the air is expelled.
Operate the instant hot tap lever to dispense water, run-off at
least 0.35 gallons of water, let the system rest for at least 30
seconds and run another 0.35 gallons of water, repeat this at
least one more time – your instant hot water tap should now be
ready for use.
You must now thoroughly check the unit for any water
leaks and take this opportunity to check for any excess
wear or damage to the system. If there are no leaks
please continue:
10. Now switch the heater tank back on at the mains, or by
pressing the button in the centre of the heater tank touch
screen.
11. Set the desired temperature by pressing the right hand
button until the desired temperature is displayed (usually 98
degrees)
12. Press the left hand button to confirm the temperature
setting.
13. The heater tank will now heat up to the desired temperature
and once completed the system is ready for use.
FILTER
HOUSING
SUMP
FILTER
HOUSING
CAP
FILTER
MOUNT
BRACKET
FILTER
HOUSING
HEAD
FILTER
INSERT
FILTER
'O' SEAL
(B)
'O' SEALS
(A)
'O' SEALS
(A)
• Instant Hot Tap •

•®
IT IS VERY IMPORTANT THAT BEFORE YOU START INSTALLING THIS
FILTER SYSTEM YOU ENSURE YOU HAVE READ THE INSTALL
GUIDES THAT CAME WITH THE TAP AND THE HEATER TANK.
First you will need to remove the filter sump. This
can be done by turning the sump a quarter turn
anti-clockwise and pulling down.
Fix the filter mounting bracket to the inside of the
cupboard with the screws provided, using the
bracket as a template for drilling the holes.
Alternatively make use of the supplied adhesive
pad, ensuring the mounting area is clean by using
the wipe provided.
Making sure:
- There is enough room underneath the filter
housing for filter replacement and maintainence.
- The housing is close enough to the heater tank &
tap so that hoses are not over stretched.
- The housing is accessible for future maintainence
& filter replacement.
1.
11 " MIN
FILTER
MOUNTING
BRACKET
MOUNTING
SCREWS X2
** Make sure all hoses are free of kinks **
Attach the G3/8" braided hose from the tap to the
threaded side of the filter housing.
Attach the threaded end of the push-fit braided hose
to the top of the heater tank as shown below.
Re-fit the Filter Sump to the Mounting Bracket.
Please now thoroughly check the unit for any
water leaks before you continue.
2.
G3/8"
BRAIDED
HOSE FROM
TAP PUSH-FIT
BRAIDED
HOSE TO
HEATER
TANK
DIRECTION
OF FLOW
Fixing Mounting Bracket
Attaching Hoses
FILTER
SUMP
9/16"
DOMESTIC
HOT IN
9/16"
COLD IN
3. System Layout
DIRECTION
OF FLOW
G3/8"
BRAIDED
HOSE FROM
TAP
PUSH-FIT BRAIDED
HOSE TO HEATER
TANK
Important Notice
The filter is nearly ready to use – it is
vitally important that you ensure that
all air is bled from the system. Do this
by:
Place a jug under the spout as water
will splutter from the spout until all
of the air is expelled.
Operate the instant hot tap lever
to dispense water, run-off at
least 0.35 gallons of water, let
the system rest for at least 30
seconds and run another 0.35
gallons litres of water, repeat at
least one more time – your instant
hot water tap should now be
ready for use.
• Filter Installation
• Instant Hot Tap •
9/16"
FLOW REGULATOR
This manual suits for next models
4
Table of contents
Other Rohl Water Filtration System manuals