Rohnson R-1185 User manual

1
VACUUM CLEANER
MODELNO. : R-1185
INSTRUCTION MANUAL
Read the instruction manual carefully before using this vacuum cleaner!

2
FEATURES
Warning:1. This appliance is for household use only. It is only used indoors for dust, but not
applied for industrial or decorating areas. It can not suck in water.
2.This appliance is not intended for use by persons(including children)with reduced physical,
sensory or mental capabilities, or lack of experience and knowledge, unless they have been given
supervision or instruction concerning use of the appliance by a person responsible for their safety.
3.Children should be supervised to ensure that they do not play with the appliance.
●Streamline mold-making and original design, representing modern fashionable life.
●Multi-filter to avoid the second air pollution
Using the multi-filter system ensures cleaning out all the dust and keep the air clean from the outlet.
●One appliance fit with various suction nozzles for multi-purposes
Various suction nozzles are used to suck up dust on carpet or hard floor but also to remove dust on
wall, ceiling, couch, bed and all home electric appliance.
●Pedal on/off buttons for easy operation
Pedal on/off buttons can release you from stooping for easy operation.
●Suction power with freely regulation
To regulate the suction power on the air flow handle and unit.
●Dust bag full indicator function
When the dust bag or the air filter is full of dust, the dust full indicator on top of the body will be
covered by red indications. This shows that you need to empty the dust bag or clean the air filter.
DESCRIPTION OF THE PARTS
Combi crevice nozzle
Sofa brush
Suction tube head
Dust full indicator
Hose
ON/OFF button
Speed control knob
Cord rewinding button
Power
cord
Air flow handle
Connecting tube
Floor brush
Handle

3
PRECAUTIONS
●Before using, please make sure the network voltage coincides with the
product rated voltage.
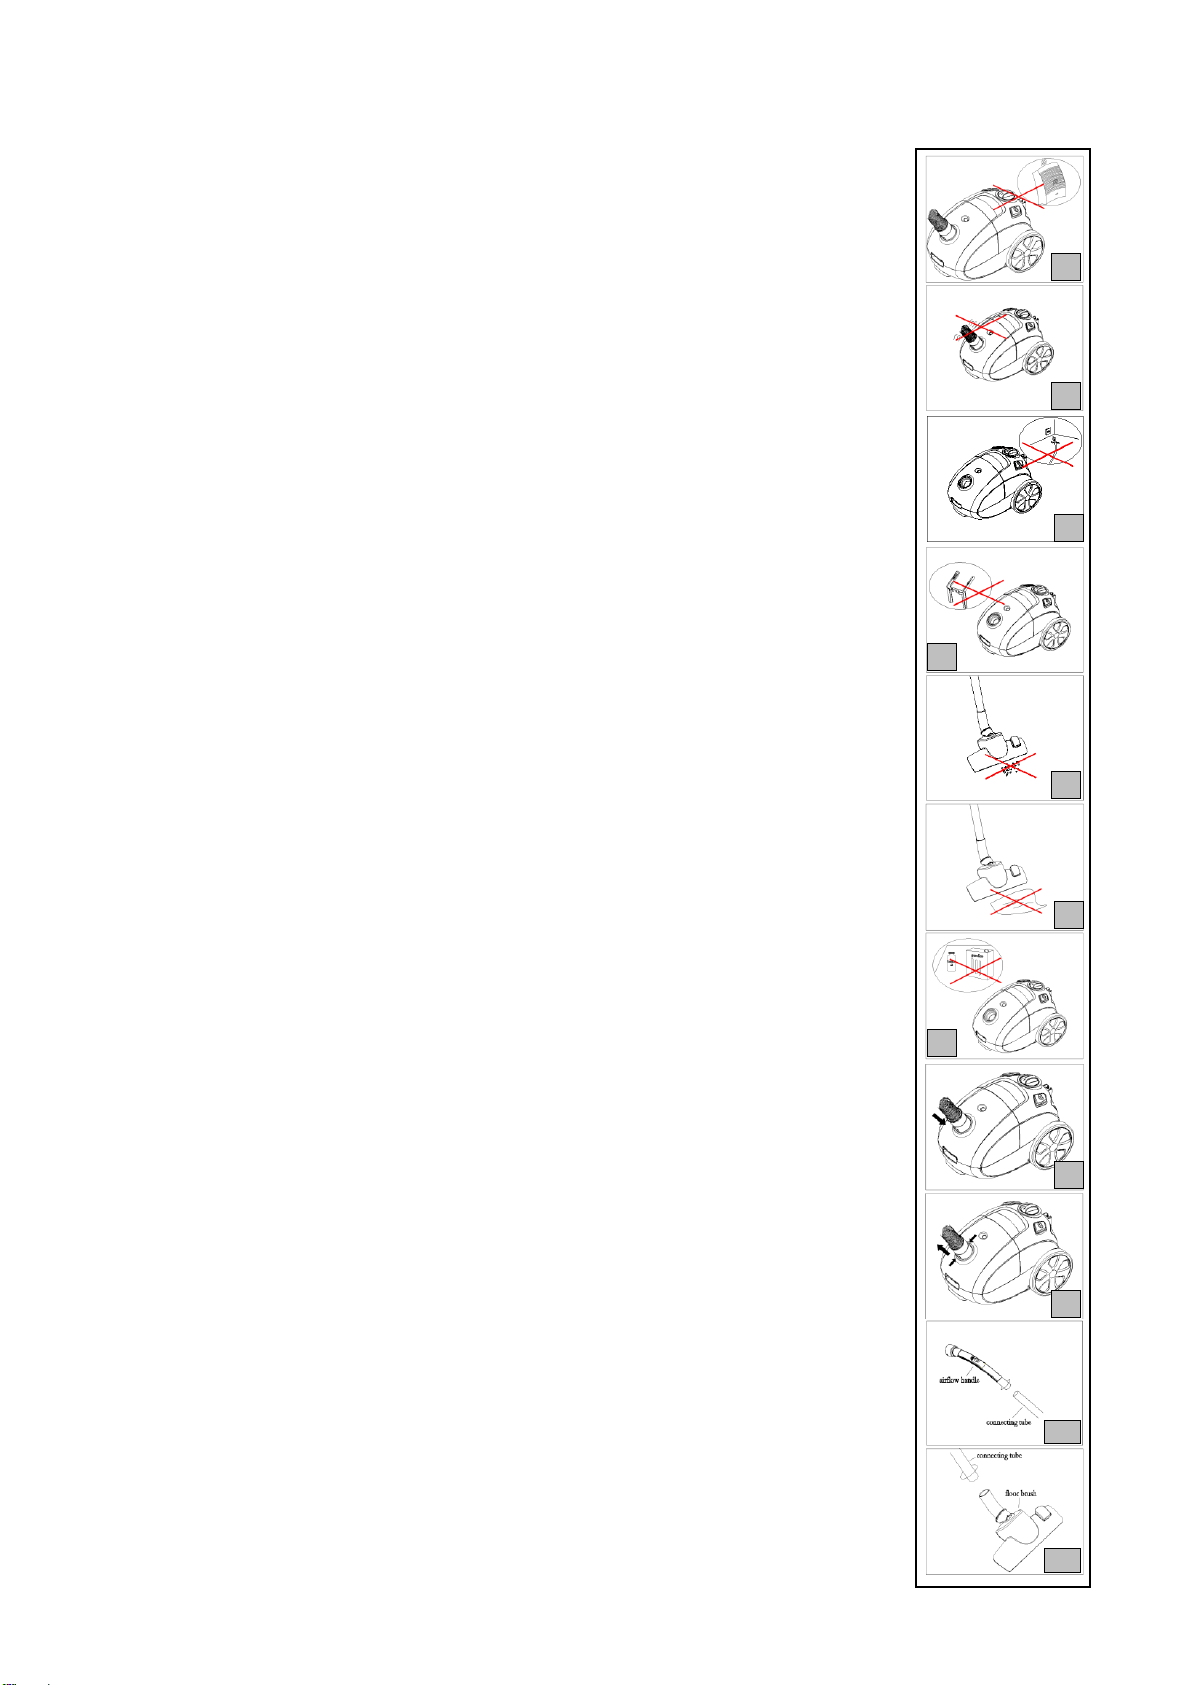
●Keep the appliance away from stove or any other high temperature objects
so as not to influence its operation by deforming its plastic parts. (fig.1)
●Do not bend, extrude or pull by the flexible hose, Stop using the broken or
damaged hose, instead to use the new hose. (Fig.2)
●When you need to clean your appliance or stop operation, unplug from the
power outlet. When unplugging, be sure to hold the plug, but not pull or
carry by the power cord. (fig.3)
●Never use the appliance without dust bag or when the dust bag is broken or
not assembled. (fig.4)
●When sucking, do not suck up particles as mud, paste, wall ashes, or sharp
articles. otherwise it may result in obstruction to the dust bag or air filter or
damage to the motor. If sucking up these particles, please immediately clean
the dust bag and air flow filter. (fig.5)
●When in use, do not suck up suck hair rolls, large paper rolls or plastic bags
which may easily lead to block the suction hole or suction tube or hose.
Other wise it may cause breakdown or deforming of body cover. If any
block occurs to the suction, immediately stop operation by unplugging from
the outlet for cleaning. (fig.6)
●When cleaning the appliance, wet cloth soaked with water or neutral
detergent shall be used instead of gasoline or banana water. Otherwise it
may lead to breakage of fadedness of the body cover. (fig.7)
●When in use, do not block or shelter the rear outlet cover to avoid
influencing normal air exhaustion. Otherwise, the motor will be damaged by
overheat.
●If the supply cord is damaged, it must be replaced by the manufacturer or its
service agent or a similarly qualified person in order to avoid a hazard.
HOW TOASSEMBLE
●Push the button of hose head, and insert it into unit inlet until locked (fig.8)
●If want to pull out the hose from unit, please press the button on the hose
before pull out. (fig.9)
●How to use connecting tubes and curved wand?
When connecting, insert the bigger end of the connecting tube into air flow
handle and then swivel it to firm connection. (fig.10)
⚫Connection of the tubes. Refer to the above said. (fig.10)
●Connection of connecting tube with floor brush. For connection, insert the
smaller end of connecting tube into the tube on the floor brush, and then
swivel it to firm connection. (fig.11)
●Regarding the connection of connecting tubes with crevice nozzle, refer to
the above said. (fig.10)
1
2
3
4
5
6
7
8
9
10
11

4
To start operation
●Pull out the power cord
The power cord can be pulled out as long as it is marked with yellow color. It is
forbidden to exceed the red mark (fig.12)
●Power button
After plugging into electrical power outlet, press the power button on the body
cover to control start and stop. (fig.13)
●Regulation of suction power
You can control suction power not only by speed regulation knob but also by
air flow regulator on handle. (fig.14, 15)
How to use
●For corner or crevice place, you can use combi nozzle(fig.16)
●For couch, curtain or decoration surfaces, the sofa brush should be used.
And the floor brush is used for blanket and floor. (fig.17)
●Cleaning dust bag and replacing parts.
When the cleaner indicator on top of the body is filled with red indications,
it means the dust bag is full of dust. You need to replace paper dust bag and
clean the air filter when clogged. (fig.18)
●Replacing the dust bag
1) Lift up by the front cover clamp to open the front cover (fig.19)
2) To take out the dust bag from dust bag holder. (fig.20)
3) If you use a paper dust bag, replace it with a new one. If a cloth dust bag,
Take out the clip and open the dust bag to empty dust then insert it back to
Its Position for further use by sealing the bag well with the clip. (fig.21)
4) Assembling the dust bag, you should press the clamp button on the bag
holder, and insert the dust bag into the two slots, then release the button
to clip the dust bag. (fig 22)
5) If the dust bag is broken, replace it immediately.
●Replacing the front cover and turn the dust bag holder over to take out
the filter for cleaning or replace a new one. (fig.23)
●Replacing the air outlet filter
Press the clamp position of the air outlet cover to discharge the air outlet
cover for clean up or a new replacement. (fig.24)
12
13
14
15
18
17
16
19
20
21

5
●Cleaning the air inlet and outlet filter. (fig.25)
1) Put the filter into running water for rinsing.
2) Remove some water by patting the filter with towel, then dry it in cool
place.
3) Dry the filter in a ventilation place, take care not to bake it so as to
avoid being deformed by high temperature.
Warning: Neither wash the filter in a washing machine nor dry it with a hair
dryer.
●Power cord rewinding
When not in use, unplug from the electrical power outlet and then press the
cord rewinding button to feed back the power cord. (fig .26)
●For storage
Insert the plastic holder of the Connecting tube into the unit base or holder
hook on the back unit. (Fig.27)
●Put the combination crevice nozzle in the accessory hole in the bottom of
the body after finishing suction. (fig.28)
TROUBLE SHOOTING GUIDE
Please check the following details before you have your appliance repaired in an
authorized servicing department.
Problem
Possible reason
Solution
Motor can’t
work
1. Check if the power plug is firmly
inserted into the outlet.
2. Check if the power switch of the
appliance is on.
3. Check if the heat sensitive thermostat
be off due to overheating.
1. Insert the plug back again into the
outlet to secure it is switched on.
2. And then turn the power switch on.
3. After the motor be cool off, the unit
will restart working automatically.
Suction
power
becomes
weak
1. Check if the hose, floor brush or
connecting tube is clogged.
2. Check if the dust is full;
3. Check if the air filter is clogged,
the connecting tube is correctly
attached.
1. Immediately remove the obstruction.
2. Empty dust.
3. Clean the dust bag for reassembly of
connecting tubes.
26
27
25
24
23
22
28

6
Power cord
will not fully
feed back
Check if the power cord is twisted.
Pull out the power cord at its
certain length and rewind it.
Power cord
can not be
taken out
The power cord may be twisted.
Rewind or pull the cord in or out for
several times by pressing the power cord
rewind button.
Power cord
rewinds itself
The inertial rewinding by the cord
rewinder device may lead to be out of
control.
Pull the power cord out in for 4-5 times.
If still rewinds itself, ask for an
authorized servicing department for
repair.
No speed
regulation
The speed regulation device
may be out of control
Restart the appliance for reuse at several
times, if it is exactly out of control, ask
for an authorized servicing department.
Front cover
can't be
closed
Check if no dust bag is put inside or the
front cover deformed without dust bag
in good position.
Put the dust bag in good position and
then take the appliance to the authorized
servicing department.
Dust full
indicator is
covered by
red
indications
Check if the floor brush, the hose or the
long connecting tube is blocked. See if
the dust bag is full and the air
filter is clogged.
Immediately remove obstructions away.
Clean or replace the dust bag. Clean the
air inlet filter.
TECHNICAL SPECIFICATIONS
Rating voltage: 220-240V~, 50/60Hz
Power: R-1185 800W
IMPORTANT INFORMATION FOR CORRECT DISPOSAL OF THE PRODUCT IN ACCORDANCE
WITH EC DIRECTIVE 2002/96/EC.
At the end of its working life, the product must not be disposed of as urban waste. It must be taken to a special local
authority differentiated waste collection centre or to a dealer providing this service. Disposing of a household
appliance separately avoids possible negative consequences for the environment and health, deriving form
inappropriate disposal and enables the constituent materials to be recovered to obtain significant savings in energy
and resources. As a reminder of the need to dispose of household appliances separately, the product is marked with a
crossed-out wheeled dustbin.
Table of contents
Other Rohnson Vacuum Cleaner manuals

Rohnson
Rohnson R-136 User manual

Rohnson
Rohnson R-1111 User manual

Rohnson
Rohnson R-103 User manual

Rohnson
Rohnson R-1219 User manual

Rohnson
Rohnson R-185 User manual

Rohnson
Rohnson Mamba RM-01 User manual

Rohnson
Rohnson R-111 User manual

Rohnson
Rohnson R-1230 User manual

Rohnson
Rohnson MAMBA pro M8 User manual

Rohnson
Rohnson R-139 User manual

Rohnson
Rohnson MAMBA plus M4 User manual

Rohnson
Rohnson R-158 User manual

Rohnson
Rohnson R-1170 User manual

Rohnson
Rohnson R-1235 User manual

Rohnson
Rohnson R-129 User manual

Rohnson
Rohnson R-1560 User manual

Rohnson
Rohnson R-1218 User manual

Rohnson
Rohnson Mamba RM-02 User manual

Rohnson
Rohnson R-1213 User manual