manuals.online logo
Brands
  1. Home
  2. •
  3. Brands
  4. •
  5. Roland
  6. •
  7. Drum
  8. •
  9. Roland V-Drums TD-07KVX User manual

Roland V-Drums TD-07KVX User manual

1
2
Drum stand
Assembly procedure
Drum sound module / Pads / Others
3
4 5
For a left-handed setup
Connection procedure
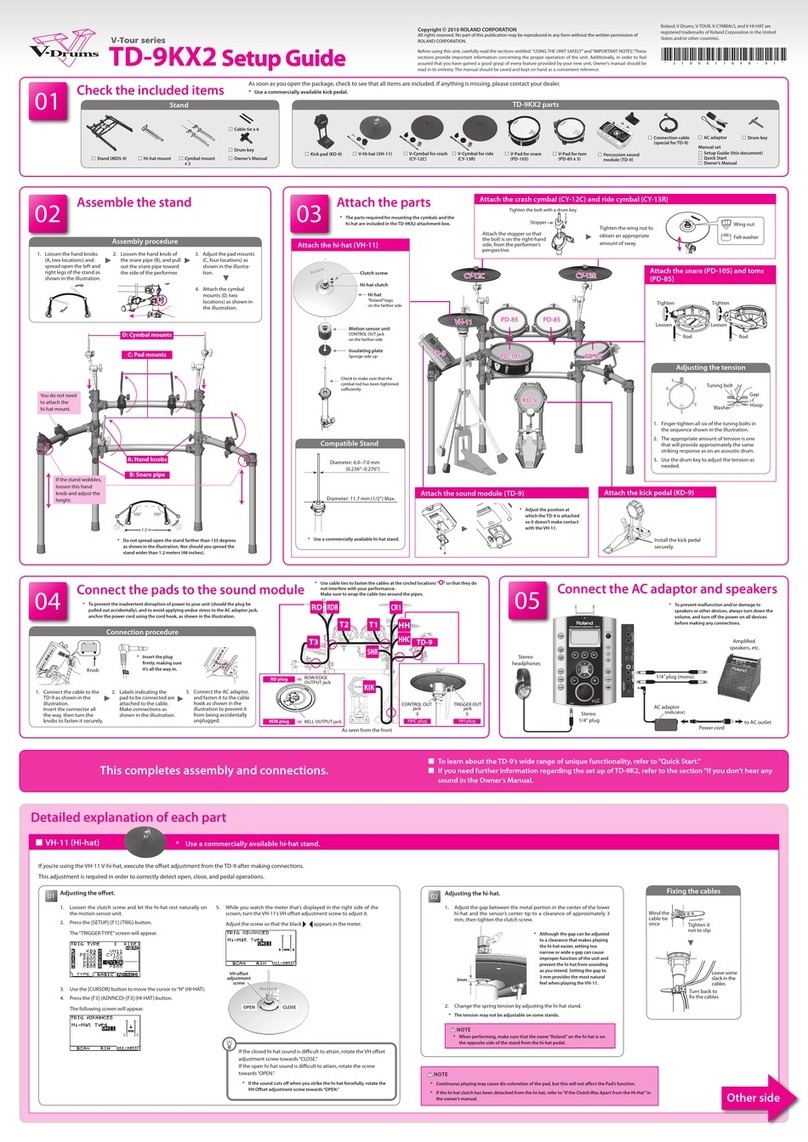
Setup Guide
Before using this unit, carefully read “USING THE UNIT SAFELY” and “IMPORTANT NOTES”(the leaet“USING THE UNIT SAFELY,”“TD-07 Owner’s Manual,”and the TD-07KVX
Setup Guide). After reading, keep the document(s) where it will be available for immediate reference.
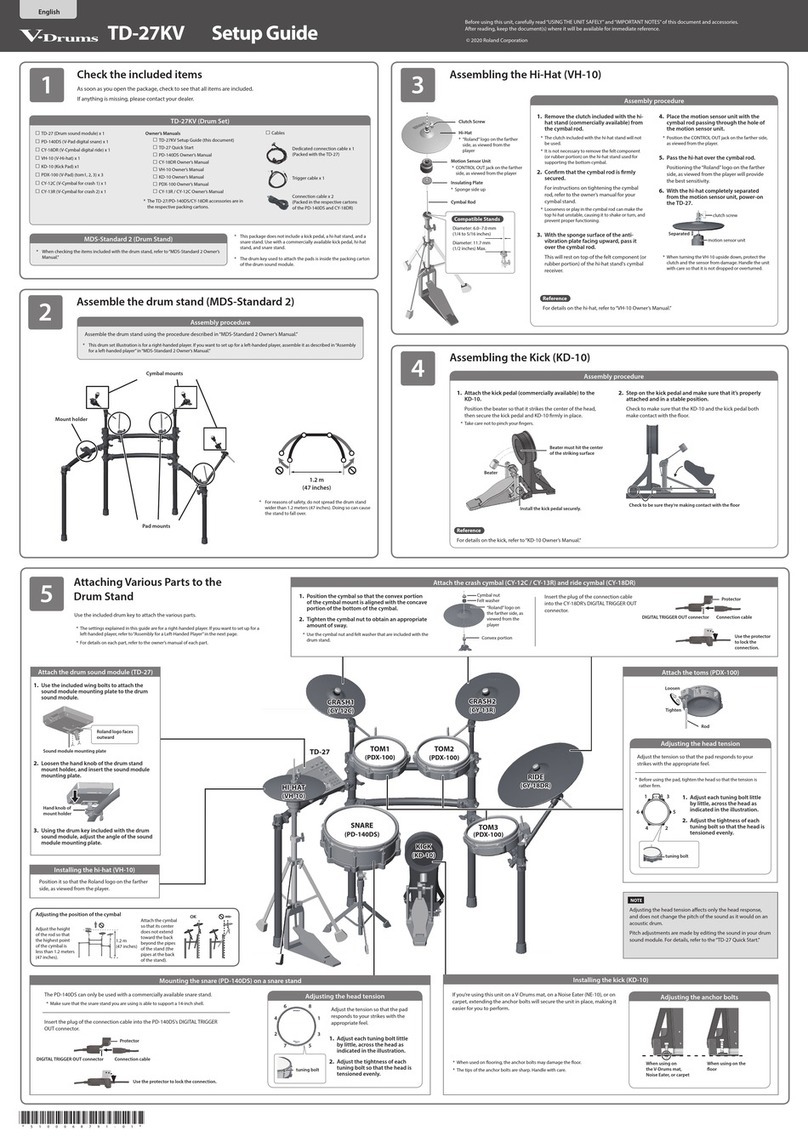
Check the included items
Assemble the drum stand
* When checking the items
included with the drum
stand, refer to “MDS-
Compact Owner’s Manual.”
* The tip of the mount is sharp. Handle it with care.
* When setting up or storing the stand, be careful not to pinch the ngers you use to
handle the stand.
Attach the parts
Connect the pads to the drum sound module (TD-07) Connect the AC adaptor
and speakers
Connect the AC adaptor, headphones, or speakers as described in the“TD-07
Owner’s Manual.”
* To prevent malfunction and equipment failure, always turn down the volume, and turn
o all the units before making any connections.
The setup described in this guide is for right-handed players. To set up for a left-handed player,
reattach the components as follows.
5Exchange curved pipes (L) and (R), and straight pipes (L) and (R), left-for-right.
5Attach holder (C) and the snare pipe to the right side.
5Exchange the pads and cymbals with their attachment mounts left-for-right.
5Exchange the drum sound module with its sound module mount left-for-right.
9 When you’ve nished making connections, turn on the power as described in the“TD-07 Owner’s Manual,” and
verify that you can hear sound.
This completes assembly and connections.
Connect the connection cables as shown in the illustration.
© 2021 Roland Corporation
* The drum stand assembly procedure is for right-handed players. If you want to set up
the stand for left-handed players, refer to“Assembly for left-handed players” below.
* Adjust the position and height of the pads and pedals according to your height and
tastes, so that they are easy to play.
* Insert the plug rmly,
making sure it’s all
the way in.
1. Connect the connection cable to
the drum sound module as shown
in the illustration below.
Insert the connector all the way,
then turn the knobs to fasten it
securely.
2. Labels are axed to the connection
cable to indicate the pads to be
connected. Make connections as
shown in the illustration at right.
TD-07KVX
1.2 m (48 inches)
* To prevent the drum stand from tipping over, do not
position the stand leg pipes at the two ends more
than 1.2 meters (48 inches) apart.
CY-12C
PDX-12
PDX-8 PDX-8
PDX-8
CY-13R
KD-10
VH-10
TD-07
Diameter: 6.0–7.0 mm
(0.236”–0.276”)
Diameter: 11.7 mm (1/2”)
Max.
Attach the hi-hat (VH-10)
Motion Sensor Unit
CONTROL OUT jack on the
farther side
Clutch screw
Hi-Hat
“Roland” logo on the
farther side
Insulating Plate
Sponge side up
Compatible hi-hat stand
Attach the snare (PDX-12) and toms (PDX-8)Attach the kick pedal
Install the kick pedal securely.
Use caution regarding the following to prevent the drum stand from
falling over.
5Adjust the rod height so that no part of any cymbal is higher than
1.2 meters (48 inches) above the oor. 1.2 m
(48 inches)
OK Not OK
5Attach the cymbals in such a way that the center of the cymbal does
not extend beyond the rear pipes of the stand.
Adjusting the position of the cymbal
Cabling diagram for the connection cable
(As seen from the back)
CR1
T1
KIK
HH
SNR
CR2
TD-07
* Fasten the cables so that they will
not obstruct your playing; use cable
clips and cable ties.
Make sure to wrap the cable ties
around the pipes.
HHC
8Kick pad (KD-10) 8V-Hi-hat (VH-10) 8V-Cymbal for crash
(CY-12C)
8V-Pad for snare
(PDX-12)
8V-Pad for tom
(PDX-8 x 3)
8V-Cymbal for ride
(CY-13R)
8Drum sound module
(TD-07)
8Connection cable 8AC adaptor
8Setup Guide (this document)
8Owner’s Manual set
As soon as you open the package, check to see that all items are included. If anything is missing, please contact your dealer.
* This package does not include a kick pedal, and a hi-hat stand. Use with a commercially available kick pedal and hi-hat stand.
CY-12C
PDX-12
PDX-8
PDX-8
CY-13R
KD-10
VH-10
TD-07
PDX-8
(T1)
(T2)
(T3) (SNR)
(KIK)
(HH)
(CR1)
(RD) (CR2)
Remove the caps, remove holder (C) and the snare pipe,
and reattach them to the right side.
Assemble the stand as the “B” type (for ride cymbal), following the steps in the“MDS-Compact Owner’s Manual.”
Adjust the location at which
the KD-10 is installed so that
it’s at a comfortable position
for playing.
After exchanging the curved pipes, attach
the holders so that the marks on the pipes
are visible through the gaps of the holders.
Mark
Straight pipe
R (short)
Curved pipe R
(including the pad mount)
Straight pipe L (long)
Curved pipe L
Attach the crash cymbal (CY-12C) and ride cymbal (CY-13R)
“Roland” logo on the farther side
Cymbal nut
Felt washer
* Use the cymbal nut and felt washer that are
included with the drum stand.
1. Position the cymbal so that the stopper (convex
portion) of the cymbal mount is aligned with the
concave portion of the bottom of the cymbal.
2. Tighten the cymbal nut enough to allow an
appropriate amount of sway.
Stopper
(convex
portion)
8Drum sound module
holder
Cymbal mounts
Pad mounts
Pad mounts
* Cymbal mount
If the stand wobbles, loosen
this hand knob and adjust
the height.
MEMO
The mount holder and cymbal mount marked with an asterisk are not used on the TD-07KVX. The mount
holder is used when mounting a drum sound module aside from the TD-07, and the cymbal mount is used
when adding/changing a drum sound module and adding a cymbal, so keep these parts for later use.
* Mount holder
Remove this, as it is not used on
the TD-07KVX.
T3
T2
CR1
T1
KIK
RD
CR2
TD-07
HHC
SNR
HH
T2
T3
Cabling diagram for the
connection cable
(As seen from the back)
* 5 1 0 0 0 7 6 4 4 1 - 0 1 *
RD
Loosen
Tighten
Pad mount
Loosen
Tighten
Pad mount
Knob
Label
BOW/EDGE
OUTPUT jack
BELL
OUTPUT jack
RD plug
CR2 plug
TRIGGER OUT
Jack
CONTROL OUT
Jack
HH plug
HHC plug
Attach the drum sound
module (TD-07)
1. Use the drum key to loosen the
bolt A of the drum sound module
holder, then attach the drum
sound module holder to straight
pipe “L” (long) and tighten the
bolt.
2. Use the bolt B of the drum sound
module holder to attach it as
shown in the illustration.
Straight pipe
L (Long)
Bolt A
Drum sound module holder
Bolt B
Drum key
NOTE
When handling the hi-hat control pedal, kick pedal, or cymbal pads, take care not to pinch your ngers
between movable parts and the main unit. If using this in a location where children are present, be sure to
provide adult supervision or guidance.
Detailed explanation of each part
9 Adjust the VH-10 (hi-hat)
9 KD-10 (Kick)
9 PDX-12 (Snare)
9 CY-12C (Crash) 9 CY-13R (Ride)9 PDX-8 (Tom)
Knob bolt
Head
Tuning bolts
OUTPUT jack
Hoop rubber
Shell
Holder
Beater
Install the kick pedal
securely.
Position the beater so that it strikes the
center of the head, then secure the kick
pedal and KD-10 rmly in place.
* A variety of commercially available
beaters can be used, including felt,
plastic, or wood types. However if a felt
beater is used, the felt may leave marks
on the striking surface.
01
Correct positioning Incorrect positioning
02
Check to be sure they’re making contact with the oor
03
When using on the V-Drums mat, noise
eater, or carpet
When using on the oor
4 3
2 5
6 1
Adjusting the head tension
When the unit is shipped from the factory,
this is adjusted fairly loosely.
Before use, adjust the head to a fairly high
tension.
1. Use the drum key to adjust each tuning bolt a little at a time, moving in
order from one side to the opposite side as shown in the illustration.
2. Fine-tune the adjustment while continuing to check the pad feel and
response.
* Do not rmly tighten a single tuning bolt by itself. Doing so will make it
impossible to tension the head evenly, and will cause malfunctions.
01 02
When using the VH-10, be sure to adjust the oset on the TD-07 after connection. This adjustment is required in order to correctly detect open, close, and pedal operations.
Wind the cable
tie once
Tighten it not to slip
Leave some slack in the
cables
Turn back to x the cables
Fixing the cables
1. Make adjustments so that the cosmetic part in the lower middle of the hi-hat is
3 mm away from the center tip of the sensor, and then tighten the clutch screw.
3mm3mm
* The spacing can be adjusted to the distance that you nd comfortable for
playing, but if it is too narrow or too wide, malfunctions may occur, and you
might not be able to play as expected.
3 mm is the spacing at which you’ll be able to play the VH-10 with the most
natural feel.
2. Use the hi-hat stand to adjust the tension of the pedal spring.
* Depending on the stand, it might not be possible to make adjustments.
1. With the hi-hat completely separated from the motion sensor unit,
power-on the TD-07.
2. Loosen the clutch screw and let the hi-hat rest naturally on the motion
sensor unit.
motion sensor unit
Separated
clutch screw
3. Press the [ ] (SETUP) button.
4. Use the [C][A] buttons to select “PAD,” and press [ ] (ENTER) button.
5. Strike the hi-hat to select the pad.
6. Use the [C][A] buttons to select “Type,” and use the dial to select the
type of hi-hat you’re using (VH-10).
PAD HH
Type VH10À
7. Use the [C][A] buttons to select “VH Set,” and press [ ] (ENTER)
button.
8. If the screen indicates “Turn screw L,” turn the oset adjustment
screw counter-clockwise. If the screen indicates“Turn screw R,”turn it
clockwise.
Adjust the oset.
NOTE
The hi-hat has a correct orientation. You’ll obtain the optimal sensitivity if the
“Roland” logo is toward the back as seen from the performer.
Adjust the hi-hat.
If you nd the closed hi-hat sound dicult to play, turn the VH oset
adjustment screw toward “CLOSE.”
If you nd the open hi-hat sound dicult to play, turn it toward “OPEN.”
* If the sound is interrupted when you play a strong strike, adjust the VH
oset adjustment screw toward “OPEN.”
NOTE
5Continuous playing may cause dis-coloration of the pad, but this
will not aect the Pad’s function.
5If the hi-hat clutch has been detached from the hi-hat, refer to
“If the Clutch Was Apart from the Hi-Hat” in the “VH-10 Owner’s
Manual.”
NOTE
5Attach the KD-10 and the kick pedal securely.
5Take care not to pinch your ngers.
5Depending on how you’re using the unit,
the bolts that attach the pedal to the plate
could become loose, causing the pedal to
rattle during performance. In such cases, use
commercially available tools to tighten the
bolts.
Adjusting the Anchor Bolts.
If you’re using this unit on a V-Drums mat, on a noise eater
(NE-10), or on carpet, extending the anchor bolts will
secure the unit in place.
However, if that’s not enough to keep the KD-10 in a xed
position, you can adjust things so that the tips of the
anchor bolts protrude through the base. That should keep
it in place and make it easier for you to play.
When Using a Twin Pedal
Position the two beaters equally apart from the center of the pad as shown in
the gure below. If one of the beater is further away from the center than the
other, the sound from the further beater will be lower in volume, or will not
sound as desired.
If you’re using twin pedals, the sensitivity will be lower than when a single
pedal is used. Raise the sensitivity on the sound module.
For details, refer to the“TD-07 Owner’s Manual.”
NOTE
5When used on ooring, the anchor bolts
may damage the oor. Adjust the anchor
bolts correctly.
5The tips of the anchor bolts are sharp.
Handle with care.
Component names
Attach the kick pedal. Step on the kick pedal and make sure that it’s properly attached and
in a stable position.
Check to make sure that the base of the KD-10 and the kick pedal
both make contact with the oor.
Component names
NOTE
Continuous playing may cause dis-coloration of the pad, but this will not aect the Pad’s function.
Component names
1. Use the drum key to adjust each tuning bolt a little at a time,
moving in order from one side to the opposite side as shown in
the illustration.
The appropriate amount of tension is one that will provide
approximately the same striking response as on an acoustic
drum.
2. Make minor adjustments to the tightness as necessary.
NOTE
5Be sure to adjust the head tension of the pad before use.
5The tom for the TD-07 drum sound module cannot be used to play
rim shots.
OPEN CLOSE
oset
adjustment
screw
When the value shown in the lower left of the screen is
approximately 80 and the “OK!”indication appears, the
adjustment is complete.
Adjust HH offset
<80> OK![EXIT]
9. Fasten the clutch screw so that the hi-hat opens to the amount you
prefer.
10.
Press the [ ] (DRUM KIT) button to return to the DRUM KIT screen.
CAUTION
Take care so as not to get ngers pinched
When handling the following moving parts, take
care so as not to get ngers, toes, etc., pinched.
Whenever a child uses the unit, an adult should be
on hand to provide supervision and guidance.
• Hi-hat control pedal
• Kick pedal
• Bottom of the cymbal pad (see gure)
Keep small items out of the reach of children
To prevent accidental ingestion of the parts listed
below, always keep them out of the reach of small
children.
• Included Parts
Cymbal nuts
• Removable Parts
Screws
CR2 plug’s cap
IMPORTANT NOTES
USING THE UNIT SAFELY
Head
OUTPUT jack
Anchor bolts
Slip-prevention tape
Mounting plate for
the kick pedal
OUTPUT jack
Tuning bolts
Knob bolt
Hoop rubber
Head Holder
Shell
18
72
36
54
Tighten
Loosen
CY-12C component names CY-13R component names
BOW/EDGE
OUTPUT jack
Pad face
Bow
Edge
Bell
BELL
OUTPUT jack
Pad face
Bow
Edge
BOW/EDGE
OUTPUT jack
Fixing the cables
(CY-8)
Secure the cable
in place with the
cable tie
Leave some slack in
the cables
Be sure to make this
small plastic hook
visible from you.
Wind a cable tie
around the pipe and
tighten it in order to
not to slip.
Wind a cable tie around
a cable.
Insert the small plastic hook to a hole
to secure the cable to the cymbal arm.
CAUTION
Cautions when moving this unit
If you need to move the instrument, take note of
the precautions listed below. At least two persons
are required to safely lift and move the unit. It
should be handled carefully, all the while keeping
it level. Make sure to have a rm grip, to protect
yourself from injury and the instrument from damage.
• Check to make sure the bolts and hand knobs securing the
stand have not become loose. Fasten them again securely
whenever you notice any loosening.
• Disconnect the power cord.
• Disconnect all cords coming from external devices.
• Disconnect the kick pedal.
• Disconnect the connection cable of the kick pad.
• Disconnect the connection cable of the hi-hat control pedal.
WARNING
Use only the supplied AC adaptor and the
correct voltage
Be sure to use only the AC adaptor supplied with
the unit. Also, make sure the line voltage at the
installation matches the input voltage specied on
the AC adaptor’s body. Other AC adaptors may use
a dierent polarity, or be designed for a dierent
voltage, so their use could result in damage, malfunction, or
electric shock.
Placement
• Depending on the material and temperature of the surface on
which you place the unit, its rubber feet may discolor or mar
the surface.
Additional Precautions
• This instrument is designed to minimize the extraneous sounds
produced when it’s played. However, since sound vibrations
can be transmitted through oors and walls to a greater degree
than expected, take care not to allow these sounds to become
a nuisance others nearby.
569
• The rubber portion of the striking surface is treated with a
preservative to maintain its performance. With the passage of
time, this preservative may appear on the surface as a white
stain, or reveal how the pads were struck during product
testing. This does not aect the performance or functionality of
the product, and you may continue using it with condence.
• Continuous playing may cause dis-coloration of the pad, but
this will not aect the pad’s function.
• This document explains the specications of the product
at the time that the document was issued. For the latest
information, refer to the Roland website.
Intellectual Property Right
• Roland and V-Drums are either registered trademarks or
trademarks of Roland Corporation in the United States and/or
other countries.
• Company names and product names appearing in this
document are registered trademarks or trademarks of their
respective owners.
* Depending on how the drums
are set up and played, some
pads might be triggered
unintentionally or one of the
pads might not respond when
two pads are struck at the same
time.
In this case, press the [ ] (SETUP)
button on the sound module,
select “PAD,” select “ADVANCED,”
and adjust the “XtlkCancel”
parameter.
For details, refer to “TD-07
Owner’s Manual.”
Other Roland Drum manuals

Roland VH-13 User manual

Roland

Roland VH-13 User manual

Roland CY-15R User manual

Roland

Roland CY-15R User manual

Roland V-Drums Lite HD-1 User manual

Roland

Roland V-Drums Lite HD-1 User manual

Roland V-Drums TD-27 User manual

Roland

Roland V-Drums TD-27 User manual

Roland V-Drums V-Compact TD-4 User manual

Roland

Roland V-Drums V-Compact TD-4 User manual

Roland 7X7-TR8 User manual

Roland

Roland 7X7-TR8 User manual

Roland V-Drums VH-14D User manual

Roland

Roland V-Drums VH-14D User manual

Roland SPD-20 Operating and maintenance manual

Roland

Roland SPD-20 Operating and maintenance manual

Roland TR-8 Technical manual

Roland

Roland TR-8 Technical manual

Roland V-Drums KD-120 User manual

Roland

Roland V-Drums KD-120 User manual

Roland HandSonic HPD-20 Operating and maintenance manual

Roland

Roland HandSonic HPD-20 Operating and maintenance manual

Roland PD-105 User manual

Roland

Roland PD-105 User manual

Roland V-Drums TD-30 User manual

Roland

Roland V-Drums TD-30 User manual

Roland Pro Stand MDS-10 User manual

Roland

Roland Pro Stand MDS-10 User manual

Roland V-Tour Series Setup guide

Roland

Roland V-Tour Series Setup guide

Roland V-Drums V-PAD PDX-8 User manual

Roland

Roland V-Drums V-PAD PDX-8 User manual

Roland MDS-12 User manual

Roland

Roland MDS-12 User manual

Roland V-Drums TD-30 User manual

Roland

Roland V-Drums TD-30 User manual

Roland Rhythm Coach RMP-5 User manual

Roland

Roland Rhythm Coach RMP-5 User manual

Roland ELCajon EC-10 User manual

Roland

Roland ELCajon EC-10 User manual

Roland V-Drums TD-8 Instruction Manual

Roland

Roland V-Drums TD-8 Instruction Manual

Roland TD-25K User manual

Roland

Roland TD-25K User manual

Roland V-Drums TD-17K User manual

Roland

Roland V-Drums TD-17K User manual

Roland TD-12 User manual

Roland

Roland TD-12 User manual

Popular Drum manuals by other brands

Pearl E-PRO Live instruction manual

Pearl

Pearl E-PRO Live instruction manual

Medeli DD630 owner's manual

Medeli

Medeli DD630 owner's manual

Hitman HD-5 user manual

Hitman

Hitman HD-5 user manual

Lab-T MOBISTAR MS-ZNUW user manual

Lab-T

Lab-T MOBISTAR MS-ZNUW user manual

Hitman HD-3 owner's manual

Hitman

Hitman HD-3 owner's manual

Yamaha RS-60 Assembling instructions

Yamaha

Yamaha RS-60 Assembling instructions

Yamaha RS-95 Assembling instructions

Yamaha

Yamaha RS-95 Assembling instructions

Ringway TD90II user manual

Ringway

Ringway TD90II user manual

Yamaha PCY135 owner's manual

Yamaha

Yamaha PCY135 owner's manual

Maker Hart DD-PAD Assembly manual

Maker Hart

Maker Hart DD-PAD Assembly manual

Alesis Command Kit Assembly guide

Alesis

Alesis Command Kit Assembly guide

Clavia ddrum4 owner's manual

Clavia

Clavia ddrum4 owner's manual

Rogers DYNA-SONIC manual

Rogers

Rogers DYNA-SONIC manual

mPTech ZE-0226 user manual

mPTech

mPTech ZE-0226 user manual

Yamaha YDD-60 owner's manual

Yamaha

Yamaha YDD-60 owner's manual

Yamaha DD-14 owner's manual

Yamaha

Yamaha DD-14 owner's manual

Alesis SR-16 Reference manual

Alesis

Alesis SR-16 Reference manual

Virgin Musical Instruments Hitman HD-17 Mako owner's manual

Virgin Musical Instruments

Virgin Musical Instruments Hitman HD-17 Mako owner's manual

manuals.online logo
manuals.online logoBrands
  • About & Mission
  • Contact us
  • Privacy Policy
  • Terms and Conditions

Copyright 2025 Manuals.Online. All Rights Reserved.