manuals.online logo
Brands
  1. Home
  2. •
  3. Brands
  4. •
  5. Roma Heating
  6. •
  7. Thermostat
  8. •
  9. Roma Heating TR3 User manual

Roma Heating TR3 User manual

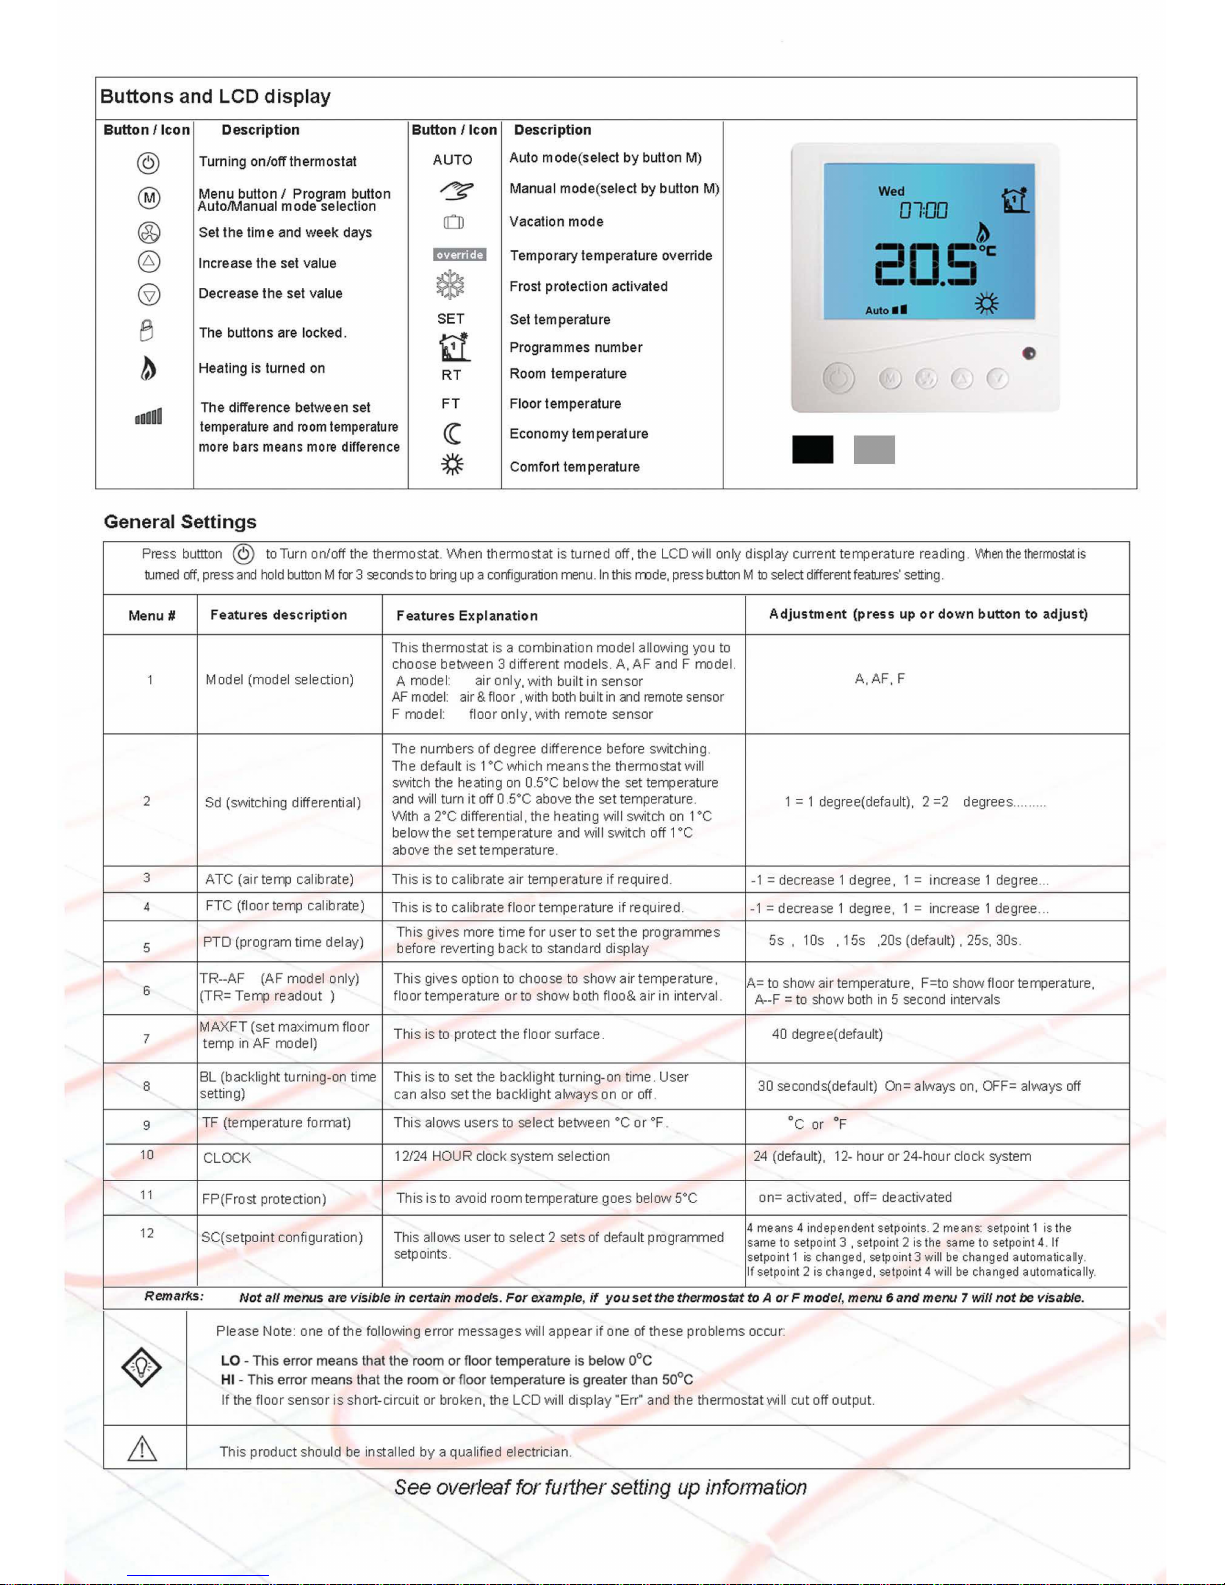
Buttons and LCD display
Button/
Icon Description
Button/
Icon Description
Turning
on/off
thermostat
AUTO
Auto mode(select
by
button
M)
Menu button/ Program button Manual
mode
(select
by
button M)
Auto/Manual
mode
selection Vacation
mode
Set
the
time and
week
days
Increase the set value Temporary temperature override
Decrease
the
set value Frost protection activated
SET
Set
perature
The buttons are locked. Programmes
number
Heating is turned on
RT
Room temperature
The difference between set
FT
Floor temperature
temperature
and
room
temperature
Economy
temperature
more bars means more difference
Comfort
tern
perature
General
Settings
Press buttton
to
Turn on/off the thermostat.
When
thermostat is turned off, the LCD will only display current temperature reading.
When the thermostat is
turned
off,
press
and
hold
button M for3 secondsto
bring
up
aconfiguration
menu
.
In
this
mode
press button M
to
select
differentfeah.Jres'
setting.
Menu#
Features
description
Features
Ex
planation
Adjustment
(press
up
or
down
button
to
adjust)
This thermostat is a combination model allowing you
to
choose between 3 different models. A,
AF
and F model.
1 Model (model selection) A model: air only, with built in sensor
A,AF,
F
AF
model· air &
floor,
with
both
built
in
and
remote
sensor
F model: floor only, with remote sensor
The numbers of degree difference before switching.
The default is 1
°c
which
means
the thermostatwill
switch the heating
on
0.5°C below the set temperature
2
Sd
(switching differential) and will turn
it
off
0.5°C above the settemperature.
with
a 2°C differential. the heating will switch
on
1°C 1 = 1 degree(default), 2 =2 degrees
below the set temperature and will switch off 1°C
above the set temperature.
3 ATC (air temp calibrate) This is to calibrate air temperature
if
required
-1
= decrease 1 degree, 1 = increase 1 degree
..
4 FTC (floor temp calibrate) This is to calibrate floor temperature
if
required.
-1
= decrease 1 degree. 1 = increase 1 degree
PTO (program time delay) This gives more time for
user
to
set
the programmes
5s
, 10s , 15s ,20s (default) , 25s, 30s.
5 before reverting back
to
standard display
TR--AF (AF model only)
This
gives option to choose to
show
airtemperature, A= to show air temperature, F=to show floor temperature,
6 (TR= Temp readout ) floor temperature
or
to
show
both floo& air in
in
terval. A--F =to show both in 5 second intervals
7
MA
XFT
(set
maximum
floor
temp
in
AF model) This is to protect the floor surface. 40 degree(default)
8 BL (backlight turning-on time
This
is to set the backlight turning-on time .User 30 seconds(default) On= always on, OFF= always off
setting) can also set the backfight
always
on or off.
9 TF (temperature format)
This
alows users to select between "C
or
"F. °C or
'F
10 CLOCK 12/24 HOUR clock system selection
24
(default),
12-
hour or 24-hour clock system
11
FP(Frost protection) This
is
to
avoid room temperature goes below
5C
on= activated, off= deactivated
12
SC(setpoint configuration) This
allows
user to select 2 sets of default programmed 4
means
4
independent
setpoints.2
means:
setpoint
1 is
the
same
to
setpoint
3 ,
setpoint
2
is
the
same
to
setpoint
4. If
setpoints.
setpoin
t 1
is
changed,
setpoint3
will
be
changed
automatically
.
lf
setpoint
2
is
changed,
setpoint
4will
be
changed
automatically.
Not
menus visible in certain models.
For
example, if
you
set
the
thermostat
to
A
or
F
model
,
menu
menu 7
not
be
visable.
Please Note: one of the following error messages will
appear
if
one of these problems occur:
LO
This error means that the room
or
floor temperature is below 0°C
HI This error means
th
at the room
or
floor temperature is greater than 50°C
If the floor sensor short-circuit or broken, the
LCD
wi
ll
display "Err" and the thermostat will
cu
t off output.
This product should
be
installed
by
a qualified electrician.
See overleafforfurthersetting
up
infonnation
Thermostat
Instructions
•Auto/
Manual
Mode
Set the Time and Day
Press button M
to
select Auto/Manual mode. In Manual mode, the thermostat maintains a constant
set
This
thermostat
is
fitted
a
real
time
clock.
It
is
essential
that
the
clock
time
and
da
y
are
set
accurately
if
you
require
your
programmed
events
to
start
on
time
.
Follow
the
temperature
manually
set
by
the
user
.
In
Auto
mode,
the
thermostat
executes
the
preprogrammed
schedules.
belo
w
easy
steps,
To
adjust these schedules, follow the easy steps below,
Step
1.
Press
tne
button
@
once
and
the
time
will
flash
Program
your
thermostat
Step
2.
Use
up
or
do
wn
button
to
change
the
time
(Hold
up
or
down
button
to
change
by
15
minutes
each
time
.)
Step
3.
Press
button
again,
the
da
y
of
the
week
will
flash
Press
and
hOld
buttonM for 5 seconds until
"PROG"
is
Shown
with the
Day
flashing. use
up
or
Step
4.
Use
up
or
down
button
to
change
the
day
of
the
weeK
down
button
adjust the day
(hOld
up
or
down
button for 5
seconds
to
set
all
days
the
same)
.
Step
5.
Press
button
again
to
accept
and
ex
it
Press button M
to
bring
up
the program
1(
Use
up
or
down button
to
set the start time
Resetting
factory
defaults
(default
07
:
00)
.(Hold
up
or
down button
to
change by
15
minutes
each
time.)
Your
thermostat
has
the ability
to
reset
all
settings
to
the factory defaults. Ifyou
are
Press button M again and use
up
or
down button
to
set the desired temperature
to
be certain you want
to
do
this
:
In
standby mode(when thermostat
is
turned off).
pre
ss
maintained
for
program
1.
(defaull
22
°C)
and
hold
button
Mand for5
seconds
until
reset
is
shown
for
5
seconds
on
LCD.
Press button M
to
bring
up
the program Use
up
or down button
to
set
the
start time
Lock
the
buttons
(default
09
:
30).
(Hold
up
or
down
button
to
change
by
15
minutes
each
time
.) To
lock
the
buttons,
press
and
hold
the
up
and
down
buttons
for
3
seconds
until you
Press button M again and use up
or
down button
to
set the desired temperature
to
be
see
a
lock
icon
appearing,
to
unlock,
repeat the
steps
above.
maintained
for
program
2.
(defaull
16
°C)
View
floor
temperature
Press button M
to
bring
up
the program Use
up
or down button
to
set the start time If thermostat
is
set
inAF
model,
and
set
to
show
air temperature only, press
and
default
16
:
30)
.
(Hold
up
or
down
button
to
change
by
15
minutes
each
time
.) hold the down button for 3 seconds. floor temperature will
show
and itwill
Press button M again and use up
or
down button
to
set
the
desired temperature
to
be
automatically
revert
back
to
air
temperarure
in
5
seconds
.
maintained
for
program
3.
(defaull
22
temperature
Press button M
to
bring
up
the program Use
up
or
down button
to
set the start time
To
temporary
override
the
current
set
temperature,
default
22:30)
.
(Hold
up
or
down
button
to
c
hange
by
15
minutes
each
time
.)
Press
up
or own
button
once,
the
set
temperature
starts
flashing
Press button M again and use up
or
down button
to
set
the
desired temperature to be
2.
Press
up
or
down
button
again
10
adjust
the
set
temperature
maintained
for
program
4.
(defaull
16
3.
Wait
for
5
seconds to
confirm
the
setting
with
override
shown
on
LCD
Press button M
to
accept
and
exit.
Now
your
thermostat
will
maintain
the
new
set
temperature
un
l
il
the
next
setpoint.
To
cancel
the
override
setting,
press
and
hold
button
for5
seconds
until"OVERRIDE"
Note:
Jt
is
faster
to
program the same schedule for the entire week and then
to
adjust the
disappear
.
exceptional
days
.
To
erase program 2 and 3 for Saturday and Sunday.see below, Vacation mode
•
In
step
1,
select
Saturday
or
Sunday
. To
set
vaca
tion
mode
press
and
hold
the
up
button
for
3
seconds
until
appears
.
Use
•
In
step
4,
instead
of
using
up
or
down
button
,
using
button
will
erase
the
time.
same
procedure
to
ex
it
this
mode.Vacation
mode
will
maintain
a
set
temperature(default
•
In
step
6,
instead
of
using
up
or
down
button
,
using
button
will
erase
the
time
.(
··:··
).
10°C)
all
the
time
.
Press
up
or
dom
butt
on
to change the set point and wait for 5
seconds
to
accept
and
exit.
Installation
and
Wiring
Carefully unplug the ribbon
connector
which
is
plugged
in
to
the
front
half
of
the thermostat
Carefully
separate
the
front half
of
the
thermostat
from
the
back
plate
by
placing
a
small
flat
head
terminal driver into the slots on the
bottom
face of
the
thermostat
Wiring Diagram
Max 16A AC230V
Sensor L N N L
6 3 2 1
Th
is product should be installed by
a qualified electrician
Dimensi
ons
86mm
Screw
the
thermostat
back
plate
on
to
the
back
bo
x
49mm E
E
50mm
13mm
Floor Sensor Control Card,
(To
be completed by a qualified electrician).
Floor Sensor
Date
of
testing :
Company Name:
Electricians signature:
Contact telephone No:
Test
Resistance
of
cable
(Ohms)
Before Commencing
of
installation
(Unrolled)
Side
View
E
Place
the
thermostat
front
half
somewhere
safe
.
Terminate
the
thermostat
as
shown
in
the
diagrams
below
Re-connect the
thermostat
ribbon cable
and
dip
the
two
halves
t
ogether
E
E
4mm
8 m
After installation
of
heating system
but
before laying flooring
After
laying
floor
covering.
Print:

Other Roma Heating Thermostat manuals

Roma Heating TS700 User manual

Roma Heating

Roma Heating TS700 User manual

Roma Heating CT1000 User manual

Roma Heating

Roma Heating CT1000 User manual

Roma Heating RW800i User manual

Roma Heating

Roma Heating RW800i User manual

Roma Heating RT5 User manual

Roma Heating

Roma Heating RT5 User manual

Roma Heating CT1000 User manual

Roma Heating

Roma Heating CT1000 User manual

Roma Heating RWI5 User manual

Roma Heating

Roma Heating RWI5 User manual

Roma Heating CT1000 User manual

Roma Heating

Roma Heating CT1000 User manual

Popular Thermostat manuals by other brands

Honeywell T8501 installation instructions

Honeywell

Honeywell T8501 installation instructions

Gabarron CTP10 user manual

Gabarron

Gabarron CTP10 user manual

Beretta Alpha DGT Installation and User Instruction

Beretta

Beretta Alpha DGT Installation and User Instruction

Bpt TH 345 Instructions for use

Bpt

Bpt TH 345 Instructions for use

HYSEN HY312WE quick start guide

HYSEN

HYSEN HY312WE quick start guide

Vaillant VRC 430 Operating and OPERATING AND INSTALLATION Manual

Vaillant

Vaillant VRC 430 Operating and OPERATING AND INSTALLATION Manual

White Rodgers 90 SERIES Installation &  configuration guide

White Rodgers

White Rodgers 90 SERIES Installation & configuration guide

Chromalox PK471-4 Installation and operation instructions

Chromalox

Chromalox PK471-4 Installation and operation instructions

LUX TX9600TS user manual

LUX

LUX TX9600TS user manual

LEGRAND Sagane 846 37 manual

LEGRAND

LEGRAND Sagane 846 37 manual

Honeywell CT410A installation manual

Honeywell

Honeywell CT410A installation manual

Theben RAMSES 366/1 top2 operating instructions

Theben

Theben RAMSES 366/1 top2 operating instructions

Carrier 33CS Installation, start-up, and operating instructions

Carrier

Carrier 33CS Installation, start-up, and operating instructions

J&D MAnufacturing VC115 Wiring instructions

J&D MAnufacturing

J&D MAnufacturing VC115 Wiring instructions

Aprilaire 8556 owner's manual

Aprilaire

Aprilaire 8556 owner's manual

Setra Systems Lite Installation & operating guide

Setra Systems

Setra Systems Lite Installation & operating guide

Pegler Yorkshire Terrier i-Temp Handbook

Pegler Yorkshire

Pegler Yorkshire Terrier i-Temp Handbook

Source 1 S1-THSU302-S Owner's Manual & Installation Instructions

Source 1

Source 1 S1-THSU302-S Owner's Manual & Installation Instructions

manuals.online logo
manuals.online logoBrands
  • About & Mission
  • Contact us
  • Privacy Policy
  • Terms and Conditions

Copyright 2025 Manuals.Online. All Rights Reserved.