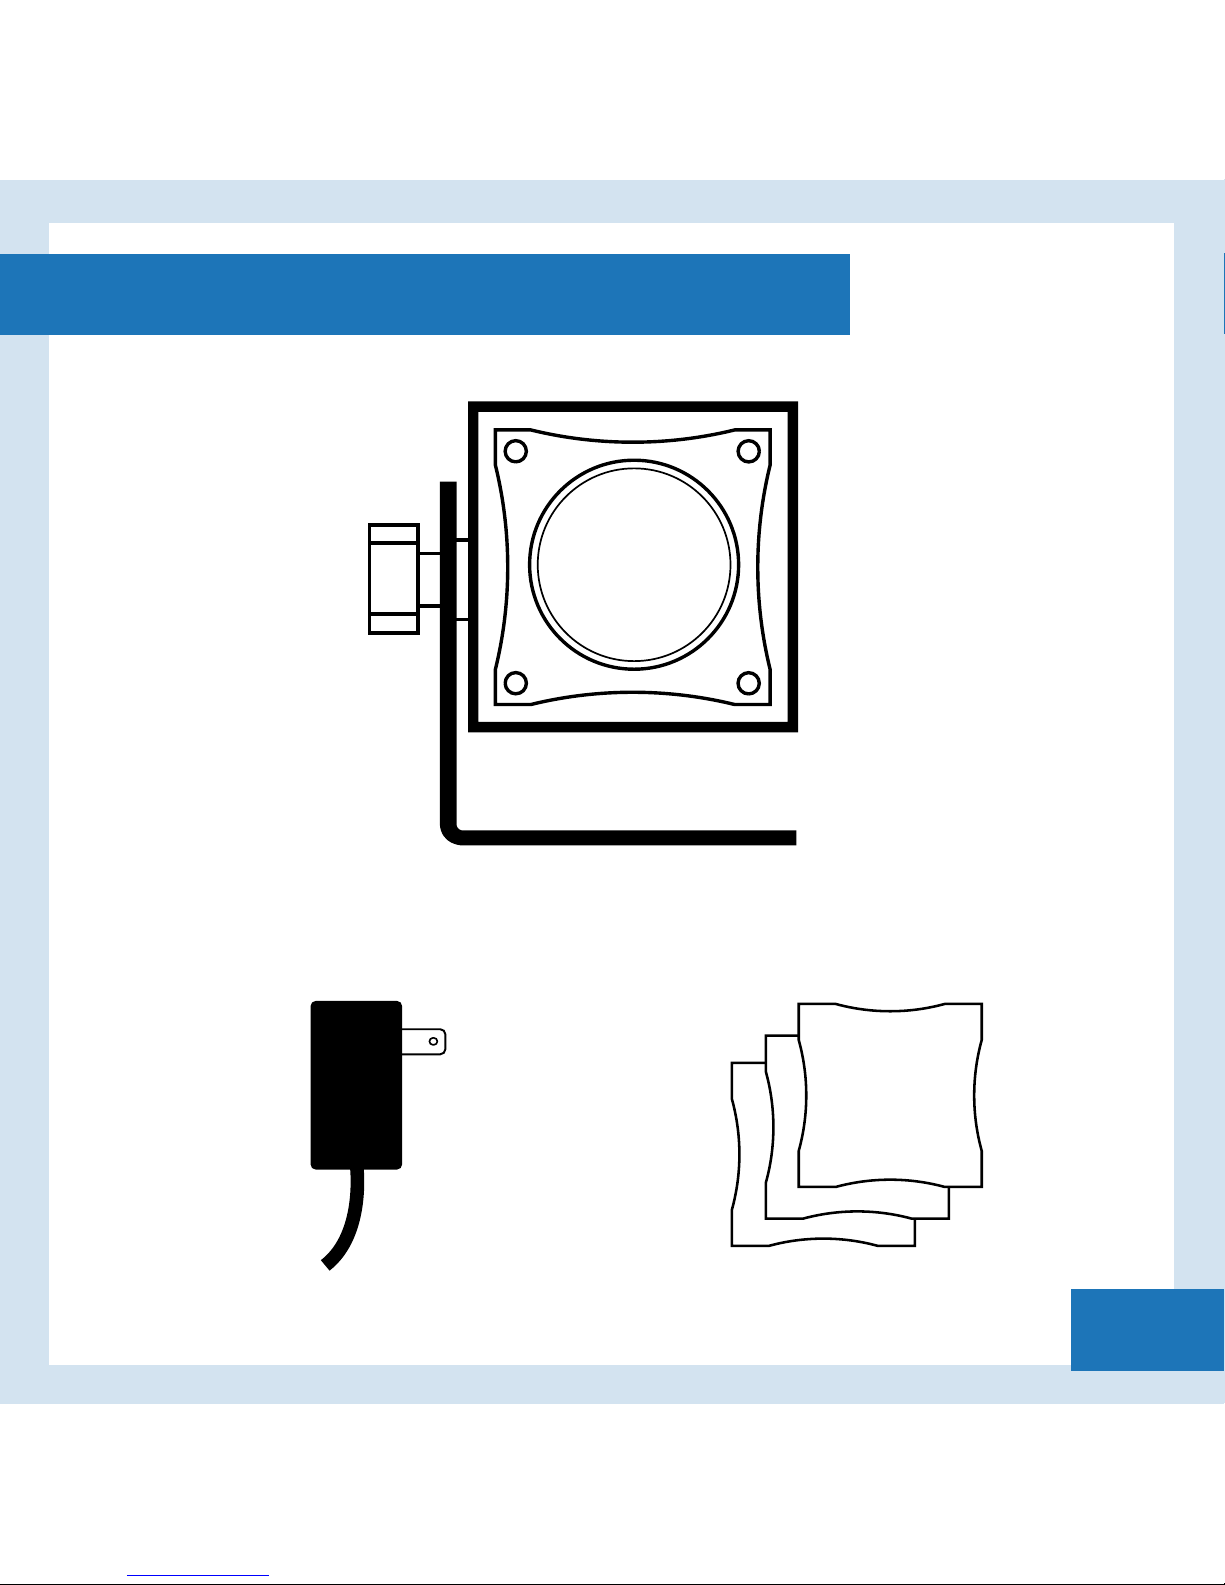
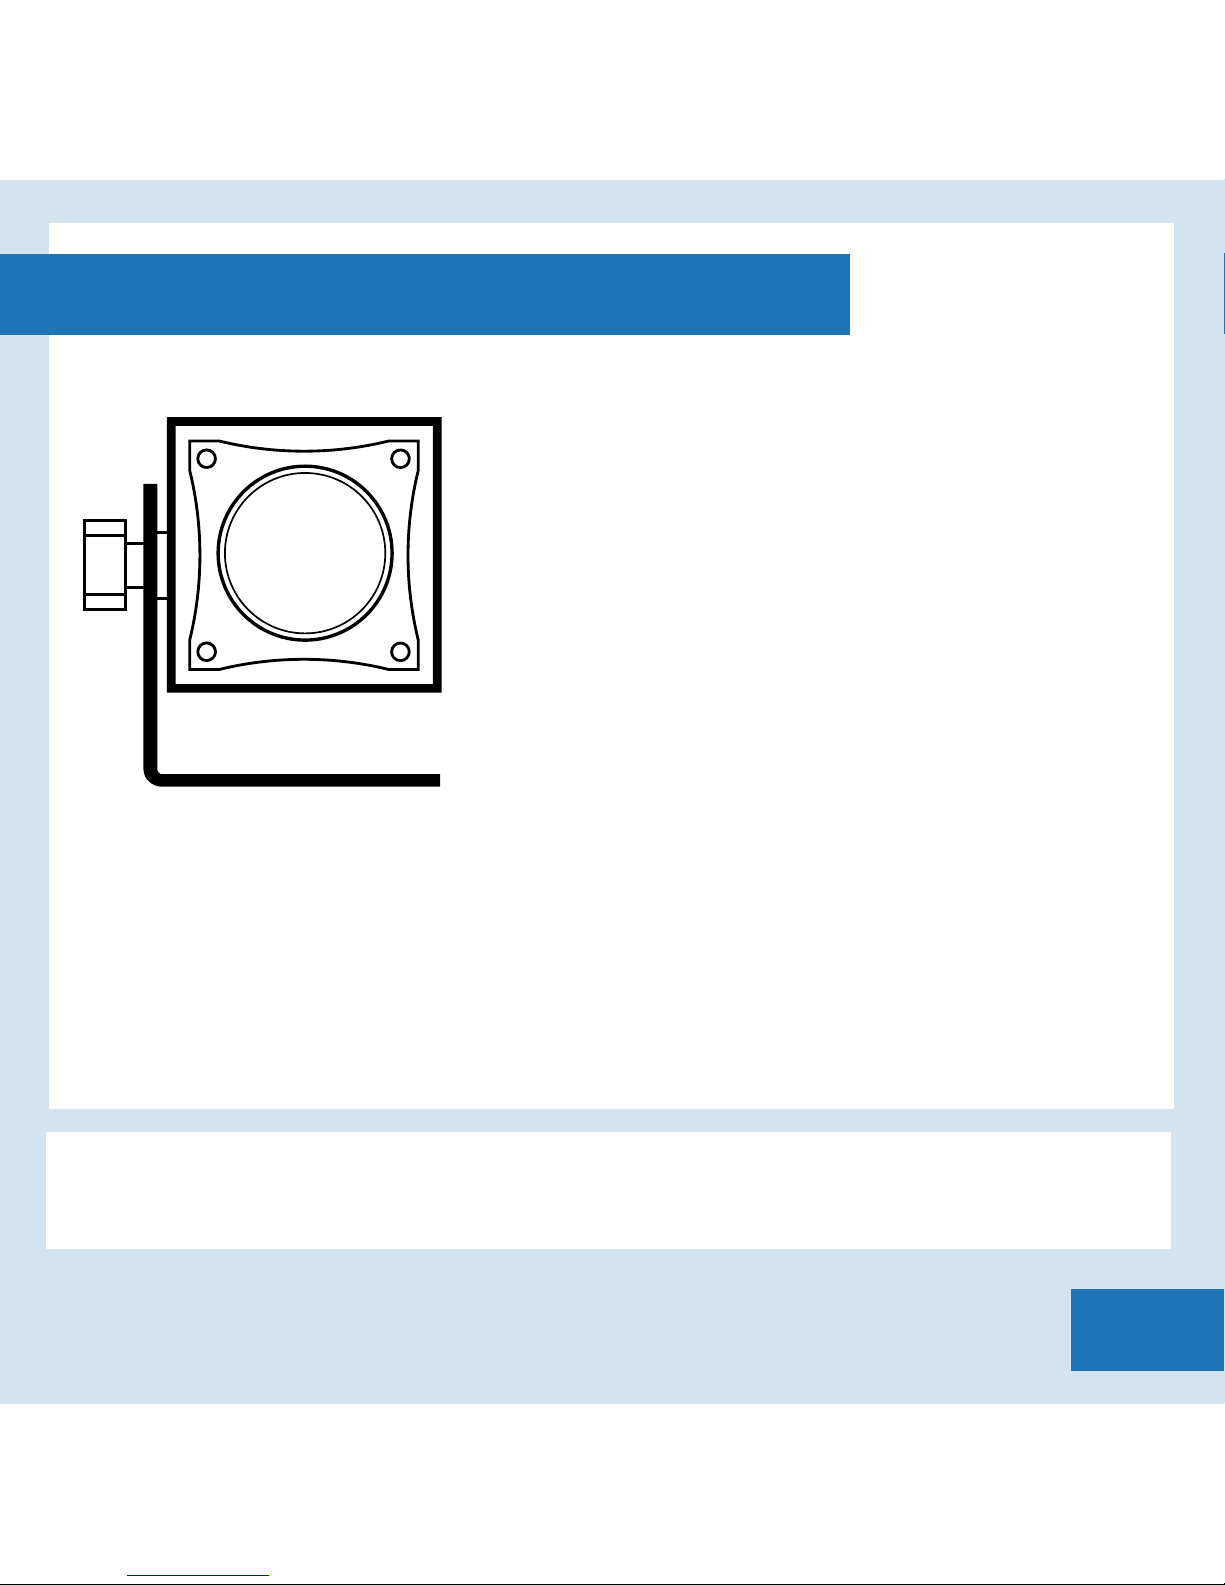
Rosco Pica Cube User manual

USER’S MANUAL


Table of Contents
03
Your Rosco Pica Cube™
Product Description....................................................................................... 5
What’s In the Box............................................................................................ 7
Pica Cube™ Series
Pica Cube™ Interface................................................................................... 8
Pica Cube™ Revision Check....................................................................... 9
Pica Cube™4C.................................................................................................. 10
Pica Cube™WNC............................................................................................. 11
Pica Cube™UV................................................................................................. 12
Pica Cube™ Modes
DMX Mode.......................................................................................................... 13
Manual Mode..................................................................................................... 17
Color Wash Mode.............................................................................................. 19
Preset Mode....................................................................................................... 21
Serial Mode........................................................................................................ 23
Beam Angles
Diuser............................................................................................................... 24
Changing Diusers........................................................................................... 25

Table of Contents
04
Mounting and Configuration
Safety Cables.................................................................................................... 26
Make Your Own Cables
DMX & Power Cable Pinout Diagram............................................................ 27
Pica Cube™ Support
FCC Warning..................................................................................................... 28
General Precautions...................................................................................... 27
Warning Messages......................................................................................... 29

Product Description
05
Pica Cube™ Series
Rosco's innovative Pica Cube™ series of LED wash lights pack 1100 lumens of
output into a compact and portable 2.5 inch cube, while only consuming
22-24 Watts of power! The sleek yet rugged, geometric design of the Pica
Cube™ is perfectly at home in entertainment environments, museums, stores
and lobbies, built into sets, truss and lighting rigs of all styles.
These luminaires oer the flexibility and versatility needed for any type of
lighting challenge. The Pica Cube™ can be powered via a wall adapter or by
using a Pica Portal™ which gives you power and data over CAT5e cable.
An intuitive control panel sets virtually every aspect of the lights including a
master-slave configuration for fast lighting set-ups. With several modes you
can control your light with no limitations.

Product Description
06
Weighing just under 1 pound, mounting these compact 2.5 inch cubes is
limited only by the imagination of the installer. The one sided bolted yoke
design allows units to be easily mounted on any surface for greater output and
coverage.
Available in versions that oer full quad chip color mixing, tuneable color
temperature white light and true UV LED blacklight, the Pica Cube™ luminaires
are the smallest, most feature packed and aordable, professional grade LED
lights on the market.

What’s In the Box
07
Pica Cube™
Power Option Diuser Pack
20
40
60

Pica Cube™ Interface
08
Ta = 45C Max
Pat No. 8767398
Made in USA
8
7
6
5
4
3
2
1
0
F
E
D
C
B
A
9
AUX INPUT
CLASS 2
12-24 VDC
12 VAC
PICA CUBE
DESIGNED BY THE BLACK TANK
TM
DMX OUT DMX IN
DMX
MANUAL
CLRWSH
PRESET
SERIAL
PWR
FAULT
TOGGLE
CHANGE
MODE

Pica Cube™ Revision Check
09
During your Pica Cube’s™ boot sequence, there will be a lamp test which illuminates all
indicators on the rear panel.
Aer the Lamp test, the green mode indicator LEDs will flash the firmware revision
of your Pica Cube™in Binary.
REVISION EXAMPLES
DMX
MANUAL
CLRWSH
PRESET
SERIAL
REV3
DMX
MANUAL
CLRWSH
PRESET
SERIAL
REV6
DMX
MANUAL
CLRWSH
PRESET
SERIAL
REV4
DMX
MANUAL
CLRWSH
PRESET
SERIAL
REV7
DMX
MANUAL
CLRWSH
PRESET
SERIAL
REV5
DMX
MANUAL
CLRWSH
PRESET
SERIAL
REV8

Pica Cube™ 4C
10
From walls to washes to uplighters, the Pica
Cube™ 4C color mixing wash light oers a
designer maximum creativity in a tiny package.
Using best in class RGBW quad color, multi
channel chip, a gorgeous palette of saturated,
mid-tone and pale tint colors can be dialed in
at the spin of a knob. And of course, a true
white is always available as well, not the
unflattering mixed amber compromise found
in other lights. Smart programming in the
Pica Cube™ 4C includes a stand-alone color wash mode or allows multiple
units to be easily slaved together, synchronized and oset using
self-generated DMX for color chases and other dynamic lighting patterns
without a console. Use it alone, configured in strips & arrays or built-in for
virtually any application needing colored light - from stage, studios and
location, bars and casinos, to stores, windows and lobbies.
NOTE: The luminaire should be positioned so that prolonged staring
into the luminaire at a distance closer than 3.3m is not expected.

Pica Cube™ WNC
11
Size Matters. But quality of light matters more!
The Pica Cube™ WNC embodies what every
lighting professional needs - A bright, tuneable,
beautiful white light. Using high quality Cree XML
4W emitters, the WNC outputs 1005 lumens and
can adjust from 2700K to 6500K. A mix of warm,
neutral and cool LEDs insure excellent rendering
across all color temperatures making it perfect
for use on TV, film sets, in retail llighting,
museums, architecture, photography studios
or any white light application.
NOTE: The luminaire should be positioned so that prolonged staring
into the luminaire at a distance closer than 3.3m is not expected.

Pica Cube™ UV
12
Ideally suited for theme parks, night clubs,
casinos, museums and stage applications, Pica
Cube™ UV is the smallest, most aordable high
powered UV light available to lighting professionals.
Drawing just 22-24 watts, it outperforms
conventional long throw fixtures using two times
the power, weighing 10 times more, and which need
an expensive lamp change every 1000 hours! The
fixture allows for full speed DMX dimming and
standalone control.
DO NOT look directly into the ultra-violet LED (hereinaer referred to as “UV-LED”) during
operation of the device. THE UV-LED radiates intense ultra-violet light (hereinaer referred to
as “UV light”) and can be harmful to the eyes even during a brief period of exposure. *UV-LED
means any UV-LED dice or packaged UV-LEDs which emit ultra-violet light whose peak
wavelength is shorter than 400nm.
2. ALWAYS wear UV protective eyewear when handling the UV-LEDs.
3. UV light can cause skin damage, up to and including, skin cancer. ALWAYS wear protective
clothing to prevent UV-LED exposure to skin.
4. ALWAYS instruct and warn all intended users of proper handling of the UV-LEDs and all
potential hazards. ALWAYS provide proper instructions, labels and warnings with your product
in accordance, at minimum, with the standards set forth by the International Electric
Committee (IEC). ALL UV light should be used in your product in such a way as to
ensure that no direct exposure to the UV light on the human.

DMX Mode
13
RDM (Remote Device Management):
Pica Cubes™, REV4 and newer, have RDM (Remote Device Management)
functionality. RDM allows bidirectional control and communication over the DMX512
cable. See Below for RDM Command List:
G = GET S = SET
In DMX mode, the unit is controlled by the data it receives on
the RJ45 connectors located on the rear panel. The RJ45
located at the center of the back panel (DMX In) also
serves as a power input. The number of DMX channels
required to control the fixture is dependent on the factory
setting in use (for example - four color Cubes™ use four DMX
Channels while one color Cubes™ use one).
• DISC_UNIQUE_BRANCE
• DISC_MUTE
• DISC_UN_MUTE
• STATUS_MESSAGES G
• STATUS_ID_DESCRIPTION G
• SUPPORTED_PARAMETERS G
• DEVICE_INFO G
• DEVICE_MODEL_DESCRIPTION G
• MANUFACTURER_LABEL G
• DEVICE_LABEL G/S
• SOFTWARE_VERSION_LABEL G
• DMX_PERSONALITY G/S
• DMX_PERSONALITY_DESCRIPTION G
• DMX_START_ADDRESS G/S
• SENSOR_DEFINITION G
• SENSOR_VALUE G
• OUTPUT_RESPONSE_TIME G/S
• OUTPUT_RESPONSE_TIME_DESCRIPT G
• MODULATION_FREQUENCY G/S
• MODULATION_FREQUENCY_DESCRIPT G
• DEVICE_HOURS G
• DEVICE_POWER_CYCLES G
• IDENTIFY_DEVICE G/S
• RESET_DEVICE S

DMX Mode
14
There are four user settings that can be adjusted - DMX Address, 8 or 16 Bit Mode,
Filament Fade Mode and PWM Frequency.
DMX Address:
To change the DMX address, while in DMX Mode, press the TOGGLE button. The
Status LED will begin to blink slowly and at this time adjust the KNOB to set the
first digit of your address. Once you have selected the first digit press the
TOGGLE button to lock it in. The status
LED will blink rapidly for a brief moment
telling you that the first digit is locked
and ready for the second digit. Repeat
this step again for the second and third
digits and press the TOGGLE button upon
completion.
NOTE: It is important that you inlcude
leading zero’s in the first and second
digits if neccesarry. Also make sure you
enter a valid DMX address (001-512)
otherwise the fixture will default to your
previous address.

DMX Mode
15
8 bit or 16 bit DMX:
The fixture can run in either 8 bit or 16 bit DMX Mode. In 8 bit mode, the Pica
Cube™ accepts one DMX channel for each color. In 16 bit mode, two channels
are required for each color. To choose 8 or 16 bit, in DMX Mode press and hold
TOGGLE until the status LED blinks rapidly. Then rotate the KNOB to desired
bit setting (8 ►TOGGLE = 8bit) and (1 ►TOGGLE ►6 ►TOGGLE = 16bit ).
The Status LED will blink rapidly notifying you the desired bit setting has been
saved.
Filament Fade:
An incandescent lamp has a slight delay, or lag with changing intensities,
whereas an LED responds instantly. The dierence is most noticeable during a
theatrical black out. The Pica CUBE™ can emulate an incandescent lamp by
selecting one of the FIlament Fade settings.
To change the Filament Fade Setting switch the mode to SERIAL mode. Once
in Serial Mode you will hold the TOGGLE button until the status LED blinks
rapidly. Then rotate the KNOB to desired Filament Fade setting as follows
(0 = o, 1 = low, 2 = medium, 3 = high). Press MODE to save and exit. Then
change back to DMX Mode.

DMX Mode
16
PWM Frequency:
Pica Cubes™, REV4 or Newer, can be set to PWM at 4kHz or 16 kHz using RDM
or the user interface.
You can determine the PWM setting by watching the green MODE LEDs
during the boot sequence. If the green mode LEDs abruptly turn o aer the
lamp test, your Pica Cube™ is set to 4kHz mode. If the green mode LEDs swoop
o from le to right, your Pica Cube™ is set to 16kHz mode.
To change your Pica Cubes™ PWM Frequency, ensure you are in DMX mode.
Then hold TOGGLE button until the status LED begins blinking rapidly. Then
rotate the KNOB to enter desired PWM Frequency:
16 kHz Frequency
F ►TOGGLE ►1 ►TOGGLE ►6 ►TOGGLE
4 kHz Frequency
F ► TOGGLE ►0 ►TOGGLE ►4 ►TOGGLE
Once you have selected your desired frequency press MODE to save and exit.

Manual Mode
17
In Manual Mode, the Pica Cube™ can be controlled directly from its rear panel
without the need of a DMX console or a DMX control device. Standalone control
capabilities vary according to the factory setting in use (Four Color, Three Color,
or One Color). The Pica Cube™ has a self recognizing interface, meaning you
don’t have to configure it at the possibility you changed LED boards.
(All standalone, DMX address and configuration settings are non-volatile,
meaning they will not change if power is lost or switched o and restored. When
set to manual mode, the Pica Cube™ operates as a DMX Master and is sending
DMX512 data.)
NOTE: Do not connect any Pica Cube™ in Manual Mode to any other DMX
sending device as contention on the DMX512 input will result.

Manual Mode
18
Manual Mode allows you to set the color
of your fixture by adjusting the intensity
of the LEDs using the rear panel. The
current value of each setting is created by
adjusting the KNOB and TOGGLE button.
There are two types of adjusments you
can make in Manual Mode, Coarse and
Fine.
To set the coarse adjustment press
TOGGLE until desired color flashes and
the status LED is blinking slowly. Rotate
the KNOB until desired setting is achieved (0 = o, 8 = medium, F = maximum).
Press MODE to save and exit. You can also press TOGGLE to adjust the next
color or hold TOGGLE to adjust the fine color setting.
To set the fine adjustment hold TOGGLE aer coarse adjustment is made. The
status LED will begin to blink rapidly. Rotate the KNOB to the desired fine
setting. Press MODE to save and exit or press TOGGLE to set the next color
coarse setting.

Color Wash Mode
19
Color wash is only available in Pica Cube™ 4C. In Color Wash mode, the Pica
Cube™ automatically cycles through its entire saturated color spectrum by
modulating the intensity of the red, green, and blue LEDs.
There are two user settings that can be adjusted in Color Wash Mode - Wash
Timer and Wash Oset.
Wash Timer:
The wash timer determines how long it takes for the Pica Cube™ to complete
an entire color cycle, and by extension, the rate at which the colors change.
Choose a short time for a rapid wash or a longer time for a slower wash. To
change the Wash Timer press TOGGLE. The status LED will begin to blink slowly.
Rotate the KNOB to desired Color Wash speed (0 = 15s, 8 = 16.5min, F = 60min).
Once your speed is achieved, press MODE to save and exit.
Wash Oset:
When set to Color Wash Mode, the Pica Cube™ is operating as a DMX master
and is sending DMX512 data, allowing it to control unique color washes on up
to fourteen additional fixtures in a chain (set to DMX mode).

Color Wash Mode
20
Use the Wash Oset function to control the
interaction between multiple Pica Cubes™
in a Color Wash chain. The Wash Oset
determines the length of delay between
each light, or how long it takes to “pass” a
color from one light to the next. Set the Wash
Oset to “0” and the lights will color wash in
unison, displaying the same color at the
same time. Create a multi-fixture Chasing
Rainbow eect, where colors pass from
light to light, by increasing the Wash Oset.
The larger the oset time, the longer it takes
for a color to pass to the next light.
To change the Wash Oset, hold the TOGGLE button until the status LED blinks
rapidly. Rotate the KNOB to desired oset (0 = no oset, 8 = medium oset,
F = large oset). Once desired Color Wash oset is achieved, press MODE to
save and exit.
Table of contents
Other Rosco Dj Equipment manuals
Popular Dj Equipment manuals by other brands

ProLights
ProLights SUNBLAST3500MAX user manual

Velleman
Velleman HQ POWER VDL250WL manual

Varytec
Varytec BAT.BALL 6in1 RGBWAP user manual

Nicols
Nicols PAR LED 96 X user guide

Chauvet Professional
Chauvet Professional PowerStream 4 IP quick start guide

Equinox Systems
Equinox Systems Ultra LED Scan EQLED75 user manual