Rosco Silk 210 User manual

www.rosco.com/silk
PLEASE READ & SAVE
THESE ORIGINAL INSTRUCTIONS
User Guide

Silk™ 210 User Guide Rev 4, 2016 Copyright ©2016 by Rosco
User Guide
Table of ConTenTs
Introduction .................................................................................................................... 2
Important Safeguards .............................................................................................. 3 - 5
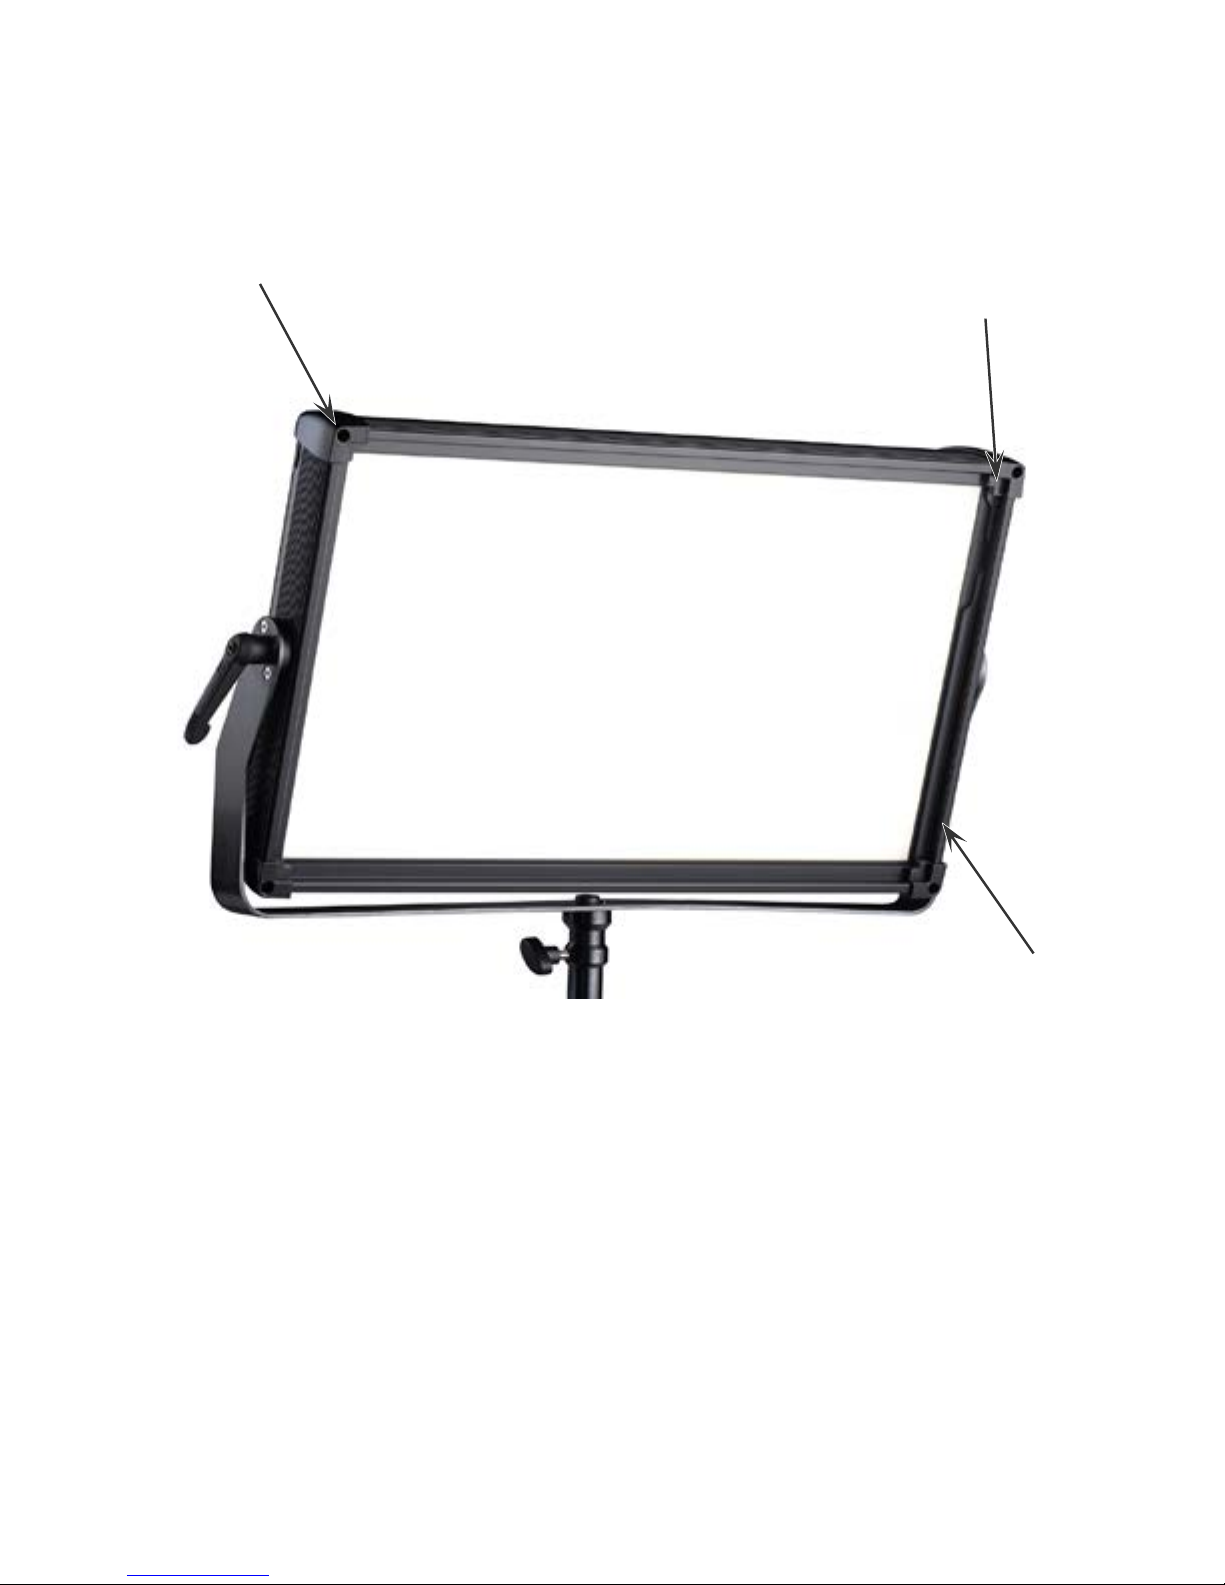
Unpacking....................................................................................................................... 6
Controls.......................................................................................................................... 8
Operation ........................................................................................................................ 9
Powering On .................................................................................................................. 9
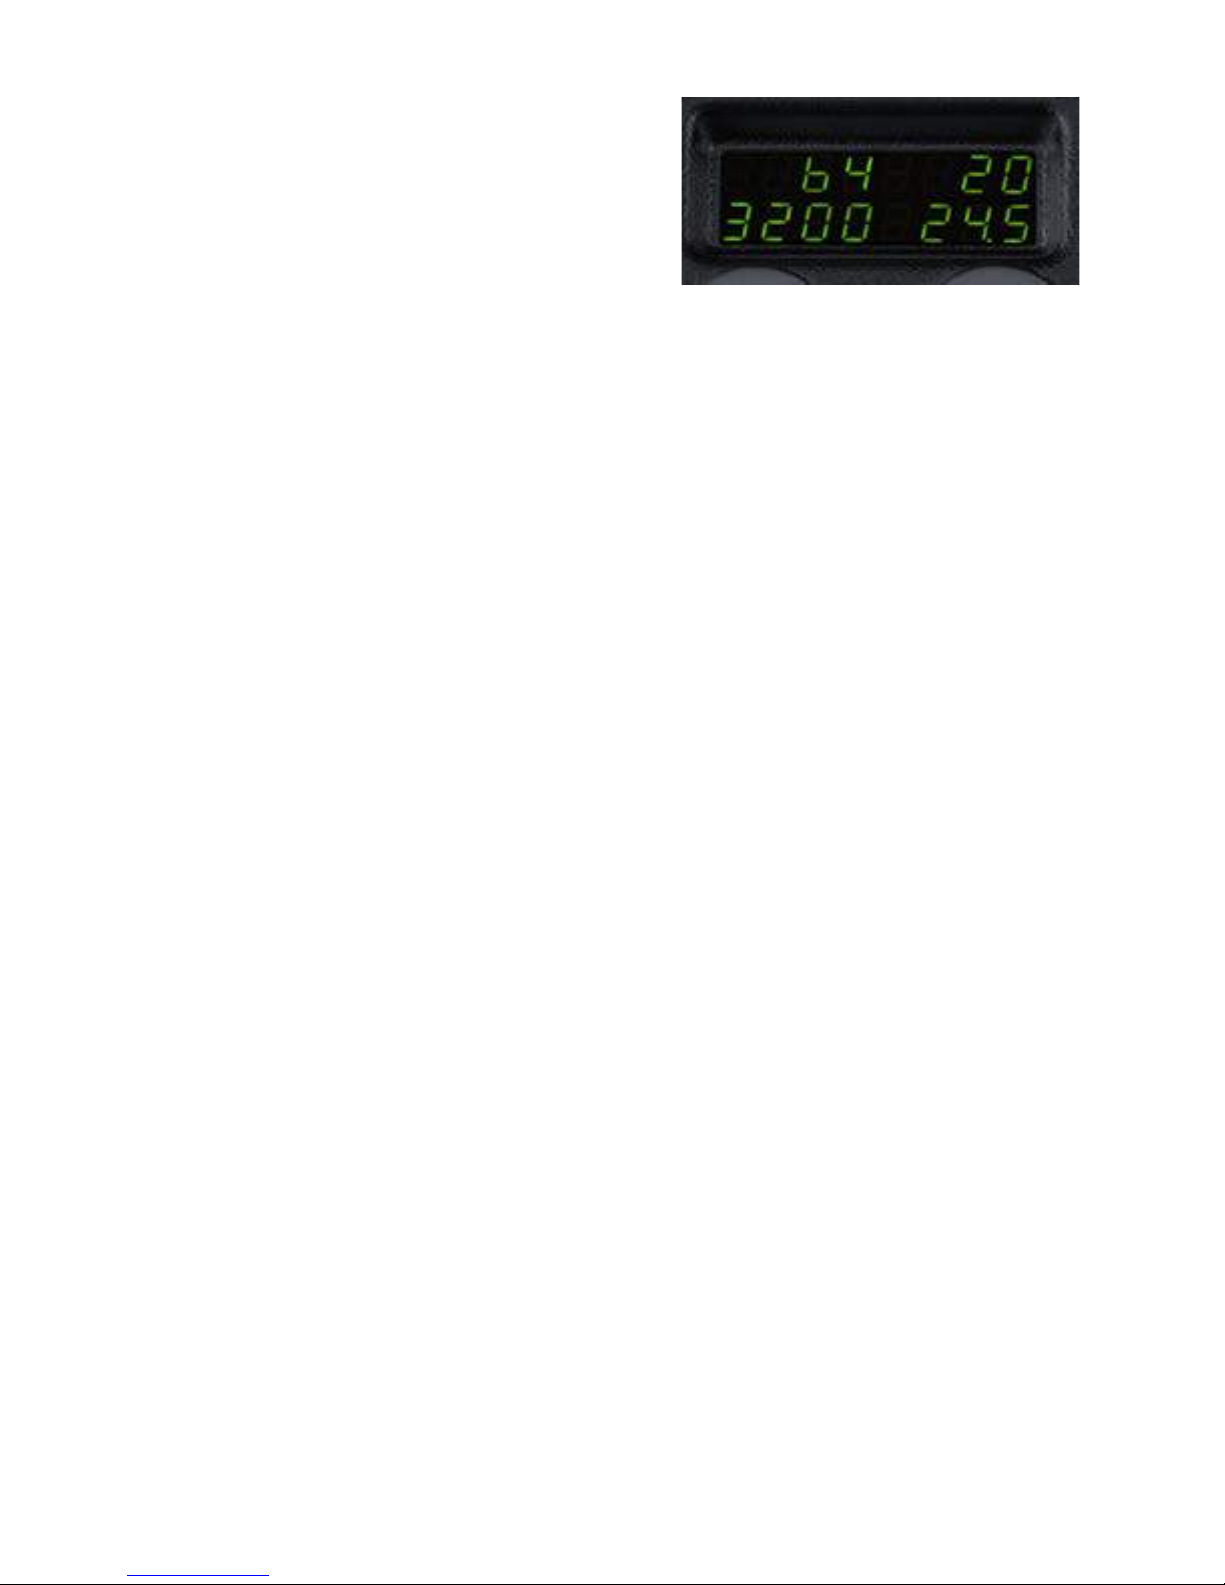
Manual Control .............................................................................................................10
DMX Control .................................................................................................................. 11
DC Sources ...................................................................................................................13
Troubleshooting ............................................................................................................16
Accessories...................................................................................................................17
Specifications................................................................................................................18
Warranty ........................................................................................................................21
Information and specifications in this document are subject to change without notice. Rosco
assumes no responsibility or liability for any errors or inaccuracies that may appear in this manual.
Rosco logo and Silk™ are trademarks of Rosco. Other trademarks and trade names may be used
in this document to refer to products by other entities. Rosco claims no proprietary interest
in trademarks and trade names owned by others. Rosco assumes no responsibility or liability for
any errors or inaccuracies that may appear in this manual. Rosco provides this manual ‘as is’
without warranty of any kind, either expressed or implied, including but not limited to the implied
warranties or merchantability and fitness for a particular purpose. Rosco may make improvements
and/or changes to the product(s) and/or the program(s) described in this publication at any time
without notice.

InTroduCTIon
Congratulations on your purchase of a Rosco SilkTM LED fixture. Engineered to
meet the requirements of the most discerning filmmaker, the SilkTM series LED
lighting system has been specifically developed for film and video applications
that demand extremely color-accurate, high-quality light.
Your new SilkTM fixture will create a high volume of enticingly soft, broad spectrum
white light utilizing state-of-the-art tungsten & daylight balanced LEDs. SilkTM
LED fixtures also feature a non-glare diffuser that provides uniform, single-
source light that gently embraces its subjects, making it the perfect fixture for
illuminating feature films and television productions, on stage or on location.
- 2 -

ImporTanT safeguards
The symbols below are used throughout this manual to identify important
safety information.
Heed all warnings and safety information.
prevenTIng eleCTrIC shoCk
• This machine uses mains electrical power at 100 - 240 VAC. When
directly contacted, such voltages are hazardous to human life. Follow all local
electrical codes and take precautions when using this product.
• This product is designed to operate from three-wire power systems, where one
of the wires is a safety ground. DO NOT disconnect the safety ground, or use
extension cords or adapter plugs to connect this machine to a two-wire system.
Operation without a safety ground may result in hazardous electrical shock.
• Use only extension cords that are of appropriate length and are rated for
SilkTM 210’s specified voltage and current. If an extension cord shows signs of
wear or gets warm to the touch, discontinue its use and obtain a cord with
a higher current rating. Improper extension cords are hazardous and may
result in poor performance due to excessive voltage drop.
• Disconnect unit from power source before servicing and when not in use.
ImporTanT healTh & safeTY InformaTIon
SilkTM lighting fixtures use high strength magnets on the front face
Do not place within 300mm of credit cards
Magnets can adversely affect heart pacemakers
- 3 -
SYMBOL MEANING
WarnIng, danger or CauTIon
Risk of injury to yourself or the product
rIsk of eleCTrICal shoCk
Risk of severe electrical shock

maInTaInIng safe operaTIon
• Use only ROSCO spare parts and accessories so as to not void the warranty.
• Allow the unit to cool before attempting to service. SilkTM LED fixtures must
only be serviced by a qualified technician.
• S i l k TM LED fixtures are not intended for residential use. Use only in a
professional studio or mobile broadcast environment by trained personnel
under proper training and supervision. Keep out of reach from children.
Children shall be supervised to ensure that they do not play with the appliance.
• S i l k TM LED fixtures are capable of reaching a maximum surface temperature of
185°F (85°C). Keep minimum 4 inches (10cm) distance away from flammable
materials /objects. The top of the unit may become hot to the touch during
operation. Contact during or immediately following operation may result in burns.
• S i l k TM LED fixtures are IP20 rated – for indoor use and/or a dry environment.
Do not operate outdoors in a wet environment.
• SilkTM LED fixtures are not certified for use in hazardous locations.
• SilkTM LED fixtures are designed for operation within the range of 32° to 95°F
(0° to + 35°C).
• Ensure SilkTM LED fixtures are stored within the range of - 4° to 140°F
(- 20° to + 60°C).
• Do not look directly into a SilkTM LED fixture for long periods of time, as
prolonged exposure may be harmful to the eyes.
- 4 -

• High voltage and stored energy may be present inside the unit. Only trained
service personnel should engage in repairs.
• The use of a safety cable is strongly recommended when hung overhead.
There are safety wire mounting ports in the extruded sides in all four corners.
• When suspended on the yoke, the yoke cannot be used as mounting point for
secondary safety cable.
• All ventilation holes in the back plate must remain clear and are not to be
obstructed during the operation of the appliance.
• This appliance is not intended for use by persons (including children) with
reduced physical, sensory or mental capabilities, or lack of experience and
knowledge, unless they have been given supervision or instruction concerning
use of the appliance by a person responsible for their safety.
- 5 -
maInTaInIng safe operaTIon

unpaCkIng
Carefully remove the unit from the box.
Do not attempt to operate SilkTM LED fixtures if there are any signs of physical
damage. In case of damage, contact your local Rosco dealer. Ensure the Light
Stand Receiver is securely mounted onto the yoke before rigging.
Your Rosco SilkTM LED fixture will arrive with a power supply attached to the
back of the unit, and the power cord detached from the unit. Plug the IEC
connector into the power supply.
Safety cables must securely be attached to the designated slots on the SilkTM
fixture (detailed on page 7) and be as short as possible to reduce travel
distance if primary hanging accessory fails. The SilkTM 210 weighs 12.8 lbs
(5.9 kg) excluding accessories. The combined weight should be considered
when choosing a suitable safety cable.
Ensure that the yoke locking handle is correctly tightened after positioning
SilkTM. If the locking handle is not tightened correctly, the fixture may swing.
- 6 -

Magnetic Points for
Egg Crate Attachment
Diffuser Panel
Slots for
Barndoor Insertion
Accessory Slot
aCCessorY mounTIng poInTs
- 7 -

ConTrols
Silk
TM
LED fixtures can be controlled via the on-board, Rear Control Panel
located on the back of the fixture, or via user-supplied DMX512 data input.
REAR CONTROL PANEL
Right Rotary Knob:
Controls color temperature with
the rotary controller and accesses
pre-sets with a push button
Left Rotary Knob:
Controls light
intensity
Blue Indicator LED:
DMX signal present
Green Indicator LED:
Power
Power Switch
DMX Set Button:
Used to select DMX
address, selected with
color wheel
The QR code will take
you to the Silk web
page on the Rosco web
site where you will
find the latest manual
PDF, latest accessories
and details on other
fixtures in the range.
- 8 -

operaTIon
NOTE:
If the input voltage drops below 13.5V, all characters will flash.
DISPLAY
Top Left Dimming percentage
Top Right DMX address
Bottom Left Color temperature
Bottom Right Input DC voltage
- 9 -
POWERING ON
1. SilkTM LED fixtures are supplied with a standard 90 – 240 VAC switching
power supply, which is mounted in a cradle on the rear of the unit. A lead
with a 4 - pin XLR connector brings DC power from the power supply to
the SilkTM.
a. SilkTM LED fixtures can be powered by V-Mount batteries. Remove the
power supply and cradle, and then replace it with an optional SilkTM
V-Mount Cheeseplate Battery Holder.
b. SilkTM LED fixtures can be powered by Anton/Bauer batteries. Remove
the power supply and cradle, and then replace it with an optional SilkTM
Anton/Bauer Cheeseplate Battery Holder.
2. Make sure the 4-pin XLR connector from the power supply is plugged into
the SilkTM, and then plug the power supply into mains power: 100 – 240
VAC. Then switch on the unit with the rocker switch on the User Interface.
a. The rear display will illuminate.
b. Settings will default to those in use when
the unit was last powered down.
3. If desired connect the SilkTM LED fixture to a DMX console using the 5-pin
XLR ports on the rear control panel.
a. The presence of a DMX input signal is automatically detected.
b. The Blue LED Indicator LED will illuminate.

manual ConTrol
1. Select the output level of the fixture by rotating the left-hand knob until the
desired set point has been achieved. The current set point will be shown in
the upper left-hand portion of the display.
2. Select the color temperature of the fixture by rotating the right-hand knob
until the desired set point has been achieved.
a. SilkTM LED fixtures can be set to color temperatures ranging from 2800K
to 6500K.
b. The current set point will be shown in the lower left portion of the
LED display.
c. Seven pre-set color temperatures are stored in the fixture’s control
logic. Push the right-hand knob to index to the desired pre-set
color temperature:
Preset Chart:
NOTE: The rear LED display will automatically dim after several seconds if no
inputs have been entered. The display will resume full illumination the next
time any of the controls are operated.
2900K
3200K
3600K
4300K
5000K
5600K
6500K
- 10 -
InformaTIon
SilkTM units have a digital serial number and firmware version, which is
viewable on the initial LED display load screen.
This information is also accessible by pressing and holding down the
DMX/MODE/SELECT button.
The display will revert to default once the button is released.

dmX operaTIon
SilkTM LED fixtures can be operated via DMX512 protocol using the standard
5-pin DMX In and DMX Out connectors on the Rear Control Panel. Once DMX
is connected to the SilkTM fixture via the ‘DMX In’ port, it can be controlled by a
DMX console. When a valid DMX signal is detected, the Blue Indicator LED will
illuminate. The ‘DMX Out’ connector allows other DMX enabled fixtures to be
daisy-chained together.
NOTE: Silk™ LED fixtures are self-terminating and do not require external
DMX termination.
DMX Control uses two channels:
• DMX Channel 1 = Output (Dimming) Intensity
(DMX value 0 - 255 = level 0 - 100%)
• DMX Channel 2 = CCT Color Temperature
(DMX value 0 = 2900K, 255 = 6500K)
SilkTM LED fixtures use industry standard 5-Pin XLR male and female connectors
to receive DMX signals and output DMX signals.
The DMX Pin wiring is as follows: • Pin 1: Ground
• Pin 2: Data +
• Pin 3: Data –
• Pin 4: Spare
• Pin 5: Spare
NOTE: SilkTM uses LTP (Last Takes Precedence) protocol. LTP is a handy
way of controlling intelligent lighting parameters that relate to intensity
or color mixing. It you need a color wheel to change from tungsten to
daylight, or dimmer position change, you want it to happen as you expect.
This allows manual override ‘on set’ even if the fixture is being run back
to the board on set or in the gallery. LTP control channels send the latest
instruction to an intelligent fixture parameter and nothing changes until it
sends another one on that channel.
- 11 -

seTTIng The dmX address
Push the DMX Set Button and the DMX base address in the upper right corner
of the display will flash. Rotate the right-hand knob to the desired DMX base
address (001 to 511). Once the desired address has been selected, push the
DMX set button again. The DMX address will stop flashing and will display
the chosen address. SilkTM LED fixtures utilize 2 channels per fixture. Other,
subsequent DMX addresses should be offset by 2.
SilkTM DMX mapping has been designed to enable easy access of color
temperatures from simple or older DMX control boards. The color temperature
relates directly to the percentage on the desk, such that if Channel 2, (base
channel + 1), on the desk is at 30%, the color temperature will be at 3000K.
KELVIN/CCT HEX DEC % Age
2800 0x48 72 28
2900 0x4a 74 29
3200 0x52 82 32
3600 0x5c 92 36
4300 0x6e 110 43
5000 0x7f 127 50
5600 0x8e 142 56
6500 0xa5 165 65
NOTE: SilkTM LED fixtures will maintain their current Color Temperature and
Output/Dimming settings in the event of an interruption to the DMX signal.
A full DMX mapping table is available on the Rosco website
at www.rosco.com/silk
- 12 -

sIlkTm 210 runnIng on dC sourCes
SilkTM 210 is designed to run on any voltage between 13V – 36VDC.
However it is most efficient running at 24V. Below 20V the fixture becomes
steadily less efficient.
For optimal performance run SilkTM 210 on an AC transformer.
A second option is to run it on 24 V DC source, either with a block battery or
with the SilkTM Double V – lock adaptor, BB-VLO-2X.
The third option is to run on one 12V battery using the V-lock or Anton/Bauer
adaptor plate, BB-SIL-VLOCP or BB-SIL-ABCP. In this situation, it is advised
to use the highest capacity battery available. High capacity and heavy duty
V-locks and Anton/Bauer batteries are available and High Draw versions are
available from some manufacturers such as Hawk-Woods.
At full output, SilkTM 210 can pull up to 10A as the battery voltage reduces,
therefore it is advised to select a battery that is suitably rated.
Hawk-Woods and other manufacturers now offer a range of batteries that are
designed for high current draw, up to 15A, ideal for use with SilkTM lighting
products. A battery used on SilkTM 210 must have a current rating of >10A to
cope with current draw at lower voltages to ensure it doesn’t cut out early and
reduce running time.
There are a range of variables that effect battery life such as capacity, age,
number of duty cycles, quality, and ambient temperature.
SilkTM firmware has been designed to protect the driver electronics. At
13.5V input the entire display will flash to warn the user that there is
limited remaining capacity. At 13V the lamp will switch off and display
“Lo OFF”. Please switch off the unit and change the battery or switch to an
alternative power source. The time between the warning display and cut out
will vary but a typical duration would be 4 – 6 minutes but typical duration on
a 100W battery would be 10 minutes.
Additionally there are other steps you can take to prolong battery life on SilkTM
210 if running time is the priority. Roll off the output to <90% and walk the lamp
in slightly closer to the subject if possible. This can increase the running time
by up to 75%. Adjusting color temperature below 5300K if possible will also
increase running time. 4300K, for instance, if appropriate to your situation will
increase running time by as much as 25%.
- 13 -

Rosco extensively tests batteries with SilkTM 210 on a range of color temperatures
and dimmer settings.
The batteries listed on page 15 have successfully passed benchmark testing
and the table is derived from real life testing which can be used as a guide to
expected running time at various fixture settings.
Many other batteries offered from a range of manufacturers may work but
their performance and reliability cannot be confirmed by Rosco.
Use only Lithium Ion batteries >=100W with this Silk luminaires. Irreparable
damage may occur to the driver board when using lower power batteries or
batteries with a different chemistry.
Rosco has tested many Lithium Ion batteries currently available and a list of
test results and expected run times are shown on page 15.
sIlkTm 210 flICker free
SilkTM 210 has been tested at 1,000fps, 1,500fps, 2,000fps and 3,000fps at a
range of color temperatures.
SilkTM has also been verified at 1,000 fps at 100%, 50% and 25% output and it
is rock solid with no evidence of wavering or flicker.
A Vision Research Miro LG320S was used for the test and a high speed specialist
validated the process and results.
- 14 -

Bat 1 Bat 2 Manufacturer CCT running time
91 IDX 2800 0:36:00
91 IDX 4700 0:37:00
91 IDX 5600 0:24:00
94 AB PAGlink 2800 0:38:00
94 AB PAGLink 4700 0:40:00
94 AB PAGLink 5600 0:26:00
98 BCB 2800 0:47:00
98 BCB 4700 0:47:00
98 BCB 5600 0:36:00
98 BCB 6500 0:46:00
130 Dynacore 4300 0:58:00
130 Dynacore 5600 0:23:00
90H Hawk-Woods 4300 0:50:36
90H Hawk-Woods 5000 0:36:00
90H Hawk-Woods 5600 0:30:00
140 Hawk-Woods 3200 0:24:00
140 Hawk-Woods 4300 1:12:00
140 Hawk-Woods 4700 1:01:00
140 Hawk-Woods 5000 0:26:00
140 Hawk-Woods 5600 0:25:00
140 Hawk-Woods 6500 0:53:00
150 AB HC Dionic 2800 0:31:00
150 AB HC Dionic 4700 0:30:00
150 AB HC Dionic 5600 0:27:00
150 AB HC Dionic 6500 0:37:00
190 Hawk-Woods 2800 1:16:00
190 Hawk-Woods 3200 0:48:00
190 Hawk-Woods 4300 1:40:00
190 Hawk-Woods 4700 1:23:00
190 Hawk-Woods 5600 0:30:00
90H Hawk-Woods 4300 0:45:00
90H Hawk-Woods 5600 0:26:00
150 Lanparte 4300 1:10:00
146 IDX 4300 1:21:00
87 IDX 5600 0:29:00
150 Lanparte 5600 0:44:00
146 IDX 5600 1:00:00
130 DYNACORE 5600 0:42:00
140 140 Hawk-Woods 3200 2:29:00
140 140 Hawk-Woods 4300 2:48:00
140 140 Hawk-Woods 5600 2:15:00
190 190 Hawk-Woods 3200 3:21:00
190 190 Hawk-Woods 4300 3:50:00
190 190 Hawk-Woods 5600 2:10:00
baTTerY run TImes
- 15 -

TroubleshooTIng
SYMPTOM
Unit does not respond
to DMX control, but
DMX indicator LED ‘lit’
Unit does not respond
to DMX, but DMX indicator
LED ‘off’
POSSIBLE CAUSE
Unit set to incorrect
DMX address
No DMX signal is
being received
Bad Cable
No DMX plugged in
Power off at the console
SOLUTION
Check DMX address
Check cable and DMX
run from the console
- 16 -

aCCessorIes
Mounting
BA-SIL-210-SY SilkTM 210 Yoke
BA-SIL-210-POY SilkTM 210 PoleOp Yoke
Battery Holders
BB-SIL-AB-CP SilkTM Anton/Bauer battery holder
BB-SIL-VLO-CP SilkTM V-Lock battery holder
Barn Doors
BD-SIL-210 SilkTM 210 Barn Doors (set)
Carrying Cases
CAS-SIL-210S SilkTM 210 Carrying Case
Diffusion and Light Modifiers
DM-SIL-210LV45 SilkTM 210 Egg Crate Louver 45 degrees
DM-SIL-210LV60 SilkTM 210 Egg Crate Louver 60 degrees
DM-SIL-210SB SilkTM 210 DOPChoice SoftBox, inc 1/4 grid cloth
DM-SIL210SG SilkTM 210 DOPChoice SnapGrid, fabric louvre
Transformers (AC Mains PSU)
TR-COM-120WOC AC PSU to XLR4 24V, no power cord
TR-SIL-120WC SilkTM AC PSU cradle
Mains Power Cables
SCHI-C13-EU EU IEC AC supply cable, 3 pin, 3m
SCHI-C13-UK UK IEC AC supply cable, 3 pin, 3m
SCHI-C13-US US IEC AC supply cable, 3 pin, 3m
Replacement Parts
XS-SIL-210DIF SilkTM Diffusion Panel – Silk™ 210
XS - S I L- C C S il k TM corner piece module with accessory
retention mechanism
- 17 -

speCIfICaTIons
Power:
Input Voltage 13- 36 VDC
AC Power Transformer
• Power Supply Universal 100 - 240VAC input / 24VDC output
• Power Consumption 120W Max (DC)
DC Operation via standard Anton/Bauer, V-Mount or 4-Pin batteries (owner supplied)
Physical Characteristics:
Dimensions (excluding Yoke)
20.5” × 11.9” × 3.9” (520 mm × 302 mm × 98 mm)
Dimensions (including Yoke & Receiver)
21.9” × 13.9” × 3.9” (557 mm × 352 mm × 98 mm)
Weight (including Power Supply, Yoke & Receiver)
13 lbs. (5.9 kg)
Optical Characteristics:
The SilkTM LED Fixture is a broad spectrum, diffuse, white light source. Like
all discontinuous spectrum lamps, this source can only emulate a black body
radiator or daylight source. However SilkTM LED fixtures have been formulated
to mix well with traditional sources, such as Tungsten Halogen, MSR and HMI
fixtures, as they work within the color gamut of current broadcast and motion
picture cameras and film stock.
Measuring Correlated Color Temperature (CCT)
SilkTM fixtures utilize an LED source that is optimized for the film, TV and image
capture industries. Most existing color meters cannot be used to accurately read
thecorrelatedcolortemperature (CCT) ofSilkTM and other discontinuous - spectrum
light sources.
Color meters in use today are designed for a full spectrum source such as
incandescent lights. These meters possess only 3 sensors to measure the light
output: red, green, and blue. As such, a narrow band light source, such as SilkTM
may not read correctly.
To ensure that the CCT of the light emanating from the SilkTM LED fixtures
matches traditional light sources, the output from Rosco SilkTM LED fixtures
has been validated using TLCI test algorithms and validated as a source of the
highest quality. Metrics suggest the source will need negligible correction in
post-production, save for subjective adjustments.
- 18 -

3200K
5600K
1.0
0.9
0.8
0.7
0.6
0.5
0.4
0.3
0.2
0.1
0.0
380 420 460 500 540 580 620 660 700 740 780
Wavelength(nm)
Relative intensity
Re = 96
Ra = 98
R1
R2
R3
R4
R5
R6
R7
R8
R9
R10
R11
R12
R13
R14
R15
98
99
95
99
99
97
99
97
94
97
97
83
99
96
97
0 10 20 30 40 50 60 70 80 90 100
1.0
0.9
0.8
0.7
0.6
0.5
0.4
0.3
0.2
0.1
0.0
380 420 460 500 540 580 620 660 700 740 780
Wavelength(nm)
Relative intensity
Re = 94
Ra = 96
R1
R2
R3
R4
R5
R6
R7
R8
R9
R10
R11
R12
R13
R14
R15
97
98
95
94
94
92
98
97
98
93
94
66
98
97
95
0 10 20 30 40 50 60 70 80 90 100
CRI is not a good measure of the appropriateness of the color output for image
capture and should not be relied on when comparing fixtures.
The diagrams below show, histogram, spectral power distribution and chip chart
images gathered with a standard SilkTM 210 at the 3200K and 5600K set points.
These metrics are typical of a Silk
TM
LED fixture, but individual units may vary
within manufacturing tolerance. It is the user’s responsibility, as is customary and
standard practice, to shoot image capture tests when combining sources using
different core technology such as HMI, fluorescent, tungsten or RGB LED fixtures
to ensure compatibility.
Color meTrICs
- 19 -
Table of contents
Other Rosco Dj Equipment manuals