Rotel RMB-1504 User manual

Owner’s Manual
Manuel de l’utilisateur
Bedienungsanleitung
Manual de Instrucciones
Gebruikershandleiding
Manuale di istruzioni
Instruktionsbok
Инструкция пользователя
RMB-1504
Four Channel Power Amplier
Ampli cateur de Puissance 4 Canaux
Etapa de Potencia de 4 Canales
Finale di Potenza a 4 Canali
Vierkanal-Endstufe
4 Kanalen Eindversterker
4-Kanals Slutsteg
4-Канального Усилитель Мощности

2RMB-1504 Four Channel Power Amplier
WARNING: There are nouser serviceable parts inside. Referall servicing
to qualified service personnel.
WARNING: To reduce the risk of fire or electric shock, do not expose the
unit to moisture or water. Do not expose the unit to dripping or splashing.
Do not place objects filled with liquids, such as vases, on the unit. Do
not allow foreign objects to get into the enclosure. If the unit is exposed
to moisture, or a foreign object gets into the enclosure, immediately
disconnect the power cord from the wall. Take the unit to a qualified
service person for inspection and necessary repairs.
Read these instructions.
Keep these instructions.
Heed all warnings.
Follow all instructions.
Do not use this apparatus near water.
Clean only with dry cloth.
Do not block any ventilation openings. Install in accordance with the
manufacturer’s instructions.
Do not install near any heat sources such as radiators, heat registers,
stoves, or other apparatus (including amplifiers) that produce heat. Do
not defeat the safety purpose of the polarized or grounding-type plug.
A polarized plug has two blades with one wider than the other.
A grounding type plug has two blades and a third grounding prong.
The wide blade or the third prong are provided for your safety. If the
provided plug does not fit into your outlet, consult an electrician for
replacement of the obsolete outlet.
Protect the power cord from being walked on or pinched particularly
at plugs, convenience receptacles, and the point where they exit from
the apparatus.
Only use attachments/accessories specified by the manufacturer.
Use only with the cart, stand, tripod, bracket, or table
specified by the manufacturer, or sold with the apparatus.
When a cart is used, use caution when moving the cart/
apparatus combination to avoid injury from tip-over.
Unplug this apparatus during lightning storms or when unused for long
periods of time.
Refer all servicing to qualified service personnel. Servicing is required
when the apparatus has been damaged in any way, such as power supply
cord or plug is damaged, liquid has been spilled or objects have fallen
into the apparatus, the apparatus has been exposed to rain or moisture,
does not operate normally, or has been dropped.
The apparatus should be used in non tropical climate.
The ventilation should not be impeded by covering the ventilation openings
with items, such as newspapers, table-cloths, curtains, etc.
No naked flame sources, such as lighted candles, should be placed on
the apparatus.
Rotel products are designed to comply with
international directives on the Restriction of
Hazardous Substances (RoHS) in electrical and
electronic equipment and the disposal of Waste
Electrical and Electronic Equipment (WEEE). The
crossed wheelie bin symbol indicates compliance and
that the products must be appropriately recycled
or processed in accordance with these directives.
Important Safety Instructions
You must allow a minimum 10 cm or 4 inches of unobstructed
clearance around the unit.
WARNING:
The rear panel power cord connector is the mains power
disconnect device. The device must be located in an open area that
allows access to the cord connector.
The unit must be connected to a power supply only of the type and
voltage specified on the rear panel. (USA: 120 V/60Hz, EC: 230V/50Hz)
Connect the component to the power outlet only with the supplied power
supply cable or an exact equivalent. Do not modify the supplied cable.
Do not use extension cords.
The mains plug is the disconnect of the unit. In order to completely
disconnect the unit from the supply mains, remove the main plug from
the unit and the AC power outlet. This is the only way to completely
remove mains power from the unit.
Use Class 2 wiring for speaker connections to ensure proper installation
and minimize the risk of electrical shock.
This symbol means that this unit is double insulated.
An earth connection is not required.

3
Figure 1: RMB-1504 Controls and Connections
Commandes et Branchements RMB-1504
RMB-1504 Bedienelemente und Anschlüsse
Controles y Conexiones de la RMB-1504
1
456 7
-
0
9
8
2 3
RMB-1504 Bedieningselementen en aansluitingen
RMB-1504 Controlli e connessioni
RMB-1504: Kontroller och anslutningar
Органы управления и разъемы RMB-1504

4RMB-1504 Four Channel Power Amplier
Figure 2: Analog Inputs and Speaker Output Connections Analoge ingangen en luidsprekeruitgangen
Branchements des entrées analogiques et sorties enceintes acoustiques Collegamenti ingressi analogici ed uscite diffusori
Analoge Eingänge und Anschließen der Lautsprecher Analoga ingångar och högtalaranslutningar
Entradas Analógicas y Conexiones de Salida a las Cajas Acústicas Аналоговые входы и выходы на колонки
STANDB YSTANDB Y
RSP-1576
HDMI
MUTE2CH SUR + DISPLAYBYPASS
VIDEO 1 VIDEO 2 VIDEO 3 VIDEO 4 VIDEO 5 VIDEO 6 VIDEO 7
USB PC-USB XLR TUNER CD PHONO BT
5V 2.1A

5
Important Notes
When making connections be sure to:
4Turn off all the components in the system before hooking up any components, including loudspeakers.
4Turn off all components in the system before changing any of the connections to the system.
It is also recommended that you:
4Turn the volume control of the amplier all the way down before the amplier is turned on or off.
Remarques importantes
Pendant les branchements, assurez-vous que :
4Tous les maillons sont éteints avant leur branchement, quels qu’ils soient, y compris les enceintes acoustiques.
4Éteignez tous les maillons avant de modier quoi que ce soit au niveau de leurs branchements, quels qu’ils soient.
Il est également recommandé de :
4Toujours baissez le niveau sonore via le contrôle de volume, avant d’allumer ou d’éteindre l’amplicateur.
Wichtige Hinweise
Achten Sie beim Herstellen der Verbindungen auf Folgendes:
4Schalten Sie alle Komponenten im System ab, bevor Sie Geräte (einschließlich Lautsprecher) anschließen.
4Schalten Sie alle Komponenten im System ab, bevor Sie Anschlüsse im System verändern.
Ferner empfehlen wir, dass
4Sie die Lautstärke herunterdrehen, bevor Sie den Verstärker ein- oder abschalten.
Notas Importantes
Cuando realice las conexiones, asegúrese de que:
4Desactiva todos los componentes del equipo, cajas acústicas incluidas, antes de conectar cualquier nuevo componente en el mismo.
4Desactiva todos los componentes del equipo antes de cambiar cualquier conexión del mismo.
También le recomendamos que:
4Reduzca el nivel de volumen de su amplicador a cero antes de activarlo o desactivarlo.
Héél belangrijk
Bij het maken van de verbindingen:
4Zorg dat niet alleen de RMB-1504, maar de gehele installatie uitstaat, als nog niet alle verbindingen gemaakt zijn.
4Zorg dat niet alleen de RMB-1504, maar de gehele installatie ook uitstaat, als u verbindingen gaat wijzigen.
Wij raden u ook aan om:
4de volumeregelaar van de (voor)versterker geheel dicht te draaien (volkomen linksom) wanneer u uw eindversterker aan- of uitzet.
Note importanti
Quando effettuate i collegamenti assicuratevi di:
4Spegnere tutti i componenti del sistema prima di collegare qualsiasi componente, inclusi i diffusori.
4Spegnere tutti i componenti del sistema prima di modicare qualsiasi connessione nel sistema.
Vi raccomandiamo inoltre di:
4Portare il volume a zero prima di accendere o spegnere l’amplicatore.
Viktigt
Tänk på följande när du gör anslutningar:
4Stäng av alla apparater i anläggningen innan du ansluter nya komponenter eller högtalare.
4Stäng av alla apparater i anläggningen innan du ändrar någon anslutning.
Du rekommenderas också:
4Vrida ner volymen på förförstärkaren helt och hållet innan förstärkaren slås på eller av.
LJÊÌ˚ Á‡Ï˜‡ÌËfl
è‰ ÔÓ‰ÒÓ‰ËÌÂÌËÂÏ:
4Ç˚Íβ˜ËÚ ‚Ò ÍÓÏÔÓÌÂÌÚ˚, ‚Íβ˜‡fl ÍÓÎÓÌÍË.
4Ç˚Íβ˜ËÚ ‚Ò ÍÓÏÔÓÌÂÌÚ˚ ‚ ‚‡¯ÂÈ ÒËÒÚÂÏÂ, ÔÂʉ ˜ÂÏ ˜ÚÓ-ÚÓ ‚ ÌÂÈ ÏÂÌflÚ¸.
êÂÍÓÏẨÛÂÚÒfl Ú‡ÍÊÂ:
4Ç˚‚ÂÒÚË „ÓÏÍÓÒÚ¸ ÛÒËÎËÚÂÎfl ̇ ÏËÌËÏÛÏ, Ô‰ ÚÂÏ Í‡Í ‚Íβ˜‡Ú¸ ËÎË ‚˚Íβ˜‡Ú¸ „Ó.

6RMB-1504 Four Channel Power Amplier
At Rotel, we are proud to do our part. We have reduced the lead content
in our products by using special lead-free ROHS solder and components.
Our engineers continually strive to improve power supply efciency without
compromise to quality. When in standby mode Rotel products use minimal
power to meet global Standby Power Consumption requirements.
The Rotel factory is also doing their part to help the environment through
constant improvements to product assembly methods for a cleaner and
greener manufacturing processes.
All of us at Rotel thank you for buying this product. We are sure it will bring
you many years of enjoyment.
Getting Started
Thank you for purchasing the Rotel RMB-1504 Four Channel Power Amplier.
When used in a high-quality music or home theater system, your Rotel
product will provide years of musical enjoyment.
The RMB-1504 is a sophisticated four-channel power amplier. Discrete
output devices, a massive power supply with toroidal transformer, premium
components, and Rotel’s Balanced Design ensure superb sound quality.
High current capability allows the RMB-1504 to drive difcult speaker
loads with ease.
Features
• Four-channel power amplier, with 70 watts per channel output into 8 ohms.
• Front panel input level controls.
• User-selectable power on/off conguration: manual, automatic signal
sensing, or controlled by remote 12 volt trigger signal.
• Protection circuitry against fault conditions with front panel indicators.
• Input linking, input mono switch and signal output link connectors for
maximum system conguration exibility.
A Few Precautions
WARNING: To avoid potential damage to your system, turn off ALL the
components in the system when connecting or disconnecting the loudspeakers
or any associated components. Do not turn the system components back on
until you are sure all the connections are correct and secure. Pay particular
attention to the speaker wires. There must be no loose strands that could
contact the other speaker wires, or the chassis of the amplifier.
Please read this manual carefully. In addition to installation and operating
instructions, it provides valuable information on various RMB-1504 system
congurations as well as general information that will help you get optimum
performance from your system. Please contact your authorized Rotel dealer
for answers to any questions you might have. In addition, all of us at Rotel
welcome your questions and comments.
Save the shipping carton and all enclosed packing material for future use.
Shipping or moving the RMB-1504 in anything other than the original
packing material may result in severe damage to your amplier.
If included in the box please complete the owner’s registration card or
register on line. Also be sure to keep the original sales receipt. It is your best
Contents
Important Safety Instructions ..........................................2
Figure 1: Controls and Connections 3
Figure 2: Analog Inputs and Speaker Output Connections 4
Important Notes 5
About Rotel .......................................................6
Getting Started ....................................................6
Features 6
A Few Precautions 6
Placement 7
AC Power and Control ...............................................7
AC Power Input -7
Power Switch and Power Indicator 17
Auto Turn On/Off Mode Selector 77
12 Volt Trigger Input 67
12 Volt Trigger Output 67
Circuit Breaker 07
Protection Circuitry 27
Signal Connections . . . . . . . . . . . . . . . . . . . . . . . . . . . . . . . . . . . . . . . . . . . . . . . . . . 8
RCA Inputs 48
Mono Switch 48
Linking the Inputs 48
Input Level Controls 38
Signal Output Link 58
Speaker Connection .................................................8
Speaker Selection 8
Speaker Wire Selection 8
Polarity and Phasing 8
Speaker Connection 89 8
Troubleshooting ....................................................9
Power Indicator Is Not Illuminated 9
No Sound 9
Protection Indicator 9
Specications......................................................9
About Rotel
Our story began over 50 years ago. Over the decades, we have received
hundreds of awards for our products and satised hundreds of thousands
of people who take their entertainment seriously - like you!
Rotel was founded by a family whose passionate interest in music led them
to manufacture high-delity components of uncompromising quality. Through
the years, that passion has remained undiminished and the family goal of
providing exceptional value for audiophiles and music lovers, regardless
of their budget, is shared by all Rotel employees.
Rotel’s engineers work as a close team, listening to, and ne tuning, each
new product until it reaches their exacting musical standards. They are
free to choose components from around the world in order to make that
product the best they can. You are likely to nd capacitors from the United
Kingdom and Germany, semiconductors from Japan or the United States,
while toroidal power transformers are manufactured in Rotel’s own factory.
We all have concerns about our environment. And, as more and more
electronics are produced it is especially important for a manufacturer to do all
it can to engineer products that have a minimum impact on the environment.

7
record of the date of purchase, which you will need in the event warranty
service is ever required.
Placement
The RMB-1504 generate heat as part of its normal operation. The heat
sinks and ventilation openings in the amplier are designed to dissipate this
heat. The ventilation slots in the top cover must be open. There should be
10 cm (4 inches) of clearance around the chassis, and reasonable airow
through the installation location, to prevent the amplier from overheating.
Remember the weight of the amplier when you select an installation location.
Make sure that the shelf or cabinet can support it. We recommend installing
the unit in furniture designed to house audio components. Such furniture is
designed to reduce or suppress vibration which can adversely affect sound
quality. Ask your authorized Rotel dealer for advice about component
furniture and proper installation of audio components.
AC Power and Control
AC Power Input -
Your amplier is congured at the factory for the proper AC voltage in the
country where you purchased it, either 120 volts or 230 volts. The AC line
conguration is noted on a decal on the back panel.
NOTE: Should you move your amplifier to another country, it may be
possible to reconfigure it for use on a different line voltage. Do not attempt
to perform this conversion yourself. Opening the enclosure of the amplifier
exposes you to dangerous voltages. Consult a qualified service person or
the Rotel factory service department for information.
NOTE: Some products are intended for sale in more than one country and
as such are supplied with more than one AC cord. Please use only the cord
appropriate for your country/region.
Because of its high power rating, the amplier can draw considerable
current. Therefore, it should be plugged directly into a polarized wall
outlet using the supplied cable or other high current compatible cable as
recommended by your authorized Rotel dealer. Do not use an extension
cord. A heavy duty multi-tap power outlet strip may be used if it (and the
wall outlet) is rated to handle the current demanded by the amplier and
all the other components connected to it.
Be sure the POWER SWITCH 1on the front panel of the amplier is
turned off (in the “out” position). Then, connect the supplied power cord to
the Power Connector -on the rear of the unit and the AC power outlet.
If you are going to be away from home for an extended period of time
such as a month-long vacation, it is a sensible precaution to unplug your
amplier (as well as other audio and video components) while you are away.
Power Switch and Power Indicator 1
The power switch is located on the left side of the front panel. To turn the
amplier on, push the switch in. The ring around the switch will light up,
indicating that the amplier is turned on. To turn the amplier off, push the
button again and return it to the “out” position.
NOTE: Place the self adhesive ring over the light surrounding the Power
switch if the blue light is too bright.
Auto Turn On/Off Mode Selector 7
The RMB-1504 provides three different options for manual or automatic
power on/off operation. These modes are selectable using a three-position
slide switch on the back panel as follows:
• With the switch in the OFF position, the amplier is turned on or off manually
using the front panel power switch. Also use this mode if you are using
a switched AC outlet to control power to the amplier.
• With the switch in the SIGNAL SENSE position, the amplier turns on
automatically when a signal is detected at the inputs. The amplier will
go into standby mode several minutes after a signal is no longer present.
The front panel power switch overrides this function. It must be ON for the
signal sensing to work. Turning the switch OFF cuts power to the amplier,
regardless of whether or not a signal is present.
• With the switch in the 12V TRIG position, the amplier is turned on
automatically when a 12 volt trigger signal is present at the 12V TRIG
input to the left of the switch. The amplier goes into standby mode if the
+12 volt signal is not present. The front panel POWER SWITCH overrides
this function. It must be ON for the +12V trigger to work. Turning the
switch OFF cuts power to the amplier, regardless of whether or not a
trigger signal is present.
12 Volt Trigger Input 6
An input jack for connecting the wires carrying a +12 volt trigger signal
from a Rotel preamp or surround sound processor to turn the amplier on
and off. To use this feature the adjacent slide switch must be placed to the
left position (see previous section).
The TRIGGER INPUT accepts any control signal (AC or DC) ranging from 3
volts to 30 volts. Use a cable with mono 3.5 mm mini-plugs on both ends.
The +12V DC signal appears at the “tip” connector.
12 Volt Trigger Output 6
The 12V TRIG jack labeled OUT is used to pass the remote turn-on signal
to a second Rotel amplier. Any 12V Trigger signal at the INPUT jack will
be passed through to the OUT jack.
Circuit Breaker 0
A circuit breaker on the rear panel protects the amplier’s electrical circuity.
Generally, the circuit breaker will only open under a fault condition which
results in excessive current draw. To reset the circuit breaker, press the
button. Should it repeatedly open, contact your authorized Rotel dealer for
troubleshooting assistance.
Protection Circuitry 2
The RMB-1504 feature thermal and over-current protection circuits that
protect against potential damage in the event of extreme or faulty operating
conditions. Unlike many designs, these protection circuits are independent
of the audio signal and have no impact on sonic performance. Instead,
the protection circuits monitors the temperature of the output devices and
the current they are handling and shuts down the amplier if operating
conditions exceed safe limits.
Most likely, you will never see this protection circuitry in action. However,
should a faulty condition arise, the amplier will stop playing and one or
more of the PROTECTION LEDS on the front panel will light.
If this happens, turn the amplier off, let it cool down for several minutes,
and attempt to identify and correct the problem. There are independent

8RMB-1504 Four Channel Power Amplier
Signal Output Link 5
This pair of RCA connections can be used to pass the unprocessed input
signals to another audio component, for example to “daisychain” an additional
amplier to drive a second set of speakers. The input signals connected to
the “A” channels is also available at these LINK outputs.
NOTE: These input signals from the “A” channels can also be linked
to the “B” inputs by playing the INPUT SELECT switch associated with
that pair of channels in the LINK position.
Speaker Connection
The RMB-1504 has two groups of speaker connectors, one for each pair
of amplier channels.
Speaker Selection
We recommend using loudspeakers with a nominal impedance of 4 ohms
or higher with the RMB-1504. You should exercise some caution in driving
multiple pairs of speakers in parallel conguration, because the effective
impedance the amplier sees is cut in half. For example, when driving two
pair of 8 ohm speakers, the amplier sees a 4 ohm load. When driving
multiple speakers in parallel, it is recommended that you select speakers
with a nominal impedance of 8 ohms or higher. Speaker impedance ratings
are less than precise. In practice, very few loudspeakers will present any
problems for the RMB-1504. See your authorized Rotel dealer if you have
any questions.
Speaker Wire Selection
Use insulated two-conductor stranded wire to connect the amplier to the
speakers. The size and quality of the wire can have an audible effect on the
performance of the system. Standard speaker wire will work, but can result in
lower output or diminished bass response, particularly over longer distances.
In general, heavier wire will improve the sound. For best performance, you
may want to consider special high-quality speaker cables. Your authorized
Rotel dealer can help in the selection of cables for your system.
Polarity and Phasing
The polarity, the positive/negative orientation of the connections, for every
speaker and amplier connection must be consistent so all the speakers will
be in phase. If the polarity of one connection is reversed, bass output will
be very weak and stereo imaging degraded. All wire is marked so you can
identify the two conductors. There may be ribs or a stripe on the insulation
of one conductor. The wire may have clear insulation with different color
conductors (copper and silver). There may be polarity indications printed
on the insulation. Identify the positive and negative conductors and be
consistent with every speaker and amplier connection.
Speaker Connections 89
See Figure 2
NOTE: The following text describes both binding post and plug-in
connections. DO NOT use both connection methods in combination to
connect multiple speakers.
Turn off all the components in the system before connecting the speakers.
The RMB-1504 have two color coded connections for each group of
amplier channels, one for the left speaker, the other for the right speaker.
Labels above the connectors show the proper connections for connecting
speakers. These speaker connectors accept bare wire, connector lugs, or
PROTECTION LEDS for each pair of channels which may help in
troubleshooting the cause of the problem. When you turn the amplier
back on, the protection circuit will automatically reset and the PROTECTION
LEDS should go out, indicating that the amplier has recovered and the
fault corrected.
In most cases, the protection circuitry activates because of a fault condition
such as shorted speaker wires, or inadequate ventilation leading to an
overheating condition. In very rare cases, highly reactive or extremely low
impedance speaker loads could cause the protection circuit to engage.
If the protection circuitry triggers repeatedly and you are unable to isolate
and correct the faulty condition, contact your authorized Rotel dealer for
assistance in troubleshooting.
Signal Connections
The RMB-1504 has conventional RCA type input connectors, the type found
on nearly all audio equipment.
There is also a pair of SIGNAL OUTPUT LINK connections for passing the
input signal connected to the “A” pair of channels on to another audio
component. Additionally, the input signal to the “A” pair of channels can
be automatically linked to the inputs for the “B” channels, so that a separate
input signal cable is not required for those channels, for example in large
systems where the RMB-1504 is being used to drive multiple pairs of speakers.
NOTE: To prevent loud potentially damaging noises, make sure the amplifier
is turned off when you make any changes to the input signal configuration.
RCA Inputs 4
See Figure 2
There is one RCA input for each of the two pair of amplier channels. These
RCA inputs accept audio signals from preampliers or surround sound
processors. Use high quality audio interconnect cables for best performance.
For each pair of amplier channels, connect the left channel output of your
preamp to the LEFT INPUT on the RMB-1504. Connect the right channel of
your preamp to the RIGHT INPUT. Make sure that the input slide switch to
the right of the RCA inputs is in the STEREO position.
Mono Switch 4
When the MONO switch is in the ON position, the “A” left channel input
is connected to the right channel.
Linking the Inputs 4
You can link the inputs for groups “B” to the “A” inputs by placing the input
slide switch to the right of the “B” pair of RCA inputs in the LINK position.
When linked, no input connection is required for that group. The input
signal from the “A” group is sent to the linked pair of channels, allowing
you to use all four amplier channels with the same stereo input signals.
Input Level Controls 3
Two controls on the front panel, one for each pair of channels, provide
input level adjustments. These allow you to adjust the gain of the amplier
to match other components in the system. The A level control changes the
gain of the “A” channels; the B level control changes the “B” channels.
To adjust these controls, use a small, at blade screwdriver. Turn the control
clockwise to increase gain. Turn counterclockwise to reduce gain.

9
Specications
Continuous Power Output 4 x 70 watts/channel,
(20-20kHz, < 0.03%, 8 ohms) All channels dirven
Total Harmonic Distortion (20Hz-20kHz, 8 ohms)
Continuous rated power: < 0.03%
One-half rated power: < 0.03%
1 watt power: < 0.03%
Intermodulation Distortion (60Hz : 7kHz, 4:1) < 0.03%
Damping Factor (20-20kHz, 8 ohms) >200
Input Impedance/Sensitivity 20k Ohms/1.0 volt
Gain 26 dB
Input Overload Level 5.0 volt
Frequency Response (±1dB) 10 Hz - 100k Hz
Signal to Noise Ratio (IHF A) 115 dB
Crosstalk/Separation > 50 dB
Speaker Impedance 4 ohms minimum
Auto Turn On Level (with all inputs) 4 mV input signal
Power Requirements
U.S. version 120 Volts, 60Hz
European version 230 Volts, 50Hz
Power Consumption 300 Watts
Standby Power Consumption
Signal Sense 1 Watt
Standby: < 0.5 watts
BTU 810 BTU / h
Dimensions (W x H x D) 431 x 144 x 443 mm
17 x 5 2/3x 17 1/2ins.
Front Panel Height 3U / 132.6 mm / 5 2/9ins
Weight (net) 14.9 kg / 32.8 lbs.
All specifications are accurate at the time of printing.
Rotel reserves the right to make improvements without notice.
Rotel and the Rotel HiFi logo are registered trademarks of The Rotel Co, Ltd., Tokyo, Japan.
dual banana type connectors (except in the European Community countries
where their use is not permitted).
Route the wire from the amplier to the speakers. Give yourself enough slack
so you can move the components to allow access to the speaker connectors.
If you are using dual banana plugs, connect them to the wires and then
plug into the backs of the binding posts. The thumbscrews of the binding
posts should be screwed in all the way (clockwise).
If you are using terminal lugs, connect them to the wires. If you are attaching
bare wires directly to the binding posts, separate the wire conductors and
strip the insulation from the end of each conductor. Be careful not to cut into
the wire strands. Unscrew (turn counterclockwise) the binding post. Place
the connector lug or wire around the binding post shaft. Turn the binding
post clockwise to clamp the connector lug or wire rmly in place.
NOTE: Be sure there are no loose wire strands that could touch adjacent
wires or connectors.
For each group of channels, connect the left speaker to the pair of speaker
connectors labeled LEFT. Connect the right speaker to the speaker connectors
labeled RIGHT. Follow the labels printed above the connectors, Make sure
that the positive terminal of the speaker is connected to the + terminal on the
amplier. Make sure that the negative terminal of the speaker is connected
to the – terminal of the amplier.
Troubleshooting
Most difculties in audio systems are the result of incorrect connections,
or improper control settings. If you encounter problems, isolate the area
of the difculty, check the control settings, determine the cause of the fault
and make the necessary changes. If you are unable to get sound from the
amplier, refer to the suggestions for the following conditions:
Power Indicator Is Not Illuminated
No main power to the RMB-1504. Check AC power connections at the
amplier and the AC outlet. Check the front panel power switch. Make sure
that it is set to the ON position. If using signal sensing auto power-on, make
sure that a signal is present at the inputs. If using 12V trigger power-on, make
sure that a trigger signal is present at rear panel 12V TRIG IN connector.
No Sound
If the amp is getting AC power, but is producing no sound, check the
Protection indicator on the front panel. If it is illuminated, see below. If not,
check all of your connections and control settings on associated components.
Protection Indicator
The front panel PROTECTION INDICATORS light when the RMB-1504
protection circuits have shut off the amplier. Typically, this occurs only
when the ventilation openings are blocked,when there is faulty speaker
wiring, or after a period of extreme use. Turn off the system and wait for
the amp to cool. Then push the front panel power switch in and out to reset
the protection devices. If the problem is not corrected or reoccurs, there is
a problem with the system or the amplier itself.

10 RMB-1504 Ampli cateur de Puissance 4 Canaux
Tous les appareils Rotel sont conçus en totale
conformité avec les directives internationales
concernant les restrictions d’utilisation de substances
dangereuses (RoHS) pour l’environnement, dans
les équipements électriques et électroniques, ainsi
que pour le recyclage des matériaux utilisés (WEEE,
pour Waste Electrical and Electronic Equipment). Le
symbole du conteneur à ordures barré par une croix
indique la compatibilité avec ces directives, et le fait
que les appareils peuvent être correctement recyclés
ou traités dans le respect total de ces normes.
Remarques importantes concernant la sécurité
L’éclair dans un triangle équilatéral indique
la présence interne de tensions électriques
élevées susceptibles de présenter des
risques graves d’électrocution.
Le point d’exclamation dans un triangle
équilatéral indique à l’utilisateur la
présence de conseils et d’informations
importantes dans le manuel d’utilisation
accompagnant l’appareil. Leur lecture est
impérative.
ATTENTION : Il n’ya àl’intérieur aucune piècesusceptible d’êtremodifiée
par l’utilisateur. Adressez-vous impérativement à une personne qualifiée.
ATTENTION : Pour réduire tout risque d’électrisation ou d’incendie, ne
pas exposer l’appareil à une source humide, ou à tout type de risque
d’éclaboussure ou de renversement de liquide. Ne pas poser dessus
d’objet contenant un liquide, comme un verre, un vase, etc. Prenez
garde à ce qu’aucun objet ou liquide ne tombe à l’intérieur de l’appareil
par ses orifices de ventilation. Si l’appareil est exposé à l’humidité ou
si un objet tombe à l’intérieur, débranchez-le immédiatement de son
alimentation secteur, et adressez-vous immédiatement et uniquement
à une personne qualifiée et agréée.
Tous les conseils de sécurité et d’installation doivent être lus.
Conservez soigneusement ce livret.
Tous les conseils de sécurité doivent être soigneusement respectés.
Respectez les procédures d’installation et de fonctionnement indiquées
dans ce manuel.
Ne pas utiliser cet appareil près d’un point d’eau.
L’appareil doit être nettoyé uniquement avec un chiffon sec ou un
aspirateur.
Il ne doit pas être posé sur un fauteuil, un canapé, une couverture ou
toute autre surface susceptible de boucher ses ouïes d’aération ; ou
placé dans un meuble empêchant la bonne circulation d’air autour des
orifices d’aération.
Cet appareil doit être placé loin de toute source de chaleur, tels que
radiateurs, chaudières, bouches de chaleur ou d’autres appareils
produisant de la chaleur.
Notamment, ne pas tenter de supprimer la prise de terre (troisième
broche de la prise) si celle-ci est présente. Si la prise n’est pas conforme
à celles utilisées dans votre installation électrique, consultez un électricien
agréé. Prendre garde à ce que ce cordon d’alimentation ne soit pas pincé,
écrasé ou détérioré sur tout son trajet, et à ce qu’il ne soit pas mis en
contact avec une source de chaleur. Vérifiez soigneusement la bonne
qualité des contacts, à l’arrière de l’appareil comme dans la prise murale.
N’utilisez que des accessoires préconisés par le constructeur.
N’utilisez que des meubles, supports, systèmes
de transport suffisamment solide pour supporter
l’appareil. Procédez toujours avec la plus extrême
précaution lorsque vous déplacez l’appareil, afin
d’éviter tout risque de blessure ou des dommages
à l’appareil.
Débranchez le câble d’alimentation en cas d’orage, ou si l’appareil ne
doit pas être utilisé pendant une longue période.
L’appareil doit être immédiatement éteint, débranché puis retourné au
service après-vente agréé dans les cas suivants : le câble d’alimentation
secteur ou sa prise est endommagé; un objet est tombé, ou du liquide
a coulé à l’intérieur de l’appareil; l’appareil a été exposé à la pluie;
l’appareil ne fonctionne manifestement pas normalement; l’appareil est
tombé, ou le coffret est endommagé.
L’appareil doit être utilisé sous un climat non tropical.
La ventilation ne doit pas être entravée en recouvrant les orifices de
ventilation d’objets tels que des journaux, des nappes, des rideaux, etc.
Aucune source de flamme nue, telle que des bougies allumées, ne doit
être placée sur l’appareil.
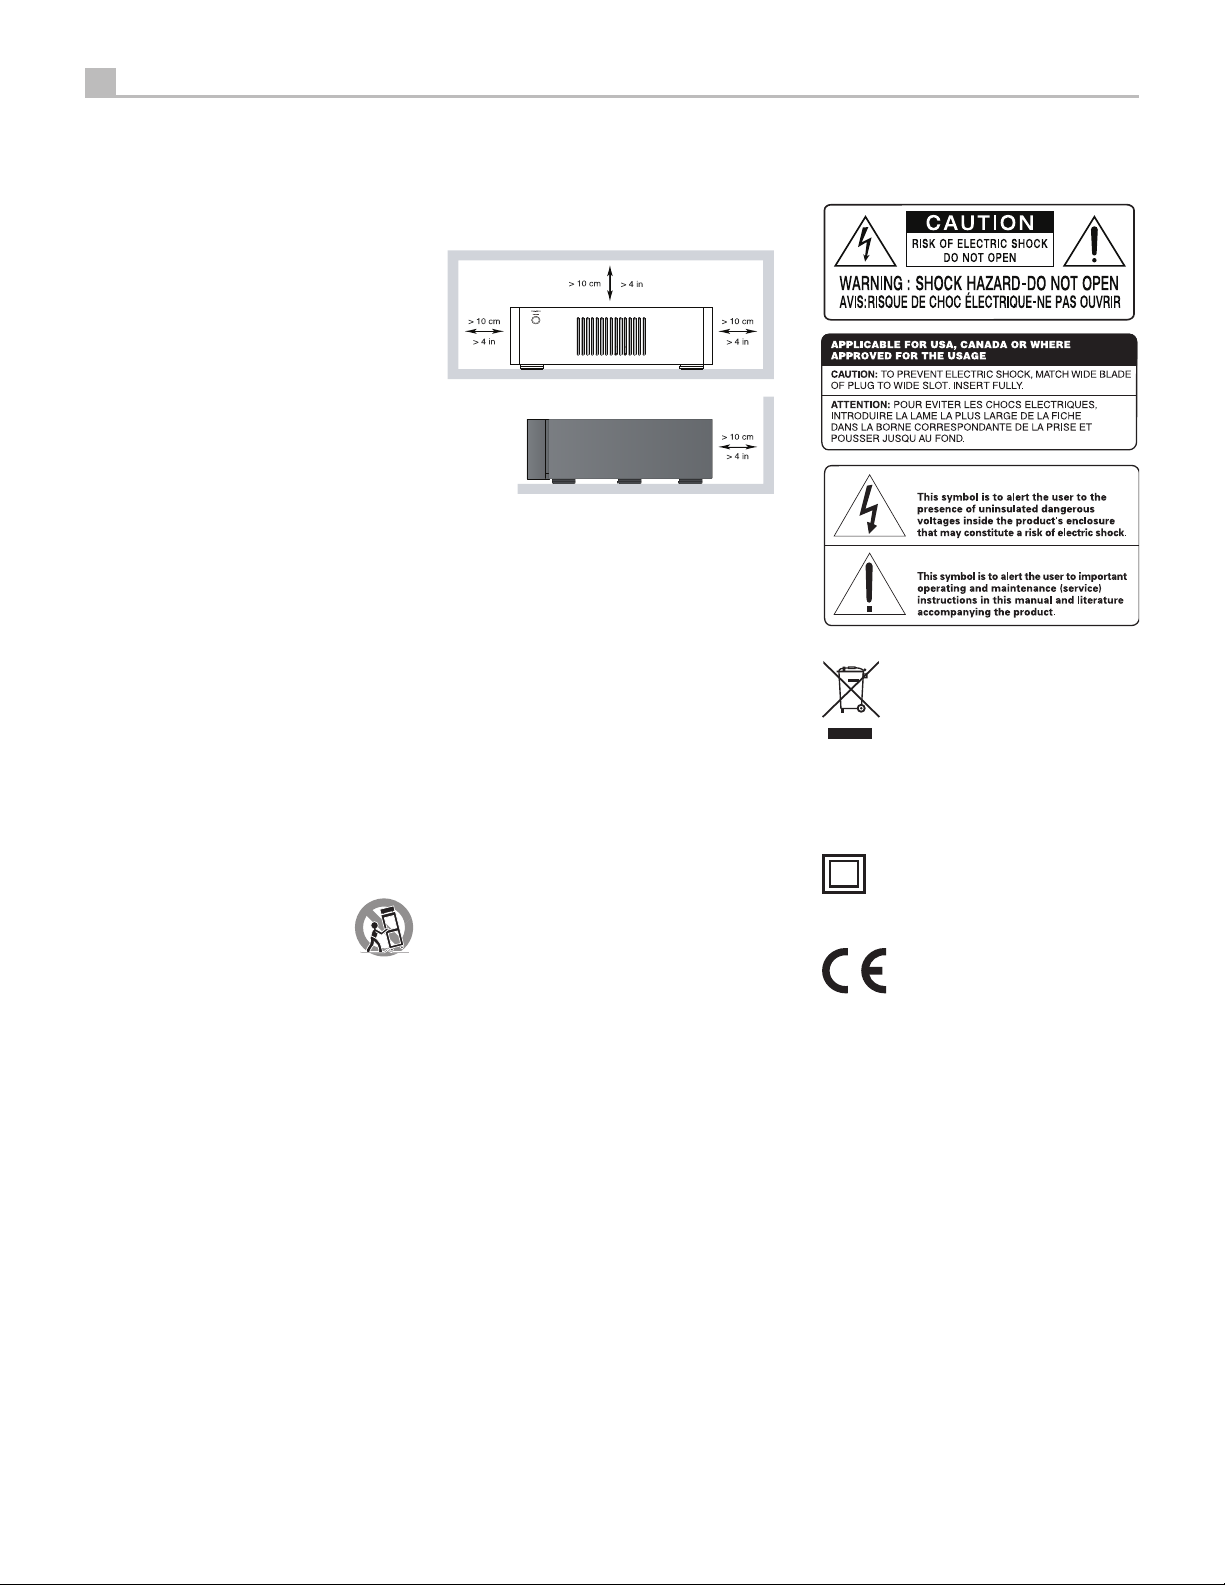
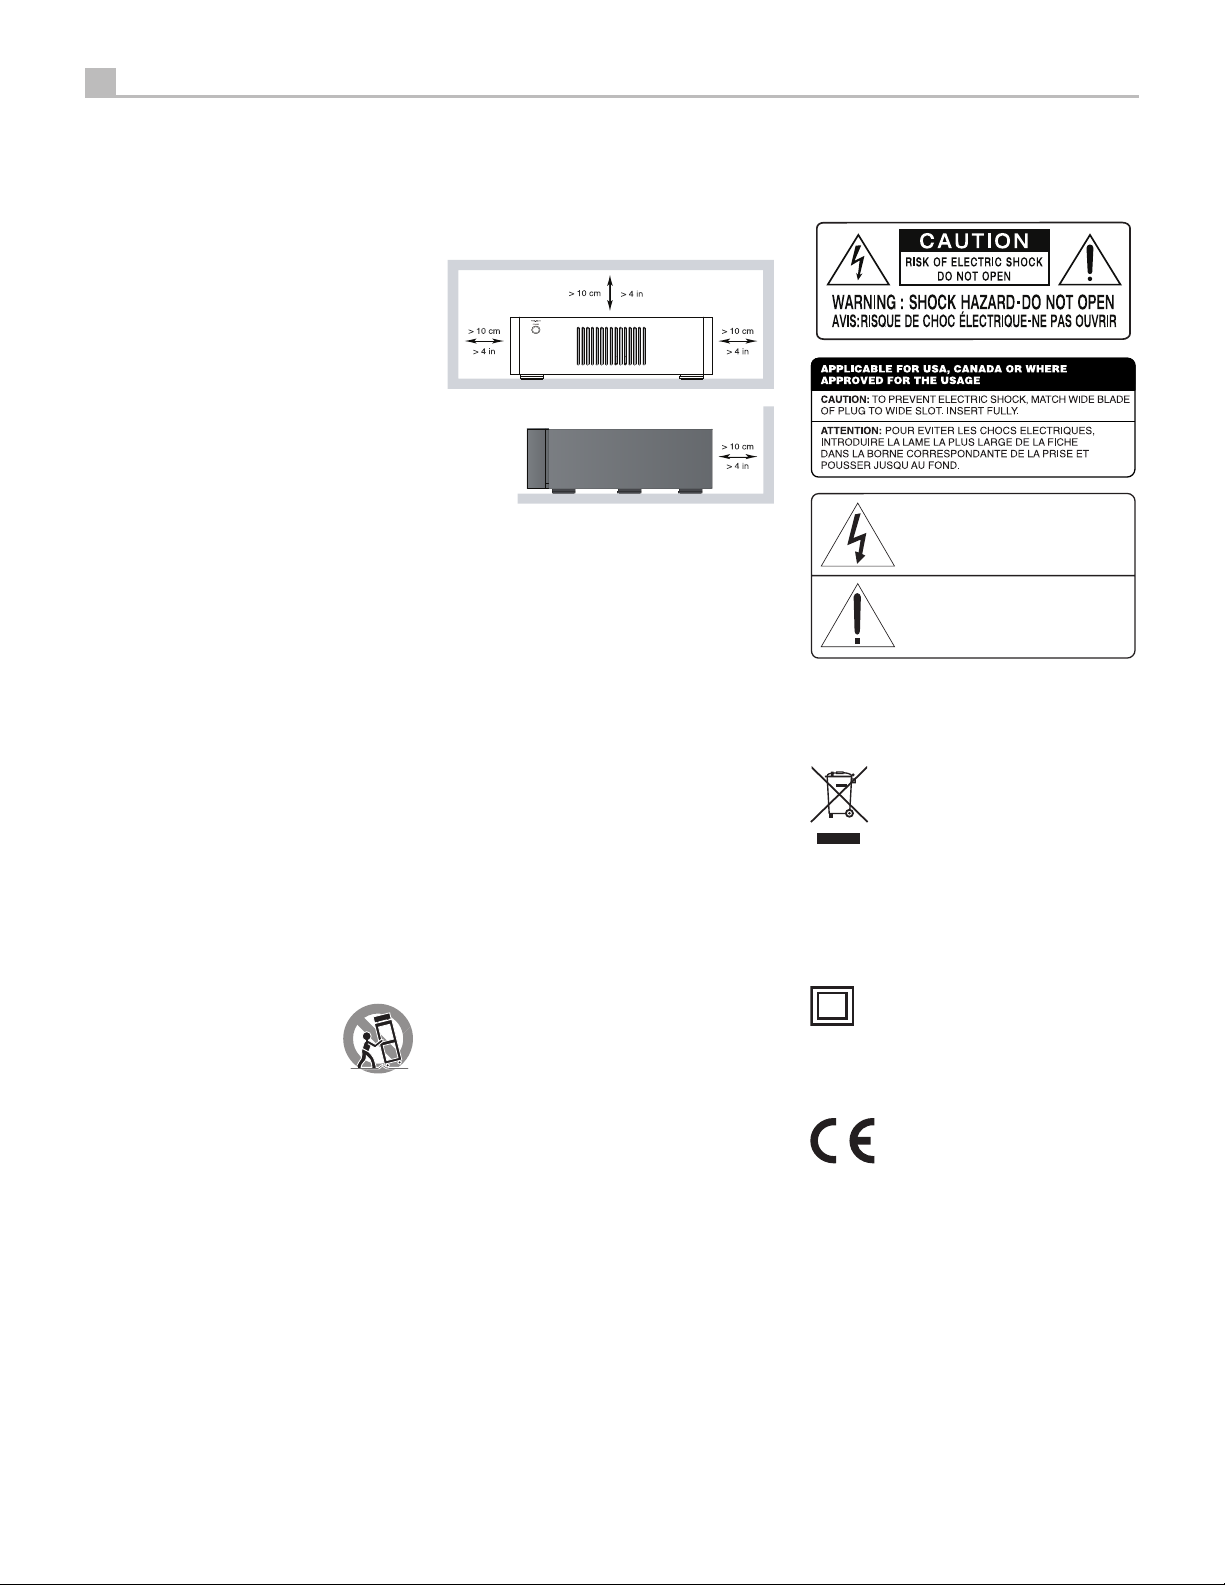
Vous devez réserver un espace libre d’une dizaine de
centimètres minimum autour de l’appareil.
ATTENTION : La prise d’alimentation située à l’arrière constitue le
principal moyen pour déconnecter l’appareil du secteur. Cet équipement
doit être positionné dans un espace ouvert qui permet de garder l‘accès
au câble d’alimentation.
Cet appareil doit être branché sur une prise d’alimentation secteur, d’une
tension et d’un type conformes à ceux qui sont indiqués sur la face arrière
de l’appareil (USA : 120 V/60 Hz, CE : 230 V/50 Hz).
Brancher l’appareil uniquement grâce au cordon secteur fourni, ou à
un modèle équivalent. Ne pas tenter de modifier ou changer la prise.
Ne pas utiliser de cordon rallonge.
La prise d’alimentation secteur constitue le moyen radical de déconnexion
de l’appareil. Elle doit donc rester en permanence accessible, car sa
déconnexion constitue la seule assurance que l’appareil n’est plus
alimenté par le secteur.
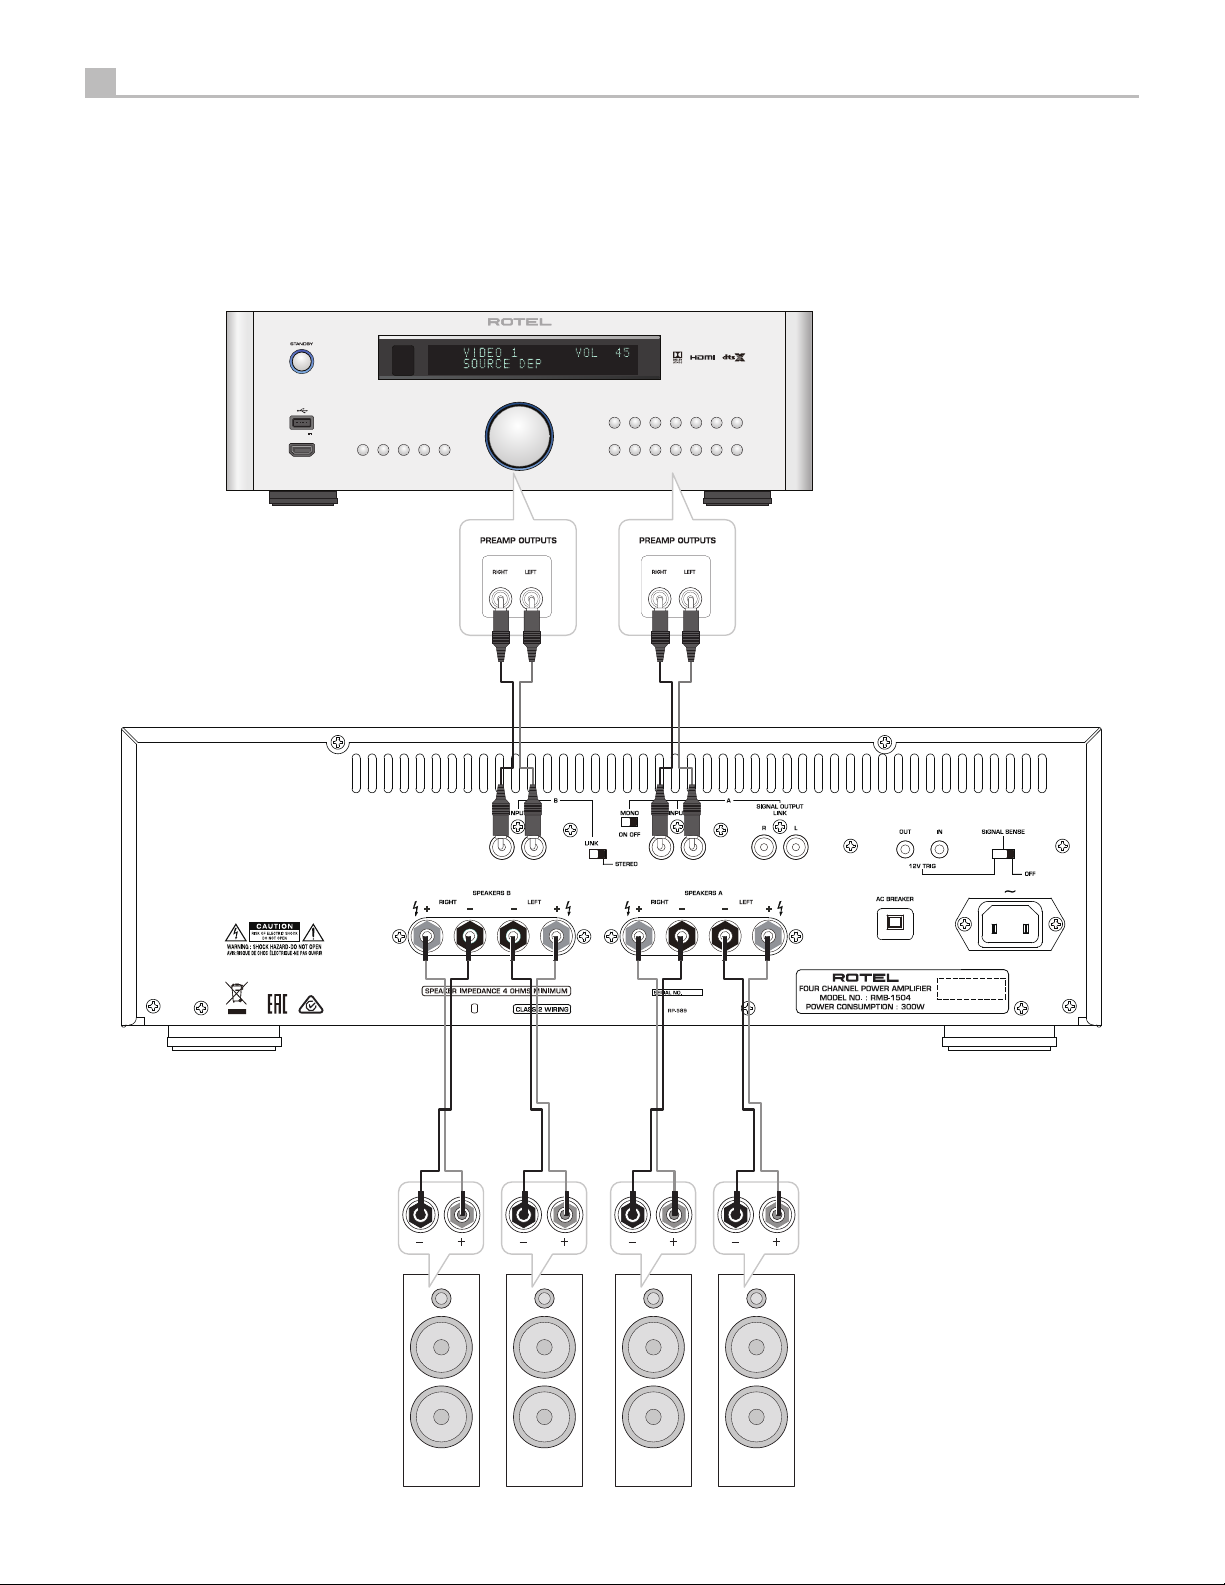
Utilisez uniquement descâbles de Classe 2pour réalise les connexionsaux
enceintes acoustiques et offrant une isolation suffisante pour minimiser
les risques de chocs électriques.
Ce symbole signifie que cet appareil bénéficie d’une
double isolation électrique. Sa prise d’alimentation
n’a pas besoin d’être reliée à la terre ou à une
masse particulière.

11
Français
A propos de Rotel
Notre histoire commence il y a plus de 50 ans. Depuis, au l des années,
nous avons reçu des centaines de prix et de récompenses, et satisfait des
centaines de milliers de personnes – comme vous !
Rotel a été fondée par une famille passionnée de musique, qui a décidé
de fabriquer des maillons Haute Fidélité sans compromis aucun. Depuis sa
création, cette passion est restée intacte, et cette famille s’est fixée comme
objectif de proposer à tous les audiophiles et mélomanes les meilleurs
appareils possibles, quel que soit leur budget. Une volonté partagée par
tous les employés de Rotel.
Les ingénieurs Rotel travaillent comme une équipe très soudée, écoutant,
peaufinant chaque nouveau modèle jusqu’à ce qu’il atteigne exactement
leurs standards – très élevés – de musicalité. Ils sont libres de choisir des
composants en provenance du monde entier, afin de concevoir le meilleur
produit possible. C’est ainsi que vous trouverez dans nos appareils des
condensateurs d’origine britannique ou allemande, des transistors japonais
ou américains, tandis que les transformateurs toriques sont toujours fabriqués
dans nos propres usines Rotel.
Nous sommes tous concernés par la qualité de l’environnement. Et, comme de
plus en plus de produits électroniques sont fabriqués puis éliminés quelques
années plus tard, il est désormais essentiel qu’un constructeur fabrique tous
ses produits en veillant à ce qu’ils aient un impact minimum sur la planète.
Chez Rotel, nous sommes très fiers d’apporter notre pierre à ce nouvel édifice.
Nous avons réduit la teneur en plomb de nos électroniques, en utilisant
notamment des composants et une soudure spéciale ROHS. Nos ingénieurs
travaillent en permanence pour améliorer le rendement des alimentations de
puissance sans compromettre leur qualité. C’est ainsi qu’en mode Standby,
les appareils Rotel consomment moins pour se conformer aux exigences
de la « Standby Power Consumption » qui limite la consommation en veille
des appareils électroniques.
L’usine Rotel participe également de façon active à la protection de
l’environnement au travers d’un processus de fabrication général amélioré
et toujours plus écologique et plus propre.
Tous les membres de l’équipe Rotel vous remercient pour l’achat de cet
appareil. Nous sommes persuadés qu’il vous offrira de nombreuses années
d’intense plaisir musical.
Mise en route
Merci d’avoir acheté cet ampli cateur de puissance quatre canaux Rotel
RMB-1504. Associé à un ensemble audio de qualité, il vous offrira de
nombreuses années de plaisir musical.
Le RMB-1504 est un ampli cateur de puissance quatre canaux particulièrement
sophistiqué. Des composants de sortie indépendants de type discrets, une très
grosse alimentation équipée de transformateurs toriques et de composants
de premier choix, ainsi que le principe de conception Rotel «Balanced
Design » garantissent des performances sonores remarquables. Sa très
haute capacité en courant permet au RMB-1504 d’alimenter les enceintes
acoustiques les plus dif ciles.
Caractéristiques principales
• Quatre canaux d’amplication, fournissant une puissance de 70 watts
par canal, sur charge de 8 ohms.
• Contrôles de gain d’entrée en face avant.
• Conguration de mise sous tension «on/ off» sélectionnée par l’utilisateur:
manuelle, automatique, par réception d’un signal à l’entrée, ou contrôlée
par l’envoi d’une tension de commutation «trigger» 12 volts.
• Circuit de protection totale, avec indicateurs en face avant.
• Sortie de renvoi du signal d’entrée, sans modication, pour alimentation
d’autres amplicateurs indépendants.
Quelques précautions préalables
AVERTISSEMENT : Pour éviter d’endommager potentiellement votre
système, veillez à bien mettre hors tension TOUS les éléments lorsque vous
branchez ou vous débranchez les enceintes acoustiques et les composants
associés. Ne mettez pas les appareils en marche tant vous n’êtes pas certain
que tous les branchements sont corrects et sécurisés. Prêtez une attention
particulière aux câbles des enceintes acoustiques. Il ne doit y avoir aucun
Sommaire
Figure 1: Commandes et Branchements 3
Figure 2: Branchements des entrées analogiques et sorties enceintes acoustiques 4
Remarques importantes 5
Remarques importantes concernant la sécurité ............................10
A propos de Rotel .................................................11
Mise en route ....................................................11
Caractéristiques principales 11
Quelques précautions préalables 11
Installation 12
Alimentation secteur et commandes.....................................12
Prise secteur -12
Interrupteur de mise sous tension/veille Standby et indicateur Power 112
Mode de sélection trigger ON/OFF 712
Entrée trigger 12 V 612
Sortie trigger 12 V 613
Disjoncteur 013
Circuit de protection 213
Connexions du signal ...............................................13
Entrées RCA 413
Sélecteur Mono 413
Relier les entrées 413
Contrôles du niveau d’entrée 313
Renvoi de signal de sortie 513
Branchement des enceintes acoustiques .................................14
Choix des enceintes acoustiques 14
Choix des câbles d’enceintes acoustiques 14
Polarité et Phase 14
Branchement des enceintes 89 14
Problèmes de fonctionnement .........................................14
L’indicateur de mise sous tension n’est pas allumé 14
Pas de son 14
Indicateur de protection 14
Spécications.....................................................15

12 RMB-1504 Ampli cateur de Puissance 4 Canaux
fil qui puisse entrer en contact avec les autres câbles d’enceintes ou avec
le châssis de l’amplificateur.
Merci de lire soigneusement ce manuel. En plus de vous donner des
renseignements utiles sur l’installation et la mise en œuvre de votre
amplicateur, il vous apportera des informations sur les diverses congurations
possibles, ainsi que des données plus générales qui vous aideront à obtenir
les meilleures performances sonore de votre système. N’hésitez pas à
contacter votre revendeur agréé Rotel pour obtenir les réponses à toutes
les questions que vous pourriez vous poser. En outre, nous sommes toujours
heureux, chez Rotel, de recevoir toutes vos remarques et commentaires.
Conservez soigneusement le carton ainsi que les éléments servant à
l’emballage pour un usage futur éventuel. En effet, expédier ou déménager
l’amplicateur dans quoique ce soit d’autre que son carton d’origine peut
avoir pour conséquence d’endommager gravement votre appareil et qui
ne serait pas converte par la garantie.
Si inclus dans la boîte, veuillez compléter la carte d’enregistrement du
propriétaire ou vous inscrire en ligne, et conservez en lieu sûr la facture
originale. Elle constitue votre meilleure preuve de date d’achat au cas où
vous auriez besoin de faire appliquer la garantie constructeur.
Installation
Le RMB-1504 génèrent de la chaleur pendant leur fonctionnement normal.
Les ouïes de refroidissement et la ventilation interne de l’amplicateur
sont conçues pour dissiper la chaleur. Les ouïes de refroidissement sur le
dessus de l’appareil doivent rester libres. Il doit y avoir environ 10 cm de
dégagement tout autour de lui pour permettre le bon fonctionnement de
sa ventilation et une bonne circulation d’air tout autour du meuble qui le
supporte pour éviter toute surchauffe à l’amplicateur.
Prenez en compte le poids et les dimensions de l’appareil lorsque vous le
disposez sur une étagère, un meuble ou dans un rack, et vériez que ceux
ci sont bien en mesure de supporter son poids. Nous vous conseillons de
disposer l’appareil dans un meuble conçu pour intégrer des éléments audio
domestiques. De tels meubles sont spécialement fabriqués pour réduire
ou supprimer les vibrations qui peuvent affecter la qualité sonore. Prenez
conseil auprès de votre revendeur agréé Rotel sur un choix de meuble et
pour une installation correcte de vos éléments audio.
Alimentation secteur et commandes
Prise secteur -
Votre amplicateur est conguré en usine pour fonctionner avec la tension
d’alimentation secteur en vigueur dans le pays où vous l’avez acheté (États-
Unis : 120 volts/60 Hz ou Communauté Européenne : 230 volts/50 Hz).
La conguration est inscrite sur une étiquette à l’arrière de votre RMB-1504.
REMARQUE : Au cas où vous seriez amené à déménager votre appareil
dans un pays étranger, il sera possible de changer sa tension d’alimentation
en interne. N’essayez pas de faire cette opération vous-même. En effet, ouvrir
le châssis expose à des tensions élevées et potentiellement dangereuses.
Adressez-vous à un technicien qualifié, ou au service après-vente Rotel
pour plus d’informations.
REMARQUE : Certains produits sont destinés à être commercialisés dans
plusieurs pays et sont par conséquent fournis avec plusieurs cordons secteur.
Choisissez bien le câble secteur qui correspond à votre pays de résidence.
Du fait de sa puissance de sortie relativement élevée, votre amplicateur
peut nécessiter des niveaux en courant très importants. Par conséquent,
il doit être branché directement dans une prise murale polarisée à l’aide
du câble fourni ou d’un autre câble compatible haute tension tel que
recommandé par votre revendeur Rotel agréé. N’utilisez pas de rallonge.
Vous pouvez toutefois utiliser un bloc multiprises de qualité, mais en étant
sûr qu’à la fois le bloc multiprises et la prise murale seront capables de
supporter la totalité de la puissance requise par l’amplificateur et celle des
autres éléments connectés.
Assurez-vous que le bouton POWER SWITCH 1en face avant de
l’amplicateur soit coupé (sur la position “out”). Puis, reliez le cordon
d’alimentation fourni à la prise d’alimentation secteur -à l’arrière de
l’appareil, et à la prise murale.
Si vous prévoyez de vous absenter pendant une période de temps assez
longue, c’est une bonne précaution de débrancher votre amplicateur (ainsi
que les autres éléments audio) pendant votre absence.
Interrupteur de mise sous tension/veille Standby et indicateur Power
1
Appuyez sur le bouton Power Switch sur la face avant pour mettre l’appareil
en marche. La diode indicatrice de mise sous tension va s’allumer, indiquant
que l’amplicateur est désormais sous tension. Appuyez de nouveau sur le
bouton pour repasser votre appareil sur arrêt.
REMARQUE : Vous pouvez mettre en place l’anneau auto-adhésif fourni
autour du bouton marche/arrêt si vous jugez la lumière bleue trop vive.
Sélecteur de mode de mise sous tension ON/OFF 7
Le RMB-1504 vous propose trois options différentes pour sa mise sous
tension, manuelle ou automatique. Ces options sont choisies à partir d’un
sélecteur à trois positions, placé en face arrière de l’appareil:
• Avec le sélecteur en position repérée «OFF», l’amplicateur est mis sous
ou hors tension manuellement, via sa touche Power en face avant. Vous
utiliserez aussi ce mode si le câble secteur de l’amplicateur est branché
sur une prise commutée, déclenchée déjà par un autre maillon.
• Lorsque le sélecteur est placé sur sa position repérée «SIGNAL SENSE»
(capteur de signal), l’amplicateur s’allume automatiquement lorsqu’il
détecte un signal sur ses entrées modulation. Il se remet en mode de
veille Standby si aucun signal n’est détecté au bout de quelques minutes.
L’interrupteur Power de la face avant doit être déjà pressé (mode ON)
pour que cette détection de signal fonctionne. Sinon, l’amplicateur reste
éteint en présence ou non d’un signal sur ses entrées.
• Lorsque le sélecteur est placé sur la position repérée «+ 12V TRIG»,
l’amplicateur s’allume automatiquement lorsqu’une tension de 12 volts
est envoyée sur sa prise jack 3,5 mm placée à gauche du sélecteur. Il se
remet en mode de veille Standby dès que cette tension disparaît sur la
prise. L’interrupteur POWER SWITCH en face avant est placé avant ce
sélecteur: il doit être pressé (ON) pour que la commutation TRIGGER 12
V soit effective et efcace. Couper l’alimentation avec cet interrupteur
(OFF) éteint l’amplicateur, qu’il y ait ou non une tension de 12 volts sur
la prise TRIGGER.
Entrée trigger 12 V 6
La prise jack 3,5 mm repérée IN est prévue pour transporter la tension de
12 volts nécessaire au fonctionnement de la commutation TRIGGER que nous
venons de décrire, la tension étant envoyée par un processeur Surround

13
Français
ou préampli cateur Rotel. Pour être ef cace, le sélecteur doit être sur sa
position la plus à gauche (voir paragraphe précédent).
Cette entrée accepte en fait une tension continue ou alternative, d’une valeur
comprise entre 3 et 30 volts. Utilisez un câble équipé de prises mini-jacks
3,5 mm mono à chacune de ses extrémités. Le positif «+ 12 V» se trouve
sur la pointe des mini-jacks.
Sortie trigger 12 V 6
La prise 12 V TRIG repérée OUT permet de brancher une autre prise jack
3,5 mm pour renvoyer la tension de commutation 12 volts vers un autre
appareil. La tension 12 volts n’est toutefois présente que si la prise INPUT
est réellement alimentée par une telle tension, tension renvoyée alors sur
la prise OUT.
Disjoncteur 0
Un disjoncteur, accessible en face arrière, protège les circuits électriques
de l’ampli cateur. Ce disjoncteur ne s’activera généralement qu’en cas
d’utilisation inappropriée, se traduisant par la présence d’un courant excessif.
Pour réarmer le disjoncteur, pressez ce bouton. S’il s’enclenche à nouveau
à plusieurs reprises, contactez immédiatement votre revendeur agréé Rotel.
Circuit de protection 2
Le RMB-1504 disposent d’un circuit de protection à la fois thermique et contre
les surcharges de courant, qui protège l’appareil de dommages pouvant
survenir dans des conditions extrêmes d’utilisation, ou non-conformes.
Contrairement à beaucoup de circuits similaires, cette fonction est totalement
indépendante du signal audio et n’a aucune inuence sur les performances
sonores. Le circuit de protection mesure en permanence la température et
le courant au niveau des composants de sortie et coupe l’amplicateur s’ils
dépassent les valeurs de fonctionnement normal.
En usage courant, vous ne devriez jamais voir le circuit de protection
s’activer. Toutefois, si un problème survient, l’amplicateur va cesser de
fonctionner et une ou plusieurs des diodes LED «PROTECTION» (une par
paire de canaux) de la face avant s’allume (nt).
Si cela se produit, débranchez immédiatement l’amplicateur. Laissez le
refroidir pendant quelques minutes, et essayez de déterminer l’origine du
problème qui a causé l’activation du circuit de protection. Lorsque vous
remettrez l’appareil sous tension de nouveau, le circuit de protection va se
réinitialiser automatiquement et la ou les diodes PROTECTION s’éteindre,
pour indiquer que le fonctionnement de l’amplicateur est désormais normal.
Dans la plupart des cas, le circuit de protection s’active en présence d’un
défaut majeur tel qu’un court-circuit au niveau des sorties de puissance
(enceintes acoustiques), ou d’un problème de ventilation insufsante ayant
entrainé une surchauffe. Dans de très rares cas, des enceintes ayant une
impédance instable ou extrêmement basse peuvent être la cause de l’activation
du circuit de protection.
Si le circuit de protection se met en marche de manière répétée et intempestive,
et que vous ne parvenez pas à déterminer l’origine du problème, contactez
votre revendeur agréé Rotel pour assistance.
Connexions du signal
Le RMB-1504 intègrent à la fois des prises traditionnelles de type RCA,
des modèles de prises que l’on peut trouver sur la très grande majorité des
appareils audio.
Il y a également une paire de prises RCA supplémentaire, repérée SIGNAL
OUTPUT LINK, qui permet de renvoyer le signal branché sur la paire de
canaux repérée «A» vers les entrées des paires de canaux repérées «B»,
ce qui permet d’alimenter plusieurs paires d’enceintes acoustiques avec
le même signal sans avoir à utiliser de câbles externes supplémentaires.
REMARQUE : Pour éviter de forts bruits parasites potentiellement
dommageables pour vos enceintes, assurez-vous que tous les éléments de
votre système sont hors tension avant de faire les connexions.
Entrées RCA 4
Voir Figure 2
Il y a une entrées par prises RCA pour chacune des deux paires de canaux
d’ampli cation. Elles acceptent le signal de sortie en provenance d’un
préampli cateur ou d’un processeur Surround. N’utilisez que des câbles
de liaison de très haute qualité pour les meilleures performances possibles.
Pour chaque paire de canaux, branchez la sortie gauche (left) du préampli
cateur sur l’entrée repérée LEFT INPUT du RMB-1504. Branchez la sortie
droite de la même manière, sur la prise repérée RIGHT INPUT. Assurez-
vous que le commutateur placé à droite des entrées RCA est bien dans la
position STEREO.
Sélecteur Mono 4
Lorsque le sélecteur MONO est sur sa position ON, l’entrée du canal gauche
A est reliée au canal d’ampli cation droit.
Relier les entrées 4
Vous pouvez relier les entrées des groupes repérés «B» aux entrées repérées
«A» en positionnant le sélecteur se trouvant à droite de chaque paire de
prises RCA correspondantes dans la position «LINK». Dans ce cas, plus
aucun câblage n’est nécessaire sur les entrées placées sur LINK. Le signal
d’entrée branché sur «A» est envoyé automatiquement aux paires de
canaux ainsi reliées, ce qui vous permet d’utiliser les toutes quatre canaux
d’amplication à partir du même signal d’entrée stéréo.
Contrôles du niveau d’entrée 3
Deux contrôles placés en face avant, un pour chaque paire de canaux,
permettent de régler le gain en entrée. Cela permet d’équilibrer le niveau
sonore de tous les composants, même dans les installations les plus complexes.
Le bouton repéré «A» règle le gain de la paire de canaux «A»; le bouton
repéré «B» règle le gain de la paire «B».
Pour régler ces boutons, utilisez un tournevis à lame étroite et ne: pour
augmenter le niveau dans le sens des aiguilles d’une montre, et dans le
sens inverse pour diminuer le niveau.
Renvoi de signal de sortie 5
Cette paire de prises RCA peut être utilisée pour transmettre le signal, non
traité, envoyé au RMB-1504, vers un autre ampli cateur indépendant
«chaîné» au premier, par exemple pour alimenter une seconde paire
d’enceintes acoustiques. C’est le signal d’entrée envoyé sur les canaux «A»
qui est disponible sur ces sorties LINK.
REMARQUE : Les signaux d’entrée branchés sur la paire «A» peuvent
toujours être également envoyés vers les entrées «B» en positionnant le
sélecteur repéré «INPUT SELECT » sur la position LINK, pour la paire de
canaux que l’on désire ainsi associer.

14 RMB-1504 Ampli cateur de Puissance 4 Canaux
Branchement des enceintes acoustiques
Le RMB-1504 possède deux paires de prises pour enceintes acoustiques,
soit une paire par paire de canaux d’ampli cation.
Choix des enceintes acoustiques
Nous vous conseillons d’utiliser des enceintes ayant une impédance
minimale de 4 ohms ou plus avec le RMB-1504. Vous devez prendre
certaines précautions si vous décidez d’alimenter plusieurs paires d’enceintes
branchées en parallèle du fait que, à chaque fois l’impédance effective vue
par l’amplicateur sera divisée par deux. Par exemple, si vous utilisez deux
paires d’enceintes ayant chacune une impédance de 8 ohms, l’amplicateur
verra une charge effective de 4 ohms. Lors de la mise en oeuvre d’enceintes
multiples branchées en parallèle, nous vous recommandons de choisir
des enceintes ayant une impédance nominale de 8 ohms ou plus. Dans
la pratique, un très petit nombre d’enceintes acoustiques peuvent poser
un problème quant à leur utilisation avec le RMB-1504. Consultez votre
revendeur agréé Rotel pour toute question.
Choix des câbles d’enceintes acoustiques
Utilisez du câble isolé à deux conducteurs pour relier l’amplicateur aux
enceintes acoustiques. Le diamètre et la qualité du câble utilisé peut avoir
un effet audible sur les performances du système. Du câble standard pour
enceintes fonctionnera, mais il pourra en résulter un niveau de sortie plus
faible et une réponse dans le grave diminuée. D’une façon générale, un
plus gros câble donnera de meilleurs résultats sur le plan sonore. Pour
des performances optimales, vous pouvez envisager l’utilisation de câble
d’enceintes de très haute qualité. Votre revendeur agréé Rotel pourra vous
conseiller sur un choix de câbles optimal pour votre système.
Polarité et Phase
La polarité – autrement dit, le branchement positif ou négatif des câbles – pour
chacune des connexions aussi bien pour les enceintes que l’amplicateur,
devra être en parfaite cohérence de manière à ce que toutes les enceintes
soient rigoureusement en phase. Si la polarité d’un des branchements est
inversée, le niveau de graves sera faible et l’image stéréo sera dégradée. Les
câbles d’enceintes sont marqués de façon à ce que vous puissiez clairement
identier les deux conducteurs. Le câble peut notamment être transparent
et les conducteurs être de couleurs différentes (cuivre et argent). Il peut
aussi y avoir des indications imprimées directement sur l’isolant. Identiez
soigneusement les conducteurs et connectez les en parfaite cohérence entre
chacune des enceintes, et chaque amplicateur.
Branchement des enceintes 89
Voir Figure 2
REMARQUE : le texte suivant décrit à la fois les branchements par
bornes à vis ou par connexion directe. N’UTILISEZ PAS les deux types de
branchements simultanément pour alimenter plusieurs paires d’enceintes.
Mettez sur arrêt tous les éléments du système avant de brancher les enceintes.
Le RMB-1504 disposent de bornes de connexion à vis pour enceintes
acoustiques avec code couleur sur le panneau arrière. Ces connecteurs
acceptent du câble nu, des cosses à fourche, ou des ches de type bananes
(excepté dans les pays de la Communauté européenne, où leur utilisation
n’est pas permise).
Déployez les câbles depuis l’amplicateur jusqu’aux enceintes. Donnez-leur
sufsamment de mou pour pouvoir déplacer facilement les éléments, de
manière à accéder sans difculté aux connecteurs d’enceintes.
Si vous utilisez des prises bananes doubles, connectez-les aux câbles et
branchez-les au centre des bornes à vis. Les bornes de connexion devront
être vissées à fond dans tous les cas (dans le sens des aiguilles d’une montre).
Si vous utilisez des cosses à fourches, reliez-les d’abord aux câbles. Enn,
si vous faites le choix de relier directement les câbles nus aux bornes à
vis, séparez les deux conducteurs et dénudez-en chaque extrémité. Faites
attention à ne pas couper les ls constituant le câble. Dévissez (tournez
dans le sens contraire des aiguilles d’une montre) les bornes de connexion.
Placez la cosse à fourche ou le câble nu autour de la vis. Vissez à fond
l’extrémité des bornes de connexion dans le sens des aiguilles d’une montre
pour bien sécuriser le branchement de la cosse à fourche ou du câble nu.
REMARQUE : Assurez-vous qu’il n’y ait aucun fil qui puisse toucher le
câble ou les bornes de connexions adjacents.
Pour chaque paire de canaux d’ampli cation, branchez l’enceinte de gauche
sur la paire de prises repérées LEFT. Branchez l’enceinte de droite sur la
paire de prises repérées RIGHT. Suivez les inscriptions portées au-dessus des
prises pour respecter la bonne polarité «+» et «-». Assurez-vous que la prise
négative de l’enceinte est bien reliée à la prise négative de l’ampli cateur.
Problèmes de fonctionnement
La plupart des problèmes rencontrés avec les systèmes audio sont dus à
des branchements incorrects ou à une mauvaise conguration. Si vous
constatez des dysfonctionnements, isolez la partie en cause, vériez la
conguration, déterminez l’origine du défaut et apportez les modications
qui sont nécessaires. Si vous n’obtenez pas de son de l’amplicateur, suivez
les recommandations suivantes, selon le cas :
L’indicateur de mise sous tension n’est pas allumé
L’ampli cateur RMB-1506 n’est pas alimenté par le secteur. Véri ez la
position de l’interrupteur de mise sous tension Power (position ON). Si vous
avez choisi l’option de mise sous tension par présence d’un signal à l’entrée
SIGNAL SENSING, assurez-vous qu’un tel signal est bien présent ! Idem
pour la position 12 V TRIG., ou une tension de commutation doit bien être
présente sur la prise jack correspondante.
Pas de son
Si l’ampli cateur est bien sous tension mais qu’aucun son n’en sort,
regardez les diodes PROTECTION INDICATORS sur la face avant. Si elles
sont allumées, voir le paragraphe suivant. Si elles sont éteintes, véri ez
tous les maillons du système, la qualité des branchements et la position des
diverses commandes.
Indicateur de protection
Le circuit de protection PROTECTION INDICATORS est entré en fonctionnement
et la diode de protection correspondante s’est allumée. Cela arrive
principalement quand les ouïes d’aération ont été obstruées, quand il y a
un court-circuit dans les sorties enceintes, ou si l’ampli cateur a fonctionné
très longtemps à puissance maximum. Éteignez l’ampli cateur et attendez
qu’il refroidisse. Le fait d’appuyer à nouveau sur l’interrupteur de mise sous
tension pour rallumer l’appareil entraînera la réinitialisation automatique
des circuits de protection. Si la protection se remet à fonctionner, il y a un
problème dans le système ou l’ampli cateur lui-même.

15
Français
Spécications
Puissance de sortie continue sur 8 ohms 4 x 70 watts/canal sur 8 ohms,
(20-20kHz, < 0.03%, 8 ohms) tous les canaux en service
Distorsion harmonique totale (20 Hz - 20000 Hz, 8 ohms)
Puissance maximale continue: < 0.03%
Demi-puissance: < 0.03%
Puissance 1 watt: < 0.03%
Distorsion d’intermodulation (60Hz : 7kHz, 4:1) < 0.03%
Facteur d’amortissement (20-20kHz, 8 ohms) >200
Impédance / Sensibilité d’entrée 20kilohms/1 volt
Gain 26 dB
Niveau de saturation de l’entrée 5 volt
Réponse en fréquence (±1dB) 10 Hz - 100k Hz
Rapport signal/bruit (pondéré A IHF) 115 dB
Diaphonie/Séparation des canaux > 50 dB
Impédance des enceintes 4 ohms minimum
Seuil d’activation 4 mV input signal
de la mise sous tension automatique
Alimentation électrique 120V, 60 Hz (Etats-Unis)
230V, 50 Hz (Europe)
Consommation 300 watts
Consommation en veille
Présence signal 1 watt
En veille < 0.5 watts
BTU 810 BTU / h
Dimensions
Largeur x Hauteur x Profondeur 431 x 144 x 443 mm
17’’ x 5 2/3’’x 17 1/2’’
Hauteur du panneau avant 3 U /132.6 mm / 5 2/9’’
Poids (net) 14.9 kg, 32.8 lbs.
Toutes les spécifications sont garanties exactes au moment de l’impression.
Rotel se réserve le droit de les modifier sans préavis.
Rotel et le logo Rotel HiFi sont des marques déposées de The Rotel Co, Ltd, Tokyo, Japon.

16 RMB-1504 Ampli cateur de Puissance 4 Canaux
Rotel-Produkte entsprechen den internationalen
Richtlinien über die Beschränkung der Verwendung
bestimmter gefährlicher Stoffe in Elektro- und
Elektronikgeräten (Restriction of Hazardous
Substances (kurz RoHS genannt)) und über Elektro-
und Elektronik-Altgeräte (Waste Electrical and
Electronic Equipment (WEEE)). Die durchgestrichene
Mülltonne stehtfür derenEinhaltung undbesagt, dass
die Produkte ordnungsgemäß recycelt oder diesen
Richtlinien entsprechend entsorgt werden müssen.
Wichtige Sicherheitshinweise
Das Blitzsymbol mit Pfeil in einem
gleichseitigen Dreieck macht den Benutzer auf
das Vorhandensein gefährlicher Spannung im
Gehäuse aufmerksam. Diese ist so groß, dass
sie für eine Gefährdung von Personen durch
einen elektrischen Schlag ausreicht.
Das Ausrufungszeichen in einem
gleichseitigen Dreieck weist den Leser auf
wichtige Betriebs- und Wartungshinweise in
der dem Gerät beiliegenden Literatur hin.
PDieses Symbol bedeutet, dass das Gerät doppelt
isoliert ist. Es muss daher nicht geerdet werden.
WARNUNG: Im Innern des Gerätes befinden sich keine vom Bediener
zu wartenden Teile. Alle Servicearbeiten müssen von qualifiziertem
Servicepersonal durchgeführt werden.
WARNUNG: Zum Schutz vor Feuer oder einem elektrischen Schlag
darf das Gerät weder Feuchtigkeit noch Wasser ausgesetzt werden.
Achten Sie darauf, dass keine Spritzer in das Gerät gelangen. Stellen Sie
keine mit Flüssigkeit gefüllten Gegenstände (z. B. Vasen) auf das Gerät.
Das Eindringen von Gegenständen in das Gehäuse ist zu vermeiden.
Sollte das Gerät trotzdem einmal Feuchtigkeit ausgesetzt sein oder ein
Gegenstand in das Gehäuse gelangen, so trennen Sie es sofort vom
Netz. Lassen Sie es von einem Fachmann prüfen und die notwendigen
Reparaturarbeiten durchführen.
Bitte lesen Sie sich die Bedienungsanleitung vor Nutzung des Gerätes
genau durch.
Bewahren Sie die Bedienungsanleitung so auf, dass sie jederzeit
zugänglich ist.
Befolgen Sie alle Warnhinweise.
Befolgen Sie alle Sicherheitshinweise in der Bedienungsanleitung und
auf dem Gerät.
Betreiben Sie das Gerät nicht in der Nähe von Wasser.
Reinigen Sie das Gehäuse nur mit einem weichen, trockenen Tuch oder
einem Staubsauger.
Stellen Sie das Gerät weder auf ein Bett, Sofa, Teppich oder ähnliche
Oberflächen, damit die Ventilationsöffnungen nicht verdeckt werden. Das
Gerät sollte nurdann in einemRegal oder ineinem Schrank untergebracht
werden, wenn eine ausreichende Luftzirkulation gewährleistet ist.
Stellen Sie das Gerät nicht in die Nähe von Wärmequellen (Heizkörpern,
Wärmespeichern, Öfen oder sonstigen Quellen, die Wärme erzeugen).
Versuchen Sie nicht, die Erdungs- und/oder Polarisationsvorschriften
zu umgehen. Das Netzkabel sollte an eine Schutzkontaktsteckdose
angeschlossen werden.
Netzkabel sind so zu verlegen, dass sie nicht beschädigt werden können
(z. B. durch Trittbelastung, Möbelstücke oder Erwärmung). Besondere
Vorsicht ist dabei an den Steckern, Verteilern und den Anschlussstellen
des Gerätes geboten.
Verwenden Sie nur vom Hersteller spezifiziertes Zubehör.
Verwenden Sienur Transportmittel, Racks,Halterungen
oder Regalsysteme,die stabilgenug sind, umdas Gerät
zu tragen. Seien Sie vorsichtig, wenn Sie das Gerät in
einem Ständer oder Rack bewegen, um Verletzungen
oder Schäden am Gerät zu vermeiden.
Während eines Gewitters oder bei Nichtbenutzung über einen längeren
Zeitraum ziehen Sie den Netzstecker aus der Steckdose.
Schalten Sie das Gerät sofort aus und ziehen Sie geschultes Fachpersonal
zu Rate, wenn: das Netzkabel oder der Stecker beschädigt sind;
Gegenstände bzw. Flüssigkeit in das Gerät gelangt sind; das Gerät Regen
ausgesetzt war, das Gerät nicht ordnungsgemäß funktioniert bzw. eine
deutliche Leistungsminderung aufweist; das Gerät hingefallen ist bzw.
beschädigt wurde.
Das Gerät sollte in nicht tropischem Klima verwendet werden.
Die Belüftung darf nicht dadurch beeinträchtigt werden, dass die
Belüftungsöffnungen mit Gegenständen wie Zeitungen, Tischdecken,
Vorhängen usw. abgedeckt werden.
Stellen Sie keine offenen Flammen wie brennende Kerzen auf das Gerät.
Stellen Sie sicher, dass um das Gerät ein Freiraum von 10cm
gewährleistet ist.
WARNUNG: Die Verbindung mit dem Netz kann nur über den
Netzeingang an der Geräterückseite unterbrochen werden. Das Gerät
muss so aufgestellt werden, dass der Netzeingang frei zugänglich ist.
Bevor Siedas Gerätin Betriebnehmen, prüfen Sie,ob dieBetriebsspannung
mit der örtlichen Netzspannung (Europa: 230 V/ 50 Hz) übereinstimmt.
Die Betriebsspannung ist an der Rückseite des Gerätes angegeben.
Schließen Sie das Gerät nur mit dem dazugehörigen Netzkabel an die
Wandsteckdose an. Modifizieren Sie das Netzkabel auf keinen Fall.
Verwenden Sie keine Verlängerungskabel.
Verwenden Sie gemäß Class 2 isolierte Lautsprecherkabel, um eine
ordnungsgemäße Installation zu gewährleisten und die Gefahr eines
elektrischen Schlages zu minimieren.

17
Deutsch
Die Firma Rotel
Unsere Geschichte begann vor über 50 Jahren. In den folgenden Jahrzehnten
haben wir Hunderte von Auszeichnungen für unsere Produkte erhalten und
unzähligen Menschen echten Hörgenuss bereitet, denen gute Unterhaltung
wichtig ist.
Rotel wurde von einer Familie gegründet, deren Interesse an Musik so
groß war, dass sie beschloss, hochwertigste HiFi-Produkte herzustellen und
Musikliebhabern ungeachtet ihres Geldbeutels einen außergewöhnlichen Wert
zukommen zu lassen. Ein Ziel, das von allen Rotel-Mitarbeitern verfolgt wird.
Die Ingenieure arbeiten als Team eng zusammen. Sie hören sich jedes
neue Produkt an und stimmen es klanglich ab, bis es den gewünschten
Musikstandards entspricht. Die eingesetzten Bauteile stammen aus
verschiedenen Ländern und wurden ausgewählt, um das jeweilige Produkt zu
optimieren. So finden Sie in Rotel-Geräten Kondensatoren aus Großbritannien
und Deutschland, Halbleiter aus Japan oder den USA und direkt bei Rotel
gefertigte Ringkerntransformatoren.
Wir fühlen uns unserer Umwelt gegenüber verpflichtet. Und da immer
mehr Elektronik produziert wird und später entsorgt werden muss, ist es
von Herstellerseite besonders wichtig, Produkte zu entwickeln, die unsere
Umwelt möglichst wenig belasten.
Rotel ist stolz darauf, seinen Beitrag zu leisten. So konnten wir den Bleianteil
in unserer Elektronik durch bleifreies Löten reduzieren. Unsere Ingenieure
arbeiten stetig daran, die Effizienz unserer Netzteile zu verbessern, ohne
dabei Kompromisse in der Qualität einzugehen. Im Standby-Betrieb ist die
Leistungsaufnahme von Rotel-Geräten minimal, um den geltenden Grenzwert
einzuhalten.
Wir verbessern den Herstellungsprozess stetig, um ihn möglichst sauber
und umweltfreundlich zu gestalten.
Vielen Dank, dass Sie sich für dieses Rotel-Produkt entschieden haben. Wir
sind sicher, dass Sie in den nächsten Jahren viel Freude daran haben werden.
Zu dieser Anleitung
Vielen Dank, dass Sie sich für die Rotel-Vierkanal-Endstufe RMB-1504
entschieden haben. In einem hochwertigen Musik- oder HiFi-Cinema-System
werden Sie mit dieser Rotel-Endstufe viele JahreMusikgenuss pur erleben.
Die RMB-1504 ist eine moderne Vierkanal-Endstufe. Sie überzeugt
dank diskreter Leistungstransistoren, einem leistungsstarken Netzteil
mit Ringkerntransformator, erstklassigen Bauteilen und Rotels Balanced-
Design-Konzept mit höchster Wiedergabequalität. Aufgrund der hohen
Stromlieferfähigkeit kann die RMB-1504 problemlos mit anspruchsvollen
Lautsprechern kombiniert werden.
Ausstattungsmerkmale
• Vierkanal-Endstufe mit 70 Watt pro Kanal an 8 Ohm.
• Pegelsteller an der Gerätefront.
• Power on/off-Konguration: Manuell, über Eingangssignal- Erkennung
oder über 12-Volt-Trigger-Signal.
• Schutzschaltung bei Störungen mit LED-Anzeigen an der Gerätefront.
• Schaltbare Eingangssignal-Verteilung, Mono-Schalter, gepufferte Link-
Ausgänge für eine maximale Flexibilität bei der Systemkonguration.
Einige Vorsichtsmaßnahmen
WARNUNG: Um möglichen Beschädigungen Ihres Systems vorzubeugen,
wenn Sie Lautsprecher oder sonstige Geräte daran anschließen bzw. davon
trennen, schalten Sie ALLE Komponenten im System ab. Schalten Sie sie
erst wieder ein, wenn Sie sichergestellt haben, dass alle Verbindungen
ordnungsgemäß und sicher hergestellt worden sind. Achten Sie dabei
besonders auf die Lautsprecherkabel. Lose Drähte dürfen weder andere
Lautsprecherkabel noch das Gehäuse des Verstärkers berühren.
Lesen Sie sich die Bedienungsanleitung bitte vor der Inbetriebnahme genau
durch. Neben grundsätzlichen Installations- und Bedienungshinweisen (bitte
beachten Sie auch die Sicherheitshinweise am Anfang der Bedienungsanleitung)
enthält sie allgemeine Informationen, die Ihnen helfen werden, Ihr System mit
seiner maximalen Leistungsfähigkeit zu betreiben. Bitte setzen Sie sich bei
etwaigen Fragen mit Ihrem autorisierten Rotel-Fachhändler in Verbindung.
Inhaltsverzeichnis
Figure 1: Bedienelemente und Anschlüsse 3
Figure 2: Analoge Eingänge und Anschließen der Lautsprecher 4
Wichtige Hinweise 5
Wichtige Sicherheitshinweise .........................................16
Die Firma Rotel ...................................................17
Zu dieser Anleitung ................................................17
Ausstattungsmerkmale 17
Einige Vorsichtsmaßnahmen 17
Aufstellung des Gerätes 18
Netzspannung und Bedienung .........................................18
Netzaneingang -18
POWER-Schalter und Betriebsanzeige 118
Auto Turn on/off-Schalter 718
12V TRIG-Eingang 618
12V TRIG-Ausgang 618
Sicherungsautomat 018
Schutzschaltung 219
Signalanschlüsse ..................................................19
Cinch-Eingänge 419
Mono-Schalter 419
LINK-Funktion 419
Pegelsteller 319
Signal Output Link 519
Anschließen der Lautsprecher .........................................21
Auswahl der Lautsprecher 19
Auswahl der Lautsprecherkabel 19
Polarität und Phasenabgleich 20
Anschließen der Lautsprecher 89 20
Bei Störungen ....................................................20
Die Betriebsanzeige leuchtet nicht 20
Kein Ton 20
Betriebsanzeige blinkt (Schutzmodus) 20
Technische Daten ..................................................21

18 RMB-1504 Ampli cateur de Puissance 4 Canaux
Bewahren Sie den Versandkarton und das übrige Verpackungsmaterial
der Endstufe für einen eventuellen späteren Einsatz auf. Der Versand oder
Transport der Endstufe in einer anderen als der Originalverpackung kann
zu erheblichen Beschädigungen Ihrer Endstufe führen.
Wenn in der Box enthalten, füllen Sie bitte die Registrierungskarte des
Besitzers aus oder registrieren Sie sich online. Bewahren Sie bitte die
Original-Kaufquittung auf. Sie belegt am besten das Kaufdatum, das für
Sie wichtig wird, sobald Sie eine Garantieleistung in Anspruch nehmen.
Aufstellung des Gerätes
Die RMB-1504 erwärmen sich während des normalen Betriebes. Diese
Wärme kann unter normalen Bedingungen über die Kühlrippen und
Ventilationsöffnungen der Endstufe problemlos abgeführt werden. Die
Ventilationsöffnungen an der Oberseite dürfen nicht blockiert werden. Das
Gerät ist an einem Ort aufzustellen, an dem rund um das Gehäuse ein
Freiraum von 10 cm und eine ausreichende Luftzirkulation gewährleistet
sind, um ein Überhitzen zu verhindern.
Beachten Sie dies beim Einbau in einen Schrank oder beim Aufeinanderstellen
mehrerer Systemkomponenten. Berücksichtigen Sie beim Aufbau das Gewicht
der Endstufe. Stellen Sie sicher, dass das Regal oder der Schrank auf das
vergleichsweise hohe Gewicht der RMB-1504 ausgelegt ist. Wir empfehlen,
das Gerät in speziell für die Unterbringung von Audiokomponenten
entwickeltem Mobiliar unterzubringen. In diesem Mobiliar werden
Schwingungen reduziert oder unterdrückt, die wiederum die Klangqualität
beeinträchtigen können. Lassen Sie sich diesbezüglich von Ihrem autorisierten
Rotel-Fachhändler beraten.
Netzspannung und Bedienung
Netzaneingang -
Ihre Endstufe wird von Rotel so eingestellt, dass sie mit der in Ihrem Land
üblichen Wechselspannung (230 Volt bzw. 120 Volt) arbeitet. Die Einstellung
ist an der Geräterückseite angegeben.
HINWEIS: Sollten Sie mit Ihrer Endstufe in ein anderes Land umziehen, kann
die Einstellung der Endstufe geändert werden, so dass sie mit einer anderen
Netzspannung betrieben werden kann. Versuchen Sie auf keinen Fall, diese
Änderung selber vorzunehmen. Durch Öffnen des Endstufengehäuses setzen
Sie sich gefährlichen Spannungen aus. Ziehen Sie hierzu stets qualifiziertes
Servicepersonal zu Rate.
HINWEIS: Einige Produkte werden in mehr als einem Land verkauft, so dass
auch mehr als ein Netzkabel zum Lieferumfang gehört. Bitte verwenden Sie
ausschließlich das für Ihr Land/Ihre Region geeignete Kabel.
Der RMB-1504 benötigt relativ viel Strom. Daher sollte es direkt in eine
polarisierte Steckdose gesteckt werden, indem das mitgelieferte Kabel
oder ein anderes hochstromkompatibles Kabel verwendet wird, wie es
von Ihrem autorisierten Rotel-Händler empfohlen wird. Verwenden Sie kein
Verlängerungskabel. Eine hochbelastbare Mehrfachsteckdose kann eingesetzt
werden, wenn sie (und die Wandsteckdose) ausreichende Strommengen für
den RMB-1504 sowie die anderen an sie angeschlossenen Komponenten
liefern können.
Stellen Sie sicher, dass sich der POWER-Schalter 1an der Gerätefront in
der AUS-Position bendet. Verbinden Sie nun das beiliegende Netzkabel mit
dem Netzeingang -an der Geräterückseite und stecken Sie das andere
Ende des Kabels in die Wandsteckdose.
Sind Sie für längere Zeit nicht zu Hause, wie z. B. während einer
mehrwöchigen Urlaubsreise, sollten Sie Ihre Endstufe (ebenso wie alle
anderen Audio- und Videokomponenten) während Ihrer Abwesenheit vom
Netz trennen.
POWER-Schalter und Betriebsanzeige 1
Der POWER-Schalter bendet sich an der Gerätefront. Drücken Sie ihn
zum Einschalten. Der Ring um den Schalter beginnt zu leuchten und zeigt
an, dass die Endstufe eingeschaltet ist. Drücken Sie zum Ausschalten der
Endstufe erneut den POWER-Schalter.
HINWEIS: Decken Sie die LED um den Netzschalter mit dem selbstklebenden
Ring ab, falls die blaue LED zu hell leuchten sollte.
Auto-Turn on/off-Schalter 7
Die RMB-1504 verfügt an der Rückseite über einen Schiebeschalter, über
den Sie zwischen drei verschiedenen Modi wählen können:
• Bendet sich der Schalter in der OFF-Position, wird die Endstufe manuell
über den Netzschalter an der Gerätefront einund ausgeschaltet. Wählen
Sie dieses Einstellung auch, wenn die Endstufe an eine schaltbare
Netzsteckdose angeschlossen ist.
• Bendet sich der Schalter in der SIGNAL SENSEPosition, so schaltet
sich die Endstufe automatisch ein, wenn an den Eingängen ein Signal
anliegt. Kommt über einen Zeitraum von mehreren Minuten kein Signal
an, schaltet die Endstufe in den Standby-Modus. Diese Funktion kann
nur genutzt werden, wenn der Netzschalter an der Gerätefront vorher
eingeschaltet wurde.
• Bendet sich der Schalter in der 12V TRIG-Position, wird die Endstufe
automatisch eingeschaltet, wenn am 12V TRIGEingang links neben dem
Schiebeschalter ein 12-V-Trigger-Signal anliegt. Liegt kein +12-V-Signal
an, schaltet die Endstufe in den Standby-Modus. Diese Funktion kann
nur genutzt werden, wenn der Netzschalter an der Gerätefront vorher
eingeschaltet wurde.
12V TRIG-Eingang 6
An die mit IN gekennzeichnete Anschlussbuchse kann zum Ein- und Ausschalten
der Endstufe ein Anschlusskabel zur Übertragung eines +12-V-Triggersignals
von einem Rotel- Vorverstärker bzw. -Surround- Prozessor angeschlossen
werden. Dazu ist der daneben liegende Schiebeschalter in die linke Position
zu setzen (siehe Abschnitt oben).
Der TRIGGER-EINGANG reagiert auf Gleich- oder Wechselspannungssignale
von 3 bis 30 Volt. Verwenden Sie ein Kabel mit 3,5-mm-Klinkensteckern an
beiden Enden. Das +12-V-Gleichspannungssignal liegt an der Steckerspitze.
12V TRIG-Ausgang 6
Die mit OUT gekennzeichnete 12V TRIG-Buchse wird zur Ferneinschaltung
eines zweiten Rotel-Verstärkers genutzt. Das 12- V-Ausgangssignal ist
verfügbar, sobald ein 12-V-Trigger-Signal an der mit IN gekennzeichneten
Buchse anliegt.
Sicherungsautomat 0
Ein Sicherungsautomat an der Geräterückseite schützt den elektrischen
Schaltkreis der Endstufe. In der Regel löst er nur bei Überstrom aus. Durch
den Schalter kann der Stromkreis – nach Beseitigen der Störung – problemlos
wieder hergestellt werden. Sollte er wiederholt auslösen, so setzen Sie sich
bitte mit Ihrem autorisierten Rotel-Fachhändler in Verbindung.

19
Deutsch
Schutzschaltung 2
Die RMB-1504 verfügt über eine thermische und eine Überstrom-
Schutzschaltung. Hierdurch wird die Endstufe vor möglichen Schäden durch
extreme oder fehlerhafte Betriebsbedingungen geschützt. Im Gegensatz zu
vielen anderen Konstruktionen sind diese Schutzschaltungen unabhängig
vom Audiosignal und beeinussen den Klang nicht. Stattdessen überwachen
sie die Temperatur an den Leistungstransistoren und schalten die Endstufe
ab, sobald bestimmte Grenzen überschritten werden.
Es ist unwahrscheinlich, dass es jemals zu einer Überlastung kommt. Sollte
dennoch eine Störung auftreten, funktioniert die Endstufe nicht mehr. Die
entsprechende(n) PROTECTION-LED(s) beginnt(beginnen) zu leuchten.
Schalten Sie die Endstufe in diesem Fall aus. Lassen Sie sie einige Minuten
abkühlen. Versuchen Sie, den Grund für die Störung herauszunden und zu
beheben. Beim erneuten Einschalten der Endstufe setzt sich die Schutzschaltung
automatisch zurück und die LEDs erlischen.
In den meisten Fällen wird die Schutzschaltung durch eine Fehlfunktion, wie
z. B. durch kurzgeschlossene Lautsprecherkabel oder eine unzureichende
Belüftung, die schließlich zu einer Überhitzung führt, aktiviert. In sehr
seltenen Fällen können Lautsprecher mit einer extrem niedrigen Impedanz
die Schutzschaltung aktivieren.
Reagieren die Schutzschaltungen wiederholt und können Sie die Ursache
für die Störung nicht nden, so setzen Sie sich mit Ihrem autorisierten Rotel-
Fachhändler in Verbindung.
Signalanschlüsse
An der Rückseite der RMB-1504 benden sich unsymmetrische Cinch-Eingänge,
wie sie an jedem hochwertigen Audiogerät zu nden sind.
Darüber hinaus be nden sich an der Geräterückseite SIGNAL OUTPUT
LINK-Anschlüsse, die das an Kanalpaar „A“ anliegende Eingangssignal zu
einer anderen Audiokomponente leiten. Ferner kann das an Kanalpaar „A“
anliegende Eingangssignal automatisch zu den Eingängen der Kanäle „B“
gesendet werden, so dass für diese Kanäle kein separates Eingangssignalkabel
erforderlich ist. Dies kann z. B. in großen Systemen hilfreich sein, in denen
an die RMB-1504 mehrere Lautsprecherpaare angeschlossen werden.
HINWEIS: Um laute Geräusche zu vermeiden, die zu Beschädigungen
führen können, schalten Sie die Endstufe ab, wenn Sie an der Konfiguration
der Eingangssignalanschlüsse etwas ändern möchten.
Cinch-Eingänge 4
Siehe Abbildung 2
Für jedes Verstärkerkanalpaar gibt es eine Cinch-Eingänge. An diese Cinch-
Eingänge können Vorverstärker bzw. Surround-Prozessoren angeschlossen
werden. Verwenden Sie hochwertige Verbindungskabel, um eine erstklassige
Klangqualität zu gewährleisten.
Verbinden Sie bei jedem Verstärkerkanalpaar den Ausgang des linken
Kanals Ihres Vorverstärkers mit dem Anschluss LEFT INPUT an der RMB-1504.
Schließen Sie den rechten Kanal Ihres Vorverstärkers an den Anschluss
RIGHT INPUT an. Stellen Sie sicher, dass sich der Eingangswahlschalter in
der STEREO-Position be ndet.
Mono-Schalter 4
Be ndet sich der MONO-Schalter in der ON-Position, wird der Eingang
des linken Kanals “A” mit dem rechten Kanal verbunden.
LINK-Funktion 4
Sie können die Eingänge für Gruppe „A“ mit den Eingängen der Gruppen
„B“ verbinden, indem Sie den jeweiligen Schalter in die LINK-Position
bringen. Für diese Gruppe ist dann kein Eingangsanschluss erforderlich.
Das Eingangssignal von Gruppe „A“ wird zu dem verbundenen Paar
von Kanälen gesendet, so dass Sie vier Verstärkerkanäle mit denselben
Stereoeingangssignalen nutzen können.
Pegelsteller 3
Über die zwei an der Gerätefront be ndlichen Steller (einer pro Kanalpaar)
können die Pegel eingestellt und auf diese Weise an die anderen Komponenten
im System angepasst werden. Über den mit A gekennzeichneten Steller
wird der Pegel der Kanäle „A“ verändert, über den mit B gekennzeichneten
Steller der Pegel der Kanäle „B“.
Drehen Sie die Pegelsteller mit einem kleinen Schlitzschraubendreher im
Uhrzeigersinn, um den Pegel zu erhöhen und gegen den Uhrzeigersinn,
um den Pegel zu reduzieren.
Signal Output Link 5
Über diese beiden Cinch-Ausgänge können die Eingangssignale unverändert
zu einer anderen Audiokomponente geleitet werden. So kann z. B. eine
zusätzliche Endstufe zum Betrieb eines zweiten Lautsprecherpaares
angeschlossen werden. Die an den mit „A“ gekennzeichneten Kanälen
anliegenden Eingangssignale stehen auch an diesen LINK-Ausgängen zur
Verfügung.
HINWEIS: Diese Eingangssignale von den Kanälen „A“ können auch an
die Eingänge „B“ weitergeleitet werden, indem der jeweilige Schalter in
die LINK-Position gebracht wird.
Anschließen der Lautsprecher
Die RMB-1504 verfügt über zwei Gruppen von Lautsprecheranschlussklemmen
(eine Gruppe für jedes Verstärkerkanalpaar).
Auswahl der Lautsprecher
Wir empfehlen, an die RMB-1504 Lautsprecher mit einer nominalen
Impedanz von mindestens 4 Ohm anzuschließen. Beim Betrieb mehrerer
parallel geschalteter Lautsprecherpaare sollten Sie einige Vorsicht walten
lassen, da sich die effektive, vom Verstärker wahrgenommene Impedanz
verringert. Beim Betrieb von zwei Paar 8-Ohm-Lautsprechern beträgt die Last
für den Verstärker 4 Ohm. Werden mehrere parallel geschaltete Lautsprecher
angeschlossen, empfehlen wir, Lautsprecher mit einer nominalen Impedanz
von 8 Ohm einzusetzen. Die Angaben bezüglich der Impedanz von
Lautsprechern sind oft ungenau. In der Praxis gibt es nur bei sehr wenigen
Lautsprechern Probleme beim Betrieb mit der RMB-1504. Wenden Sie sich
bei Fragen bitte an Ihren autorisierten Rotel-Fachhändler.
Auswahl der Lautsprecherkabel
Verbinden Sie die Endstufe und die Lautsprecher über ein isoliertes, zweiadriges
Lautsprecherkabel. Aufbau und Qualität des Kabels können hörbare Effekte
auf die Musikwiedergabe haben. Standard-„Klingeldraht“ wird funktionieren,
jedoch können vor allem bei größeren Kabellängen Leistungsverluste und
eine ungleichmäßige Wiedergabe des Frequenzspektrums das Ergebnis

20 RMB-1504 Ampli cateur de Puissance 4 Canaux
sein. Allgemein gilt, dass Kabel mit größerem Querschnitt eine verbesserte
Wiedergabequalität gewährleisten. Für höchste Wiedergabequalität
sollten Sie die Benutzung von speziellen, hochwertigen Lautsprecherkabeln
erwägen. Ihr autorisierter Rotel-Fachhändler wird Ihnen bei der Auswahl
dieser Lautsprecherkabel gerne weiterhelfen.
Polarität und Phasenabgleich
Die Polarität – die positive/negative Ausrichtung der Anschlüsse – muss
für jede Lautsprecher-/Verstärkerverbindung phasengleich sein. Wird
die Polarität einer Verbindung irrtümlicherweise umgekehrt, führt dies zu
einem unausgewogenen Klangbild mit schwachen Bässen. Die Kabel sind
zur Identizierung gekennzeichnet. So kann die Isolationsschicht eines
Leiters gerippt oder ein Leiter mit einem Streifen markiert sein. Das Kabel
kann verschiedenfarbige Leiter (Kupfer und Silber) besitzen und von einer
transparenten Isolationsschicht umgeben sein. Bei anderen Kabeln wird
die Polaritätsangabe auf die Isolationsschicht gedruckt. Unterscheiden Sie
zwischen positiven und negativen Leitern und achten Sie beim Anschluss
an Lautsprecher und Verstärker auf die gleiche Polung.
Anschließen der Lautsprecher 89
Siehe Abbildung 2
HINWEIS: Der folgende Text beschreibt sowohl Binding Post- als auch
Plug-In-Verbindungen. Verwenden Sie NICHT beide Verbindungsmethoden
in Kombination, um mehrere Lautsprecher anzuschließen.
Schalten Sie alle Geräte im System ab, bevor Sie die Lautsprecher anschließen.
Die RMB-1504 verfügen an der Rückseite über zwei farbig gekennzeichnete
Schraubklemmen für jeden Verstärkerkanal. An diese Klemmen können
blanke Drähte oder Kabelschuhe angeschlossen werden. Die Verwendung
von Bananensteckern ist aus Sicherheitsgründen in Europa nicht zulässig.
Führen Sie die Kabel von der Endstufe zu den Lautsprechern. Lassen Sie
genügend Raum, damit Sie die Komponenten bewegen können und so einen
freien Zugang zu den Lautsprecheranschlüssen sicherstellen.
Bei der Verwendung von Kabelschuhen verbinden Sie diese mit den Kabeln,
stecken die Kabelschuhe hinten unter die Anschlussklemmen und drehen
die Klemmen im Uhrzeigersinn fest. Sollten die Lautsprecherkabel direkt
(ohne Kabelschuhe) an die Lautsprecherklemmen angeschlossen werden,
so entfernen Sie an den Kabelenden ca. 15 mm der Isolation. Lösen Sie
die Schraubklemmen durch Drehen gegen den Uhrzeigersinn. Verdrillen
Sie die blanken Kabelenden, um ein Zerfasern zu vermeiden, und stecken
Sie das verdrillte Kabel hinter die Schraubklemmen. Anschließend drehen
Sie diese im Uhrzeigersinn fest.
HINWEIS: Achten Sie bitte darauf, dass die blanken Kabelenden
vollständig an den Schraubklemmen untergebracht sind und somit das
Berühren benachbarter Drähte oder Anschlüsse ausgeschlossen ist.
Bei jeder Gruppe von Kanälen verbinden Sie den linken Lautsprecher mit
den mit LEFT gekennzeichneten Schraubklemmen. Schließen Sie den rechten
Lautsprecher an die mit RIGHT gekennzeichneten Schraubklemmen an.
Gehen Sie dabei wie oberhalb der Schraubklemmen gekennzeichnet vor.
Stellen Sie sicher, dass der positive Anschluss am Lautsprecher mit der mit
+ gekennzeichneten Schraubklemme verbunden wird. Stellen Sie sicher,
dass der negative Anschluss am Lautsprecher an die mit - gekennzeichnete
Schraubklemme angeschlossen wird.
Bei Störungen
In Audiosystemen sind viele Schwierigkeiten auf falsches Anschließen oder
falsches Einstellen der Bedienelemente zurückzuführen. Sollten Probleme
auftreten, isolieren Sie den betroffenen Bereich, prüfen die Einstellung der
Bedienelemente, lokalisieren die Ursache der Störung und nehmen die
notwendigen Veränderungen vor.
Die Betriebsanzeige leuchtet nicht
Die Endstufe bekommt keinen Strom. Prüfen Sie, ob sich der POWER-Schalter
an der Gerätefront in der EIN-Position bendet. Prüfen Sie die Netzanschlüsse
an der Endstufe und der Wandsteckdose.
Kein Ton
Bekommt die Endstufe Strom und ist trotzdem kein Ton zu hören, prüfen
Sie, ob die Betriebsanzeige an der Gerätefront blinkt. Falls ja, beachten
Sie bitte die Hinweise unten. Falls nicht, prüfen Sie, ob alle Geräte richtig
angeschlossen sind und die Einstellungen an den angeschlossenen Geräten
richtig vorgenommen wurden.
Betriebsanzeige blinkt (Schutzmodus)
Wurde die Endstufe von den Schutzschaltungen abgeschaltet, beginnt die
POWER-Anzeige an der Gerätefront zu blinken. Normalerweise passiert
dies nur, wenn die Endstufe überhitzt wurde, die Lautsprecher nicht richtig
angeschlossen wurden oder bei extremer Belastung. Schalten Sie das System
ab und warten Sie, bis sich die Endstufe abgekühlt hat. Drücken Sie den
POWER-Schalter anschließend einmal ein und aus, um die Schutzschaltungen
zurückzusetzen. Ist die Störung nicht beseitigt oder tritt sie erneut auf, liegt
das Problem im System oder in der Endstufe selber.
Other manuals for RMB-1504
1
Table of contents
Languages:
Other Rotel Amplifier manuals

Rotel
Rotel QA-101 User manual

Rotel
Rotel RB-880 User manual

Rotel
Rotel RB-981 User manual

Rotel
Rotel RB-1080 User manual

Rotel
Rotel RA-1592 User manual

Rotel
Rotel RKB-850 User manual

Rotel
Rotel ra-870bx User manual

Rotel
Rotel RA-2040 User manual

Rotel
Rotel RMB-1587MKII User manual

Rotel
Rotel RA-1570 User manual
Popular Amplifier manuals by other brands

TJ Media
TJ Media TA-550 user manual

Balanced Audio Technology
Balanced Audio Technology VK-32SE owner's manual

Musical Surroundings
Musical Surroundings SuperNova 2 owner's manual

Rockford Fosgate
Rockford Fosgate RFK-HDRK Installation & operation

Hartke
Hartke HD 150 owner's manual

NAD
NAD M33 Quick setup guide