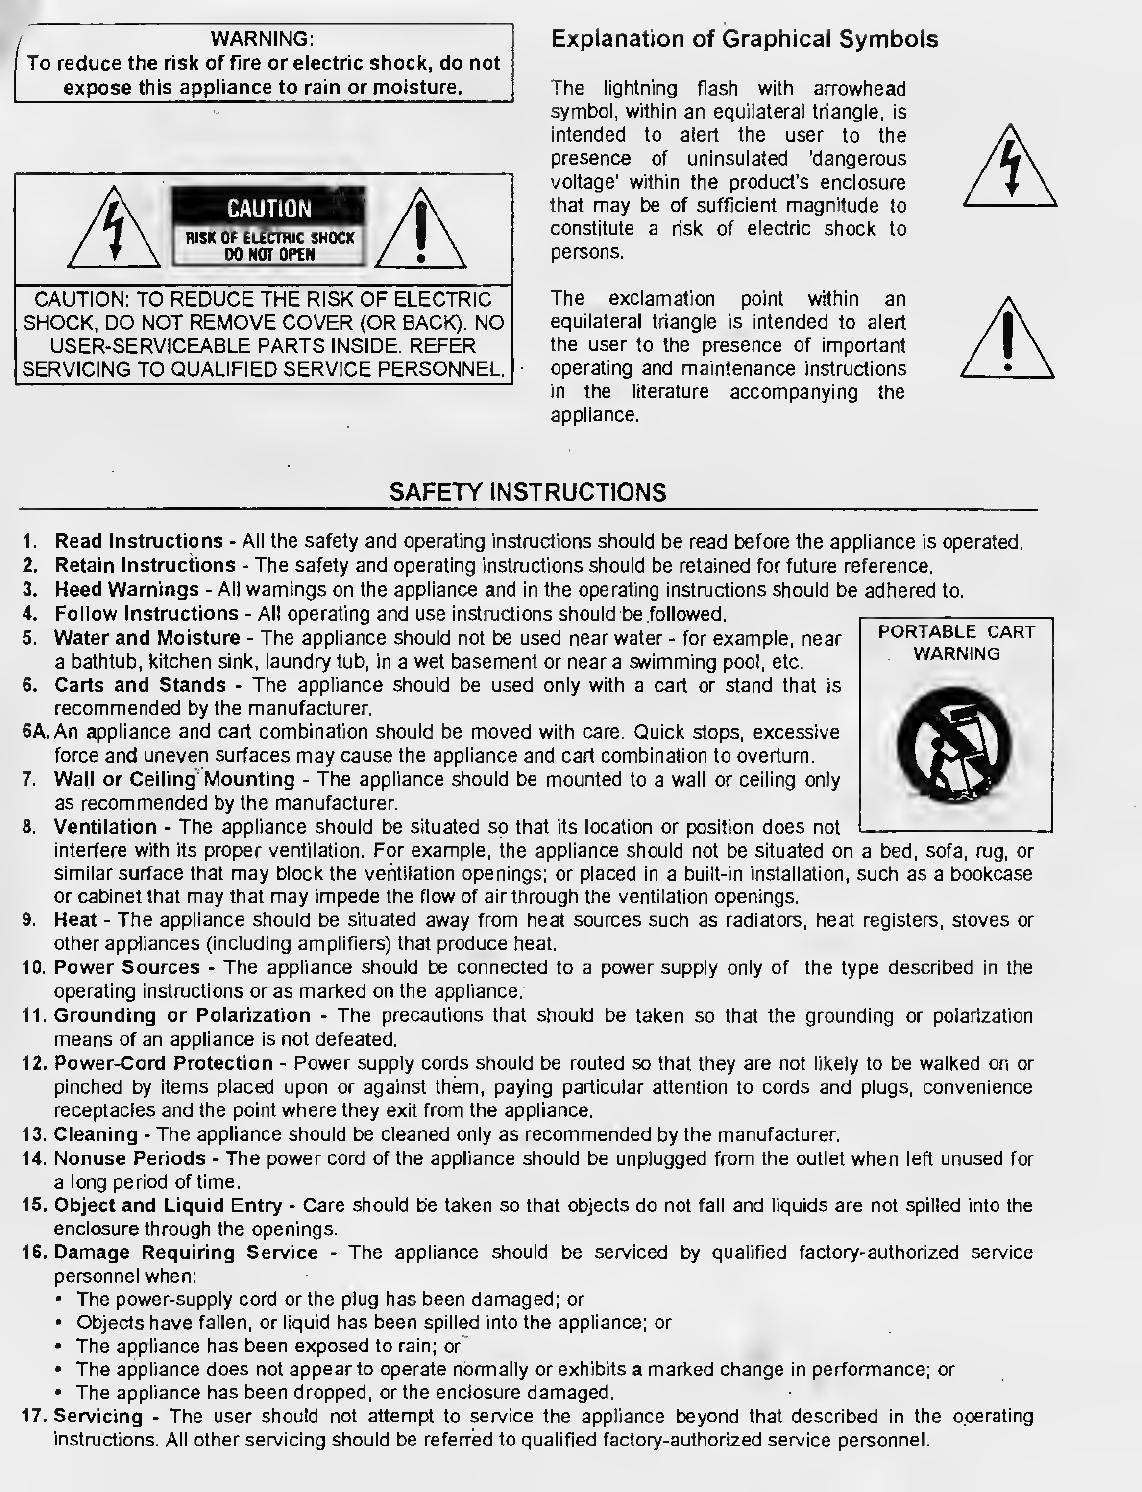
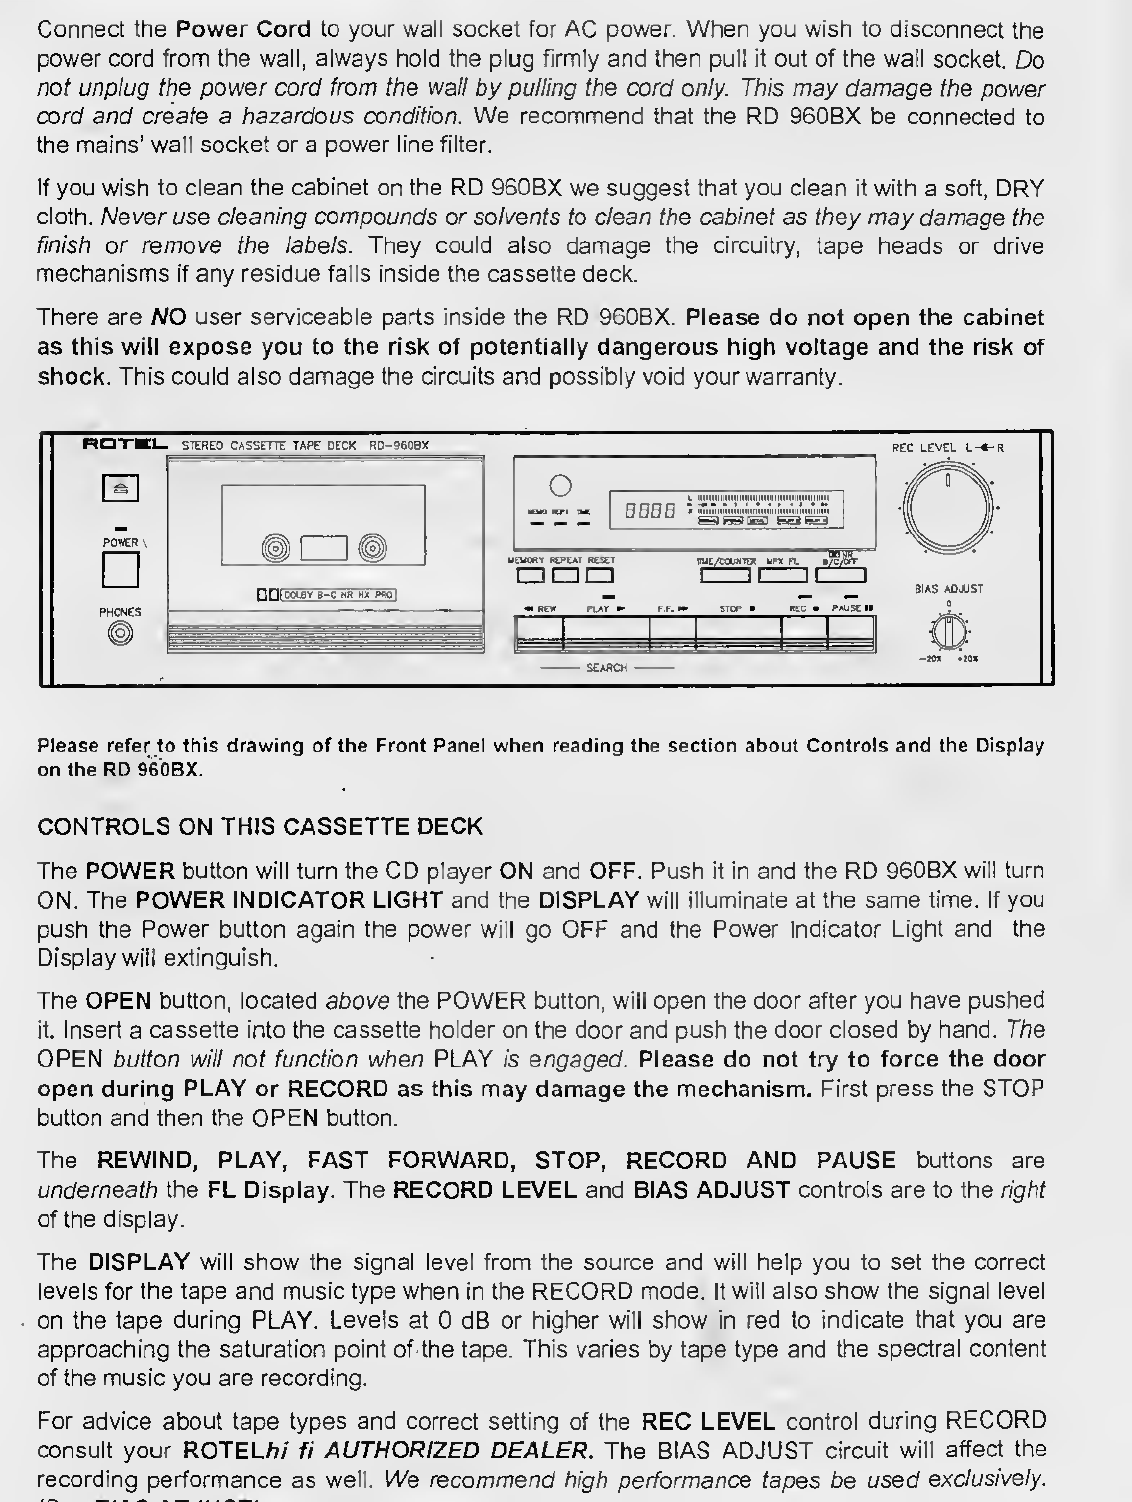
Rotel RD 960BX User manual

RD
960BX
Stereo
Cassette
Tape
Deck
Owners
Manual
Please
write
the
serial
number
and
purchase
date
of
this
RD
960BX
for
your
records
in
the
space
provided.
Serial
Number
Purchase
date

I
WARNING:
I
To
reduce
the
risk
of
fire
or
electric
shock,
do
not
I
expose
this
appliance
to
rain
or
moisture.
'f
CAUTION
A
RISK
OF
ELECTRIC
SHOCK
DO
NOT
OPEN
u
CAUTION:
TO
REDUCE
THE
RISK
OF
ELECTRIC
SHOCK,
DO
NOT
REMOVE
COVER
(OR
BACK).
NO
USER-SERVICEABLE
PARTS
INSIDE.
REFER
SERVICING
TO
QUALIFIED
SERVICE
PERSONNEL.
Explanation
of
Graphical
Symbols
The
lightning
flash
with
arrowhead
symbol,
within
an
equilateral
triangle,
is
intended
to
alert
the
user
to
the
presence
of
uninsulated
'dangerous
voltage’
within
the
product's
enclosure
that
may
be
of
sufficient
magnitude
to
constitute
a
risk
of
electric
shock
to
persons.
The
exclamation
point
within
an
equilateral
triangle
is
intended
to
alert
the
user
to
the
presence
of
important
operating
and
maintenance
instructions
in
the
literature
accompanying
the
appliance.
SAFETY
INSTRUCTIONS
1.
Read
Instructions
-
All
the
safety
and
operating
instructions
should
be
read
before
the
appliance
is
operated.
2.
Retain
Instructions
-
The
safety
and
operating
instructions
should
be
retained
for
future
reference.
3.
Heed
Warnings
-
All
warnings
on
the
appliance
and
in
the
operating
instructions
should
be
adhered
to.
4.
Follow
Instructions
-
All
operating
and
use
instructions
should
be
followed.
5.
Water
and
Moisture
-
The
appliance
should
not
be
used
near
water
-
for
example,
near
a
bathtub,
kitchen
sink,
laundry
tub,
in
a
wet
basement
or
near
a
swimming
pool,
etc.
6.
Carts
and
Stands
-
The
appliance
should
be
used
only
with
a
cart
or
stand
that
is
recommended
by
the
manufacturer.
6A.An
appliance
and
cart
combination
should
be
moved
with
care.
Quick
stops,
excessive
force
and
uneven
surfaces
may
cause
the
appliance
and
cart
combination
to
overturn.
7.
Wall
or
Ceiling
Mounting
-
The
appliance
should
be
mounted
to
a
wall
or
ceiling
only
as
recommended
by
the
manufacturer.
8.
Ventilation
-
The
appliance
should
be
situated
so
that
its
location
or
position
does
not
interfere
with
its
proper
ventilation.
For
example,
the
appliance
should
not
be
situated
on
a
bed,
sofa,
rug,
or
similar
surface
that
may
block
the
ventilation
openings;
or
placed
in
a
built-in
installation,
such
as
a
bookcase
or
cabinet
that
may
that
may
impede
the
flow
of
air
through
the
ventilation
openings.
9.
Heat
-
The
appliance
should
be
situated
away
from
heat
sources
such
as
radiators,
heat
registers,
stoves
or
other
appliances
(including
amplifiers)
that
produce
heat.
10.
Power
Sources
-
The
appliance
should
be
connected
to
a
power
supply
only
of
the
type
described
in
the
operating
instructions
or
as
marked
on
the
appliance.
11.
Grounding
or
Polarization
-
The
precautions
that
should
be
taken
so
that
the
grounding
or
polarization
means
of
an
appliance
is
not
defeated.
12.
Power-Cord
Protection
-
Power
supply
cords
should
be
routed
so
that
they
are
not
likely
to
be
walked
on
or
pinched
by
items
placed
upon
or
against
them,
paying
particular
attention
to
cords
and
plugs,
convenience
receptacles
and
the
point
where
they
exit
from
the
appliance.
13.
Cleaning
-
The
appliance
should
be
cleaned
only
as
recommended
by
the
manufacturer.
14.
Nonuse
Periods
-
The
power
cord
of
the
appliance
should
be
unplugged
from
the
outlet
when
left
unused
for
a
long
period
of
time.
15.
Object
and
Liquid
Entry
-
Care
should
be
taken
so
that
objects
do
not
fall
and
liquids
are
not
spilled
into
the
enclosure
through
the
openings.
16.
Damage
Requiring
Service
-
The
appliance
should
be
serviced
by
qualified
factory-authorized
service
personnel
when:
•
The
power-supply
cord
or
the
plug
has
been
damaged;
or
•
Objects
have
fallen,
or
liquid
has
been
spilled
into
the
appliance;
or
•
The
appliance
has
been
exposed
to
rain;
or
•
The
appliance
does
not
appear
to
operate
normally
or
exhibits
a
marked
change
in
performance;
or
•
The
appliance
has
been
dropped,
or
the
enclosure
damaged.
17.
Servicing
-
The
user
should
not
attempt
to
service
the
appliance
beyond
that
described
in
the
operating
instructions.
All
other
servicing
should
be
referred
to
qualified
factory-authorized
service
personnel.
PORTABLE
CART
WARNING

A
WORD
FROM
All
OF
US
AT
ROTEL
We
thank
you
for
purchasing
our
RD
960BX
Compact
Cassette
Deck.
We
have
been
designing
and
manufacturing
high
quality,
high
performance
audio
electronics
for
more
than
30
years.
This
cassette
deck
was
designed
to
offer
lifelike
recording
and
playback
and
is
a
natural
extension
of
our
love
for
music.
Our
passion
for
good
sound
and
our
love
of
music
is
well
known.
We
believe
that
the
music
recorded
and
played
back
by
the
RD
960BX
will
be
a
source
of
enjoyment
to
you
for
many
years
to
come.
Rotel
is
committed
to
making
quality
products
to
enhance
your
life.
We
have
designed
this
cassette
deck
to
be
durable,
easy
to
use
and
to
make
recordings
with
high
fidelity
to
the
original
sound.
Please
read
the
owners
manual
to
ensure
that
the
RD
960BX
is
properly
installed
and
able
to
offer
optimum
performance.
We
appreciate
being
a
part
of
your
life.
FEATURES
OF
THE
RD
960BX
CASSETTE
DECK
This
is
a
good
sounding
cassette
deck
that
will
bring
a
lively,
entertaining
source
of
music
and
recording
capabilities
to
your
stereo
system.
The
display
is
designed
to
be
informative
and
will
readout
the
tape
position
with
digits
or
time.
The
tape
type
is
selected
automatically
when
a
tape
is
inserted
and
the
door
is
closed.
The
display
will
show
the
tape
type
(Normal
-
Type
1,
Special
(Cr02)
=
Type
2,
Metal
=
Type
4)
in
red.
We
have
included
a
MPX
filter
switch
to
allow
you
to
have
maximum
fidelity
when
not
recording
from
a
tuner.
Many
makers
include
this
filter
without
a
defeat
switch.
The
combination
Record/Play
head
is
made
from
Hard
Permalloy
for
maximum
sound
quality.
The
Erase
head
is
made
from
Ferrite.
We
have
included
DOLBY
B
and
DOLBY
C
Noise
Reduction
with
HX
PRO
to
make
clear,
quiet
recordings.
The
Recording
BIAS
is
adjustable
to
optimize
the
machine
for
operation
with
various
brands
of
good
quality
tape.
We
have-
included
MUSIC
SEARCH,
MEMORY
REWIND
and
REPEAT
play.
The
Remote
Control
will
operate
the
main
functions
on
the
cassette
deck
and
is
easy
to
operate.
The
FL
Display
is
calibrated
from
-20
dB
to
+8
dB
for
recording
and
playback.
This
display
can
be
read
easily.
We
believe
the
RD
960BX
will
be
a
musical
source
of
pleasure
to
you.
INSTALLATION
OF
THE
RD
960BX
Please
place
the
unit
on
a
DRY,
level
surface
away
from
direct
sunlight.
Avoid
placing
objects
on
top
of
the
RD
960BX.
Do
not
allow
water
to
fall
onto
or
into
the
RD-960BX
as
this
could
damage
the
circuitry.
Avoid
installing
the
cassette
deck
in
a
location
where
excessive
heat,
humidity,
vibration,
magnetic
hum
fields
or
moisture
will
be
a
problem.
We
recommend
installing
the
RD
960BX
in
furniture
designed
to
house
audio
components.
This
will
allow
the
cassette
deck
to
be
on
its
own
shelf
with
nothing
stacked
on
top
of
it.
This
will
minimize
potential
interference
from
hum
fields
created
by
other
components
in
your
system
such
as
your
receiver,
integrated
or
power
amplifier.
Component
furniture
will
also
reduce
or
suppress
vibration
and
all
audio
components
will
provide
improved
sound
when
free
from
vibration.
Ask
your
ROTEL/?/
fi
Authorized
Dealer
for
advice
about
component
furniture
and
proper
installation
of
audio
components.
ELECTRICAL
REQUIREMENTS
This
cassette
deck
is
designed
to
work
on
AC
voltage
and
the
correct
voltage
is
displayed
on
the
Back
Panel.
Do
not
attempt
to
operate
the
RD
960BX
on
incorrect
voltage
as
this
will
damage
the
circuitry
and
will
void
your
warranty.
If
you
are
in
doubt
about
the
correct
voltage
for
this
cassette
deck
we
suggest
that
you
please
read
the
label
on
the
back
panel
or
consult
your
ROTEL/
7
/
fi
Authorized
Dealer
for
confirmation
of
the
correct
voltage.

Connect
the
Power
Cord
to
your
wall
socket
for
AC
power.
When
you
wish
to
disconnect
the
power
cord
from
the
wall,
always
hold
the
plug
firmly
and
then
pull
it
out
of
the
wall
socket.
Do
not
unplug
the
power
cord
from
the
wall
by
pulling
the
cord
only.
This
may
damage
the
power
cord
and
create
a
hazardous
condition.
We
recommend
that
the
RD
960BX
be
connected
to
the
mains'
wall
socket
or
a
power
line
filter.
If
you
wish
to
clean
the
cabinet
on
the
RD
960BX
we
suggest
that
you
clean
it
with
a
soft,
DRY
cloth.
Never
use
cleaning
compounds
or
solvents
to
clean
the
cabinet
as
they
may
damage
the
finish
or
remove
the
labels.
They
could
also
damage
the
circuitry,
tape
heads
or
drive
mechanisms
if
any
residue
falls
inside
the
cassette
deck.
There
are
NO
user
serviceable
parts
inside
the
RD
960BX.
Please
do
not
open
the
cabinet
as
this
will
expose
you
to
the
risk
of
potentially
dangerous
high
voltage
and
the
risk
of
shock.
This
could
also
damage
the
circuits
and
possibly
void
your
warranty.
Please
refer
to
this
drawing
of
the
Front
Panel
when
reading
the
section
about
Controls
and
the
Display
on
the
RD
960BX.
CONTROLS
ON
THIS
CASSETTE
DECK
The
POWER
button
will
turn
the
CD
player
ON
and
OFF.
Push
it
in
and
the
RD
960BX
will
turn
ON.
The
POWER
INDICATOR
LIGHT
and
the
DISPLAY
will
illuminate
at
the
same
time.
If
you
push
the
Power
button
again
the
power
will
go
OFF
and
the
Power
Indicator
Light
and
the
Display
will
extinguish.
The
OPEN
button,
located
above
the
POWER
button,
will
open
the
door
after
you
have
pushed
it.
Insert
a
cassette
into
the
cassette
holder
on
the
door
and
push
the
door
closed
by
hand.
The
OPEN
button
will
not
function
when
PLAY
is
engaged.
Please
do
not
try
to
force
the
door
open
during
PLAY
or
RECORD
as
this
may
damage
the
mechanism.
First
press
the
STOP
button
and
then
the
OPEN
button.
The
REWIND,
PLAY,
FAST
FORWARD,
STOP,
RECORD
AND
PAUSE
buttons
are
underneath
the
FL
Display.
The
RECORD
LEVEL
and
BIAS
ADJUST
controls
are
to
the
right
of
the
display.
The
DISPLAY
will
show
the
signal
level
from
the
source
and
will
help
you
to
set
the
correct
levels
for
the
tape
and
music
type
when
in
the
RECORD
mode.
It
will
also
show
the
signal
level
on
the
tape
during
PLAY.
Levels
at
0
dB
or
higher
will
show
in
red
to
indicate
that
you
are
approaching
the
saturation
point
of
the
tape.
This
varies
by
tape
type
and
the
spectral
content
of
the
music
you
are
recording.
For
advice
about
tape
types
and
correct
setting
of
the
REC
LEVEL
control
during
RECORD
consult
your
ROTEL
hi
fi
AUTHORIZED
DEALER.
The
BIAS
ADJUST
circuit
will
affect
the
recording
performance
as
well.
We
recommend
high
performance
tapes
be
used
exclusively.

The
Display
panel
includes
the
REMOTE
SENSOR
for
receiving
the
Infra
Red
signals
from
the
REMOTE
CONTROL
handset.
Please
be
certain
not
to
block
this
as
the
Remote
Control
handset
will
not
function
if
this
is
covered
or
blocked.
The
Display
on
the
RD
960BX
will
normally
show
a
"0000"
when
first
turned
on.
It
will
show
the
current
position
of
the
tape
in
minutes
and
seconds
or
in
digits
during
PLAY,
FF
or
REW.
Select
the
readout
you
prefer
with
the
TIME
COUNTER
button.
Pressing
the
PAUSE
button
will
make
the
cassette
deck
stay
in
the
same
place
on
the
tape
and
the
PAUSE
indicator
light
will
flash.
No
sound
will
be
heard
until
you
press
the
PLAY
button.
Pressing
the
FF
(»)
button
will
cause
the
cassette
deck
to
FAST
FORWARD
to
the
end
of
the
tape.
Pressing
REW
(«)
will
cause
the
cassette
deck
to
REWIND
to
the
beginning
of
the
tape.
If
you
are
in
PAUSE
and
press
the
FF
or
REW
button,
it
will
cancel
PAUSE
and
wind
to
the
end
(FF)
or
beginning
(REW)
of
the
tape.
The
FF
or
REW
buttons
will
advance
the
tape
to
the
next
song
(»)
or
will
go
back
to
the
beginning
of
the
song
(«)
on
the
tape,
if
pressed
during
PLAY.
This
engages
the
MUSIC
SEARCH
circuit.
MUSIC
SEARCH
"looks"
for
blank
places
in
the
tape
that
are
approximately
4
to
5
seconds
long
and
then
engages
PLAY.
If
you
are
in
PLAY
and
wish
to
REWIND
or
FAST
FORWARD
without
MUSIC
SEARCH,
press
STOP
before
pressing
REW
or
FF.
The
REPEAT
button
will
allow
you
to
play
a
whole
tape,
a
song
or
songs
repeatedly.
To
operate
the
REPEAT
mode
press
the
REPEAT
button
and
the
indicator
light
will
illuminate.
At
the
end
of
the
tape,
RD
960BX
will
rewind
to
the
beginning
of
the
tape
and
begin
PLAY
again.
This
will
continue
as
long
as
the
REPEAT
button
is
engaged.
Press
STOP
to
end
PLAY.
Press
REPEAT
a
second
time
to
cancel
this
function.
To
operate
the
MEMORY
REWIND
mode,
press
the
button
and
the
indicator
light
will
illuminate.
Then
choose
the
point
you
wish
to
return
to
and
press
the
RESET
button
to
"Zero"
the
display.
When
the
RD
960BX
reaches
the
end
of
the
tape
it
will
rewind
to
Zero,
the
MEMORY
REWIND
point,
and
then
stop.
This
may
be
combined
with
REPEAT
to
create
a
continuous
play
mode.
Press
the
MEMORY
button
a
second
time
to
end
this
function.
The
TIME
COUNTER
button,
if
pressed
once,
will
change
the
Display
readout
from
digits
to
Time
elapsed
on
the
tape.
Pressing
it
again
will
return
the
display
to
digits.
The
MPX
button
engages
a
high
frequency
filter
that
is
designed
to
remove
the
19
kHz
pilot
tone
from
the
MPX
signal
of
an
FM
Stereo
tuner.
This
should
be
used
only
when
recording
from
your
tuner.
It
reduces
the
high
frequency
response
of
the
RD
960BX
above
15
kHz
when
it
is
engaged.
The
NR
B/C/OFF
button
engages
the
DOLBY
B
and
C
Noise
Reduction
circuits.
The
DOLBY
circuits
provide
improved
signal
to
noise
ratios
during
recording
and
playback
of
your
tapes.
The
DOLBY
B
circuit
will
improve
the
signal
to
noise
ratio
by
approximately
10
dB,
DOLBY
C
will
add
another
10
dB
or
so
improvement
to
the
signal
to
noise
ratio.
You
should
use
the
same
NR
during
PLAY
that
you
have
used
during
RECORD
for
maximum
fidelity.
We
have
included
the
DOLBY
HX
PRO
circuit
to
improve
the
high
frequency
response
of
the
recordings
of
NORMAL
and
SPECIAL
tapes
made
with
the
RD
960BX.
This
circuit
has
been
included
to
more
closely
approximate
the
performance
of
METAL
tapes
with
NORMAL
or
SPECIAL
tape
types.
DOLBY
HX
PRO
works
during
RECORD
with
TYPE
1
or
NORMAL
and
TYPE
2,
Cr02
or
SPECIAL
tapes
only.
The
best
way
to
describe
how
this
circuit
works
would
be
to
imagine
that
the
cassette
deck
is
reading
the
musical
score
and
adjusting
the
recording
bias
dynamically
to
enable
the
tape
to
accept
the
maximum
amount
of
high
frequency
energy,
without
overloading,
that
the
music
requires.

High
level
high
frequency
sounds
tend
to
be
additive
to
the
high
frequency
bias
signal
that
makes
the
recording
process
possible.
This
results
in
overbiasing
the
tape,
which
leads
to
a
dull
sounding
recording
with
poor
high
frequency
response.
The
HX
PRO
circuit
will
"see"
the
high
level
high
frequency
sounds
and
dynamically
reduce
the
recording
bias
momentarily
to
minimize
the
possibility
of
saturating
the
tape.
The
result
is
a
correctly
biased
tape
with
improved
headroom
at
high
frequencies
and
better
sounding
recordings
of
your
favorite
music.
This
works
in
conjunction
with
the
BIAS
ADJUST
control.
The
BIAS
ADJUST
control
makes
it
possible
to
optimize
the
RECORD
BIAS
level
for
various
high
performance
brands
of
tape.
We
suggest
making
a
recording
from
your
tuner
of
the
FM
hiss
sound
between
stations.
(Defeat
the
Mute
circuit
on
the
tuner
to
do
this.)
Set
the
REC
LEVEL
so
that
the
meter
reads
-15
or
-20
dB
and
make
a
recording
of
the
hiss.
Compare
the
sound
of
the
tape
recording
to
the
sound
from
the
tuner
(not
for
volume
level)
for
similarity
of
the
high
frequency
sound.
Rotate
the
BIAS
ADJUST
control
for
the
best
sonic
match
by
repeating
the
recording
and
listening
process.
If
you
have
a
test
CD,
we
suggest
this
be
done
with
an
8
kHz
tone
at
-20
dB.
This
adjustment
should
be
done
with
the
DOLBY
NR
turned
OFF.
The
REMOTE
CONTROL
handset
duplicates
the
REW,
PLAY,
FF,
STOP,
REC
and
PAUSE
functions
on
the
Front
Panel
of
the
RD
960BX.
The
RD
960BX
may
be
operated
by
the
front
panel
buttons
or
by
the
remote
control.
TO
RECORD
WITH
RD
960BX
Select
the
Dolby
NR
(B,
C
or
OFF)
you
intend
to
use
for
your
recording.
Press
the
PLAY
button
and
wait
five
seconds
before
pressing
STOP.
This
will
advance
the
cassette
past
the
beginning
leader.
Press
the
REC
button,
the
REC
light
will
illuminate
and
RD
960BX
will
be
in
Recording
Pause
mode.
Play
the
source
you
intend
to
record
and
adjust
the
REC
LEVEL
control
to
the
level
appropriate
for
your
musical
selection
and
tape
type.
As
a
general
guide,
we
would
suggest
that
the
peak
recording
level
for
Normal
tape
should
be
+3
dB,
Special
should
be
+3
to
+5
dB
and
Metal
+5
to
+8
dB.
Music
with
high
level
high
frequencies
should
be
recorded
at
a
reduced
level
to
avoid
tape
saturation.
You
may
wish
to
ADJUST
BIAS
as
well
to
optimize
the
RD
960BX
to
the
brand
of
tape
you
have
selected.
(See
ADJUST
BIAS)
Press
the
PLAY
button,
start
the
source
music
and
the
RD
960BX
will
begin
recording.
The
REC
and
PLAY
lights
will
be
on.
Press
PAUSE
if
you
wish
to
make
a
momentary
interruption
of
the
recording.
When
you
wish
to
stop
the
RECORD
mode,
press
the
STOP
button.
This
will
stop
the
cassette
deck,
turn
the
recording
circuits
and
indicator
lights
OFF.
TO
PLAYBACK
WITH
RD
960BX
Note
the
Dolby
NR
system
used
during
the-recording
of
the
cassette
tape
you
intend
to
play.
Set
the
Dolby
NR
of
the
RD
960BX
to
the
same
setting
as
the
tape.
Insert
the
cassette
into
the
door
holder
and
close
the
door.
The
tape
playback
equalization
will
be
selected
automatically
by
the
RD
960BX.
Press
the
PLAY
button
to
commence
playing
the
tape
and
the
PLAY
indicator
linht
will
illuminate
To
stoD
the
taoe
momentarily,
vou
mav

select
the
pause
mode
by
pressing
the
PAUSE
button
on
the
RD
960BX
or
on
the
remote
control.
The
PAUSE
light
will
flash.
To
continue,
press
PLAY,
If
you
wish
to
stop
the
tape
press
the
STOP
button.
OUTPUT
INPUT
WARNING:
to
reouce
the
risk
of
the
fire
or
ELECTRICAL
SHOCK
DO
NOT
EXPOSE
THIS
ECUIPMENT
TO
RAIN
OR
MOISTURE.
A
CAUTION
A
mm
<r
«jc«c
*001
M
itn
rrm
1
A
VIS:
—
-
«
o«
*M*mM*m
—
n/~.
|
D08LY
NOISE
REDUCTION
AND
HX
PRO
HEADROOM
EXTENSION
MANUFACTURED
UNDER
LICENSE
FROM
DOLBY
LABORATORIES
LICENSING
CORPORATION.
HX
PRO
ORIGINATED
BY
BANG
AND
OLUFSEN.
’OOLBY'
THE
DOUBLE-D
SYMBOL
AND
'HX
PRO'
ARE
TRADEMARKS
OF
DOLBY
LABORATORIES
LICENSING
CORPORATION.
SERIAL
NO.
RQTEL
CASSETTE
TAPE
DECK
UOOEL
NO.
RO-96O0X
POWER
CONSUMPTION:
30W
RQTEL
EIECmCHICS
CO..
LTD.
Please
refer
to
this
drawing
of
the
Rear
panel
of
the
RD
960BX
when
connecting
to
your
stereo
system.
CONNECTING
THE
RD
960BX
TO
YOUR
STEREO
SYSTEM
The
rear
panel
of
the
RD
960BX
has
the
INPUT
and
OUTPUT
connections
for
the
cassette
deck.
These
are
RCA
jacks
and
are
designed
to
be
connected
to
the
TAPE
Inputs
and
TAPE
Outputs
of
your
stereo
integrated
amplifier,
receiver
or
preamplifier.
Please
observe
the
correct
Left
and
Right
Channel
connections
for
optimum
enjoyment
of
your
stereo
system.
The
INPUT
connections
on
the
RD
960BX
should
receive
signals
from
the
RECORD
OUT
or
TAPE
OUT
connections
on
your
preamplifier,
integrated
amplifier,
tuner
preamplifier
or
receiver.
Use
the
supplied
patch
cables
or
purchase
high
performance
cables
from
your
dealer
for
improved
sound
quality.
The
OUTPUT
connections
on
the
RD
960BX
should
send
signals
to
the
RECORD
IN
or
TAPE
IN
connections
on
your
preamplifier,
integrated
amplifier,
tuner
preamplifier
or
receiver.
Use
the
supplied
patch
cables
or
purchase
high
performance
cables
from
your
dealer
for
improved
sound
quality.
High
performance
patch
cables
will
improve
the
sound
of
your
stereo
and
we
recommend
them.
We
suggest
auditioning
them
at
home
with
your
stereo
system.
Ask
your
ROTEL
hi
fi
AUTHORIZED
DEALER
for
advice
about
cables
for
analog
and
digital
signals.
MAINTENANCE
OF
THE
RD
960BX
CASSETTE
DECK
A
cassette
deck
needs
to
have
CLEAN
heads
and
drive
mechanisms
to
make
a
good
recording
or
to
sound
good
on
playback.
If
you
play
this
cassette
deck
every
day
for
several
hours,
the
heads
will
need
to
be
cleaned
about
once
a
week
with
excellent
tapes
and
more
frequently
with
inexpensive
tapes.
We
suggest
cleaning
the
cassette
deck
heads
and
drive
mechanisms
every
time
you
make
a
recording
to
improve
the
sound
of
your
recordings.
The
compact
cassette
runs
at
a
slow
speed
and
even
a
small
amount
of
oxide
buildup
from
the
tape
onto
the
heads
will
degrade
the
high
frequency
sounds
quite
a
lot.
As
a
general
guide;
a
clean
cassette
deck
is
a
good
sounding
cassette
deck.
The
door
may
be
removed
from
the
cassette
holder
to
facilitate
cleaning
by
pressing
the
OPEN
button
and
then
gently
pulling
up
on
the
sides
of
the
door
panel.
Installation
should
be
done
carefully
to
ensure
a
proper
alignment
of
the
door
on
the
cassette
holder
and
then
press
down
gently
to
install
it.

The
heads
(Erase
and
Record/Play),
pinch
roller
(rubber
wheel)
and
the
capstan
(drive
shaft)
should
be
cleaned
with
pure
(not
rubbing/
alcohol
and
cotton
swabs,
cotton
buds
or
"Q"
tips.
This
should
be
done
gently
as
the
proper
head
alignment
is
critical
to
the
sound
quality
of
the
RD
960BX.
Pure
distilled
grain
alcohol
(Don't
drink
it!)
is
excellent
for
this
purpose
as
it
has
no
impurities
to
leave
a
residue.
DRY
"cleaning
tapes"
are
not
recommended
as
they
are
abrasive
and
do
not
clean
the
capstan
or
pinch
roller.
Occasional
demagnetizing
of
the
heads
and
capstan
with
a
commercially
available
demagnetizer
will
also
maintain
the
sound
quality.
Magnetism
builds
up
in
these
parts
as
a
direct
result
of
the
recording
and
playback
process.
Demagnetizing
every
50
hours
of
use
is
a
good
idea
and
we
recommend
it.
Ask
your
ROTEL
hi
fi
AUTHORIZED
DEALER
for
advice
about
the
maintenance
and
demagnetizing
of
your
cassette
deck.
A
FINAL
WORD
FROM
ROTEL
ABOUT
THIS
CASSETTE
DECK
The
compact
cassette
is
a
very
popular
music
source
for
many
people
and
we
believe
the
RD
960BX
will
be
a
valued
addition
to
your
musical
enjoyment.
We
have
designed
this
cassette
deck
for
high
performance
using
test
equipment
and
the
human
ear.
We
believe
that
both
methods
are
useful
in
the
design
of
audio
electronics.
This
is
time
consuming
but
we
feel
that
the
music
benefits
from
this
care
and
attention
to
detail.
We
realize
that
there
are
many
choices
available
in
the
market
today
and
we
thank
you
again
for
choosing
our
RD
960BX
Compact
Cassette
Deck
to
record
and
play
your
cassette
tapes.
Enjoy
recording
and
playing
the
music!
SPECIFICATIONS
RD
960BX
COMPACT
CASSETTE
DECK
30-18,000
Hz
±
3
dB
(Type
4)
30-17,000
Hz
±
3
dB
(Type
2)
30-16,000
Hz
±
3
dB
(Type
1)
0.035
%wrms,
0.1%
DIN
Electronic
governor
type
4.8
cm
/
sec.
4
Track/2
channel
55
dB
NR
Off
65
dB
Dolby
B
NR
74
dB
Dolby
C
NR
0.9%
(Type
4)
50
mV
/
33
kohms
740
mV
/1.5
kohms
115
volts
AC
50/60
Hz
230
volts
AC
50/60
Hz
30
watts
6.0
Kgs
/13^2
Lbs
440mm
(W)
x
121mm
(H)
x
329
mm
(D)
17-3/8"
(W)
x
4-13/16"
(H)
x
13"
(D)
•
All
specifications
are
accurate
at
the
time
of
printing.
Rotel
reserves
the
right
to
make
improvements
without
notice.
•
Dolby
Noise
Reduction
and
HX
PRO
headroom
extension
manufactured
under
license
from
Dolby
Laboratories
Licensing
Corporation.
•
HX
PRO
originated
by
Bang
and
Olufsen.
"Dolby",
the
double-D
symbol,
and
"HX
PRO"
are
trademarks
of
Dolby
Laboratories
Licensing
Corporation.
Frequency
Response
Wow
and
Flutter
Motor
Tape
Speed
Tracks
Signal
to
Noise
Ratio
(Wtd,
OdB,
Cr0
2
t
ape)
Total
Harmonic
Distortion
(Rec/Play
400
Hz,
0
dB)
Input
Sensitivity/Impedance
Output
Level/Impedance
Power
Requirements
Power
Consumption
Weight
Dimensions
Table of contents
Other Rotel Tape Deck manuals