Roth Mobeli 14002 68S User manual

EN
QuattroPower Support Handles Kid
Instruction Manual
QuattroPower Support Kid
14002 68S, 14002 69S

1400268-9S_D14.754.19.03_2019-07-20 QuattroPowerSupportKid Eng Page 2from 12
Table of contents
1. General ................................................................................................................................................................................2
1.1 General information ........................................................................................................................................................2
1.2 Explanations/symbols in the manual and on the handle .................................................................................................3
1.3 Intended use ...................................................................................................................................................................3
1.4 Application range of the product .....................................................................................................................................3
1.5 For your Information .......................................................................................................................................................3
1.6 Useful life ........................................................................................................................................................................4
1.7 Reuse .............................................................................................................................................................................4
2. Safety information ..............................................................................................................................................................4
3. Operation / mounting .........................................................................................................................................................5
3.1 Mounting / assembling ....................................................................................................................................................5
3.2 Attaching / suction ..........................................................................................................................................................5
3.3 Releasing .......................................................................................................................................................................5
3.4 Disassembling ................................................................................................................................................................5
4. Technical data .....................................................................................................................................................................6
4.1 Markings on the product .................................................................................................................................................6
4.2 Table of technical data ...................................................................................................................................................6
4.3 Materials .........................................................................................................................................................................6
5. Maintenance ........................................................................................................................................................................6
5.1 Maintenance (cleaning/disinfection) ...............................................................................................................................6
5.2 Maintenance (service) ....................................................................................................................................................7
6. Recognizing and remedying malfunctions ......................................................................................................................7
7. Disposal ..............................................................................................................................................................................7
8. Pictures ...............................................................................................................................................................................8
8.1 Pictures for operation –mounting/disassembly ................................................................................................... 8 and 9
8.2 Pictures for operation –mounting/assembly .................................................................................................................10
8.3 Images of the function of the vacuum safety indicator ..................................................................................................11
9. Accessories ......................................................................................................................................................................12
1. General
1.1 General information
Please read this manual carefully before use and follow the safety instructions to ensure your safety when
using the mobile QuattroPower handle Kid. Keep these instructions for future reference and pass them on to
other users!
If the safety rules stated in the instructions for use are not observed, any liability on our part is excluded.

1400268-9S_D14.754.19.03_2019-07-20 QuattroPowerSupportKid Eng Page 3from 12
1.2 Explanations/symbols in this manual and on the handle
Follow the instructions for use!
For persons with visual impairment, the font size for this on-line manual can be set accordingly at
https://www.mobeli.de/download-bereich.
Warning (indicates a dangerous situation)
Manufacturer (additionally, year of manufacture on the handlebar)
Order number
Maximum user weight
The mobile MOBELI grab handles comply with the directive 93/42/EEC on medical devices of class I.
Batch designation
Allergy Notice: The high-quality rubber pads contain natural rubber latex.
Natural rubber latex can cause allergic reactions including anaphylactic reactions.
1.3 Intended use
As grab handle or stand-up handle for children. The QuattroPower Support Kid have been developed to support
natural movement. They are not designed to carry the full body weight.
Any other use, e.g. as a seat, carrying handle or climbing aid, is not permitted.
1.4 Application range of the product
The QuattroPower Support Kid is intended for largely independent use indoors, as in shower cubicles, bath tubs,
toilets, and at washbasins.
For the vacuum suction generated by the rubber pads to be effective, the grab handle may only be attached to
smooth and non-porous rigid surfaces that are pore- and steam-tight, clean, dry, and free of oils and grease.
On rough or porous surfaces, the vacuum hold will be diminished or does not exist at all. Please bear in mind that tiles
are not necessarily always smooth and steam-tight (i.e., suitable for vacuum generation).
Test your tiles and the wall prior to use (with the help of another person, if necessary).
Since the MOBELI vacuum suction pads are made from strongly adhesive and flexible natural rubber, they can
usually adapt to slightly textured tiles. (Attention, reduced holding time! Pay attention to the safety indicator!)
The mobile grab handle is ideally suited for use at home where there are no permanently fixed rails, e.g. for short-
term use after a stay in hospital or for testing of a new accommodation. It is also well suited at hospitals and nursing
homes as an additional and short-term supplement for stationary rails.
The mobile grab handle can also be used where it is not possible to install permanent rails, e.g. in glass shower
cubicles or in bathtubs, or if drilling in walls is not allowed (or not possible), e.g. in a rented flat or in a wall where
water and/or power lines can be located. Also, during doctor's visitations, office visits, journeys etc., the MOBELI grab
handle finds its ideal use.
In addition, the mobile grab handle can be used to determine the optimum position and height for installing fixed rails,
i.e., before commencing any drilling and bolting work.
1.5 For your information
In hotels and public establishments in Europe, tiles must be non-porous and steam-tight (as per DIN/EN 159 and
176). According to the tile adhesives material standard DIN 12004, tile adhesives must have a minimum adhesive
strength of 0.5 N/mm². E.g., for two tiles with a tile size of 147 mm x 147 mm x 0.5 N/mm2, this would result in an
adhesive force of approx. 2160 kg. Even with an effective adhesive surface of only ⅓ of the tile surface (e.g., due to a
rough serrated trowel) and tile joints not filled-in, there would still be an adhesive strength of approx. 700 kg.

1400268-9S_D14.754.19.03_2019-07-20 QuattroPowerSupportKid Eng Page 4from 12
Unfortunately, though, one cannot always rely on this assumption; therefore, it is absolutely indispensable to test the
adhesive force of the respective tiles or other surface materials on the wall.
Furthermore, due to material aging or in prefabricated construction there might be a reduction of the adhesive power,
therefore testing is essential (e.g., by abrupt application of force).
1.6 Useful life
The expected useful life is six years (if used daily and in accordance with the intended purpose) in an institution or
public facility. The prerequisite for this is compliance with the maintenance and safety regulations specified in these
operating instructions. The actual service life may vary depending on the frequency and intensity of use. These
handles have been tested according to ISO 17966:2016.
1.7 Reuse
The product is suitable for repeated use. How often the product can be used depends on the type of use. Clean and
disinfect the product thoroughly before re-use and check the handle carefully, especially the function of the vacuum
safety indicator.
2. Safety information
•Prior to any use of the mobile QuattroPower support grab bar, the vacuum safety indicator must be
examined and acted upon according to the instructions (cf. page 11)
•Even on fully impermeable, flush tiles it can never be determined exactly when the vacuum will decrease
(e.g. due to hairline cracks), therefore always pay attention to the vacuum safety indicator!
•Use the QuattroPower support handle only when you have experience in handling it or while you are under
supervision of a person who has experience in handling it. Children may only use the handle under supervision or
if you have secured the rocker arms with a rocker arm lock (cf. accessories on page 12).
•Before each new attachment, make sure of the proper functioning of the mobile QuattroPower Support Kid. Pay
particular attention to the rubber suction pads; they must be clean and intact and must not have any tears or
scoring.
Never use mobile grab handles with damaged rubber pads and/or with reduced retaining strength.
•Please bear in mind that the suction power of the rubber pads is dependent on the surface they are to be adhered
to.
•After applying the vacuum tilting levers, the sucking adhesive strength created by the vacuum can be entirely or
partly absent, in particular with unglazed tiles, natural stone, wood, as well as ceramic coating that has been
textured/grinded or given a rough grain to provide a non-slip finish.
With grab bars with vacuum safety indicator this becomes visible by the rising of the flip-up tab!
•Attention! Usage under water reduces the suction power.
•The suction strength stated above refers to normal room temperature (10 °C –30 °C); at high temperatures, e.g.
in a sauna, the suction strength will be reduced. Attention! Temperatures higher than 41 °C can be reached due
to solar radiation or by contact with hot water which can lead to skin damage and/or burning.
•The indicated suction strength is calculated at about 300 m above sea level. At higher altitudes, the suction
strength diminishes (by approx. 10 % per every additional 1,000 m of altitude).
•Never expose the rubber pads to UV radiation (sunlight) for any prolonged periods of time; otherwise they will
quickly lose their elasticity. For this reason, never attach the grab handles to any surface (e.g. window) that will be
illuminated from the outside.
•Do not place anything underneath the grab handle that could be damaged by the rail suddenly releasing and
dropping on it, or remove the grab handle after use.
•The detachable mobile grab handles must only be used with the tilting levers perfectly engaged (i.e.,
vacuum tilting levers level with the surface).
•Do not attach the QuattroPower Support Kid to vehicle metal panels, foils, or thin glass panes because the
vacuum created by the suction pad might deform and damage these materials.
•If the mobile QuattroPower support handle remains attached over prolonged periods of time, there is the risk that
the underground (e.g. bath tub) gets permanently stained by the rubber pad.
•Never combine MOBELI products or parts of them with parts from other manufacturers. This will invalidate any
warranty or liability. Risk of accident!!!

1400268-9S_D14.754.19.03_2019-07-20 QuattroPowerSupportKid Eng Page 5from 12
3. Operation / assembly
3.1 Mounting (see page 8)
(Fig. 1) Push in the snap-lock pins from the bar connector (B) and insert into the short bar (C) until the snap-lock pin
engages in the hole. (Fig. 2 arrow) Then insert the long bar (part D) into the bar connector (B). Insert the two bars (C
and D) into the suction head connectors (A) (fig. 3).
Test the secure hold of the snap-lock pins by trying to pull the components apart!
The handle must not be used if not all snap-lock pins on both sides are securely locked.
3.2 Attaching / suction: (see pages 10 and 11)
1. Examine the vacuum suction pads and the surface they are to be attached to.
2. Clean the surface thoroughly (fig. 11) so that it is clean (e.g. from etched lime sludge) and grease-free.
Likewise, the surface of the suction disc must be clean.
3. Firmly press the mobile grab handles onto the surface where they should be sucked on (fig. 13).
a. The tilting vacuum levers must be loose at this point.
b. It should be noted that both rubber discs are always fully positioned on tiles or other surfaces so that
there is no joint under the rubber disc and the discs are positioned at least 10 mm above the lower
edge of the joint.
4. While pressing the bar against the surface to be adhered to and at the same time pressing on the
rocker, turn over the 1st rocker and then the 2nd rocker (figs. 2, 3, 4, 5, 17.18).
5. Attach the lower suction cups (fig. 14) by turning the suction heads (see arrow) so that they are flat on the wall
(turn with some force using the built-in safety brakes).
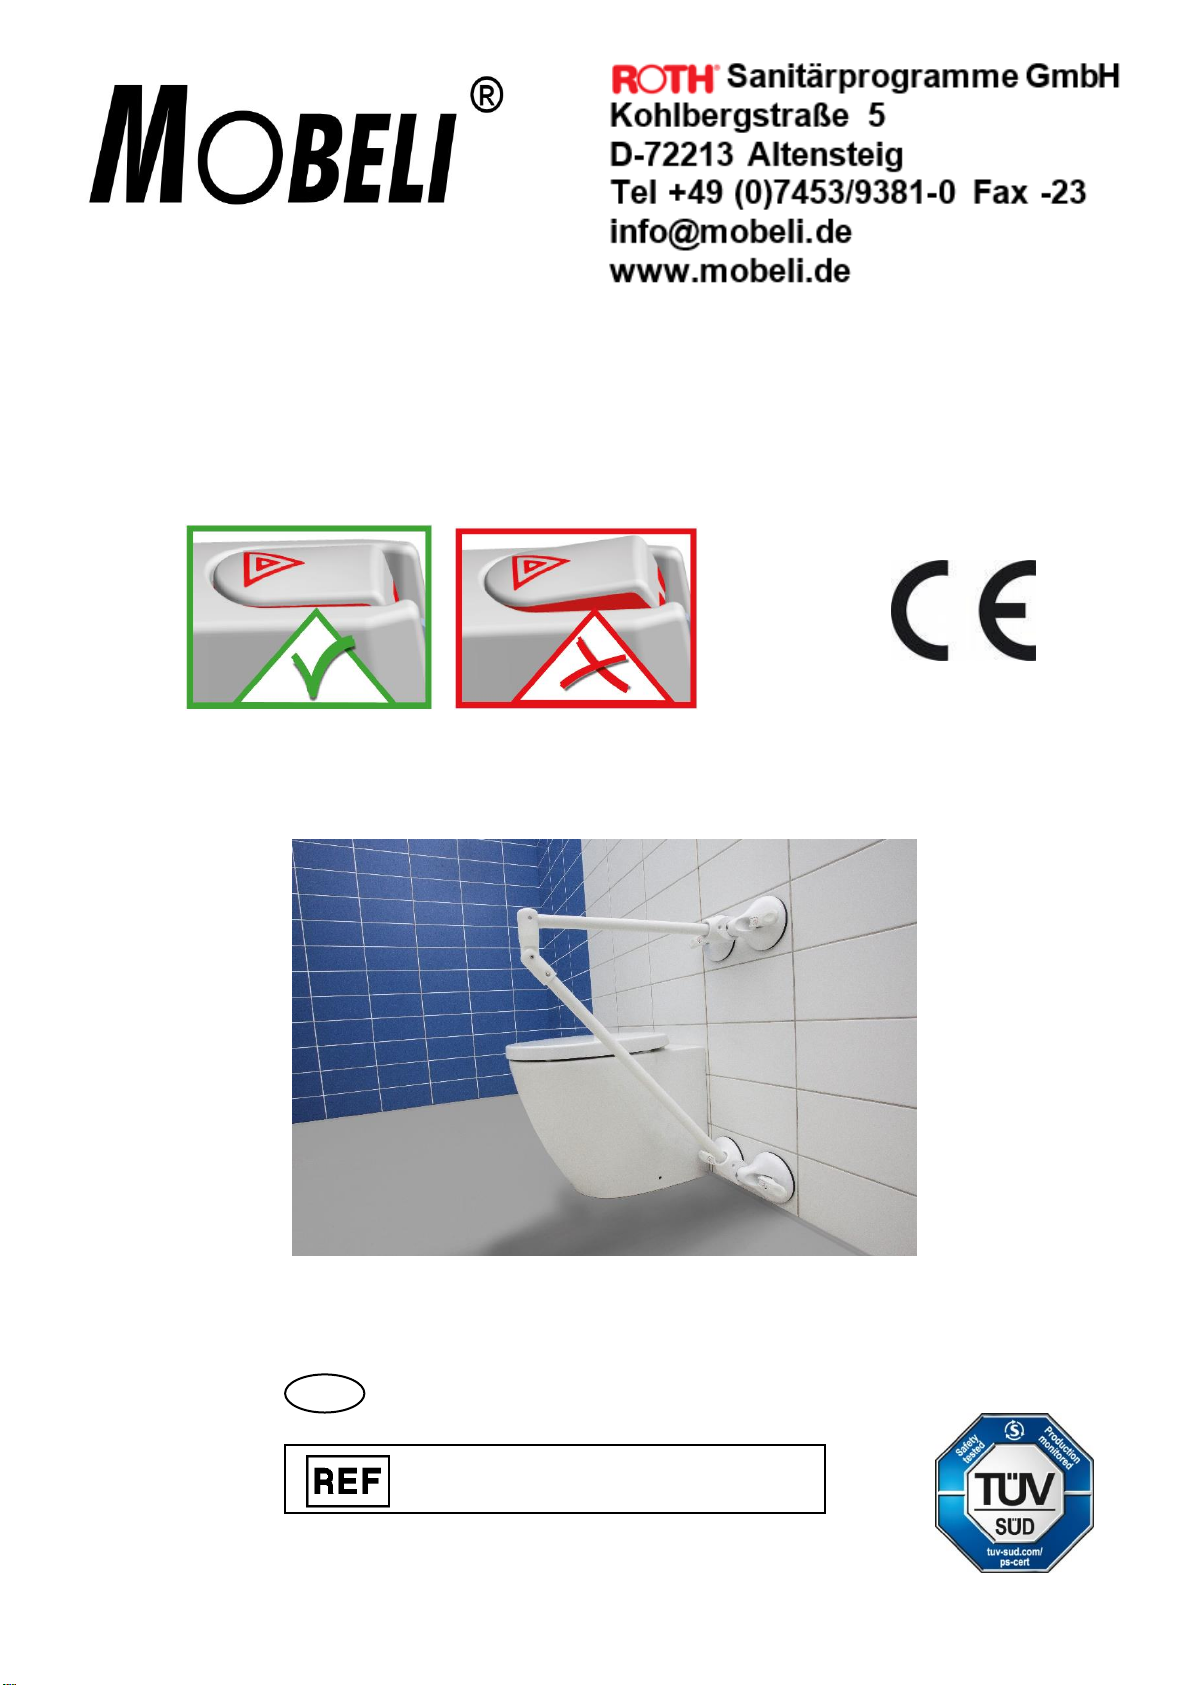
6. The vacuum safety indicators continuously monitor the current vacuum state.
After the rocker is pressed and turned, the red-coloured safety tab must be completely recessed flush with
the surface in the rocker (page 11, figs. 19 and 21)! In the course of time when the vacuum decreases, the
safety rockers will extend.
•If a red side edge of the safety tabs (figs. 20 and 22) has become visible, the grab bar must not be
used under any circumstances and must be reattached immediately!
•The clearer a red side edge of the tabs (figs. 14 and 22) can be seen, the lower is the actual
adhesive strength!
7. Check the vacuum safety indicator prior to any use. This can be felt by visually impaired or blind people. If the
vacuum safety indicator is not retracted (as just described), reattach the bar. If the indicator tabs are still
raised after the rocker has been turned and also are still sticking out after the tabs have been pressed, the
grab bar must be reattached (cf. malfunctions on page 7).
If retraction of the indicator tabs cannot be achieved, do not use the bar under any circumstances!
3.3 Releasing:
1. Put a finger under the vacuum tilting lever in order to raise it; at the same time set your thumb on the
structured recess of the vacuum tilting lever to prevent a recoil effect. Caution! With wrong operation there
exists danger of squeezing.
2. Wait a little while! The rubber pads will relax after approx. 30–60 seconds and return to their original shape,
and then the suction device can be removed from the wall. Now the suction cup can be removed from the
wall. Should the rubber pads keep adhering longer, you can additionally raise the pads at one side (between
wall and rubber disc) with a finger so that air can penetrate underneath.
3. Do not try to loosen the rubber pads with sharp edged items or tools; you would damage them.
4. When not in use, store the mobile grab handle with the rubber pads relaxed (i.e., with vacuum tilting levers
disengaged), flat and plane. Protect your mobile grab handle (e.g. in the box) from UV rays.
3.4 Disassembling (see page 8 and 9)
Press in the quick-release locking device of the rods with the enclosed press-in aid (without red part) and pull the rod
out of the held suction head connector (figs. 5 and 6).
Press in the quick-release lock (fig. 7 and 8 see arrows) with the enclosed press-in aid (with red part) and pull the
rods out of the held rod connector (fig. 8).
Disassembly of the rod connectors and suction parts:
Push in the quick lock (fig. 9) of the suction head connector using the push-in aid supplied (without red part) and pull
the suction housing out of the held suction head connector (fig. 10).
This manual suits for next models
1
Table of contents
Other Roth Bathroom Aid manuals
Popular Bathroom Aid manuals by other brands

Cobi Rehab
Cobi Rehab XXL-Rehab Rise N Tilt user manual

Invacare
Invacare 9630E Styxo Assembly, installation and operating instructions

Leckey
Leckey firefly splashy BIG user manual

NRS Healthcare
NRS Healthcare H85350 User instructions

Pressalit Care
Pressalit Care R2040 Assembly instruction

WENKO
WENKO 23285100 Assembly instructions