Rothenberger RO User manual

1ENGLISH
RO THERMAL IMAGING
CAMERA
rothenberger.com
MAN00150 REV 1.00321Part No. 1000003350
RO THERMAL IMAGING CAMERA
EN Instructions for use

2ENGLISH
Contents Page
1 Introduction ..........................................................4
2 General saftey.......................................................4
3 RO thermal imaging camera overview ................5
4 Maintenance .........................................................5
4.1 Cleaning ........................................................................5
4.2 Lens maintenance.........................................................5
5 Batteries................................................................6
5.1 How to charge batteries...............................................6
5.2 Optimal battery performance ......................................6
5.3 Battery disposal............................................................6
6 Specifications........................................................7
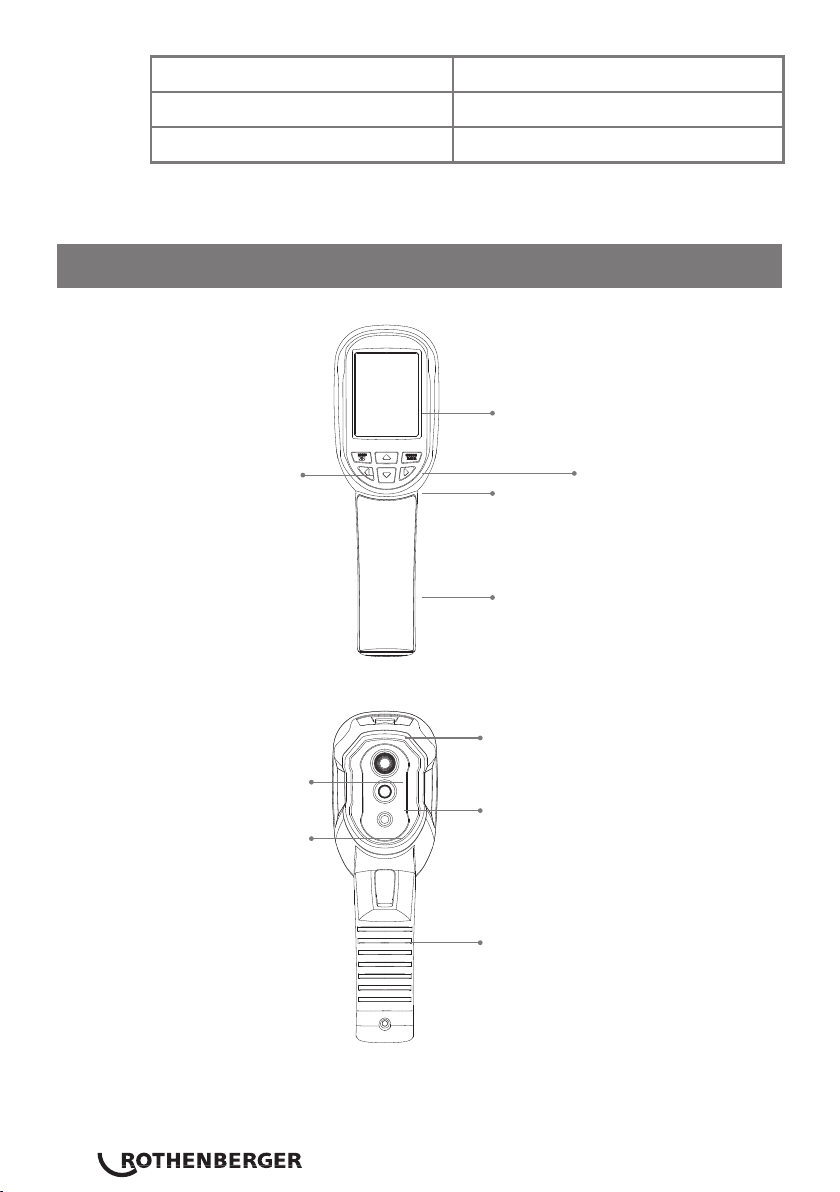
7 Layout ....................................................................8
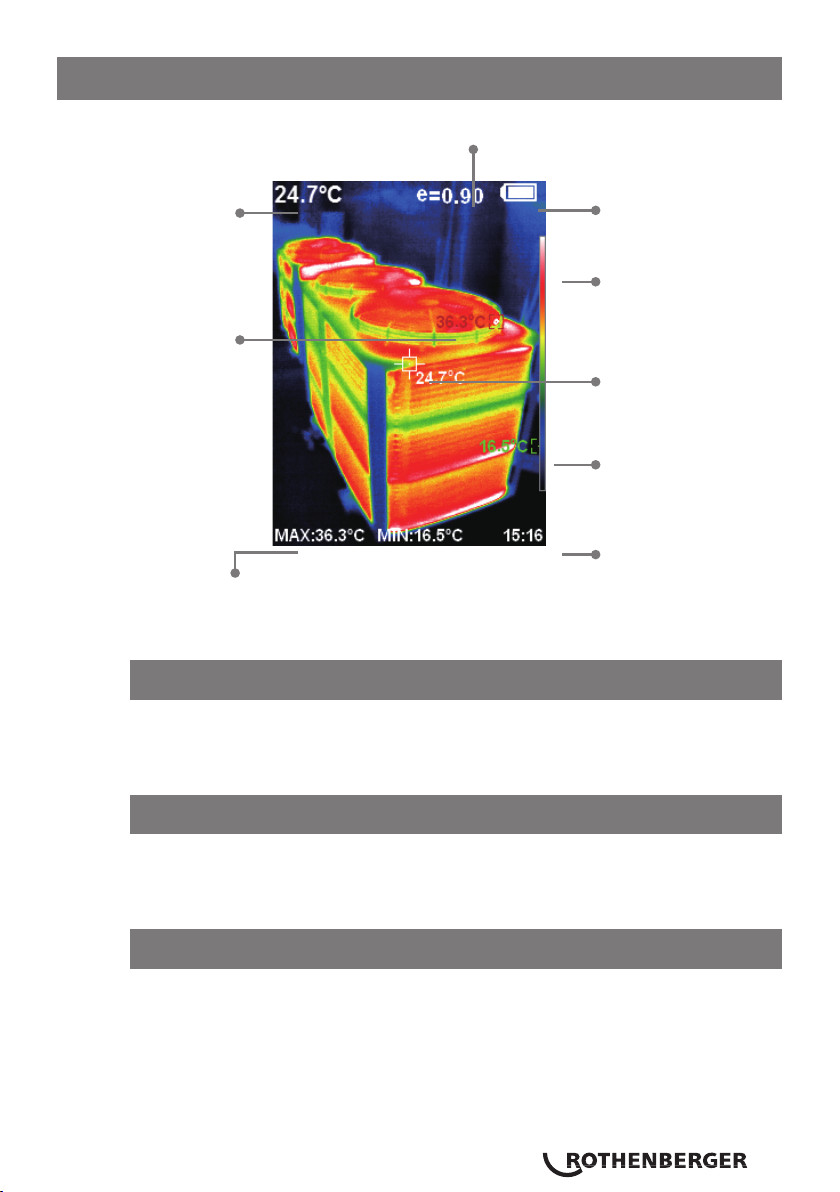
8 Display ..................................................................9
8.1 Colour code ...................................................................9
8.2 Central point temperature cursor ................................9
8.3 Highest point temperature cursor ...............................9
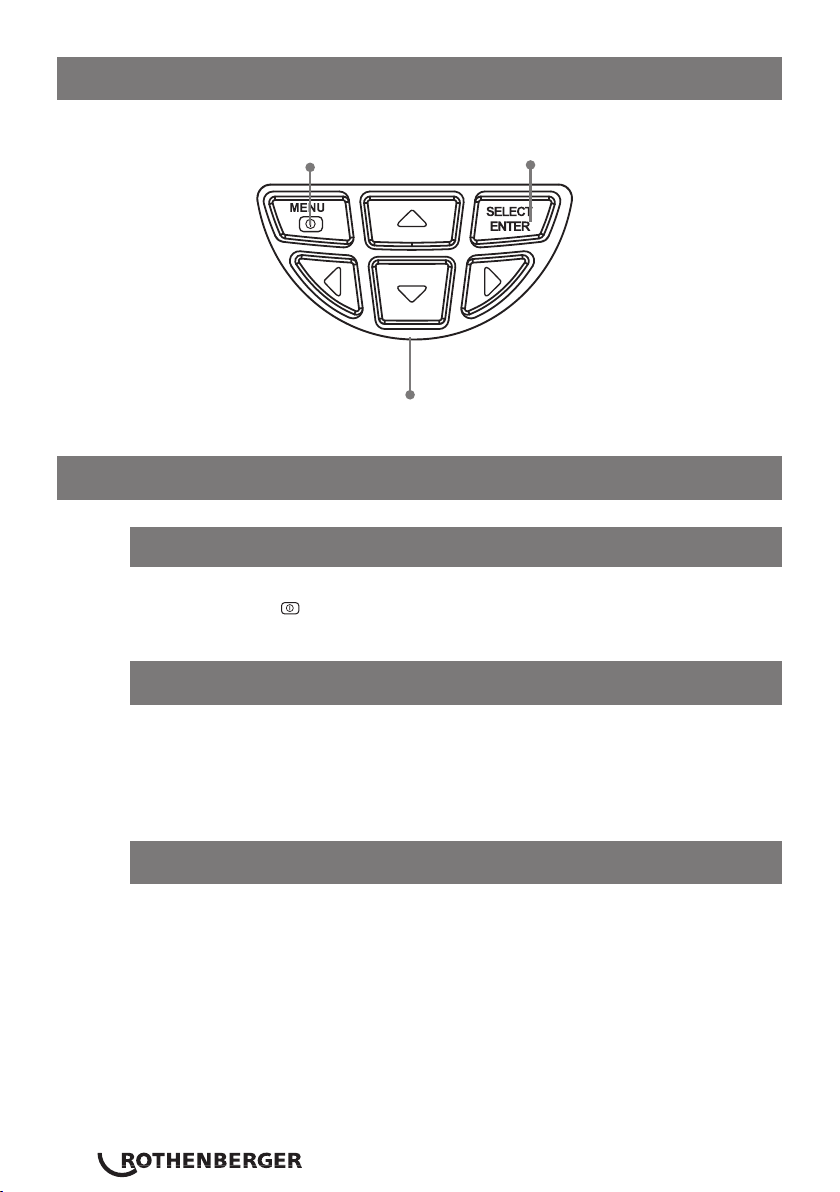
9 Keypad buttons ..................................................10
10 Operation............................................................10
10.1 Power on/off ...............................................................10
10.2 LCD screen display ......................................................10
10.3 LED light......................................................................10
10.4 Switching between image types ...............................11
10.5 Image capture .............................................................11
10.6 Hide highest & lowest temperature...........................11
10.7 Image output ..............................................................11
11 Menu .................................................................11
11.1 Image overlapping sub menu .....................................11
11.2 Image overlapping application...................................12
11.3 Image submenu – view image....................................12
11.4 Deleting images ..........................................................12
11.5 Colour palatte sub menu - description.......................13
11.6 Application of colour palatte .....................................13

ENGLISH 3
Contents Page
11.7 Emissivity sub menu - description...............................14
11.8 Emissivity setting.........................................................14
11.9 Application of emissivity measurement .....................15
11.10 Emissivity vaule of common materials .......................15
12 Settings ...............................................................16
12.1 Auto shutdown setting................................................16
12.2 Intensity setting...........................................................16
12.3 Language setting.........................................................17
12.4 Unit setting ..................................................................17
12.5 Time format setting.....................................................17
12.6 Time & date setting .....................................................17
12.7 Enable/disable hotspot cursor.....................................18
13 Troubleshooting..................................................18
14 EU declaraton of conformity ..............................19

4ENGLISH
Thank you for purchasing our instrument. Use according to these instructions
and maintain properly for optimal performance.
IMPORTANT: Please read these instructions carefully. Note the safe opera-
tional requirements, warnings & cautions. Use the product
correctly and with care for the purpose for which it is intended. Failure to do
so may cause damage and/or personal injury and will invalidate the warran-
ty. Keep these instructions safe for future use.
1 Introduction
Ensure that you have read & understood the safety precautions described in
the following text before using the product.
Safety warning
When using this product you must adhere to relevant practice regulations –
such as Health & Safety, general workshop and local authority.
• DO familiarise yourself with the applications, limitations and potential
hazards of the Thermal Imaging Camera.
• DO use the correct charging adapter that is supplied with the Thermal
Imaging Camera.
• DO keep the Thermal Imaging Camera Clean and in good condition.
• DO protect the Thermal Imaging Camera from thermal shock - caused by
large and/or fluctuations in temperature and high temperatures.
• DO NOT assemble or dismantle the Thermal Imaging Camera.
• DO NOT use the Thermal Imaging Camera if it is damaged.
• DO NOT get the Thermal Imaging Camera wet or use in damp or wet
conditions or areas where there is condensation.
• DO NOT use the Thermal Imaging Camera for any purpose other than that
for which it is designed.
• DO NOT allow untrained persons (particularly children) to operate the
Thermal Camera.
2 General saftey

ENGLISH 5
• DO NOT operate the Thermal Imaging Camera when you are tired or
under the influence of alcohol, drugs or intoxicating medication.
Safety warning
The warnings, cautions and instructions in this manual do not cover all
possible conditions and situations that may occur. Logic and attention must
be applied by the operator.
3 RO thermal imaging camera overview
The RO Thermal imaging camera Thermal Imaging Camera combines surface
temperature measurement & real-time thermal imaging.
The large colour display screen provides the user with visual information
based on the current activity including an on-screen curser to accurately
locate temperature hotspots.
The RO Thermal imaging camera uses a data storage system allowing the
user to store images on the device. These can be extracted through USB to
generate reports.
Suitable for many industries including plumbing & heating (radiators,
underfloor heating, energy auditing or water damage), automotive (heated
seats and windows, high resistance in wiring, overheating wiring or
components).
4 Maintenance
Use a damp cloth and light soap to clean the outer casing of the device. Don’t
use abradant, isopropanol or solvent to clean. The lens & screen should be
cleaned with cleaning agents for professional optical glasses.
To prevent damage of the refined anti-reflective coating:
• Don’t clean with force.
• Use a cleaning solution for lens maintenance, such as an alcohol-based
4.1 Cleaning
4.2 Lens maintenance

6ENGLISH
commercial lens cleaner & a lint-free cloth or paper towel.
• Wipe the lens surface by making circular motion. Then discard the cloth.
• If it is necessary to repeat above step, please use new cloth to dip with the
cleaning solution to wipe.
• Compressed air tanks can be used to remove loose particles.
• Use Micro USB cable to charge.
• The product has built-in chargeable 18650 lithium-ion batteries.
• When the battery level is low, the top right of the screen will display
“ ”.
• Ensure that the product is turned off before charging.
• Remove the Micro USB cable after fully charging.
• Don’t charge the battery for more than 24 hours.
• To extend the battery life, charge the product for two hours at least
every three months.
• Don’t try to charge the battery in extremely cold conditions.
This Product contains lithium-ion batteries. Always dispose of depleted
batteries using approved disposal methods that protect the environment.
5.1 How to charge batteries
5.2 Optimal battery performance
5.3 Battery disposal
5 Batteries

ENGLISH 7
Model RO Thermal imaging camera
Display screen 2.8-inch full-view TFT display
Temperature
measurement range
-20℃to 300℃(-4°F to 572°F)
Measurement accuracy ±2℃/±2% (whichever is greater)
Infrared image resolution 220×160
Visible image resolution 35200 pixel
LCD resolution 320×240
Field angle 35°×26°
Focal distance (shortest) 0.15m
Thermal sensitivity 0.07℃
Frame rate of thermal images 9Hz
Focus mode Fixed
Wavelength coverage 8-14um
Emissivity Adjustable from 0.01 to 1.00
Colour palette Rainbow, iron oxide red, cold col-
our, black & white, white & black
Storage capacity Built-in memory 3GB
File format JPG
USB Micro USB 2.0
Power supply Built-in chargeable 18650 battery
Detachable
Working time 2-3 hours
Setting command Unit, language, date, time,
information
Language English & French
Automatic power-off time Selectable: 5 minutes/20 minutes/
not power off automatically
Product size 96mm×72mm×226mm
Product weight 389g
6 Specifications

8ENGLISH
7 Layout
Work temperature 0℃to 45℃
Storage temperature -20℃ to 60℃
Relative humidity < 85%RH
This product has been tested for compliance with the following EMCThis product has been tested for compliance with the following EMC
Directive 2014/30/EU.Directive 2014/30/EU.
Colour display screen
Keypad
Select & enter
Handle
On/Off switch &
Menu
Micro USB
Infrared imaging
sensor
Visible light camera
LED lighting lamp
Image capture
trigger

ENGLISH 9
8 Display
Battery
power
Colour code
Time
Central point
temperature
cursor
Lowest
temperature
cursor
Central point
temperature
Maximum value & minimum value of
eld temperature
Highest
temperature
cursor
Current emissivity
Marks the colour corresponding to the relative temperature from low to high.
(See colour palette menu for more details).
Indicates the central position of the screen. The temperature value is also
displayed in the top left corner of the screen.
Indicates the highest temperature position in the screen area. The temperature
value is also displayed in the bottom left corner of the screen.
8.1 Colour code
8.2 Central point temperature cursor
8.3 Highest point temperature cursor

10 ENGLISH
9 Keypad buttons
10 Operation
After turning on, the screen shows the thermal imaging status.
Note: Time adjustment may be required when you move the camera between
environments with varying ambient temperatures.
Hold down the “image capture trigger” for 5 seconds to power on/off the
LED light.
Press & hold the key for 3 seconds to turn the Thermal Imaging Camera
on or off.
10.2 LCD screen display
10.3 LED light
10.1 Power on/off
Menu key & On/off key Selection key/Enter key
Navigation keys: Up, down, left & right

ENGLISH 11
11 Menu
Press the “ ” or “ ” key to switch the degree of fusion between infrared
thermal images & visible images (the degree of fusion is 0%, 25%, 50%,
75% & 100%).
Press the image capture trigger. When the capture is successful, the screen
will display “store photo?”. If “yes” is selected, press the “MENU/ ” key to
save the image. If “no” is selected, press the “ SELECT/ENTER ” key to delete
the image.
Press the “ ” key to switch between displaying or hiding the highest &
lowest temperature.
Saved images can be downloaded by connecting a computer through a Micro
USB lead.
*Supported operating systems: all USB 2.0 compliant OS.
Image overlapping makes it easier for users to understand the infrared
images by using aligned visible images & infrared images. The use of image
overlapping can capture the visible image of every infrared image so as to
display the temperature distribution in the target region correctly & share
with other people more effectively.
Press the “MENU/ ” key to access the menu bar.
10.4 Switching between image types
10.5 Image capture
10.6 Hide highest & lowest temperature
10.7 Image output
11.1 Image overlapping sub menu

12 ENGLISH
Press the “MENU/ ” key to enter the main menu, & select “ ” image
registration.
Press the “SELECT/ENTER” key to enter into image overlap adjustment mode.
Press the navigation keys (up, down, left & right to perform the visible image
shift operation.
Press the “SELECT/ENTER” key to exit the image overlapping mode (Note: If
there is no operation for more than 6 seconds, the image overlapping mode
will be automatically exited).
Press the “MENU/ ” key to enter the main menu, & select “ ” image.
Select the image you would like to delete, the screen will show a “delete
photo prompt”. You can scroll through yes or no options by pressing
Press the “ ” key to enter image list. Then press the “ ” or “ ” key
to navigate to the image you want to select. To view the image press the
“SELECT/ENTER” key.
When viewing the images, press the “ ” key to view the previous
image, Press the “ ” key to view the next image.
Press the “SELECT/ENTER” key to return to the previous menu and to exit the
menu altogether press the “MENU/ ” key.
11.2 Image overlapping application
11.3 Image submenu – view image
11.4 Deleting images
171229-105030
171229-105031
171229-105032
171229-105033

ENGLISH 13
the “ ” key. To delete the image press the “MENU/ ” key when yes is
selected.
The palette can be used to change the pseudo-colour display of the infrared
image on the display. Some tune swatches are better suited for specific
applications & can be set up as needed.
The palette is divided into five colour sections: rainbow, iron red, cool, white
hot & black hot. These palettes work best with high thermal contrast &
provide additional colour contrast between high & low temperatures.
For high heat applications the rainbow, iron oxide red & cold colour palettes
are better suited as they are easy to see the contrast between high & low
temperature.
Black & white, and white & black colour palettes provide even linear colour.
The following is an image of the same object with different colour palettes.
11.5 Colour palatte sub menu - description
11.6 Application of colour palatte
Rainbow Iron oxide
red
Cold colour White heat Black heat
Spectra
Iron
Cool
White
Black
Color palette

14 ENGLISH
The emissivity of the product can be adjusted from 0.01 to 1.00 with the
default value of 0.95. Many common objects & materials (such as timber,
water, skin & textile fabric) can reflect the heat energy effectively. So it is easy
to obtain relatively correct measurement values.
The emissivity of a course surface is usually set as 0.95. For semi-matte surfaces
that give out less energy, the emissivity is usually about 0.85 & the emissivity
of semi-gloss surfaces is 0.6. Shiny surfaces are divided into materials with
low radiation coefficient. The emissivity is usually set as 0.3 at the time of
measurement.
Setting the correct value of emissivity is very important for accurate
temperature measurement.
The surface emissivity will impact the surface temperature measured by
the product. Understanding the surface emissivity will enable you to obtain
correct the temperature measurement.
The product has four types of surface measurement modes:
• Coarse surface (0.95)
• Semi-matte surface (0.85)
• Semi-shiny surface (0.60)
• Shiny surface (0.30)
Depending on the characteristics of the measured surfaces, users may set the
emissivity value through the “self-define” option (please refer to the table of
“emissivity of common materials”).
Select “ ” (colour palette) option & press the “ ” key to enter the colour
palette list. Press the “ ” & “ ” keys to navigate once in the colour
pallete menu. Then press the “SELECT/ENTER” key to select the colour palette
you desire. Press the “ ” key to return.
11.7 Emissivity sub menu - description
11.8 Emissivity setting

ENGLISH 15
As shown in the figure, press “MENU/ ” key to enter the main menu & select “
”(emissivity) option & press “ ” key to enter the emissivity list.
Press the “MENU/ ” key to enter the main menu & select “ ”(emissivity)
option then press the “ ” key to enter the emissivity list.
Press the “ ” & “ ” keys to navigate the emissivity. Then press the
“SELECT/ENTER” key to determine selection of the emissivity. Press the “
” key to return.
If you select “self-defined” emissivity, press the “SELECT/ENTER” key to enter
the editing state.
Press the “ ”/“ ” keys to change the number & press the “ ”/ “ ”
keys to change the value.
After the modification is complete, press the “SELECT/ENTER” key to confirm,
then press the “ ” to return. The “MENU/ ” button exits the menu.
11.9 Application of emissivity mesurement
11.10 Emissivity value of common materials
Matt (e=0.95)
Emissivity
Semi-matt (e=0.85)
Semi-glossy (e=0.60)
Glossy (e=0.30)
Custom
0.01
Substance Thermal radiation Substance Thermal radiation
Bitumen 0.90~0.98 Black cloth 0.98
Concrete 0.94 Human skin 0.98
Cement 0.96 Foam 0.75~0.80
Sand 0.90 Charcoal dust 0.96
Earth 0.92~0.96 Paint 0.80~0.95
Water 0.92~0.96 Matte paint 0.97
Ice 0.96~0.98 Black rubber 0.94

16 ENGLISH
Snow 0.83 Plastic 0.85~0.95
Glass 0.90~0.95 Timber 0.90
Ceramics 0.90~0.94 Paper 0.70~0.94
Marble 0.94 Chromium
hemitrioxide
0.81
Gypsum 0.80~0.90 Copper oxide 0.78
Mortar 0.89~0.91 Ferric oxide 0.78~0.82
Brick 0.93~0.96 Textile 0.90
12 Settings
Press the “MENU/ ” key to select the “ ”(setting) option in the main
menu. Press the “ ” key again to enter the settings sub-menu.
After selecting “ ” automatic shutdown, press the “ ” key to enter the
auto power shutdown setting. Can be set how long you want it to be before
the Thermal Imaging Camera automatically shuts down.
After selecting “ ” automatic shutdown, press the “ ” key to enter the
12.1 Auto shutdown setting
12.2 Intensity setting

ENGLISH 17
auto power shutdown setting. Can be set how long you want it to be before
the Thermal Imaging Camera automatically shuts down.
After selecting “ ” (Language, press the “ ” key to edit the language
setting. Available in 2 languages: English & French.
After selecting “ ” unit, press the “ ” key to enter the temperature unit
setting. Can be set to Celsius or Fahrenheit.
After you select “
24
h
” Time format, press the “ ” key to enter the time
format setting. Can be set to 24 hours or 12 hours.
In the Set Time menu “ ” you can set the time and date.
Press the “ ” / “ ” key to navigate between the year/month/day/hour/
minute.
Press the “SELECT/ENTER” key to enter editing mode.
Press the “ ” & “ ” keys to select the parameter to be changed. Press “
12.3 Language setting
12.4 Unit setting
12.5 Time format setting
12.6 Time & date setting
24h
Year
Month
Day
Hour
Minute
2016
9
9
11
33
Second 33
Set time

18 ENGLISH
In the cold hotspot menu “ ” you can toggle the hotspot on or off.
Press the “ ” / “ ” keys to either enable or disable the option. Then press
the “ SELECT/ENTER ” key to determine selection.
After setting, press the “ ” key to exit.
12.7 Enable/disable hotspot cursor
” & “ ” key to change the value. After completing the change, press the
“ SELECT/ENTER” key to enter.
After setting, press the “ ” key to exit.
Spot
Off
On
24h
13 Troubleshooting
If you encounter any problems when using the thermal imaging camera
please use the following table for repair. If the problems are not solved, please
cut off the power supply & contact with the manufacturer.
Failure type Failure cause Solution
The thermal imaging
camera will not power
on
The battery is not
installed
Install the battery
correctly
The battery is at Replace with new
battery or charge
The thermal imaging
device powers off
automatically
The battery is at Replace with new
battery or charge
The product is set to
power off automati-
cally
Check the Auto
Shutdown setting
(refer to section 5.1)

ENGLISH 19
14 EU declaraton of conformity
This declaration of conformity is issued under the sole responsibility of the
manufacturer:-
Kane International Ltd.
Kane House, 11 Bessemer Road, Welwyn Garden City, Hertfordshire. AL7
1GF, UK.
Tel: +44 1707 375550 Web: www.kane.co.uk
The KANE T-CAM is in conformity with the relevant Union harmonization
legislation below:
DIRECTIVE TITLE
201430EU Electromagnetic Compatibility (EMC)
201165EU Restriction of the use of certain hazardous substances in
electrical and electronic equipment (RoHS)
The following harmonised standards and technical specifications have been
applied:
CERTIFICATION
The KANE T-CAM is tested to the following standards
EMC
EN61326-1:2013
SAFETY
EN61010-1:2010 + A1:2019
ROHS
IEC62321-2:2013, IEC62321-1:2013, IEC62321-3-1:2013, IEC62321-
5:2013, IEC62321-4:2013, IEC62321-7-2:2017, IEC62321-7-1:2015,
IEC62321-6:2015
Signed for on behalf of:- Kane International Ltd.
11 August 2020
Paul Morrison
Engineering Manager

Stock No. QRG00088 Rev: 1.20720
Please register your RO TCAM at www.kane.co.uk
PLEASE READ ALL SAFETY WARNINGS IN THE MANUAL
Register your RO TCAM to create your KAM
dashboard:
★ Simple online booking on www.kane.co.uk
★ Automatic reminder when due for recertification
★ FREE POSTAGE returning your Rothenberger analyser
★ SAME DAY annual FGA recertification OR YOUR MONEY BACK*
KAM
Register your RO TCAM
4
Table of contents