manuals.online logo
Brands
  1. Home
  2. •
  3. Brands
  4. •
  5. Rotofluid
  6. •
  7. Industrial Equipment
  8. •
  9. Rotofluid 50 Series Manual

Rotofluid 50 Series Manual

50 SERIES INSTALLATION, OPERATION AND
MAINTENANCE INSTRUCTIONS
WARNING
Unless specified; ROTOFLUID rotary joints must not be used with Hydrocarbons or Flammable
Mediums. Leaking may result explosion or fire.
Document No: TL 7 43 EN Release Date: 01.01.2015
Medium: Water
Max. Pressure: 10 bar (150 psi)
Max. Temperature: 120⁰C (250⁰F)
Max. Speed: 100 RPM
- Do not work with max. pressure at max. speed.
- All ROTOFLUID products are leakage tested before shipment. Disassemling or dismantling the joint
invalidates the warranty.
- Operator should not make any modification or attachments and retroffiting of the rotary joint without
manufacturers’ consent is prohibited.
- It is important to use correct hand of rotary connection thread to ensure that the Rotary Joint will not
unscrew. If shaft rotates forward & reverse; flanged connection is recommended.unscrew. If shaft rotates forward & reverse; flanged connection is recommended.
- ROTOFLUID Rotary Joints may only be installed by personel who have experience and knowledge
about rotary joints and plumbing systems.
- For safe operation only use genuine ROTOFLUID parts.
- For safe operation only use hoses which are appropriate for the media.
- Follow engineering specifications of the machine builder.
- 50 Series Rotary Joints are designed to work with the interpassing medium. Do not run dry very long
time. If application needs dry running, please consult factortime. If application needs dry running, please consult factory.
INSTALLATION
- Do not connect Rotary Joint directly to piping. Rotary Joints are
designed to float with the flexible hoses.
- Install hose with curve in direction of rotation.
- Unless specified, all 50 Series Rotary Joints are shipped as P-type.
- All 50 Series Rotary Joints has a standard P type housing. S type
and RSP type joints consists of P-type housings with the appropriate
elbow (S or RSP) type.elbow (S or RSP) type.
- Always flood the Rotary Joint and purge any entrapped air in the
system before operating the machine to improve joint performance
and longer joint life.
Direction of
rotation
Page 1 / 3 www.rotofluid.com
Rev No: 0
1
3b
4a
4b
7a
7b 9a
9b
3a
50 SERIES INSTALLATION, OPERATION AND
MAINTENANCE INSTRUCTIONS
Page 2 / 3 www.rotofluid.com
- 50 Series Rotary Joints are equipped with composite or bronze
bearing which are self lubricating which does not need lubrication for life.
- 50 Series Rotary Joints are maintenance free.
- Before maintenance, allow the machine and media to cool down.
- Be sure that no feed pressure is applied.
- If the rotary joint is defected and leaking occurs, replace seals with new ones and do not work with
leaking joints.
MAINTENANCE
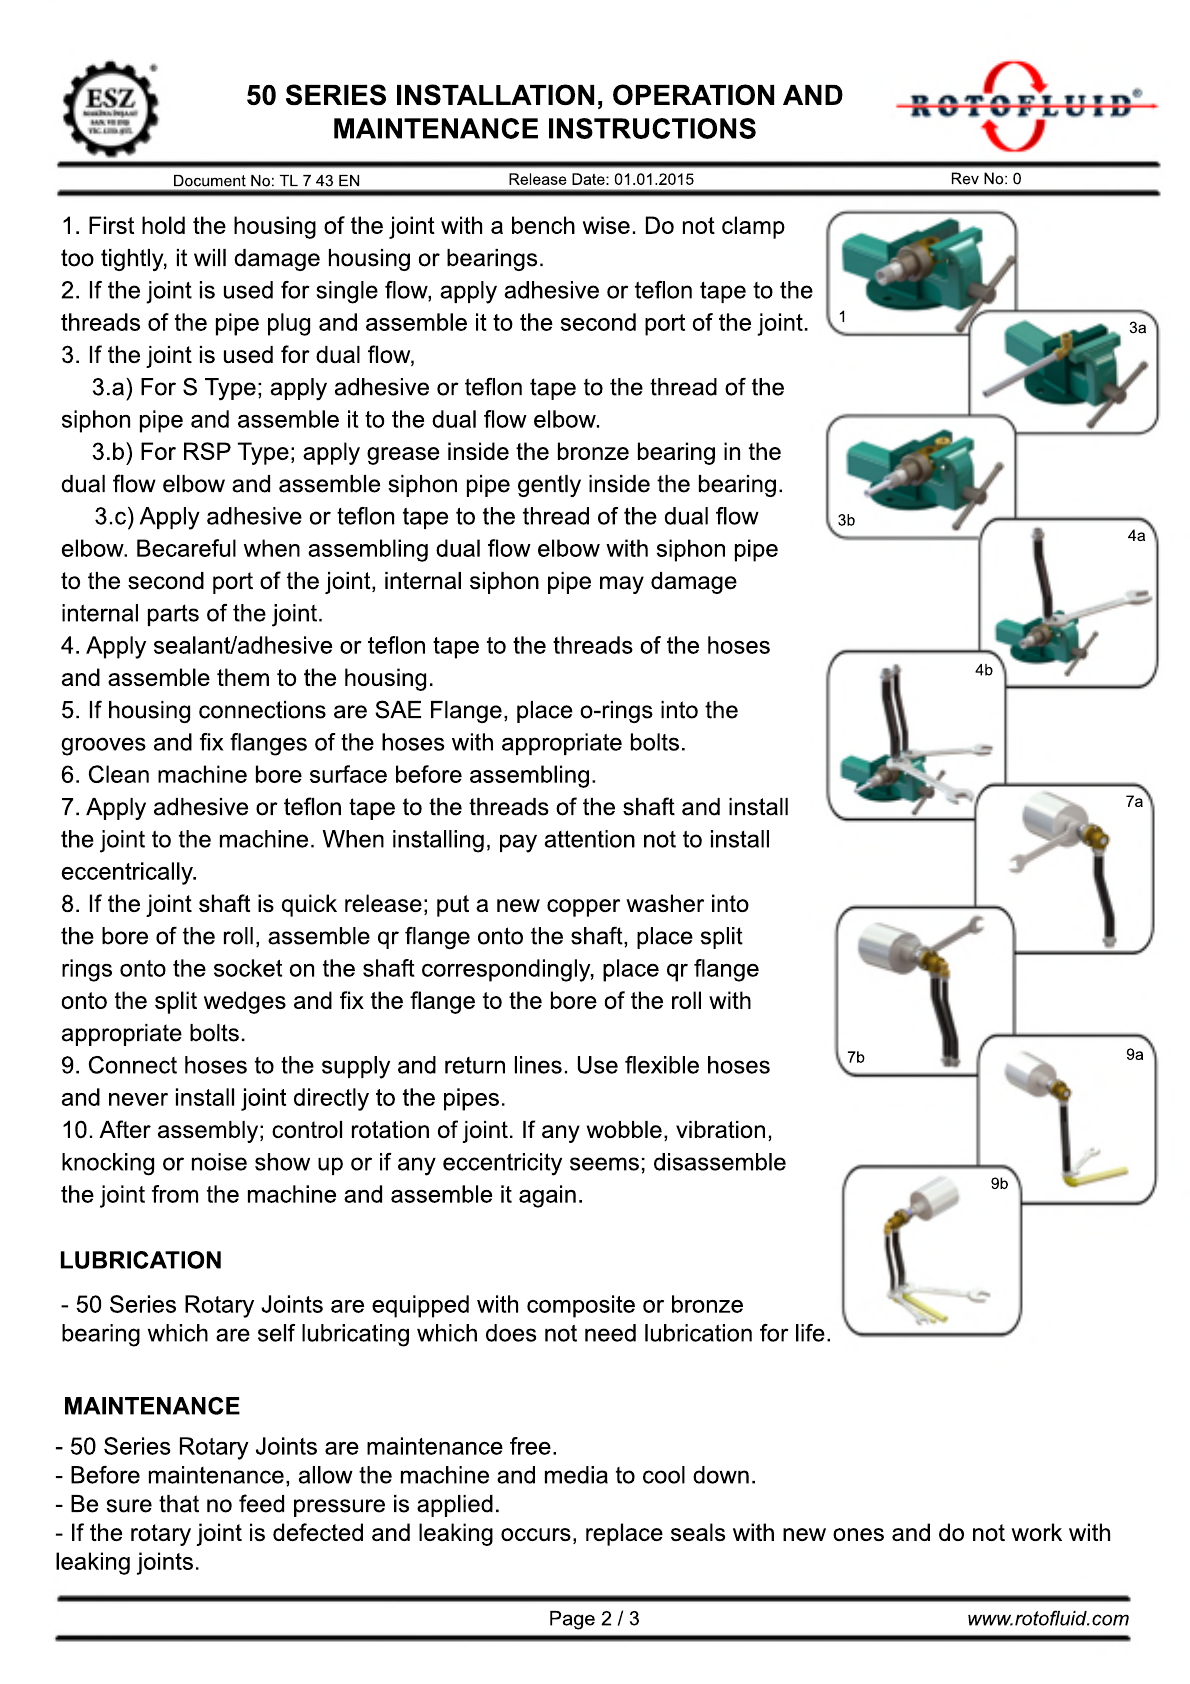
1. First hold the housing of the joint with a bench wise. Do not clamp
too tightly, it will damage housing or bearings.
2. If the joint is used for single flow, apply adhesive or teflon tape to the
threads of the pipe plug and assemble it to the second port of the joint.
3. If the joint is used for dual flow,
3.a) For S Type; apply adhesive or teflon tape to the thread of the
siphon pipe and assemble it to the dual flow elbosiphon pipe and assemble it to the dual flow elbow.
3.b) For RSP Type; apply grease inside the bronze bearing in the
dual flow elbow and assemble siphon pipe gently inside the bearing.
3.c) Apply adhesive or teflon tape to the thread of the dual flow
elbow. Becareful when assembling dual flow elbow with siphon pipe
to the second port of the joint, internal siphon pipe may damage
internal parts of the joint.
4.4. Apply sealant/adhesive or teflon tape to the threads of the hoses
and assemble them to the housing.
5. If housing connections are SAE Flange, place o-rings into the
grooves and fix flanges of the hoses with appropriate bolts.
6. Clean machine bore surface before assembling.
7. Apply adhesive or teflon tape to the threads of the shaft and install
the joint to the machine. When installing, pay attention not to install
eccentricalleccentrically.
8. If the joint shaft is quick release; put a new copper washer into
the bore of the roll, assemble qr flange onto the shaft, place split
rings onto the socket on the shaft correspondingly, place qr flange
onto the split wedges and fix the flange to the bore of the roll with
appropriate bolts.
9. Connect hoses to the supply and return lines. Use flexible hoses
and never install joint directly to the pipes.and never install joint directly to the pipes.
10. After assembly; control rotation of joint. If any wobble, vibration,
knocking or noise show up or if any eccentricity seems; disassemble
the joint from the machine and assemble it again.
LUBRICATION
Document No: TL 7 43 EN Release Date: 01.01.2015 Rev No: 0
50 SERIES INSTALLATION, OPERATION AND
MAINTENANCE INSTRUCTIONS
Document No: TL 7 43 EN Release Date: 01.01.2015 Rev No: 0
Page 3 / 3
Repair kits are available for 50 Series and can be supplied by ROTOFLUID.
If you don’t want to repair your rotary joints, ROTOFLUID will disassemble the joints, clean and replace
worn out parts and all sealing tests will be made and joints will be shipped as good as a new joint.
Small Spare Parts Kit
- (6) Seal Ring
- (7) Seal Ring O-ring
- (9) Floating Seal Ring
- (10) Floating Seal O-ring
- (13) Spring
Spare Parts Kit
- (2) Shaft Threaded - (8) Pim
- (3) Bearing - (9) Floating Seal Ring
- (4) O-ring - (10) Floating Seal O-ring
- (5) PTFE Washer - (12) Washer
- (6) Seal Ring - (13) Spring
- (7) O-ring- (7) O-ring
www.rotofluid.com

This manual suits for next models

2

Other Rotofluid Industrial Equipment manuals

Rotofluid 20 Series Manual

Rotofluid

Rotofluid 20 Series Manual

Rotofluid 50 Series Manual

Rotofluid

Rotofluid 50 Series Manual

Rotofluid 20 Series Manual

Rotofluid

Rotofluid 20 Series Manual

Popular Industrial Equipment manuals by other brands

ABB +Q957 user manual

ABB

ABB +Q957 user manual

G.B.C BASIC EDGE 50 instruction manual

G.B.C

G.B.C BASIC EDGE 50 instruction manual

Tronair Batpak 11-6602-1000 Operation & service manual

Tronair

Tronair Batpak 11-6602-1000 Operation & service manual

Pilz PNOZ mi2p Operation manual

Pilz

Pilz PNOZ mi2p Operation manual

Clemco Zero BNP 6012 manual

Clemco

Clemco Zero BNP 6012 manual

Erskine Attachments V-Plow Operator's manual

Erskine Attachments

Erskine Attachments V-Plow Operator's manual

ABB HT610965 Operation manual

ABB

ABB HT610965 Operation manual

Morra MH 540 user manual

Morra

Morra MH 540 user manual

Eaton S090ST manual

Eaton

Eaton S090ST manual

GRIGGIO G 240 P4 instructions

GRIGGIO

GRIGGIO G 240 P4 instructions

Nexen AIR CHAMP HT45 user manual

Nexen

Nexen AIR CHAMP HT45 user manual

WTE V5 installation manual

WTE

WTE V5 installation manual

ABB HT845232 Operation manual

ABB

ABB HT845232 Operation manual

SMC Networks CJP Series Operation manual

SMC Networks

SMC Networks CJP Series Operation manual

JohnDow Industries JDI-AFT58 Operator's manual

JohnDow Industries

JohnDow Industries JDI-AFT58 Operator's manual

IMB MB9016A instruction manual

IMB

IMB MB9016A instruction manual

Clarke CUMB1 Assembly & operating instructions

Clarke

Clarke CUMB1 Assembly & operating instructions

amiad Arkal Spin Klin 2 user guide

amiad

amiad Arkal Spin Klin 2 user guide

manuals.online logo
manuals.online logoBrands
  • About & Mission
  • Contact us
  • Privacy Policy
  • Terms and Conditions

Copyright 2025 Manuals.Online. All Rights Reserved.