Rotolight NEO 3 User manual

MOVE. SHOOT. CREATE
QUICK START GUIDE
NEO 3 & AEOS 2
Version V3.0 January 2023
STANDARD & PRO EDITIONS

POWERFUL OUTPUT,
LIGHTWEIGHT DESIGN
HIGH SPEED SYNC
RGBWW FLASH
16.7M COLOURS,
2500 FILTERS
INTUITIVE
TOUCHSCREEN DISPLAY
WELCOME TO YOUR NEW ROTOLIGHT
TIME TO CREATE
PRODUCT OVERVIEW ROTOLIGHT APP MASTER OF LIGHT (MOL)
- PRESETS
ROTOLIGHT USER GROUP
JOIN OUR

TOUCHSCREEN
DISPLAY
WORLD’S BRIGHTEST
ON-CAMERA
LED LIGHT
BUILT-IN
ELINCHROM®
GODOX*®
PROFOTO*® FLASH
RECEIVERS & WIFI
USB FIRMWARE
UPDATABLE
HIGH-PERFORMANCE
USB RECHARGEABLE
LITHIUM BATTERY
16.7 MILLION
COLOURS, 2500 GELS
CLICK BOTH DIALS
TOGETHER TO LOCK /
UNLOCK TOUCHSCREEN
TOUCHSCREEN
DISPLAY
ULTRA-THIN
DESIGN
ALUMINIUM
HANDLES
SMARTSOFT ENABLED
INTERGRATED
V-LOCK
BATTERY PLATE
16.7 MILLION
COLOURS, 2500 GELS
CLICK BOTH KNOBS
TOGETHER TO LOCK /
UNLOCK TOUCHSCREEN
*PRO MODELS ONLY
*RED HANDLES
ON PRO MODELS ONLY
*ALUMINUM RED DIALS
ON PRO MODELS ONLY
POCKET SOCKET
PLEASE NOTE NEO 3 PRO
REQUIRES A HIGHER POWER PSU
THAN NEO 3 STANDARD.
AVAILABLE AT ROTOLIGHT.COM

HUE, SATURATION, INTENSITY
H
S
I
S
F
XS
E
T
GEL
S
CC
T
FL
S
H
SPECIAL EFFECTS
SYSTEM
SETTINGS
FILTER
MENU
COLOUR
TEMPERATURE
( KELVIN )
FLASH
MENU
HOME MENU
From the home menu, select from 5 operating modes; CCT (Continuous light, Kelvin 3000-
10,000K), HSI (Hue, Saturation, Intensity) for 16.7M RGB Colours, GELS for 2500 digital
lters and sampled ‘source match’ effects, FLASH for RGB HSS ash (ash in any CCT, HSI
or lter colour). System settings, such as language, display and factory reset, can also be
adjusted by the ‘SET’ page. On start up, the light will automatically recall your last used
settings and on each of the 5 operating mode pages. (e.g. CCT, HSI).
CCT MENU
Using the touchscreen slider or right-hand knob for ne adjustments, adjust Kelvin from
3000-10,000K to your desired setting, (typically 5600K). For maximum peak output
brightness, set the light to 4600 Kelvin where both warm and cool LEDs are on full power.
Use the left-hand knob to adjust brightness or tap the bottom-left brightness icon to use
the on-screen slider that appears. To save your current settings, long press on one of the
numbered presets, (across the top) and a prompt to save will appear. To recall, short tap on
a preset, (indicated by a thick blue line at bottom of preset box). Swipe right across preset
bar to reveal additional presets.
5600
K
100
%
1 2
5600
K
G
/
M
:-54
HOME
BATTERY
LEVEL
BRIGHTNESS
COLOUR
TEMPERATURE
/GREEN MAGENTA
TAP TO SWITCH
USER PRESETS
(LONG PRESS TO SAVE)
COLOUR TEMP.
SLIDER
SAVED PRESET
INDICATOR
(TAP TO RECALL)
DIFFUSION*
(TOUCH TO SELECT)
*AEOS 2 ONLY, ENABLED WHEN
SMARTSOFT BOX IS CONNECTED
ACCESS
KELVIN PRESETS
(TOUCH TO REVEAL)

© SAM NASH

FLASH MENU
Rotolight AEOS 2 & NEO 3 are the world’s rst RGBWW LED lights capable of High Speed
Sync ash, providing an extra stop of output when compared to their maximum continuous
power**. The ash will default to the colour mode you were using prior to entering ash, (e.g.
CCT, HSI or GELS). Tap the bottom-right button to switch between colour modes, (Kelvin,
Gels, HSI). For best results, maximum power is available at 4600 Kelvin. Flash power should
always be set to ‘MAX’ or ‘MAX+’ if available with ash duration to the longest available, e.g.
1/50th. Any faster shutter speed will be captured automatically.
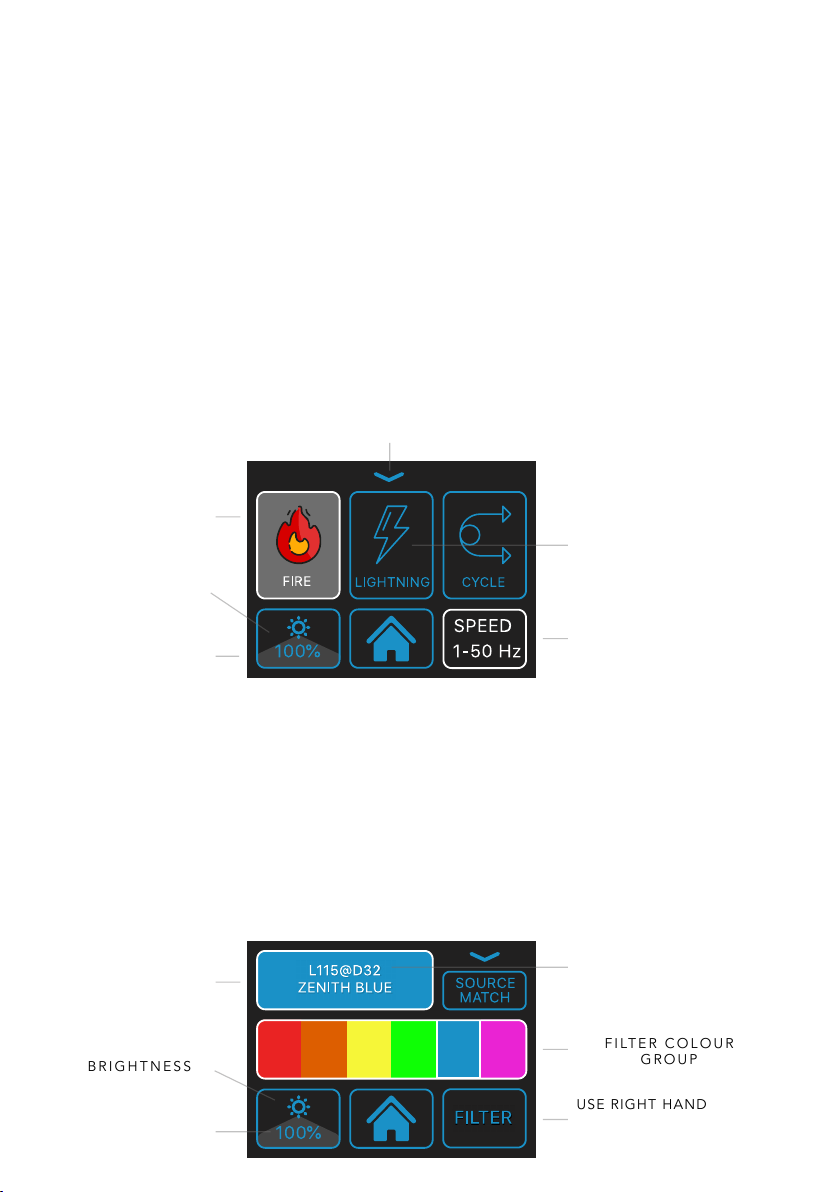
100
%
6620K
GRP
MAX+
1
1/50s
TEST
SKYP
SPEED
FREQ 1
FREQUENCY
FLASH
DURATION
GROUP
COLOUR
TEMP. / FILTER / HSI
TAP TO SWITCH TO HUE
OR FILTER COLOUR.
FLASH RECEIVER
MODE
SKYPORT NORMAL
(NON HSS) / SPEED (HSS) /
GODOX* / PROFOTO* ETC.
MODELLING
LIGHT POWER
FLASH
POWER
TEST FIRE
The lights feature an integrated Godox*, Profoto*, Elinchrom Skyport, and other* wireless
ash receivers compatible with their associated transmitters. For Elinchrom, ensure Skyport
mode, (top-right) is set to ‘SPEED’ for HSS, and that the transmitter is also set to ‘SPEED’
mode, (Menu> ELSP mode> Speed). Third-party transmitters, e.g. Godox X1T/R, can also be
used via a wired connection to the 3.5MM ash sync socket found on the light.
*Pro models only
Please note: modelling light power can be adjusted or turned off with the left-hand knob. in order to preserve battery life, it is signicantly
less bright than the regular continuous power, whilst providing enough light to focus and to compose your shot. **in CCT mode.
USER PRESETS &
FLASH SLAVE MODE
( TAP TO REVEAL )
UNIVERSAL FLASH SLAVE MODE
NEO 3 PRO / AEOS 2 PRO can output a synchronized ash slave command using the spare
Elinchrom receiver, that will re ANY Skyport enabled Rotolight ( NEO 2, AEOS 1, AP2, TITAN).
This would allow you to use a Godox / Profoto transmitter* to trigger an older generation Rotolight
when utilising a NEO 3 PRO or AEOS 2 PRO. Alternatively, plug in a third party (e.g. Godox) ash
reciever into the 3.5mm ash socket and using a standard edition NEO 3 / AEOS 2 now trigger all
your Skyport enabaled Rotolights from a Godox or Profoto transmitter.
*See Rotolight.com/support for list of compatible transmitters
100
%
6620K
GRP
MAX+
1
1/50s
TEST
SYNC
GODOX
FREQ 1
1. In flash menu press the
downward arrow to reveal user
prests & flash slave out toggle.
Touch slave out icon to enable
slave out mode. (icon will turn
green when enabled)
2. In the top left box, select
skyport (skyp, speed) to set the
flash slave output frequency
settings for any connected
slaves.
3. Next, in the top left box, select
the desired ash input receiver
brand (Godox, Profoto, etc). Select
sync wired on standard NEO 3 /
AEOS2 when plugging a third party
receiver into the 3.5mm ash socket.
100
%
6620K
GRP
MAX+
1
1/50s
TEST
SKYP
SPEED
FREQ 1
100
%
0
º
X
8 1
T
E
ST
H
U
E
31 32
S
LA
V
E
UT

HSI MENU
Access up to 16.7Million colours with the HSI menu. Using the touchscreen slider or right-
hand knob for ne adjustments, adjust hue colour to your desired setting. Tap the bottom-
right-hand box to adjust saturation of the selected colour. Use the left-hand knob to adjust
brightness or tap the bottom-left brightness icon and use the on screen slider that appears.
To save your current settings, long press on one of the numbered presets across the top and
a prompt to save will appear. To recall, short tap on a preset, (indicated by a thick blue line at
bottom of preset box). Swipe right across preset bar to reveal additional presets.
BATTERY
INDICATOR
BRIGHTNESS
HUE / SATURATION
(TOUCH TO SELECT)
USER PRESETS
(LONG PRESS TO SAVE.
CHOSEN PRESET COLOUR
WILL NOW DISPLAY IN
BOX.)
HSI COLOUR
SLIDER
TRIANGLE INDICATES
SECONDARY FUNCTION
ACCESS MOL
PRESETS
(TOUCH TO REVEAL)
MASTER OF LIGHT PRESETS
Including over 100+ built-in exclusive special effects, GEL and HSI colour presets and
accompanying tutorial videos from some of the world’s leading photographers and Emmy-
winning lmmakers at your ngertips. With SFX presets designed by Two-time Emmy® Award
winner Roy Wagner (Nightmare on Elm Street, House, Ray Donovan), Emmy® Winning Visual
FX Veteran Stefan Lange, (Batman, Tombraider, No Time to Die), Cinematographer of the Year
2021, Denson Baker, (The Colour Room, Ophelia, The Lumineers) and more.
The Master of Light preset pack comes included as standard with the PRO models however
they can be purchased for standard models via the Rotolight APP.
ACTIVE
PRESET PACK
AVAILABLE
PRESETS
(SWIPE TO REVEAL
ALL PRESETS)
MASTER OF LIGHT
PRESETS
(SWIPE TO REVEAL
ALL PRESETS)
EXIT PRESETS

100
%
FIL
T
E
R
L
115@
D
32
Z
ENI
T
H BL
U
E
S
O
UR
CE
MA
T
CH
FILTER COLOUR
GROUP
BRIGHTNESS
USE RIGHT HAND KNOB,
TO CYCLE SELECTED
FILTER GROUP /
SOURCE MATCH
FILTER MENU
Access up to 2500 digital lters and sampled ‘Source Match’ effects using the ‘GELS’ menu. Tap
to select preferred lter group, (i.e. ‘RED’) and use the right-hand knob to cycle available lters in
that group. Click on the right-hand knob to switch between a daylight, ‘D65’, or tungsten, ‘D32’
emulation of the selected lter. The selected lter is indicated by the last digits of the displayed
lter name. Use the left-hand knob to adjust brightness of the selected lter. Tap the top-right-
hand box, ‘Source Match’ for real-world sampled lighting sources. Rotate the right-hand knob to
cycle available Source Match samples.
ACCESS MOL / USER PRESET BANK
SFX CONTROL
(I.E. SPEED)
ACTIVE EFFECT
(TOUCH SFX TO START/STOP)
AVAILABLE SFX
(SWIPE TO
REVEAL MORE)
PEAK
BRIGHTNESS
SFX MENU
Enhance your feature lm, music video or short lm with Rotolight’s award-winning SFX,
which have been designed and developed with Stefan Lange, (James Bond - Skyfall/
No Time to Die, Batman, Tombraider & many, many more). Swipe across the SFX row to
reveal available SFX. Tap desired SFX to start the effect and tap once more to stop. Certain
effects, (fade, gunshot and paparazzi) can also be triggered using the right-hand knob
when selected via the app or the test-re button on the Elinchrom Skyport trigger. Each
effect typically has multiple adjustable parameters. A grey triangle on the bottom-left box
indicates a secondary function. Tap to reveal and adjust accordingly. For example, touch
to select the Police SFX; use the bottom-left knob to adjust SFX brightness or tap to adjust
colour mode. Touch the downward arrow to reveal user and MOL presets and switch
between default SFX parameters or custom. In custom mode SFX will use last used RGB
colour from HSI or gels page as the base colour for the SFX setting.
Note: The inbuilt SFX have colours assigned to them, (i.e. warm orange/red for re) by default to produce realistic SFX. For
fully customisable SFX, determined by the last-used HSI or lter colour, the default colours can be disabled in the MOL menu
at the top of the sfx page.
TRIANGLE INDICATES
SECONDARY
FUNCTION, TOUCH
TO REVEAL
STORE &
RECALL USER/
MOL GEL
PRESETS
D32 (TUNGSTEN) O R
D65(DAYLIGHT)
INDICATOR
CLICK THE RIGHT KNOB TO
SWITCH EMULATION
TRIANGLE INDICATES
SECONDARY
FUNCTION, TOUCH
TO REVEAL

© SAM NASH

CHANGE CONTROL SETTING
LOCAL CONTROL - CONTROL VIA TOUCHSCREEN OR KNOBS
APP CONTROL - CONTROL VIA ROTOLIGHT APP (ENABLES WIFI)
AUTO - (RECOMMENDED) MAX POWER WITH AUTO FAN CONTROL
VIDEO - SILENT FAN OPERATION, REDUCED MAX POWER
OFF - NO FAN, CAPPED MAX POWER
*FLASH POWER UNAFFECTED BY FAN MODES
ON = PERMANENTLY ON
AUTO = AUTO OFF
FAN MODE
ARROW INDICATES
TOUCH TO
REVEAL SUB-MENU
SYSTEM
SETTING
SWIPE UP OR
USE LEFT KNOB
TO SCROLL
SYSTEM
SETTINGS
CURRENT SETTING
(USE RIGHT KNOB TO
CHANGE VALUE)
SYSTEM MENU
Adjust universal system parameters and apply factory reset in the SYS menu. Swipe up to
reveal system parameters and use the right knob to adjust selected option.
LANGUAGE SELECTOR
ENGLISH, GERMAN, FRENCH, SPANISH, ITALIAN, DUTCH
FACTORY RESET, SCROLL RIGHT KNOB TO ACTIVATE
SERIAL NUMBER, FIRMWARE, VERSION
REGULATORY INFO: FCC ID, WIFI, IC & MORE
MAX - (RECOMMENDED) MAX POWER, AT ANY KELVIN
CONSTANT - CONSTANT LUX ( EXPOSURE ) REGARDLESS OF KELVIN.
IDEAL FOR VIDEO OPERATION, REDUCED MAX POWER
FDIM
FAN MODE
LUX MODE
CONSTANT
TRUE APERTURE DIMMING (FDIM) CALCULATE AND
DISPLAY THE LIGHT OUTPUT AS AN F-STOP FOR A
SUBJECT AT A GIVEN DISTANCE, ISO AND SHUTTER SPEED,
ELIMINATING THE NEED FOR A LIGHT METER. PRO MODELS ONLY

APP CONNECTION GUIDE V3.0
In order to connect a xture to the Rotolight App it is necessary to have rmware version 3.0
or later installed into you light. To verify which rmware is currently installed, go to system
page > About OR it is also displayed on power up of the light
Current rmware can be found on the Rotolight website.
1. Power on your light and navigate to the ‘SYS’ menu.
2. Select the ‘Wi control’ option from the Sys menu.
3. Within the control menu you will see two options.
LOCAL CONTROL turns off the WiFI
APP CONTROL turns on the Wi.
Select ‘APP CONTROL’
If ‘APP CONTROL’ is already highlighted then the WiFI is on. The
xture will remember the setting so everytime your light is power
cycled the xture will remain in the state it was set in previously.
A
PP
CON
TR
OL
LOCAL
CON
TR
OL
BAC
T
O N
U
W
IFI I
n
i
t
iai
s
i
n
g
,
W
ai
t
f
or
“
W
IFI
R
ead
y
”
O
4. If you have just switched to ‘APP CONTROL’ or if you have
just powered on your light the WiFi module needs time to
boot up. This takes approximetely 20 seconds and you will
see the message ‘WiFi Initialising, wait for ‘Wi Ready’’. This
message is only displayed within the control menu.
5. When the Wi module has nished booting up and is ready
to accept connections you will see the message ‘Wi Ready’.
6. When the WiFi is ready to accept connections you will be
taken back to the control menu. Select ‘APP CONTROL’ again
to open the QR code screen. Please note that if your Wi was
previously ready to accept connections then selecting ‘APP
CONTROL’ in step 3 will take you straight to the QR code
screen.
H
S
I
S
F
XS
E
T
GEL
S
CC
T
FL
S
H
A
PP
CON
TR
OL
LOCAL
CON
TR
OL
BAC
T
O N
U
1.
2.
3.
A
PP
CON
TR
OL
LOCAL
CON
TR
OL
BAC
T
O N
U
W
IFI
R
ead
y
O
4.
5.

7. Open up the Rotolight App on you mobile device. If this is
the rst time you have used the app you will need to complete
the sign in process and accept the Terms and Conditions.
8. From within the Rotolight App Select the Red circle with the
plus symbol.
9. After you have selected plus symbol this will open the
Camera on you mobile device.
Move the camera over the QR code shown on the light.
The App should now attempt to connect to your light.
Important Note:
Some cameras on lower end devices, or in conditions with a lot
of ambient light, can struggle to focus on the QR code. There
are two alternative ways to add a device without scanning the
QR code.
You can scan the 2D barcode shown on the serial label of
your light, alternatively you can enter the SSID and Password
manually. The SSID and Password are identical. They are both
the Serial number of your light which can be found in the
‘ABOUT’ option located in the SYS menu or on the serial label
on your light. These elds are case sensitive and all characters
should be in capitols.
10. You should now see a request from the App asking if you
want to Join the WiFi network. Select Join. When the App has
successfully connected to the xture (indicated with green status
dot on the light within the app), you can close the QR code
page on the light and go to the home menu (or CCT/HSI etc).
Please also note that the QR page on the light will self close
when the connection to the app is complete.
11. You are now connected to your light and can begin
to control it via the App. To add additional xtures repeat
the process above. You can then switch between lights by
selecting them on the xture list in the App.
Troubleshooting and bug reporting
If you have any issues connecting to your lights or experience
any bugs please use the email address below and give as
much detail as possible including the mobile device you are
using. We will respond to you as soon as possible.
8.
9.
10.

TROUBLESHOOTING AND BUG REPORTING
If you are experiencing repeated issues with connectivity please try the follows steps
1. Ensure you have the latest Rotolight rmware installed on your light. The app will
only work with rmware 3.0 or later. To install the latest rmware go to rotolight.com/
support and download the latest rmware to a USB 2.0 stick, with no other les on it.
With the light powered off, insert the USB stick containing the update le, hold down both
knobs, and whilst continuing to hold them down, turn the power on. An update dialgoue
box will now appear prompting you to upgrade.
You can verify what rmware you have installed on the light by turning the light on and
noting the version on the bottom of the logo screen OR, by going to the system settings
page, scroll down to ‘About’ , and tap on the arrow to enter the menu. Firmware will now be
displayed.
2. Ensure you have the latest version of the app installed from the Apple or Android
app stores. For links to the app in the respective stores visit rotolight.com/app
3. Cycle the power on your mobile device and light. Turn the power off/on on both
your phone, and light. It is always good practice to do this after installing any new rmware
or update for your device.
4. Ensure Wi is enabled in the light (this is disabled after a factory reset, or on rst
use). To switch on Wi (you will only need to do this once, unless you do a factory reset),
from the home menu, go to the system settings page (bottom right) > Wi control > select
App control.
SCAN QR CODE TO WATCH OUR TROUBLESHOOTING GUIDE

You will now see a Wi initializing, ‘wait for Wi Ready’ message. After 15-20 seconds the
message will clear and “wi ready” will be displayed. Wi is now enabled.
You can now pair your rotolight with the app by tapping the app control box to display a QR
code, then open the rotolight app, press the “+” button to add a xture and place the QR
code label in the middle of the camera display window, then press join when the dialogue
box appears.
Note: Upon turning on the light, it takes approximately 15-20 seconds for the Wi to fully
initialize (like a wi router in your home). You can also verify that Wi is turned on by going to
the system settings page (bottom right) > Wi control , and if the right hand box “wi/app
control” is highlighted blue, then it is on.
5. Force quit the app, re-open, and tap on the light to reconnect to your light. If you
exit an app, to use other functions on your phone, the app is not quit, its infact still running
in the background. Force quit the app if you are having problems to refresh the app. In iOS,
to force quit the app, swipe up from the bottom of the screen, the swipe the selected app
upwards off the screen to quit it. Now reopen.
6. Remove the light within the app, and re-add the light. To do so swipe left across the
xture to reveal a red “x” , press to remove the light. Now press the “+” button to re-pair
the light to the app.
7. Ensure any use of a VPN is disabled. Virtual Private Networks (VPN’s) can interefere
with connection of the mobile\tablet to the app, if you use a VPN, please ensure VPN’s are
disabled.
8. Factory Reset your Rotolight go to the system settings page (bottom right) > Factory
Reset > Click the right knob and select “Yes”. (Please note wi will now be disabled, see
step 4 to turn Wi on)
Important Note:
Please ensure location information is enabled. The Rotolight App will request that location
information is switched on. Rotolight do not collect your location information. IOS and
Android operating systems restrict the apps access to WiFi controls if the location information
is not enabled which leads to communication issues between the App and the light.
If having tried all of the above troubleshooting steps, you continue to have any issues
connecting to your lights or experience any bugs please use the email address below and
give as much detail as possible including:
mobile device details,
iOS/Android software version
Which light you are using
Rotolight rmware version installed (displayed on startup screen, OR System page> About)
The exact nature of the problem and when it started
We will respond to you as soon as possible.

LATEST FIRMWARE AND MANUAL
For all rmware updates, user manual and other resources, please visit
www.rotolight.com/support
To apply a rmware update, download the latest rmware to a USB 2.0 type A stick, (not
USB 3.0) and ensure it is formatted to Fat 32, (not Fat 32 extended). Ensure any connected
battery has a reasonable charge level prior to starting the update process. Power off the
light and insert the USB stick. Whilst clicking and holding down both knobs, power on the
unit. Release knobs when the bootloader dialogue box appears. Select ‘YES’ to install the
rmware. DO NOT power off the light during a rmware update and ensure the update is
allowed to complete. A progress bar will appear and upon completion the light will restart.
© JASON LANIER

SAFETY WARNINGS & NOTICES
1. Do not under any circumstance attempt to use the USB port for any purpose
other than inserting a USB stick for firmware updates. Do NOT under any
circumstance attempt to charge your phone from the NEO battery from the USB
port. Doing so presents an immediate risk of fire or explosion. 2. Rotolight is a high
performance hybrid flash and continuous light and places a unique demand on batteries
in flash mode to achieve a zero recycle time flash. Rotolight only recommends the use
of official Rotolight batteries for flash operation. 3. Only ever use the Rotolight official
power supplies. Using any other power supply may present a risk of damage to the light,
fire or explosion.
WWW.ROTOLIGHT.COM
Wooburn Industrial Park, Unit 10 Thomas Rd, Wooburn Green, High Wycombe HP10 0PE
Other manuals for NEO 3
1
This manual suits for next models
1
Table of contents
Other Rotolight Camera Accessories manuals