Royal Catering RC-CGE22 User manual

expondo.de
BEDIENUNGSANLEITUNG
User manual | Instrukcja | Návod k použití | Manuel d´utilisation | Istruzioni per l‘uso | Manual de instrucciones
RC-CGE22
RC-CGM21
RC-CGM20
RC-CGM19
COFFEE
GRINDER

3
8
12
17
21
26
31
Deutsch
English
Polski
Česky
Français
Italiano
Español
INHALT | CONTENT | TREŚĆ | OBSAH | CONTENU | CONTENUTO | CONTENIDO
expondo.de Rev. 20.05.2021
PRODUKTNAME KAFFEEMÜHLE
PRODUCT NAME COFFEE GRINDER
NAZWA PRODUKTU MŁYNEK DO KAWY
NÁZEV VÝROBKU MLÝNEK NA KÁVU
NOM DU PRODUIT MOULIN A CAFE
NOME DEL PRODOTTO MACINACAFFÈ
NOMBRE DEL PRODUCTO MOLINILLO DE CAFÉ
MODELL
RC-CGE22
RC-CGM21
RC-CGM20
RC-CGM19
PRODUCT MODEL
MODEL PRODUKTU
MODEL VÝROBKU
MODÈLE
MODELLO
MODELO
IMPORTEUR
EXPONDO POLSKA SP. Z O.O. SP. K.
IMPORTER
IMPORTER
DOVOZCE
IMPORTATEUR
IMPORTATORE
IMPORTADOR
ADRESSE VON IMPORTEUR
UL. NOWY KISIELIN-INNOWACYJNA 7, 66-002 ZIELONA GÓRA | POLAND, EU
IMPORTER ADDRESS
ADRES IMPORTERA
ADRESA DOVOZCE
ADRESSE DE L'IMPORTATEUR
INDIRIZZO DELL'IMPORTATORE
DIRECCIÓN DEL IMPORTADOR
TECHNISCHE DATEN
Die Begrie „Gerät“ oder „Produkt“ in den Warnungen
und Beschreibung des Handbuchs beziehen sich auf
KAFFEEMÜHLE.
2.1. ELEKTRISCHE SICHERHEIT
a) Der Gerätestecker muss mit der Steckdose kompatibel
sein. Ändern Sie den Stecker in keiner Weise.
Originalstecker und passende Steckdosen vermindern
das Risiko eines elektrischen Schlags.
b) Vermeiden Sie das Berühren von geerdeten
Bauteilen wie Rohrleitungen, Heizkörpern, Öfen und
Kühlschränken. Es besteht das erhöhte Risiko eines
elektrischen Schlags, wenn Ihr Körper durch nasse
Oberächen und in feuchter Umgebung geerdet ist.
Wasser, das in das Gerät eintritt, erhöht das Risiko von
Beschädigungen und elektrischen Schlägen.
c) Berühren Sie das Gerät nicht mit nassen oder feuchten
Händen.
d) Verwenden Sie das Kabel nicht in unsachgemäßer
Weise. Verwenden Sie es niemals zum Tragen
des Geräts oder zum Herausziehen des Steckers.
Halten Sie das Kabel von Hitze, Öl, scharfen Kanten
oder beweglichen Teilen fern. Beschädigte oder
geschweißte Kabel erhöhen das Risiko eines
elektrischen Schlags.
e) Wenn sich die Verwendung des Geräts in feuchter
Umgebung nicht verhindern lässt, verwenden Sie
einen Fehlerstromschutzschalter (RCD). Mit einem
RCD verringert sich das Risiko eines elektrischen
Schlags.
f) Es ist verboten, das Gerät zu verwenden, wenn
das Netzkabel beschädigt ist oder oensichtliche
Gebrauchsspuren aufweist. Ein beschädigtes
Netzkabel sollte von einem qualizierten Elektriker
oder vom Kundendienst des Herstellers ersetzt
werden.
g) Tauchen Sie Kabel, Stecker bzw. das Gerät nicht
in Wasser oder andere Flüssigkeiten, um einen
Stromschlag zu vermeiden. Verwenden Sie das Gerät
nicht auf nassen Oberächen.
h) ACHTUNG LEBENSGEFAHR! Tauchen und Halten Sie
das Gerät während des Reinigens oder des Betriebes
nie in Wasser oder andere Flüssigkeiten.
2.2. SICHERHEIT AM ARBEITSPLATZ
a) Halten Sie Ihren Arbeitsplatz sauber und gut
beleuchtet. Unordnung oder schlechte Beleuchtung
kann zu Unfällen führen. Handeln Sie vorausschauend,
beobachten Sie, was getan wird, und nutzen Sie Ihren
gesunden Menschenverstand bei der Verwendung
des Gerätes.
b) Bei Zweifeln, ob das Produkt ordnungsgemäß
funktioniert, oder wenn Schäden festgestellt werden,
wenden Sie sich bitte an den Kundendienst des
Herstellers.
c) Das Produkt darf nur vom Hersteller repariert werden.
Reparieren Sie es nicht selbst!
3
Rev. 20.05.2021
Parameter Werte
Produktname KAFFEEMÜHLE
Modell RC-CG
M19
RC-CG
M20
RC-CG
M21
RC-CG
E22
Nennspannung
[V~]/
Frequenz [Hz] 220/50
Nennleistung [W] 200
Abmessungen
(Breite x Tiefe
x Länge) [mm]
150
x232
x425
132x228x470
132
x228
x465
Gewicht [kg] 4,6 4,5 4,7
1. ALLGEMEINE BESCHREIBUNG
Diese Anleitung ist als Hilfe für eine sichere und zuverlässige
Nutzung gedacht. Das Produkt wurde strikt nach den
technischen Vorgaben und unter Verwendung modernster
Technologien und Komponenten sowie unter Wahrung der
höchsten Qualitätsstandards entworfen und angefertigt.
VOR INBETRIEBNAHME MUSS DIE ANLEITUNG
GENAU DURCHGELESEN UND VERSTANDEN
WERDEN.
Für einen langen und zuverlässigen Betrieb des Geräts muss
auf die richtige Handhabung und Wartung entsprechend
den in dieser Anleitung angeführten Vorgaben geachtet
werden. Die in dieser Anleitung angegebenen technischen
Daten und die Spezikation sind aktuell. Der Hersteller
behält sich das Recht vor, im Rahmen der Verbesserung der
Qualität Änderungen vorzunehmen. Unter Berücksichtigung
des technischen Fortschritts und der Geräuschreduzierung
wurde das Gerät so entworfen und produziert, dass das
infolge der Geräuschemission entstehende Risiko auf dem
niedrigsten Niveau gehalten wird.
ERLÄUTERUNG DER SYMBOLE
Das Produkt erfüllt die geltenden
Sicherheitsnormen.
Gebrauchsanweisung beachten.
Recyclingprodukt.
ACHTUNG!, WARNUNG! oder HINWEIS!, um
auf bestimmte Umstände aufmerksam zu
machen (allgemeines Warnzeichen).
Nur zur Verwendung in geschlossenen Räumen.
HINWEIS! In der vorliegenden Anleitung sind
Beispielbilder vorhanden, die von dem tatsächlichen
Aussehen das Produkt abweichen können.
Die originale Anweisung ist die deutschsprachige Fassung.
Sonstige Sprachfassungen sind Übersetzungen aus der
deutschen Sprache.
ACHTUNG! Lesen Sie alle Sicherheitshinweise und
alle Anweisungen durch. Die Nichtbeachtung der
Warnungen und Anweisungen kann zu elektrischen
Schlägen, Feuer und / oder schweren Verletzungen
bis hin zum Tod führen.
2. NUTZUNGSSICHERHEIT
DE
BEDIENUNGSANLEITUNG

C
BA
3. NUTZUNGSBEDINGUNGEN
Das Produkt ist zum Mahlen von Kaeebohnen bestimmt.
Das Produkt ist nur für den Heimgebrauch bestimmt!
Für alle Schäden bei nicht sachgemäßer Verwendung
haftet allein der Betreiber.
3.1. GERÄTEBESCHREIBUNG
d) Zum Löschen des Gerätes bei Brand oder Feuer, nur
Pulverfeuerlöscher oder Kohlendioxidlöscher (CO2)
verwenden.
e) Bewahren Sie die Gebrauchsanleitung für den
weiteren Gebrauch auf. Sollte das Gerät an Dritte
weitergegeben werden, muss die Gebrauchsanleitung
mit ausgehändigt werden.
f) Verpackungselemente und kleine Montageteile
außerhalb der Reichweite von Kindern aufbewahren.
g) Halten Sie das Gerät von Kindern und Tieren fern.
2.3. PERSÖNLICHE SICHERHEIT
a) Das Gerät darf nicht von Kindern oder Personen
mit eingeschränkten physischen, sensorischen und
geistigen Fähigkeiten oder ohne entsprechende
Erfahrung und entsprechendes Wissen bedient
werden. Dies ist nur unter Aufsicht einer für die
Sicherheit zuständigen Person und nach einer
Einweisung in die Bedienung der Maschine gestattet.
b) Vergewissern Sie sich vor dem Anschließen des Geräts
an eine Stromquelle, dass der Schalter ausgeschaltet
ist.
c) Das Gerät ist kein Spielzeug. Kinder sollten in der
Nähe des Geräts unter Aufsicht stehen, um Unfälle zu
vermeiden.
d) Legen Sie keine Hände oder Gegenstände in das
laufende Gerät!
2.4. SICHERE ANWENDUNG DES GERÄTS
a) Benutzen Sie das Gerät nicht, wenn der EIN-/AUS-
Schalter nicht ordnungsgemäß funktioniert. Geräte,
die nicht über den Schalter gesteuert werden können,
sind gefährlich und müssen repariert werden.
b) Trennen Sie das Gerät von der Stromversorgung,
bevor Sie mit der Einstellung, Reinigung und Wartung
beginnen. Eine solche vorbeugende Maßnahme
verringert das Risiko einer versehentlichen Aktivierung
des Geräts.
c) Nicht verwendete Werkzeuge sind außerhalb
der Reichweite von Kindern sowie von Personen
aufzubewahren, welche weder das Gerät noch die
Anleitung kennen. In den Händen unerfahrener
Personen können diese Geräte eine Gefahr darstellen.
d) Halten Sie das Gerät stets in einem einwandfreien
Zustand. Prüfen Sie vor jeder Inbetriebnahme, ob
am Gerät und seinen beweglichen Teilen Schäden
vorliegen (defekte Komponenten oder andere
Faktoren, die den sicheren Betrieb der Maschine
beeinträchtigen könnten). Im Falle eines Schadens
muss das Gerät vor Gebrauch in Reparatur gegeben
werden.
e) Halten Sie das Gerät außerhalb der Reichweite von
Kindern.
f) Reparatur und Wartung von Geräten dürfen
nur von qualiziertem Fachpersonal und mit
Originalersatzteilen durchgeführt werden. Nur so wird
die Sicherheit während der Nutzung gewährleistet.
g) Um die Funktionsfähigkeit des Gerätes zu
gewährleisten, dürfen die werksmäßig montierten
Abdeckungen oder Schrauben nicht entfernt werden.
h) Vermeiden Sie Situationen, in denen das Gerät
bei laufendem Betrieb unter schwerer Last stoppt.
Dies kann zu Überhitzung und damit zu einer
Beschädigung des Gerätes führen.
i) Berühren Sie keine beweglichen Teile oder
Zubehörteile, es sei denn, das Gerät wurde vom Netz
getrennt.
j) Es ist verboten, das Gerät während des Betriebs zu
schieben, umzustellen oder zu drehen.
k) Lassen Sie dieses Gerät während des Betriebs nicht
unbeaufsichtigt.
l) Das Gerät muss regelmäßig gereinigt werden, damit
sich nicht dauerhaft Schmutz festsetzt.
m) Das Gerät ist kein Spielzeug. Reinigung und Wartung
dürfen nicht von Kindern ohne Aufsicht durch eine
erwachsene Person durchgeführt werden.
n) Es ist untersagt, in den Aufbau des Geräts einzugreifen,
um seine Parameter oder Konstruktion zu ändern.
o) Geräte von Feuer – und Wärmequellen fernhalten.
p) Die Ventilationsönungen dürfen nicht verdeckt
werden!
1. Trichterabdeckung
2. Trichter
3. Skalenregler (Schleifgradring)
4. Basis
5. Netzkabel
6. Netzschalter
7. Positionierer des Skalenreglers
8. Gri
9. Sicherung
10. Mikroschalter
11. Steuerpaneel
3.2. VORBEREITUNG ZUR VERWENDUNG
ARBEITSPLATZ DES GERÄTES
Verwenden Sie das Gerät nicht bei Umgebungstemperaturen
über 40°C sein und einer relativen Luftfeuchtigkeit über 85%.
Stellen Sie das Gerät so auf, dass eine gute Luftzirkulation
gewährleistet ist. Es ist auf allen Seiten ein Abstand von
mindestens 10 cm einzuhalten. Halten Sie das Gerät von
heißen Flächen fern. Das Gerät sollte immer auf einer
ebenen, stabilen, sauberen, feuerfesten und trockenen
Oberäche und außerhalb der Reichweite von Kindern und
Personen mit eingeschränkten geistigen, sensorischen und
psychischen Fähigkeiten verwendet werden. Stellen Sie
sicher, dass der Netzstecker jederzeit zugänglich und nicht
verdeckt ist. Achten Sie darauf, dass die Stromversorgung
des Gerätes den Angaben auf dem Produktschild
entspricht. Vor der ersten Anwendung sind das Gerät und
alle Bestandteile auseinanderzubauen und zu reinigen.
3.3. ARBEIT MIT DEM GERÄT RC-CGM19
1. Schalten Sie den Netzschalter ein, um den Motor zu
starten.
2. Stellen Sie den Mahlgradring nach Ihren Wünschen
ein (bevor Sie Kaeebohnen hinzufügen).
• Der gewünschte Mahlgrad des Kaees sollte
zwischen 1 und 19 eingestellt werden, wobei 1
fein Pulver und 19 grobes ist.
• Um den Schleif- bzw. Mahlring einzustellen,
lösen Sie zuerst die Einstellschraube und stellen
Sie dann den Ring ein. Die Schraube festziehen.
3. Gießen Sie Kaeebohnen in den Trichter und setzen
Sie die Trichterabdeckung wieder auf.
4. Stellen Sie den gemahlenen Kaeebehälter oder den
Siebträger auf die Kaeemaschine am Halter (8).
5. Den Mikroschalter (10) mit ausreichender Kraft
drücken. Der Motor startet und die Kaeebohnen
werden nach einer Weile gemahlen. Lösen Sie den
Gri, das Schleifen hört auf.
6. Schalten Sie das Gerät (6) nach Gebrauch aus.
3.4. ARBEIT MIT DEM GERÄT RC-CGM20
1. Schalten Sie den Netzschalter ein, um den
Motor zu starten. Überprüfen Sie, ob die
Betriebsanzeigekontrollleuchte leuchtet.
2. Stellen Sie den Mahlgradring nach Ihren Wünschen
ein (bevor Sie Kaeebohnen hinzufügen).
• Der gewünschte Mahlgrad des Kaees sollte
zwischen 1 und 19 eingestellt werden, wobei 1
fein Pulver und 19 grobes ist.
• Wenn der Schleifgrad ungeeignet ist, drücken Sie
das Teil (7) nach unten und drehen Sie gleichzeitig
den Schleifgradring (3). Das Kaeepulver ist
gröber, wenn es im Uhrzeigersinn gedreht wird,
und feiner, wenn es gegen den Uhrzeigersinn
gedreht wird. Stellen Sie die Kaeemühle nach
Ihren Wünschen ein.
3. Gießen Sie Kaeebohnen in den Trichter und setzen
Sie die Trichterabdeckung wieder auf.
4. Stellen Sie den gemahlenen Kaeebehälter oder den
Siebträger auf die Kaeemaschine am Halter (8).
5. Den Mikroschalter (10) mit ausreichender Kraft
drücken. Der Motor startet und die Kaeebohnen
werden nach einer Weile gemahlen. Lösen Sie den
Gri, der Mahlprozess hört auf.
6. Schalten Sie das Gerät (6) nach Gebrauch aus.
54 Rev. 20.05.2021 Rev. 20.05.2021
3.5. ARBEIT MIT DEM GERÄT RC-CGM21
1. Schalten Sie den Netzschalter ein, um den Motor
zu starten. Überprüfen Sie, ob die Betriebsanzeige
leuchtet.
2. Stellen Sie den Mahlgradring nach Ihren Wünschen
ein (bevor Sie Kaeebohnen hinzufügen).
• Der gewünschte Mahlgrad des Kaees sollte
zwischen 1 und 19 eingestellt werden, wobei 1
fein Pulver und 19 grobes ist.
• Wenn der Mahlgrad ungeeignet ist, drücken Sie
das Teil (7) nach unten und drehen Sie gleichzeitig
den Mahlgradring (3). Das Kaeepulver ist gröber,
wenn es im Uhrzeigersinn gedreht wird, und feiner,
wenn es gegen den Uhrzeigersinn gedreht wird.
Stellen Sie die Mühle nach Ihren Wünschen ein.
3. Gießen Sie Kaeebohnen in den Trichter und setzen
Sie die Trichterabdeckung wieder auf.
4. Stellen Sie den gemahlenen Kaeebehälter oder den
Siebträger auf die Kaeemaschine am Halter (8).
5. Betätigen Sie die Tasten auf dem Steuerpaneel wie
in Abb. 1 gezeigt. Mit der SET-Taste wird die Uhrzeit
eingestellt. Nach dem Drücken der SET-Taste blinkt
die Uhrzeit auf dem Steuerpaneel, was bedeutet, dass
sie eingestellt werden kann. Drücken Sie (A) für eine
einzelne Tasse oder drücken Sie die Taste (B) für eine
doppelte Tasse. Verwenden Sie die Tasten (+) (-), um
die Zeit einzustellen, die zum Mahlen einer einzelnen
Tasse oder zweier Tassen erforderlich ist, und
drücken Sie dann die SET-Taste, um die Einstellung
abzuschließen. Drücken Sie die Taste (C) einmal, um
das kontinuierliche Mahlen zu starten, und drücken
Sie sie erneut, um den Mahlvorgang zu beenden.
Beim ersten Drücken der Taste (C) läuft die Mühle
weitere 60 Sekunden.
6. Schalten Sie das Gerät nach Gebrauch aus.
3.6. ARBEIT MIT DEM GERÄT RC-CGE22
1. Schalten Sie den Netzschalter ein, um den
Motor zu starten. Überprüfen Sie, ob die
Betriebsanzeigekontrollleuchte leuchtet.
2. Stellen Sie den Mahlgradring nach Ihren Wünschen
ein (bevor Sie Kaeebohnen hinzufügen).
• Der gewünschte Mahlgrad des Kaees sollte
zwischen 1 und 19 eingestellt werden, wobei 1
fein Pulver und 19 grobes ist.
• Wenn der Mahlgrad ungeeignet ist, drücken Sie
das Teil (7) nach unten und drehen Sie gleichzeitig
den Mahlgradring (3). Das Kaeepulver ist
gröber, wenn es im Uhrzeigersinn gedreht wird,
und feiner, wenn es gegen den Uhrzeigersinn
gedreht wird. Stellen Sie die Mühle nach Ihren
Wünschen ein.
6
95
8
10
6
5
4
3
2
1
2
1
3
4
77
11
10
8
9
ACHTUNG!Obwohl das Gerät in Hinblick auf Sicherheit
entworfen wurde und über Schutzmechanismen
sowie zusätzlicher Sicherheitselemente verfügt,
besteht bei der Bedienung eine geringe Unfall-
oder Verletzungsgefahr. Es wird empfohlen, bei der
Nutzung Vorsicht und Vernunft walten zu lassen.
DEDE

76 Rev. 20.05.2021 Rev. 20.05.2021
3. Gießen Sie Kaeebohnen in den Trichter und setzen
Sie die Trichterabdeckung wieder auf.
4. Stellen Sie den gemahlenen Kaeebehälter oder den
Siebträger auf die Kaeemaschine am Halter (8).
5. Berühren Sie die Doppel- oder Einzeltasten auf der
Tastatur und drücken Sie den Mikroschalter (10) mit
entsprechender Kraft. Der Motor läuft so lange, wie
er eingestellt wurde. Berühren Sie die entsprechenden
Tasten, um das Mahlen zu beenden. Steuerpaneel:
Berühren Sie die Taste (A), um die Standardzeit für
eine einzelne Tasse anzuzeigen. Berühren Sie die
Taste (B), um die Standardzeit für eine doppelte Tasse
anzuzeigen. Um die Standardzeit für eine einzelne
Tasse zu ändern, halten Sie die Taste (C) 3 Sekunden
lang gedrückt, bis das SET auf dem Display rot wird
und zu blinken beginnt. Drücken Sie dann die Taste
(A) für eine einzelne Tasse und die Taste (C), bis SET
auf dem Display rot wird und die Einheiten S und
Single blinken. Dies bedeutet, dass Sie die Zeit für
eine einzelne Tasse einstellen können. Berühren Sie
die Tasten (+) und (-), um die Standardzeit zu erhöhen
oder zu verringern, und berühren Sie dann die Taste
(C), um die für eine einzelne Tasse eingestellte Zeit
automatisch zu speichern. Um die Standardzeit für
eine Doppelschale zu ändern, halten Sie die Taste (C) 3
Sekunden lang gedrückt, bis das SET auf dem Display
rot wird und zu blinken beginnt. Drücken Sie dann die
Taste (B) für eine doppelte Tasse und die Taste (C), bis
SET auf dem Display rot wird und die Einheiten S und
Double blinken. Dies bedeutet, dass Sie die Zeit für
doppelte Tassen einstellen können. Berühren Sie die
Tasten (+) und (-), um die Standardzeit zu erhöhen
oder zu verringern, und berühren Sie dann die Taste
(C), um die für die Doppelschale eingestellte Zeit
automatisch zu speichern.
6. Schalten Sie das Gerät nach Gebrauch aus.
3.7. REINIGUNG UND WARTUNG
a) Vor jeder Reinigung und Einstellung, dem Austausch
von Zubehör oder wenn das Gerät nicht benutzt wird,
muss der Netzstecker gezogen werden und das Gerät
vollständig abkühlen.
• Warten Sie ab, bis die rotierenden Elemente
stehen bleiben.
b) Zur Reinigung des Geräts dürfen nur milde
Reinigungsmittel verwendet werden, die für
Oberächen, mit denen Lebensmittel in Kontakt
kommen, bestimmt sind.
c) Lassen Sie nach jeder Reinigung alle Teile gut
trocknen, bevor das Gerät erneut verwendet wird.
d) Bewahren Sie das Gerät an einem trockenen, kühlen,
vor Feuchtigkeit und direkter Sonneneinstrahlung
geschütztem Ort auf.
e) Es ist verboten, das Gerät mit einem Wasserstrahl zu
besprühen oder in Wasser zu tauchen.
f) In Hinblick auf technische Ezienz und zur
Vorbeugung vor Schäden sollte das Gerät regelmäßig
überprüft werden.
g) Zum Reinigen ist ein weicher, feuchter Lappen zu
verwenden.
h) Zum Reinigen darf man keine scharfen und/
oder Metallgegenstände (z.B. Drahtbürste oder
Metallspachtel) benutzen, weil diese die Oberäche
des Materials, aus dem das Gerät hergestellt ist,
beschädigen können.
i) Reinigen Sie das Gerät nicht mit säurehaltigen
Substanzen. Medizinische Geräte, Verdünner,
Kraftsto, Öle oder andere Chemikalien können das
Gerät beschädigen.
Wenn Sie bestimmte Teile des Geräts zerlegen müssen,
vergewissern Sie sich, dass der Netzschalter ausgeschaltet
ist, oder ziehen Sie den Stecker aus der Steckdose, um zu
vermeiden, dass Sie den Schalter versehentlich berühren
und das Gerät starten.
Innenäche der Schleifkammer reinigen
1. Demontieren Sie den Trichter zusammen mit der
Abdeckung.
2. Drehen Sie den Skalenregler (Mahlgradring) im
Uhrzeigersinn nach oben.
3. Entfernen Sie den Klingenhalter.
4. Reinigen Sie die Innenäche.
Montage der Schleifkammer
1. Montieren Sie den Klingenhalter.
2. Drehen Sie den Skalenregler (Mahlgradring) gegen
den Uhrzeigersinn, bis er sich in der gewünschten
Position bendet.
3. Montieren Sie den Trichter zusammen mit der
Abdeckung.
* Entfernen Sie vorsichtig das Kaeepulver von der
Basis und den Gewinden des Skaleneinstellknopfs,
da sonst der Mahlgrad des gemahlenen Kaees
beeinträchtigt werden kann. Der Skalierungsknopf
kann stecken bleiben, der beim Zusammenbau nicht
oder nur teilweise gedreht werden kann.
ENTSORGUNG GEBRAUCHTER GERÄTE
Dieses Produkt darf nicht über den normalen Hausmüll
entsorgt werden. Geben Sie das Gerät bei entsprechenden
Sammel- und Recyclinghöfen für Elektro- und
Elektronikgeräte ab. Überprüfen Sie das Symbol auf dem
Produkt, der Bedienungsanleitung und der Verpackung.
Die bei der Konstruktion des Gerätes verwendeten
Kunststoe können entsprechend ihrer Kennzeichnung
recycelt werden. Mit der Entscheidung für das Recycling
leisten Sie einen wesentlichen Beitrag zum Schutz unserer
Umwelt. Wenden Sie sich an die örtlichen Behörden, um
Informationen über Ihre lokale Recyclinganlagen zu erhalten.
PROBLEM MÖGLICHE
URSACHE LÖSUNG
Motor
startet
nicht
Netzschal-
ter beschä-
digt
Ersetzen Sie den
Netzschalter. Schalten
Sie die Stromversorgung
aus und reinigen Sie
die Schleifkammer.
Stellen Sie sicher, dass
keine Fremdkörper den
Motor behindern und
ihn am Laufen hindern.
Installieren Sie nach der
Überprüfung alle Teile neu.
Betreiben Sie den Anlasser
zum Testen, nachdem Sie
sichergestellt haben, dass
alle Teile ordnungsgemäß
zusammengebaut sind.
Wenn der Netzschalter
nicht beschädigt ist,
überprüfen Sie, ob
die Anzeigen auf dem
Steuerpaneel leuchten (
gilt für Geräte (RC-CGM21)
und (RC-CGM22)). Wenn
das Steuerpaneel nicht
funktioniert muss es
ersetzt werden.
Durchge-
brannte
Sicherung
Ersetzen Sie die Sicherung.
Schalten Sie den Schalter
aus und reinigen Sie
die Schleifkammer.
Stellen Sie sicher, dass
keine Fremdkörper den
Motor behindern und
ihn am Laufen hindern.
Installieren Sie nach der
Überprüfung alle Teile neu.
Betreiben Sie den Anlasser
zum Testen, nachdem Sie
sichergestellt haben, dass
alle Teile ordnungsgemäß
zusammengebaut sind.
Wenn die Sicherung
nicht beschädigt ist,
überprüfen Sie, ob die
Steuerpaneelanzeigen
leuchten (für (RC-CGM21)
und (RC-CGM22)). Wenn
das Steuerpaneel nicht
funktioniert, ersetzen
Sie es.
Ungenau-
es Mahlen
Die Teile in
der Schleif-
kammer
sind nicht
richtig
montiert.
Zerlegen Sie alle Teile und
bauen Sie sie sorgfältig
wieder ein.
Der Skalen-
einsteller
(Mahlgra-
dring) wird
nicht im
Uhrzeiger-
sinn zur
Positio-
nierleiste
gedreht.
Reinigen und
konservieren Sie die
Schleifkammer gemäß der
Bedienungsanleitung und
bauen Sie sie dann wieder
zusammen. Schalten Sie
den Netzschalter ein
und schieben Sie den
Skaleneinsteller langsam
nach rechts, bis Sie die
gerillte Scheibe reiben
hören. Dann gegen den
Uhrzeigersinn ca. 0,5 cm
drehen. Fügen Sie nach
Abschluss der o.g. Schritte
Kaeebohnen zum
Testmahlen hinzu.
PROBLEMLÖSUNGEN
DEDE

TECHNICAL DATA The terms „device“ or „product“ are used in the warnings
and instructions to refer to COFFEE GRINDER.
2.1. ELECTRICAL SAFETY
a) The plug must t the socket. Do not modify the plug
in any way. Using original plugs and matching sockets
reduces the risk of electric shock.
b) Avoid touching earthed elements such as pipes,
heaters, boilers and refrigerators. There is an increased
risk of electric shock if the earthed device is exposed
to rain, comes into direct contact with a wet surface
or is operating in a damp environment. Water getting
into the device increases the risk of damage to the
device and of electric shock.
c) Do not touch the device with wet or damp hands.
d) Use the cable only for its designated use. Never use it
to carry the device or to pull the plug out of a socket.
Keep the cable away from heat sources, oil, sharp
edges or moving parts. Damaged or tangled cables
increase the risk of electric shock.
e) If using the device in a damp environment cannot be
avoided, a residual current device (RCD) should be
applied. The use of an RCD reduces the risk of electric
shock.
f) Do not use the device if the power cord is damaged
or shows obvious signs of wear. A damaged power
cord should be replaced by a qualied electrician or
the manufacturer‘s service centre.
g) To avoid electric shock, do not immerse the cord, plug
or device in water or other liquids. Do not use the
device on wet surfaces.
h) ATTENTION! DANGER TO LIFE! While cleaning, never
immerse the device in water or other liquids.
2.2. SAFETY IN THE WORKPLACE
a) Make sure the workplace is clean and well lit. A messy
or poorly lit workplace may lead to accidents. Try
to think ahead, observe what is going on and use
common sense when working with the device.
b) If you are unsure about whether the product is
operating correctly or if you nd damage, please
contact the manufacturer’s service centre.
c) Only the manufacturer’s service centre may make
repairs to the product. Do not attempt to make
repairs yourself!
d) In case of re, use a powder or carbon dioxide
(CO2) re extinguisher (one intended for use on live
electrical devices) to put it out.
e) Please keep this manual available for future reference.
If this device is passed on to a third party, the manual
must be passed on with it.
f) Keep packaging elements and small assembly parts in
a place not available to children.
g) Keep the device away from children and animals.
2.3. PERSONAL SAFETY
a) The device is not designed to be handled by persons
(including children) with limited mental and sensory
functions or persons lacking relevant experience and/
or knowledge unless they are supervised by a person
responsible for their safety or they have received
instruction on how to operate the device.
b) To prevent the device from accidentally switching on,
make sure the switch is on the OFF position before
connecting to a power source.
Parameter
description Parameter value
Product name COFFEE GRINDER
Model RC-CG
M19
RC-CG
M20
RC-CG
M21
RC-CG
E22
Rated voltage
[V~]/
Frequency [Hz] 220/50
Rated power [W] 200
Dimensions
(Width x Depth
x Height) [mm]
150
x232
x425
132x228x470
132
x228
x465
Weight [kg] 4,6 4,5 4,7
3. USE GUIDELINES
The product is intended for grinding coee beans.
The product is intended for home use only!
The user is liable for any damage resulting from
unintended use of the device.
c) The device is not a toy. Children must be supervised to
ensure that they do not play with the device.
d) Do not put your hands or other items inside the
device while it is in use!
2.4. SAFE DEVICE USE
a) Do not use the device if the ON/OFF switch does not
function properly (does not switch the device on and
o). Devices which cannot be switched on and o
using the ON/OFF switch are hazardous, should not
be operated and must be repaired.
b) Disconnect the device from the power supply
before commencement of adjustment, cleaning and
maintenance. Such a preventive measure reduces the
risk of accidental activation.
c) When not in use, store in a safe place, away from
children and people not familiar with the device who
have not read the user manual. The device may pose
a hazard in the hands of inexperienced users.
d) Keep the device in perfect technical condition. Before
each use check for general damage and especially
check for cracked parts or elements and for any other
conditions which may impact the safe operation of
the device. If damage is discovered, hand over the
device for repair before use.
e) Keep the device out of the reach of children.
f) Device repair or maintenance should be carried out by
qualied persons, only using original spare parts. This
will ensure safe use.
g) To ensure the operational integrity of the device, do
not remove factory-tted guards and do not loosen
any screws.
h) Avoid situations where the device stops working
during use due to excessive loading. This may result
in overheating of the drive elements and damage to
the device.
i) Do not touch articulated parts or accessories unless
the device has been disconnected from the power
source.
j) Do not move, adjust or rotate the device in the course
of work.
k) Do not leave this appliance unattended while it is in
use.
l) Clean the device regularly to prevent stubborn grime
from accumulating.
m) The device is not a toy. Cleaning and maintenance may
not be carried out by children without supervision by
an adult person.
n) It is forbidden to interfere with the structure of
the device in order to change its parameters or
construction.
o) Keep the device away from sources of re and heat.
p) Do not cover the ventilation openings!
1. Funnel cover
2. Funnel
3. Scale regulator (grinding degree ring)
4. Base
5. Power cord
6. Power switch
7. Scale regulator positioner
8. Handle
9. Fuse
10. Microswitch
11. Control panel
3.2. PREPARING FOR USE
APPLIANCE LOCATION
The temperature of environment must not be higher than
40°C and the relative humidity should be less than 85%.
Ensure good ventilation in the room in which the device is
being used. There should be at least 10 cm distance between
each side of the device and the wall or other objects. Keep
the product away from hot surfaces. The device should
always be used when positioned on an even, stable,
clean, reproof and dry surface, and be out of the reach
of children and persons with limited mental and sensory
functions. Position the device such that you always have
access to the power plug. The power cord connected to
the appliance must be properly grounded and correspond
to the technical details on the product label. Disassemble
the device and all its components and clean them before
the rst use.
3.3. DEVICE USE RC-CGM19
1. Turn the power switch on to start the engine.
2. Adjust the grinding degree ring to your preference
(before adding coee beans).
• The desired grinding degree of the coee should
be set between 1 and 19, with 1 being ne and 19
being coarse.
• To adjust the grinding ring, rst loosen the
adjusting screw and then adjust the ring. Tighten
the screw.
3. Pour coee beans into the funnel and put the cover
on.
6
95
8
10
6
5
4
3
2
1
2
1
3
4
77
11
10
8
9
To increase the product life of the device and to ensure
trouble-free operation, use it in accordance with this user
manual and regularly perform maintenance tasks. The
technical data and specications in this user manual are
up to date. The manufacturer reserves the right to make
changes associated with quality improvement. The device
is designed to reduce noise emission risks to a minimum,
taking into account technological progress and noise
reduction opportunities.
LEGEND
1. GENERAL DESCRIPTION
The user manual is designed to assist in the safe and
trouble-free use of the device. The product is designed
and manufactured in accordance with strict technical
guidelines, using state-of-the-art technologies and
components. Additionally, it is produced in compliance
with the most stringent quality standards.
DO NOT USE THE DEVICE UNLESS YOU HAVE
THOROUGHLY READ AND UNDERSTOOD THIS
USER MANUAL.
The product satises the relevant safety
standards.
Read instructions before use.
The product must be recycled.
WARNING! or CAUTION! or REMEMBER!
Applicable to the given situation (general
warning sign).
Only use indoors.
PLEASE NOTE! Drawings in this manual are for
illustration purposes only and in some details may
dier from the actual product.
The original operation manual is written in German. Other
language versions are translations from the German.
2. USAGE SAFETY
ATTENTION! Read all safety warnings and all
instructions. Failure to follow the warnings and
instructions may result in electric shock, re and/or
serious injury or even death.
ATTENTION! Despite the safe design of the device
and its protective features, and despite the use of
additional elements protecting the operator, there is
still a slight risk of accident or injury when using the
device. Stay alert and use common sense when using
the device.
3.1. DEVICE DESCRIPTION
EN EN
USER MANUAL
9
Rev. 20.05.2021
8Rev. 20.05.2021

C
BA
4. Place the ground coee container or place the
coeemaker portalter on the handle (8).
5. Press the microswitch (10) with sucient force. The
engine will start and the coee beans will be ground
after a while. Loosen the handle, grinding will stop.
6. Turn the power o (6) after use.
3.4. DEVICE USE RC-CGM20
1. Turn the power switch on to start the engine. Check if
the power light is on.
2. Set the grinding degree ring to your preference
(before adding coee beans).
• The desired grinding degree of the coee should
be set between 1 and 19, with 1 being ne and 19
being coarse.
• If the grinding degree is unsuitable, press the
part (7) downwards and at the same time turn the
grinding degree ring (3). The coee powder will
be coarser when turned clockwise and ner when
turned counter-clockwise. Adjust the grinder
according to your preferences.
3. Pour coee beans into the funnel and put the cover
on.
4. Place the ground coee container or place the
coeemaker portalter on the handle (8).
5. Press the microswitch (10) with sucient force. The
engine will start and the coee beans will be ground
after a while. Loosen the handle, grinding will stop.
6. Turn the power o (6) after use.
3.5. DEVICE USE RC-CGM21
1. Turn the power switch on to start the engine. Check if
the power light is on.
2. Set the grinding degree ring to your preference
(before adding coee beans).
• The desired grinding degree of the coee should
be set between 1 and 19, with 1 being ne and 19
being coarse.
• If the grinding degree is unsuitable, press the
part (7) downwards and at the same time turn the
grinding degree ring (3). The coee powder will
be coarser when turned clockwise and ner when
turned counter-clockwise. Adjust the grinder
according to your preferences.
3. Pour coee beans into the funnel and put the cover
on.
4. Place the ground coee container or place the
coeemaker portalter on the handle (8).
5. Operate the buttons on the control panel as shown on
g. 1.
The SET button is used to set the time. After pressing
the SET button, the time will ash on the panel, which
means the time can be set.
Press (A) for a single cup or press button (B) for a
double cup. Use the (+) (-) buttons to set the time
required to grind a single cup or two cups, then press
the SET button to complete the setting. Press button
(C) once to start continuous grinding and press it
again to stop grinding. When pressing button (C)
for the rst time, the grinder will run for a further 60
seconds.
6. Turn the power o after use.
3.6. DEVICE USE RC-CGE22
1. Turn the power switch on to start the engine. Check if
the power light is on.
2. Set the grinding degree ring to your preference
(before adding coee beans).
• The desired grinding degree of the coee should
be set between 1 and 19, with 1 being ne and 19
being coarse.
• If the grinding degree is unsuitable, press the
part (7) downwards and at the same time turn the
grinding degree ring (3). The coee powder will
be coarser when turned clockwise and ner when
turned counter-clockwise. Adjust the grinder
according to your preferences.
3. Pour coee beans into the funnel and put the cover
on.
4. Place the ground coee container or place the
coeemaker portalter on the handle (8).
5. Touch the Double or Single buttons on the keypad
and press the microswitch (10) with appropriate force.
The engine will run for as long as it has been set.
Touch the relevant buttons to stop grinding.
Control panel: Touch button (A) to display the default
time for a single cup. Touch the button (B) to display
the default time for a double cup.
To change the default time for a single cup, hold
down the button (C) for 3 seconds until the SET on
the display turns red and ashes. Then press button
(A) for a single cup and button (C) until SET on the
display turns red and the S and Single units ash,
which means that you can set the time for a single
cup. Touch the (+) and (-) buttons to increase or
decrease the default time, then touch the (C) button
to automatically save the time set for a single cup.
To change the default time for a double cup, hold
down the button (C) for 3 seconds until the SET on
the display turns red and starts ashing. Then press
button (B) for a double cup and button (C) until
SET on the display turns red and the S and Double
units ash, which means that you can set the time
for double cups. Touch the (+) and (-) buttons to
increase or decrease the default time, then touch the
(C) button to automatically save the time set for the
double cup.
6. Turn the power o after use.
3.7. CLEANING AND MAINTENANCE
a) Unplug the mains plug and allow the device to cool
completely before each cleaning, adjustment or
replacement of accessories, or if the device is not
being used.
• Wait for the rotating elements to stop.
b) Use only mild, food-safe detergents to wash the
device.
c) After cleaning the device, all parts should be dried
completely before using it again.
d) Store the unit in a dry, cool place, free from moisture
and direct exposure to sunlight.
e) Do not spray the device with a water jet or submerge
it in water.
f) The device must be regularly inspected to check its
technical eciency and spot any damage.
g) Use a soft, damp cloth for cleaning.
h) Do not use sharp and/or metal objects for cleaning
(e.g. a wire brush or a metal spatula) because they
may damage the surface material of the appliance.
i) Do not clean the device with an acidic substance,
agents of medical purposes, thinners, fuel, oils or
other chemical substances because it may damage
the device.
If you need to disassemble certain parts of the device, make
sure that the power switch is turned o or pull the plug
from the socket to avoid touching the switch by mistake
and starting the device.
Cleaning the inner surface of the grinding chamber:
1. Dismantle the funnel and the cover.
2. Turn the scale regulator (grinding degree ring)
upwards clockwise.
3. Remove the blade holder.
4. Clean the inside surface.
Grinding chamber assembly:
1. Assemble the blade holder.
2. Turn the scale regulator (grinding degree ring)
counterclockwise until it is in the desired position.
3. Assemble the funnel and the cover.
* Carefully remove the coee powder from the base
and the threads of the scale adjustment knob,
otherwise the grinding degree of the ground coee
may be aected. The scale knob may get stuck, which
cannot be turned when reassembled, or can only be
turned partially.
DISPOSING OF USED DEVICES
Do not dispose of this device in municipal waste systems.
Hand it over to an electric and electrical device recycling
and collection point. Check the symbol on the product,
instruction manual and packaging. The plastics used to
construct the device can be recycled in accordance with
their markings. By choosing to recycle you are making
a signicant contribution to the protection of our
environment. Contact local authorities for information on
your local recycling facility.
TROUBLESHOOTING
PROBLEM POSSIBLE
CAUSE SOLUTION
The
engine
cannot
turn on
Power
switch
damage
Replace the power switch.
Turn the power o,
then clean the grinding
chamber. Check if there
are no foreign objects
obstructing the engine and
preventing it from running.
After checking, reinstall all
parts. Operate the starter
for a test after conrming
that all parts are properly
assembled.
If the power switch is not
damaged, check if the
indicators on the control
panel are on (for (RC-
CGM21) and (RC-CGM22)
devices). If the control panel
does not work, it must be
replaced.
Blown
fuse
Replace the fuse.
Turn the switch o and
then clean the grinding
chamber. Check if there
are no foreign objects
obstructing the engine and
preventing it from running.
After checking, reinstall all
parts. Operate the starter
for a test after conrming
that all parts are properly
assembled.
If the fuse is not damaged,
check if the control panel
indicators are on (for (RC-
CGM21) and (RC-CGM22)).
If the control panel does not
work, replace it.
Inaccurate
grinding
The parts
inside the
grinding
chamber
are not
tted
correctly.
Disassemble and reinstall all
parts carefully.
The scale
adjuster
(grinding
degree
ring) is
not turned
clockwise
towards
the positi-
oning bar.
Clean and preserve the
grinding chamber according
to the operating instructions,
and then reassemble.
Turn the power switch on
and slowly slide the scale
adjuster to the right until
you hear the grooved
disc rubbing. Then turn it
counterclockwise about 0,5
cm. After completing the
above steps, add coee
beans for a trial grinding.
EN EN
11
Rev. 20.05.2021
10 Rev. 20.05.2021

DANE TECHNICZNE
1. OGÓLNY OPIS
Instrukcja przeznaczona jest do pomocy w bezpiecznym
i niezawodnym użytkowaniu. Produkt jest zaprojektowany
i wykonany ściśle według wskazań technicznych przy
użyciu najnowszych technologii i komponentów oraz przy
zachowaniu najwyższych standardów jakości.
PRZED PRZYSTĄPIENIEM DO PRACY NALEŻY
DOKŁADNIE PRZECZYTAĆ I ZROZUMIEĆ NINIEJSZĄ
INSTRUKCJĘ.
Dla zapewnienia długiej i niezawodnej pracy urządzenia
należy dbać o jego prawidłową obsługę oraz konserwację
zgodnie ze wskazówkami zawartymi w tej instrukcji. Dane
techniczne i specykacje zawarte w tej instrukcji obsługi są
aktualne. Producent zastrzega sobie prawo dokonywania
zmian związanych z podwyższeniem jakości. Uwzględniając
postęp techniczny i możliwość ograniczenia hałasu,
urządzenie zaprojektowano i zbudowano tak, aby ryzyko
jakie wynika z emisji hałasu ograniczyć do najniższego
poziomu.
OBJAŚNIENIE SYMBOLI
UWAGA! Ilustracje w niniejszej instrukcji obsługi
mają charakter poglądowy i w niektórych
szczegółach mogą różnić się od rzeczywistego
wyglądu produktu.
Instrukcją oryginalną jest niemiecka wersja instrukcji.
Pozostałe wersje językowe są tłumaczeniami z języka
niemieckiego.
2. BEZPIECZEŃSTWO UŻYTKOWANIA
UWAGA! Przeczytaj wszystkie ostrzeżenia
dotyczące bezpieczeństwa oraz wszystkie instrukcje.
Niezastosowanie się do ostrzeżeń i instrukcji może
spowodować porażenie prądem, pożar i/lub ciężkie
obrażenia ciała lub śmierć.
Termin „urządzenie” lub „produkt” w ostrzeżeniach i w
opisie instrukcji odnosi się do MŁYNEK DO KAWY.
2.1. BEZPIECZEŃSTWO ELEKTRYCZNE
a) Wtyczka urządzenia musi pasować do gniazda.
Nie modykować wtyczki w jakikolwiek sposób.
Oryginalne wtyczki i pasujące gniazda zmniejszają
ryzyko porażenia prądem.
b) Unikać dotykania uziemionych elementów, takich jak
rury, grzejniki, piece i lodówki. Istnieje zwiększone
ryzyko porażenia prądem, jeśli ciało jest uziemione
i dotyka urządzenia narażonego na bezpośrednie
działanie deszczu, mokrej nawierzchni i pracy w
wilgotnym otoczeniu. Przedostanie się wody do
urządzenia zwiększa ryzyko jego uszkodzenia oraz
porażenia prądem.
c) Nie wolno dotykać urządzenia mokrymi lub
wilgotnymi rękoma.
d) Nie należy używać przewodu w sposób niewłaściwy.
Nigdy nie używać go do przenoszenia urządzenia lub
do wyciągania wtyczki z gniazda. Trzymać przewód
z dala od źródeł ciepła, oleju, ostrych krawędzi
lub ruchomych części. Uszkodzone lub poplątane
przewody zwiększają ryzyko porażenia prądem.
e) Jeśli nie można uniknąć używania urządzenia w
środowisku wilgotnym, należy stosować wyłącznik
różnicowo-prądowy (RCD). Używanie RCD zmniejsza
ryzyko porażenia prądem.
f) Zabrania się używania urządzenia, jeśli przewód
zasilający jest uszkodzony lub nosi wyraźne oznaki
zużycia. Uszkodzony przewód zasilający powinien być
wymieniony przez wykwalikowanego elektryka lub
serwis producenta
g) Aby uniknąć porażenia prądem elektrycznym, nie
należy zanurzać kabla, wtyczki ani samego urządzenia
w wodzie lub innym płynie. Nie wolno używać
urządzenia na mokrych powierzchniach.
h) UWAGA – ZAGROŻENIE ŻYCIA! Podczas czyszczenia
lub użytkowania urządzenia nigdy nie wolno zanurzać
go w wodzie lub innych cieczach.
2.2. BEZPIECZEŃSTWO W MIEJSCU PRACY
a) Utrzymywać porządek w miejscu pracy i dobre
oświetlenie. Nieporządek lub złe oświetlenie może
prowadzić do wypadków. Należy być przewidującym,
obserwować co się robi i zachowywać rozsądek
podczas używania urządzenia.
b) W razie wątpliwości czy produkt działa poprawnie lub
stwierdzenia uszkodzenia należy skontaktować się z
serwisem producenta.
c) Naprawę produktu może wykonać wyłącznie
serwis producenta. Nie wolno dokonywać napraw
samodzielnie!
d) W przypadku zaprószenia ognia lub pożaru, do
gaszenia urządzenia pod napięciem należy używać
wyłącznie gaśnic proszkowych lub śniegowych (CO2).
Opis parametru Wartość parametru
Nazwa produktu MŁYNEK DO KAWY
Model RC-CG
M19
RC-CG
M20
RC-CG
M21
RC-CG
E22
Napięcie
zasilania [V~]/
Częstotliwość [Hz] 220/50
Moc znamionowa
[W] 200
Wymiary
(Szerokość
x Głębokość
x Wysokość )[mm]
150
x232
x425
132x228x470
132
x228
x465
Ciężar [kg] 4,6 4,5 4,7
Produkt spełnia wymagania odpowiednich
norm bezpieczeństwa.
Przed użyciem należy zapoznać się z instrukcją.
Produkt podlegający recyklingowi.
UWAGA! lub OSTRZEŻENIE! lub PAMIĘTAJ!
opisująca daną sytuację (ogólny znak
ostrzegawczy).
Do użytku tylko wewnątrz pomieszczeń.
UWAGA! Pomimo iż urządzenie zostało
zaprojektowane tak aby było bezpieczne, posiadało
odpowiednie środki ochrony oraz pomimo użycia
dodatkowych elementów zabezpieczających
użytkownika, nadal istnieje niewielkie ryzyko
wypadku lub odniesienia obrażeń w trakcie pracy
z urządzeniem. Zaleca się zachowanie ostrożności
i rozsądku podczas jego użytkowania.
3. ZASADY UŻYTKOWANIA
Produkt przeznaczony jest do mielenia ziaren kawy.
Produkt jest przeznaczony tylko do użytku domowego!
Odpowiedzialność za wszelkie szkody powstałe
w wyniku użytkowania niezgodnego z przeznaczeniem
ponosi użytkownik.
3.1. OPIS URZĄDZENIA
e) Zachować instrukcję użytkowania w celu jej
późniejszego użycia. W razie, gdyby urządzenie miało
zostać przekazane osobom trzecim, to wraz z nim
należy przekazać również instrukcję użytkowania.
f) Elementy opakowania oraz drobne elementy
montażowe należy przechowywać w miejscu
niedostępnym dla dzieci.
g) Urządzenie trzymać z dala od dzieci i zwierząt.
2.3. BEZPIECZEŃSTWO OSOBISTE
a) Urządzenie nie jest przeznaczone do tego, by
było użytkowane przez osoby (w tym dzieci)
o ograniczonych funkcjach psychicznych,
sensorycznych i umysłowych lub nieposiadające
odpowiedniego doświadczenia i/lub wiedzy, chyba że
są one nadzorowane przez osobę odpowiedzialną za
ich bezpieczeństwo lub otrzymały od niej wskazówki
dotyczące tego, jak należy obsługiwać urządzenie.
b) Aby zapobiegać przypadkowemu uruchomieniu
upewnij się, że przełącznik jest w pozycji wyłączonej
przed podłączeniem do źródła zasilania.
c) Urządzenie nie jest zabawką. Dzieci powinny być
pilnowane, aby nie bawiły się urządzeniem.
d) Nie wkładać rąk, przedmiotów do wnętrza
pracującego urządzenia!
2.4. BEZPIECZNE STOSOWANIE URZĄDZENIA
a) Nie należy używać urządzenia, jeśli przełącznik ON/
OFF nie działa sprawnie (nie załącza i nie wyłącza
się). Urządzenia, które nie mogą być kontrolowane
za pomocą przełącznika są niebezpieczne, nie mogą
pracować i muszą zostać naprawione.
b) Przed przystąpieniem do regulacji, czyszczenia i
konserwacji urządzenie należy odłączyć od zasilania.
Taki środek zapobiegawczy zmniejsza ryzyko
przypadkowego uruchomienia.
c) Nieużywane urządzenia należy przechowywać
w miejscu niedostępnym dla dzieci oraz osób
nieznających urządzenia lub tej instrukcji
obsługi. Urządzenia są niebezpieczne w rękach
niedoświadczonych użytkowników.
d) Utrzymywać urządzenie w dobrym stanie
technicznym. Sprawdzać przed każdą pracą czy
nie posiada uszkodzeń ogólnych lub związanych z
elementami ruchomymi (pęknięcia części i elementów
lub wszelkie inne warunki, które mogą mieć wpływ
na bezpieczne działanie urządzenia). W przypadku
uszkodzenia, oddać urządzenie do naprawy przed
użyciem.
e) Urządzenie należy chronić przed dziećmi.
f) Naprawa oraz konserwacja urządzeń powinna być
wykonywana przez wykwalikowane osoby przy
użyciu wyłącznie oryginalnych części zamiennych.
Zapewni to bezpieczeństwo użytkowania.
g) Aby zapewnić zaprojektowaną integralność
operacyjną urządzenia, nie należy usuwać
zainstalowanych fabrycznie osłon lub odkręcać śrub.
h) Należy unikać sytuacji, gdy urządzenie podczas pracy,
zatrzymuje się pod wpływem dużego obciążenia.
Może spowodować to przegrzanie się elementów
napędowych i w konsekwencji uszkodzenie
urządzenia.
i) Nie wolno dotykać części lub akcesoriów ruchomych,
chyba że urządzenie zostało odłączone od zasilania.
j) Zabrania się przesuwania, przestawiania i obracania
urządzenia będącego w trakcie pracy.
k) Nie należy pozostawiać włączonego urządzenia bez
nadzoru.
l) Należy regularnie czyścić urządzenie, aby nie dopuścić
do trwałego osadzenia się zanieczyszczeń.
m) Urządzenie nie jest zabawką. Czyszczenie i
konserwacja nie mogą być wykonywane przez dzieci
bez nadzoru osoby dorosłej.
n) Zabrania się ingerowania w konstrukcję urządzenia
celem zmiany jego parametrów lub budowy.
o) Trzymać urządzenia z dala od źródeł ognia i ciepła.
p) Nie wolno zasłaniać otworów wentylacyjnych
urządzenia!
1. Pokrywka lejka
2. Lejek
3. Regulator skali (pierścień stopnia zmielenia)
4. Baza
5. Kabel zasilania
6. Przełącznik zasilania
7. Pozycjoner regulatora skali
8. Uchwyt
9. Bezpiecznik
10. Mikroprzełącznik
11. Panel sterowania
6
95
8
10
6
5
4
3
2
1
2
1
3
4
77
11
10
8
9
INSTRUKCJA OBSŁUGI
PL PL
13
Rev. 20.05.2021
12 Rev. 20.05.2021

C
BA
3.2. PRZYGOTOWANIE DO PRACY
UMIEJSCOWIENIE URZĄDZENIA
Temperatura otoczenia nie może przekraczać 40°C a
wilgotność względna nie powinna przekraczać 85%.
Urządzenie należy ustawić w sposób zapewniający dobrą
cyrkulację powietrza. Należy utrzymać minimalny odstęp 10
cm od każdej ściany urządzenia. Urządzenie należy trzymać
z dala od wszelkich gorących powierzchni. Urządzenie
należy zawsze użytkować na równej, stabilnej, czystej,
ognioodpornej i suchej powierzchni i poza zasięgiem
dzieci oraz osób ograniczonych funkcjach psychicznych,
sensorycznych i umysłowych. Urządzenie należy
umiejscowić w taki sposób, by w dowolnej chwili można
się było dostać do wtyczki sieciowej. Należy pamiętać o
tym, by zasilanie urządzenia energią odpowiadało danym
podanym na tabliczce znamionowej!
Przed pierwszym użyciem zdemontować wszystkie
elementy i umyć je jak również umyć całe urządzenie.
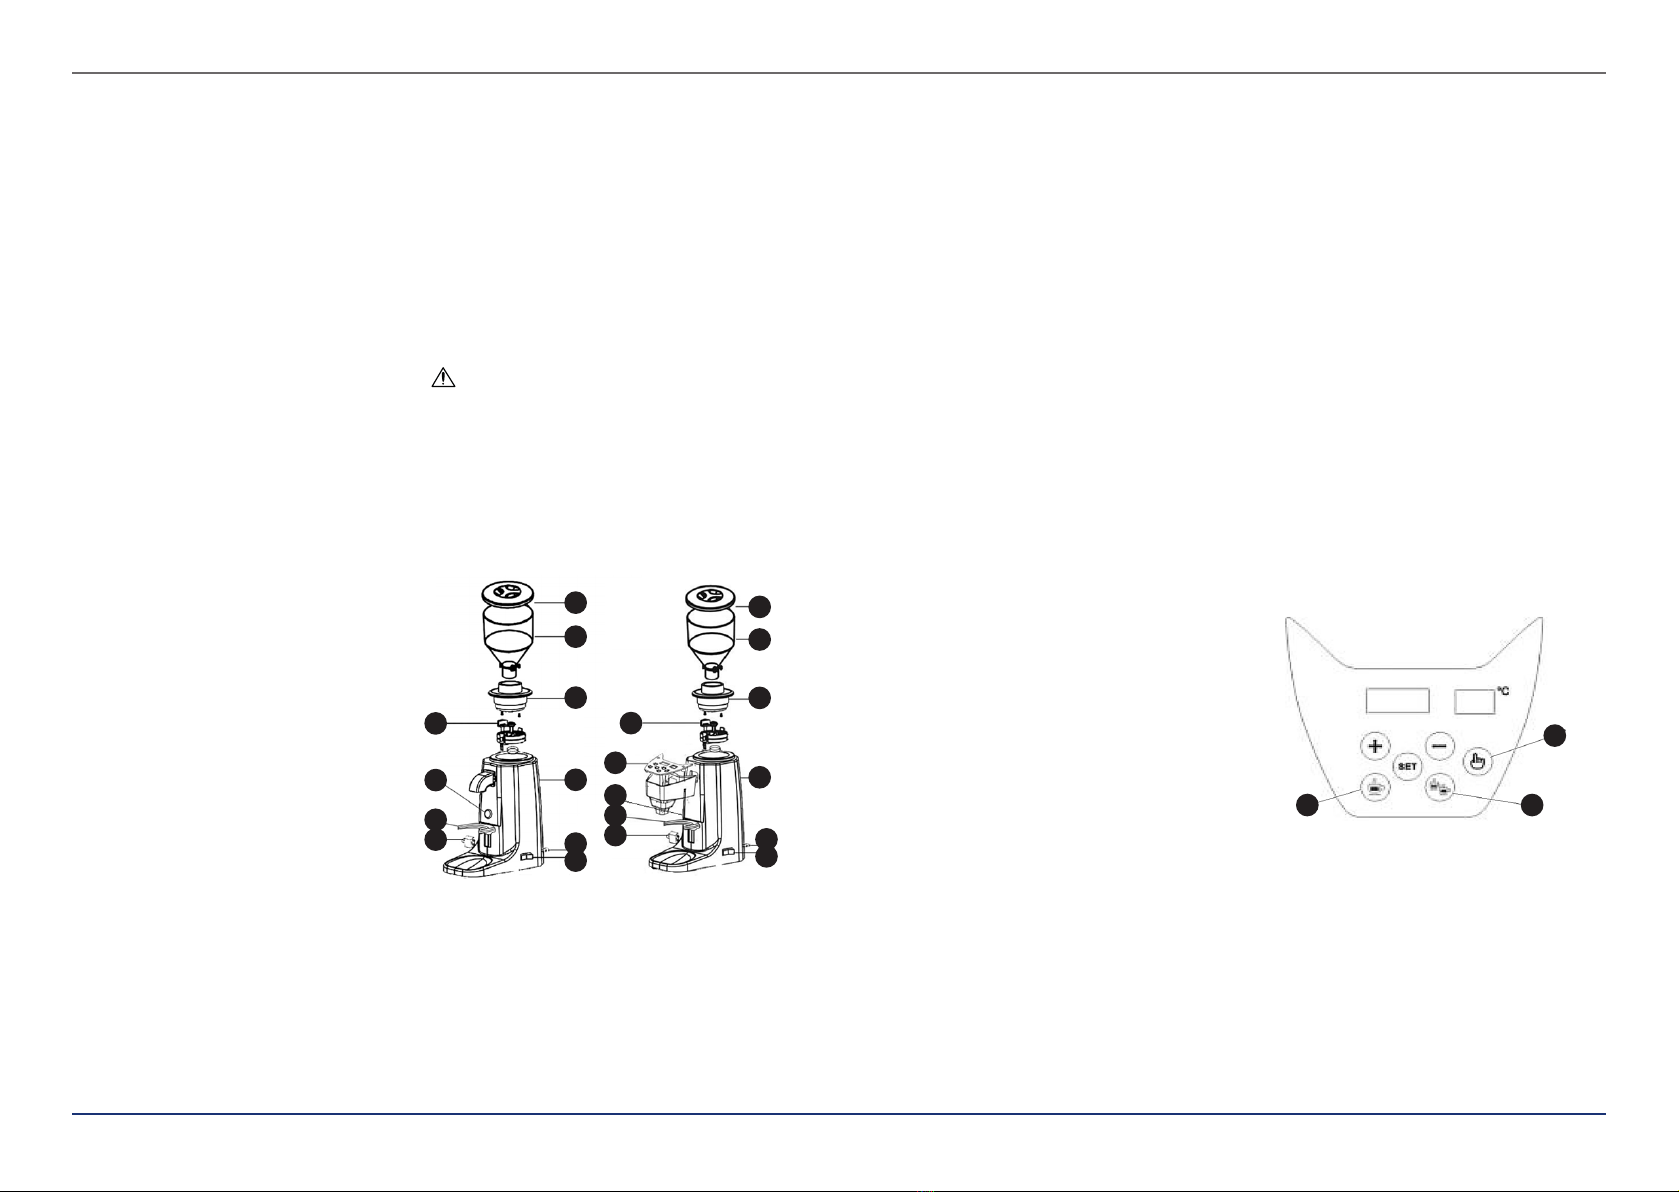
3.3. PRACA Z URZĄDZENIEM RC-CGM19
1. Włączyć przełącznik zasilania, aby uruchomić silnik.
2. Ustawić pierścień stopnia zmielenia zgodnie z
preferencjami (przed wsypaniem ziaren kawy).
• Żądany stopień zmielenia kawy należy ustawić
w zakresie od 1 do 19, gdzie 1 oznacza
drobnoziarnisty proszek, a 19 gruboziarnisty.
• Aby wyregulować pierścień zmielenia kawy,
należy najpierw poluzować śrubę regulacyjną,
a następnie wyregulować pierścień. Dokręcić
śrubę.
3. Wsypać ziarna kawy do lejka i nałożyć pokrywkę lejka.
4. Podstawić pojemnik na kawę mieloną lub umieścić
kolbę do ekspresu na uchwycie (8).
5. Nacisnąć z odpowiednią siłą mikroprzełącznik (10).
Silnik zostanie uruchomiony, a ziarna kawy po chwili
zostaną zmielone. Poluzować uchwyt, mielenie
zatrzyma się.
6. Wyłączyć zasilanie (6) po zakończeniu użytkowania.
3.4. PRACA Z URZĄDZENIEM RC-CGM20
1. Włączyć przełącznik zasilania, aby uruchomić silnik.
Sprawdzić czy lampka zasilania jest włączona.
2. Ustawić pierścień stopnia zmielenia zgodnie z
preferencjami (przed wsypaniem ziaren kawy).
• Żądany stopień zmielenia kawy należy ustawić
w zakresie od 1 do 19, gdzie 1 oznacza
drobnoziarnisty proszek, a 19 gruboziarnisty.
• Jeśli stopień rozdrobnienia jest nieodpowiedni,
wcisnąć część (7) w dół i jednocześnie
przekręcić pierścień stopnia zmielenia (3).
Proszek kawowy będzie grubszy przy obracaniu
w kierunku zgodnym z ruchem wskazówek
zegara i drobniejszy przy obracaniu w kierunku
przeciwnym. Należy wyregulować młynek
zgodnie z własnymi preferencjami.
3. Wsypać ziarna kawy do lejka i nałożyć pokrywkę lejka.
4. Podstawić pojemnik na kawę mieloną lub umieścić
kolbę do ekspresu na uchwycie (8).
5. Nacisnąć z odpowiednią siłą mikroprzełącznik (10).
Silnik zostanie uruchomiony, a ziarna kawy po chwili
zostaną zmielone. Poluzować uchwyt, mielenie
zatrzyma się.
6. Wyłączyć zasilanie (6) po zakończeniu użytkowania.
3.5. PRACA Z URZĄDZENIEM RC-CGM21
1. Włączyć przełącznik zasilania, aby uruchomić silnik.
Sprawdzić czy lampka zasilania jest włączona.
2. Ustawić pierścień stopnia zmielenia zgodnie z
preferencjami (przed wsypaniem ziaren kawy).
• Żądany stopień zmielenia kawy należy ustawić
w zakresie od 1 do 19, gdzie 1 oznacza
drobnoziarnisty proszek, a 19 gruboziarnisty.
• Jeśli stopień rozdrobnienia jest nieodpowiedni,
należy nacisnąć część (7) w dół i jednocześnie
przekręcić pierścień stopnia zmielenia (3).
Proszek kawowy będzie grubszy przy obracaniu
w kierunku zgodnym z ruchem wskazówek
zegara i drobniejszy przy obracaniu w kierunku
przeciwnym. Należy wyregulować młynek
zgodnie z własnymi preferencjami.
3. Wsypać ziarna kawy do lejka i nałożyć pokrywkę lejka.
4. Podstawić pojemnik na kawę mieloną lub umieścić
kolbę do ekspresu na uchwycie (8).
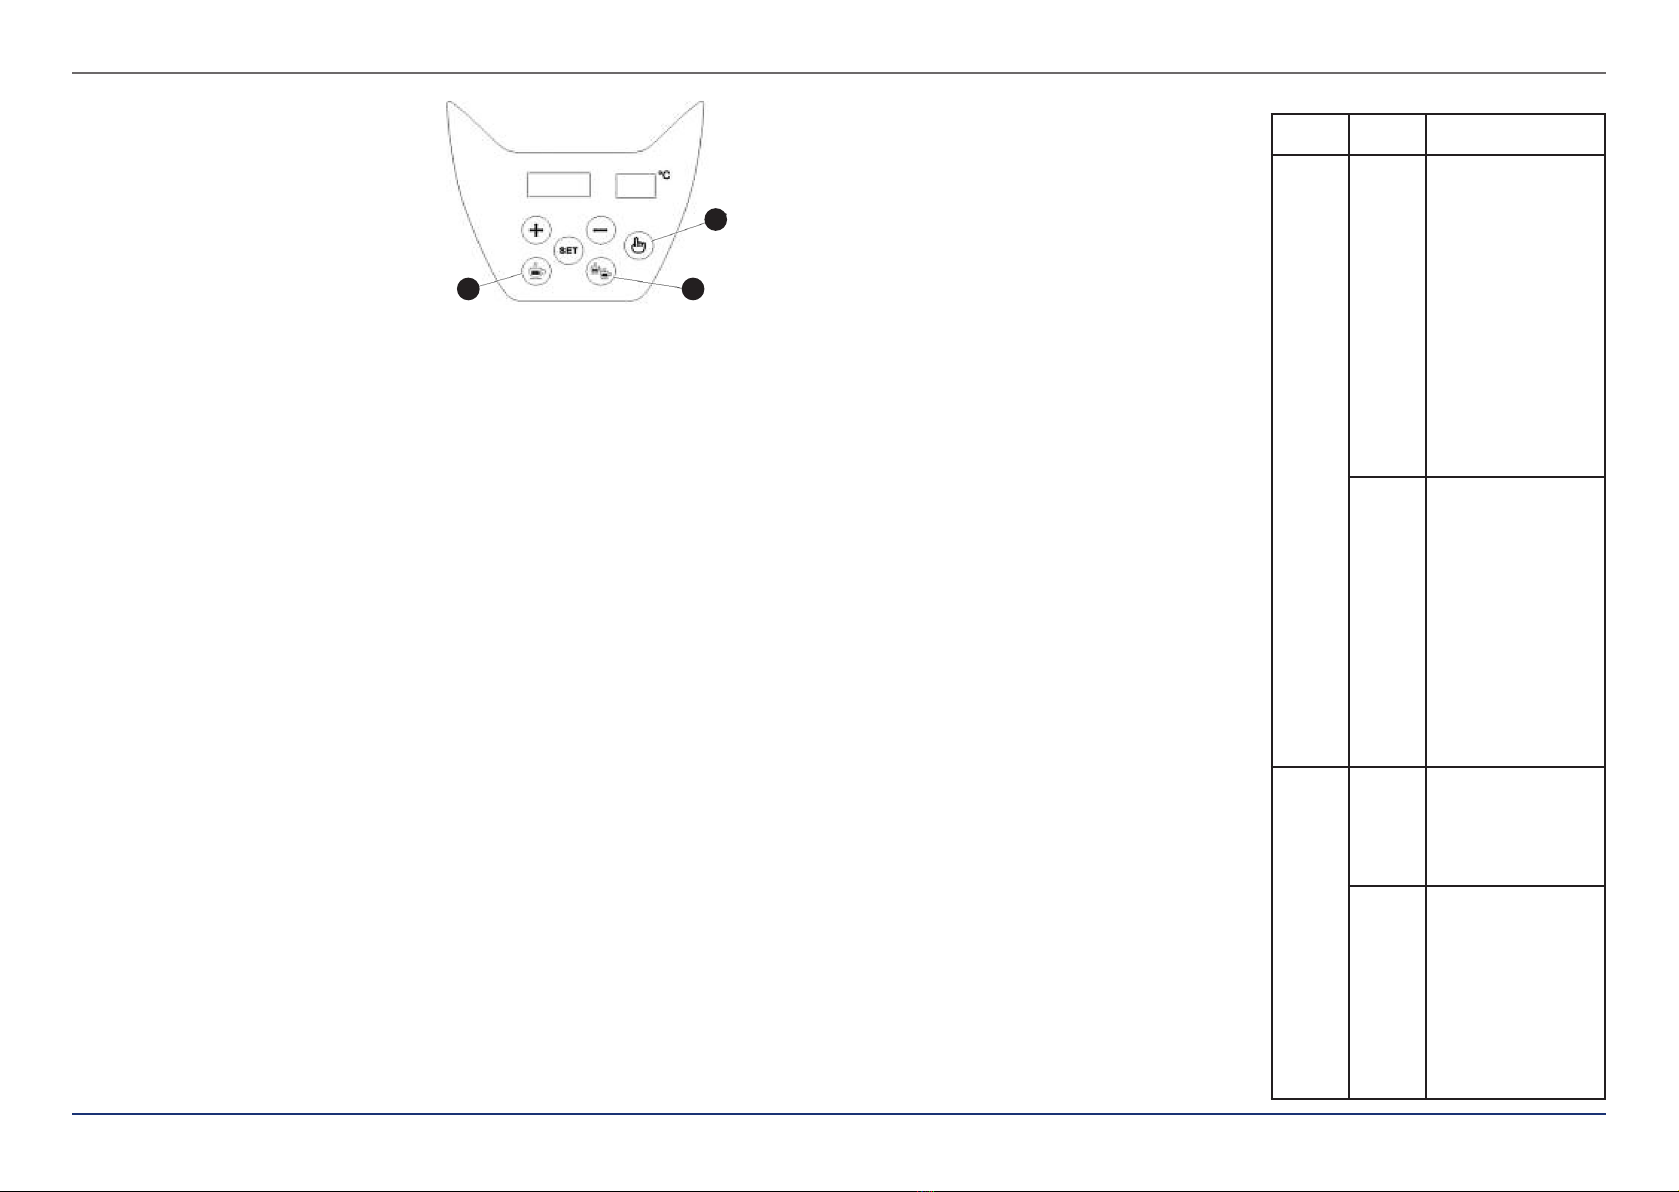
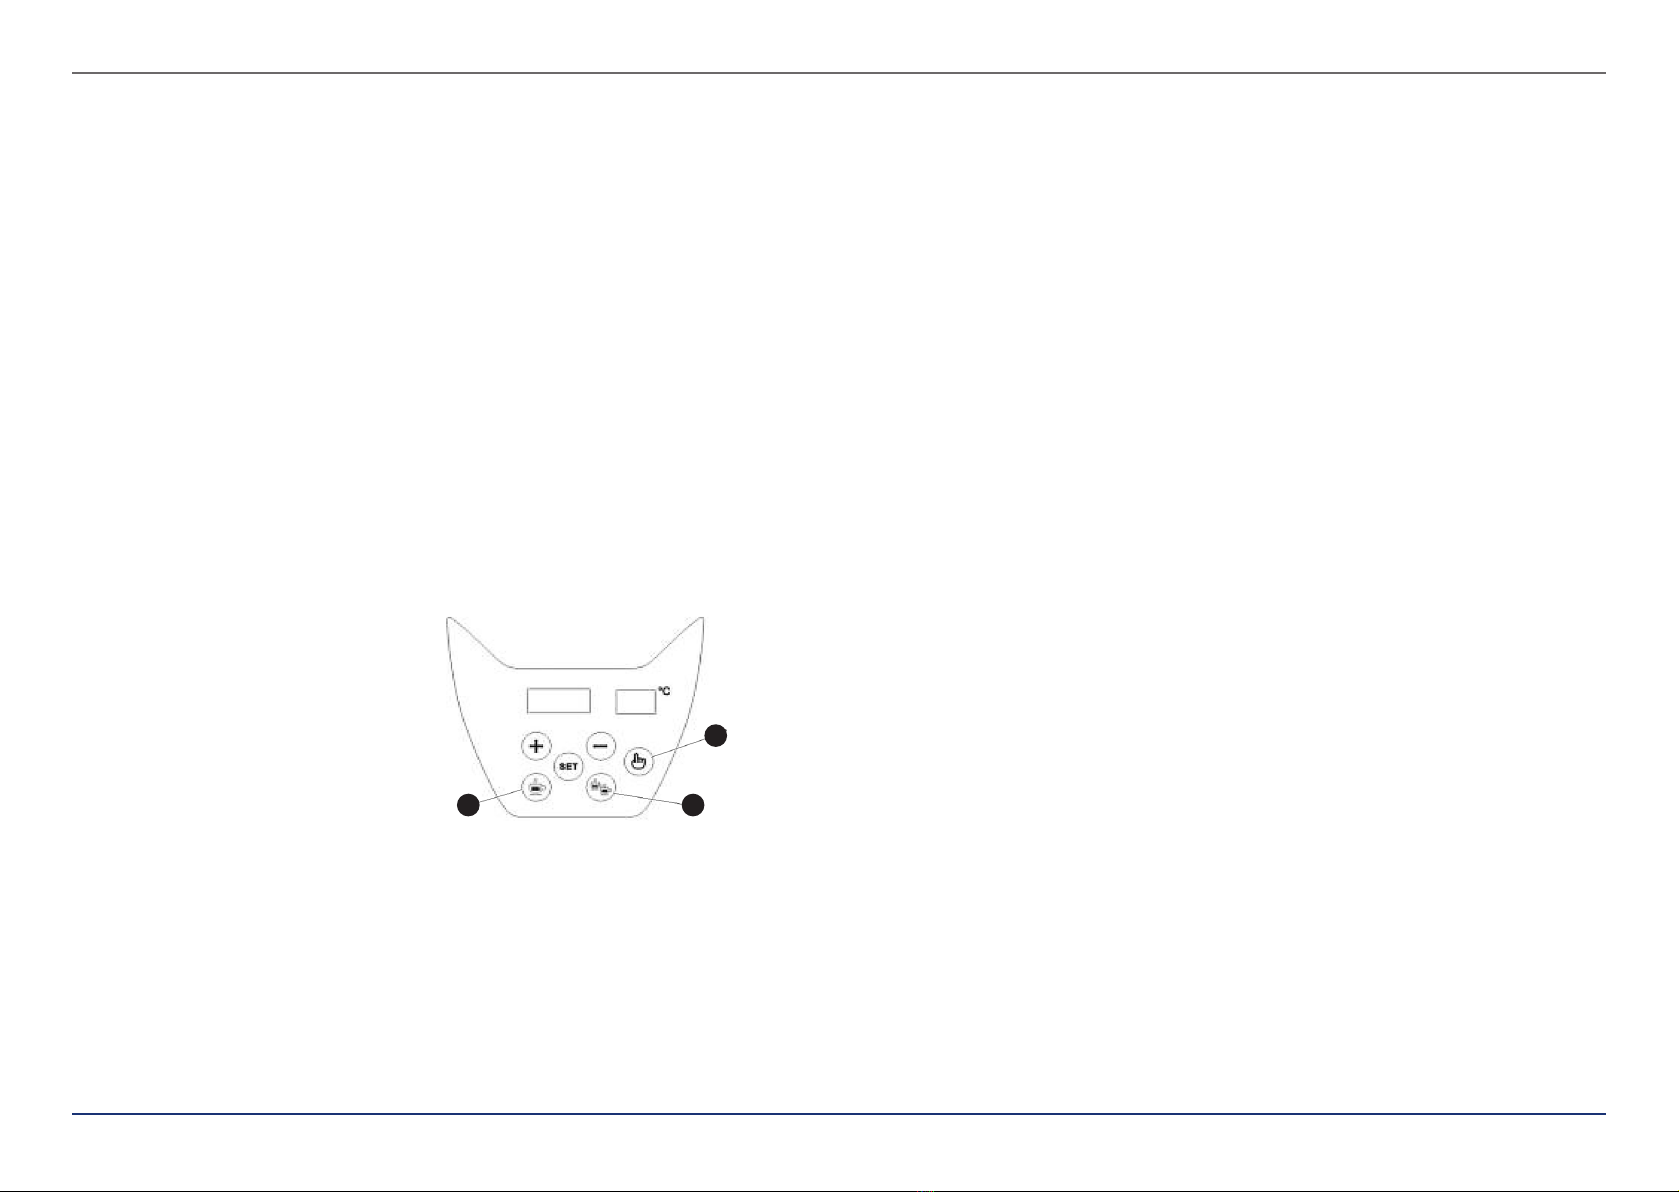
5. Obsługiwać przyciski na panelu sterowania, jak
pokazano na rys. 1.
Przycisk SET służy do ustawiania czasu. Po naciśnięciu
przycisku SET na panelu zacznie migać czas, co
oznacza, że można go ustawić.
Wcisnąć (A) dla pojedynczej liżanki lub wcisnąć
przycisk (B) dla podwójnej liżanki. Za pomocą
przycisków (+) (-) ustawić czas potrzebny do zmielenia
pojedynczej liżanki lub dwóch liżanek, a następnie
nacisnąć przycisk SET, aby zakończyć ustawianie.
Nacisnąć raz przycisk (C), aby rozpocząć ciągłe
mielenie i nacisnąć go ponownie, aby zatrzymać
mielenie. Wciśnięcie przycisku (C) po raz pierwszy
spowoduje, że młynek będzie pracował jeszcze przez
60 sekund.
6. Wyłączyć zasilanie po zakończeniu użytkowania.
3.6. PRACA Z URZĄDZENIEM RC-CGE22
1. Włączyć przełącznik zasilania, aby uruchomić silnik.
Sprawdzić czy lampka zasilania jest włączona.
2. Ustawić pierścień stopnia zmielenia zgodnie z
preferencjami (przed wsypaniem ziaren kawy).
• Żądany stopień zmielenia kawy należy ustawić
w zakresie od 1 do 19, gdzie 1 oznacza
drobnoziarnisty proszek, a 19 gruboziarnisty.
• Jeśli stopień rozdrobnienia jest nieodpowiedni,
należy nacisnąć część (7) w dół i jednocześnie
przekręcić pierścień stopnia zmielenia (3).
Proszek kawowy będzie grubszy przy obracaniu
w kierunku zgodnym z ruchem wskazówek
zegara i drobniejszy przy obracaniu w kierunku
przeciwnym. Należy wyregulować młynek
zgodnie z własnymi preferencjami.
3. Wsypać ziarna kawy do lejka i nałożyć pokrywkę lejka.
4. Podstawić pojemnik na kawę mieloną lub umieścić
kolbę do ekspresu na uchwycie (8).
5. Dotknąć przycisków Double lub Single na
panelu klawiszy i nacisnąć z odpowiednią siłą
mikroprzełącznik (10). Silnik zostanie uruchomiony
na tak długo, jak zostało to ustawione. Dotknąć
odpowiednich przycisków, aby zatrzymać mielenie.
Panel sterowania: Dotknąć przycisku (A), aby
wyświetlić domyślnie ustawiony czas dla pojedynczej
liżanki. Dotknąć przycisku (B), aby wyświetlić
domyślnie ustawiony czas dla podwójnej liżanki.
Aby zmienić domyślnie ustawiony czas dla
pojedynczej liżanki, należy przytrzymać przycisk
(C) przez 3 sekundy, aż SET na wyświetlaczu zmieni
kolor na czerwony i zacznie migać. Następnie należy
nacisnąć przycisk (A) dla pojedynczej liżanki i
przycisk (C), aż SET na wyświetlaczu zmieni kolor
na czerwony, a jednostki S i Single będą migać, co
oznacza, że można ustawić czas dla pojedynczej
liżanki. Dotknąć przycisków (+) i (-), aby zwiększyć
lub zmniejszyć domyślnie ustawiony czas, a następnie
dotknąć przycisku (C), aby automatycznie zapisać czas
ustawiony dla pojedynczej liżanki.
Aby zmienić domyślnie ustawiony czas dla podwójnej
liżanki, należy przytrzymać przycisk (C) przez 3
sekundy, aż SET na wyświetlaczu zmieni kolor na
czerwony i zacznie migać. Następnie należy nacisnąć
przycisk (B) dla liżanki podwójnej i przycisk (C), aż SET
na wyświetlaczu zmieni kolor na czerwony, a jednostki
S i Double będą migać, co oznacza, że można ustawić
czas dla liżanek podwójnych. Dotknąć przycisków
(+) i (-), aby zwiększyć lub zmniejszyć domyślnie
ustawiony czas, a następnie dotknąć przycisku (C), aby
automatycznie zapisać czas ustawiony dla podwójnej
liżanki.
7. Wyłączyć zasilanie po zakończeniu użytkowania.
3.7. CZYSZCZENIE I KONSERWACJA
a) Przed każdym czyszczeniem, regulacją, wymianą
osprzętu, a także jeżeli urządzenie nie jest używane,
należy wyciągnąć wtyczkę sieciową i całkowicie
ochłodzić urządzenie.
• Odczekać, aż wirujące elementy zatrzymają się.
b) Do czyszczenia urządzenia wolno stosować tylko
łagodne środki czyszczące przeznaczone do
czyszczenia powierzchni mających styczność z
żywnością.
c) Po każdym czyszczeniu wszystkie elementy należy
dobrze wysuszyć, zanim urządzenie zostanie
ponownie użyte.
d) Urządzenie należy przechowywać w suchym i
chłodnym miejscu chronionym przed wilgocią i
bezpośrednim promieniowaniem słonecznym.
e) Zabrania się spryskiwania urządzenia strumieniem
wody lub zanurzania urządzenia w wodzie.
f) Należy wykonywać regularne przeglądy urządzenia
pod kątem jego sprawności technicznej oraz wszelkich
uszkodzeń.
g) Do czyszczenia należy używać miękkiej, wilgotnej
ściereczki.
h) Do czyszczenia nie wolno używać ostrych i/lub
metalowych przedmiotów (np. drucianej szczotki lub
metalowej łopatki) ponieważ mogą one uszkodzić
powierzchnię materiału, z którego wykonane jest
urządzenie.
i) Nie czyścić urządzenia substancja o odczynie
kwasowym, środkami przeznaczenia medycznego,
rozcieńczalnikami, paliwem, olejami lub innymi
substancjami chemicznymi może to spowodować
uszkodzenie urządzenia.
Jeśli zaistnieje potrzeba zdemontowania pewnych części
urządzenia, należy upewnić się, że przełącznik zasilania jest
wyłączony lub wyciągnąć wtyczkę z gniazda, aby uniknąć
pomyłkowego dotknięcia przełącznika i uruchomienia
urządzenia.
Czyszczenie wewnętrznej powierzchni komory mielenia:
1. Zdemontować lejek razem z pokrywką.
2. Obracać regulator skali (pierścień stopnia zmielenia) w
górę zgodnie z ruchem wskazówek zegara.
3. Zdemontować uchwyt ostrza.
4. Oczyścić powierzchnię wewnętrzną.
Montaż komory mielenia:
1. Zamontować uchwyt ostrza.
2. Obracać regulator skali (pierścień stopnia zmielenia) w
kierunku przeciwnym do ruchu wskazówek zegara aż
do ustawienia w odpowiedniej pozycji.
3. Zamontować lejek razem z pokrywką.
* Dokładnie usunąć proszek kawowy z podstawy i
gwintów regulatora skali, w przeciwnym razie może to
mieć wpływ na stopień rozdrobnienia zmielonej kawy.
Pokrętło skali może zostać zakleszczone, którego po
ponownym zamontowaniu nie można obrócić lub
można je obrócić tylko częściowo.
USUWANIE ZUŻYTYCH URZĄDZEŃ.
Po zakończeniu okresu użytkowania nie wolno usuwać
niniejszego produktu poprzez normalne odpady komunalne,
lecz należy go oddać do punktu zbiórki i recyklingu
urządzeń elektrycznych i elektronicznych. Informuje o tym
symbol, umieszczony na produkcie, instrukcji obsługi lub
opakowaniu. Zastosowane w urządzeniu tworzywa nadają
się do powtórnego użycia zgodnie z ich oznaczeniem. Dzięki
powtórnemu użyciu, wykorzystaniu materiałów lub innym
formom wykorzystania zużytych urządzeń wnoszą Państwo
istotny wkład w ochronę naszego środowiska. Informacji
o właściwym punkcie usuwania zużytych urządzeń udzieli
Państwu lokalna administracja.
PL PL
15
Rev. 20.05.2021
14 Rev. 20.05.2021

PROBLEM MOŻLIWA
PRZYCZYNA DZIAŁANIE
Nie
można
uruchomić
silnika
Uszkodzenie
przełącznika
zasilania
Wymienić przełącznik
zasilania.
Wyłączyć zasilanie, a
następnie wyczyścić
komorę mielenia.
Sprawdzić, czy nie
ma ciał obcych, które
zakleszczają silnik i
uniemożliwiają jego
pracę. Po sprawdzeniu,
ponownie zamontować
wszystkie części.
Uruchomić rozrusznik do
testu po potwierdzeniu,
że wszystkie części
zostały prawidłowo
zmontowane.
Jeżeli przełącznik
zasilania nie jest
uszkodzony, sprawdzić,
czy wskaźniki na panelu
sterowania są włączone
(dla urządzeń (RC-
CGM21) i (RC-CGM22)).
Jeśli panel sterowania
nie działa, należy go
wymienić.
Przepalony
bezpiecznik
Wymienić bezpiecznik.
Wyłączyć wyłącznik,
a następnie wyczyścić
komorę mielenia.
Sprawdzić, czy nie
ma ciał obcych, które
zakleszczają silnik i
uniemożliwiają jego
pracę. Po sprawdzeniu,
ponownie zamontować
wszystkie części.
Uruchomić rozrusznik do
testu po potwierdzeniu,
że wszystkie części
zostały prawidłowo
zmontowane.
Jeżeli bezpiecznik
nie jest uszkodzony,
sprawdzić, czy wskaźniki
na panelu sterowania są
włączone (dla urządzeń
(RC-CGM21) i (RC-
CGM22)).. Jeśli panel
sterowania nie działa,
należy go wymienić.
Niedo-
kładne
mielenie
Części we-
wnątrz komo-
ry mielenia są
nieprawidło-
wo zamonto-
wane.
Zdemontować i
ponownie zamontować
dokładnie wszystkie
części.
Regulator
skali (pier-
ścień stopnia
zmielenia)
nie jest obró-
cony w prawo
do słupka do
pozycjono-
wania.
Oczyścić i
zakonserwować komorę
mielenia zgodnie z
instrukcją obsługi, a
następnie ponownie
zmontować. Włączyć
przełącznik zasilania
i powoli przesuwać
regulator skali w prawo
aż do usłyszenia tarcia
tarczy żłobkowanej.
Następnie obrócić go w
kierunku przeciwnym do
ruchu wskazówek zegara
na około 0,5 cm. Po
wykonaniu powyższych
czynności należy
wsypać ziarna kawy do
próbnego mielenia.
ROZWIĄZYWANIE PROBLEMÓW TECHNICKÉ ÚDAJE 2.1. ELEKTRICKÁ BEZPEČNOST
a) Daná zásuvka musí být se zástrčkou zařízení
kompatibilní. Zástrčku žádným způsobem
neupravujte. Originální zástrčky a příslušné zásuvky
snižují nebezpečí úrazu elektrickým proudem.
b) Nedotýkejte se uzemněných předmětů jako jsou
trubky, topidla, kamna a chladničky. Pokud je
zařízení uzemněno, existuje zvýšené nebezpečí úrazu
elektrickým proudem v následku působení deště,
mokrého povrchu a práce se zařízením ve vlhkém
prostředí. Proniknutí vody do zařízení zvyšuje nebezpečí
jeho poškození a úrazu elektrickým proudem.
c) Zařízení se nedotýkejte mokrýma nebo vlhkýma
rukama.
d) Napájecí kabel nepoužívejte na jiné účely, než na
které je určen. Nikdy jej nepoužívejte k přenášení
zařízení nebo k vytahování zástrčky ze síťové zásuvky.
Držte jej mimo dosah tepla, oleje, ostrých hran nebo
rotujících dílů. Poškozené nebo zamotané elektrické
napájecí kabely zvyšují nebezpečí úrazu elektrickým
proudem.
e) Pokud není možné vyhnout se práci se zařízením
ve vlhkém prostředí, používejte při tom proudový
chránič (RCD). Používání RCD snižuje nebezpečí úrazu
elektrickým proudem.
f) Je zakázáno používat zařízení, pokud je napájecí
kabel poškozený nebo má zjevné známky opotřebení.
Poškozený napájecí kabel musí být vyměněn
kvalikovaným elektrikářem nebo v servisním
středisku výrobce.
g) Aby nedošlo k zasažení elektrickým proudem,
nesmíte kabel, zástrčku ani samotné zařízení
ponořovat do vody nebo jiné tekutiny. Je zakázáno
používat zařízení na mokrém povrchu.
h) POZOR – OHROŽENÍ ŽIVOTA! Během čistění nebo
používání zařízení nikdy nesmí být ponořováno ve
vodě nebo jiných kapalinách.
2.2. BEZPEČNOST NA PRACOVIŠTI
a) Na pracovišti udržujte pořádek a mějte dobré
osvětlení. Nepořádek nebo špatné osvětlení mohou
vést k úrazům. Buďte předvídaví a sledujte, co se
během práce kolem vás děje. Při práci se zařízením
vždy zachovávejte zdravý rozum.
b) Budete-li mít pochybnosti, zda výrobek funguje
správně, nebo zjistíte poškození, kontaktujte servis
výrobce.
c) Výrobek může opravovat pouze servis výrobce.
Opravy neprovádějte sami!
d) V případě vzniku požáru k hašení zařízení pod
napětím používejte pouze práškové nebo sněhové
hasicí přístroje (CO2).
e) Návod k obsluze uschovejte za účelem jeho
pozdějšího použití. V případě předánání zařízení
třetím osobám musí být spolu se zařízením předán
rovněž návod k obsluze.
f) Obalový materiál a drobné montážní prvky
uchovávejte na místě nedostupném pro děti.
g) Zařízení mějte v dostatečné vzdálenosti od dětí a
zvířat.
2.3. OSOBNÍ BEZPEČNOST
a) Zařízení není určen k tomu, aby jej používaly osoby
(včetně dětí) s omezenými psychickými, smyslovými
nebo duševními schopnostmi nebo osoby bez
Popis parametru Hodnota parametru
Název výrobku MLÝNEK NA KÁVU
Model RC-CG
M19
RC-CG
M20
RC-CG
M21
RC-CG
E22
Jmenovité napětí
napájení [V~]/
Frekvence [Hz] 220/50
Jmenovitý výkon
[W] 200
Rozměry (Šířka
x hloubka x výška)
[mm]
150
x232
x425
132x228x470
132
x228
x465
Hmotnost [kg] 4,6 4,5 4,7
Pro zajištění dlouhého a spolehlivého fungování zařízení
pravidelně provádějte revize a údržbu v souladu s pokyny
uvedenými v tomto návodu. Technické údaje a specikace
uvedené v návodu jsou aktuální. Výrobce si vyhrazuje
právo provádět změny za účelem zvýšení kvality. Vzhledem
k technickému pokroku a možnosti omezení hluku bylo
zařízení navrženo a vyrobeno tak, aby nebezpečí vyplývající
z emise hluku bylo omezeno na nejnižší úroveň.
VYSVĚTLENÍ SYMBOLŮ
1. VŠEOBECNÝ POPIS
Návod slouží jako nápověda pro bezpečné a spolehlivé
používání výrobku. Výrobek je navržen a vyroben přesně
podle technických údajů za použití nejnovějších technologií
a komponentů a za dodržení nejvyšších jakostních norem.
PŘED ZAHÁJENÍM PRÁCE SI DŮKLADNĚ PŘEČTĚTE
TENTO NÁVOD A UJISTĚTE SE, ŽE JSTE POCHOPILI
VŠECHNY POKYNY.
Výrobek splňuje požadavky příslušných
bezpečnostních norem.
Před použitím výrobku se seznamte s návodem.
Recyklovatelný výrobek.
UPOZORNĚNÍ! nebo VAROVÁNÍ! nebo
PAMATUJTE! popisující danou situaci
(všeobecná výstražná značka).
Pouze k použití ve vnitřních prostorech.
POZOR! Obrázky v tomto návodu jsou ilustrační.
V některých detailech se od skutečného vzhledu
zařízení mohou lišit.
Originálním návodem je německá verze návodu. Ostatní
jazykové verze jsou překladem z německého jazyka.
2. BEZPEČNOST POUŽÍVÁNÍ
POZNÁMKA! Přečtěte si tento návod včetně všech
bezpečnostních pokynů. Nedodržování návodu
a pokynů může vést k úrazu elektrickým proudem,
požáru anebo těžkému úrazu či smrti.
Pojem „zařízení“ nebo „výrobek“ v bezpečnostních
pokynech a návodu se vztahuje na MLÝNEK NA KÁVU.
NÁVOD K OBSLUZE
PL CZ
17
Rev. 20.05.2021
16 Rev. 20.05.2021

C
BA
5. Stiskněte mikrospínač (10) dostatečnou silou. Motor
nastartuje a kávová zrna se po chvíli rozdrtí. Uvolněte
rukojeť, mletí se zastaví.
6. Po použití vypněte zařízení z napájení (6).
3.4. PRÁCE SE ZAŘÍZENÍM RC-CGM20
1. Zapněte hlavní vypínač a nastartujte motor.
Zkontrolujte, zda svítí kontrolka napájení.
2. Nastavte kroužek stupně mletí podle svých preferencí
(před přidáním kávových zrn).
• Požadovaný stupeň mletí kávy by měl být
nastaven mezi 1 a 19, přičemž 1 je jemný prášek
a 19 hrubý prášek.
• Pokud stupeň mletí není vhodný, stiskněte díl (7)
dolů a současně otočte kroužkem stupně mletí
(3). Kávový prášek bude hrubší při otáčení ve
směru hodinových ručiček a jemnější při otáčení
proti směru hodinových ručiček. Upravte mlýnek
podle svých preferencí.
3. Vsypte kávová zrna do trychtýře a nasaďte kryt
trychtýře.
4. Umístěte nádobu na mletou kávu
5. Stiskněte mikrospínač (10) dostatečnou silou. Motor
nastartuje a kávová zrna se po chvíli rozdrtí. Uvolněte
rukojeť, mletí se zastaví.
6. Po použití vypněte zařízení z napájení (6).
3.5. PRÁCE SE ZAŘÍZENÍM RC-CGM21
1. Zapněte hlavní vypínač a nastartujte motor.
Zkontrolujte, zda svítí kontrolka napájení.
2. Nastavte kroužek stupně mletí podle svých preferencí
(před přidáním kávových zrn).
• Požadovaný stupeň mletí kávy by měl být
nastaven mezi 1 a 19, přičemž 1 je jemný prášek
a 19 hrubý prášek.
• Pokud stupeň mletí není vhodný, stiskněte díl (7)
dolů a současně otočte kroužkem stupně mletí
(3). Kávový prášek bude hrubší při otáčení ve
směru hodinových ručiček a jemnější při otáčení
proti směru hodinových ručiček. Upravte mlýnek
podle svých preferencí.
3. Do trychtýře vsypte kávová zrna a nasaďte kryt
trychtýře.
4. Umístěte zásobník na mletou kávu nebo umístěte
portaltr kávovaru na rukojeť (8).
5. Používejte tlačítka na ovládacím panelu, tak jak je
znázorněno na obrázku 1. Tlačítko SET se používá
k nastavení času. Po stisknutí tlačítka SET začne na
panelu blikat čas, což znamená, že lze nastavit čas.
Stiskněte (A) pro jeden šálek nebo stiskněte (B) pro
dvojitý šálek. Pomocí tlačítek (+) a (-) nastavte čas
potřebný k rozemletí jednoho nebo dvou šálků, poté
dokončete nastavení stisknutím tlačítka SET. Jedním
stisknutím tlačítka (C) zahájíte kontinuální mletí a
dalším stisknutím jej zastavíte. Při prvním stisknutí
tlačítka (C) bude mlýnek fungovat dalších 60 sekund.
CZ
19
Rev. 20.05.2021
6. Po použití vypněte z napájení.
3.6. PRÁCE SE ZAŘÍZENÍM RC-CGE22
1. Zapněte hlavní vypínač a nastartujte motor.
Zkontrolujte, zda svítí kontrolka napájení.
2. Nastavte kroužek stupně mletí podle svých preferencí
(před přidáním kávových zrn).
• Požadovaný stupeň mletí kávy by měl být
nastaven mezi 1 a 19, přičemž 1 je jemný prášek
a 19 hrubý prášek.
• Pokud stupeň mletí není vhodný, stiskněte díl (7)
dolů a současně otočte kroužkem stupně mletí
(3). Kávový prášek bude hrubší při otáčení ve
směru hodinových ručiček a jemnější při otáčení
proti směru hodinových ručiček. Upravte mlýnek
podle svých preferencí.
3. Do trychtýře vsypte kávová zrna a nasaďte kryt
trychtýře
4. Umístěte zásobník na mletou kávu nebo umístěte
portaltr kávovaru na rukojeť (8).
5. Stiskněte tlačítka Double nebo Single na klávesnici a
stiskněte mikrospínač (10) odpovídající silou. Motor
poběží tak dlouho, jak byl nastaven. Stisknutím
příslušných tlačítek se mletí zastaví.
Ovládací panel: Stisknutím tlačítka (A) zobrazíte
výchozí čas pro jeden šálek. Stisknutím (B) zobrazíte
výchozí čas pro dvojitý šálek.
Chcete-li změnit výchozí čas pro jeden šálek, podržte
tlačítko (C) po dobu 3 sekund, dokud SET na displeji
nezčervená a nezačne blikat. Poté stiskněte tlačítko (A)
pro jeden šálek a tlačítko (C), dokud SET na displeji
nezčervená a jednotky S a Single nebudou blikat,
což znamená, že můžete nastavit čas pro jeden šálek.
Stisknutím tlačítek (+) a (-) zvýšíte nebo snížíte výchozí
čas, poté stisknutím tlačítka (C) automaticky uložíte
čas nastavený pro jeden šálek.
Chcete-li změnit výchozí čas pro dvojitý šálek, podržte
tlačítko (C) po dobu 3 sekund, dokud SET na displeji
nezčervená a nezačne blikat. Poté stiskněte tlačítko (B)
pro dvojitý šálek a tlačítko (C), dokud SET na displeji
nezčervená a jednotky S a Double nebudou blikat, což
znamená, že můžete nastavit čas pro dvojité šálky.
Stisknutím tlačítek (+) a (-) zvýšíte nebo snížíte výchozí
čas, poté stisknutím tlačítka (C) automaticky uložíte
čas nastavený pro dvojitý šálek.
6. Po použití vypněte napájení.
3. ZÁSADY POUŽÍVÁNÍ
Výrobek je určen k mletí kávových zrn.
Zařízení je určeno pouze pro domácí použití!
Odpovědnost za veškeré škody vzniklé v důsledku
použití zařízení v rozporu s určením nese uživatel.
příslušných zkušeností a/nebo znalostí, ledaže jsou pod
dohledem osoby zodpovědné za jejich bezpečnost
nebo od ní obdržely pokyny, jak zařízení obsluhovat.
b) Zabraňte náhodnému spuštění. Ujistěte se, že je
spínač ve vypnuté poloze před připojením zařízení k
napájecímu zdroji.
c) Zařízení není hračka. Dohlížejte na děti, aby si nehrály
se zařízením.
d) Pokud je zařízení v provozu, nevkládejte do něj ruce
ani žádné předměty!
2.4. BEZPEČNÉ POUŽÍVÁNÍ ZAŘÍZENÍ
a) Zařízení nepoužívejte, pokud spínač pro zapnutí a
vypnutí zařízení nefunguje správně. Zařízení, které
nelze ovládat spínačem, je nebezpečné a musí být
opraveno.
b) Před každým seřízením, čištěním a údržbou odpojte
zařízení od napájení. Toto bezpečnostní opatření
snižuje nebezpečí náhodného zapnutí.
c) Nepoužívaná zařízení uchovávejte mimo dosah dětí
a osob, které nejsou seznámeny se zařízením nebo
návodem k obsluze. Zařízení jsou nebezpečná v
rukou nezkušených uživatelů.
d) Zařízení udržujte v dobrém technickém stavu.
Kontrolujte před každou prací jeho celkový stav i
jednotlivé díly a ujistěte se, že je vše v dobrém stavu,
a uživateli tak při práci se zařízením nehrozí žádné
nebezpečí. V případě, že zjistíte poškození, nechte
zařízení opravit.
e) Udržujte zařízení mimo dosah dětí.
f) Opravu a údržbu zařízení by měly provádět
pouze kvalikované osoby za výhradního použití
originálních náhradních dílů. Zajistí to bezpečné
používání zařízení.
g) Pro zachování navržené mechanické integrity zařízení
neodstraňujte předem namontované kryty nebo
neuvolňujte šrouby.
h) Zabraňte situaci, kdy se zapnuté zařízení zastaví
vlivem velkého zatížení. Může to způsobit přehřátí
hnacích součástí a v následku poškození zařízení.
i) Pokud zařízení nebylo odpojeno od napájení,
nedotýkejte se rotujících dílů ani součástí.
j) Nepřesouvejte, nepřenášejte a neotáčejte zařízení v
provozu.
k) Zapnuté zařízení nenechávejte bez dozoru.
l) Pravidelně čistěte zařízení, aby nedošlo k trvalému
usazovaní nečistot.
m) Zařízení není hračka. Čištění a údržbu nesmí provádět
děti bez dohledu dospělé osoby.
n) Nezasahujte do zařízení s cílem změnit jeho
parametry nebo konstrukci.
o) Udržujte zařízení mimo zdroje ohně a tepla.
p) Nezakrývejte větrací otvory!
1. Kryt trychtýře
2. Trychtýř
3. Regulátor měřítka (kroužek stupně mletí)
4. Základna
5. Napájecí kabel
6. Vypínač
7. Nastavení regulátoru měřítka
8. Rukojeť
9. Pojistka
10. Mikrospínač
11. Ovládací panel
3.2. PŘÍPRAVA K PRÁCI
UMÍSTĚNÍ ZAŘÍZENÍ
Teplota okolí nesmí být vyšší než 40 °C a relativní vlhkost
nesmí být vyšší než 85 %. Zařízení postavte takovým
způsobem, aby byla zajištěna dobrá cirkulace vzduchu.
Vzdálenost zařízení od stěny by neměla být menší než 10
cm. Zařízení se musí nacházet daleko od jakéhokoli horkého
povrchu. Zařízení vždy používejte na rovnoměrném,
stabilním, čistém a ohnivzdorném povrchu, mimo dosah
dětí a osob s omezenými psychickými, smyslovými a
duševními funkcemi. Zařízení umístěte takovým způsobem,
abyste v každém okamžiku měli ničím nezatarasený přístup
k elektrické zásuvce. Ujistěte se, aby hodnoty proudu,
kterým je zařízení napájeno, byly shodné s údaji uvedenými
na technickém štítku zařízení! Před prvním použitím
demontujte všechny díly a umyjte je, a také umyjte celé
zařízení.
3.3. PRÁCE SE ZAŘÍZENÍM RC-CGM19
1. Zapněte hlavní vypínač pro nastartování motoru.
2. Nastavte kroužek stupně mletí podle svých preferencí
(před přidáním kávových zrn).
• Požadovaný stupeň mletí kávy by měl být
nastaven mezi 1 a 19, přičemž 1 je jemný prášek
a 19 hrubý prášek.
• Chcete-li upravit kroužek mletí kávy, nejprve
povolte seřizovací šroub a poté kroužek seřiďte.
Utáhněte šroub.
3. Do trychtýře vsypte kávová zrna a nasaďte kryt
trychtýře.
4. Umístěte zásobník na mletou kávu nebo umístěte
portaltr kávovaru na rukojeť.
CZ
18 Rev. 20.05.2021
6
95
8
10
6
5
4
3
2
1
2
1
3
4
77
11
10
8
9
3.1. POPIS ZAŘÍZENÍ
POZNÁMKA! I když zařízení bylo navrženo tak, aby
bylo bezpečné, tedy má vhodné bezpečnostní prvky,
tak i přes použití dodatečné ochrany uživatelem při
práci se zařízením nadále existuje malé riziko úrazu
nebo poranění. Doporučuje se zachovat opatrnost
a zdravý rozum při jeho používání.

20 Rev. 20.05.2021
3.7. ČIŠTĚNÍ A ÚDRŽBA
a) Před každým čištěním, seřizováním, výměnou
příslušenství a také vždy, když zařízení nepoužíváte,
vytáhněte síťovou zástrčku a nechte zařízení úplně
vychladnout.
• Počkejte, až se rotující prvky zastaví.
b) K čištění zařízení používejte pouze jemné čisticí
prostředky, určené pro čištění povrchů přicházejících
do styku s potravinami.
c) Po každém čištění je nutno všechny prvky dobře
osušit, než bude zařízení opět použito.
d) Zařízení skladujte na suchém a chladném místě,
chráněném proti vlhkosti a přímému slunečnímu svitu.
e) Je zakázáno zařízení polévat vodou nebo je do vody
ponořovat.
f) Pravidelně provádějte revize zařízení a kontrolujte,
zda je technicky způsobilé a není poškozeno.
g) K čištění používejte měkký, vlhký hadřík.
h) K čištění nepoužívejte ostré ani kovové předměty
(například drátěný kartáč nebo kovovou obracečku),
protože mohou poškodit povrch materiálu, z něhož je
zařízení vyrobeno.
i) Zařízení nečistěte přípravky s kyselým pH,
dezinfekčními prostředky, ředidly, palivem, oleji nebo
jinými chemickými látkami, může to poškodit zařízení.
Pokud potřebujete demontovat určité části zařízení, ujistěte
se, že je vypínač napájení vypnutý, nebo vytáhněte zástrčku
ze zásuvky, abyste se omylem nedotkli spínače a nespustili
zařízení.
Čištění vnitřního povrchu mlecí komory
1. Demontujte trychtýř společně s krytem.
2. Otáčejte regulátorem měřítka (kroužek stupně mletí)
nahoru ve směru hodinových ručiček.
3. Demontujte držák ostří.
4. Vyčistěte vnitřní povrch.
Montáž mlecí komory
1. Namontujte držák ostří.
2. Otáčejte regulátorem měřítka (kroužek stupně
mletí) proti směru hodinových ručiček, dokud není v
požadované poloze.
3. Namontujte trychtýř společně s krytem.
* Opatrně odstraňte kávový prášek ze základny a
závitů kroužku nastavení měřítka, jinak může být
ovlivněn stupeň mletí kávy. Kroužek měřítka se může
zaseknout, což se při opětovné montáži nedá otočit,
nebo se dá otočit jen částečně.
LIKVIDACE OPOTŘEBENÝCH ZAŘÍZENÍ
Po ukončení doby používání nevyhazujte tento výrobek
společně s komunálním odpadem, ale odevzdejte jej k
recyklaci do sběrny elektrických a elektronických zařízení.
O tom informuje symbol umístěný na zařízení, v návodě
k obsluze nebo na obalu. Komponenty použité v zařízení
jsou vhodné pro zužitkování v souladu s jejich označením.
Díky zužitkování, recyklaci nebo jiným způsobům využití
opotřebených zařízení významně přispíváte k ochraně
životního prostředí. Informace o příslušné sběrně
opotřebených zařízení poskytne místní obecný nebo
městský úřad.
ŘEŠENÍ PROBLÉMŮ
PROBLÉM MOŽNÁ
PŘÍČINA ČINNOST
Není
možné
spustit
motor
Poško-
zený
vypínač
napájení
Vyměňte hlavní vypínač.
Vypněte napájení a poté
vyčistěte mlecí komoru.
Zkontrolujte, zda motor
neblokují žádné cizí předměty
a nebrání mu v chodu. Po
kontrole znovu nainstalujte
všechny součásti. Po ověření,
že jsou všechny součásti
správně namontovány,
proveďte zkoušku startéru.
Pokud vypínač není
poškozen, zkontrolujte, zda
svítí indikátory na ovládacím
panelu (pro zařízení (RC-
CGM21) a (RC-CGM22)).
Pokud ovládací panel
nefunguje, musí být vyměněn.
Vyhořelá
pojistka
Vyměňte pojistku.
Vypněte vypínač a poté
vyčistěte mlecí komoru.
Zkontrolujte, zda motor
neblokují žádné cizí předměty
a nebrání mu v chodu. Po
kontrole znovu nainstalujte
všechny součásti. Po ověření,
že jsou všechny součásti
správně namontovány,
proveďte zkoušku startéru.
Pokud pojistka není
poškozená, zkontrolujte, zda
svítí kontrolky ovládacího
panelu (pro zařízení (RC-
CGM21) a (RC-CGM22)). Pokud
ovládací panel nefunguje,
vyměňte jej.
Nedůklad-
né mletí
Části
uvnitř
mlecí
komory
nejsou
správně
namon-
továny.
Pečlivě demontujte a znovu
nainstalujte všechny součásti.
Regu-
látor
měřítka
(kroužek
stupně
mletí)
není
otočen
ve směru
hodi-
nových
ručiček k
poloho-
vací liště.
Vyčistěte a konzervujte mlecí
komoru podle návodu k
použití a poté ji znovu sestavte.
Zapněte vypínač a pomalu
posuňte regulátor měřítka
doprava, dokud neuslyšíte tření
drážkovaného kotouče. Poté jej
otočte proti směru hodinových
ručiček asi o 0,5 cm. Po
dokončení výše uvedených
kroků přidejte kávová zrna pro
zkušební mletí.
DÉTAILS TECHNIQUES
Les notions d‘« appareil », de « machine » et de « produit »
gurant dans les descriptions et les consignes du manuel
se rapportent à/au MOULIN A CAFE.
2.1. SÉCURITÉ ÉLECTRIQUE
a) La che de l’appareil doit être compatible avec la
prise électrique. Ne modiez d‘aucune façon la che
électrique. L‘utilisation de la che originale et d‘une
prise électrique adaptée diminue les risques de chocs
électriques.
b) Évitez de toucher aux composants mis à la terre
comme les tuyaux, les radiateurs, les fours et
les réfrigérateurs. Le risque de chocs électriques
augmente lorsque votre corps est mis à la terre par
le biais de surfaces trempées et d‘un environnement
humide. La pénétration d‘eau dans l‘appareil accroît
le risque de dommages et de chocs électriques.
c) Ne touchez pas l‘appareil lorsque vos mains sont
humides ou mouillées.
d) N‘utilisez pas le câble d‘une manière diérant de son
usage prévu. Ne vous en servez jamais pour porter
l‘appareil. Ne tirez pas sur le câble pour débrancher
l‘appareil. Tenez le câble à l‘écart de la chaleur, de
l‘huile, des arêtes vives et des pièces mobiles. Les
câbles endommagés ou soudés augmentent le risque
de chocs électriques.
e) Si vous n‘avez d‘autre choix que de vous servir de
l’appareil dans un environnement humide, utilisez
un dispositif diérentiel à courant résiduel (DDR). Un
DDR réduit le risque de chocs électriques.
f) Il est interdit d‘utiliser l‘appareil si le câble
d‘alimentation est endommagé ou s‘il présente
des signes visibles d‘usure. Le câble d‘alimentation
endommagé doit être remplacé par un électricien
qualié ou le centre de service du fabricant.
g) Pour éviter tout risque d‘électrocution, n‘immergez
pas le câble, la prise ou l‘appareil dans l‘eau ou tout
autre liquide. N‘utilisez pas l‘appareil sur des surfaces
humides.
h) ATTENTION DANGER DE MORT ! Ne trempez et
n’immergez jamais l’appareil dans l’eau ou dans
d’autres liquides pendant le nettoyage ou le
fonctionnement.
2.2. SÉCURITÉ AU POSTE DE TRAVAIL
a) Veillez à ce que votre poste de travail soit toujours
propre et bien éclairé. Le désordre ou un éclairage
insusant peuvent entraîner des accidents. Soyez
prévoyant, observez les opérations et faites preuve
de bon sens lorsque vous utilisez l’appareil.
b) En cas de doute quant au bon fonctionnement de
l‘appareil ou si vous constatez des dommages sur
celui-ci, veuillez communiquer avec le service client
du fabricant.
c) Seul le fabricant doit réparer le produit. Ne tentez pas
de réparer le produit par vous-même !
d) En cas de feu ou d’incendie, utilisez uniquement des
extincteurs à poudre ou au dioxyde de carbone (CO2)
pour étouer les ammes sur l’appareil.
21
Rev. 20.05.2021
Description
des paramètres Valeur des paramètres
Nom du produit MOULIN A CAFE
Modèle RC-CG
M19
RC-CG
M20
RC-CG
M21
RC-CG
E22
Tension nominale
[V~]/
Fréquence [Hz] 220/50
Puissance
nominale [W] 200
Dimensions
(Largeur
x Profondeur
x Hauteur) [mm]
150
x232
x425
132x228x470
132
x228
x465
Poids [kg] 4,6 4,5 4,7
1. DESCRIPTION GÉNÉRALE
L'objectif du présent manuel est de favoriser une utilisation
sécuritaire et able de l'appareil. Le produit a été conçu
et fabriqué en respectant étroitement les directives
techniques applicables et en utilisant les technologies et
composants les plus modernes. Il est conforme aux normes
de qualité les plus élevées.
AVANT LA MISE EN SERVICE, LES INSTRUCTIONS
D’UTILISATION DOIVENT ÊTRE LUES ET COMPRISES
DE FAÇON PRÉCISE.
An de garantir le fonctionnement able et durable de
l‘appareil, il est nécessaire d‘utiliser et d‘entretenir ce
dernier conformément aux consignes gurant dans le
présent manuel. Les caractéristiques et les spécications
contenues dans ce document sont à jour. Le fabricant se
réserve le droit de procéder à des modications à des ns
d’amélioration du produit. L‘appareil a été mis au point et
fabriqué en tenant compte des progrès techniques et de la
réduction de bruit an de réduire au maximum les risques
liés aux émissions sonores.
SYMBOLES
Le produit est conforme aux normes de sécurité
en vigueur.
Respectez les consignes du manuel.
Collecte séparée.
ATTENTION ! , AVERTISSEMENT ! et REMARQUE
attirent l’attention sur des circonstances
spéciques (symboles d’avertissement
généraux).
Pour l'utilisation intérieure uniquement.
ATTENTION! Certaines illustrations, présentes
dans cette notice, peuvent diérer de la véritable
apparence de l‘appareil.
La version originale de ce manuel a été rédigée en
allemand. Les autres versions sont des traductions de
l‘allemand.
2. SÉCURITÉ D'EMPLOI
ATTENTION! Lisez attentivement toutes les
consignes de sécurité et toutes les instructions. Le
non-respect des avertissements et instructions peut
entraîner des chocs électriques, des incendies et/
ou des blessures graves ou la mort.
MANUEL D‘UTILISATION
CZ FR

C
BA
3.2. PRÉPARATION À L‘UTILISATION
CHOIX DE L’EMPLACEMENT DE L’APPAREIL
La température ambiante ne doit pas dépasser 40°C et le
taux d‘humidité relative ne doit pas être de plus de 85%.
Positionnez l’appareil de sorte qu’une bonne circulation
d’air soit assurée. Vériez qu’un espace d‘au moins 10 cm
est libre de chaque côté de l’appareil. Tenez l’appareil à
l’écart des surfaces chaudes. Utilisé toujours l’appareil sur
une surface plane, stable, propre, ininammable et sèche,
hors de portée des enfants et des personnes présentant des
capacités physiques, sensorielles ou mentales diminuées.
Placez l’appareil de sorte que la che soit accessible
en permanence et non couverte. Assurez-vous que
l’alimentation électrique correspond aux indications gurant
sur la plaque signalétique du produit. Avant la première
utilisation, l‘appareil et l‘ensemble de ses composants
doivent être démontés et nettoyés.
3.3. UTILISATION DE L‘APPAREIL RC-CGM19
1. Mettez l‘interrupteur en position marche pour faire
démarrer le moteur.
2. Réglez l‘anneau de degré de mouture selon votre
préférence (avant de verser les grains de café).
• Réglez le degrés souhaité de mouture du café sur
une échelle de 1 à 19, où 1 indique une mouture
ne et 19 une mouture grossière.
• Pour régler l‘anneau de mouture du café,
desserrez d‘abord la vis de réglage, puis réglez
l‘anneau. Serrez la vis.
3. Versez les grains de café dans la trémie et remettez le
couvercle de la trémie en place.
4. Placez un récipient pour le café moulu ou un porte-
ltre à café sur le support (8).
5. Appuyez sur le micro-commutateur (10) en exerçant
une force de pression adéquate. Le moteur démarre et
au bout d‘un moment, les grains de café sont moulus.
Desserrez le support, l‘appareil arrêtera de moudre.
6. Éteignez l‘appareil (6) en n d‘utilisation.
3.4. UTILISATION DE L‘APPAREIL RC-CGM20
1. Mettez l‘interrupteur en position marche pour faire
démarrer le moteur. Assurez-vous que le témoin
d‘alimentation est allumé.
2. Réglez l‘anneau de degré de mouture selon votre
préférence (avant de verser les grains de café).
• Réglez le degrés souhaité de mouture du café sur
une échelle de 1 à 19, où 1 indique une mouture
ne et 19 une mouture grossière.
• Si le degré de mouture ne vous convient pas,
poussez l‘élément (7) vers le bas tout en tournant
l‘anneau du degré de mouture (3). Le café moulu
sera plus grossier si vous le tournez dans le sens
des aiguilles d‘une montre et plus n si vous le
tournez dans le sens inverse.
3. Réglez le moulin selon vos préférences.
4. Versez les grains de café dans la trémie et remettez le
couvercle de la trémie en place.
5. Placez un récipient pour le café moulu ou un porte-
ltre de café sur le support (8).
6. Appuyez sur le micro-commutateur (10) en exerçant
une force pression adéquate. Le moteur démarre et
au bout d‘un moment, les grains de café sont moulus.
Desserrez le support, l‘appareil arrêtera de moudre.
7. Éteignez l‘appareil (6) en n d‘utilisation.
FR
23
Rev. 20.05.2021
3.5. UTILISATION DE L‘APPAREIL RC-CGM21
1. Mettez l‘interrupteur en position marche pour faire
démarrer le moteur. Assurez-vous que le témoin
d‘alimentation est allumé.
2. Réglez l‘anneau du degré de mouture selon votre
préférence (avant de verser les grains de café).
• Réglez le degrés souhaité de mouture du café sur
une échelle de 1 à 19, où 1 indique une mouture
ne et 19 une mouture grossière.
• Si le degré de mouture ne vous convient pas,
poussez l‘élément (7) vers le bas tout en tournant
l‘anneau du degré de mouture (3). Le café moulu
sera plus grossier si vous le tournez dans le sens
des aiguilles d‘une montre et plus n si vous le
tournez dans le sens inverse. Réglez le moulin
selon vos préférences
3. Versez les grains de café dans la trémie et remettez le
couvercle de la trémie en place.
4. Placez un récipient pour le café moulu ou un porte-
ltre de café sur le support (8).
5. Utilisez les boutons du panneau de commande
comme indiqué sur la gure 1.
Le bouton SET permet de régler le temps. Lorsque
vous appuyez sur le bouton SET, la valeur clignote sur
le panneau, ce qui indique que vous pouvez régler le
temps. Appuyez sur (A) pour une seule tasse ou sur
(B) pour deux tasses. Utilisez les boutons (+) (-) pour
régler le temps nécessaire pour moudre une tasse
ou deux tasses, puis appuyez sur le bouton SET pour
terminer le réglage. Appuyez une fois sur le bouton
(C) pour la mouture continue et appuyez à nouveau
pour l‘arrêter. Si vous appuyez sur le bouton (C) la
première fois, le moulin fonctionnera encore pendant
60 secondes.
6. Éteignez l‘appareil (6) en n d‘utilisation
3.6. UTILISATION DE L‘APPAREIL RC-CGE22
1. Mettez l‘interrupteur en position marche pour faire
démarrer le moteur. Assurez-vous que le témoin
d‘alimentation est allumé.
2. Réglez l‘anneau du degré de mouture selon votre
préférence (avant de verser les grains de café).
• Réglez le degrés souhaité de mouture du café sur
une échelle de 1 à 19, où 1 indique une mouture
ne et 19 une mouture grossière.
• Si le degré de mouture ne vous convient pas,
poussez l‘élément (7) vers le bas tout en tournant
l‘anneau du degré de mouture (3). Le café moulu
sera plus grossier si vous le tournez dans le sens
des aiguilles d‘une montre et plus n si vous le
tournez dans le sens inverse. Réglez le moulin
selon vos préférences
e) Conservez le manuel d’utilisation an de pouvoir
le consulter ultérieurement. En cas de cession de
l’appareil à un tiers, l’appareil doit impérativement
être accompagné du manuel d’utilisation.
f) Tenez les éléments d’emballage et les pièces de
xation de petit format hors de portée des enfants.
g) Tenez l’appareil hors de portée des enfants et des
animaux.
2.3. SÉCURITÉ DES PERSONNES
a) Cet appareil n‘est pas conçu pour être utilisé
par les personnes dont les facultés physiques,
sensorielles ou mentales sont limitées (enfants y
compris), ni par des personnes sans expérience
ou connaissances adéquates, à moins qu‘elles se
trouvent sous la supervision et la protection d‘une
personne responsable ou qu‘une telle personne leur
ait transmis des consignes appropriées en lien avec
l‘utilisation de l’appareil.
b) An de prévenir la mise en marche accidentelle de
l‘appareil, assurez-vous que celui-ci est éteint et que
l‘interrupteur se trouve sur arrêt avant de procéder au
branchement.
c) Cet appareil n‘est pas un jouet. Les enfants doivent
demeurer sous la supervision d’un adulte an qu’ils
ne jouent pas avec l’appareil.
d) N‘insérez ni les mains, ni tout autre objet dans
l‘appareil lorsqu‘il fonctionne !
2.4. UTILISATION SÉCURITAIRE DE L‘APPAREIL
a) N’utilisez pas l’appareil si l’interrupteur MARCHE/
ARRÊT ne fonctionne pas correctement. Les appareils
qui ne peuvent pas être contrôlés à l‘aide d‘un
interrupteur sont dangereux et doivent être réparés.
b) Avant de procéder au nettoyage et à l’entretien de
l’appareil, débranchez-le. Une telle mesure préventive
réduit le risque de mise en marche accidentelle de
l’appareil.
c) Les outils qui ne sont pas en cours d‘utilisation
doivent être mis hors de portée des enfants et des
personnes qui ne connaissent ni l‘appareil, ni le
manuel d‘utilisation s‘y rapportant. Entre les mains
de personnes inexpérimentées, ce genre d‘appareils
peut représenter un danger.
d) Maintenez l‘appareil en parfait état de marche. Avant
chaque utilisation, vériez l’absence de dommages
en général et au niveau des pièces mobiles (assurez-
vous qu’aucune pièce ni composant n’est cassé et
vériez que rien ne compromet le fonctionnement
sécuritaire de l’appareil). En cas de dommages,
l’appareil doit impérativement être envoyé en
réparation avant d’être utilisé de nouveau.
e) Tenez l‘appareil hors de portée des enfants.
f) La réparation et l‘entretien des appareils doivent être
eectués uniquement par un personnel qualié, à
l‘aide de pièces de rechange d‘origine. Cela garantit
la sécurité d’utilisation.
g) Pour garantir l‘intégrité opérationnelle de l‘appareil,
les couvercles et les vis posés à l‘usine ne doivent pas
être retirés.
h) Évitez de soumettre l‘appareil à une charge excessive
entraînant son arrêt. Cela peut causer une surchaue
des composants d‘entraînement et endommager
l‘appareil.
i) Ne touchez ni les pièces mobiles, ni les accessoires
à moins que l’appareil n‘ait été préalablement
débranché.
j) Il est défendu de pousser, de déplacer ou de tourner
l’appareil pendant son fonctionnement.
k) Ne laissez pas l’appareil fonctionner sans surveillance.
l) Nettoyez régulièrement l‘appareil pour en prévenir
l’encrassement.
m) Cet appareil n‘est pas un jouet. Le nettoyage et
l’entretien ne doivent pas être eectués par des
enfants, à moins qu’ils se trouvent sous la supervision
d’un adulte responsable.
n) Il est défendu de modier l’appareil pour en changer
les paramètres ou la construction.
o) Gardez le produit à l’écart des sources de feu et de
chaleur.
p) Ne couvrez pas les orices de ventilation !
1. Couvercle de trémie
2. Trémie
3. Ajusteur d‘échelle (anneau degré de mouture)
4. Base
5. Câble d‘alimentation
6. Interrupteur Marche/Arrêt
7. Indicateur de l’ajusteur de l’échelle
8. Support
9. Fusible
10. Micro-commutateur
11. Panneau de contrôle
FR
22 Rev. 20.05.2021
6
95
8
10
6
5
4
3
2
1
2
1
3
4
77
11
10
8
9
3. CONDITIONS D’UTILISATION
La machine est conçue pour moudre et brasser du café.
Le produit est destiné uniquement à l’utilisation privée !
L’utilisateur porte l’entière responsabilité pour l’ensemble
des dommages attribuables à un usage inapproprié.
3.1. DESCRIPTION DE L‘APPAREIL
ATTENTION! Bien que l'appareil ait été conçu en
accordant une attention spéciale à la sécurité et qu'il
comporte des dispositifs de protection, ainsi que des
caractéristiques de sécurité supplémentaires, il n’est
pas possible d’exclure entièrement tout risque de
blessure lors de son utilisation. Nous recommandons
de faire preuve de prudence et de bon sens lorsque
vous utilisez l’appareil.

FR
25
Rev. 20.05.2021
PRO-
BLÈME
CAUSE
POSSIBLE SOLUTION
Impossible
de faire
démarrer
le moteur
Défaut
Interrupteur
Marche /
Arrêt
Remplacez l’interrupteur
d’alimentation.
Éteignez l’appareil, puis
nettoyez la chambre de
mouture. Assurez-vous
qu’il n’y a pas de corps
étrangers susceptibles de
bloquer le moteur. Après
vérication, remettez
toutes les pièces en
place. Assurez-vous
que toutes les pièces
ont été correctement
installées avant de faire
fonctionner le démarreur.
Si l’interrupteur Marche/
Arrêt n’est pas défectueux,
vériez que les témoins du
panneau de commande
sont allumés (pour
(RC-CGM21) et (RC-
CGM22)). Si le panneau de
commande ne fonctionne
pas, remplacez-le.
Fusible
grillé
Remplacez le fusible.
Éteignez l’appareil, puis
nettoyez la chambre de
mouture. Assurez-vous
qu’il n’y a pas de corps
étrangers susceptibles de
bloquer le moteur. Après
vérication, remettez
toutes les pièces en
place. Assurez-vous que
toutes les pièces ont été
correctement installées
avant de faire fonctionner
le démarreur. Si le fusible
n’est pas défectueux,
vériez que les témoins du
panneau de commande
sont allumés (pour
(RC-CGM21) et (RC-
CGM22)). Si le panneau de
commande ne fonctionne
pas, remplacez-le.
Mouture
incorrecte
Les pièces
à l'intérieur
de la
chambre
de mouture
sont mal
installées.
Retirez et remettez en
place soigneusement
toutes les pièces.
L'ajusteur
d'échelle
(anneau du
degré de
mouture)
n'est pas
tourné dans
le sens des
aiguilles
d'une
montre vers
la tige de
positionne-
ment.
Mettez l'interrupteur
en position marche
et tournez lentement
l'ajusteur de l'échelle
vers la droite jusqu'à ce
que vous entendiez le
frottement du disque
rainuré. Puis tournez-le
dans le sens inverse des
aiguilles d'une montre
d'environ 0,5 cm. Après
avoir eectué les étapes
ci-dessus, versez les grains
de café pour tester la
mouture.
DÉPANNAGE
FR
24 Rev. 20.05.2021
3. Versez les grains de café dans la trémie et remettez le
couvercle de la trémie en place.
4. Placez un récipient pour le café moulu ou un porte-
ltre de café sur le support (8).
5. Touchez les boutons Double ou Single du panneau de
commande et appuyez sur le micro-commutateur (10)
en exerçant une force pression adéquate. La durée de
fonctionnement du moteur dépend du réglage que
vous avez eectué. Touchez les boutons appropriés
pour arrêter la mouture.
Panneau de commande : Touchez le bouton (A) pour
acher le temps par défaut réglé pour une seule
tasse. Touchez le bouton (B) pour acher le temps
par défaut pour deux tasses.
Pour modier le temps par défaut pour une seule tasse,
maintenez le bouton (C) enfoncé pendant 3 secondes
jusqu‘à ce que SET s‘ache en rouge et commence
à clignoter. Appuyez ensuite sur le bouton (A) pour
une seule tasse et sur le bouton (C) jusqu‘à ce que SET
apparaisse en rouge sur l‘écran et que les unités S et
Single se mettent à clignoter, ce qui indique que vous
pouvez régler le temps pour une seule tasse. Touchez
les boutons (+) et (-) pour augmenter ou diminuer le
temps déni par défaut, puis touchez le bouton (C)
pour enregistrer automatiquement le temps déni
pour une seule tasse.
Pour modier le temps réglé par défaut pour deux
tasses, maintenez le bouton (C) enfoncé pendant 3
secondes jusqu‘à ce que SET s‘ache en rouge et
commence à clignoter. Ensuite, appuyez sur le bouton
(B) pour deux tasse et sur le bouton (C) jusqu‘à ce que
SET apparaisse en rouge sur l‘écran et que les unités
S et Double se mettent à clignoter, ce qui indique
que vous pouvez régler le temps pour deux tasses.
Touchez les boutons (+) et (-) pour augmenter ou
diminuer le temps déni par défaut, puis touchez
le bouton (C) pour enregistrer automatiquement le
temps déni pour deux tasse.
7. Éteignez l‘appareil (6) en n d‘utilisation
3.7. NETTOYAGE ET ENTRETIEN
a) Avant chaque nettoyage ou réglage, avant tout
changement d’accessoire et lorsque vous ne
comptez pas utiliser l‘appareil pour une période
prolongée, débranchez l’appareil et laissez-le refroidir
complètement.
• Attendre que les éléments en rotation s‘arrêtent.
b) Pour nettoyer l‘appareil, n‘utilisez que des détergents
doux qui conviennent à l‘entretien des surfaces en
contact avec des produits alimentaires.
c) Laissez bien sécher tous les composants après chaque
nettoyage avant de réutiliser l’appareil.
d) Conservez l‘appareil dans un endroit propre, frais et
sec, à l‘abri de l‘humidité et des rayons directs du
soleil.
e) Il est interdit d’asperger l‘appareil d‘eau ou de
l‘immerger dans l‘eau.
f) Contrôlez régulièrement l‘appareil pour vous assurer
qu‘il fonctionne correctement et ne présente aucun
dommage.
g) Il est conseillé de laver l’appareil uniquement avec un
chion mou et humide.
h) N’utilisez aucun objet présentant des arêtes
tranchantes, ni objet métallique (tels qu’une brosse
ou une spatule en métal) pour le nettoyage car ils
pourraient endommager la surface de l’appareil.
i) Ne nettoyez pas l’appareil pas avec des substances
acides. L’équipement médical, les solvants, les
carburants, les huiles et les produits chimiques
peuvent endommager l’appareil.
S‘il s‘avère nécessaire de retirer certaines parties de l‘appareil,
assurez-vous que l‘interrupteur est éteint ou retirez la che
de la prise pour éviter tout contact avec l‘interrupteur et le
démarrage accidentel de l‘appareil.
Nettoyage de la partie intérieure de la chambre de mouture
1. Retirez la trémie et le couvercle.
2. Tournez l‘ajusteur d‘échelle (anneau degré de
mouture) vers le haut dans le sens des aiguilles d‘une
montre.
3. Retirez le porte-lame.
4. Nettoyez la partie intérieure.
Montage de la chambre de mouture
1. Installez le porte-lame.
2. Tournez l‘ajusteur d‘échelle (anneau degré de
mouture) dans le sens inverse des aiguilles d‘une
montre jusqu‘à ce qu‘il atteigne la position correcte.
3. Installez la trémie avec le couvercle.
* Retirez soigneusement le café moulu de la base et des
letages de l‘ajusteur d‘échelle, car il risque d‘aecter
la qualité de la mouture du café.
MISE AU REBUT DES APPAREILS USAGÉS
À la n de sa vie, ce produit ne doit pas être jeté dans les
ordures ménagères ; il doit impérativement être remis
dans un point de collecte et de recyclage pour appareils
électroniques et électroménagers. Un symbole à cet
eet gure sur le produit, l‘emballage ou dans le manuel
d‘utilisation. Les matériaux utilisés lors de la fabrication de
l‘appareil sont recyclables conformément à leur désignation.
En recyclant ces matériaux, en les réutilisant ou en utilisant
les appareils usagés d’une autre manière, vous contribuez
grandement à protéger notre environnement. Pour obtenir
de plus amples informations sur les points de collecte
appropriés, adressez-vous à vos autorités locales.

DATI TECNICI
Il termine „apparecchio“ o „prodotto“ nelle avvertenze
e descrizioni contenute nel manuale si riferisce alla/al
MACINACAFFÈ.
2.1. SICUREZZA ELETTRICA
a) La spina del dispositivo deve essere compatibile con
la presa. Non cambiare la spina per alcun motivo. Le
spine e le prese originali riducono il rischio di scosse
elettriche.
b) Evitare che il dispositivo tocchi componenti collegati
a terra come tubi, radiatori, forni e frigoriferi. Il rischio
di scosse elettriche aumenta se il corpo viene messo
a terra su superci umide o in un ambiente umido.
L‘acqua che entra nel dispositivo aumenta il rischio di
danni e scosse elettriche.
c) Non toccare l‘apparecchio con mani umide o bagnate.
d) Non utilizzare il cavo in modo improprio. Non
utilizzarlo mai per trasportare l‘apparecchio o
rimuovere la spina. Tenere il cavo lontano da fonti di
calore, oli, bordi appuntiti e da parti in movimento.
I cavi danneggiati o saldati aumentano il rischio di
scosse elettriche.
e) Se non è possibile evitare che il dispositivo venga
utilizzato in un ambiente umido, utilizzare un
interruttore dierenziale. Un interruttore dierenziale
riduce il rischio di scosse elettriche.
f) Si sconsiglia l‘uso dell‘ apparecchio qualora il cavo
di alimentazione sia danneggiato o presenti segni
di usura. Il cavo di alimentazione danneggiato deve
essere sostituito da un elettricista qualicato o dal
servizio di assistenza del fabbricante.
g) Per evitare scosse elettriche, non immergere il cavo,
la spina o il dispositivo in acqua o altri liquidi. Non
utilizzare il dispositivo su superci bagnate.
h) ATTENZIONE: PERICOLO DI MORTE! Non immergere il
dispositivo in acqua o altri liquidi durante la pulizia o
la messa in funzione.
2.2. SICUREZZA SUL LAVORO
a) Mantenere il posto di lavoro pulito e ben illuminato. Il
disordine o una scarsa illuminazione possono portare
a incidenti. Essere sempre prudenti, osservare che
cosa si sta facendo e utilizzare il buon senso quando
si adopera il dispositivo.
b) In presenza di dubbi sul corretto funzionamento del
dispositivo o se ci sono dei danni, rivolgersi al servizio
clienti del produttore.
c) Il prodotto può essere riparato soltanto dal fornitore.
Non auto-ripararlo.
d) In caso di incendio, utilizzare solo estintori a polvere o
ad anidride carbonica (CO2).
e) Conservare le istruzioni d‘uso per uso futuro. Nel caso
in cui il dispositivo venisse adato a terzi, consegnare
anche queste istruzioni.
f) Tenere gli elementi di imballaggio e le piccole parti di
assemblaggio fuori dalla portata dei bambini.
g) Tenere il dispositivo fuori dalla portata dei bambini e
degli animali.
Parametri
- Descrizione Parametri - Valore
Nome del
prodotto MACINACAFFÈ
Modello RC-CG
M19
RC-CG
M20
RC-CG
M21
RC-CG
E22
Tensione
nominale [V~]/
Frequenza [Hz] 220/50
Potenza nominale
[W] 200
Dimensioni
(Larghezza
x Profondità
x Altezza) [mm]
150
x232
x425
132x228x470
132
x228
x465
Peso [kg] 4,6 4,5 4,7
2.3. SICUREZZA PERSONALE
a) Questo dispositivo non è adatto per essere utilizzato
da persone, bambini compresi, con ridotte capacità
siche, sensoriali o mentali, così come da privi di
adeguata esperienza e/o conoscenze. Si fa eccezione
per coloro i quali siano sorvegliati da un responsabile
qualicato che si prenda carico della loro sicurezza e
abbia ricevuto istruzioni dettagliate al riguardo.
b) Per evitare avviamenti accidentali, prima di collegare
il dispositivo a una fonte di alimentazione assicurarsi
che questo sia spento.
c) Questo dispositivo non è un giocattolo. I bambini
devono essere sorvegliati anché non giochino con
il prodotto.
d) Non mettere mani o oggetti nel dispositivo in
movimento!
2.4. USO SICURO DEL DISPOSITIVO
a) Non utilizzare il dispositivo se l‘interruttore ON/
OFF non funziona correttamente (non accendere o
spegnere il dispositivo). I dispositivi con interruttore
difettoso sono pericolosi quindi devono essere
riparati.
b) Scollegare l‘unità dall‘alimentazione prima di iniziare
l‘impostazione, la pulizia e la manutenzione. Tale
misura preventiva riduce il rischio di attivazione
accidentale del dispositivo.
c) Gli strumenti inutilizzati devono essere tenuti fuori
dalla portata dei bambini e delle persone che non
hanno familiarità con il dispositivo e le istruzioni d’uso.
Nelle mani di persone inesperte, questo dispositivo
può rappresentare un pericolo.
d) Mantenere il dispositivo in perfette condizioni. Prima
di ogni utilizzo, vericare che non vi siano danni
generali o danni alle parti mobili (frattura di parti
e componenti o altre condizioni che potrebbero
compromettere il funzionamento sicuro del prodotto).
In caso di danni, l‘unità deve essere riparata prima
dell‘uso.
e) Tenere il dispositivo fuori dalla portata dei bambini.
f) La riparazione e la manutenzione dell‘attrezzatura
devono essere eseguite esclusivamente da personale
specializzato qualicato e con pezzi di ricambio
originali. Ciò garantisce la sicurezza durante l‘uso.
g) Per garantire l‘integrità di funzionamento
dell‘apparecchio, i coperchi o le viti installati in
fabbrica non devono essere rimossi.
h) Evitare situazioni in cui l‘unità si arresta a causa di un
carico eccessivo durante il funzionamento. Ciò può
causare il surriscaldamento dei componenti e quindi
danni al dispositivo.
i) Non toccare parti mobili o accessori senza aver
scollegato il dispositivo dall‘alimentazione.
j) È vietato spostare o ruotare il dispositivo durante il
funzionamento.
k) Non lasciare il dispositivo incustodito mentre è in uso.
l) Pulire regolarmente l‘apparecchio in modo da evitare
l‘accumulo di sporcizia.
m) Questo apparecchio non è un giocattolo! La pulizia
e la manutenzione non devono essere eseguite da
bambini a meno che non siano sotto la supervisione
di un adulto.
n) È vietato intervenire sulla costruzione del dispositivo
per modicare i suoi parametri o la sua costruzione.
o) Tenere dispositivi lontano da fonti di fuoco e calore.
p) Le aperture di ventilazione non devono essere
coperte!
1. Coperchio dell’imbuto
2. Imbuto
3. Regolatore della scala (anello del grado di macinatura)
4. Base
5. Cavo di alimentazione
6. Interruttore di alimentazione
7. Posizionatore del regolatore della scala
8. Impugnatura
9. Fusibile
10. Microinterruttore
11. Pannello di controllo
3.2. PREPARAZIONE AL FUNZIONAMENTO
POSIZIONAMENTO DEL DISPOSITIVO:
La temperatura ambiente non deve superare i 40°C e
l‘umidità relativa non deve superare l‘85%. Posizionare
l‘apparecchio in modo da garantire una buona circolazione
dell‘aria. Garantire una distanza di almeno 10 cm tra il
dispositivo e altri apparecchi o strutture circostanti. Tenere
il dispositivo lontano da fonti di calore. Il dispositivo va
sempre utilizzato su una supercie piana, stabile, pulita,
ignifuga e asciutta, lontano dalla portata dei bambini
e di persone con capacità psichiche, sensoriali e mentali
ridotte. Posizionare il dispositivo in modo che la spina sia
facilmente accessibile e non risulti ostruita. Assicurarsi che
l‘alimentazione corrisponda a quella indicata sul quadro
tecnico del prodotto.
6
95
8
10
6
5
4
3
2
1
2
1
3
4
77
11
10
8
9
1. DESCRIZIONE GENERALE
Queste istruzioni sono intese come ausilio per un uso sicuro
e adabile. Il prodotto è stato rigorosamente progettato
e realizzato secondo le direttive tecniche e l'utilizzo delle
tecnologie e componenti più moderne e seguendo gli
standard di qualità più elevati.
PRIMA DELLA MESSA IN FUNZIONE È NECESSARIO
AVER LETTO E COMPRESO LE ISTRUZIONI D'USO.
Per un funzionamento duraturo e adabile del dispositivo
assicurarsi di maneggiarlo e curarne la manutenzione
secondo le disposizioni presentate in questo manuale.
I dati e le speciche tecniche indicati in questo manuale
sono attuali. Il fornitore si riserva il diritto di apportare
delle migliorie nel contesto del miglioramento dei
propri prodotti. L‘apparecchiatura è stata progettata e
realizzata tenendo in considerazione il progresso tecnico
e la riduzione di rumore, in maniera tale da mantenere al
minimo i possibili rischi derivanti dalle emissioni di rumore.
SPIEGAZIONE DEI SIMBOLI
Il prodotto soddisfa le attuali norme di
sicurezza.
Leggere attentamente le istruzioni.
Prodotto riciclabile.
ATTENZIONE o AVVERTENZA! o NOTA!
per richiamare l’attenzione su determinate
circostanze (indicazioni generali di avvertenza).
Usare solo in ambienti chiusi.
IMPORTANTE! Le immagini contenute in questo
manuale sono puramente indicative e potrebbero
dierire dal prodotto.
Il manuale originale è stato scritto in tedesco. Le versioni in
altre lingue sono traduzioni dalla lingua tedesca.
2. SICUREZZA NELL'IMPIEGO
ATTENZIONE! Leggere le istruzioni d'uso e di
sicurezza. Non prestare attenzione alle avvertenze
e alle istruzioni può condurre a shock elettrici,
incendi, gravi lesioni o addirittura al decesso. ATTENZIONE! Anche se l'apparecchiatura
è stata progettata per essere sicura, sono presenti
degli ulteriori meccanismi di sicurezza. Malgrado
l'applicazione di queste misure supplementari di
sicurezza sussiste comunque il rischio di ferirsi. Si
raccomanda inoltre di usare cautela e buon senso.
3. CONDIZIONI D‘USO
Il prodotto è progettato per macinare i chicchi di caè.
Questo prodotto è destinato esclusivamente all’uso
domestico!
L‘operatore è responsabile di tutti i danni derivanti da un
uso improprio.
3.1. DESCRIZIONE DEL DISPOSITIVO
ISTRUZIONI PER L’USO
IT IT
27
Rev. 20.05.2021
26 Rev. 20.05.2021

Per cambiare il tempo predenito per una singola
tazza, tenere premuto il pulsante (C) per 3 secondi
nché SET sul display diventa rosso e inizia a
lampeggiare. Poi premere il pulsante (A) per la tazza
singola e il pulsante (C) nché SET sul display diventa
rosso e le unità S e Single lampeggiano, indicando che
è possibile impostare il tempo per la tazza singola.
Toccare i pulsanti (+) e (-) per aumentare o diminuire il
tempo impostato di default, quindi toccare il pulsante
(C) per salvare automaticamente il tempo impostato
per una singola tazza.
Per cambiare di default il tempo predenito per una
tazza doppia, tenere premuto il pulsante (C) per 3
secondi nché SET nel display diventa rosso e inizia
a lampeggiare. Poi premere il pulsante (B) per la
doppia tazza e il pulsante (C) nché SET sul display
diventa rosso e le unità S e Double lampeggiano, il
che signica che è possibile impostare il tempo per le
doppie tazze. Toccare i pulsanti (+) e (-) per aumentare
o diminuire il tempo impostato di default, quindi
toccare il pulsante (C) per salvare automaticamente il
tempo impostato per la doppia tazza.
6. Dopo aver terminato l’uso disinserire l’alimentazione.
3.7. PULIZIA E MANUTENZIONE
a) Prima di pulire o regolare il dispositivo, prima di
sostituire gli accessori o quando il dispositivo non
viene utilizzato, staccare la spina e lasciarlo rareddare
completamente.
• Attendere che le parti rotanti si arrestino.
b) Utilizzare solo detergenti delicati destinati alla pulizia
delle superci a contatto con gli alimenti.
c) Dopo la pulizia, prima di riutilizzare l‘apparecchio,
asciugare tutte le parti.
d) Tenere l‘apparecchio in un luogo asciutto, fresco,
protetto dall‘umidità e dalla luce diretta del sole.
e) È vietato spruzzare il dispositivo con un getto d‘acqua
o immergere il dispositivo in acqua.
f) Eettuare controlli regolari del dispositivo per
mantenerlo eciente e privo di danni.
g) Per la pulizia utilizzare un panno morbido e umido.
h) Non utilizzare oggetti appuntiti o / e metallici (come
una spazzola o una spatola metallica) per la pulizia,
poiché potrebbero danneggiare la supercie del
materiale con cui è fatto il dispositivo.
i) Non pulire il dispositivo con sostanze acide.
Attrezzature mediche, diluente per vernici, carburante,
olio o altre sostanze chimiche possono danneggiare
l‘unità.
Se è necessario rimuovere alcune parti del dispositivo,
assicurarsi che l‘interruttore di alimentazione sia spento o
scollegare il cavo di alimentazione dalla presa per evitare
di toccare accidentalmente l‘interruttore e avviare il
dispositivo.
Pulizia della supercie interna della camera di macinatura
1. Smontare l’imbuto assieme al coperchio.
2. Girare il regolatore della scala (anello dei gradi di
rettica) in senso orario verso l‘alto.
3. Smontare l’impugnatura della macina.
4. Pulire la supercie interna.
Installazione della camera di macinatura
1. Smontare l’impugnatura della macina.
2. Ruotare il regolatore della scala (anello del livello di
macinatura) in senso antiorario no a raggiungere la
posizione corretta.
3. Montare l’imbuto assieme al coperchio.
* Rimuovere accuratamente la polvere di caè dalla
base e dalle lettature della manopola della scala,
altrimenti può inuire sulla frammentazione del
caè macinato. La manopola della scala può essere
bloccata e non può essere ruotata o può essere
ruotata solo parzialmente dopo il riassemblaggio.
SMALTIMENTO DELLE ATTREZZATURE USATE
Questo prodotto, se non più funzionante, non deve
essere smaltito insieme ai normali riuti, ma deve essere
consegnato ad un’organizzazione competente per lo
smaltimento dei dispositivi elettrici e elettronici. Maggiori
informazioni sono reperibili sull‘etichetta sul prodotto, sul
manuale di istruzioni o sull‘imballaggio. I materiali utilizzati
nel dispositivo possono essere riciclati secondo indicazioni.
Riutilizzando i materiali o i dispositivi, si contribuisce a
tutelare l‘ambiente circostante. Le informazioni sui rispettivi
punti di smaltimento sono reperibili presso le autorità locali.
RISOLUZIONE DEI PROBLEMI
C
BA
Prima del primo utilizzo si consiglia di smontare tutte le
parti e pulirne le superci.
3.3. LAVORARE CON IL DISPOSITIVO RC-CGM19
1. Per avviare il motore accendere l’interruttore di
alimentazione.
2. Regolare l‘anello del livello di macinatura secondo le
proprie preferenze (prima di versare i chicchi di caè).
• Il grado desiderato di macinatura del caè deve
essere impostato su un intervallo tra 1 e 19,
dove 1 indica la polvere ne e 19 la polvere
grossolana.
• Per regolare l‘anello di macinatura del caè,
allentare prima la vite di regolazione, poi regolare
l‘anello. Stringere la vite.
3. Versare i chicchi di caè nell‘imbuto e mettere il
coperchio sull‘imbuto.
4. Posizionare il contenitore del caè macinato o il
pallone della caettiera sul supporto (8).
5. Premere il microinterruttore (10) con forza. Il motore
si avvierà e i chicchi di caè saranno macinati dopo un
po‘. Allentando l’impugnatura, la macinatura si fermerà.
6. Dopo l’uso spegnere l‘alimentazione (6).
3.4. LAVORARE CON IL DISPOSITIVO RC-CGM20
1. Accendere l‘interruttore per avviare il motore.
Controllare che l’indicatore di alimentazione sia
acceso.
2. Regolare l‘anello del livello di macinatura secondo le
proprie preferenze (prima di versare i chicchi di caè).
• Il grado desiderato di macinatura del caè deve
essere impostato su un intervallo tra 1 e 19,
dove 1 indica la polvere ne e 19 la polvere
grossolana.
• Se il livello di macinatura è insuciente, spingere
la parte (7) verso il basso e allo stesso tempo
girare l‘anello del livello di macinatura (3). La
polvere di caè sarà più grossolana quando si
gira in senso orario e più ne quando si gira in
senso antiorario.
3. Versare i chicchi di caè nell‘imbuto e mettere il
coperchio dell‘imbuto.
4. Posizionare il contenitore del caè macinato o il
pallone della caettiera sul supporto (8).
5. Premere l‘interruttore DIP (10) con suciente forza. Il
motore si avvierà e i chicchi di caè saranno macinati
dopo un po‘. Allentare la maniglia, la macinatura si
fermerà.
6. Spegnere l‘alimentazione (6) dopo l‘uso.
3.5. LAVORARE CON IL DISPOSITIVO RC-CGM21
1. Accendere l‘interruttore per avviare il motore.
Controllare che la luce di alimentazione sia accesa.
2. Regolare l‘anello del livello di macinatura secondo le
proprie preferenze (prima di versare i chicchi di caè).
• Il grado desiderato di macinatura del caè deve
essere impostato su un intervallo tra 1 e 19,
dove 1 indica la polvere ne e 19 la polvere
grossolana.
• Se il livello di macinatura è insuciente, spingere
la parte (7) verso il basso e allo stesso tempo
girare l‘anello del livello di macinatura (3). La
polvere di caè sarà più grossolana quando si
gira in senso orario e più ne quando si gira in
senso antiorario. Regolare il macinino secondo le
proprie preferenze.
3. Versare i chicchi di caè nell‘imbuto e mettere il
coperchio dell‘imbuto.
4. Posizionare il contenitore del caè macinato o il
pallone della caettiera sul supporto (8).
5. Agire sui pulsanti del pannello di controllo come
mostrato nella g. 1.
Il pulsante SET è usato per impostare l‘ora. Quando si
preme il pulsante SET, l‘ora lampeggia sul pannello,
indicando che l‘ora può essere impostata.
Premere (A) per la tazza singola o premere (B) per la
tazza doppia. Usare i pulsanti (+) (-) per impostare
il tempo necessario per macinare una tazza singola
o due tazze, quindi premere il pulsante SET per
completare l‘impostazione. Premere il pulsante
(C) una volta per iniziare la macinatura continua
e premerlo di nuovo per fermare la macinatura.
Premendo il pulsante (C) la prima volta, il macinacaé
funzionerà per altri 60 secondi.
6. Spegnere l‘alimentazione dopo l‘uso.
3.6. LAVORARE CON IL DISPOSITIVO RC-CGE22
1. Accendere l‘interruttore per avviare il motore.
Controllare che l’indicatore di alimentazione sia
acceso.
2. Regolare l‘anello del livello di macinatura secondo le
proprie preferenze (prima di versare i chicchi di caè).
• Il grado desiderato di macinatura del caè deve
essere impostato su un intervallo tra 1 e 19,
dove 1 indica la polvere ne e 19 la polvere
grossolana.
• Se il livello di macinatura è insuciente, spingere
la parte (7) verso il basso e allo stesso tempo
girare l‘anello del livello di macinatura (3). La
polvere di caè sarà più grossolana quando si
gira in senso orario e più ne quando si gira in
senso antiorario. Regolare il macinino secondo
le proprie preferenze.
3. Versare i chicchi di caè nell‘imbuto e mettere il
coperchio dell‘imbuto.
4. Posizionare il contenitore del caè macinato o il
pallone della caettiera sul supporto (8).
5. Toccare i pulsanti Doppio o Singolo sul pannello
dei tasti e premere l‘interruttore DIP (10) con forza
suciente. Il motore funzionerà per tutto il tempo che
avete impostato. Toccare i pulsanti corrispondenti per
fermare la macinatura.
Pannello di controllo: Toccare il pulsante (A) per
visualizzare il tempo predenito impostato per una
singola tazza. Toccare il pulsante (B) per visualizzare il
tempo predenito per una tazza doppia.
PROBLEMA POSSIBILE
CAUSA SOLUZIONE
Non si rie-
sce avviare
il motore
Guasto
dell‘inter-
ruttore di
alimenta-
zione
Sostituire l’interruttore di
alimentazione.
Spegnere l’alimentazione,
poi pulire la camera di
macinatura. Controllare
che non ci siano oggetti
estranei che inceppano il
motore e ne impediscono
il funzionamento. Dopo
il controllo, reinstallare
tutte le parti. Eseguire
un test dell’avviamento
dopo aver confermato
che tutte le parti sono
state assemblate
correttamente.
Se l’interruttore di
alimentazione non è
difettoso, controllare che
gli indicatori sul pannello
di controllo siano
accesi (per (RC-CGM21)
e (RC-CGM22)). Se il
pannello di controllo non
funziona, sostituirlo.
IT IT
29
Rev. 20.05.2021
28 Rev. 20.05.2021

PROBLEMA POSSIBILE
CAUSA SOLUZIONE
Non si rie-
sce avviare
il motore
Fusibile
bruciato
Sostituire il fusibile.
Spegnere l’interruttore,
poi pulire la camera di
macinatura. Controllare
che non ci siano oggetti
estranei che inceppano il
motore e ne impediscono
il funzionamento. Dopo
il controllo, reinstallare
tutte le parti. Eseguire
un test dell’avviamento
dopo aver confermato
che tutte le parti sono
state assemblate
correttamente.
Se il fusibile non è
danneggiato, controllare
che gli indicatori sul
pannello di controllo
siano accesi (per (RC-
CGM21) e (RC-CGM22)).
Se il pannello di controllo
non funziona, sostituirlo.
Macinatura
imprecisa
Le parti
all'inter-
no della
camera di
macinatura
non sono
montate
corretta-
mente.
Smontare e rimontare
tutte le parti con
attenzione.
Il regolatore
della scala
(anello dei
gradi di
macinatura)
non è girato
in senso
orario verso
il perno di
posiziona-
mento
Pulire e conservare la
camera di macinatura
secondo il manuale
d'istruzioni, poi
rimontare. Accendere
l'interruttore e spostare
lentamente il controllo
della scala verso destra
no a quando si sente
l'attrito del disco
scanalato. Poi girare
in senso antiorario per
circa 0,5 cm. Dopo aver
eseguito i passaggi di cui
sopra, versare i chicchi
di caè per testare la
macinatura.
DATOS TÉCNICOS
Conceptos como „aparato“ o „producto“ en las advertencias
y descripciones de este manual se reeren a MOLINILLO DE
CAFÉ.
2.1. SEGURIDAD ELÉCTRICA
a) La clavija del aparato debe ser compatible con el
enchufe. No cambie la clavija bajo ningún concepto.
Las clavijas originales y los enchufes apropiados
disminuyen el riesgo de descarga eléctrica.
b) Evite tocar componentes conectados a tierra como
tuberías, radiadores, hornos y refrigeradores. Existe un
mayor riesgo de descarga eléctrica si su cuerpo está
conectado a tierra mediante supercies mojadas o en
ambientes húmedos. Si entrara agua en el aparato
aumentaría el riesgo de daños y descargas eléctricas.
c) No toque el dispositivo con las manos mojadas o
húmedas.
d) No utilice el cable de manera inadecuada. Nunca tire
de él para desplazar el aparato o para desconectarlo
del enchufe. Por favor, mantenga el cable alejado
de bordes alados, aceite, calor o aparatos en
movimiento. Los cables dañados o soldados
aumentan el riesgo de descargas eléctricas.
e) En caso de no poder evitar que el aparato se emplee
en un entorno húmedo, utilice un interruptor de
corriente residual (RCD). Con este RCD reduce el
peligro de descargas eléctricas.
f) No utilice el dispositivo si el cable de alimentación
se encuentra dañado o presenta signos evidentes de
desgaste. Los cables dañados deben ser reemplazados
por un electricista o por el servicio del fabricante.
g) Para evitar electrocutarse, no se debe sumergir
el cable, los enchufes ni el propio aparato en agua
o en cualquier otro uido. No utilizar el aparato en
supercies mojadas.
h) ¡ATENCIÓN, PELIGRO DE MUERTE! Nunca sumerja el
equipo en agua u otros líquidos durante su limpieza o
funcionamiento.
2.2. SEGURIDAD EN EL PUESTO DE TRABAJO
a) Mantenga el lugar de trabajo limpio y bien iluminado.
El desorden o la mala iluminación pueden provocar
accidentes. Tenga cuidado, preste atención al trabajo
que está realizando y use el sentido común cuando
utilice el dispositivo.
b) En caso de duda sobre si el producto funciona
correctamente o si detectara daños, póngase en
contacto con el servicio de atención al cliente del
fabricante.
c) El producto solamente puede ser reparado por el
fabricante. ¡No intente repararlo usted mismo!
d) En caso de incendio, utilice únicamente extintores
de polvo o dióxido de carbono (CO2) para apagar el
aparato.
e) Conserve el manual de instrucciones para futuras
consultas. Este manual debe ser entregado a toda
persona que vaya a hacer uso del dispositivo.
Parámetro
- Descripción Parámetro - Valor
Nombre del
producto MOLINILLO DE CAFÉ
Modelo RC-CG
M19
RC-CG
M20
RC-CG
M21
RC-CG
E22
Voltaje [V ~]/
Frecuencia [Hz] 220/50
Potencia nominal
[W] 200
Dimensiones
(Ancho
x Profundidad
x Altura) [mm]
150
x232
x425
132x228x470
132
x228
x465
Peso [kg] 4,6 4,5 4,7
1. DESCRIPCIÓN GENERAL
Este manual ha sido elaborado para favorecer un empleo
seguro y able. El producto ha sido estrictamente diseñado
y fabricado conforme a las especicaciones técnicas y para
ello se han utilizado las últimas tecnologías y componentes,
manteniendo los más altos estándares de calidad.
ANTES DE LA PUESTA EN FUNCIONAMIENTO,
LEA LAS INSTRUCCIONES MINUCIOSAMENTE Y
ASEGÚRESE DE COMPRENDERLAS.
Para garantizar un funcionamiento duradero y able del
aparato, el manejo y mantenimiento deben llevarse a
cabo de acuerdo con las instrucciones de este manual.
Los datos técnicos y las especicaciones de este manual
están actualizados. El fabricante se reserva el derecho de
realizar modicaciones para mejorar la calidad. Teniendo
en cuenta los avances técnicos en materia de reducción
del ruido, el equipo ha sido diseñado y fabricado para
mantener el riesgo de emisiones sonoras al nivel más bajo
posible.
EXPLICACIÓN DE LOS SÍMBOLOS
El producto cumple con las normas de
seguridad vigentes.
Respetar las instrucciones de uso.
Producto reciclable.
¡ATENCIÓN!, ¡ADVERTENCIA! o ¡NOTA! para
llamar la atención sobre ciertas circunstancias
(señal general de advertencia).
Uso exclusivo en áreas cerradas.
El texto en alemán corresponde a la versión original. Los
textos en otras lenguas son traducciones del original en
alemán.
¡ADVERTENCIA! En este manual se incluyen fotos
ilustrativas, que podrían no coincidir exactamente
con la apariencia real del dispositivo.
¡ATENCIÓN! Lea todas las instrucciones
e indicaciones de seguridad. La inobservancia de
las advertencias e instrucciones al respecto puede
provocar descargas eléctricas, incendios, lesiones
graves e incluso la muerte.
2. SEGURIDAD
MANUAL DE INSTRUCCIONES
IT ES
31
Rev. 20.05.2021
30 Rev. 20.05.2021

C
BA
3.2. PREPARACIÓN PARA LA PUESTA EN MARCHA
LUGAR DE TRABAJO
La temperatura ambiente no debe superar los 40°C y
la humedad relativa no debe exceder el 85%. Instale el
equipo teniendo en cuenta que debe garantizarse una
buena ventilación. Para ello hay que respetar una distancia
perimetral mínima de al menos 10 cm. Mantenga el aparato
alejado de supercies calientes. El aparato se debe usar
siempre en una supercie plana, estable, limpia, ignífuga
y seca, fuera del alcance de los niños y de personas con
funciones psíquicas, mentales y sensoriales limitadas.
Ubique el aparato de modo que el enchufe esté siempre
accesible y donde nada pueda cubrirlo. Asegúrese de que las
características del suministro eléctrico se corresponden con
las indicaciones que aparecen en la placa de características
del artículo. Antes del primer uso, desmonte el aparato y
limpie todas sus piezas.
3.3. MANEJO DEL APARATO RC-CGM19
1. Pulse el interruptor de encendido para poner en
marcha el motor.
2. Ajuste el anillo de grado de molido según su
preferencia (antes de verter los granos de café).
• El grado de molido de café deseado debe
ajustarse entre 1 y 19, donde 1 indica polvo no
y 19 indica polvo grueso.
• Para ajustar el anillo de molido de café, primero
aoje el tornillo de ajuste y luego regule el anillo.
Apriete el tornillo.
3. Vierta los granos de café en el embudo y vuelva a
colocar la tapa del embudo.
4. Coloque un recipiente para el café molido o un
portaltro de café en el soporte (8).
5. Pulse el microinterruptor (10) con la fuerza apropiada.
El motor se pondrá en marcha y los granos de café se
molerán después de un momento. Libere el soporte,
la molienda se detendrá.
6. Apague el interruptor (6) después del uso.
3.4. MANEJO DEL APARATO RC-CGM20
1. Pulse el interruptor de encendido para activar el motor.
Compruebe que la luz de encendido esté iluminada.
2. Ajuste el anillo de grado de molido según su
preferencia (antes de verter los granos de café).
• El grado de molido de café deseado debe
ajustarse entre 1 y 19, donde 1 indica polvo no
y 19 indica polvo grueso.
• Si el grado de molienda no es el adecuado,
presione el posicionador (7) hacia abajo y al
mismo tiempo gire el anillo de grado de molido
(3). El café en polvo será más grueso cuando se
gire en el sentido de las agujas del reloj y más
no cuando se gire en sentido contrario a las
agujas del reloj. Ajuste el molinillo según sus
preferencias.
3. Vierta los granos de café en el embudo y vuelva a
colocar la tapa del embudo.
4. Coloque un recipiente para el café molido o un
portaltro de café en el soporte (8).
5. Pulse el microinterruptor (10) con la fuerza apropiada.
El motor se pondrá en marcha y los granos de café se
molerán después de un momento. Libere el soporte,
la molienda se detendrá.
6. Apague el interruptor (6) después del uso.
ES
33
Rev. 20.05.2021
3.5. MANEJO DEL APARATO RC-CGM21
1. Pulse el interruptor de encendido para activar el
motor. Compruebe que la luz de encendido esté
iluminada.
2. Ajuste el anillo de grado de molido según su
preferencia (antes de verter los granos de café).
• El grado de molido de café deseado debe ajustarse
entre 1 y 19, donde 1 indica polvo no y 19 indica
polvo grueso.
• Si el grado de molienda no es el adecuado, presione
el posicionador (7) hacia abajo y al mismo tiempo
gire el anillo de grado de molido (3). El café en polvo
será más grueso cuando se gire en el sentido de las
agujas del reloj y más no cuando se gire en sentido
contrario a las agujas del reloj. Ajuste el molinillo
según sus preferencias.
3. Vierta los granos de café en el embudo y vuelva a
colocar la tapa del embudo.
4. Coloque un recipiente para el café molido o un
portaltro de café en el soporte (8).
5. Utilice los botones del panel de control como se
muestra en la ilustración 1.
El botón SET se utiliza para congurar el tiempo.
Después de presionar el botón SET, el tiempo
parpadeará en el panel, lo que signica que se puede
congurar.
Pulse (A) para una taza individual o presione el botón
(B) para una taza doble. Use los botones (+) (-) para
congurar el tiempo requerido para moler una taza o
dos tazas, luego presione el botón SET para completar
la conguración. Pulse el botón (C) una vez para
iniciar la molienda continua y presiónelo nuevamente
para detener la molienda. Al presionar el botón (C)
por primera vez, el molinillo funcionará durante 60
segundos más.
6. Apague la alimentación después del uso.
3.6. MANEJO DEL APARATO RC-CGE22
1. Pulse el interruptor de encendido para activar el motor.
Compruebe que la luz de encendido esté iluminada.
2. Ajuste el anillo de grado de molido según su
preferencia (antes de verter los granos de café).
• El grado de molido de café deseado debe
ajustarse entre 1 y 19, donde 1 indica polvo no
y 19 indica polvo grueso.
• Si el grado de molienda no es el adecuado,
presione el posicionador (7) hacia abajo y al
mismo tiempo gire el anillo de grado de molido
(3). El café en polvo será más grueso cuando se
gire en el sentido de las agujas del reloj y más
no cuando se gire en sentido contrario a las
agujas del reloj. Ajuste el molinillo según sus
preferencias.
f) Los elementos de embalaje y pequeñas piezas de
montaje deben mantenerse alejados del alcance de
los niños.
g) Mantenga el equipo alejado de niños y animales.
2.3. SEGURIDAD PERSONAL
a) Este aparato no debe ser utilizado por personas
(entre ellas niños) con capacidades físicas, sensoriales
o mentales reducidas, o con falta de la experiencia
y/o los conocimientos necesarios, a menos que
sean supervisadas por una persona responsable de
su seguridad o que hayan recibido de esta persona
responsable las indicaciones pertinentes en relación
al manejo del aparato.
b) Para evitar una puesta en marcha accidental,
asegúrese de que el interruptor esté apagado antes
de conectar la clavija a una fuente de alimentación.
c) Este aparato no es un juguete. Debe controlar que los
niños no jueguen con él.
d) ¡No coloque las manos ni otros objetos sobre el
aparato en funcionamiento!
2.4. MANEJO SEGURO DEL APARATO
a) No utilice la unidad si el interruptor ON/OFF no
funcionara correctamente (no enciende o apaga).
Los aparatos que no pueden ser controlados por
interruptores son peligrosos. Estos pueden y deben
ser reparados.
b) Antes de proceder a la limpieza, ajuste o
mantenimiento, desconecte el dispositivo del
suministro eléctrico. Esta medida preventiva reduce
el riesgo de que el dispositivo se ponga en marcha
accidentalmente.
c) Mantenga las herramientas fuera del alcance de los
niños y de las personas que no estén familiarizadas
con el equipo en sí o no hayan recibido las
instrucciones pertinentes al respecto. En manos de
personas inexpertas este equipo puede representar
un peligro.
d) Mantenga el aparato en perfecto estado de
funcionamiento. Antes de cada trabajo, compruébelo
en busca de daños generales o de piezas móviles
(fractura de piezas y componentes u otras
condiciones que puedan perjudicar el funcionamiento
seguro de la máquina). En caso de daños, el aparato
debe ser reparado antes de volver a ponerse en
funcionamiento.
e) Mantenga la unidad fuera del alcance de los niños.
f) La reparación y el mantenimiento de los equipos
solo pueden ser realizados por personal cualicado
y siempre empleando piezas de repuesto originales.
Esto garantiza la seguridad durante el uso.
g) A n de asegurar la integridad operativa del
dispositivo, no se deben retirar las cubiertas o los
tornillos instalados de fábrica.
h) Evite situaciones en las que el aparato haya
de trabajar en exceso. Esto podría ocasionar el
sobrecalentamiento de sus componentes y, con ello,
daños en el equipo.
i) No toque ninguna pieza o accesorio móvil a menos
que el aparato haya sido desconectado de la corriente
eléctrica.
j) Está prohibido mover, cambiar o girar el aparato
durante su funcionamiento.
k) No deje este equipo sin supervisión mientras esté en
funcionamiento.
l) Limpie regularmente el dispositivo para evitar que la
suciedad se incruste permanentemente.
m) Este aparato no es un juguete. La limpieza y el
mantenimiento no deben ser llevados a cabo por
niños que no estén bajo la supervisión de adultos.
n) Se prohíbe realizar cambios en la construcción del
dispositivo para modicar sus parámetros o diseño.
o) Mantenga el dispositivo alejado de fuentes de fuego
o calor.
p) ¡Los oricios de ventilación no deben cubrirse!
1. Tapa de embudo
2. Embudo
3. Regulador (anillo de grado de molido)
4. Base
5. Cable de alimentación
6. Interruptor de encendido
7. Posicionador del regulador
8. Soporte
9. Fusible
10. Microinterruptor
11. Panel de control
ES
32 Rev. 20.05.2021
6
95
8
10
6
5
4
3
2
1
2
1
3
4
77
11
10
8
9
3. INSTRUCCIONES DE USO
El producto está diseñado para moler granos de café.
¡El producto solamente puede utilizarse de forma privada!
El usuario es responsable de los daños derivados de un
uso inadecuado del aparato.
3.1. DESCRIPCIÓN DEL APARATO
¡ATENCIÓN! Aunque en la fabricación de
este aparato se ha prestado gran importancia
a la seguridad, dispone de ciertos mecanismos de
protección extras. A pesar del uso de elementos de
seguridad adicionales, existe el riesgo de lesiones
durante el funcionamiento, por lo que se recomienda
proceder con precaución y sentido común.

ES
35
Rev. 20.05.2021
PROBLEMA POSIBLE
CAUSA SOLUCIÓN
No se puede
arrancar el
motor
Fallo del in-
terruptor de
encendido
Reemplace el interruptor
de encendido.
Apague la alimentación,
a continuación, limpie
la cámara de molido.
Compruebe que no
haya objetos extraños
que obstruyan el
motor e impidan
su funcionamiento.
Después de la
vericación, vuelva
a instalar todas las
piezas. Encienda el
motor para probarlo
después de conrmar
que todas las piezas
están ensambladas
correctamente.
ES
34 Rev. 20.05.2021
3. Vierta los granos de café en el embudo y vuelva a
colocar la tapa del embudo.
4. Coloque un recipiente para el café molido o un
portaltro de café en el soporte (8).
5. Toque los botones Double o Single en el panel y
pulse el microinterruptor (10) con la fuerza adecuada.
El motor funcionará durante el tiempo que se haya
congurado. Pulse los botones correspondientes para
dejar de moler.
Panel de control: pulse el botón (A) para mostrar el
tiempo predeterminado para una sola taza. Toque
el botón (B) para mostrar el tiempo predeterminado
para una taza doble.
Para cambiar el tiempo predeterminado para una sola
taza, mantenga presionado el botón (C) durante 3
segundos hasta que SET en la pantalla se vuelva rojo y
comience a parpadear. A continuación, pulse el botón
(A) para una sola taza y el botón (C) hasta que SET
en la pantalla se vuelva rojo y S y Single parpadeen,
lo que signica que puede congurar el tiempo para
una sola taza. Use los botones (+) y (-) para aumentar
o disminuir el tiempo predeterminado, luego pulse el
botón (C) para guardar automáticamente el tiempo
establecido para una sola taza.
Para cambiar el tiempo predeterminado para una taza
doble, mantenga presionado el botón (C) durante 3
segundos hasta que SET en la pantalla se vuelva rojo y
comience a parpadear. A continuación, pulse el botón
(B) para una taza doble y el botón (C) hasta que SET
en la pantalla se vuelva rojo y S y Double parpadeen,
lo que signica que puede congurar el tiempo para
tazas dobles. Use los botones (+) y (-) para aumentar
o disminuir el tiempo predeterminado, luego pulse el
botón (C) para guardar automáticamente el tiempo
establecido para la taza doble.
6. Apague la alimentación después de su uso.
3.7. LIMPIEZA Y MANTENIMIENTO
a) Antes de limpiar y ajustar, sustituir accesorios
o cuando no tenga previsto utilizar el equipo,
desenchufe el cable de alimentación y deje que la
unidad se enfríe completamente.
• Espere a que los elementos giratorios se
detengan.
b) Utilizar únicamente detergentes suaves destinados a
la limpieza de supercies en contacto con alimentos.
c) Después de cada limpieza, deje secar bien todas las
piezas antes de volver a utilizar el aparato.
d) Guarde el aparato en un lugar seco, fresco y protegido
de la humedad y la radiación solar directa.
e) Prohibido rociar agua sobre el dispositivo o
sumergirlo en agua.
f) En lo que respecta a la eciencia técnica y posibles
daños, el dispositivo debe ser revisado regularmente.
g) Para su limpieza utilizar un paño húmedo y suave.
h) No utilizar para la limpieza objetos de metal
puntiagudos y/o alados (p.ej. cepillos metálicos o
espátulas de metal), ya que podrían dañar la supercie
del material del que está hecho el aparato.
i) No limpie el aparato con limpiadores que puedan
contener sustancias ácidas. Los aparatos médicos,
disolventes, carburantes, aceites y otros químicos
podrían dañar el producto.
Si necesita desmontar ciertas partes del dispositivo,
asegúrese de que el interruptor de encendido esté
apagado o desconecte el enchufe de la toma de
corriente para evitar tocar el interruptor por error y
encender el dispositivo.
Limpieza de la supercie interior de la cámara de molido
1. Desmonte el embudo y la tapa.
2. Gire el regulador (anillo de grado de molido) hacia
arriba en el sentido de las agujas del reloj.
3. Retire el soporte de la cuchilla.
4. Limpie la supercie interior.
Montaje de la cámara de molido
1. Monte el soporte de la cuchilla.
2. Gire el regulador (anillo de grado de molido) en
sentido contrario a las agujas del reloj hasta que
quede en la posición deseada.
3. Ensamble el embudo junto con la tapa.
* Retire con cuidado el café en polvo de la base y las
roscas del regulador, de lo contrario el grado de
molido del café podría verse afectado. La perilla
podría atascarse y no girar correctamente cuando se
vuelva a ensamblar, o solo girar parcialmente.
ELIMINACIÓN DE DISPOSITIVOS USADOS
Tras su vida útil, este producto no debe tirarse al contenedor
de basura doméstico, sino que ha de entregarse en el
punto limpio correspondiente para recolección y reciclaje
de aparatos eléctricos. Al respecto informa el símbolo
situado sobre el producto, las instrucciones de uso o el
embalaje. Los materiales utilizados en este aparato son
reciclables, conforme a su designación. Con la reutilización,
aprovechamiento de materiales u otras formas de uso de
los aparatos utilizados, contribuirás a proteger el medio
ambiente. Para obtener información sobre los puntos de
recogida y reciclaje contacte con las autoridades locales
competentes.
SOLUCIONES DE PROBLEMAS
No se puede
arrancar el
motor
Fusible
fundido
Reemplace el fusible.
Apague la alimentación,
a continuación, limpie
la cámara de molido.
Compruebe que no
haya objetos extraños
que obstruyan el
motor e impidan
su funcionamiento.
Después de la
vericación, vuelva
a instalar todas las
piezas. Encienda el
motor para probarlo
después de conrmar
que todas las piezas
están ensambladas
correctamente.
Si el fusible no está
dañado, verique que
los indicadores del
panel de control estén
encendidos (para (RC-
CGM21) y (RC-CGM22)).
Si el panel de control no
funciona, reemplácelo.
Molienda
inapropiada
Las piezas
del interior
de la
cámara
de molido
no están
colocadas
correcta-
mente.
Desmonte y vuelva a
montar todas las piezas
con cuidado.
El regulador
(anillo de
grado de
molido) no
gira hacia la
derecha.
Limpie la cámara de
molido de acuerdo
con las instrucciones
de funcionamiento y
luego vuelva a montarla.
Active el interruptor
de encendido y deslice
lentamente el regulador
hacia la derecha hasta
que escuche el roce
por el bloqueo. A
continuación, gírelo
en sentido contrario
a las agujas del reloj
unos 0,5 cm. Después
de completar los pasos
anteriores, agregue
granos de café para la
molienda de prueba.

expondo.de
CONTACT
Hersteller an Verbraucher
Sehr geehrte Damen und Herren,
gebrauchte Elektro – und Elektronikgeräte dürfen gemäß europäischer Vorgaben [1] nicht zum unsortierten Siedlungsabfall
gegeben werden, sondern müssen getrennt erfasst werden. Das Symbol der Abfalltonne auf Rädern weist auf die Notwendigkeit
der getrennten Sammlung hin. Helfen auch Sie mit beim Umweltschutz. Sorgen Sie dafür, dieses Gerät, wenn Sie es nicht mehr
weiter nutzen wollen, in die hierfür vorgesehenen Systeme der Getrenntsammlung zu geben.
In Deutschland sind Sie gesetzlich [2] verpichtet, ein Altgerät einer vom unsortierten Siedlungsabfall getrennten Erfassung
zuzuführen. Die öffentlich – rechtlichen Entsorgungsträger (Kommunen) haben hierzu Sammelstellen eingerichtet, an denen
Altgeräte aus privaten Haushalten ihres Gebietes für Sie kostenfrei entgegengenommen werden. Möglicherweise holen die
rechtlichen Entsorgungsträger die Altgeräte auch bei den privaten Haushalten ab.
Bitte informieren Sie sich über Ihren lokalen Abfallkalender oder bei Ihrer Stadt – oder Gemeindeverwaltung über die in Ihrem
Gebiet zur Verfügung stehenden Möglichkeiten der Rückgabe oder Sammlung von Altgeräten.
[1] RICHTLINIE 2002/96/EG DES EUROPÄISCHEN PARLAMENTS UND DES RATES
ÜBER ELEKTRO – UND ELEKTRONIK – ALTGERÄTE
[2] Gesetz über das Inverkehrbringen, die Rücknahme und die umweltverträgliche Entsorgung
von Elektro – und Elektronikgeräten (Elektro – und Elektronikgerätegesetz – ElektroG).
Umwelt – und Entsorgungshinweise
Utylizacja produktu
Produkty elektryczne i elektroniczne po zakończeniu okresu eksploatacji wymagają segregacji i oddania ich do wyznaczonego
punktu odbioru. Nie wolno wyrzucać produktów elektrycznych razem z odpadami gospodarstwa domowego. Zgodnie
z dyrektywą WEEE 2012/19/UE obowiązującą w Unii Europejskiej, urządzenia elektryczne i elektroniczne wymagają segregacji
i utylizacji w wyznaczonych miejscach. Dbając o prawidłową utylizację, przyczyniasz się do ochrony zasobów naturalnych
i zmniejszasz negatywny wpływ oddziaływania na środowisko, człowieka i otoczenie. Zgodnie z krajowym prawodawstwem,
nieprawidłowe usuwanie odpadów elektrycznych i elektronicznych może być karane!
For the disposal of the device please consider and act according to the national and local rules and regulations.
expondo Polska sp. z o.o. sp. k.
ul. Nowy Kisielin-Innowacyjna 7
66-002 Zielona Góra | Poland, EU
e-mail: info@expondo.de
This manual suits for next models
3
Table of contents
Languages:
Other Royal Catering Coffee Grinder manuals