manuals.online logo
Brands
  1. Home
  2. •
  3. Brands
  4. •
  5. RPI
  6. •
  7. Swimming Pool
  8. •
  9. RPI Naturalis User manual

RPI Naturalis User manual

NATURALIS
03
2,90 x 7,14 m
RECTANGULAR 1.40
An RP INDUSTRIES
product.
ASSEMBLY
INSTRUCTIONS GUIDE
®
You have just bought your Naturalis swimming pool. Thank you for your choice and
the trust you deposit on our product. We recommend that you read carefully these
instructions, follow them step by step, understand the instructions very well and take
into account the advice and recommendations transmitted.
IMPORTANT !
Before beginning the construction of your pool, read several times this guide. Indeed,
the aesthetics and strength of your pool depend on the care with which you will
perform the installation. Any problem caused by a mounting and handling, not in
accordance with the instructions in this guide could void your warranty.
INTRODUCTION
PLEASE READ
CAREFULLY AND
KEEP FOR FUTURE
REFERENCE
All the information inside this guide is true at the moment of publication. However, the photos of the illustrations only serve
to show how the process of construction is, they are not contractual, such their color, their shape, their appearance are only
examples. To improve its products, R P INDUSTRIES reserves the right to modify at any time and without prior notice, the
characteristics, the technical details, the standard equipment and the options of the products.
The highest level of risk exists when children are under 5 years of age. The accident does not
just happen to other people. Watch carefully and act quickly:
• The kids’ surveillance has to be closed and constant;
• Designate just one responsible for the security;
• Get stronger the supervision when there is a lot of people inside the pool;
• Get wet nape, arms, and legs before getting inside the water;
• Learn lifesaving techniques especially those specics to children;
• Prohibit diving and jumping into the pool;
• Prohibit running or violent games near the pool;
• Do not permit access to the pool, to children that don’t know swimming without life belt or life jacket;
• Don’t leave any toys near or inside the pool without surveillance;
• Maintain the water constantly clean and healthy;
• Store water treatment’s products out of reach of children.
Provide:
• A lifebuoy and a pole near the pool;
• Accessible phone near the pool so as not to leave children alone when you call;
• If you have an above ground pool, always remove the outside ladder after each use of the pool;
• Furthermore, some equipment can contribute for more safety:
• Safety fence with gate that must always be kept closed (for instance, a hedge cannot be considered as a safety fence);
• A manual or automatic safety cover, properly installed and xed;
• Automatic motion or fall detectors, running and operative;
• However, it does not replace a constant vigilance.
If an accident happens:
• Take the child out of the water as quickly as possible;
• Call immediately the emergency number and follow the given instructions
• Change wet clothes by warm blankets;
• Memorize and xe the emergency numbers near the pool;
• European emergency number: 112
ATTENTION:
THE SAFETY OF YOUR CHILDREN DEPENDS ONLY ON YOU!
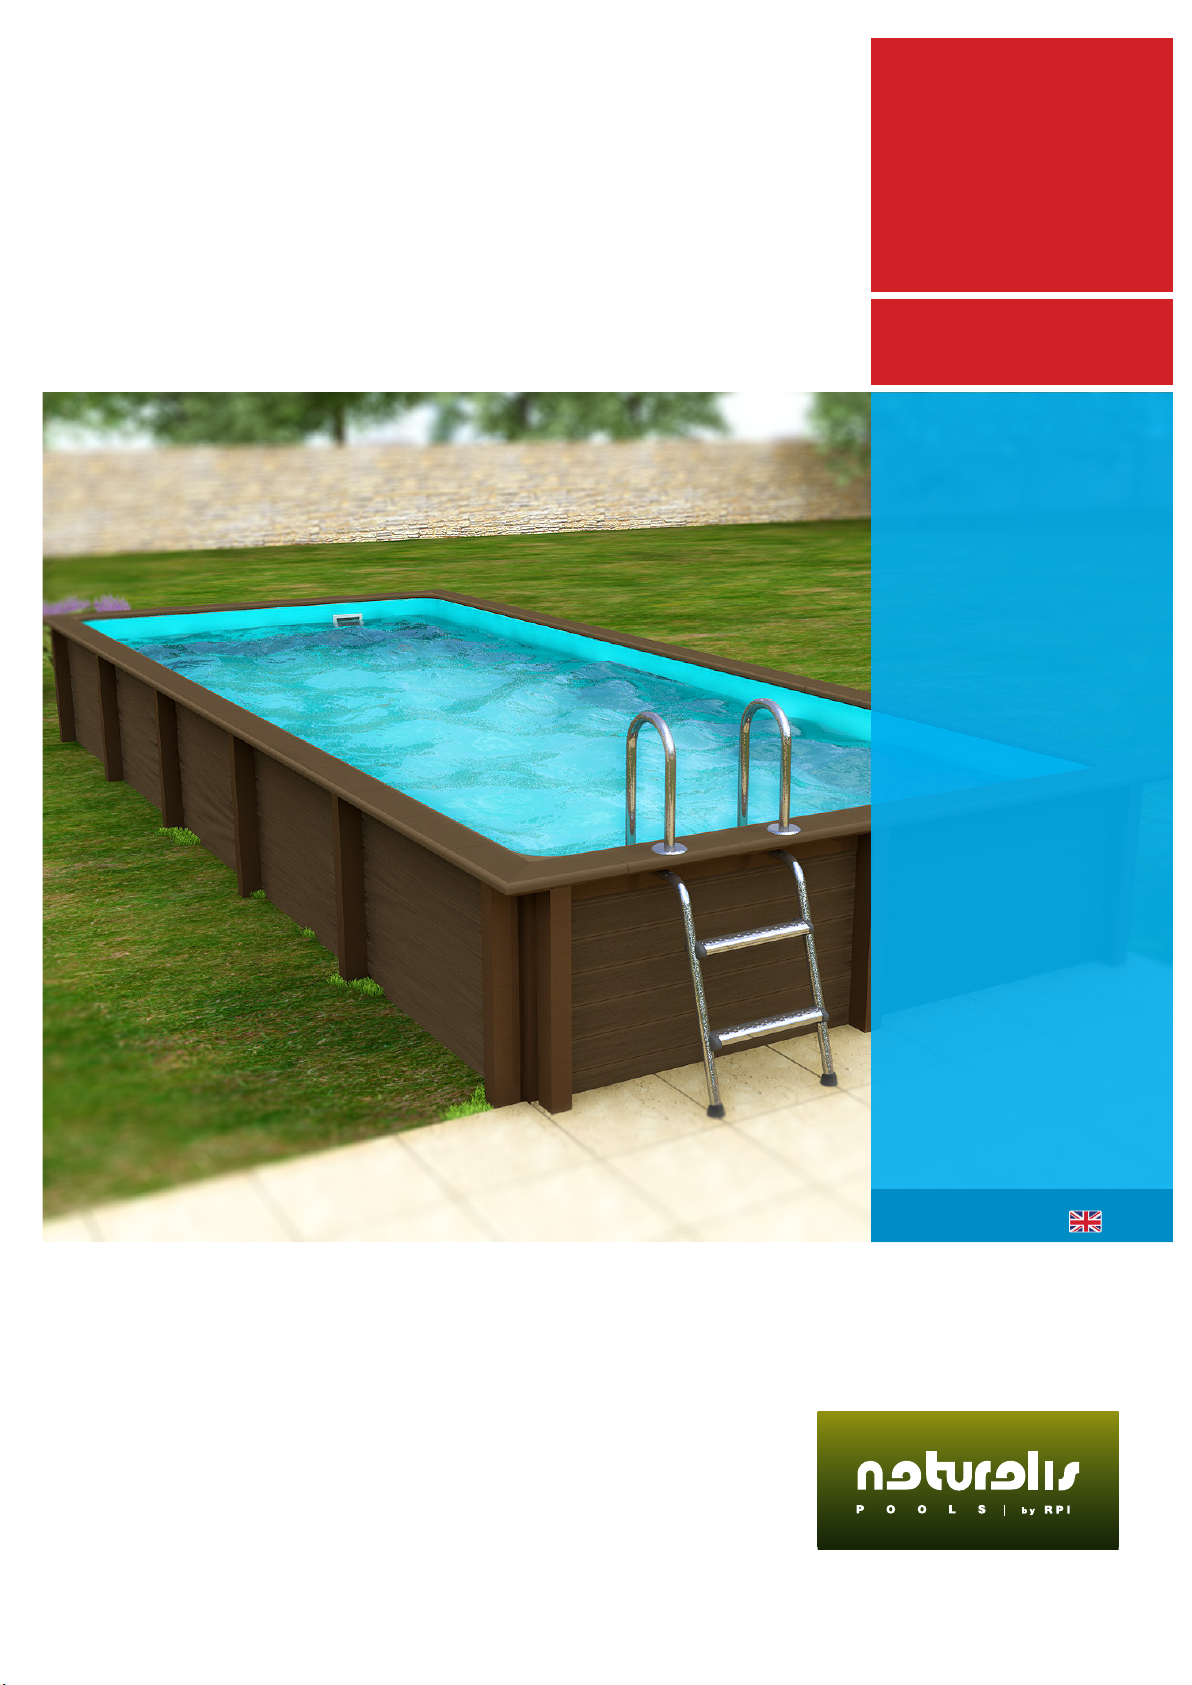
CONCRETE SWIMMING POOL,
WOOD APPEARANCE
®
1
Safety warnings
It’s required to predict a special di󰀨erential protective device for pools on the electric power of the
pump according to legal and technical norms.
The minimum distance between the pump and the pool must be at least 3,50mt, to prevent
electrical shock.
Do not leave any child without surveillance near the pool.
After each use remove the exterior ladder, to prevent children or pets from accidentally falling into
the pool.
The NATURALIS pool is to be used only for private use.
It’s totally prohibited to walk along the edge, dive or jump from the coping.
The installation of your pool requires 2 persons and takes about two days (excluding the excavation
and the construction of the concrete slab). The concrete slab must be made two weeks before the
start of the assembly.
Check if:
• The electrical connections of the equipment are installed by a qualied technician;
• Make sure you have enough water to fully supply and ll the pool;
• The instructions were read with attention and you are able to reproduce the di󰀨erent steps of the
installation.
The ground for the implantation of the NATURALIS pool must be prepared according
to the instructions of this manual on chapter IMPLANTATION.
DO NOT INSTALL THE POOL:
• Under electrical cables
• Under trees
• On an un-stabilized ground.
A good location for your pool is essential to avoid future problems or disappointments.
The pool must be easily accessible, preferably in a sunny place.
The pool must be installed far from pipes or electrical net.
Duration of construction
Before the construction of your NATURALIS pool
Implantation Advice
NEVER LEAVE THE POOL EMPTY
1,40 m
0,10 m
62.50 cm 62.50 cm
RECTANGULAR 2,90 x 7,14 m
2 m
nº 14/15
nº10
3 065
(3 paletts)
Lenght .
(m)
Lenght .
(m)
Height
(m)
Water
Volume
(m3)
Liner Filtration
Widht
(m)
Widht
(m)
Weight
(Kg)
OutsideInside
Depth
water (m)
Blue pale Cartridge
16 m3/h
Excavation
Concrete slab
Blue Thread
Concrete drill nº10
Necessary tools for Installation:
1,40 33.70 1,222,90 7,14 3,70 7,94
1
2
2
2
2
2
3
1
2
3
67 x
16x1x1x
36x
2x
4x
1 x 1 x
14 x
164x 166x36x 84x 142x
4 x4 x
14 x 4 x
1 x
14x
8x
18x
14 x 14 x
13 x 1x 2x
2x 1x
13 x 1 x
4 x
14 x
1x20.5x4x 1x 1x 1x
4 x
Ladder
Kit composition for NATURALIS 03
Maximum authorized weight:150 kg
IMPORTANT:
The ladder can not be used for other purposes.
SUMMARY
Presentation of the NATURALIS Kit 03
1-Implantation
2-Escavation work
3-Concrete slab
4-Marking the layout of the pool
5-Fastening the pillars and the base structure
6-Setting up the aluminium prol
7-Setting up Beam nº1
8-Setting up Beam nº2
9-Setting up Beam nº 4
10-Setting up Beam nº 3
11-Setting up Beam nº 5
12-Placing of coping support
13-Fixation of the protective steel panel
14-Placing angles R15
15-Placement of PVC HUNG prole for liner
16-Installation of the embeded parts
17-Pump and Hydraulic system connection
18-Landll around the pool
19-Installation of the Geotextile carpet
20-Placement of the liner
21- Placement of sealing rings
22-Placing of coping
22-Placing of stainless steel ladder
1
4
62.50 cm 62.50 cm
3,90 m
3,90 m
4,00 m
4,472 m
2,00 m
8,14 m
8,14 m
Point 0
1
2
Implantation
IMPORTANT:
Before beginning your Naturalis installation read these instructions carefully. Any
installation, which is not made according to these instructions, will cancel the
warranty.
The choice of the pool location is essential because it a󰀨ects not only the reliability of the pool but also the comfort
of utilization. Take all the time needed for a perfect construction. This way, you will improve the longevity of your
swimming pool and the comfort of utilization.
To enjoy your swimming pool, check if it is correctly exposed to the sun. Avoid the proximity of trees and vegetation.
Prefer an area without wind.
We recommend the alignment of the pool with an already existing construction (house, wall, terrace, etc) to t
perfectly in your environment.
Excavation
IMPORTANT:
The structure of your pool must
be built on a consolidated eld,
stable, without landll with less
than 10 years.
The recommendations for partially
or totally underground pools
are valid for an installation on a
dry eld, without humidity. The
Rectangular 2,90 x 7,14 mm must
must be necessarily, half-buried to
a depth of 52.50 cm.
After determination of the location
of the swimming pool, xe the
highest point (point zero).
Then, draw on the ground a
rectangle of 3,90 m by 8.14 m.
To obtain the perfect corner
squareness, you should mark the
point 0 4,00m for one side and
2,00m for the perpendicular side.
The union between these two points
must be 4,472m. Repeat this steps
for the remaining corners.
When all the soil markings are done,
you should obtain a rectangular
shape such as shown in the
illustration.
2
5
4
5
3
3
62.50 cm
Excavation work
Begin to evacuate 62.50 cm deep of land inside
the rectangular, according to the highest point.
After removal, check the leveling of the bottom
and place the welded metal mesh E300.
ATTENTION:
The recommendations for partially or
totally underground pools are valid for an
installation on a dry eld, without humidity.
The adaptation of these instructions has
to be done according to the kind of soil
or to the high level of water inside the
eld (source, water ow, etc) It’s highly
recommended to place a drainage system
under or around the pool to avoid every kind
of water stagnation which can damage the
concrete work and cause the appearance of
spots on the liner.
Concrete slab
IMPERATIVE
The pool has to be built on a concrete leveled slab (only 1 cm is tolerated between the highest and
the lowest point of the area of implantation).
Put de welded metal mesh on the soil and make
a concrete slab (350 kg) with 10 cm of thickness
on all the pool’s area. The slab must be smooth,
without irregularities and completely leveled.
The concrete dosing can be easily obtained
by the 1-2-3 rule: To ll the concrete-mixer,
put 1 bucket of cement, 2 buckets of sand
and 3 buckets of gravel. The quantity of
water to add to the moisture depends on
the humidity of the aggregates. Anyway,
the concrete texture has to be unctuous.
To obtain 1 m3 of concrete, you have to mix 350
kg of cement, 680 kg of sand and 1175 kg of
gravel.
4
6
(0)
3,5725 m
1
3,5725 m
2
1,45 m
1,45 m
4
3
(0)
(0)
1
2
4
3
A
Marking the layout of the pool
Before assembling, proceed to clean the slab to eliminate all kinds of impurities (sand, twigs, leaves, etc).
The slab should be smooth without irregularities and properly leveled to allow the correct assembly of the pool.
IMPORTANT:
The assembly of the pool should be performed after complete drying of the concrete slab (2/3 weeks).
Dimensions shown are interior dimensions.
On the concrete slab perform marking the route of the
pool. A rst marking nds the center point of the concrete
slab (0).
Perform marking of points 1and 2separated 3.5725
m from the center of the pool (0). Repeat to get points
1 and 2 with a distance of 1.45 m from the center of the
pool (0). Make sure 1/2 is 3/4 perpendicular.
From points 3 and 4 draw two parallel lines the 1 / 2
over the entire length of the concrete slab.
From points 1 and 2, draw two lines parallel to the lines
3/4.
Conrm the corresponding diagonals with the
measurement of 7,72 m and with this way you will obtain
the form for the installation of the pool.
After the correct marking of the layout of the pool, it is time
to begin the assembly of the structure. The assembly of the
structure is initiated by the placement of the corner pillars.
Choose one of the corners of the pool to begin placement
of the structure.
5
7
A
Fastening the pillars and the base structure
NOTE:
There are two types of pillars: straight and
angle. The straight pillars are placed on the
length of the pool.
The angle pillars are intended to be placed
across the width of the pool.
right pillar
angle pillar
The installation of the structure starts from the corner of the pool (A). Position the abutment correctly as shown in
the picture and then attach the base panel.
For the xing between the corner pillar
and the right pillar that make up the
corners of the pool, the joints between
the corners are used.
Union between corners
The joints allow to unify the pillars that make up the
corner and the base structure panel.
Then proceed to the placement of the next panel
and make the respective fastening using the screws
provided.
After xing the 1st base frame panel to the corner pillar,
place the right pillar that completes the corner of the
pool.
Then repeat the same procedure until you get the full
shape of the pool. Before securing to the concrete slab,
check the diagonals and leveling of the structure.
5
8
D
C
A
B
7,69m
7,69 m
2
2
2
22
2
1
1
1
A
D
B
C
1
(0)
3
3
3 3
3 3
3
3
3
3
3
3
3
3
2
2
2
2
2
2
2
2
5 5
55
4
4
4 4
4 4
4
4
4
4
4
4 4
Fastening the pillars and the base structure
Points A, B, C, D, dene the location of the rst angle pillars.
ATTENTION:
Before proceeding to the nal establishment of the pillars to the concrete slab
must verify the dimensions and the leveling of the structure as indicated.
After performing the positioning of the pillars
and the base structure, as indicated in the plant
conrm the dimensions of the diagonals.
The distance between A/C and B/D
should be 7,69 m.
Before proceeding to the xing of the pillars and the base
structure to the concrete slab ensure that the pillars are
properly upright and the structural panels are leveled.
3
2
1
4
Base structure pannel
Straight pillar
Angle pillars
Triangular
reinforcement
5Cover
xing piece
5
9
Fastening the pillars and the base structure
Drill concrete with a drill, using the existing hole in the base of the pillar. Repeat for the structure.
Then secure the pillar to the slab using the steel anchors provided in the kit.
Fixation of the pillars
Fixing the base structure
Fixing of triangular reinforcements
ATTENTION:
Should screw all pillars making sure they are leveled and upright.
Using the same method of xing pillars, make the xing of panels of the base structure.
Position the triangular reinforcement on the panel, xing the existing holes. Use the respective bolts and nuts for
xing the panel. In xing the triangular reinforcement use metal bushings used when xing the structure base
panel.
6
10
Placement and fixing of aluminum profile
After positioning the aluminum prole in the base structure panel will be noticeable that the drilling from the prole
is aligned with the existing hole in the top of the panel.
Use these holes to attach the prole to the base frame using the screws provided in the kit.
Proceed to the set of proles using all the holes for the purpose.
Repeat around the perimeter of the pool.
Developed to allow the tting of the rst row of platters of the wall the aluminum
prole rests on top of the base structure panels. Slide the aluminum prole in the
recess of the post to the top of the panel.
IMPORTANT:
Before placing the
aluminum prole you
have to apply silicone
on the top of the steel
panel (of the base
structure). Both parts
must be previously
cleaned.
Nº 1
Nº 2
Nº 2
Nº 2
Nº 2
Nº 3
Nº 2
7
11
Beam n.º 1
Base
Structure
Panel
BEAM N.º 1 (1st row)
The beam, which will form the rst row is n.º 1 and ts directly on the aluminum prole, previously covered
by a silicone bead.
ATTENTION:
For the placing of the beams, it is mandatory to respect the numbering of the parts.
The platters are numbered as shown in the photo.
IMPORTANT:
Prior to the laying of the rst row
of beams, you must clean up the
aluminum prole and apply a bead
of silicone on top and inside of the
prole.
The silicone supplied in the kit will
help you x the beams, putting
them evenly and to confer greater
resistance to the wall.
Placement of beam n.º 1
Swimming
pool inner side
7
12
Placement of beam n.º 1
During the placement of the beam, ensure that this
is perfectly leveled.
Once placed the rst
row of beams check
that they are correctly
tted so that it can
ensure a perfect
assembly of the rest
of the structure.
Place the rst row of
beams, formed by
beam n.º 1, around the
perimeter of the pool.
8
13
Nº 1
Nº 2
Nº 2
Nº 2
Nº 2
Nº 3
Nº 2
Placement of beam n.º 2
Numbered in the part itself (n.º 2), the 2nd row of beams t on top of the beams n.º 1
Beam n.º 2
Base
Structure
Panel
BEAM N.º 2 (2nd row)
ATTENTION:
Before placing the sleepers, apply a
silicone cord, as indicated for the rst
row (on the top of the sleepers).
The crossbeams must be tted without
any particular e󰀨ort and always at
level. Swimming
pool inner side
8
14
Placement of beam n.º 2
IMPORTANT:
You must apply among each slat a bead
of silicon in the whole length in order to x
and secure a perfect stability of the whole
structure.
At each end, you must also apply a dot of
silicon between the beam and the aluminum
prole.
CAUTION:
A defective xation may cause cracks in the
beams, thus is not covered by the warranty.
The 2nd row of beams is installed all around the perimeter of the pool.
Such as the previous row you must verify that all the beams are correctly tted and leveled.
Once the 2nd row is installed, proceed to the placement of the following rows.
8
15
Nº 1
Nº 2
Nº 2
Nº 2
Nº 2
Nº 3
Nº 2
Placement of beam n.º 2
Beam n.º 2
Base
Structure
Panel
BEAM N.º 2 (from 3rd to 6ªth row)
The beam n.º 2 is intended to build the wall of the pool from the 2nd to the 6th row.
The next chapter will deal with the placement of the panel where the outlet nozzle and the skimlter will be
inserted.
Placement of platter n.º 2 to row n.º 6.
IMPORTANT:
In each row, you should be equipped with a spatula, remove excess of silicon in between the
beams, as shown in the photograph.
16
9
Panneau A
pour mur d’ équipements
Nº 1
Nº 2
Nº 2
Nº 4
Nº 5
The beam n.º 4 is for xing
the outlet nozzle (and,
optionally, the projector)
it should be in the 4th row.
The beam n.º 4 should be
placed just below the future
location of Skimltre.
BEAM N.º 4 (OUTLET NOZZLE)
ATTENTION:
In case of installing a projector, you must place the beam
in the desired location on the 3rd row.
Base
Structure
Panel
Beam n.º 4
Placement of the beam n.º 4
17
10
Nº 1
Nº 2
Nº 2
Nº 2
Nº 2
Nº 3
Nº 2
Placement of beam n.º 3
Beam n.º 3
BEAM N.º 3 (7th row)
The beams n.º 3 are
intended to be placed
in the last row of the pool
wall (except for the skimmer
wall).
The beams are tted
and xed in the same way
as the previous rows
IMPORTANT:
As in previous rows, it must be applied before placing beam n.º 3, a bead of silicon through
the whole length in order to x and secure a perfect stability of the whole structure.
At each end, you must also apply a dot of silicone between the plate and the aluminum prole.
Base
Structure
Panel
18
11
Nº 1
Nº 2
Nº 2
Nº 4
Nº 5
Beam n.º 5
Placement of beam n.º 5
BEAM N.º 5 AND PANEL SKIMFILTRE
and panel skimfiltre
Beam n.º 5 Panel skimltre
The two beams are placed on each side of skimltre, occupying the space of the 5th to the 7th row
and are identied with n.º 5. Between the two beams it is placed a steel panel for xing the skimltre.
Placement of Panel skimltrePlacement of beam n.º 5
IMPORTANT:
After placing the Skimltre steel panel, approximate beams n.º 5,
as shown in the photograph

This manual suits for next models

1

Other RPI Swimming Pool manuals

RPI NATURALIS 02 User manual

RPI

RPI NATURALIS 02 User manual

RPI NATURALIS 01 User manual

RPI

RPI NATURALIS 01 User manual

Popular Swimming Pool manuals by other brands

Bestway POWER STEEL 56622E owner's manual

Bestway

Bestway POWER STEEL 56622E owner's manual

Intex 128274GN owner's manual

Intex

Intex 128274GN owner's manual

Intex 126356NP owner's manual

Intex

Intex 126356NP owner's manual

BSVILLAGE NaturalWood 560 Assembly manual

BSVILLAGE

BSVILLAGE NaturalWood 560 Assembly manual

Bestway POWER STEEL 56629 manual

Bestway

Bestway POWER STEEL 56629 manual

Swim & Fun 2908 user manual

Swim & Fun

Swim & Fun 2908 user manual

Weka 593.4050 ASSEMBLY, USER AND MAINTENANCE INSTRUCTIONS

Weka

Weka 593.4050 ASSEMBLY, USER AND MAINTENANCE INSTRUCTIONS

Intex 128352GN owner's manual

Intex

Intex 128352GN owner's manual

Jilong JL017010-3N/NPF user manual

Jilong

Jilong JL017010-3N/NPF user manual

ubbink 7524860 Note of assembly

ubbink

ubbink 7524860 Note of assembly

Outside Living Industries ubbink Linea 500x800 - H140 cm Note of assembly

Outside Living Industries

Outside Living Industries ubbink Linea 500x800 - H140 cm Note of assembly

GRE PEOV9159 instructions

GRE

GRE PEOV9159 instructions

Bluworld Tranquility Pool Instructions for use

Bluworld

Bluworld Tranquility Pool Instructions for use

Chad Valley 435/4109 Assembly

Chad Valley

Chad Valley 435/4109 Assembly

Interline BALI Assembly instructions

Interline

Interline BALI Assembly instructions

Simplicity PSMP Assembly & installation

Simplicity

Simplicity PSMP Assembly & installation

Cornelius CANYON Assembly instructions

Cornelius

Cornelius CANYON Assembly instructions

Bestway 52486E owner's manual

Bestway

Bestway 52486E owner's manual

manuals.online logo
manuals.online logoBrands
  • About & Mission
  • Contact us
  • Privacy Policy
  • Terms and Conditions

Copyright 2025 Manuals.Online. All Rights Reserved.