RSL OURSIDER II User manual

OUTSIDER II
Owner’s Manual

2
Hold On A Minute!
We know what you are thinking. Owners manuals are boring and hard to
understand. We don’t like them either. So, we’ve worked semi-hard to make this
manual as interesting and informative as possible, while skipping the stuff you
don’t really need such as:
….A big section to thank you for your purchase.
….“The fact that you’ve purchased these speakers shows that you’re a person
of great taste.”
….That you’re about to be rewarded with great audio for years to come.
While all this is true, our intelligent customers such as yourself already
know this. So please read the manual for helpful installation and use informa-
tion.
A Little History (You can skip this)
In 1982, if you wanted music outside your home you had 2 choices: 1.
You could purchase tinny-sounding metal horns. Or 2. You could turn your up
your stereo inside and open some windows and doors.
It was then that RSL introduced the Outsider, the world’s first high fidelity
outdoor speaker. It’s now 30 years later and many of the original Outsiders are
still going strong, even if some of us aren’t.
The new RSL Outsider II takes advantage of advances in materials and
technology resulting in an outdoor speaker that can surpass the sound quality of
many indoor speakers. As a matter of fact, you could hang these speakers on
The RSL Outsider IIs Need Break-in Time To
Sound Right.
Any great speaker system needs break-in time to sound the way it was
designed. Out of the box, the sound will not be nearly as good as it will be when
the speaker has had 30-40 hours of use. So, please don’t listen critically when
the speakers are brand new. This is very important! When the speakers are
new the suspension parts of the woofer and tweeter are very stiff, resulting in a
somewhat harsh, thin sound. As they loosen up, the woofer becomes “in-tune”
with the enclosure and the tweeter smoothes out.
To break them in, we recommend playing music at medium volume. If you
wish, you may do this with the speakers inside your home. You can leave the
speakers playing while you’re away.

What’s Included
Each set of RSL Outsider IIs include two speakers, mounting brackets
and knobs to secure the brackets to the speakers. In addition, there are 2
theaded inserts in the back of each speaker if you wish to use an optional wall-
mount or ceiling-mount (In most cases the included mounting brackets will do
fine). We don’t include a registration card, because we already know who you
are and we’re ready to be there for you, if you need us.
Safety Stuff
1. Don’t do anything stupid!
2. Make sure you know what you’re mounting the speakers to. Be certain it’s
sturdy and can easily support the weight of the speakers. Also know what’s in
the wall. You’ll be in for an unpleasant surprise if you drill into electrical, plumb-
ing or gas lines.
3. Don’t hang anything on the speakers or put items on top of them.
4. Make sure the speakers are installed away from heat sources such as barbe-
ques, outdoor heaters, fire pits, or flame throwers.
5. When drilling into your walls or ceiling, make sure wear eye protection.
6. If you are uncertain about doing the installation, please contact a profes-
sional. Make sure your speakers cannot fall and cause injuries.
7. Do not spray water directly into the grill of the speakers. Cleaning is best
done with a damp cloth. If you use a cleaner, spray it on the cloth and not the
cabinet.
8. Do not put the Outsider IIs in the pool, Jacuzzi, or bath tub. They are not a
substitute for your rubber ducky.
3

Mounting your Outsider IIs
Mounting the speakers to a wall is not any different than mounting any
other object of comparable weight. If you do not have experience mounting
objects to the wall, please ask for help from someone who does. Or, hire a
professional.
For best audio performance, we suggest mounting them on the same wall
facing the same direction, at least 6 feet apart. They can be mounted either ver-
tically or horizontally. If they are mounted horizontally, you may be wondering
whether to mount them with the tweeters inward or outward. This really depends
on the distance apart. If they are relatively close together, we suggest mounting
them with the tweeters outside. If you mount them far apart, we suggest mount-
ing them with the tweeters inwards (closest to the other speaker).
The supplied mounting brackets have 3 holes. The holes on the ends are
for wall or ceiling mounting. The hole in the center is for the speaker wire com-
ing from the wall. Make sure your speakers cannot fall and cause injuries.
The best way to mount them is directly to a wall stud using a wood screw.
However, this is not always possible. In that case, we suggest using sturdy wall
anchors (a couple of examples are below).
Good Good Bad (Do not use)
Speaker Wire
1.Always shut off the power to all components before installing!
2. Use quality speaker wire. We recommend two-conductor wire with high
quality copper. You’ll also want to make sure that there is a means of de-
termining polarity (identifying the positive and negative strands). If the
wire will be exposed to sunlight, make sure the insulation is UV resistant.
3. All wire has resistance in it. The thicker the wire, the less resistance it
has. The less resistance, the better your speakers will sound. The thick-
ness of the wire should be determined by the length of the wire you are
using.
4

Speaker Wire—Continued
For longer lengths, heavier wire should be used. See our table below:
Length of Speaker Wire (each speaker) Recommended Minimum Thick-
ness Up to 15 feet 16 AWG
15 to 30 feet 14 AWG
Over 30 feet 12 AWG
4. When connecting wire to a terminal, twist the wire strands together so
that they all can be neatly inserted into the terminal. If strands are left
loose and make contact with the terminal or a wire of the opposite po-
larity, they will cause a short and can severely damage your speakers
and equipment.
Phasing
It’s critically important that the speakers all work together. To accomplish
this, all speakers must be wired in phase.
This means that for each speaker
and for your receiver, each positive wire
is correctly connected to the positive (+)
terminal, and every negative wire is
properly connected to a negative (-) ter-
minal. Then, your speakers will be “in
phase”. On our speakers the positive (+)
input terminal is identified with a red
band, while the negative (-) input termi-
nal is labeled with a black band. Your re-
ceiver or amplifier will provide identifica-
tion by plus (+) and minus (-) symbols or
by colors also (commonly red for positive
and black for negative).
If you inadvertently connect the
wires backwards, this will significantly
degrade the sound quality. In a stereo
system, out of phase speakers will sound
as if there is a hole in the imaging be-
tween the speakers. Voices can sound as if they are far away from you. Incor-
rect phasing can also diminishes bass. Therefore, make sure that the polarity of
every connection is consistent.
Properly twist wire to eliminate stray strands
Do not allow strands to cause a short
5

Troubleshooting
Here we will address some of the most commonly occurring problems that
can occur with your speakers. Remember we at RSL are always available to an-
swer questions and offer support. Feel free to contact us.
No Sound from Speakers
1, Double check all wire connections. Make sure all wires, cables, and
power cords are securely attached to their terminals.
2. Confirm that your home theater receiver or amplifier is turned on. If
you’ve connected to ‘B’ connections or a separate zone on your receiver,
make sure that the ‘B’ connection or the zone is switched on.
3. Determine the following: if the volume control is set to the minimum, if
your system has been muted, or if headphones are plugged in.
4. Double check all wire connections. If a loose wire strand is touching an-
other wire strand or terminal of opposite polarity, you will hear significant
distortion or no sound at all.
5. Check any settings or features in your receiver that you may have inad-
vertently activated.
6. Make sure no foreign objects or liquids have made their way into the
speaker.
7. In a stereo setting, be sure the subwoofer is turned on or set to standby.
No Sound from One Speaker
If all wires and cables are properly and securely attached, your re-
ceiver is turned on, the volume is ample, but one or more speakers have
no sound, try substituting the wire from a working speaker. This will deter-
mine if the source of the problem is the speaker, or elsewhere. Also,
check the balance control on your receiver.
Distorted Sound from Speakers
1.Check to see if the volume control has been set too high. Your speakers
were designed to play loudly, however all speakers have limits. Too much
volume can create distortion. Distortion can damage speakers. If the vol-
ume is lowered and you still hear distortion, the speaker may be damaged
and require service.
2. Double check all wire connections. If a loose wire strand is touching an-
other wire strand or terminal of opposite polarity, you will hear significant
distortion or no sound at all.
6

Troubleshooting — Continued
Weak Stereo Imaging (A Hole in the Middle) or Weak Bass
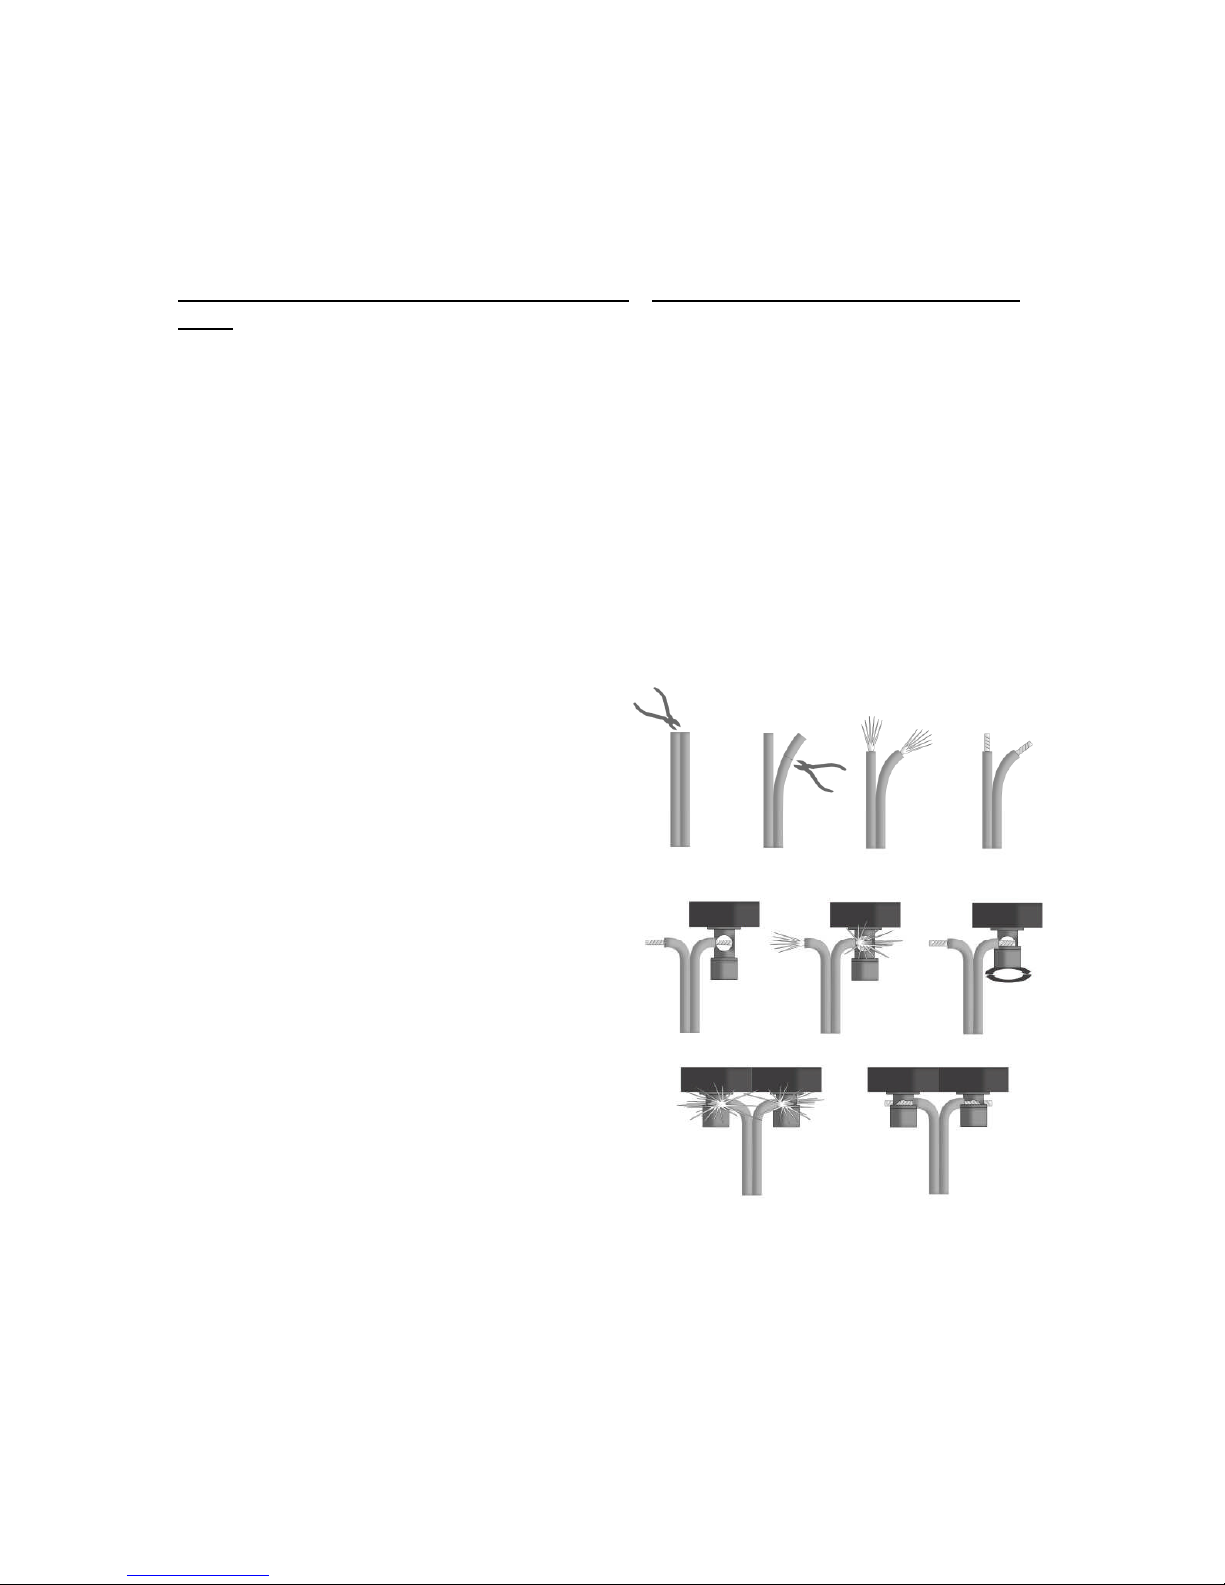
Make sure that all speakers are in phase. Check to be sure that all posi-
tive (+) wires are properly connected to positive (+) terminals and that all nega-
tive (-) wires are correctly connected to negative (-) terminals. One wrong con-
nection can adversely affect the sound. Trust us, we know (we’ve made this
mistake ourselves).
Features and Specifications
Woofer: 6 1/2” with Ferrite Magnet, Polymer Composite Cone, Rubber Surround
Tweeter: 1” Silk Dome, Ferrite Magnet
Frequency Response: 50-19,000 Hz
Nominal Impedance: 8 ohms
Sensitivity: 88 db SPL @ 1 watt, 1 meter distance
Recommended Power: 25-100 watts
(Amplifiers up to 150 watts can be used if care is taken not to operate the
speakers at maximum volume)
Crossover Frequency: 2,500 Hz
Crossover Slope: 6 db/octave
Cabinet: UV Treated, Polymer Infused Anti-Resonant enclosure
Gold Plated binding posts
Aluminum Mounting Brackets
Weight: 7 lbs.
Dimensions: H: 11 1/2” W: 8 1/2” D: 8 7/8” “(Without bracket 7 1/2”)
The RSL Outsider IIs are build to withstand the rigors of outdoor use.
However, if you can locate them to minimize the exposure of elements,
you will achieve the longest possible service life.
Disadvantages of The RSL Outsider IIs
1. After hearing them, your neighbors are likely to pressure you into invit-
ing them over often.
2. You may become dissatisfied with your indoor speakers and feel the
need to upgrade them to RSL home theater or stereo speakers.
3. You may spend too much time outside listening to your RSLs. If it’s
cold and rainy, you may catch a cold. This could cause you to miss work. If you
miss too much work, you could loose you job. If you loose your job, you may
loose your home. The buyer of your home may insist you leave your RSLs,
causing you to loose them. Don’t loose your RSLs. Use good judgement!
7

WARRANTY
Simply Stated:
If it breaks and it’s our fault we’ll fix it for free.
The RSL Outsider IIs are warranted for 5 years.
Here are the terms:
We warranty our speakers for a period of 5 years from the date of purchase.
Our products are warranted to be free of defects in original materials and workman-
ship. Our warranties apply to the original purchaser. To obtain warranty service we
need your cooperation in the following:
1. Be able to furnish a copy of your sales invoice.
2. The serial numbers must be intact and match those on your sales invoice.
Return authorization must first be obtaining by contacting us prior to sending
your speakers to us. Speakers must be properly packed.
Our speakers were designed for residential stereo or home theater use and
must be used in this manner. They were not specifically designed for public address,
musical instrument amplification, or other commercial or high intensity application.
Such use is not covered under warranty.
Speakers returned under the terms of the warranty will be repaired or replaced
at our option. We will pay for shipping the repaired product back to you if you live in
the continental U.S. You are responsible for prepaying the shipping to us. Speakers
that have been abused, operated improperly, improperly packed, tampered with or
opened (without our prior permission) will not be repaired under warranty. This war-
ranty does not cover damage caused by the use of faulty or improper audio/video
components.
This is the total warranty. There are no other warranties, expressed or implied.
No responsibility is assumed for any incidental or consequential damages. This war-
ranty gives you specific legal rights, and you may have other rights which vary from
state to state.
If you require service please contact us through our website or by phone:
26500 W. Agoura Road
Suite 571
Calabasas, CA 91302
(800)905-5485
www.rslspeakers.com
Table of contents
Other RSL Speakers System manuals