Rubicon Expedition Products Corral User manual


Section 1: Corral Bike Rack™ Hitch Mechanism Installation
Part 1 - Hitch Mechanism Installation………………………….…..Page 2
Section 2: Corral Bike Rack™Assembly and Installation
Part 1 - Center Column Assembly…………………………………….Page 3
Part 2 - Upper Cross Bar Assembly….…………..……...….….…..Page 5
Part 3 - Lower Cross Bar Assembly……………………….……….…Page 7
Part 4 - Wheel Basket Assembly………………………………………Page 8
Part 5 - Wheel Basket Installation…………………………………...Page 9
Part 6 - Lasso & Velcro Strap Assembly………….………….…..Page 11
Section 3: Corral Bike Rack™ Use, Tips, & Tricks
Part 1 - Raising & Lowering your Corral Bike Rack™…..…..Page 12
Part 2 - Placing bikes on your Corral Bike Rack™…………….Page 13
Part 3 - Removing bikes from your Corral Bike Rack™…...Page 14
Part 4 - Adjusting Safety Latch Tension…………………..……..Page 15
Section 4: Troubleshooting
Part 1 - Troubleshooting Solutions Table……………..…….….Page 16

P a g e | 1 Corral Bike Rack™ Manual
Disclaimer and Warning
Congratulations on purchasing your new RubiconEP product. The
information in this document affects your safety and your legal rights
and responsibilities. Read this entire document carefully to ensure
proper configuration before use. Failure to read and follow instructions
and warnings in this document may result in serious injury to yourself or
others, damage to your Corral Bike RackTM, or damage to other objects
in the vicinity. This document and all other collateral documents are
subject to change at the sole discretion of RubiconEP. For up-to-date
product information, visit https://rubiconep.com/corral. Do not use
Corral Bike RackTM with other or incompatible components or otherwise
alter this product in any way outside this or other documentation
provided by RubiconEP.
By using this product, you hereby signify that you have read this
disclaimer and warning carefully and that you understand and agree to
abide by the terms and conditions herein. You agree that you are solely
responsible for your own conduct while using this product, and for any
consequences thereof. You agree to use this product only for purposes
that are detailed in this document and in accordance with all applicable
laws, rules, and regulations, and all terms, precautions, practices, and
guidelines RubiconEP has made and may make available.

Corral Bike Rack™ Manual P a g e | 2
Corral Bike Rack™Assembly Instructions:
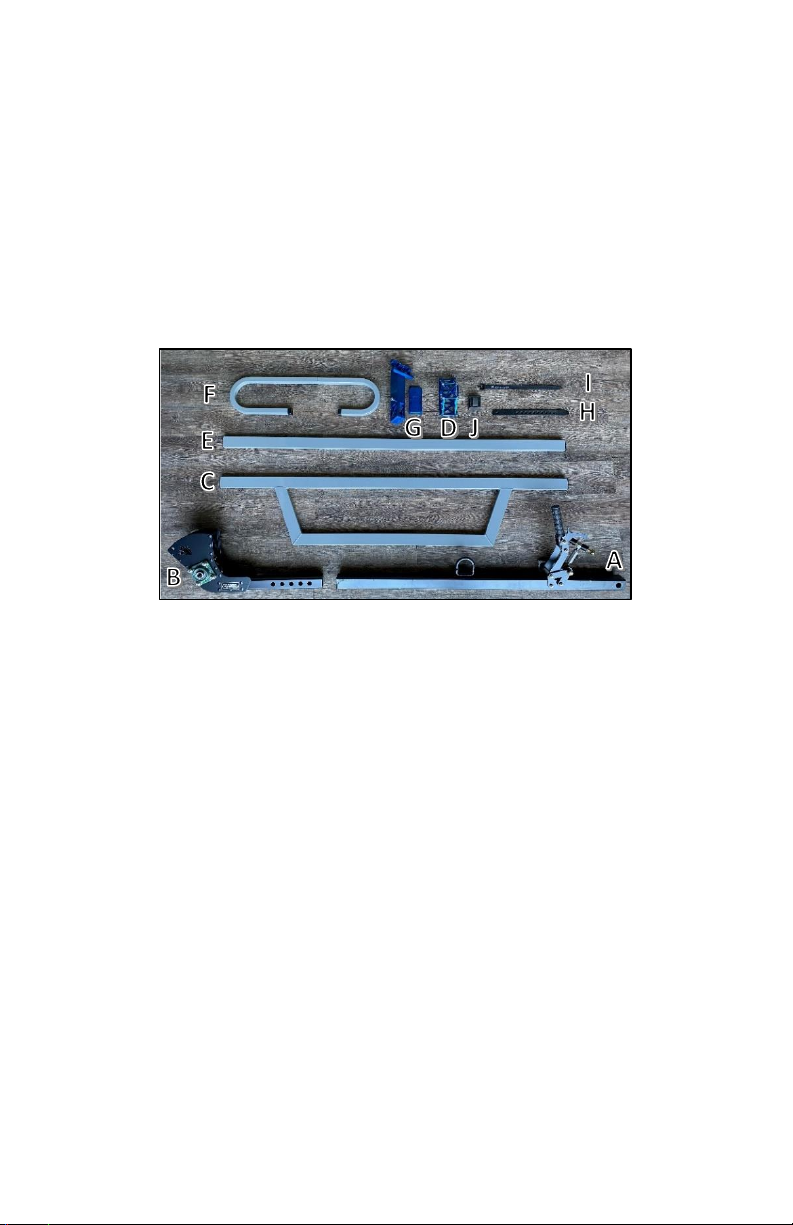
Included in your new RubiconEP Corral Bike Rack™is everything
required for assembly and installation. The quantity of certain parts will
depend on the size of the bike rack ordered. For example, if you
ordered a 4-bike Corral Bike Rack™, you should have received 4 Wheel
Baskets with Basket Clamps, and so on. If you ordered a 5-bike rack,
your quantities would be 5. Please verify that all parts are present:
A) 1 Center Column with linkages
B) 1 Hitch Mechanism with Silent Hitch Pin
C) 1 Upper Cross Bar
D) 2 Center Brackets for a 2-bike rack and 3 for a 4 or 5-bike rack
E) 1 Lower Cross Bar
F) 2, 4 or 5 Wheel Baskets with Basket Clamps
G) 2, 4 or 5 Riser Brackets
H) 2, 4 or 5 Upper Lassos
I) 2, 4 or 5 Lower Lassos
J) 2, 4, or 5 Velcro Straps
K) 1 Parts Kit*: 1/8” Hex Allen wrench , ¼” Hex Allen wrench, 5/32”
Hex Allen wrench, and one bottle of Medium Strength (blue)
Loctite. *not pictured
Note: Before you begin, grab a tape measure, 2 crescent wrenches,
and a Philips head screwdriver.
___________________________________________________________

P a g e | 3 Corral Bike Rack™ Manual
Section 1 –Hitch Mechanism Installation
Part One: Hitch Mechanism Installation
1) Let’s start by installing your new Hitch
Mechanism (B) on your vehicle. We find that
this helps make the assembly of your Corral
Bike Rack so much easier.
2) Find that Hitch Mechanism and the included Let’s Go Aero Silent
Hitch Pin. This pin allows the Hitch Mechanism to be installed so
that it will not move around in the receiver. And that my friends, is
important!
3)
4) Now, the LGA pin comes pre-installed in the most
extended position. However, if you would like to
adjust it so that your rack sits closer to the vehicle,
simply remove the Hitch Mechanism, move the
spring nut to a different hole, and reinstall. Done
and done!
5) The image on the far right shows a Hitch
Mechanism properly installed.
___________________________________________________________
STEP 1: Insert the Spring Nut into the hitch
accessory shank tube. Align the Spring Nut’s coil
with the hitch receiver pin hole.
STEP 2: With the Spring Nut compressed within the
accessory shank, slide the shank into the vehicle’s
hitch receiver and align the hitch pin holes.
STEP 3: Insert the Silent Hitch Pin with the Split
Washer into the hitch pin hole and thread the pin
through the threaded block side of the Spring Nut as
shown.
STEP 4: Slide the sleeve into the hitch pin hole so
that it slides over the hitch pin. Using a 7/8”
wrench, fully tighten the Pin so it is snug and tight;
secure with clip. You are now ready for Safe and
Silent Towing.

Corral Bike Rack™ Manual P a g e | 4
Section 2 –Corral Bike Rack™Assembly & Installation
Part One: Center Column Assembly
1) Now for the fun part!
2) Locate Center Column (A). The Hitch Mechanism
should already be installed on your rig.
3) First, we need to check that the bearings did not
become mis-aligned during shipping. To do this,
insert the ¾” axle through the opening indicated
in the picture to the right. If it slides all the way
through, you are set. If it does not, then they
are not aligned, and you can simply use the axle
as a lever to re-align them.
6) Slide the ¾” axle from the outside of the Hitch Mechanism in,
through the welded internal sleeve in the bottom of the Center
Column. This part can be a little tricky as you need both holes in the
bottom of the Center Column to align with each of the holes on the
sides of the Hitch Mechanism. Don’t be shy! Ask a friend for help!
4) Next, hold the Center Column with the
linkages at the bottom, closest to the
ground, and the handle facing you.
5) Insert the Center Column into the
receiver tube of the Hitch Mechanism,
aligning the bottom hole with the
bearing openings on each side.

P a g e | 5 Corral Bike Rack™ Manual
7) Once the ¾” axle rod is fully inserted, use a
Philips head screwdriver to tighten the screw
on the bottom of the Center Column, securing
it in place.
8) Finally, using the 1/8” Allen wrench, tighten the two
small, black set-pins on the left and right sides of
the ¾” axle. Note: This means you should have
tightened 4 in total. #Math.
11) Once it passes through that first hole, add a bushing to it.
12) Next, slide it through the rod end, and add your second bushing.
13) Finally, slide the bolt through the hole on the opposite side of the
Hitch Mechanism.
14) Add the nut to the end of the bolt and use a ¾” socket or box end
wrench and crescent wrench to tighten. - Included?
15) The picture to the right shows the Center
Column and Hitch Mechanism correctly installed
on the vehicle.
9) Next, we will insert the Yellow-Zinc
plated bolt through the openings on
each side of the Hitch Mechanism, and
the rod end in the center.
10) Slide the bolt from the right to the left,
through the first hole in the Hitch
Mechanism.

Corral Bike Rack™ Manual P a g e | 6
Part Two: Upper Cross Bar Assembly
1) Locate the Upper Cross Bar (C) and your Center
Brackets (D).
2) Pull up on the safety trigger of the Hitch
Mechanism and lower the Center Column into
the lean-to-load position.
3) Pull down firmly on the top of the Center
Column until you feel it lock into the lowered
position.
4) Hold the Upper Cross Bar out in front of you with the longest
section on top, and the smaller section below.
7) Spacing will vary, depending on whether you have a 2, 4, or 5-bike
rack. Additionally, placement of the Upper and Lower Cross Bars
will intentionally stagger them. This is essential to the proper
functionality of your Corral Bike Rack™.
8) Using the chart below, determine the correct placement of your
Upper Cross Bar. Note: “centerline” denotes the very center of the
Center Column horizontally, from left to right.
Placement
5-Bike Rack
4-Bike Rack
2-Bike Rack
Upper
Cross Bar
27.5” (70 cm) from
left end of cross bar
to centerline
27.5” (70 cm) from
left end of cross bar
to centerline
11” (28 cm) from left
end of cross bar to
centerline
5) Place the Upper Cross Bar
behind the Center Column and
position it so that is about 0.5”
(1.3 cm) from the top.
6) Now, let’s set your spacing.

P a g e | 7 Corral Bike Rack™ Manual
9) Slide that Upper Cross Bar until it is correctly positioned.
10) Then, ask a friend to help hold it in place
while you work on the bottom Center
Bracket. #worksmarternotharder
11) Using the 5/32” Allen wrench, remove the
hardware from the largest plate of each of
the Center Brackets. This is the top plate.
14) Ensure the 4 bolts on the bottom (small) plate of the
Center Bracket are secure.
15) Then, reattach the larger, top plate and LOOSELY
ASSEMBLE THE HARDWARE, adding a small amount of
medium strength Loctite (blue) to each of the 8 bolts
as you go. Just a tad. Don’t get too excited. And
don’t stress. We already did the other side.
DO NOT overtighten one side of the
bracket as it can DAMAGE it!!!
A GAP BETWEEN THE TOP PLATE &
PARTS BELOW WILL REMAIN.
We are serious. These are the facts.
12) Hold one Center Bracket so that the
longest section is horizontal, and
the open section is facing away
from you, towards the vehicle.
13) Place it over the Center Column and
bottom section of the Upper Cross
Bar.
16) Then, using a crisscross pattern,
lightly tighten each of the bolts on
the top of the Center Bracket using
the 5/32” Allen wrench.

Corral Bike Rack™ Manual P a g e | 8
17) Check that a 0.125” (3.175 mm) gap between the top plate and the
parts below is present around the entire bracket. This gap must
remain for proper functionality of the Corral Bike Rack™. In other
words, if it is not present you could break it, which would be bad.
18) Once you’ve verified that gap, using a crisscross
pattern, tighten each of the bolts snugly. This
should be no more than ½ a turn of the wrench, so
don’t go all Hulk on it!
19) Repeat Steps 11 through 18 for the next Center
Bracket, placing it over the Center Column and on
the top section of the Upper Cross Bar. Nailed it!
Part Three: Lower Cross Bar Assembly
1) Locate that Lower Cross Bar (E).It should be the only one left. If
you find you have an extra, pause, cry a little, and figure out where
the heck you went wrong. #coolcoolcool
2) We will be securing it near the Hitch Mechanism end of the Center
Column, below the D ring.
3) Grab that last Center Bracket. You should have
already removed the top plate.
4) Hold the Center Bracket so that the longest section
is horizontal and the opening faces towards you,
away from the vehicle.
5) Place it behind and over the Center Column.
6) Insert the Lower Cross Bar.
7) Let’s set your spacing! Just as you did in the
previous section, use the chart below to determine
the placement of the Lower Cross Bar for your
rack.
Placement
5-Bike Rack
4-Bike Rack
2-Bike Rack
Lower
Cross Bar
27.5” (70 cm)
from right end of
cross bar to
centerline
27.5” (70 cm)
from right end of
cross bar to
centerline
11” (28 cm) from
right end of cross
bar to centerline

P a g e | 9 Corral Bike Rack™ Manual
8) First, slide the Lower Cross Bar horizontally so
that it measures the correct distance from the
left end of the cross bar to the centerline of the
Center Column. (See table above)
9) Next, move it vertically so that the Lower Cross
Bar with Center Bracket is positioned
approximately 1” (2.5 cm) away from the top of
the Hitch Mechanism handle linkage.
10) This space should be just large enough to clear
the linkage when you lift and lower the Corral
Bike Rack™.
11) Double check that the Lower Cross Bar is still in
the correct position.
12) Make sure that the smaller, bottom plate is fully
secure. No pressure!
13) LOOSELY ASSEMBLE THE TOP HARDWARE. Don’t forget that Loctite!
14) Repeat Steps 15 through 18 of Section 2, Part 2 right above to
assemble the Lower Cross Bar Center Bracket. Mind that gap!
Part Four: Wheel Basket Assembly
1) Locate the Wheel Baskets with Basket Clamps (D) and
Riser Brackets (E). If you selected a 2-bike rack, you
should have 2 of each. If you selected a 4-bike rack, you
should have 4 of each, and so on. You see what we did
there.
2) Using the ¼” Allen wrench remove each of the four ¼”
socket head screws from the very top of the Riser Bracket.
3) Position the Riser Bracket so that the space
where the socket head screws attach is on
top and facing upwards.
4) Now, hold the Wheel Basket with Basket
Clamp so that the longest section is on the
left, and the shortest section on the right.

Corral Bike Rack™ Manual P a g e | 10
6) Insert the socket head screws through the openings in the Basket
Clamp and into the holes provided, at the top of the Riser Bracket.
7) Then, reassemble the hardware, tightening each of the 4 screws
little by little, using an alternating pattern. Don’t forget to add a
little Loctite (blue)!
8) Repeat for all Wheel Basket and Riser Brackets.
Part Five: Wheel Basket Installation
1) Now it’s time to set your spacing and attach
your Wheel Basket Assemblies to the Upper
Cross Bar. The spacings below are
recommendations and can be adjusted as
desired.
2) Looking at your Wheel Basket Assemblies,
locate the ¼” socket head cap screws on the
base of the Riser Brackets.
3) Using your ¼” Allen wrench, remove each of
the four screws, allowing you to fully
separate the front-bottom of the Riser
Bracket.
4) Hold the Riser Bracket so that it is angled
left at approximately a 20° angle, with the
open section facing towards you.
5) Then, using the table below, place each of the Riser Brackets with
Wheel Basket Assemblies on the back of Upper Cross Bar in the
correct locations.
5) Align the outside of the Basket
Clamp to the inside of the Riser
Bracket.

P a g e | 11 Corral Bike Rack™ Manual
Riser
Placement
5-Bike
Rack
4-Bike
Rack
2-Bike
Rack
Rightmost Riser
Right side, very
end of crossbar
Right side, very
end of crossbar
Right side, very
end of crossbar
Leftmost Riser
Right side of
riser should be
6.5” (16.5 cm)
from left end of
crossbar
Right side of
riser should be
6.5” (16.5 cm)
from left end of
crossbar
Right side of
riser should be
6.5” (16.5 cm)
from left end of
crossbar
Riser Spacing*
13.75”(35 cm)
from same
point on riser,
to same point
on next riser
17”(43 cm)
from same
point on end
riser, to same
point on next,
inner riser
Not applicable
*When measuring spacing
between riser brackets, make
sure to measure from one spot
on one bracket to the exact
same spot on the next bracket.
6) Once you have the Riser
Bracket placed correctly, replace the Riser
Bracket front-bottom and insert the four ¼”
socket head bolts, adding a little Loctite (blue) as
you go.
7) Finally, use the ¼” Allen wrench to tighten the
bolts in an alternating pattern.
8) Repeat for all Wheel Basket Assemblies, setting each Riser Bracket
in the correct location.
9) We believe in you. You can do this!

Corral Bike Rack™ Manual P a g e | 12
Part Six: Upper Lasso, Lower Lasso, & Velcro Strap Assembly
1) Locate the provided Upper Lassos (H), Lower
Lassos (I), and Velcro straps (J).
2) We will first install the Upper Lassos to the Riser
Brackets on the Upper Cross Bar.
3) Stretch the square end of the Upper Lasso over
the middle bolt on the front of the Riser Bracket.
4) Then, secure the other end to the back of the
Riser Bracket.
5) Repeat for each Wheel Basket Assembly.
6) Next, grab a Velcro strap and hold it so that the
tab is on top and facing away from you.
7) Slide it over the left end of the Lower Cross Bar,
with the tab pointing back, towards the vehicle.
8) Repeat Step 7 for all remaining Velcro straps,
according to your Corral Bike Rack™:
a. 2-rack: 1 on the left, 1 on the right
b. 4-rack: 2 on the left, 2 on the right
c. 5-rack: 2 on the left, 3 on the right
9) Next, align each Velcro strap so that it is
roughly below the open side of its
corresponding Wheel Basket above. This
may need to be adjusted depending on
the geometry of your bike, and the bikes
next to it.
10) Position the strap so that the plastic
buckle is on the top edge of the Lower
Cross Bar, tighten, and adhere the
Velcro. This will keep it held securely.
11) Repeat steps 9 and 10 for all remaining
Velcro straps.

P a g e | 13 Corral Bike Rack™ Manual
12) Finally, find that Lower Lasso and run it
through the fabric loop with the tail end
pointing towards the Center Column. The
tab end should be facing back, towards the
lower cross bar.
13) Secure it.
___________________________________________________________
Section 3 –Corral Bike Rack™Use, Tips, & Tricks
If you get stuck or have questions, feel free to contact us at 916-891-
5922. We are happy to help!
Part One: Raising and Lowering your Corral Bike Rack™
ATTENTION:
Depending on the size, type, and number of bikes, there may be a
substantial amount of weight (150+ lbs/70+ kg) to lift.
Practice proper lifting technique to avoid injury.
If you do not feel confident lifting alone, ask a friend for help!
1) To lower your Corral Bike
Rack™into the lean-to-load
position, disengage the safety
trigger and pull the handle up.
2) Using your other hand, or a
friend, slowly lower the Corral
Bike Rack™.
3) When finished, gently raise the Corral Bike Rack™and push handle
down with your hand or foot until you hear the satisfying
“kachunk.” This sound indicates that your Corral Bike Rack™is
secured and that safety is re-engaged.
Note: To keep things running smoothly, make sure to clean and lube
up all moving parts between trips with a little WD-40!

Corral Bike Rack™ Manual P a g e | 14
4) A simple shake test is a good way to ensure everything is tight. Just
push a few times on the side of the rack to check the stiffness of the
system. If anything is moving more than expected, check the trouble
shooting section at the end of the Corral Bike Rack™Manual.
5) Finally, a friendly reminder. While out adventuring, make sure to
check all Corral Bike Rack™ main attachment points each day to
ensure the safety of you and others.
a. Corral Bike Rack™ Safety Latch Cam-Over Tension
b. Upper and Lower Lassos
c. Velcro Straps
d. Let’s Go Aero Silent Hitch Pin
e. And, if using items such as an extension, Swing-Away, or
anti-rattle mechanism, double check those too!
Note: Cam-Over tension of the main safety latch mechanism is set
from the factory and should be ideal out of the box. After some use
it may be necessary to adjust this. Instructions are in Section 3, Part
4, below.
Part Two: Placing and securing bikes on your Corral Bike Rack™
1) Pull the safety trigger to activate the lean-to-
load position.
2) Using your second hand, gently guide the rack
into the lowered position.
3) When loading bikes, make sure to load from
right to left, with your largest bike on the right-
hand side, down to your smallest on the left.
4) To do this, stand directly behind your bike and
pull it up vertically, into a wheelie position.
5) With your hand on the handlebars, push your
knee or thigh against the seat, helping you
gently lift the bike as you guide it into the Wheel
Basket.
6) As you do so, allow the wheel to turn to the left
for proper placement.

P a g e | 15 Corral Bike Rack™ Manual
7) Pull down on the front tire to ensure it is fully
seated in the Wheel Basket.
8) Next, run the Upper Lasso along the front of the
rack, under the tire, and up and through the
wheel to the attachment point on the vehicle side
of the Riser Bracket.
11) Carefully lift the rack and re-secure the
safety latch.
Part Three: Removing bikes from your Corral Bike Rack™
1) Pull the safety trigger to activate the lean-
to-load position.
2) Gently lower the rack. Remember to use
your second hand to help lower the rack
slowly, and safely.
3) Unsecure the Lower Lasso on the lower
wheel of each bike.
4) Unsecure the Upper Lassos on the upper
wheel of each bike.
5) Carefully lift the bike out of the Wheel
Basket and lower to the ground.
9) Secure it tightly to the bolt on
the back side of the Riser
Bracket.
10) Wrap the Lower Lasso around
bottom wheel of bike and secure
tightly.

Corral Bike Rack™ Manual P a g e | 16
6) Once all bikes have been removed, carefully lift the rack.
7) Re-secure the safety latch.
8) Put on that helmet and ride into the sunset doing a wheelie!
Seriously, wear a helmet. #WeCare.
Part Four: Adjusting Safety Latch Tension
Note: This should be checked before EVERY use, with the Corral Bike
Rack™in the upright position. If the closure mechanism feels loose,
adjust it! #SafetyFirst
1) Pull the safety trigger to activate lean-to-load
position.
2) Gently lower the rack.
3) Attach one crescent wrench to the lower nut, at
the base of the rod.
4) Attach a second crescent wrench to the rod
above.
5) While holding the lower wrench, rotate the upper
wrench counterclockwise to loosen.
6) Then, continue to rotate the rod
counterclockwise, lengthening the mechanism,
and increasing the tension.
7) Once you have lengthened it the desired amount,
hold the upper wrench securely in place and
tighten the lower nut using the lower wrench.
This will secure everything in place.
8) Finally, secure the safety latch. If you find it now
has too much tension, repeat Steps 1 through 7
until the desired tension is achieved.
a. Counterclockwise - Lengthens and
increases tension.
b. Clockwise - Shortens and decreases tension.
___________________________________________________________

P a g e | 17 Corral Bike Rack™ Manual
Section 4 –Troubleshooting
Part One: Troubleshooting Solutions Table
Problem
Try This:
Hitch
Mechanism is
moving inside
the receiver
•Ensure LGA Silent Hitch Pin is installed
correctly (page 2) and torqued to
recommended spec.
•If using an extension, Swing-Away, or
other hitch-based add-on, ensure the
movement is not originating there.
Corral Bike
Rack™is moving
inside Hitch
Mechanism
•Verify that the Philips head screw at the
base of the Center Column is fully
tightened.
•Verify that the 4 small set pins on the
sides of the Hitch Mechanism are fully
secure as well.
Hitch
Mechanism
safety trigger
does not stay
latched or is very
easy/hard to
latch
•First, remove any dirt or grime present.
•Next, grab some WD-40 and lube it up!
•If that WD-40 didn’t do the trick, follow
the instructions on page 16 to adjust main
latch tension. After some use, it is
common for it to need a slight adjustment.
Lower Cross Bar
does not clear
the Hitch
Mechanism
when lowering
or lifting.
•Loosen the 4 bottom bolts the Lower
Cross Bar Center Bracket using the 5/32”
Allen wrench.
•Slide that Lower Cross Bar up the Center
Column slightly to provide additional
clearance.
•Add a little Loctite (blue) to each bolt and
tighten, using a crisscross pattern.
Table of contents