5
5. Make sure that the steam knob is set to dry position, then place the iron vertically (see fig. 1).
6. Once soleplate temperature has reached the preset temperature, indicator light will
go out. Set the team knob to your desired steam output or keep it in dry positon. You
can now start ironing. While pressing, temperatures and steam output can be adjusted
depending on your need.
NOTE! As the sole plate is very HOT, never touch it before cooling down completely.
• Press spray button a couple of times to moisten the laundry if necessary. Make sure
there is enough water in the water tank.
• Steam shot can also be applied when holding the iron in a vertical position. This is
useful for removing creases from hung clothes and other textiles.
• Steam shot function is best used when the iron is set to max temperature as it helps
to remove stubborn creases.
• This steam iron has an anti-drip function. If you are ironing for a long time, the
soleplate temperature will reduce and the iron will stop steam and water from coming
out of the soleplate.
CLEANING AND MAINTANENCE
AFTER IRONING
1. Disconnect power supply and empty the water left in the water tank. Install and cover
the water inlet cover again after draining.
2. Reconnect into power supply to dry the soleplate. Disconnect after indicator light goes o.
3. Let the iron cool down completely, and then clean the upper part of iron with a damp
cloth. Wipe residues and any other deposits o the soleplate.
4. Always store the iron horizontally on a flat and dry surface with a cloth protecting the
soleplate.
5. In order to keep the soleplate smooth, never let any metal materials rub against it.
SELF-CLEANING FUNCTION
The steam iron should be cleaned regularly according to the
hardness of water in your region, as well as the using frequency.
Never pour white vinegar or liquid cleaners into the water tank,
always use fresh and clean water.
1. Fill water into the water tank.
2. Connect into a power supply and set the temperature selector
to max position, the indicator will illuminate. Make sure that
the steam knob is in dry position. Place it vertically (see fig. 1).
3. Once the light is o, hold the iron over a sink and turn the
steam knob to self-clean position. Steam and boiling water
will come out of the soleplate while impurities and flakes will
be flushed out.
4. Release the knob to 0 setting as soon as the water in the
water tank has been used up.
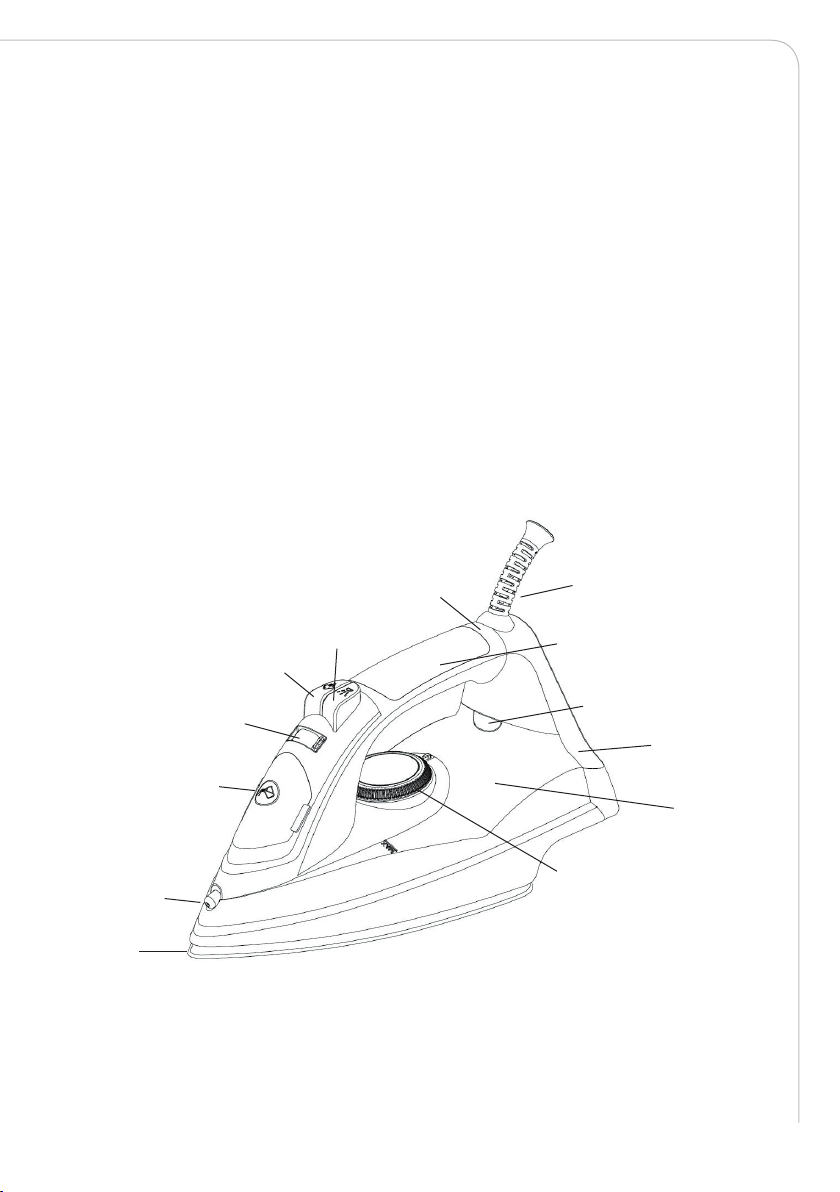
Temperature selection
Turn this dial to appropriate temperature.
Indicator light
The light is illuminated and sparkling while the iron is heating up, and then keeps on once the iron reaches
the set temperature. During ironing, the light may sparkle as it maintains the set temperature.
Sole plate
Flat surface of the iron, which is heated electrically and pressed against textile materials while ironing
BEFORE FIRST USE
1. Remove any sticker, protective foil or storage cover from the soleplate and steam iron.
2. Fill the water tank of the iron to the MAX level as indicated on the tank surface. Heat up the iron
to maximum temperature and iron over a piece of damp cloth for several minutes. This remove
manufacturing residues from the soleplate.
USING THE STEAM IRON
Open the water inlet cover and hold the iron in a tilted position. Fill the water tank with the help of a
measuring cup. Use clean and fresh water. Make sure to not exceed the MAX level as indicated on the tank
surface. Press down the water inlet cover, when you hear a click it is in the correct position.
1. Connect the plug to an outlet and turn the temperature slector to your desired setting depending on
the fabric of garment. The indicator light will be illuminated, which indicates that the iron is heating
up.
2. Make sure that the steam knob is set to dry position, then place the iron vertically (see fig. 1).
3. Once soleplate temperature has reached the preset temperature, indicator light will go out. Set the
team knob to your desired steam output or keep it in dry positon. You can now start ironing. While
pressing, temperatures and steam output can be adjusted depending on your need.
WARNING: Do not touch hot soleplate at any time before cooling down!
Fig. 1