Ryobi P2300 User manual

Le coupe-bordures a été conçue et fabriquée conformément à
nos strictes normes de fiabilité, simplicité d’emploi et sécurité
d’utilisation.Correctemententretenue,ellevousdonneradesannées
de fonctionnement robuste et sans problème.
AVERTISSEMENT : Pour réduire les risques de
blessures, l’utilisateur doit lire et veiller à bien comprendre le
manuel d’utilisation avant d’employer ce produit.
Merci de votre achat.
Your edger has been engineered and manufactured to our high standard for dependability, ease of operation, and operator
safety. When properly cared for, it will give you years of rugged, trouble-free performance.
WARNING: To reduce the risk of injury, the user must read and understand the operator’s manual before using
this product.
Thank you for your purchase.
Su recortar de bordes ha sido diseñada y fabricada de conformidad
con las estrictas normas para brindar fiabilidad, facilidad de
uso y seguridad para el operador. Con el debido cuidado, le
brindará muchos años de sólido y eficiente funcionamiento.
ADVERTENCIA: Para reducir el riesgo de lesiones,
el usuario debe leer y comprender el manual del operador antes
de usar este producto.
Le agradecemos su compra.
CONSERVER CE MANUEL POUR
FUTURE RÉFÉRENCE
GUARDE ESTE MANUAL PARA
FUTURAS CONSULTAS
SAVE THIS MANUAL FOR FUTURE REFERENCE
ACCEPTS ALL ONE+ BATTERY PACKS
BATTERIES AND CHARGERS SOLD SEPARATELY
COMPATIBLE AVEC TOUS LE BLOC-PILES ONE+
PILE ET CHARGEUR VENDUS SÉPARÉMENT
ACEPTA TODOS LOS PAQUETES DE BATERÍAS ONE+
LAS BATERÍAS Y EL CARGADOR SE VENDEN POR SEPARADO
OPERATOR’S MANUAL
MANUEL D’UTILISATION
MANUAL DEL OPERADOR
18 VOLT EDGER
COUPE-BORDURES DE 18 V
RECORTADORA DE BORDES DE 18 V
P2300

ii
Fig. 1
A - Edger attachment shaft (arbre de l’accessoire
coupe-bordures, eje del accesorio para cortar
bordes)
B - Blade guard (garde de lame, protección de la
hoja)
C - Gear head (carter d’engrenages, cabezal de
engranajes)
D- Blade (lame, hoja)
E - Guide wheel (roulette de guidage, rueda guía)
F
- Depth adjusting lever (levier de réglage de la
profondeur, palanca de ajuste de profundidad)
G - Coupler (coupleur, acoplador)
H - Adjustable front handle (poignée avant
réglable, mango delantero ajustable)
I - Lock-out (verrouillage, seguro)
J
- Switch trigger (gâchette, gatillo del interruptor)
A
D
B
C
G
F
H
I
E
I
Fig. 2
A - Front handle (poignée avant, mango
delantero)
B - Wing bolt (boulon à oreilles,perno de
mariposa)
A
B
Fig. 3
C
A
A - Coupler (coupleur, acoplador)
B - Base (base, base)
C - Arrow (flèche, flecha)
B
Fig. 4
A - Latches (loquets, pestillos)
A
Fig. 5
A - Knob (bouton, perilla)
A
See this fold-out section for all the figures
referenced in the operator’s manual.
Voir que cette section d’encart pour toutes les figures
a adressé dans le manuel d’utilisation.
Vea esta sección de la página desplegable para todas
las figuras mencionó en el manual del operador.
J

iii
Fig. 7
PROPER EDGING OPERATING POSITION
POSITION D’UTILISATION CORRECTE
POUR COUPE-BORDURES
POSICIÓN CORRECTA PARA EL MANEJO
DE LA CORTAR BORDES
A - Lock-out button (bouton de verrouillage,
botón de seguro de seguro)
B - Switch trigger (gâchette, gatillo del
interruptor)
Fig. 6
B
A
B
A
B
A
C
Fig. 8
A - To increase depth (pour augmenter la
profondeur, para aumentar la profundidad)
B - Depth adjusting lever (levier de réglage de la
profondeur, palanca de ajuste de profundidad)
C - To decrease depth (pour réduirela profondeur,
para disminuir la profundidad)
Fig. 9
A - Blade depth (profondeur de coupe,
profundidad de la hoja)
B - Blade (lame, hoja)
E
A
Fig. 10
A - Indicator hole (trou de l’indicateur, orificio
indicador)
B - Slots (fentes, ranuras)
C - Flange washer (rondelle bombée, arandela
cóncava)
D -Gear case (carter d’engrenages, caja de
engranajes)
E - Holding pin inserted into aligned slots
(broche de retenue insérée dans les fentes
alignées, sujetando el pasador introducido
en las ranuras alineadas)
F - Wrench (clé, llave)
G -Blade nut (écrou de lame, tuerca de la hoja)
C
D
E
G
C
D
BF
Fig. 11
A - Flange washer (rondelle à épaulement,
arandela de brida)
B - Gear case ring (anneau de carter
d’engrenages, anillo de caja de engranajes)
C - Blade (lame, hoja)
D - Cupped washer (rondelle bombée, arandela
cóncava)
E - Blade nut (écrou de lame, tuerca de la hoja)
F - Motor shaft (axe du motor, eje del motor)
A
B
F

2 — English
Introduction ...................................................................................................................................................................... 2
Introduction / Introducción
Important Safety Instructions ........................................................................................................................................3-4
Instructions importantes concernant la sécurité / Instrucciones de seguidad importantes
Specific Safety Rules........................................................................................................................................................ 5
Règles de sécurité particulières / Reglas de seguridad espicifícas
Symbols.........................................................................................................................................................................6-7
Symboles / Símbolos
Features............................................................................................................................................................................ 8
Caractéristiques / Características
Assembly.......................................................................................................................................................................8-9
Assemblage / Armado
Operation.....................................................................................................................................................................9-10
Utilisation / Funcionamiento
Maintenance................................................................................................................................................................... 11
Entretien / Mantenimiento
Troubleshooting.............................................................................................................................................................. 12
Dépannage / Corrección de problemas
Warranty ......................................................................................................................................................................... 13
Garantie / Garantía
Parts Ordering and Service ...............................................................................................................................Back Page
Commande de pièces et réparation / Pedidos de piezas y servicio ......................................................... Page arrière / Pág. posterior
TABLE OF CONTENTS
TABLE DES MATIÈRES / ÍNDICE DE CONTENIDO
INTRODUCTION
INTRODUCTION / INTRODUCCIÓN
This product has many features for making its use more pleasant and enjoyable. Safety, performance, and dependability
have been given top priority in the design of this product making it easy to maintain and operate.
* * *
Ce produit offre de nombreuses fonctions destinées à rendre son utilisation plus plaisante et satisfaisante. Lors de la
conception de ce produit, l’accent a été mis sur la sécurité, les performances et la fiabilité, afin d’en faire un outil facile à
utiliser et à entretenir.
* * *
Este producto ofrece numerosas características para hacer más agradable y placentero su uso. En el diseño de este producto
se ha conferido prioridad a la seguridad, el desempeño y la fiabilidad, por lo cual se facilita su manejo y mantenimiento.

3 — English
WARNING :
When using electric gardening appliances, basic safety
precautions should always be followed to reduce the risk
of fire, electric shock and personal injury.
READ ALL INSTRUCTIONS
For safe operation, read and understand all instructions
before using this product. Follow all safety instructions.
Failure to follow all safety instructions listed below, can
result in serious personal injury.
Do not allow children or untrained individuals to use this
unit.
Check the work area before each use. Remove all objects
such as rocks, broken glass, nails, wire, or string which
can be thrown or become entangled in the machine.
Always wear eye protection with side shields marked to
comply with ANSI Z87.1. Following this rule will reduce
the risk of serious personal injury.
Use Safety Glasses – Always use face or dust mask if
operation is dusty.
Protect your lungs. Wear a face or dust mask if the
operation is dusty. Following this rule will reduce the risk
of serious personal injury.
Dress Properly – Use rubber gloves and substantial
footwear is recommended when working outdoors. Wear
heavy, long pants, long sleeves, boots, and gloves. Do
not wear loose fitting clothing or jewelry or anything that
can be caught in moving parts.
Secure long hair above shoulder level to prevent
entanglement in moving parts.
Keep children away – Keep all bystanders, children, and
pets at least 50 ft. away.
Stay alert – Watch what you are doing. Use common
sense. Do not operate this unit when you are tired,
ill, upset, or under the influence of alcohol, drugs, or
medication.
Do not operate in poor lighting.
Keep all parts of your body away from any moving part.
Do not operate power tools in explosive atmospheres,
such as in the presence of flammable liquids, gases, or
dust. Power tools create sparks which may ignite the
dust or fumes.
Do not, under any circumstance, use any attachment or
accessory on this product, which was not provided with
the product, or identified as appropriate for use with this
product in the operator’s manual.
Avoid Dangerous Environments – Don’t expose appliance
to rain or wet conditions. Water entering an appliance will
increase the risk of electric shock.
IMPORTANT SAFETY INSTRUCTIONS
Use Right Appliance – Do not use appliance for any job
except that for which it is intended.
Don’t Force Appliance – It will do the job better and with
less likelihood of a risk of injury at the rate for which it
was designed.
Do not operate the equipment while barefoot or when
wearing sandals or similar lightweight footwear. Wear
protective footwear that will protect your feet and improve
your footing on slippery surfaces.
Do not overreach – Keep firm footing and balance.
Overreaching can result in loss of balance.
Avoid accidental starting – Be sure switch trigger is in
the locked or off position before inserting battery pack.
Carrying tools with your finger on the switch trigger or
inserting the battery pack into a tool with the switch on
invites accidents.
Do not use tool if switch trigger does not turn it on or off.
Any tool that cannot be controlled with the switch trigger
is dangerous and must be repaired.
Disconnect edger – Disconnect battery pack from the
appliance before storing, servicing, or changing blade or
when not in use. Such preventive safety measures reduce
the risk of starting the tool accidentally.
Use only identical manufacturer’s replacement parts and
accessories. Use of any other parts may create a hazard
or cause product damage.
Check Damaged Parts – Before further use of the
appliance, a guard or other part that is damaged should
be carefully checked to determine that it will operate
properly and perform its function. Check for alignment
of moving parts, binding of moving parts, breakage of
parts, mounting and any other condition that may effect
its operation. A guard or other part that is damaged should
be properly repaired or replaced by an authorized service
center unless indicated elsewhere in this manual.
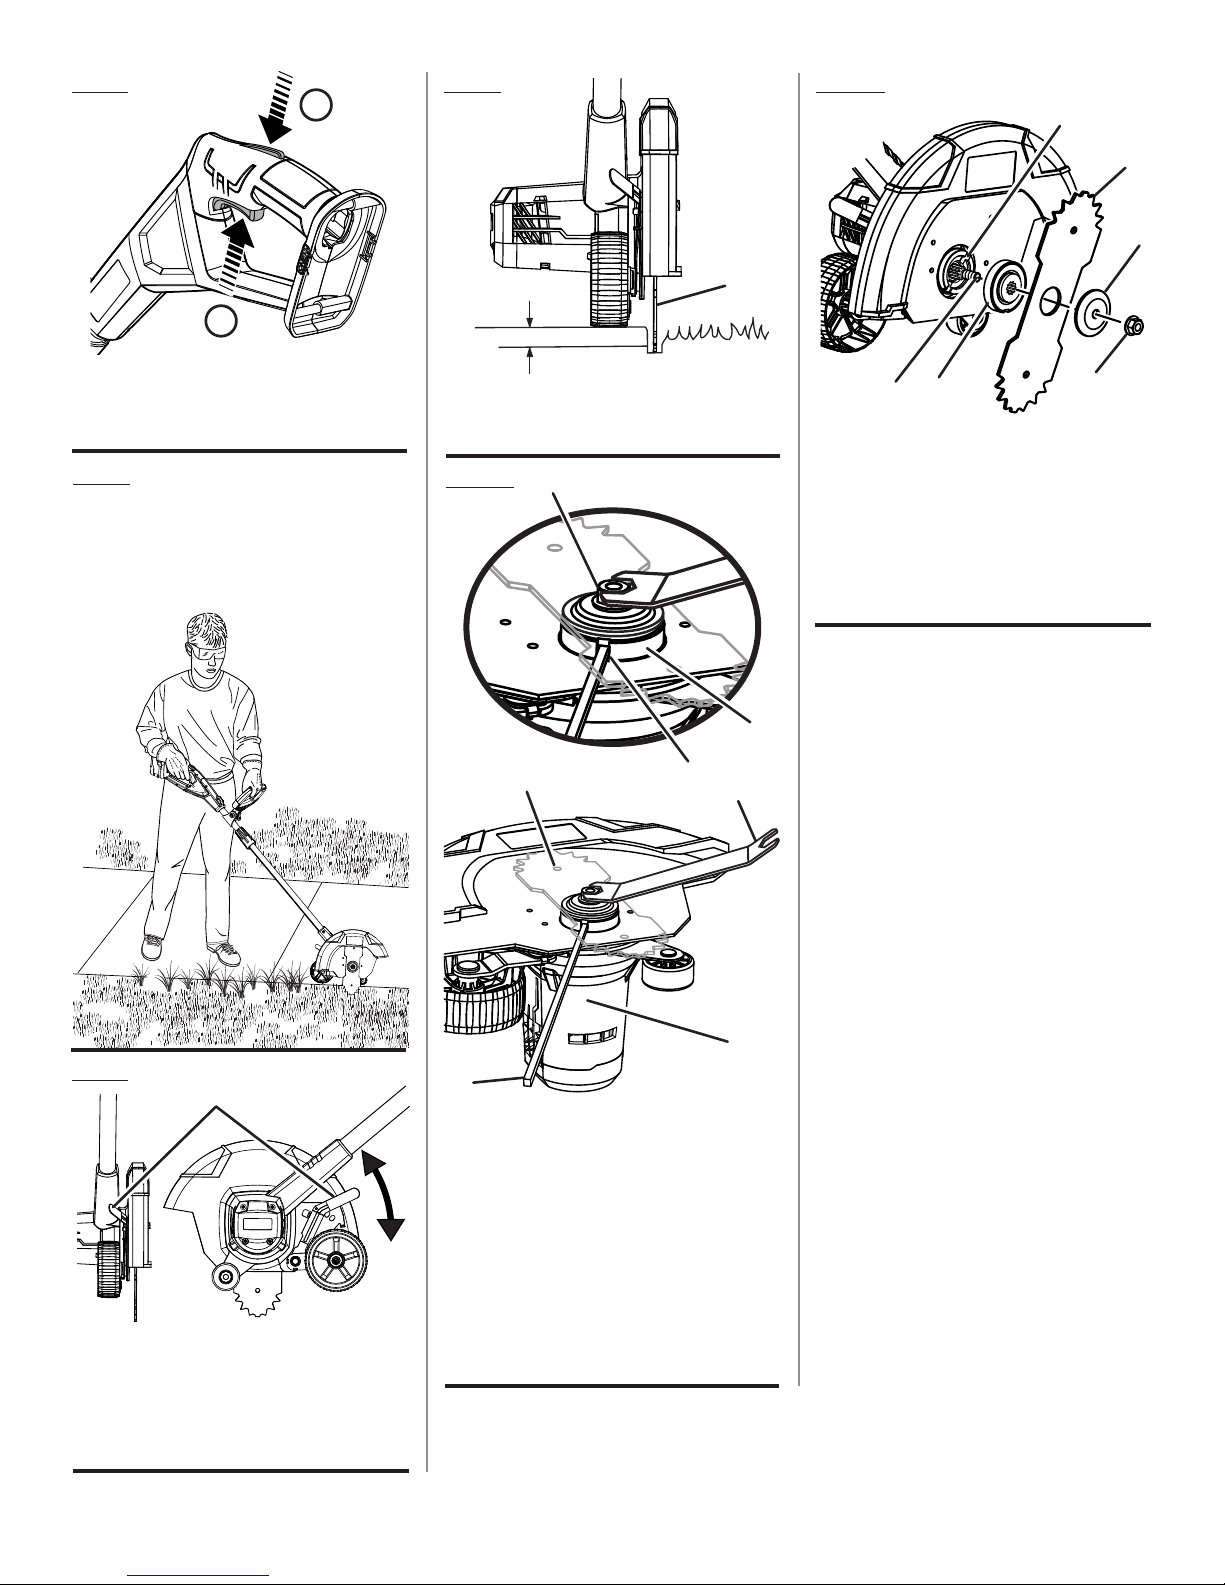
Keep hands and feet away from cutting area.
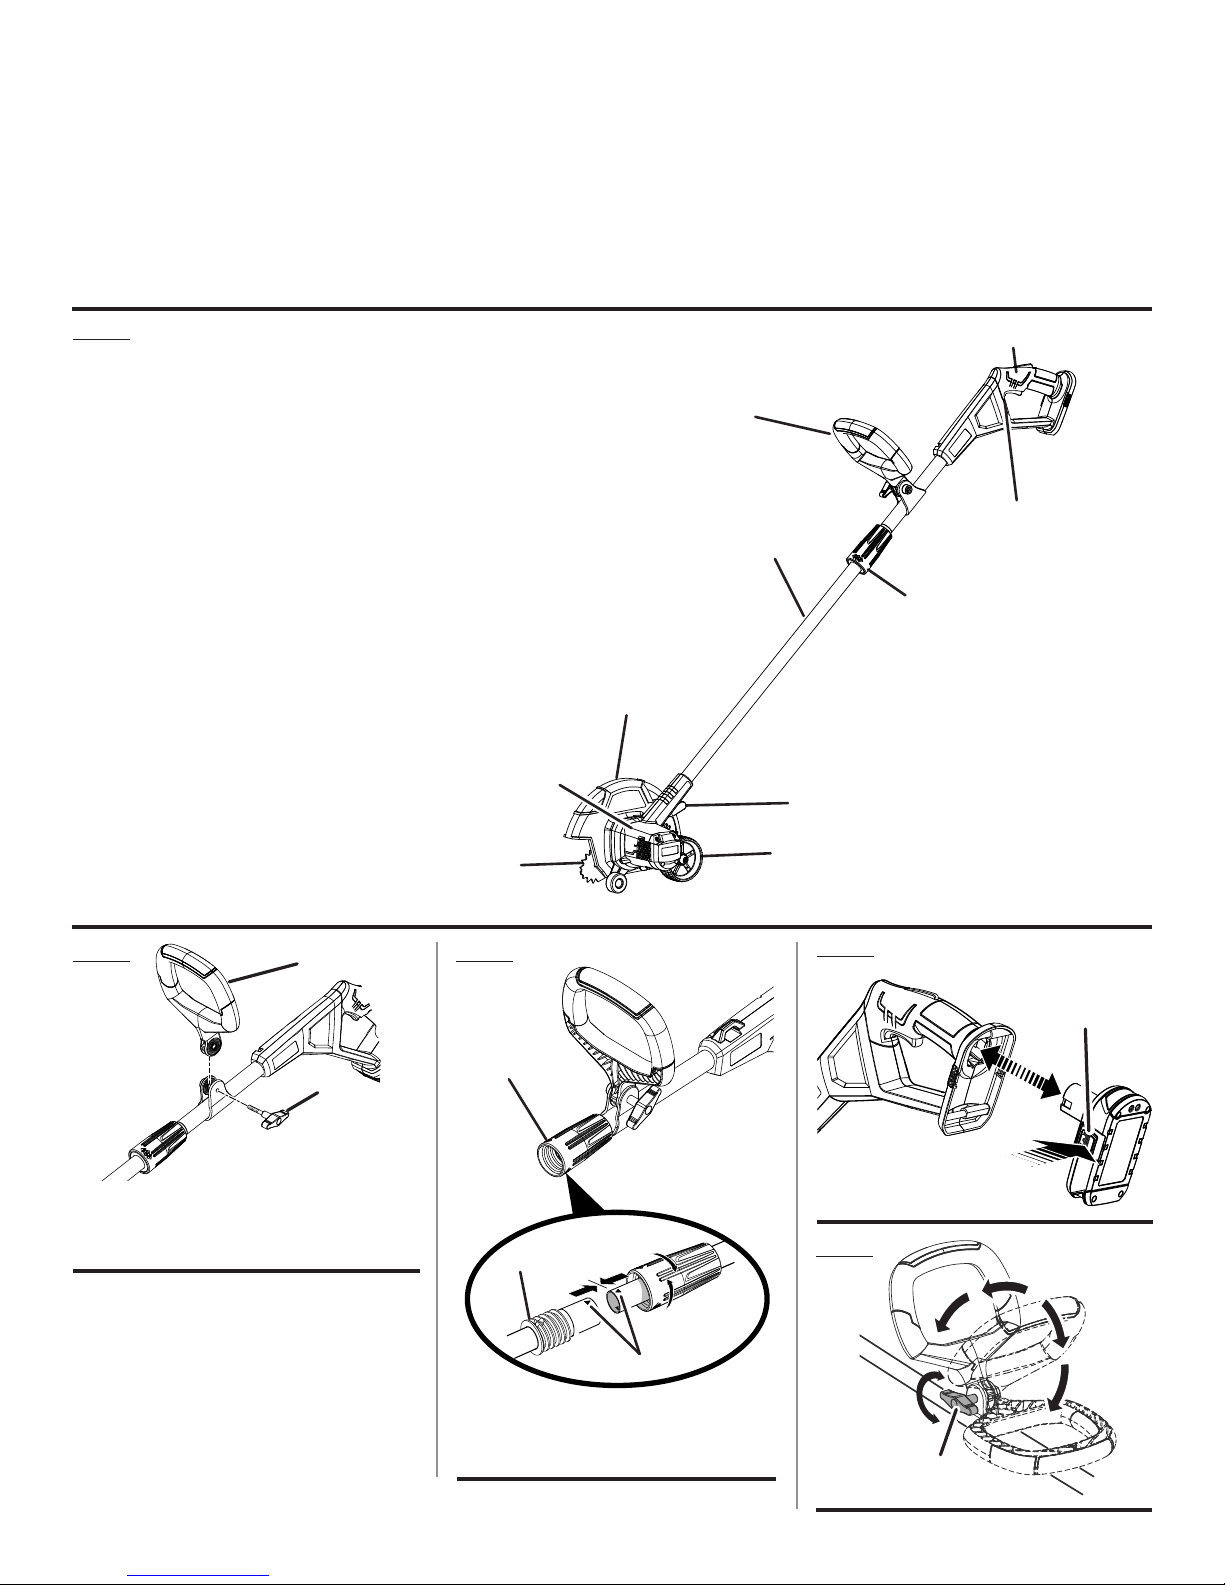
Make sure all guards, straps, deflectors and handles are
properly and securely attached.
Store idle appliances indoors - When not in use, edger
should be stored indoors in a dry, locked place out of the
reach of children.
Keep the air vents clean and free of debris to avoid
overheating the motor. Clean after each use.
Stop the unit and disconnect the power source when not
in use. Carry the unit with the motor stopped.
Don’t grasp the exposed cutting edges when picking up
or holding the appliance.

4 — English
Do not place battery tools or their batteries near fire or
heat. This will reduce the risk of explosion and possibly
injury.
Batteries can explode in the presence of a source
of ignition, such as a pilot light. To reduce the risk of
serious personal injury, never use any cordless product
in the presence of open flame. An exploded battery can
propel debris and chemicals. If exposed, flush with water
immediately.
Do not crush, drop or damage battery pack. Do not
use a battery pack or charger that has been dropped or
received a sharp blow. A damaged battery is subject to
explosion. Properly dispose of a dropped or damaged
battery immediately.
Exercise care in handling batteries in order not to short the
battery with conducting materials such as rings, bracelets,
and keys. The battery or conductor may overheat and
cause burns.
For best results, your battery tool should be charged in
a location where the temperature is more than 50°F but
less than 100°F. To reduce the risk of serious personal
injury, do not store outside or in vehicles.
Under extreme usage or temperature conditions,
battery leakage may occur. If liquid comes in contact
with your skin, wash immediately with soap and water,
then neutralize with lemon juice or vinegar. If liquid gets
into your eyes, flush them with clean water for at least
10 minutes, then seek immediate medical attention.
Following this rule will reduce the risk of serious personal
injury.
Maintain Appliance With Care - Keep cutting edge sharp
and clean for best performance and to reduce the risk
of injury. Follow instructions for lubricating and changing
accessories. Inspect appliance cord periodically, and
if damaged, have it repaired by an authorized service
facility. Inspect extension cords periodically and replace
if damaged. Keep handles dry, clean, and free from oil
and grease.
Store out of the reach of children.
Do not hang unit so that the switch trigger is depressed.
Battery tools do not have to be plugged into an electrical
outlet; therefore, they are always in operating condition.
Be aware of possible hazards when not using your battery
tool or when changing accessories. Following this rule will
reduce the risk of electric shock, fire, or serious personal
injury.
Do not charge battery tool in rain, or damp or wet location.
Following this rule will reduce the risk of electric shock.
Do not use battery-operated appliance in rain.
Remove or disconnect battery before servicing, cleaning
or removing material from the gardening appliance.
Use battery only with charger listed. For use with 18V
nickel-cadmium and lithium-ion battery packs. See Tool/
Appliance/Battery Pack/Charger Correlation Supplement
987000-432.
Do not dispose of the batteries in a fire. The cell may
explode. Check with local codes for possible special
disposal instructions.
Do not open or mutilate the batteries. Released electrolyte
is corrosive and may cause damage to the eyes or skin.
It may be toxic if swallowed.
IMPORTANT SAFETY INSTRUCTIONS

5 — English
SPECIFIC SAFETY RULES
Replace dull or worn blade; do not attempt to sharpen.
Use this edger for edging along sidewalks, driveways,
flower beds, and similar areas. Do not use for any other
purpose.
Be thoroughly familiar with the controls. Know how to
stop the unit and disengage the controls quickly.
Do not use the edger on or near graveled surfaces.
Make yourself familiar with the area you are edging. Be
aware of uneven sidewalks and holes in the terrain as well
as other similar hazardous conditions (example: wire or
wire rope which can break off and become a dangerous
projectile). Always push the edger attachment slowly over
rough ground.
Do not attempt to remove cut material nor hold material
to be cut when the motor is running or when the cutting
blade is moving.
Always keep your right hand on the rear handle and your
left hand on the front handle when the blade is rotating.
A coasting blade can cause injury while it continues to
spin after the motor is stopped or throttle trigger released.
Maintain proper control until the blade has completely
stopped rotating.
Check blade nut for tightness before operating the
attachment.
Improper assembly can create a dangerous situation.
Never stand or have any part of your body in line with the
path of the edger blade.
If the edger strikes any type of foreign object:
a) Stop the edger and remove the spark plug wire or
disconnect from the power supply.
b) Inspect for damage to the edger attachment.
c) Correct damage before using the edger attachment.
Failure to do so can cause serious injury.
Always stop motor and remove the battery before attempt-
ing to remove any obstruction caught or jammed in the
blade, installing attachment, or making any adjustments.
Save these instructions. Refer to them frequently and use
them to instruct others who may use this product. If you
loan someone this product, loan them these instructions
also to prevent misuse of the product and possible injury.

6 — English
Some of the following symbols may be used on this product. Please study them and learn their meaning. Proper
interpretation of these symbols will allow you to operate the product better and safer.
SYMBOL NAME DESIGNATION/EXPLANATION
Safety Alert Indicates a potential personal injury hazard.
Read Operator’s
Manual
To reduce the risk of injury, user must read and understand operator’s
manual before using this product.
Eye Protection Always wear eye protection with side shields marked to comply with
ANSI Z87.1.
Wet Conditions Alert Do not expose to rain or use in damp locations.
Cutting Hazard Keep feet and hands away from rotating blade.
Keep Bystanders
Away Keep all bystanders at least 50 ft. away.
Ricochet Thrown objects can ricochet and result in personal injury or property
damage.
Thrown Objects Thrown objects hazard; keep all bystanders at least 50 ft. (15 m) away.
Blade Rotation Direction of Blade Rotation
SYMBOLS
The following signal words and meanings are intended to explain the levels of risk associated with this product.
SYMBOL SIGNAL MEANING
DANGER: Indicates an imminently hazardous situation, which, if not avoided, will result
in death or serious injury.
WARNING: Indicates a potentially hazardous situation, which, if not avoided, could result
in death or serious injury.
CAUTION: Indicates a potentially hazardous situation, which, if not avoided, may result in
minor or moderate injury.
NOTICE: (Without Safety Alert Symbol) Indicates important information not related to an
injury hazard, such as a situation that may result in property damage.

7 — English
Some of the following symbols may be used on this product. Please study them and learn their meaning. Proper
interpretation of these symbols will allow you to operate the product better and safer.
SYMBOL NAME DESIGNATION/EXPLANATION
Recycle Symbols
This product uses nickel-cadmium (Ni-Cd) and lithium-ion (Li-ion)
batteries. Local, state, or federal laws may prohibit disposal of
batteries in ordinary trash. Consult your local waste authority for
information regarding available recycling and/or disposal options.
Direct Current Type or a characteristic of current
n
o
No Load Speed Rotational speed, at no load
.../min Per Minute Revolutions, strokes, surface speed, orbits etc., per minute
V Volts Voltage
Hz Hertz Frequency (cycles per second)
min Minutes Time
SYMBOLS

8 — English
PACKING LIST
Powerhead
Adjustable Front Handle
Edger Attachment
Holding Pin
Wrench
Operator’s Manual
WARNING:
If any parts are damaged or missing do not operate this
product until the parts are replaced. Use of this product
with damaged or missing parts could result in serious
personal injury.
WARNING:
Do not attempt to modify this product or create
accessories not recommended for use with this product.
Any such alteration or modification is misuse and could
result in a hazardous condition leading to possible serious
personal injury.
FEATURES
KNOW YOUR PRODUCT
See Figure 1.
The safe use of this product requires an understanding of
the information on the tool and in this operator’s manual as
well as a knowledge of the project you are attempting. Before
use of this product, familiarize yourself with all operating
features and safety rules.
ADJUSTABLE FRONT HANDLE
The front handle assembly can be adjusted for ease of
operation and to help prevent loss of control, and can be
positioned above or below the coupler.
DEPTH ADJUSTMENT LEVER
The depth adjustment lever allows user to control
depth of cut.
EDGER WHEEL
The edger wheel allows for more stable cutting performance
while edging.
HANDLE OVERMOLD
Handle overmold provides added user comfort.
LOCK-OUT
The lock-out prevents accidental starting.
ASSEMBLY
UNPACKING
This product requires assembly.
Carefully remove the product and any accessories from
the box. Make sure that all items listed in the packing list
are included.
WARNING:
Do not use this product if any parts on the Packing List
are already assembled to your product when you unpack
it. Parts on this list are not assembled to the product by
the manufacturer and require customer installation. Use
of a product that may have been improperly assembled
could result in serious personal injury.
Inspect the product carefully to make sure no breakage
or damage occurred during shipping.
Do not discard the packing material until you have
carefully inspected and satisfactorily operated the
product.
If any parts are damaged or missing, please call
1-800-860-4050 for assistance.
PRODUCT SPECIFICATIONS
Motor.....................................................................................................................................................................18 Volts DC
Blade Length .....................................................................................................................................................................9 in.
Edging Depth.....................................................................................................................Adjustable from 1/4 in. to 1-1/2 in.

9 — English
ASSEMBLY
WARNING:
To prevent accidental starting that could cause serious
personal injury, always remove the battery pack from the
product when assembling parts.
ATTACHING THE FRONT HANDLE
See Figure 2.
Loosen and remove the wing bolt from the handle.
Install the handle on the rear handle pole in the area
indicated by the illustration.
Adjust handle up or down, if necessary, to desired
operating position.
Reinstall the wing bolt. Tighten wing bolt to secure.
CONNECTING THE POWER HEAD TO THE
EDGER ATTACHMENT
See Figure 3.
WARNING:
Never install, remove, or adjust any attachment while
power head is running or with the battery pack installed.
Failure to stop the motor or remove the battery pack can
result in serious personal injury.
The attachment connects to the power head by means of
a coupler device.
Remove the battery pack if installed.
Align the arrows on the edger attachment and the power
head. Then, insert the plug on the attachment into the
opening on the coupler. Make sure the plug is fully seated.
Slide the threaded coupler on the power head onto the
threaded base on the attachment and turn the coupler
clockwise. Tighten securely.
NOTE: Once assembled correctly, the edger attachment
and power head should not separate when pulled. Repeat
above steps if pieces can be separated.
WARNING:
Failure to secure the edger attachment and power head
as instructed above could result in serious personal injury.
REMOVING THE EDGER ATTACHMENT
FROM THE POWER HEAD
Remove the battery pack.
Turn the coupler counterclockwise to unlock. Then
remove the edger shaft from the power head.
OPERATION
WARNING:
Do not allow familiarity with products to make you
careless. Remember that a careless fraction of a second is
sufficient to inflict serious injury.
WARNING:
Always wear eye protection with side shields marked to
comply with ANSI Z87.1. Failure to do so could result in
objects being thrown into your eyes resulting in possible
serious injury.
WARNING:
Never use flailing devices, wire, or rope on this product.
Do not use any attachments or accessories not
recommended by the manufacturer of this product. The
use of attachments or accessories not recommended
can result in serious personal injury.
NOTICE:
Before each use, inspect the entire product for damaged,
missing, or loose parts such as screws, nuts, bolts,
caps, etc. Tighten securely all fasteners and caps and
do not operate this product until all missing or damaged
parts are replaced. Please contact customer service or
a qualified service center for assistance.
This product will accept Ryobi One+ 18 V lithium-ion battery
packs and Ryobi One+ 18 V nickel-cadmium battery packs.
For complete charging instructions, refer to the Operator’s
Manuals for your Ryobi One+ battery pack and charger
models.

10 — English
OPERATING THE EDGER
See Figure 7.
Hold the edger with your right hand on the rear handle
and your left hand on the front handle.
Keep a firm grip with both hands while in operation.
Edger should be held at a comfortable position with the
rear handle about hip height.
The edger will edge along sidewalks, driveways, flower
beds, curbs, and similar areas.
Cut at a steady pace. If the blade begins to bog down,
you are edging too fast; slow your pace. Do not force the
blade into ground.
Light contact of the blade against the sidewalk edge,
curb, etc., is acceptable and will not damage the edger.
Best appearance is obtained when grass is dry. Avoid
edging in wet soil or wet grass areas or the blade guard
might clog and result in an uneven edge. If the blade guard
becomes clogged, stop the edger, remove the battery,
and remove debris from the blade guard.
WARNING:
Always hold the edger away from the body keeping
clearance between the body and the edger. Any contact
with the edger cutting head while operating can result in
serious personal injury.
ADJUSTING DEPTH OF CUT
See Figures 8 - 9.
Remove the battery pack.
Lift the depth adjusting lever and move up to increase
the depth or down to decrease the depth.
Release lever to lock into desired position.
Replace the battery pack.
NOTE:Adjust the bladedepthfrom1/2 in. to 1in. deep initially.
Make a shallow cut to test the cutting depth. If the cutting
depth needs adjusting, this should be done progressively
until the desired depth is reached.
TO INSTALL BATTERY PACK
See Figure 4.
WARNING:
Always remove battery pack from your tool when you are
assembling parts, making adjustments, cleaning, or when
not in use. Removing battery pack will prevent accidental
starting that could cause serious personal injury.
Insert the battery pack into the product as shown.
WARNING:
Make sure the latches on the battery pack snap in place
and the battery pack is fully seated and secure in the
power head battery port before beginning operation.
Failure to securely seat the battery pack could cause the
battery pack to fall out, resulting in serious personal injury.
TO REMOVE BATTERY PACK
See Figure 4.
Depress the latches on the battery pack.
Remove the battery pack.
WARNING:
To avoid serious personal injury, always remove the
battery pack and keep hands clear of the lock-out when
carrying or transporting the tool.
ADJUSTABLE FRONT HANDLE
See Figure 5.
The angle of the front handle can be adjusted 180°.
Remove the battery pack.
Set the edger on a flat surface and turn the knob
counterclockwise to loosen the handle.
For edging, adjust the handle downward.
Turn the knob clockwise until the handle is securely
tightened before reinstalling the battery pack
STARTING/STOPPING THE EDGER
See Figure 6.
To start:
Press and hold the lock-out.
Depress the switch trigger.
To stop:
Release the switch trigger to stop the edger.
Upon release of the switch trigger, the lock-out will
automatically reset to the locked position.
OPERATION

11 — English
MAINTENANCE
WARNING:
To avoid serious personal injury, always remove the
battery pack from the tool when cleaning or performing
any maintenance.
WARNING:
Always wear eye protection with side shields marked to
comply with ANSI Z87.1. Failure to do so could result in
objects being thrown into your eyes resulting in possible
serious injury.
WARNING:
When servicing, use only identical replacement parts.
Use of any other parts could create a hazard or cause
product damage.
NOTICE:
Periodically inspect the entire product for damaged,
missing, or loose parts such as screws, nuts, bolts, caps,
etc. Tighten securely all fasteners and caps and do not
operate this product until all missing or damaged parts
are replaced. Please contact customer service or a quali-
fied service center for assistance.
GENERAL MAINTENANCE
Avoid using solvents when cleaning plastic parts. Most
plastics are susceptible to damage from various types of
commercial solvents and may be damaged by their use. Use
clean cloths to remove dirt, dust, oil, grease, etc.
WARNING:
Do not at any time let brake fluids, gasoline, petroleum-
based products, penetrating oils, etc., come in contact
with plastic parts. Chemicals can damage, weaken or
destroy plastic which could result in serious personal injury.
REPLACING THE BLADE
See Figures 10 - 11.
Replace blades when worn down to indicator hole on blade.
Remove the battery pack.
Wear gloves when handling blade.
Align the slot in the flange washer with the slot in the
gear case ring; place the holding pin through both slots
to secure in place.
Using the wrench (included), turn the blade nut
counterclockwise to loosen.
Remove the old blade from the motor shaft.
Clean debris from the edger shaft, flange washer and
cupped washer.
Center the new blade on the flange washer, making sure
the blade sits flat.
Properly install the cupped washer with the raised center
area with the hole not touching the blade and the outer
ring of the cupped washer touching the blade.
Install the blade nut onto the motor shaft and reinsert the
holding pin into the slots as described above.
Using a wrench, turn the blade nut clockwise onto the
edger shaft and tighten securely.
This replacement part is available from the place of
purchase, or by calling 1-800-860-4050.
WARNING:
Always make sure the blade is correctly installed and
securely fastened before each use. Failure to properly
install the blade may result in serious personal injury.
STORING THE EDGER
Remove the battery pack from the power head before
storing.
Clean all foreign material from the edger.
Store it in a place that is inaccessible to children.
Keep away from corrosive agents such as garden
chemicals and de-icing salts.

12 — English
TROUBLESHOOTING
PROBLEM POSSIBLE CAUSE SOLUTION
Motor fails to start when switch
trigger is depressed.
Battery is not secure.
Battery is not charged.
To secure the battery pack, make sure the latch
(or latches) snap into place.
Charge the battery pack according to the
instructions included with your model.
CALL US FIRST
For any questions about operating or maintaining your product,
call the Ryobi Help Line!
Your product has been fully tested prior to shipment to ensure
your complete satisfaction.

13 — English
LIMITED WARRANTY STATEMENT
Techtronic Industries Power Equipment, warrants to the
original retail purchaser that this RYOBI™brand outdoor
product is free from defect in material and workmanship
and agrees to repair or replace, at Techtronic Industries
PowerEquipment’s,discretion,anydefectiveproductfreeof
charge withinthesetime periods fromthe date of purchase.
Three years if the product is used for personal, family
or household use;
90 days, if used for any other purpose, such as
commercial or rental.
This warranty extends to the original retail purchaser
only and commences on the date of the original retail
purchase.
Any part of this product found in the reasonable judgment
of Techtronic Industries Power Equipment to be defective
in material or workmanship will be repaired or replaced
without charge for parts and labor by an authorized service
center for RYOBI™brand outdoor products (Authorized
Ryobi Service Center).
Theproduct,includingany defective part, must be returned
to an authorized Ryobi service center within the warranty
period.The expense of delivering the producttothe service
center for warranty work and the expense of returning it
back to the owner after repair or replacement will be paid
by the owner. Techtronic Industries Power Equipment’s,
responsibility in respect to claims is limited to making the
required repairs or replacements and no claim of breach
of warranty shall be cause for cancellation or rescission
of the contract of sale of any RYOBI™brand outdoor
product. Proof of purchase will be required by the dealer
to substantiate any warranty claim. All warranty work must
be performed by an authorized service dealer.
This warranty is limited to ninety (90) days from the date
of original retail purchase for any RYOBI™brand outdoor
product that is used for rental or commercial purposes, or
any other income-producing purpose.
This warranty does not cover any product that has been
subject to misuse, neglect, negligence, or accident, or that
has been operated in any way contrary to the operating
instructions as specified in this operator’s manual. This
warranty does not apply to any damage to the product that
is the result of improper maintenance or to any product
that has been altered or modified. The warranty does not
extend to repairs made necessary by normal wear or by the
use of parts or accessories which are either incompatible
with the RYOBI™brand outdoor product or adversely affect
its operation, performance, or durability. In addition, this
warranty does not cover:
A. Tune-ups – Spark Plugs, Carburetor, Carburetor
Adjustments, Ignition, Filters
B. Wear items – Bump Knobs, Outer Spools, Cutting
Lines, Inner Reels, Starter Pulleys, Starter Ropes, Drive
Belts, Tines, Felt Washers, Hitch Pins, Mulching Blades,
Blower Fans, Blower and Vacuum Tubes, Vacuum Bag
and Straps, Guide Bars, Saw Chains
Techtronic Industries Power Equipment, reserves the right
to change or improve the design of any RYOBI™brand
outdoorproductwithoutassuming any obligation to modify
any product previously manufactured.
ALL IMPLIED WARRANTIES ARE LIMITED IN DURATION
TO THE STATED WARRANTY PERIOD. ACCORDINGLY,
ANY SUCH IMPLIED WARRANTIES INCLUDING
MERCHANTABILITY, FITNESS FOR A PARTICULAR
PURPOSE, OR OTHERWISE, ARE DISCLAIMED
IN THEIR ENTIRETY AFTER THE EXPIRATION OF
THE APPROPRIATE THREE-YEAR OR NINETY-DAY
WARRANTYPERIOD.TECHTRONICINDUSTRIESPOWER
EQUIPMENT’S, OBLIGATION UNDER THIS WARRANTY
IS STRICTLY AND EXCLUSIVELY LIMITED TO THE
REPAIR OR REPLACEMENT OF DEFECTIVE PARTS
AND TECHTRONIC INDUSTRIES POWER EQUIPMENT,
DOES NOT ASSUME OR AUTHORIZE ANYONE TO
ASSUME FOR THEM ANY OTHER OBLIGATION. SOME
STATES DO NOT ALLOW LIMITATIONS ON HOW LONG
AN IMPLIED WARRANTY LASTS, SO THE ABOVE
LIMITATION MAY NOT APPLY TO YOU. TECHTRONIC
INDUSTRIES POWER EQUIPMENT, ASSUMES NO
RESPONSIBILITY FOR INCIDENTAL, CONSEQUENTIAL,
OR OTHER DAMAGES INCLUDING, BUT NOT LIMITED
TO, EXPENSE OF RETURNING THE PRODUCT TO AN
AUTHORIZED RYOBI SERVICE CENTER AND EXPENSE
OF DELIVERING IT BACK TO THE OWNER, MECHANIC’S
TRAVEL TIME, TELEPHONE OR TELEGRAM CHARGES,
RENTAL OF A LIKE PRODUCT DURING THE TIME
WARRANTY SERVICE IS BEING PERFORMED, TRAVEL,
LOSS OR DAMAGE TO PERSONAL PROPERTY, LOSS
OF REVENUE, LOSS OF USE OF THE PRODUCT, LOSS
OF TIME, OR INCONVENIENCE. SOME STATES DO NOT
ALLOWTHE EXCLUSIONOR LIMITATIONOFINCIDENTAL
OR CONSEQUENTIAL DAMAGES, SO THE ABOVE
LIMITATION OR EXCLUSION MAY NOT APPLY TO YOU.
This warranty gives you specific legal rights, and you may
also have other rights which vary from state to state.
Thiswarranty applies toallRYOBI™brand outdoor products
manufactured by or for Techtronic Industries Power
Equipment, and sold in the United States and Canada.
To locate your nearest Authorized Ryobi Service Center,
dial 1-800-860-4050.
WARRANTY

3 — Français
AVERTISSEMENT :
Lors de l’utilisation d’outils de jardinage, toujours suivre
les consignes de sécurité de base pour éviter les risques
d’incendie, d’électrocution et de blessures.
LIRE TOUTES LES INSTRUCTIONS
Pour travailler en toute sécurité, lire et veiller à bien
comprendre toutes les instructions avant d’utiliser ce
produit. Respecter toutes les instructions de sécurité.
Le non respect des instructions de sécurité ci-dessous
peut entraîner des blessures graves.
Ne pas laisser des enfants ou personnes n’ayant pas reçu
une formation adéquate utiliser cet produit.
Déblayer la zone de travail avant chaque utilisation. La
débarrasser de tous les objets tels que cailloux, verre
brisé, clous, fils métalliques, cordes, etc. risquant d’être
projetés ou de se prendre dans la ligne de coupe ou la
lame.
Toujours porter une protection oculaire avec écrans
latéraux certifiée conforme à la norme ANSI Z87.1. Le
respect de cette règle réduira les risques de blessures
graves.
Utiliser les lunettes de sûreté – Toujours la visage
d’usage ou le masque de poussière si l’opération est
poussiéreuse.
Protection respiratoire. Porter un masque facial ou un
masque antipoussière si le travail produit de la poussière.
Le respect de cette consigne réduira les risques de
blessures graves.
Vêtements adéquats – Le port de gants de caoutchouc et
de chaussures solides est recommandé pour le travail à
l’extérieur. Porter des pantalons et des manches longues
en tissu robuste, des chaussures de travail et des gants.
Ne pas porter de vêtements amples, des bijoux ou tout
autre article pouvant se coincer dans les pièces mobiles.
Attacher les cheveux longs pour les maintenir au-dessus
des épaules afin qu’ils ne se coincent pas dans les pièces
mobiles.
Tenir les enfants éloignés - Ranger les appareils qui ne
sont pas utilisés - Garder les badauds, enfants et animaux
à une distance de 15 m (50 pi) minimum.
Rester alerte –Se concentrer sur son travail. Faire
preuve de bon sens. Ne pas utiliser ce taille-bordures
en état de fatigue, si l’on est souffrant, si vous êtes
bouleversé, ou sous l’influence de l’alcool, de drogues
ou de médicaments.
Ne pas travailler sous un éclairage insuffisant.
Garder toutes les parties du corps à l’écart des pièces
en mouvement.
Ne pas utiliser d’outils électriques dans des atmosphères
explosives, par exemple en présence de liquides, gaz
ou poussières inflammables. Les outils électriques
produisent des étincelles risquant d’enflammer les
poussières ou vapeurs.
N’utiliser en aucun cas un accessoire non fourni avec le
produit, ou indiqué comme pouvant être utilisé sur l’outil
dans le manuel d’utilisation.
Éviter les environnements dangereux –Ne pas exposer
le appareil ou outil à la pluie ou l’humidité. La pénétration
d’eau dans ces outils accroît le risque de choc électrique.
Utiliser les appareils appropriés –Ne pas utiliser l’outil
pour une tâche pour laquelle il n’est pas conçu.
Ne pas forcer appareil – Un produit approprié exécutera le
travail mieux et de façon moins dangereuse s’il fonctionne
dans les limites prévues.
Ne pas faire fonctionner l’équipement pied-nu ou
en portant des sandales ou des chaussures légères
similaires. Porter des chaussures de protection qui
protègent vos pieds et améliorent votre équilibre sur des
surfaces glissantes.
Ne pas exagérer en se courbant ou en s’étirant. Se tenir
bien campé et en équilibre. Cette façon de travailler
pourrait vous faire perdre l’équilibre.
Éviter les démarrages accidentels s’assurer que la
gâchette est verrouillée en position d’arrêt avant
d’insérer le bloc piles. Le transport d’outils avec le doigt
sur le commutateur ou l’insertion du bloc piles avec le
commutateur en position de marche est une invite aux
accidents.
Ne pas utiliser l’produit si le commutateur ne permet
pas de le mettre en marche et de l’arrêter. Tout produit
qui ne peut pas être contrôlé par son commutateur est
dangereux et doit être réparé.
Débrachement du taille-bordures – Retirer le bloc-piles
de l’outil avant de le ranger, le réparer ou changer la
lame. Ces mesures de sécurité réduisent les risques de
démarrage accidentel de l’outil.
Utiliser exclusivement des pièces de rechange et
accessoire d’origine. L’usage de toute autre pièce pourrait
créer une situation dangereuse ou endommager l’produit.
Vérifier l’état des pièces – Avant d’utiliser l’appareil
de nouveau examiner soigneusement les pièces et
dispositifs de protection qui semblent endommagés afin
de déterminer s’ils fonctionnent correctement et s’ils
remplissent les fonctions prévues. Vérifier l’alignement
des pièces mobiles, s’assurer qu’aucune pièce n’est
bloquée ou cassée, vérifier la fixation de chaque pièce et
s’assurer qu’aucun autre problème ne risque d’affecter
le bon fonctionnement de l’outil. La réparation ou le
remplacement du dispositif de protection ou de toute
autre pièce doivent être confiés à un centre de réparations
autorisé, sauf indication contraire dans le présent manuel.
INSTRUCTIONS IMPORTANTES CONCERNANT LA SÉCURITÉ

4 — Français
INSTRUCTIONS IMPORTANTES CONCERNANT LA SÉCURITÉ
Éloigner les mains et les pieds de la zone de coupe.
S’assurer que tous les dispositifs de protection,
déflecteurs d’herbe et poignées sont correctement
installés et solidement assujettis.
Entreposer les outils à l’intérieur - Quand pas dans
l’usage, tondeuse à fouet devrait être emmagasiné à
la maison dans un sec, fermé à clef la remiser dans un
endroit inaccessible aux enfants.
S’assurer que les évents d’aération sont propres et
exempts de débris afin d’éviter que le moteur ne
surchauffe. Les nettoyer après chaque utilisation.
Arrêter l’produit et le débrancher de la source d’alimentation
lorsqu’il n’est pas utilisé. Attendre l’arrêt complet du
moteur avant de déplacer l’produit.
Ne pas tenir les bords coupants lorsque l’on ramasse ou
que l’on tient l’outil.
Realice un mantenimiento cuidadoso del artefacto
- mantenga los bordes de corte afilados y limpios
para optimizar el rendimiento y reducir el riesgo de
lesiones. Siga las instrucciones referentes al cambio y la
lubricación de accesorios. Inspeccione periódicamente
el cable del artefacto y, si está dañado, llévelo a reparar
a un establecimiento de servicio autorizado. Revise
periódicamente los prolongadores y reemplácelos si
están dañados. Mantenga los mangos secos, limpios y
sin aceite ni grasa.
Ranger l’produit en s’assurant qu’il est débranché et qu’il
est hors de la portée des enfants.
Ne pas suspendre l’produit d’une façon qui enclencherait
la gâchette.
Les outils fonctionnant sur piles n’ayant pas besoin d’être
branchés sur une prise de courant, ils sont toujours
en état de fonctionnement. Tenir compte des dangers
possibles lorsque l’produit n’est pas en usage et lors du
remplacement des piles. Le respect de cette consigne
réduira les risques d’incendie, de choc électrique et de
blessures graves.
Ne pas recharger un produit fonctionnant sur piles dans
un endroit la pluie ou humide ou mouillé. Le respect de
cette règle réduira les risques de choc électrique.
Ne pas utiliser un appareil alimenté par pile sous la pluie.
Retirer ou débrancher la pile avant l’entretien ou le
nettoyage de l’produit de jardin ou avant d’en retirer des
matériaux.
Pour utiliser avec nickel-cadmium et lithium-ion
bloc-piles. Voir « Consignes de sécurité relatives à
l’outil, appareil, à la pile et au chargeur supplément »
987000-432.
Ne pas jeter les piles au feu. La cellule peut exploser.
Vérifier les codes locaux pour connaître toute instruction
spéciale relative à l’élimination des piles.
Ne pas altérer le bloc piles. L’électrolyte est un produit
corrosif pouvant causer des lésions cutanées ou
oculaires. Il peut être toxique en cas d’ingestion.
Ne pas placer les outils électriques sans fil ou leurs piles
à proximité de flammes ou d’une source de chaleur. Ceci
réduira les risques d’explosion et de blessures.
Les piles peuvent exploser en présence d’une source
d’allumage, telle qu’une veilleuse. Pour réduire les
risques de blessures graves, ne jamais utiliser un appareil
sans fil, quel qu’il soit, en présence d’une flamme
vive. En explosant, une pile peut projeter des débris
et des produits chimiques. En cas d’exposition, rincer
immédiatement les parties atteintes avec de l’eau.
Ne pas écraser, faire tomber ou endommager le bloc
piles. Ne jamais utiliser un bloc piles ou un chargeur
qui est tombé, a été écrasé, a reçu un choc violent ou a
été endommagé de quelque façon que ce soit. Une pile
endommagée risque d’exploser. Éliminer immédiatement
toute pile endommagée, selon une méthode appropriée.
Manipuler les piles avec soin pour éviter des courts
circuits avec des objets conducteurs comme des
anneaux, des bracelets et des clés. La pile ou l’objet
conducteur peuvent surchauffer et causer des brûlures.
Pou un résultat optimal, les piles de l’produit doivent être
rechargées dans un local où la température est de 10 à 38 °C
(50 à 100 °F). Ne pas ranger l’produit à l’extérieur ou
dans un véhicule.
Si l’produit est utilisé de façon intensive ou sous des
températures extrêmes, des fuites de pile peuvent se
produire. En cas de contact du liquide avec la peau,
rincez immédiatement la partie atteinte avec de l’eau
savonneuse, puis neutralisez avec du jus de citron ou du
vinaigre. En cas d’éclaboussure dans les yeux, rincez-
les à l’eau fraîche pendant au moins 10 minutes, puis
contactez immédiatement un médecin. Le respect de
cette consigne réduira les risques de blessures graves.

5 — Français
RÈGLES DE SÉCURITÉ PARTICULIÈRES
Remplacer les lames émoussées ou usées; ne pas tenter
de les affûter.
Ce coupe-bordures permet d’effectuer la finition des
trottoirs, allées et massifs de fleurs. Ne pas l’utiliser pour
d’autres applications.
Bien se familiariser avec les commandes. Savoir arrêter
l’appareil et débrayer rapidement l’entraînement.
Ne pas utiliser le coupe-bordures sur ou à proximité de
surfaces gravillonnées.
Se familiariser avec le terrain sur lequel sont effectuées les
finitions. Faire attention aux trottoirs irréguliers et aux trous
dans le terrain ainsi qu’aux autres situations présentant
un danger semblable (exemple : ne jamais utiliser de
fil ou câble métallique qui pourrait se briser et devenir
un projectile dangereux).Toujours pousser lentement
l’accessoire coupe-border sur les terrains irréguliers.
Ne pas essayer de retirer de l’herbe coupée de l’outil ou
de tenir l’herbe à couper lorsque le moteur tourne ou la
lame est en rotation.
Lorsque la lame est en rotation, toujours tenir l’outil avec
la main droite sur la poignée arrière et la main gauche sur
la poignée avant.
Une lame continuant de tourner au débrayé une fois que
le moteur est arrêté et la gâchette relâchée peut causer
des blessures. Garder le contrôle de l’outil jusqu’à ce que
la lame soit complètement immobilisée.
S’assurer que l’écrou de lame est serré solidement avant
d’utiliser l’accessoire.
Un assemblage inadéquat peut entraîner une situation
dangereuse.
Ne jamais se tenir vis-à-vis du chemin de coupe et garder
toutes les parties du corps à l’écart de celui-ci.
Si le coupe-bordures cogne un objet quelconque :
a) Arrêter le coupe-bordure et débrancher le fil de la
bougie ou débrancher de la prise secteur.
b) Inspecter le coupe-bordures pour voir s’il est
endommagé.
c) Effectuer les corrections requises avant d’utiliser
l’accessoire coupe-bordures. Ne pas prendre cette
précaution peut entraîner des risques de blessures
graves.
Toujours éteindre le moteur et retirer le bloc de piles avant
d’essayer de retirer des objets pris dans la lame ou la
bloquant, avant d’installer la lame ou avant d’effectuer
tout réglage.
Conserver ces instructions. Les consulter fréquemment
et les utiliser pour instruire les autres utilisateurs
éventuels. Si cet outil est prêté, il doit être accompagné
de ces instructions, afin d’éviter un usage incorrect et
d’éventuelles blessures.

6 — Français
Certains des symboles ci-dessous peuvent être utilisés sur produit. Veiller à les étudier et à apprendre leur signification.
Une interprétation correcte de ces symboles permettra d’utiliser produit plus efficacement et de réduire les risques.
SYMBOLE NOM DÉSIGNATION / EXPLICATION
Symbole d’alerte de
sécurité Indique un risque de blessure potentiel.
Lire manuel
d’utilisation
Pour réduire les risques de blessures, l’utilisateur doit lire et veiller à bien
comprendre le manuel d’utilisation avant d’utiliser ce produit.
Protection oculaire Toujours porter une protection oculaire avec écrans latéraux certifiée
conforme à la norme ANSI Z87.1.
Avertissement
concernant l’humidité Ne pas exposer à la pluie ou l’humidité.
Risque de coupure Garder la lame tournante loin des mains et des pieds.
Ne laisser personne
s’approcher Garder les badauds à une distance de 15 m (50 pi) minimum.
Danger de ricochet Ne pas utiliser le coupe-bourdures sans le protecteur. Rester éloigné de
la tête de coupe rotative.
Projection d’objets Projection risques d’objets; Garder les badauds à une distance de 15 m
ou 50 po minimum.
Sens de rotation
de la lame Sens de rotation de la lame
SYMBOLES
Les termes de mise en garde suivants et leur signification ont pour but d’expliquer le degré de risques associé à
l’utilisation de ce produit.
SYMBOLE SIGNAL SIGNIFICATION
DANGER: Indique une situation extrêmement dangereuse qui, si elle n’est pas évitée,
aura pour conséquences des blessures graves ou mortelles.
AVERTISSEMENT : Indique une situation potentiellement dangereuse qui, si elle n’est pas
évitée, pourrait entraîner des blessures graves ou mortelles.
ATTENTION : Indique une situation potentiellement dangereuse qui, si elle n’est pas
évitée, pourraît entraîner des blessures légères ou de gravité modérée.
AVIS :
(Sans symbole d’alerte de sécurité) Indique une information importante
ne concernant pas un risque de blessure comme une situation pouvant
occasionner des dommages matériels.

7 — Français
Certains des symboles ci-dessous peuvent être utilisés sur produit. Veiller à les étudier et à apprendre leur signification.
Une interprétation correcte de ces symboles permettra d’utiliser produit plus efficacement et de réduire les risques.
SYMBOLE NOM DÉSIGNATION / EXPLICATION
Symboles de
recyclage
Ce produit utilise les piles de nickel-cadmium (Ni-Cd) ou lithium-ion (Li-ion).
Les réglementations locales ou gouvernementales peuvent interdire de
jeter les piles dans les ordures ménagères. Consulter les autorités locales
compétentes pour les options de recyclage et/ou l’élimination.
Courant continu Type ou caractéristique du courant
n
o
Vitesse à vide Vitesse de rotation à vide
.../min Par minute Tours, coups, vitesse périphérique, orbites, etc., par minute
VVolts Tension
Hz Hertz Fréquence (cycles par seconde)
min Minutes Temps
SYMBOLES
Table of contents
Languages:
Other Ryobi Lawn Mower manuals

Ryobi
Ryobi RLM46175Y Operation instructions

Ryobi
Ryobi RY48141 User manual

Ryobi
Ryobi RY401010 User manual

Ryobi
Ryobi RLM140SP User manual

Ryobi
Ryobi RY18SFX35A User manual

Ryobi
Ryobi R18XLMW54 User manual

Ryobi
Ryobi RLM5319SME User manual

Ryobi
Ryobi R36LMW16 User manual

Ryobi
Ryobi RLM46160S User manual

Ryobi
Ryobi RLM36X41H50PG User manual

Ryobi
Ryobi RY40100 User manual

Ryobi
Ryobi RLM18X41H240 User manual

Ryobi
Ryobi RLM5317SME User manual

Ryobi
Ryobi RLM1956MEB User manual

Ryobi
Ryobi RY18LMX40A User manual

Ryobi
Ryobi RY40180 User manual

Ryobi
Ryobi RYRM8003 User manual

Ryobi
Ryobi RLM4114 User manual

Ryobi
Ryobi RY401010 User manual

Ryobi
Ryobi RLM15E36H User manual