2
■Keep proper footing and balance at all times, and be
sure of proper footing on slopes.
■Do not walk backwards when using the product. Walk,
never run.
■Keep the head attachment below waist level.
■Never use the product with damaged guards or without
guards in place.
■Never fit a metal replacement line.
■Keep hands and feet away from the cutting means at all
times, especially when turning on the motor.
■Beware, the cutting means continue to rotate after the
motor is turned off.
■Beware of objects thrown by the cutting means. Clear
debris like small stones, gravel, and other foreign
objects from the work area before starting operation.
Wires or string may become entangled with the cutting
means.
■To reduce the risk of injury associated with contacting
moving parts, always turn off the product, remove the
battery pack, and allow both to cool down. Make sure
that all moving parts have come to a complete stop:
●before servicing
●before clearing a blockage
●before checking, cleaning, and working on the
product
●before changing accessories
●after striking a foreign object
●whenever leaving the product unattended
●whenever performing maintenance
●whenever the product starts to vibrate abnormally
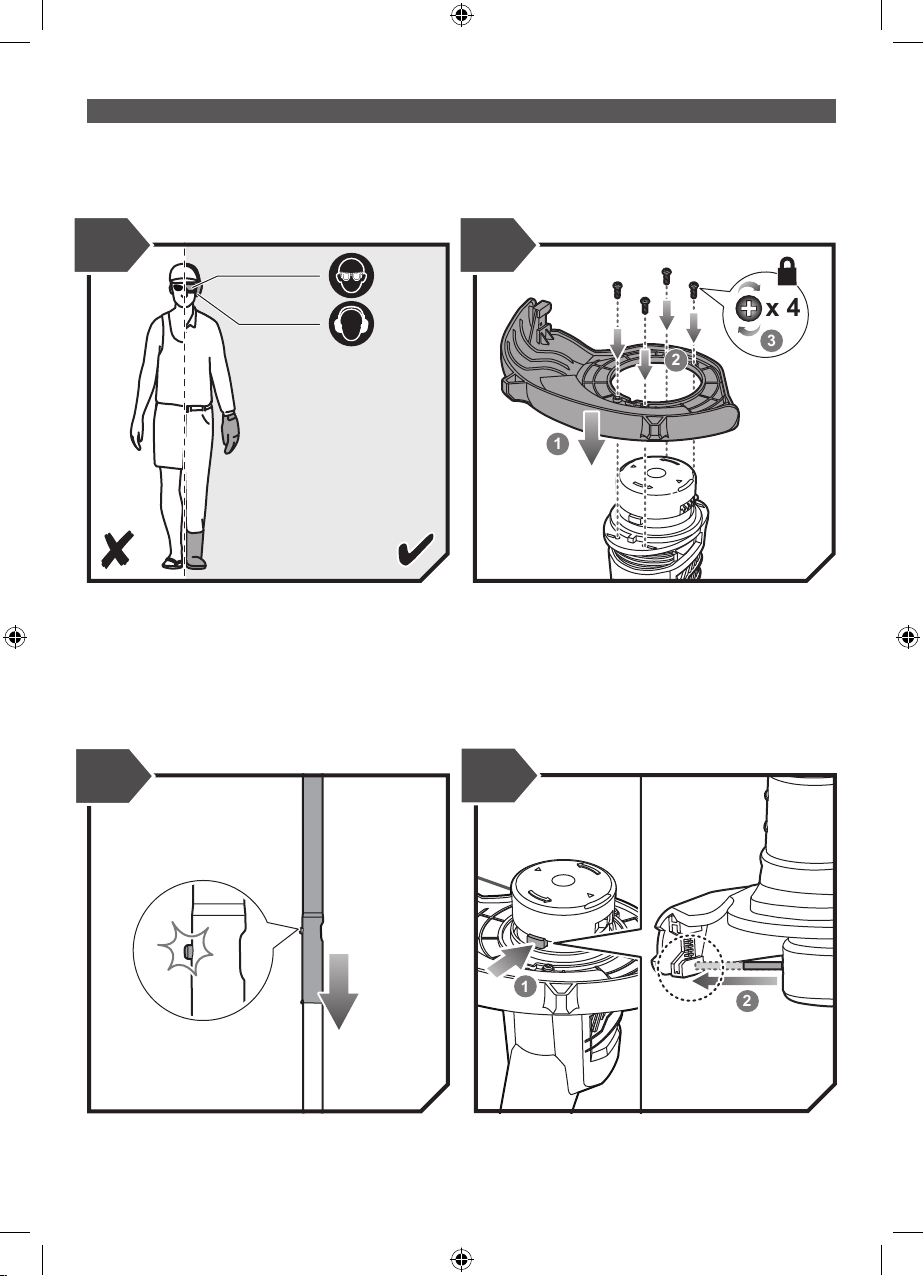
■Wear full eye and hearing protection while operating the
product. If working in an area where there is a risk of
falling objects, head protection must be worn.
■Hearing protection may restrict the operator’s ability
to hear warning sounds. Pay particular attention to
potential hazards around and inside the working area.
■Wear heavy, long trousers, boots, and gloves. Do not
wear loose-fitting clothing, short trousers, or jewellery
of any kind, and do not use the product with bare feet.
■Secure long hair so that it is above shoulder level to
prevent entanglement in moving parts.
■The small blade fitted to the lawn guard is designed to
trim the new extended line to the correct length for safe
and optimum performance. The blade is very sharp.
Do not touch the blade, particularly when cleaning the
product.
■Always ensure that ventilation openings are kept clear
of debris.
■Before use and after any impact, check that there are
no damaged parts on the product. A defective switch
or any part that is damaged or worn should be properly
repaired or replaced by an authorised service centre.
■Make sure that the cutting head attachment is properly
installed and securely fastened.
■Make sure that all guards, deflectors, and handles are
properly and securely attached.
■Do not modify the product in any way. This may
increase the risk of injury to yourself or others.
■Use only the manufacturer’s replacement cutting line.
Do not use any other cutting attachment.
■Immediately turn off and remove the battery pack in
the event of accident or breakdown. Do not operate
the product again until it has been fully checked by an
authorised service centre.
WARNING
Ensure that the line cut-off blade in the guard is properly
positioned and secured before each use.
ADDITIONAL BATTERY SAFETY WARNINGS
WARNING
To reduce the risk of re, personal injury, and product
damage due to a short circuit, never immerse your
tool, battery pack or charger in uid or allow a uid to
ow inside them. Corrosive or conductive uids, such
as seawater, certain industrial chemicals, and bleach
or bleach-containing products, etc., can cause a short
circuit.
TRANSPORTATION AND STORAGE
■Turn off the product, remove the battery pack, and allow
the product to cool down before storing or transporting.
■Clean all foreign material from the product.
■Do not store or transport the product with the battery
pack fitted. Remove the battery pack and secure it
separately. Store the product in a cool, dry, and well-
ventilated place that is inaccessible to children. Keep
the product away from corrosive agents, such as
garden chemicals and de-icing salts. Do not store the
product outdoors.
■For transportation in vehicles, secure the product
against movement or falling to prevent injury to persons
or damage to the product.
TRANSPORTING LITHIUM BATTERIES
Transport the battery pack in accordance with local and
national provisions and regulations.
Follow all special requirements on packaging and labelling
when transporting batteries by a third party. Ensure that
no batteries can come in contact with other batteries
or conductive materials while in transport by protecting
exposed connectors with insulating, non-conductive caps
or tape. Do not transport batteries that are cracked or
leaking. Check with the forwarding company for further
advice.
MAINTENANCE
WARNING
Use only original manufacturer’s replacement parts,
accessories, and attachments. Failure to do so can cause
possible injury, can contribute to poor performance, and
may void your warranty.