manuals.online logo
Brands
  1. Home
  2. •
  3. Brands
  4. •
  5. Ryobi
  6. •
  7. Trimmer
  8. •
  9. Ryobi UT33600 User manual

Ryobi UT33600 User manual

Other Ryobi Trimmer manuals

Ryobi RPT400 User manual

Ryobi

Ryobi RPT400 User manual

Ryobi 720r User manual

Ryobi

Ryobi 720r User manual

Ryobi 890r User manual

Ryobi

Ryobi 890r User manual

Ryobi RPT400 User manual

Ryobi

Ryobi RPT400 User manual

Ryobi RBC-1000EX User manual

Ryobi

Ryobi RBC-1000EX User manual

Ryobi RLT26C User manual

Ryobi

Ryobi RLT26C User manual

Ryobi RHT36 User manual

Ryobi

Ryobi RHT36 User manual

Ryobi RLT1038 User manual

Ryobi

Ryobi RLT1038 User manual

Ryobi RBC52FSBO User manual

Ryobi

Ryobi RBC52FSBO User manual

Ryobi RY34440 Application guide

Ryobi

Ryobi RY34440 Application guide

Ryobi P2602 User manual

Ryobi

Ryobi P2602 User manual

Ryobi RBC254SESO User manual

Ryobi

Ryobi RBC254SESO User manual

Ryobi One+ OHT1800P User manual

Ryobi

Ryobi One+ OHT1800P User manual

Ryobi PLT3043A, RY70101A User manual

Ryobi

Ryobi PLT3043A, RY70101A User manual

Ryobi RY252CS User manual

Ryobi

Ryobi RY252CS User manual

Ryobi RY29550 User manual

Ryobi

Ryobi RY29550 User manual

Ryobi 704r User manual

Ryobi

Ryobi 704r User manual

Ryobi RY44140 User manual

Ryobi

Ryobi RY44140 User manual

Ryobi RHT1851R40 User manual

Ryobi

Ryobi RHT1851R40 User manual

Ryobi ONE+ P2607 User manual

Ryobi

Ryobi ONE+ P2607 User manual

Ryobi P2008 User manual

Ryobi

Ryobi P2008 User manual

Ryobi 750r User manual

Ryobi

Ryobi 750r User manual

Ryobi RHT6060RS User manual

Ryobi

Ryobi RHT6060RS User manual

Ryobi RHT36 User manual

Ryobi

Ryobi RHT36 User manual

Popular Trimmer manuals by other brands

LawnMaster LML261 Safety and operating manual

LawnMaster

LawnMaster LML261 Safety and operating manual

McCulloch TrimMac ST+ instruction manual

McCulloch

McCulloch TrimMac ST+ instruction manual

Gardena EasyCut 48 PLUS operating instructions

Gardena

Gardena EasyCut 48 PLUS operating instructions

Gardena ComfortCut 450/25 user manual

Gardena

Gardena ComfortCut 450/25 user manual

Twose TF500 Operator's manual

Twose

Twose TF500 Operator's manual

Echo SRM-230 parts catalog

Echo

Echo SRM-230 parts catalog

netta PHTEG06AA-450 manual

netta

netta PHTEG06AA-450 manual

Total TGTLI20301 manual

Total

Total TGTLI20301 manual

Maestro MR680 owner's manual

Maestro

Maestro MR680 owner's manual

Andis Experience D4X specification

Andis

Andis Experience D4X specification

Flymo EASICUT 5500 Original instructions

Flymo

Flymo EASICUT 5500 Original instructions

Troy-Bilt AST TB25CS Operator's manual

Troy-Bilt

Troy-Bilt AST TB25CS Operator's manual

Homelite F-3040 user manual

Homelite

Homelite F-3040 user manual

Ozito LTR-301 instruction manual

Ozito

Ozito LTR-301 instruction manual

Flymo Contour Cordless 24 V Original instructions

Flymo

Flymo Contour Cordless 24 V Original instructions

McCulloch T22 LS Operator's manual

McCulloch

McCulloch T22 LS Operator's manual

COCKRAFT PRO HL36-S Original instructions

COCKRAFT

COCKRAFT PRO HL36-S Original instructions

Weed Eater BC2400 instruction manual

Weed Eater

Weed Eater BC2400 instruction manual

manuals.online logo
manuals.online logoBrands
  • About & Mission
  • Contact us
  • Privacy Policy
  • Terms and Conditions

Copyright 2025 Manuals.Online. All Rights Reserved.

First Time Assembly
First Time Start
Remove product from carton.
Assemble per instructions
in your operator’s manual.
1
WARNING: This Quick Start Guide is not a substitute for reading the
operator’s manual. To reduce the risk of injury, user must read and understand
operator’s manual before using this product.
2
3
Spread handle over boom and
snap into place. Secure with bolt,
washer, and wing nut.
Snap shield into place over boom and bracket.
Secure with bolt, washer, and wing nut as shown.
4
Align and assemble 2 booms
until fully seated. Tighten
screws with provided hex key.
- OR -
Curved Shaft
Straight Shaft
Mix 2.6 oz. 2-cycle oil with
1 gallon of fresh gasoline in
separate gas container. Shake,
then pour into trimmer tank.
5
6
7
7
Place trimmer on ground
with the trim head end facing
away from you.
Repeatedly press the primer
bulb 10 times.
Squeeze and hold trigger.
9
8
Set choke lever to A
start position.
Pull quickly and powerfully
to start (6x MAX.)
Continue to squeeze and hold
trigger for 10 seconds after
engine starts. If engine
does not start,
REPEAT STEPS
11
12
Set choke lever to
B run position.
You are now ready to Trim!
If engine did not start,
REPEAT STEPS
To stop trimmer, press the
red switch located on the
side of motor housing.
Go to www.homelite.com and register your new tool online.
For any questions about operating or maintaining your product,
call the Homelite®Help Line!
1-800-242-4672
Your Product has been fully tested prior to shipment to ensure
your complete satisfaction. Troubleshooting tips are also
available in your operator’s manual.
For additional registration instruction, refer to operator’s manual.
10X
TRIM!
10
10
990000235
9-13-12 (REV:01)
7
–
11
CALL
www.homelite.com
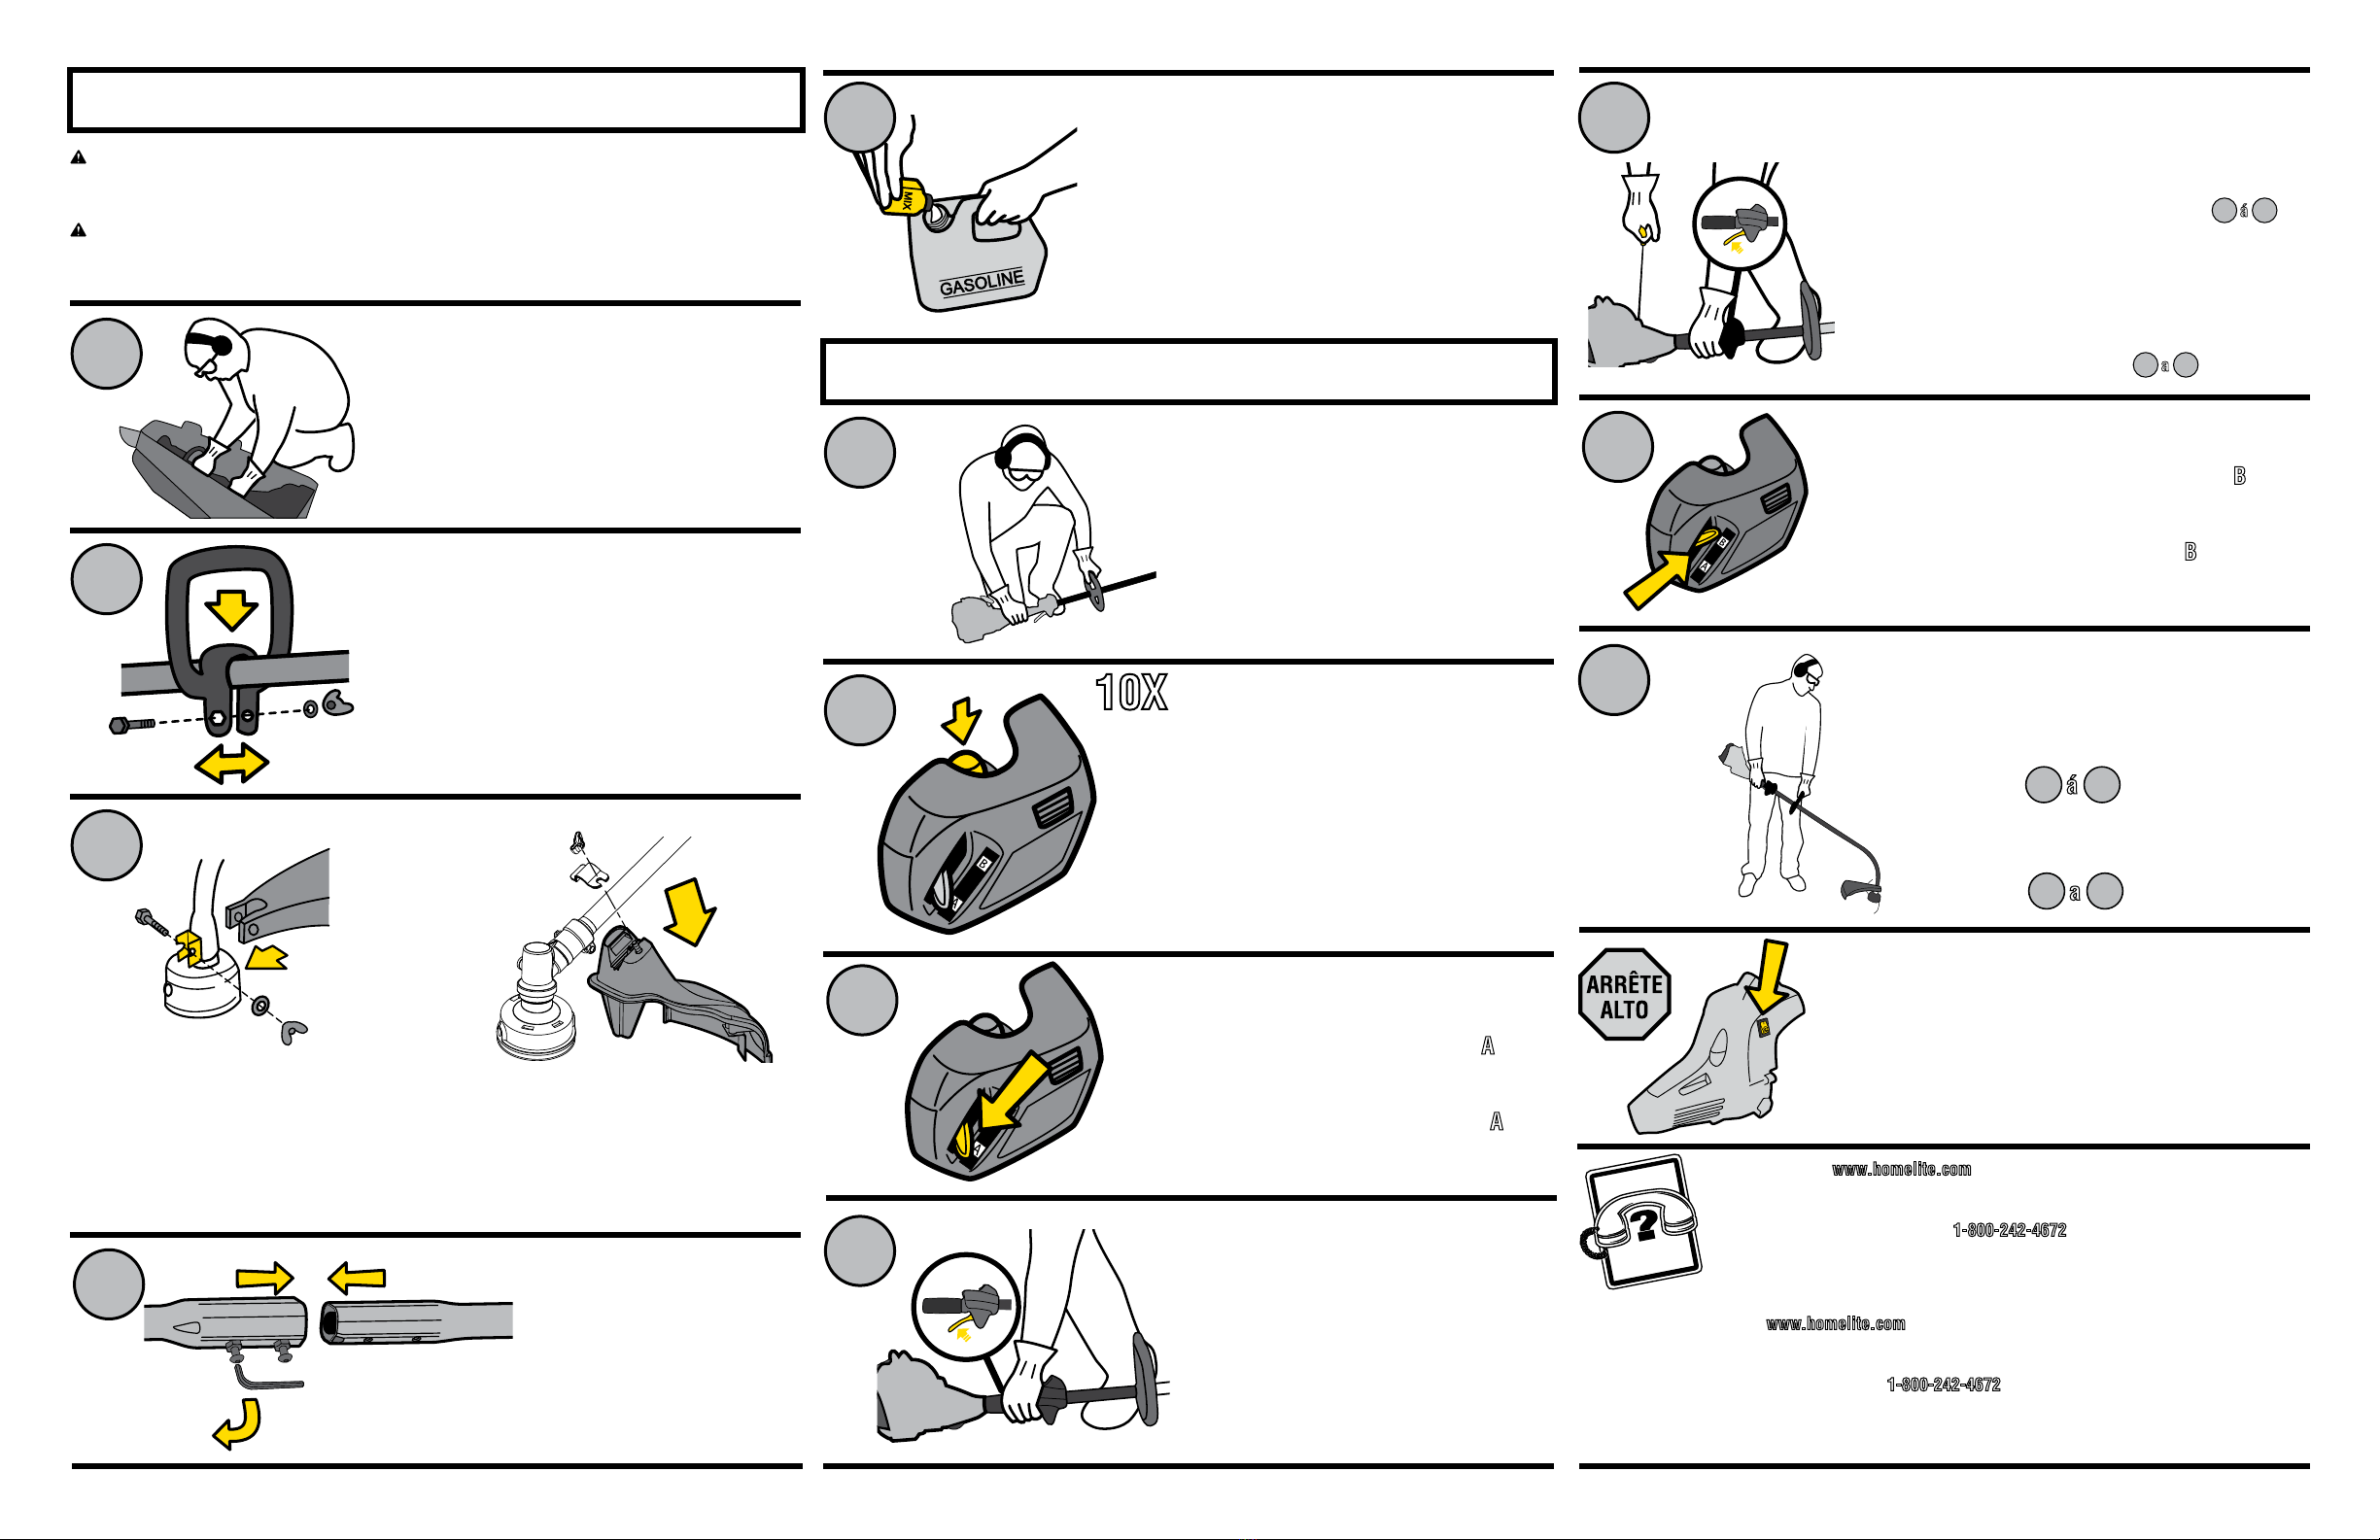
Démarrage Initial / Arrancer Inicial
Assemblage Initial / Montaje Inicial
Retirer le produit de son emballage.
Assembler le produit selon les instructions
contenues dans le manuel d’utilisation.
Quite el producto de la caja. Arme el
producto según las instrucciones del
manual del operador.
1
AVERTISSEMENT : Cette Guide de démarrage rapide n’est pas un substitut au manuel
d’utilisation, qu’il importe de lire. Pour réduire les risques de blessures, l’utilisateur doit
lire et veiller à bien comprendre le manuel d’utilisation avant d’employer ce produit.
ADVERTENCIA: Comprender el Guía inicial rápida no equivale a leer el manual del
operador. Para reducir el riesgo de lesiones, el usuario debe leer y comprender el manual
del operador antes de usar este producto.
2
3
Positionner la poignée en la passant par
dessus la perche et enclencher. Fixer à
l’aide d’un boulon, d’une rondelle et d’un
écrou à oreilles.
Coloque el mango sobre el brazo y trabe
en su lugar. Sujétela con un perno, una
arandela y una tuerca mariposa.
Installer le protecteur par-dessus le bras et le support. Puis le fixer à l’aide
d’un boulon, d’une rondelle et d’un écrou à oreilles, tel qu’illustré.
Coloque la protector en su lugar, sobre la barra y el soporte.
Luego, sujétela con un perno, una arandela y una
tuerca mariposa, como se muestra en la figura.
- OU -
- O -
Arbre courbe / Eje curvo Arbre droit / Eje recto
Mélanger 77 ml (2,6 oz) d’huile 2 temps et
3,8 l (1 gal) d’essence fraîche dans
un jerrycan séparé. Agiter, puis verser
dans le réservoir du taille-bordures.
Mezcle 77 ml (2,6 oz) de aceite de 2 tiempos con
3,8 l (1 gal) de gasolina fresca en un contenedor
para combustible independiente. Agite la mezcla
y luego viértala en el tanque de la recortadora.
5
6
8
7
Placer le taille-bordures au sol,
en vous assurant que
la tête de celui-ci n’est pas
tournée vers vous.
Coloque la recortadora sobre el
piso, con el extremo de la cabeza
recortadora lejos de usted.
Mettre le levier du volet de départ
en position de démarrage A.
Mueva la palanca del anegador
en la posición de arranque, A.
Appuyer la poire d’amorçage à
plusieurs reprises de 10 fois.
Presiónela la bomba de cebado
10 veces.
Appuyer sur la gâchette et la
maintenir enfoncée pour la
déverrouiller.
Presione el gatillo y el bloqueo y
manténgalos presionados.
9
Tirer rapidement et vigoureusement pour
démarrer l’appareil (6X MAX.) Continuer
d’appuyer sur la gâchette et la maintenir
enfoncée pendant 10 secondes. Si le moteur ne
démarre pas, RÉPÉTER LES ÉTAPES
7
á
10
.
Tire del arrancador rápidamente y con fuerza.
Continúe presionando los gatillos durante
10 segundos luego de que el motor arranque
(máximo 6 veces). Si el motor no arranca,
REPITA LOS PASOS
7
a
10
.
11
12
Mettre le volet de départ en position B.
Coloque la palanca del anegador
en la posición de marcha, B.
Vous êtes maintenant prêt à
utiliser votre taille-bordure!
Si le moteur ne démarre pas,
RÉPÉTER LES ÉTAPES
7
á
11
¡Ya puede usar la recortadora! Si el
motor no arranca, REPITA LOS PASOS
7
a
11
Pour éteindre le taille-bordures, appuyer sur
l’interrupteur rouge situé du boîtier de moteur.
Para detener la recortadora, presione
el interruptor rojo ubicado del alojamiento
del motor.
Visitez le site www.homelite.com pour enregistrer votre nouvel outil en ligne.
Pour toute question concernant l’utilisation ou l’entretien du produit, appeler le
service d’assistance téléphonique Homelite®!
1-800-242-4672
Ce produit à été entièrement testé avant expédition pour assurer la complète satisfaction
de l’utilisateur. Le manuel d’utilisation donne des conseils pour le dépannage. Pour
plus d’information sur l’enregistrement, consulter le manuel de d’utilisation.
Dirijase a www.homelite.com y registre en linea su nueva herramienta
¡Si tiene preguntas sobre el funcionamiento o el mantenimiento del producto, llame al teléfono de
atención al consumidor de Homelite®!
1-800-242-4672
Este producto ha sido probado enteramente antes de embarcarse para asegurar la completa
satisfacción del consumidor. El manual del operador ofrece sugerencias para la solución de
problemas. Para ver las instrucciones de registro adicionales, consulte el manual del operador.
10X
TAILLER !
¡CORTAR!
10
APPELER LE
1-800-242-4672
BESOIN D'AIDE?
¿NECESITA AYUDA?
LLAME AL
www.homelite.com
4
Aligner et assembler les deux bras jusqu’à
ce qu’ils soient adéquatement positionnés
Serrer les vis à l’aide de la
clé hexagonale fournie.
Alinee y arme los dos brazos hasta que estén
firmemente asentados. Apriete firmemente los
tornillos con la llave hexagonal suministrada.