RYOSAI TECHNICA ROSAHL User manual

1/ 4
RB-OP21011
Make installation hole for the following dimensions on the container and attach the unit with two screws.
Electric Dehumidifier
R O S A H L
Instruction Manual
Humidity Controller Unit
C-M1J
RYOSAI TECHNICACO., LTD.
8-1-1 Tsukaguchi-Honmachi
Amagasaki-City, Hyogo, 661-0001 Japan
Phone : +81-6-6497-9078 Fax : +81-6-6497-9082
For Proper Usage
Installation
Note 1) Processed dimensions for Installation hole, refer to Fig.1.
Note 2) The connection to Electric Dehumidifier "ROSAHL", refer to Fig.2.
1. Please read this manual before you use a humidity controller unit and use it correctly.
2. Please keep this manual to the person who operates, manages and maintains the unit.
NOTICE
This unit is an option part exclusively for ROSAHL. Use it as a set with ROSAHL.
We cannot guarantee for any troubles caused by using in combination with other than ROSAHL.
Prohibited
DO NOT put pin or wire etc into the unit. It may cause an electric shock and
the unit may be damaged or deteriorate.
Prohibited
DO NOT attempt to disassemble, repair or modify ROSAHL. It may cause an electric shock
and the performance deterioration, as this may damage it.
Prohibited
Fig.1

2/ 4
RB-OP21011
Precautions for Use of ROSAHL
1) This unit is an option part exclusively for ROSAHL. Use it as a set with ROSAHL.
2) Attach the unit on the inside of a container that is dehumidified with ROSAHL.
3) Attach the unit in a place where air can easily circulate in the container as much as possible.
4) There may be a gap about ±10% from the set value.
(We do not guarantee the accuracy. Please consider the set value as a guide only.)
5) Humidity inside a container may change due to changes in the surrounding environment.
The unit does not have the function that keeps inside of a container at the specified humidity.
6) Do not do remodeling. The unit may break down.
Fig.2 Connection diagram between the units (For separate type dehumidifier [RDHB series])
Fig.3 Connection diagram between the units (For general type dehumidifier [RDH series])

3/ 4
RB-OP21011
Usage
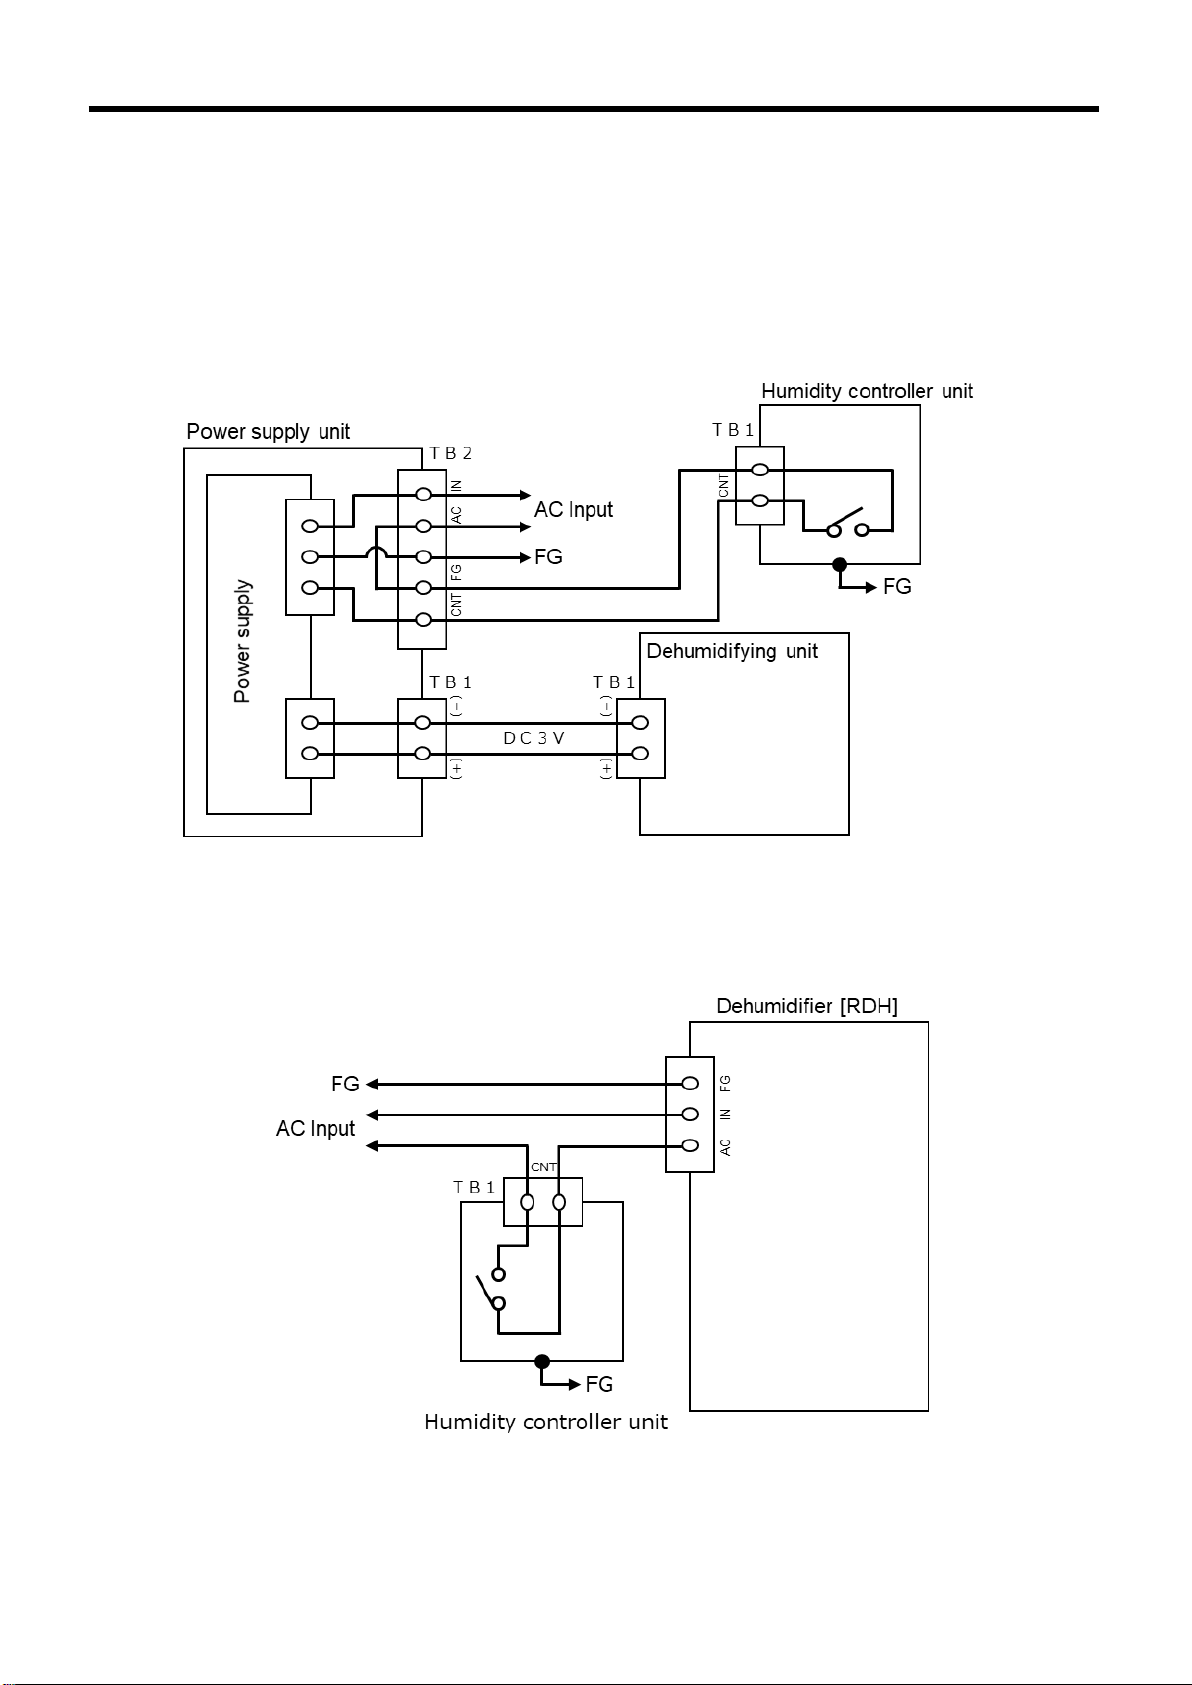
1. For Using with Separate Type Dehumidifier [RDHB series]
1. For Using with General Type Dehumidifier [RDH series]
Please turn on the AC power supply and get energized. (Please use 100V AC *)
*Note : RDH-10J1 & RDH-10J2 can be used with 100/200V AC
2
Please confirm lighting of the LED.* (It is a usage state)
*Note : It might take 3-5 minutes to light the LED on the initial stage of turning on the power supply.
This is not abnormal.
●Please confirm the following matters when LED doesn't light.
(1) Is the power supply correctly connected?
(2) Is the input voltage correct?
(3) Does not the moisture discharging side of a dehumidifying element get wet?
(In this case, the overcurrent protection circuit of the power supply functions and LED
does not light. If the wet state is canceled, it returns to normal state.)
3
Please set the knob of humidity controller as the right side of it as possible.
(Low humidity side)
1
Please set the knob of humidity controller at the value you want.
4
Please turn on the AC power supply and get energized.
2
Please confirm lighting of the LED.* (It is a usage state)
*Note : It might take 3-5 minutes to light the LED on the initial stage of turning on the power supply.
This is not abnormal.
●Please confirm the following matters when LED doesn't light.
(1) When LEDs of both the power supply unit and dehumidifying unit do not light
a) Is the power supply correctly connected?
b) Is the connection between units correctry connected?
c) Does not the moisture discharging side of a dehumidifying unit get wet?
(In this case, the overcurrent protection circuit of the power supply functions and LED
does not light. If the wet state is canceled, it returns to normal state.)
(2) When LED of the power supply unit light and LED of the dehumidifying unit does not light
a) Is the power supply unit and the dehumidifying unit connected?
b) Is not the polarity of wiring between the power supply unit and the dehumidifying unit wrong?
3
Please set the knob of humidity controller as the right side of it as possible.
(Low humidity side)
1
Please set the knob of humidity controller at the value you want.
5
Please adjust the voltage of the power supply unit in the range of 2.9 ~ 3.3V DC at the terminal
block of the dehumidifying unit after 15-20 minutes the LEDs of both the power supply unit and
the dehumidifying unit light.
*The location of voltage adjustment hole, refer to Fig.6 on page 5.
4

4/ 4
RB-OP21011
Specifications
Outline
●Precautions for Humidity Controller
(1) The humidity controller only turns on / off the dehumidification function, and does not have the
function that keeps inside of a container at the specified humidity.
(2) There may be a gap about ±10% from the set value. Also, the conditions of use and depending
on changes in the surrounding environment, the gap may become even larger. So please
consider the set value as a guide only. We do not guarantee the accuracy.
(3) Please turn the knob of humidity controller slowly.
Model Name
Items
C-M1J
Dielectric Strength (V)
2000 AC
(per minute)
Dimensions
(mm)*1
112×78×35
Weight
(kg)
0.2
Humidity Set Range
(%RH)
20 ~ 80
Operating Temperature
(deg C)
-10 ~ 50
Note *1 : Dimensions show the values of
H × W × D in the figure below.
This manual suits for next models
1
Table of contents