S.E.A. Paragliders COCOON RUNA Manual
S.E.A. Paraglider
cocoon RUNA
pilot manual

CONTENT
1
2
2
3
6
8
9
Introduction
Description
Specications
General information
Before you y
Pre-ight check-list
Connection of the rescue parachute
Installation the rescue parachute
Compatibility between harness
and rescue parachute
10
11
Activating the rescue parachute
Adjust and t the harness
Inspections
Disposal, recycling
Repairs
Care and storage of harness
Environmental information
Warranty
List of materials
11
12
15
15
16
16
17
17
17

Paragliding, like any other aviation sport, is an activity associated with increased danger for life
and health. It is strongly recommended that you take training in a proven paragliding school, as
well as choose the equipment and flight conditions appropriate to your level of training.
Having made his choice, the pilot takes full responsibility for these risks. Taking paragliding serious-
ly, training and pilot experience can reduce these risks. Knowledge, including knowledge related
to equipment, is a necessary part of this. Seek new knowledge and rely on this knowledge — this
is an important component of your safety. If you still have questions about your equipment, do not
hesitate to contact your nearest dealer, importer or manufacturer directly. The varied conditions
of the paragliding situation cannot be predicted in advance and this manual does not answer all
safety questions. Neither the manufacturer nor the supplier of the equipment can guarantee your
safety and the safety of third parties. The various local requirements and laws of the countries
where you fly cannot be considered within the framework of this manual. This is the sole responsi-
bility of the pilot.
S.E.A. Paragliders follow the philosophy of“paragliding is not just ying”. We believe that paragliding does not start
after takeo and does not end with landing. For us, lightweight and reliable equipment is a means to expand the
pilot's possibilities in choosing starts and ying places. Free the pilot from thinking about logistics, give the pilot
more options outside the ight without sacricing the quality of the ight itself.
A WARNING
INTRODUCTION
1

Runa was designed to be the lightest harness for regular cross-country pilots who want more freedom of
movement without sacricing ight quality. The Runa is lighter, but without compromising on ight comfort,
safety, aerodynamics or usability.
The Runa power structure is made with a large margin of safety and does not require special handling, but do not
forget that the outer skin of your harness is made of almost the same fabric as your paraglider. Treat the harness
with the same care as your wing and it will serve you for a long time.
DESCRIPTION OF RUNA HARNESS
SPECIFICATIONS
Size S M L XL
Pilot height, cm
Carabiner height, cm
Volume of frontcontainer, cm3
Reserve parachute
Harness weight, kg
Maximum load, kg
Harness certication
Protector certication
RUNA - technical data
EN, LTF/NFL
EN 1651:2018 / LTF
Package of delivery:
- Harness
- Inatable S.E.A. protector
(EN certied)
- Speed system (2-step speedbar
with lines and pulleys)
- Acrylic footplate
- 2 aluminium main carabiners
- Rescue bridle
- Rescue parachute handle
- Outer cover for harness
160−172 170−182 180−192 190−202
44 46 48 50
Integrated frontal container
100
2100 - 3100 2100 - 3250 2200 - 3900 2250 - 4200
2.1 2.46 2.6 2.7
2

GENERAL INFORMATION
FEATURES
1. Outer pocket (twin)
2. Rescue parachute container
a) container pocket
b) container fastener
3. Inner pocket (twin)
4. Back big pocket
5. Rear fairing
6. Air inlet (twin)
7. Back inatable protector
8. Bottom pocket
9. Shoulder strap (twin)
10. Side adjustment strap (twin)
11. Lumbar adjustment
12. Footplate cords:
a) upper (twin)
b) lower (twin)
13. Footplate
14. Main carabiner (twin)
15. Left cocoon panel
16. Get-Up closing system
17. Speedbag closing line
18. Speedbar
3

Runa has a hammock design. The harnesses of this type does not have a rigid board under the pilot.This design saves
weight, and allows more precise tuning of the harness to the individual proportions of the pilot.
ACCELERATOR
The harness is supplied with a compact two-step speedbar. The speed system contains two pulley, the speedbar
with lines and elastic cords.
RESCUE PARACHUTE COMPARTMENT
Runa allows the installation of one rescue parachute in the forward (upper) container. The mount of Y-bridle is
placed on the shoulders, which is safer compared to the mount on carabiners, but makes it little bit dicult to
deploy the rescue parachute to the left side.
The internal container of the cockpit is designed for the installation of lightweight rescue parachutes and is limited
in volume.
FLIGHT INSTRUMENTS
The panel of container intended for ight instruments mounting. It is small in size and is located close enough to
the pilot's face. We made it so that the small-sized instrument screens were easy to view. You will nd it convenient
to use a small (and light) smartphone or ight instruments.
CARGO SPACE
Runa has two storage compartments: main and under the seat. The main luggage compartment (behind the
pilot`s back – big pocket) has a compartment for installing a drinking system. Small lockable cockpit pocket is
meant for power bank. There are also four pockets available in ight: two outer ones on the sides of the harness
and two inner ones, under the carabiners.
4
POWER STRUCTURE
BACK PROTECTOR
The inatable protector — is a key element of the harness Runa concept. Thanks to him, the packing volume of the
harness is so small that it can be used instead of a roller inside the glider, taking care of its long plastic rods.
AEROBATICS
Runa harness is not intended for acrobatic maneuvers in order to avoid getting into dangerous ight situations.
TOWING
Runa harness is suitable for towing. There is no any special points on the harness for mounting of tow bridles. So,
the tow bridle must be connected to main carabiners only.
Always remember that during towing paraglider can react dierently to pilot control actions. When towing, it is
necessary to control the wing with less brake eects than normal ight to avoid dangerous ight situations.
Before ying, make sure that your equipment meets the safety requirements for towing. Follow the instructions of
towing team.
MOTORIZED FLIGHT
The Runa harness is not suitable for ying with any paramotor.
TANDEM FLYING
The Runa harness is not designed for tandem ying. Please, see sea-wings.pro for details of our harnesses speci-
cally designed for tandem ying.
5

Runa harness delivered with pre-installed speedbar.
In case of need, you can install the speed system by yourself – before rst ight in the new harness or if replace of
speedbar needed.
It is convenient to install the speed system using a simulator — by hanging the harness on it.
Begin installing from front part of harness to back.
First, attach the speedbar to footplate by rubber lines.
INSTALLING SPEEDSYSTEM
ATTACHMENT TO THE WING
BEFORE YOU FLY
Before the rst ight, the harness must be prepared at home: install a reserve parachute, adjust the harness for the
pilot, adjust the accelerator. Harness adjustments can require serious attention, with many pilots adjusting the
new suspension after several ights to achieve maximum comfort and control. It is very important to understand
here that tting the harness is a long process, but the reward is high. We ask you to treat this section with all your
attention and do not hesitate to ask us questions directly.
If Runa is your rst cocoon harness, please note that landing in any cocoon, as well as piloting techniques, is quite
dierent from open harnesses.
To do this, install main carabiners in webbings on left and right sides of the harness – main hangpoints loop and
side adjustment straps. Locks of carabiners must be oriented forward in ight direction.
6
Second, pass the lines through
metal rings on front end of
harness seat board.
Third, route the lines through
both pulleys on the sides of
harness.
Fourth, route the lines through
both eyelets under the
carabiners.
Then tie the line to the brummel hook with a bowline knot and attach the speed system to the corresponding
cords on risers of paraglider.
INSTALLING THE DRINK SYSTEM
The Runa harness allows you to install a drinking system.
To install the drinking system, place it in the dedicated compartment in the rear storage pocket. Next, pass the
drinking tube through the opening in the shoulder strap.
FILLING THE INFLATABLE PROTECTOR
The Runa harness is equipped S.E.A. inatable protector. It is located in a special compartment behind the pilot's
back. Thanks to its size and length, it perfectly protects the pilot's waist, back and pelvis. S.E.A. inatable protector
is EN certied. The protector can be removed (e.g. for the check or replacing) through a zippered pocket in the
lower part of the harness - just behind the lower pocket under the pilot's knees.
Inate the protector before each ight to maximize its protective properties. You can even use a small electric
pump for this. It is important not to pump up the protector too much. Close the cap on the pipe in 2 seconds after
lling.
After landing, simply open the cap on the lling pipe of protector, the air will out on its own without additional
action. Then you can fold and pack the harness.
7

LANDING
Before each take-o you must do next check:
- there no any damage on the harness or carabiners;
- the rescue chute container closed correctly;
- deployment handle attached correctly;
- all buckles, belts, zips are securely fastened;
- all ight instruments are secured;
- paraglider connected correctly to the harness;
- both carabiners secured by their lockers;
- the speed bar are attached correctly to the glider;
- all pockets are closed properly;
- Is both air intakes open;
- the back protector is lled correctly;
- your Get-Up system is closed.
You should always training to use a complete and consistent system of pre-ight checks and repeat the same
procedure before every ight.
PREFLIGHT CHECKLIST
Before landing always pull your legs out in forward direction of the speedbag of the harness. NEVER do the
landing in the seated position — it is very dangerous even if you have back protector. Stand up before landing for
increasing safety.
8

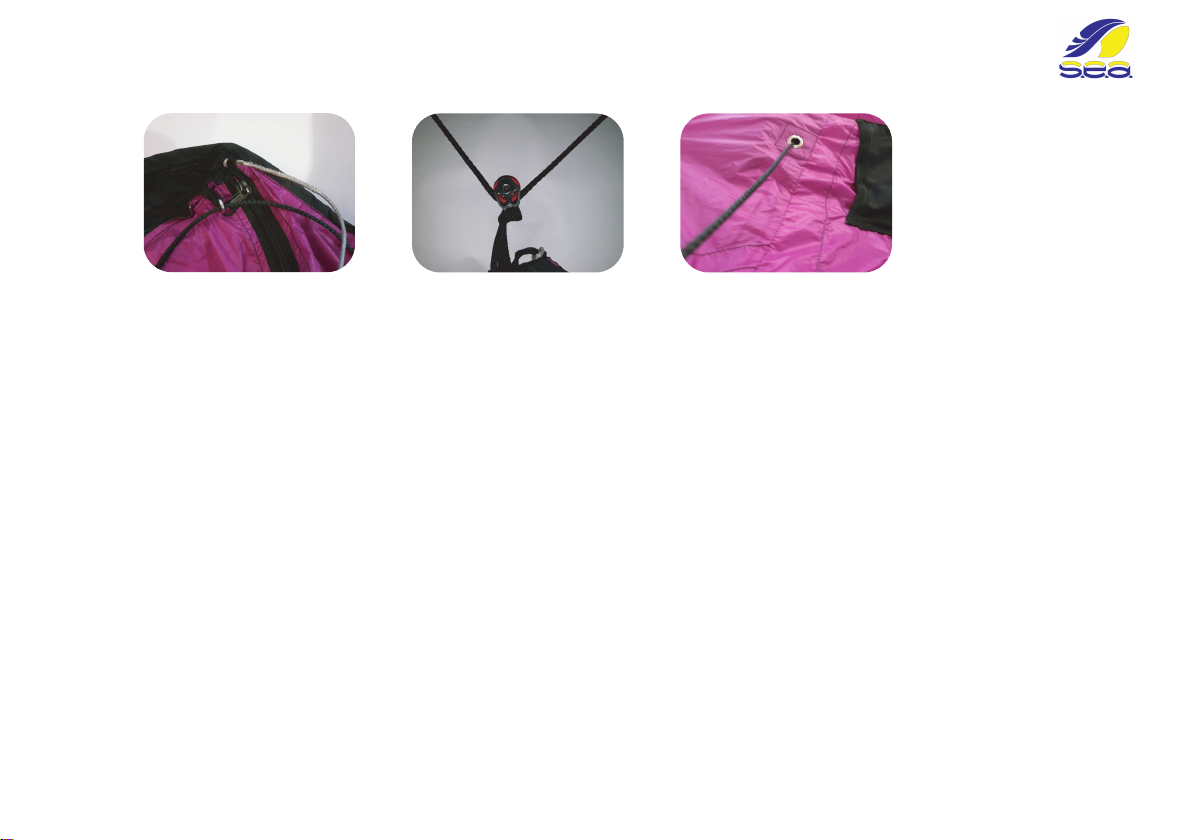
1. Connect the handle to the inner container of the rescue parachute. Use a loop in the middle of your inner container.
2. The main riser of the rescue parachute must be connected to V-bridle of the harness.
Two methods of this connection are commonly used:
- by the steel carabiner (it must be tighted):
CONNECTION OF THE RESCUE PARACHUTE
- by loop “bridle-to-bridle”method:
The choosed link must have the breaking load at least 2300 daN. Make sure the link connection or loop are
secured from the slipping and wearing.
9
Lightweight compact parachutes such as the S.E.A. Paragliders WTF are better suited for Runa harness. It is best to
leave the rescue parachute installation to an experienced instructor or harness manufacturer's representative. It is
very important that the rescue parachute is repacked shortly before being installed in the harness - this directly
aects the safety of the pilot.
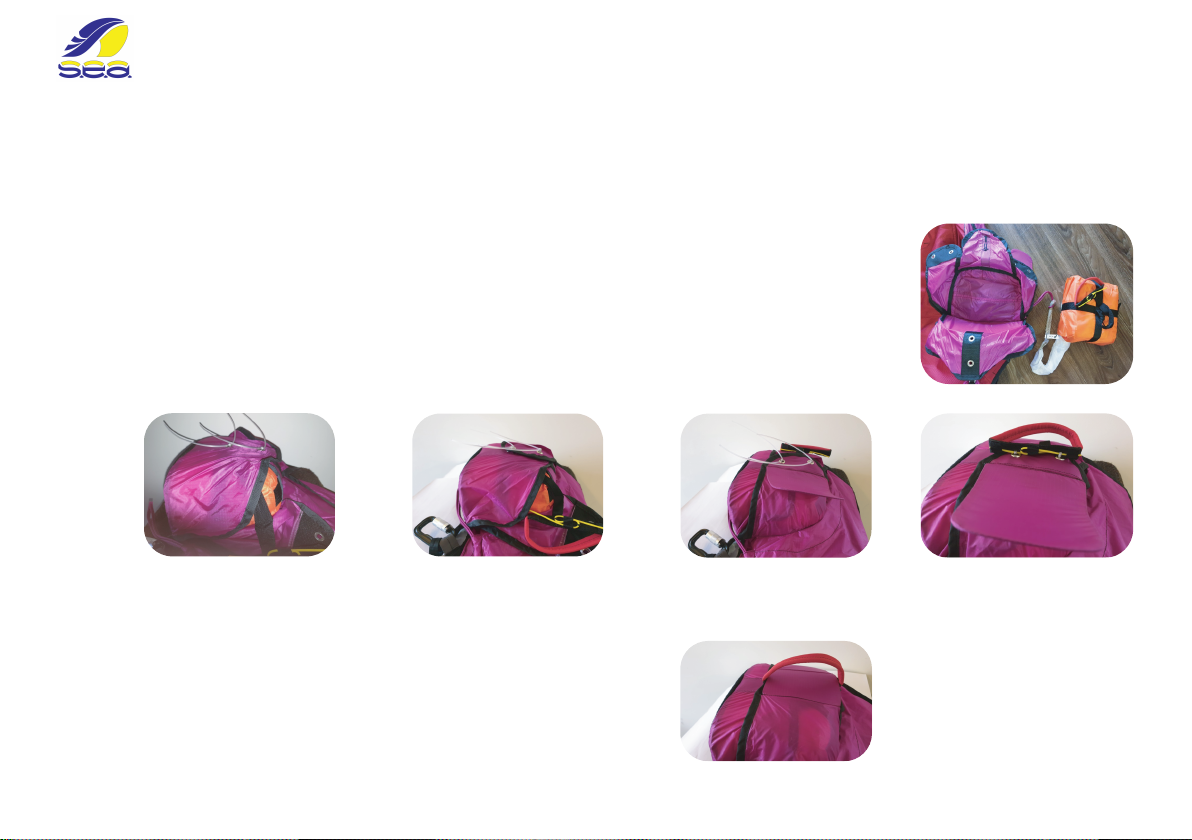
1. Place the inner reserve parachute container with the tied handle next to the harness container. Make sure the
harness and parachute bridles are not twisted. When installing the reserve make sure the reserve handle is up and
the reserve lines are facing down.
2. Guide the Y-bridles of the harness through all covers from the shoulder straps to the rescue parachute position-
ing on the harness.
3. After installing the parachute into the harness, the harness container must be closed with the pins on the
reserve parachute handle. To do this, use the two special packing devices (included in the harness kit), which are
threaded through two loops on the bottom ap of the outer container.
INSTALLATION THE RESCUE PARACHUTE
4. Close the top ap. 5. Close the left ap (in the
ight direction).
6. Close the right ap (in the
ight direction).
7. Pass the lower pin of the
parachute handle through the
lower loop and the upper pin
through the upper loop.
8. Remove the packing
devices carefully and slowly.
10
9. Pass the plastic cover on
the right side ap through
the parachute handle and
put it into the corresponding
pocket on the left side ap (in
the direction of ight).

ACTIVATING THE RESCUE PARACHUTE
After installation of the rescue parachute, it is necessary to check the compatibility of the parachute and harness.
Use the harness simulator - put on the harness with installed parachute, fasten all the buckles and attach the
harness with main carabiners to the simulator. You must check that the rescue parachute can be used according
to the procedure described in this manual.
COMPATIBILITY BETWEEN HARNESS AND RESCUE PARACHUTE
It is recommended to throw the rescue parachute with the right hand, throwing it to the right side. The design
features of the harness (the bridles of the rescue parachute runs along the right side of the harness) make it
dicult to deploy it to the left side. Throw the rescue parachute with your left hand as a last option, only if the
right hand is injured / blocked.
In a situation requiring the deployment of a rescue parachute, it is very important to correctly estimate the height.
If the height is low, any delay can be very expensive. On the other hand, the deployment of a rescue system in a
situation, where the paraglider is able to return to the ight state, leads to unnecessary injuries. Remember, a
reserve parachute saves not your health, but only your life! Landing with a rescue parachute can be quite tough
and is not acceptable at every location on the earth's surface.
Deployment procedure:
- nd and rmly grab the reserve parachute handle (on the harness or external container);
- pull the handle so that the parachute comes out of the harness (or outer container) shaft. The parachute must
remain in its inner container. You have to pull the handle in forward direction.
- throw the parachute away from you as much as possible towards the open space - where the canopy or paraglid-
er lines will not interfere with it. The stronger the throw, the faster the parachute will open. If there is a height /
time for the throw, it is advisable to make a swing with a preliminary swing. The harness release handle have to be
thrown away together with the inner container!
11
ADJUST AND FIT THE HARNESS
- Immediately after opening the parachute it is necessary “to kill” the canopy of the paraglider to avoid the “bell”
regime. To do this, tighten the B- or C-risers of the glider rmly and deeply. If this is not possible, you need to
deeply tighten the brakes of the paraglider until it enters a complete stall;
- when descending under the canopy of a rescue parachute, it is necessary to control the height and the environ-
ment. Before touching the ground, you need to take the right position - take the maximum "standing" position in
the harness, bend your knees, tighten the muscles of the legs, abs and back to absorb the impact energy;
- to avoid the injury, always try to land on your feet;
- after landing in a strong wind, you need to kill the canopy of the parachute by tightening either one main (side)
line, or the central line.
The harness Runa is available in four sizes, each designed for a specic pilot's height (see “Specications”). For a
more precise adjustment for a specic pilot, we recommend using a simulator. Adjustments must take into
account not only height, but also the shape and proportions of the pilot's body. When choosing the backrest
angle, take into account the individual piloting style and your own preferences.
12

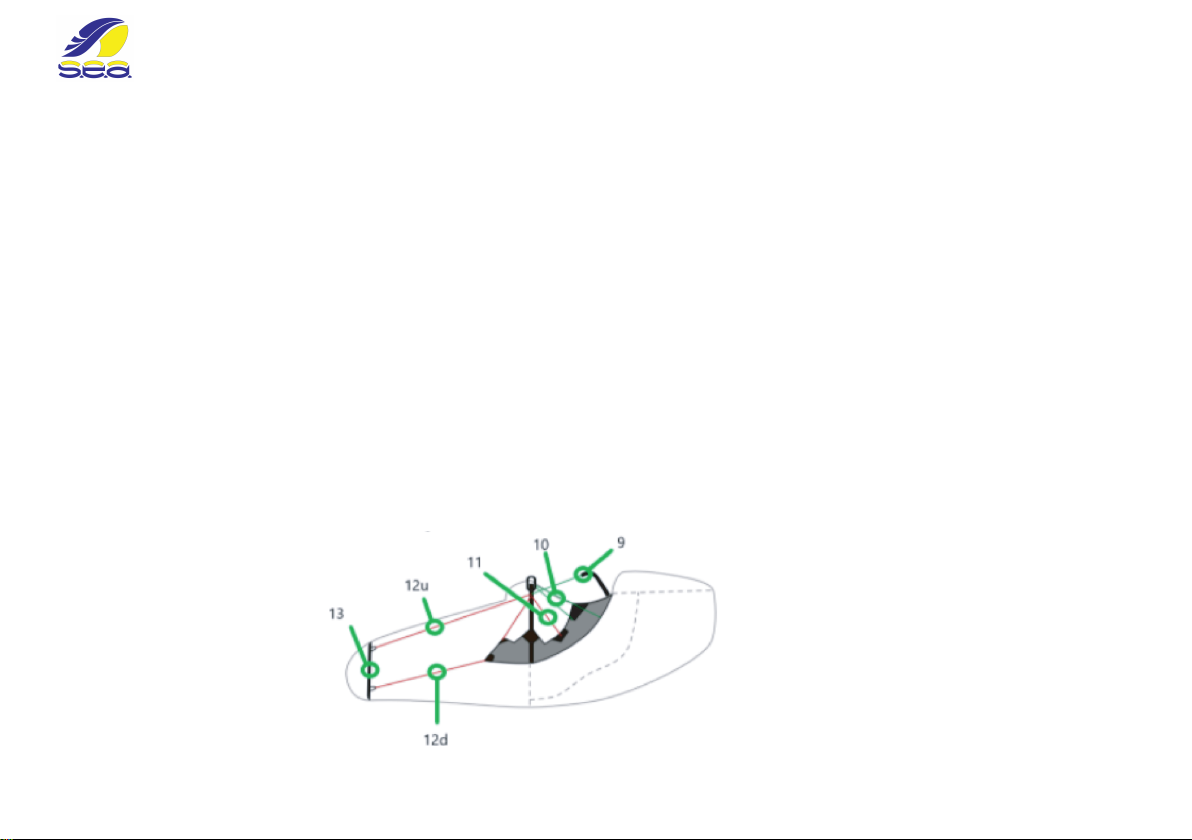
ADJUSTMENTS PRINCIPLES
The cocoon frontal lines (12) denes the overall harness pitch adjustment.
The relative lengths of the upper (12u) and lower (12d) frontal lines denes the angle of footplate (13).
The lumbar adjustments (11) reect the shape of the pilot's body and their adjustment depends on his body size.
The side straps is adjusted with strong plastic buckles (10).
To tighten: pull the shoulder webbing forward.
To loosen: pull sideways on the front of the slide buckle.
The last step is to adjust the shoulder straps (9), they is needed for x the pilot in the longitudinal axis.
The optimum setting for the shoulder straps depends on the height of the pilot.
Step into the harness and stand upright, symmetrically adjust the shoulder straps until they are a snug t, but not
tight.
To tighten: pull the shoulder webbing forward and down. To loosen: pull up on the front of the slide buckle.
ANGLE OF FOOTPLATE
The footplate can be adjusted with a 4-knot cords. Make sure both pairs the lines (on both sides – left and right) is symmet-
ric — have equal tension.
An elastic insert at the front of the speedbag allows you to change the length of the cocoon without creating
additional wrinkles on the side panels.
13

FOLLOW THE NEXT INSTRUCTION TO PUT ON THE HARNESS:
2. Lock the Get Up system 3. Pass the right ball through
the left loop of the speedbag
4. Pass the closing line
through the right eyelet on
the speedbag and pass the
left ball through the loop on
the closing line.
5. Attach the rescue container
with the plastic fasteners.
14
1. Place the shoulder straps over
your shoulders. (Arms are inside
the shoulder straps).

INSPECTIONS
We at S.E.A. Paragliders recommend to do a technical inspection of the harness every 24 months.
The full inspection can be done by the manufacturer or his representative.
It is highly recommended with regular pre-ight checks to do inspection thoroughly on every rescue repack of 6
months. Additional inspections should be performed after any accident, bad landing or take o, or if there are any
signs of damage, tearing or some wear. Always ask professional advice if you are in doubt.
The following checks should be done:
- After a long period of storage, you shoul to do visual inspection the main parts and units of harness.
- Check all webbings, straps and buckles for wear and damage, especially in the “hidden” areas, such as the inside
of the carabiner hook-in points.
- All sewing and stitches must be intact.
- Special attention should be paid to the rescue installation, mounting of rescue handle with its pins.
- Check the integrity and impermeability of the protector.
- The main carabiners must be replaced at least every 5 years or after 500 hours, whatever comes rst. Impacts may
create undetectable cracks that could result in structural failure under continuous load.
At the end of service life the harness must be disposed properly. Please, send it back to manufacturer for correct
disposal.
DISPOSAL, RECYCLING
15

CARE AND STORAGE OF HARNESS
Only the manufacturer or his approved specialist can perform any repair that involves critical parts of the harness.
This will ensure that the correct materials and repair techniques are used.
REPAIRS
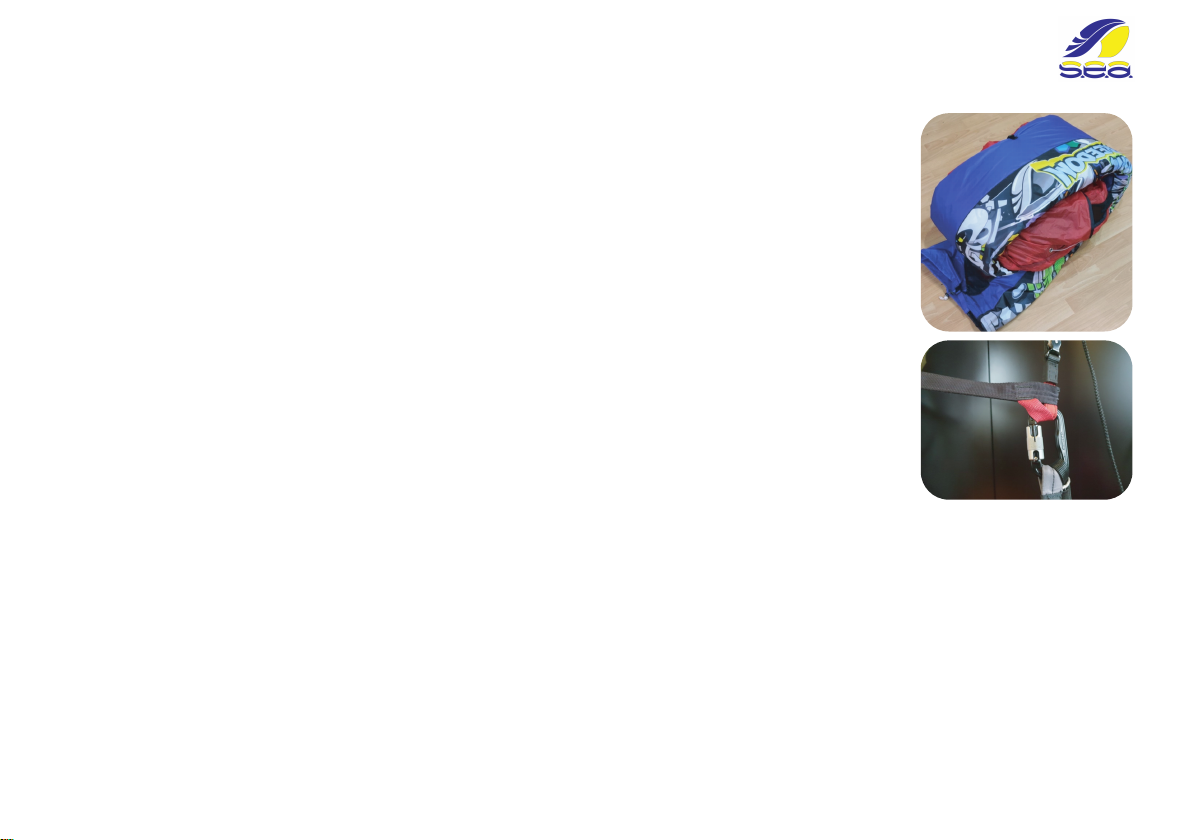
- put the harness in a bag or backpack as carefully as possible;
- store the harness at a temperature between 10° and 30°C and in relative humidity between 40 and 75%;
- do not pack the harness with foreign objects and debris inside;
- do not leave the harness in the sun for a long time;
- do not leave equipment in a closed car under the sun;
- do not drag the harness on the surface of the earth;
- avoid contact of the harness with hot objects and open re;
- avoid wetting the harness;
- do not walk in the shoes on the harness;
- do not put heavy objects on the packed harness and do not sit on it;
- in case of contamination - never wash the wing using chemicals, only wipe it with a slightly wet soft sponge;
- do not store the harness in a wet, not ventilated room;
- after getting soaked in sea water, immediately rinse the harness outside and inside in plenty of fresh water (for
example, in a car wash), only then dry it in the shade in the wind.
16

LIST OF MATERIALS:
WARRANTY
ENVIRONMENTAL INFORMATION
Paragliding is a particularly nature-friendly sport. This makes it all the more important that we as paraglider pilots
behave in a responsible way towards both the environment and the people sharing it with us. Please also make
sure to comply with legislation regarding protected areas, privately owned property or hunting arenas - this
ensures the least possible friction in relation to other users of the great outdoors, to the benet of both yourself
and the sport as a whole.
We at S.E.A. Paragliders provides a 12-month or 100 ight hours warranty - for the correct and ¬awless function
of the harness. The warranty covers only manufacturing or functional defects. The warranty does not cover hidden
defects in material, as well as defects caused by improper use, inappropriate storage, damages during transporta-
tion, or harsh handling and using that is not in appropriate accordance with the product design.
Harness fabric: Oxford honeycomb 157g Nylon, 40g double ripstop Nylon, 80g ripstop Nylon,
Webbing: 25mm, 12mm and 15mm PES webbing,
Ropes: Liros DC 500, D-Pro 5mm, Abrax PES line,
Other: Chang ball bearing pulleys, acryl footplate, PET reinforcements, 2.5mm steel rods, carabiner Edelrid Foras,
webbing buckles Edelrid SB
17

HARNESS DATA
SIZE COLOR Date of manufacturing
Serial number
Checks and repairs:
S,E,A, Paragliders
Gvardeytsev Shironintsev str. 40D, 62
Kharkov, 61123, UKRAINE,
+38 050 159-27-76
+38 050 257-46-38
www.sea-wings.pro
Table of contents
Other S.E.A. Paragliders Aircraft manuals


