1) Connect the DC plug to the adaptor connector of control box.
4-1. Battery charging
Power on/off & speed control Knob
Charge display LED
Speed display LED White >> Sky Blue >> Blue >> Pink
Pause button
Forward/Reverse switch
Handpiece connector
Front panel
Control box
Handpiece
Handpiece stand
Control box stand (optional)
Adaptor
Clip(optional)
Handpiece holder (optional)
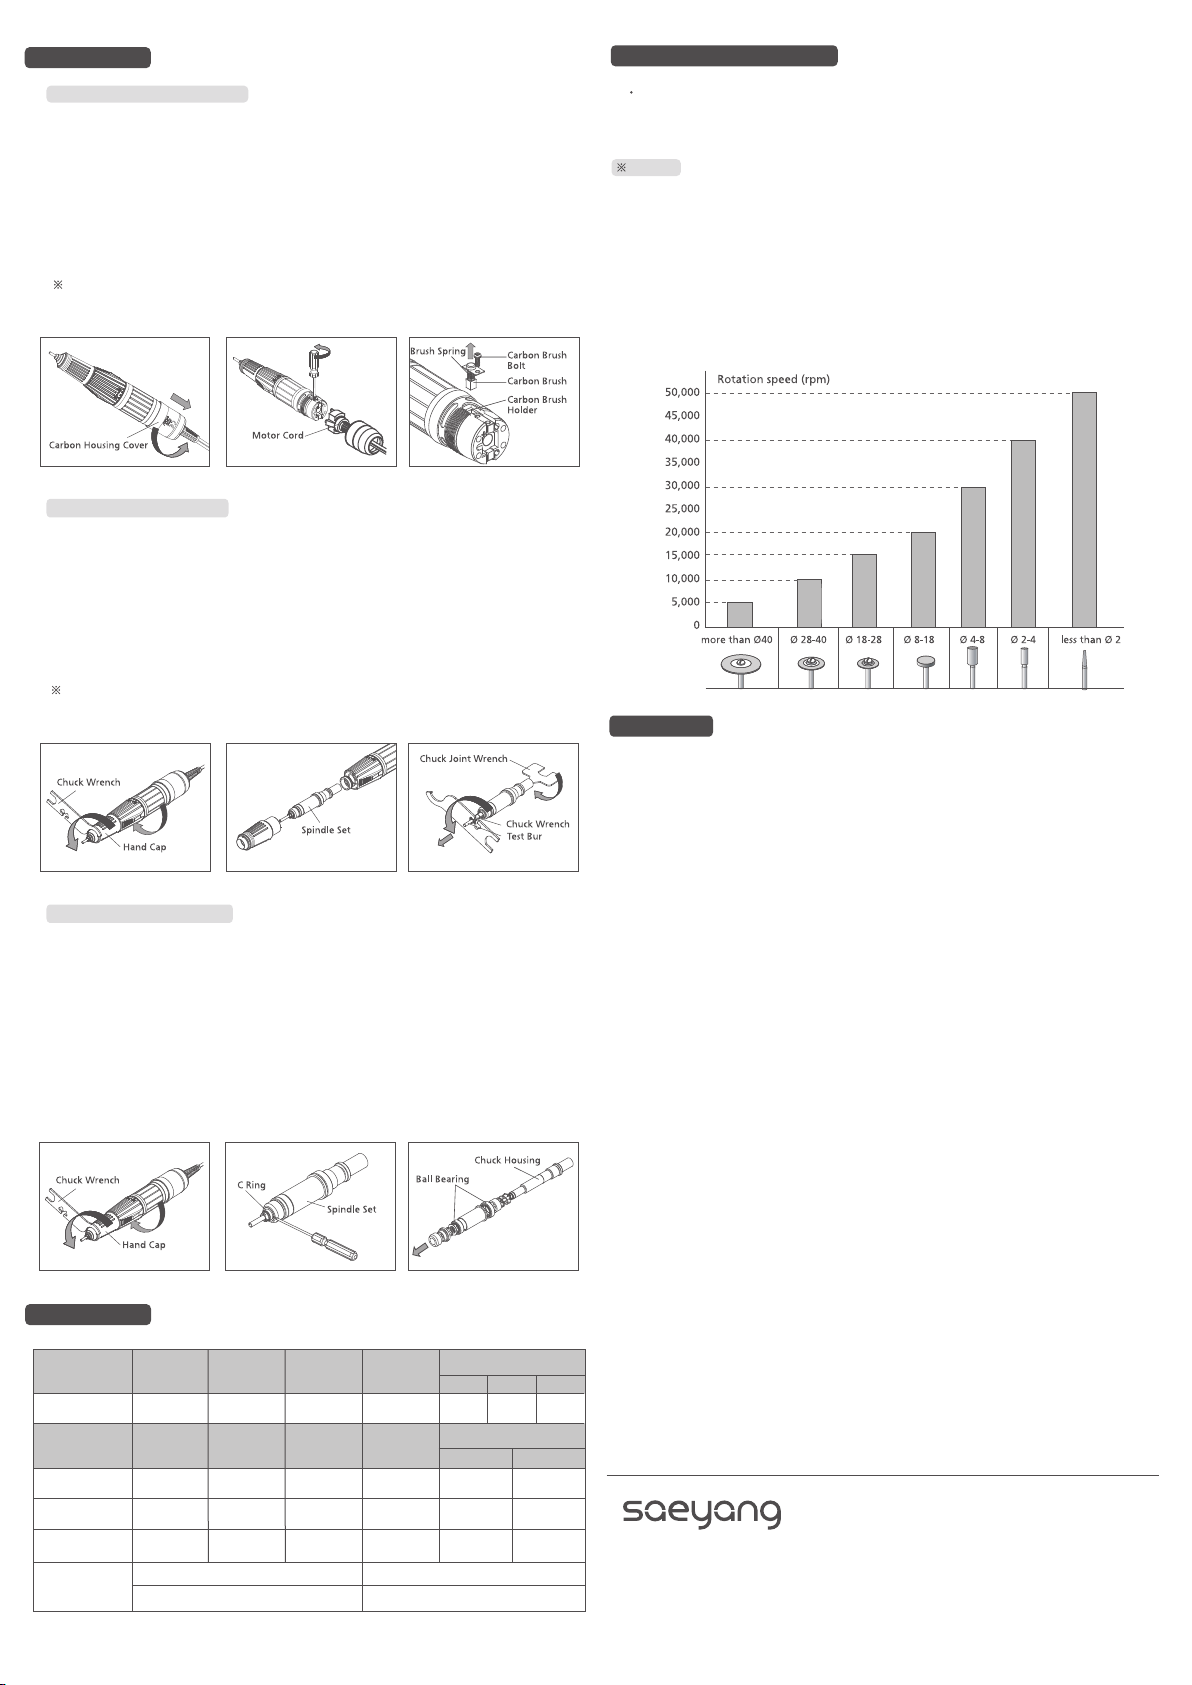
Max speed : 30,000 RPM
Run-time
Charging time : 3 hrs.
Speed control
Forward / Reverse rotation
Overload protection
Use with the standard bit
The battery is a Li-ion rechargeable battery(consumable goods)
Battery lifetime is limited and depends on working conditions.
Please dispose used batteries in accordance with the national and local laws.
Install the unit at your workplace and do not use in a dirty or very hot and humid
environment.(-20℃~ 40℃, 0-90% RH)
Please take care not to drop the handpiece or drill unit. This will result in damage
to ball bearing and will affect the durability of the motor.
Please do not allow water or other liquids to spill onto and into all units.
After replacing a bur, please make sure to close the chuck handle.
Do not open the chuck handle while the handpiece is in operation.
While the handpiece is not in operation, it is recommended to leave a drill bit (bur)
inserted into the chuck after cleaning
MINI cro is a professional use only device, for use by professionals only.
1. Precaution
2. Features
3. Part introduction
※Please be sure to read this manual before operation.
Portable control box & Micro-motor
20,000 RPM
30,000 RPM
30,000 RPM
9hrs
10hrs, 4hrs
6hrs
SDE-MH20(30K), SDE-SH300
SDE-MH20
SDE-H200
②③④⑥ ⑦⑤
Clip Type
(Optional)
Standard type
Back viewSide viewFront view
madein korea
4. Installation & Operation
See No.6 Safety protection system.
Check the chuck and close the chuck.
Check the motor and repair if the
motor has a problem
Replace the motor cord.
Replace the carbon brushes.
Correctly plug the motor cord to the
motor connector of control box.
Worn carbon brushes.
In case any malfunction is found, consult with an official dealer.
Trouble in the motor part.
Defect in the motor cord.
Motor stops suddenly
while in use.
Although a control
box is fully charged,
a handpiece fails to
run.
Loose connection of a
motor cord with the motor
connector of control box.
(1) To remove a bur, please turn a chuck handle clockwise until it clicks to stop, and
then pull out the bur.
(2) To insert the bur, please turn the chuck handle counterclockwise until it clicks to
stop.
(3) Please be sure not to use bent, asymmetrical or damaged burs. Always use stand-
ard burs.
5. Bur(Bit) insertion and removal
4-3. Pause Funtion
1) If you press the Pause button during handpiece operation, the operation
of the handpiece is temporarily stopped.
2) Press the Pause button again to start the handpiece operation.
1) Connect the handpiece to a control box.
2) Turn the power on / off & speed control knob to the right SPEED LED turns
white and power is on.
3) Turn the Power on/off & speed control knob to the left or right to use the
minimum and maximum rpm.
4) Forward / Reverse can be selected using Forward / Reverse switch
4-2. Operation by Hand
To prevent from overheating, please be sure to separate the adaptor from the
control box. Also,please avoid operating the unit during charging hours.
When charging, please make sure to use the original charge adapter and
power cord.
2) The CHG LED lights up RED while the battery is charging, and the CHG LED
lights up GREEN when charging is complete
6-1. Overload protection function
: During overload, the speed display LED turns red and flashes, and the current
is cut off. Turn the knob to the left to turn off the power or press the pause
button, release the cause of the overload, then turn the power on or release
the pause to use again.
6. Safety protection system
Overloaded or a chuck is open i
in operation.
(low speed) (high speed)
made in korea
Warning about battery usage