SAF tehnika Aranet PRO User manual

Quick Start Guide
Aranet PRO


SENSOR DATA
WIFI
LAN
12V
POWER FROM BATTERY
OFF ON LAN RESET
1. Check the contents of the box
PZ2
2. Attach the device to the mount
A
A
B
C
C
B

ON
10 sec
Optional PoE
accessory
3. Connect power to the device
4. Turn the device on
1
SENSOR DATA
WIFI
LAN
12V
POWER FROM BATTERY
OFF ON LAN RESET
SENSOR DATA
WIFI
LAN
12V
POWER FROM BATTERY
OFF ON LAN RESET
2
OR

Change your password, modify and add users in
the Users setting section.
Set the device time in the System > Time setting
section.
Scan the availability of the radio channel in the
Sensors > Radio setting section.
Pair your sensors by pressing the Add sensor
button in the Sensors > Sensors setting section.
Enter the Notications setting section, to
congure your sms and/or e-mail notications.
WiFi SSID “Aranet-******”
http://192.168.206.100
Username: root
Password: changeme
6. Congure the device
5. Connect to the device
THE DEFAULT
ADMINISTRATOR LOGIN
3
1
2

7. Additional resources
ATo view Aranet PRO User’s Guide visit
https://aranet.com/downloads/
B To view Terms&Conditions visit
https://aranet.com/terms-and-conditions/
C To view Returns&Guarantees visit
https://aranet.com/returns-guarantees/
D To ll RMA form visit
https://aranet.com/rma/
The information presented in this guide is the property of SAF Tehnika, JSC.
No part of this document may be reproduced or transmitted without proper
permission from SAF Tehnika, JSC.
The specications or information contained in this document are subject to
change without notice due to continuing introduction of design improvements.
If there is any conict between this document and compliance statements, the
latter will supersede this document.
SAF Tehnika, JSC has no liability for typing errors in this document or damages of
any kind that result from the use of this document.
To get up to date information about accessories and their availability, please
contact sales representative.

Deutsche
1Überprüfen Sie den Lieferumfang
2 Montieren Sie das Gerät an der Halterung
3 Verbinden Sie das Gerät mit der Spannungsversorgung /
Optionales Zubehör PoE
4 Schalten Sie das Gerät ein
5 Stellen Sie eine Verbindung mit dem Gerät her
6 Kongurieren Sie das Gerät
Ändern des Passworts und Ändern oder Hinzufügen von
Benutzer in den Benutzer.
Einstellen der Gerätezeit in System > Zeit.
Prüfen Sie die Kanalverfügbarkeit in Sensoren > Radio.
Um Sensoren anzubinden, drücken Sie die Sensor
hinzugfügen in Sensoren > Sensoren.
SMS - und / oder E-Mail-Benachrichtigungen verwalten in den
Benachrichtigung.
7 Zusätzliche Ressourcen
7A Um das Aranet PRO Benutzerhandbuch einzusehen, besuchen
Sie
https://aranet.com/downloads/
7B Um Terms&Conditions einzusehen, besuchen Sie
https://aranet.com/terms-and-conditions/
7C Um Rückgabe-&Garrantiebestimmungen einzusehen,
besuchen Sie
https://aranet.com/returns-guarantees/
7D Um unser RMA-Formula auszufüllen, besuchen Sie
https://aranet.com/rma/

Español
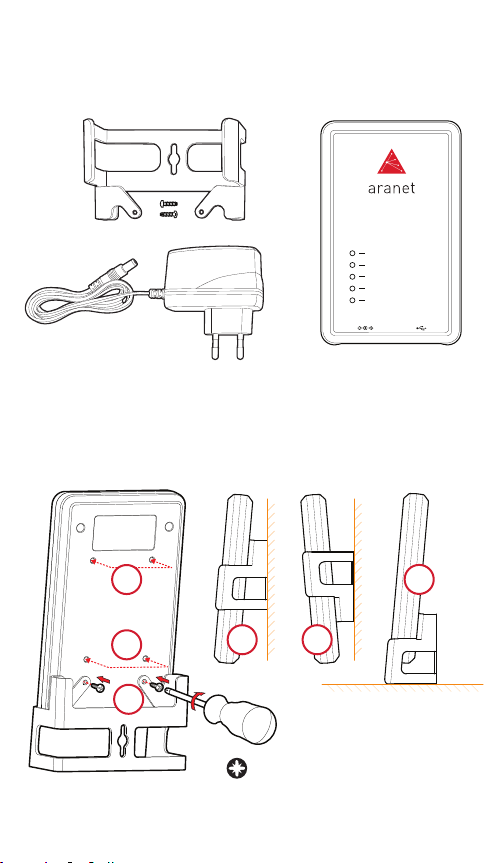
1 Verique el contenido de la caja
2 Adjunte el dispositivo al soporte
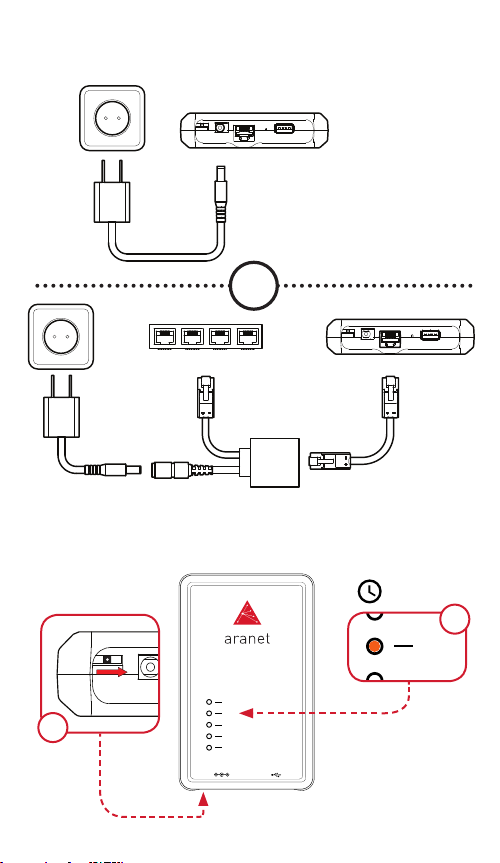
3 Conecte el dispositivo a la energía / Accesorio opcional PoE
4Encienda el dispositivo
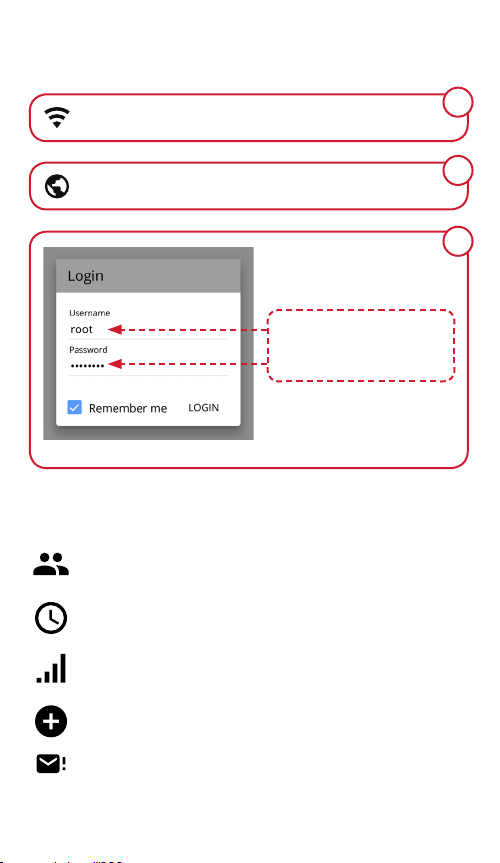
5Conéctese al dispositivo
6 Congura el dispositivo
Cambie su contraseña, modique y agregue usuarios en la
sección Conguración de Usuarios.
Congure la hora del dispositivo en la sección Conguración
del Sistema > Tiempo.
Escanee la disponibilidad del canal de radio en la sección
Sensores > Conguración de Radio.
Empareje sus sensores presionando el botón Añadir sensor
en la sección de conguración Sensores > Sensores.
Ingrese a la sección Conguración de Noticaciones para
congurar sus sms y / o noticaciones por correo electrónico.
7Recursos adicionales
7A Para ver la Guía del usuario de Aranet PRO, visite
https://aranet.com/downloads/
7B Para ver los términos y condiciones, visite
https://aranet.com/terms-and-conditions/
7C Para ver Devoluciones y garantías, visite
https://aranet.com/returns-guarantees/
7D Para completar el formulario de RMA, visite
https://aranet.com/rma/

Français
1 Vériez le contenu de la box
2Attacher l’appareil à la monture
3 Connectez l’alimentation à l’appareil / Accessoire optionnel de
PoE
4 Allumez l’appareil
5 Connectez à l’appareil
6 Congurer l’appareil
Changez votre mot de passe, modiez et ajoutez des
utilisateurs dans la section Utilisateurs.
Dénissez l’heure de l’appareil dans la section Système >
Temps.
Parcourez la disponibilité du canal radio dans la section
Capteurs > Radio.
Associez vos capteurs en appuyant sur le bouton Ajouter un
capteur dans la section Capteurs > Capteurs.
Entrez dans la section Notications pour congurer vos
notications par SMS et / ou e-mail.
7Ressources additionnelles
7A Pour voir le guide de l’utilisateur Aranet PRO, veuillez visiter
https://aranet.com/downloads/
7B Pour voir les termes et conditions, veuillez visiter
https://aranet.com/terms-and-conditions/
7C Pour voir les retours et les garanties, veuillez visiter
https://aranet.com/returns-guarantees/
7D Pour remplir le formulaire RMA, veuillez visiter
https://aranet.com/rma/

Italiano
1 Vericare il contenuto della scatola
2Attaccare il dispositivo al supporto
3 Collegare il dispositivo all’alimentazione / Accessorio opzionale PoE
4Accendere il dispositivo
5Connettersi al dispositivo
6 Congurare il dispositivo
Cambiare la password, modicare e aggiungere utenti nella
sezione Impostazioni Utenti.
Impostare l’orario nella sezione Sistema > Impostazione Ora.
Scansionare la disponibilità di canali radio nella sezione
Sensori > Impostazioni Radio.
Allineare i sensori premendo il pulsante Aggungi Sensore nella
sezione Sensori > Impostazioni Sensori.
Accedere alla sezione Impostazioni Notiche per congurare
SMS e/o notiche via email.
7Risorse aggiuntive
7A Per consultare la Guida d’Utente Aranet PRO visitare
https://aranet.com/downloads/
7B Per consultare le condizioni di vendita visitare
https://aranet.com/terms-and-conditions/
7C Per consultare i termini della garanzia visitare
https://aranet.com/returns-guarantees/
7D Per compilare il modulo RMA visitare
https://aranet.com/rma/

Latviešu
1 Pārbaudiet iepakojuma saturu
2 Pieskrūvējiet stiprinājumu pie ierīces
3 Pievienojiet ierīci pie elektrobarošanas / Papildus PoE
aksesuārs
4 Ieslēdziet ierīci
5 Pieslēdzieties ierīcei
6 Iestatiet ierīci
Nomainiet paroli, modicējiet un pievienojiet lietotājus
Lietotāji sadaļā.
Iestatiet laiku un datumu Sistēma > Laiks sadaļā.
Pārbaudiet radio kanālu pieejamību Devēji > Radio sadaļā.
Pievienojiet devējus, nospiežot Pievienot devēju pogu Devēji
> Devēji sadaļā.
Apmeklējiet sadaļu Paziņojumi, lai mainītu SMS un e-pastu
paziņojumu iestatījumus.
7Papildu resursi
7A Lai skatītu pilnu Aranet PRO rokasgrāmatu, apmeklējiet
https://aranet.com/downloads/
7B Lai skatītu pilnus lietošanas nosacījumus, apmeklējiet
https://aranet.com/terms-and-conditions/
7C Lai skatītu garantijas un atgriešanas noteikumus, apmeklējiet
https://aranet.com/returns-guarantees/
7D Lai aizpildītu RMA anketu, apmeklējiet
https://aranet.com/rma/

Nederlands
1Controleer inhoud van de doos
2Bevestig de standaard aan het apparaat
3 Sluit de stroombron aan / PoE optionele accessoire
4Zet het apparaat aan
5Verbind aan het apparaat
6 Congureer het apparaat
Verander password, voeg Gebruikers toe in Instellingen.
Stel tijd in Systeem > Tijd.
Scan beschikbaarheid radiokanalen in Sensoren > Radio.
Verbind sensor met apparaat door te drukken op Voeg sensor
toe in Sensoren > Sensoren instellingen.
Kies Meldingen om SMS en/of e-mail noticaties in te stellen.
7Additionele bronnen
7A Om Aranet PRO handleiding te bekijken bezoek
https://aranet.com/downloads/
7B Om T&C’s te bekijken bezoek
https://aranet.com/terms-and-conditions/
7C Om Retouren en Garanties te bekijken bezoek
https://aranet.com/returns-guarantees/
7D Om RMA formulier in te vullen bezoek
https://aranet.com/rma/

Norsk
1 Sjekk boksens innhold
2Fest enheten til festeanordningen
3 Kobl strøm til enheten / Valgfritt tilbehør til PoE
4Slå enheten på
5Tilkobl enheten
6 Kongurer enheten
Endr passordet, kongurer og legg til brukere i avdeling Users.
Angi enhetens tid i avdeling av innstillinger System > Time.
Utfør skanning av tilgjengelige radiokanaler i avdeling av
innstillinger Sensor > Radio.
Utfør paring av dine sensorer ved å trykke på knappen Add
sensor i avdeling av innstillinger Sensors > Sensors.
Gå inn i avdeling av innstillinger Notications for å kongurere
dine sms og/eller e-post varslinger.
7Ytterlige opplysninger
7A For å se på brukerveiledning til “Aranet PRO”, vennligst besøk
https://aranet.com/downloads/
7B For å se på “Betingelser og vilkår”, vennligst besøk
https://aranet.com/terms-and-conditions/
7C For å se på “Retur og garanti”, vennligst besøk
https://aranet.com/returns-guarantees/
7D For å fylle inn RMA-formularen, vennligst besøk
https://aranet.com/rma/

Portugueses
1 Verique o conteúdo da caixa
2Anexar o dispositivo ao suporte
3 Conecte o dispositivo à energia elétrica / Acessório opcional
PoE
4Ligue o aparelho
5 Conecte-se ao dispositivo
6 Congurar o dispositivo
Utilizadores, modique e adicione usuários na seção
Conguração do usuário.
Dena a hora do dispositivo na seção Sistema > Hora.
Analise a disponibilidade do canal de rádio na seção Sensores
> Rádio.
Emparelhe seus sensores pressionando o botão Adicionar
sensor na seção de conguração Sensores > Sensores.
Entre na seção de conguração de Noticações para
congurar suas noticações por SMS e / ou e-mail.
7Recursos adicionais
7A Para ver o Guia do Usuário do Aranet PRO, visite
https://aranet.com/downloads/
7B Para ver os Termos e Condições, visite
https://aranet.com/terms-and-conditions/
7C Para visualizar Devoluções e Garantias, visite
https://aranet.com/returns-guarantees/
7D Para preencher o formulário de RMA, visite
https://aranet.com/rma/

Русский
1 Проверьте содержимое коробки
2 Присоедините устройство к креплению
3 Подключите питание к устройству / Дополнительный PoE
аксессуар
4 Включите устройство
5 Подключитесь к устройству
6 Произведите настройку устройства
Измените свой пароль, измените и добавьте
пользователей в разделе Пользователи.
Установите время устройства в Система > раздел Время.
Просканируйте доступность радиоканалов в Датчики >
раздел Радио.
Присоедините свои датчики, нажимая кнопку Добавить
датчик в Датчики > раздел Датчики.
В разделе Уведомления настройте свои уведомления по
СМС и/или электронной почте.
7 Дополнительные ресурсы
7A Для просмотра руководства пользователя Aranet PRO
посетите
https://aranet.com/downloads/
7B Для просмотра Условий посетите
https://aranet.com/terms-and-conditions/
7C Для просмотра Возвратов и Гарантий посетите
https://aranet.com/returns-guarantees/
7D Для заполнения формы RMA посетите
https://aranet.com/rma/

Suomalainen
1 Tarkista laatikon sisältö
2 Liitä laite kiinnikkeeseen
3 Kytke virta laitteeseen / PoE valinnainen lisävaruste
4 Kytke laite päälle
5 Yhdistä laitteeseen
6 Määritä laitteen asetukset
Vaihda salasanasi, muuta ja lisää käyttäjät Users asetusten
osiossa.
Aseta laitteen aikaa System > Time asetusten osiossa.
Tarkista radiokanavien saatavuus Sensors > Radio asetusten
osiossa.
Muodosta laitepari painamalla Add sensor-painiketta Sensors
> Sensors asetusten osiossa.
Määritä sms ja/tai sähköposti-ilmoitukset Notications
asetusten osiossa.
7 Lisäresursseja
7A Nähdäksesi Aranet PRO Käyttöohjee ole hyvä ja käy sivulla
https://aranet.com/downloads/
7B Nähdäksesi Takuut ja palautukset ole hyvä ja käy sivulla
https://aranet.com/terms-and-conditions/
7C Om Retouren en Garanties te bekijken bezoek
https://aranet.com/returns-guarantees/
7D Täyttääksesi Palautustodistuslomake (RMA) ole hyvä ja käy
sivulla
https://aranet.com/rma/

Svenska
1Kontrollera innehållet i boxen
2 Fäst enheten på fästet
3 Anslut ström till enheten / Tillvalstillbehör för PoE
4Slå på enheten
5Anslut enheten
6 Kongurera enheten
Ändra ditt lösenord, kongurera och lägg till användare i
inställningssektion Users.
Ställ in enhetstid i inställningssektion System > Time.
Utför skanning av tillgängliga radiokanaler i inställningssektion
Sensors > Radio.
Utför parning av dina sensorer genom att trycka på knappen
Add Sensor i inställningssektion Sensors > Sensors.
Gå in i inställningssektion Notications för att kongurera
dina SMS och/eller e-post anmälningar.
7Ytterligare uppgifter
7A För att läsa Användarmanual av “Aranet PRO”, besök vänligen
https://aranet.com/downloads/
7B För att läsa “Regler och villkor”, besök vänligen
https://aranet.com/terms-and-conditions/
7C För att läsa “Returer och garantier”, besök vänligen
https://aranet.com/returns-guarantees/
7D För att fylla i RMA-formuläret, besök vänligen
https://aranet.com/rma/

Türk
1 Kutunun içindekileri kontrol edin
2 Cihazı dayanağına monte edin
3 Cihaza güç kaynağını bağlayın / PoE opsiyonel aksesuar
4 Cihazı açın
5 Cihaza bağlayın
6 Cihazı kongüre edin
Parolanızı değiştirin, Kullanıcılar ayarları bölümünde kullanıcı
ekleyin veya modiye edin.
Sistem cihaz zaman ayarını set edin > Zaman ayarı bölümü.
Sensörler radyo kanalının kullanılabilirliğini tara > Radyo
ayarları bölümü.
Sensörler Sensör Ekle düğmesine basarak sensörlerinizi
eşleştirin > Sensörler ayarları bölümü.
Sms ve / veya e-posta bildirimlerinizi yapılandırmak için
Bildirimler ayar bölümüne girin.
7Ek kaynaklar
7A Aranet PRO kullanım kılavuzunu görmek için lütfen ziyaret edin
https://aranet.com/downloads/
7B Şartları ve koşulları görmek için lütfen ziyaret edin
https://aranet.com/terms-and-conditions/
7C İade ve Garantileri görmek için lütfen ziyaret edin
https://aranet.com/returns-guarantees/
7D RMA formunu doldurmak için lütfen ziyaret edin
https://aranet.com/rma/


Copyright © 2019 SAF Tehnika, JSC. All rights reserved.
www.aranet.com
Table of contents
Languages: